child seat MERCEDES-BENZ SPRINTER 2012 MY12 Operator’s Manual
[x] Cancel search | Manufacturer: MERCEDES-BENZ, Model Year: 2012, Model line: SPRINTER, Model: MERCEDES-BENZ SPRINTER 2012Pages: 292, PDF Size: 6.75 MB
Page 45 of 292
R
Never place anything between the seat
cushion and child seat (e.g. pillow). The
bottom of the child seat must make full
contact with the vehicle seat cushion. An
incorrectly mounted child
seat could cause
injuries to the child in the event of an
accident, instead of protecting the child.
R Observe the manufacturer's instructions
when installing special child restraint
systems. G
Warning
Infants and
small children should never share
a seat belt with another occupant. During an
accident, they could
be crushed between the
occupant and seat belt.
A child's risk of serious or fatal injuries is
significantly increased if the child restraints
are not properly secured in the vehicle and/
or the child is not properly secured in the child
restraint.
Children too big for a toddler restraint must
ride in seats using regular seat belts. Position
the shoulder belt across the chest and
shoulder, not face or neck. A booster seat
may be necessary to achieve proper seat belt
positioning for children over 41 lb (18 kg) until
they reach a height where a lap/shoulder belt
fits properly without a booster.
When the child restraint is not in use, remove
it from the vehicle or secure it with the seat
belt to prevent the child restraint from
becoming a projectile in the event of an
accident.
Special seat belt retractor G
Warning
Observe "Important safety notes"
(Y
page 41).
All seat belts in the vehicle, except the
driver's seat belt,
are equipped with a special
seat belt retractor. When activated, the
special seat belt retractor ensures that the
seat belt cannot slacken once the child seat
is secured. Installing a child restraint system:
X
Always comply with the manufacturer's
installation instructions.
X Pull the seat belt smoothly from the inertia
reel.
X Engage the seat belt tongue in the belt
buckle.
Activating the special seat belt retractor:
X Pull the seat belt out fully and let the inertia
reel retract it again.
While the seat
belt is retracting, you should
hear a ratcheting sound. The special seat
belt retractor function is enabled.
X Push down on the child restraint system to
take up any slack.
Removing a child restraint system/
deactivating the special seat belt retractor:
X Always comply with the manufacturer's
installation instructions.
X Press the seat belt release button and
guide the belt tongue to the belt outlet.
The special seat belt retractor function is
deactivated. G
Warning
Never release the seat belt buckle while the
vehicle is in
motion, since the special seat belt
retractor will be deactivated.
LATCH-type (ISOFIX) child seat securing
system in the rear compartment G
Warning
Observe "Important safety notes"
(Y
page 41).
G
Warning
Children too big for a toddler restraint must
ride in seats
using regular seat belts. Position
the shoulder belt across the chest and
shoulder, not face or neck.
In order to attain the correct seating position
for children weighing over 41 lb (18 kg), it may
be necessary to use a booster seat until they
reach a height where a normal lap/shoulder Occupant safety
43
Safety
Z
Page 46 of 292
seat belt lies properly across their bodies
without the need for a booster seat.
Install the
child
restraint system according to
the manufacturer's instructions.
The child restraint system must be installed
firmly on both brackets.
An incorrectly installed child restraint system
can come loose in the event of an accident,
causing the child to be severely or fatally
injured.
Child restraint systems/child restraint
retaining brackets that are damaged or have
suffered damage due to an impact must be
replaced.
LATCH-type (ISOFIX) is a standardized
securing system for special child restraint
systems on the rear seats.
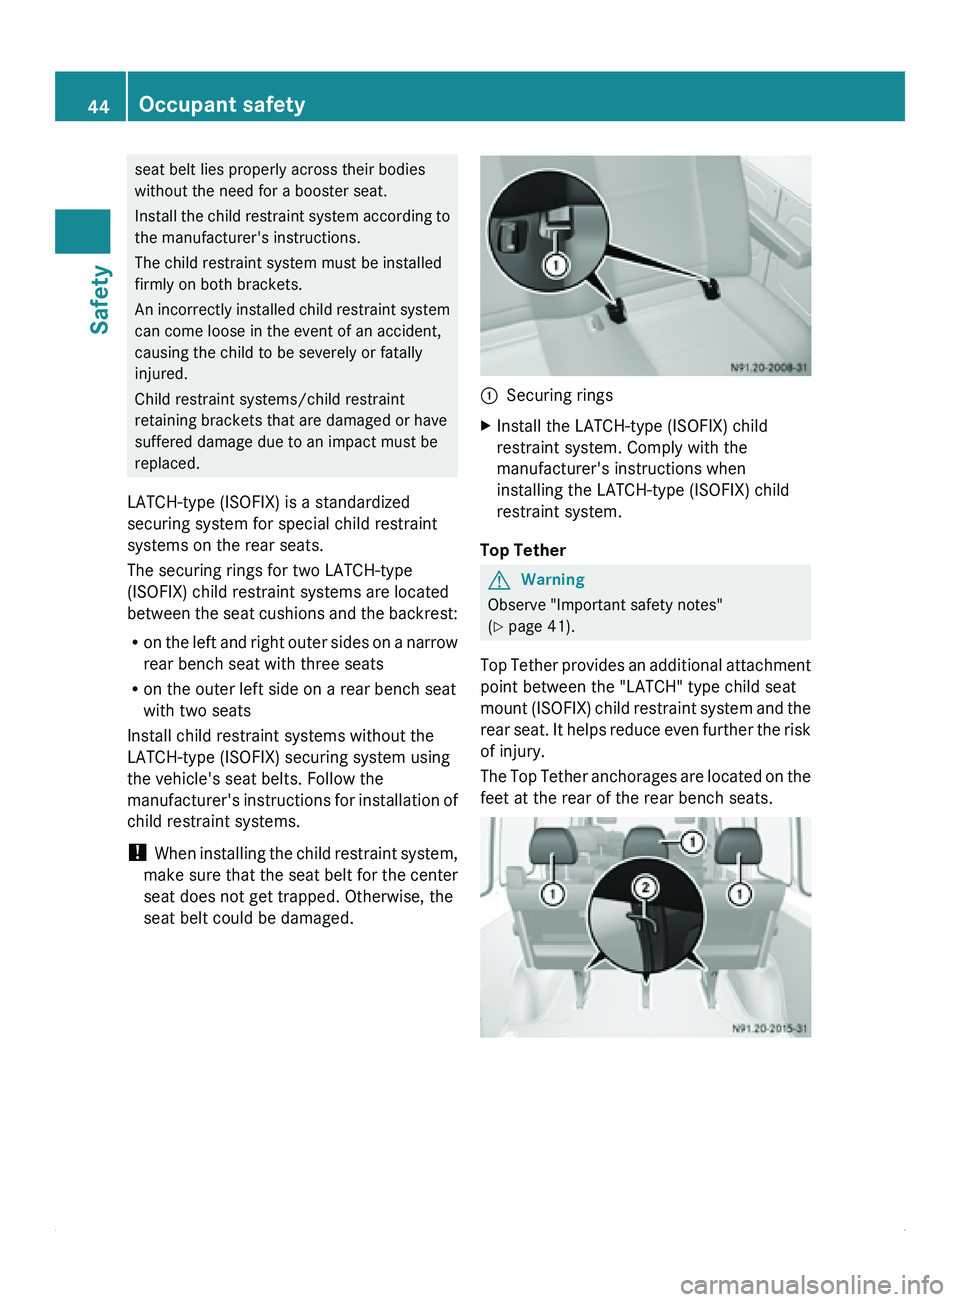
The securing rings for two LATCH-type
(ISOFIX) child restraint systems are located
between the seat cushions and the backrest:
R on the left and right outer sides on a narrow
rear bench seat with three seats
R on the outer left side on a rear bench seat
with two seats
Install child restraint systems without the
LATCH-type (ISOFIX) securing system using
the vehicle's seat belts. Follow the
manufacturer's instructions for installation of
child restraint systems.
! When installing the child restraint system,
make sure that the seat belt for the center
seat does not get trapped. Otherwise, the
seat belt could be damaged. 0046
Securing rings
X Install the LATCH-type (ISOFIX) child
restraint system. Comply with the
manufacturer's instructions when
installing the LATCH-type (ISOFIX) child
restraint system.
Top Tether G
Warning
Observe "Important safety notes"
(Y
page 41).
Top Tether provides
an additional attachment
point between the "LATCH" type child seat
mount (ISOFIX) child restraint system and the
rear seat. It helps reduce even further the risk
of injury.
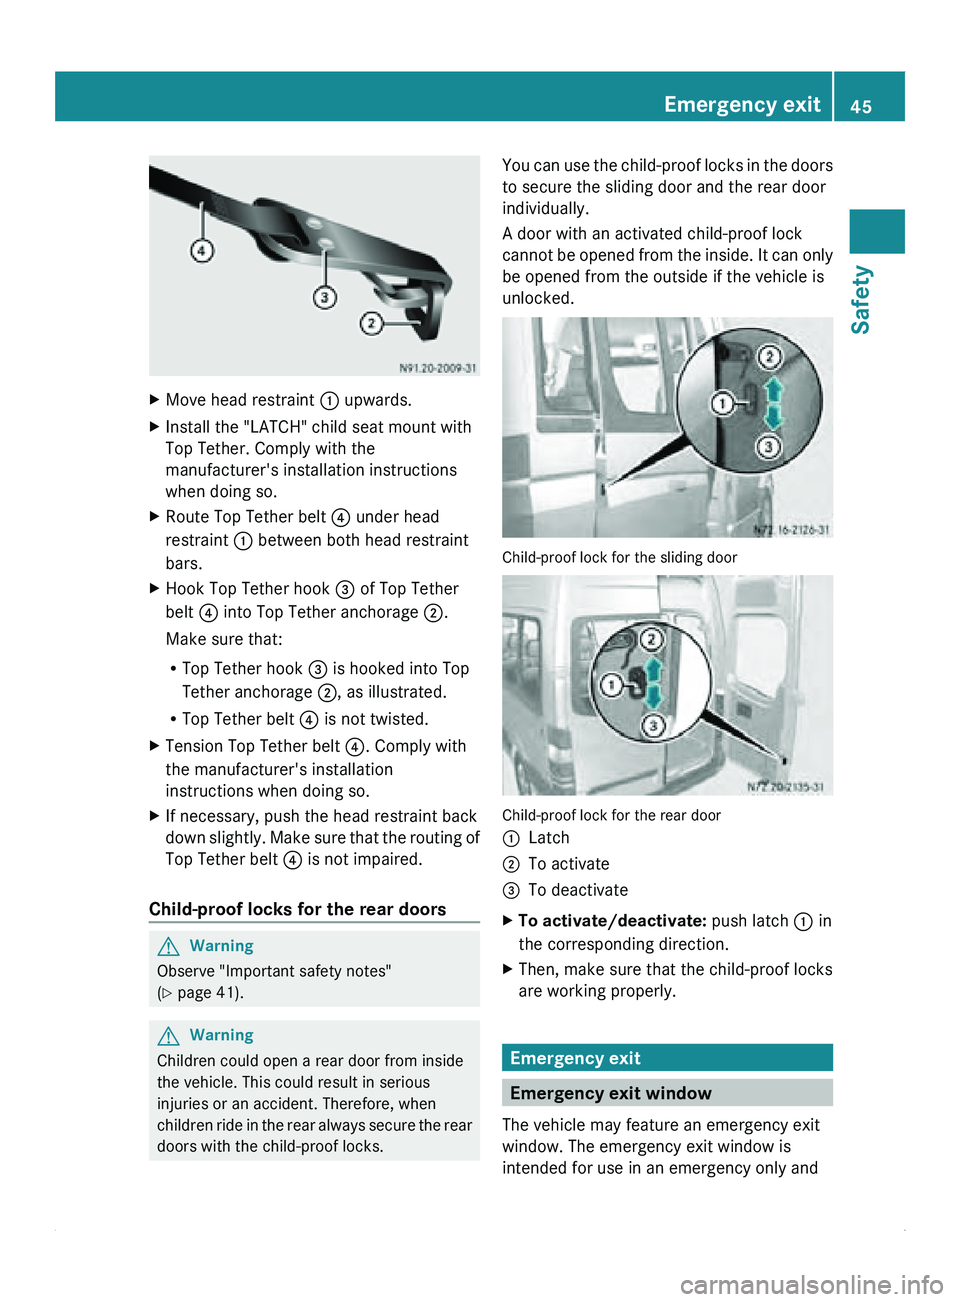
The Top Tether anchorages are located on the
feet at the rear of the rear bench seats. 44
Occupant safety
Safety
Page 47 of 292
X
Move head restraint 0046 upwards.
X Install the "LATCH" child seat mount with
Top Tether. Comply with the
manufacturer's installation instructions
when doing so.
X Route Top Tether belt 0088 under head
restraint 0046 between both head restraint
bars.
X Hook Top Tether hook 008A of Top Tether
belt 0088 into Top Tether anchorage
0047.
Make sure that:
R Top Tether hook 008A is hooked into Top
Tether anchorage 0047
, as illustrated.
R Top Tether belt 0088 is not twisted.
X Tension Top Tether belt 0088
. Comply with
the manufacturer's installation
instructions when doing so.
X If necessary, push the head restraint back
down slightly. Make sure that the routing of
Top Tether belt 0088 is not impaired.
Child-proof locks for the rear doors G
Warning
Observe "Important safety notes"
(Y page 41). G
Warning
Children could open a rear door from inside
the vehicle. This could result in serious
injuries or an accident. Therefore, when
children ride in the rear always secure the rear
doors with the child-proof locks. You can use the child-proof locks in the doors
to secure the sliding door and the rear door
individually.
A door with an activated child-proof lock
cannot be opened from the inside. It can only
be opened from the outside if the vehicle is
unlocked.
Child-proof lock for the sliding door
Child-proof lock for the rear door
0046
Latch
0047 To activate
008A To deactivate
X To activate/deactivate: push latch 0046 in
the corresponding direction.
X Then, make sure that the child-proof locks
are working properly. Emergency exit
Emergency exit window
The vehicle may feature an emergency exit
window. The emergency exit window is
intended for use in an emergency only and Emergency exit
45
Safety Z
Page 48 of 292
must not be opened unless the vehicle is
stationary.
In an emergency, or after an accident, the
vehicle occupants can exit the vehicle
through the emergency exit window.
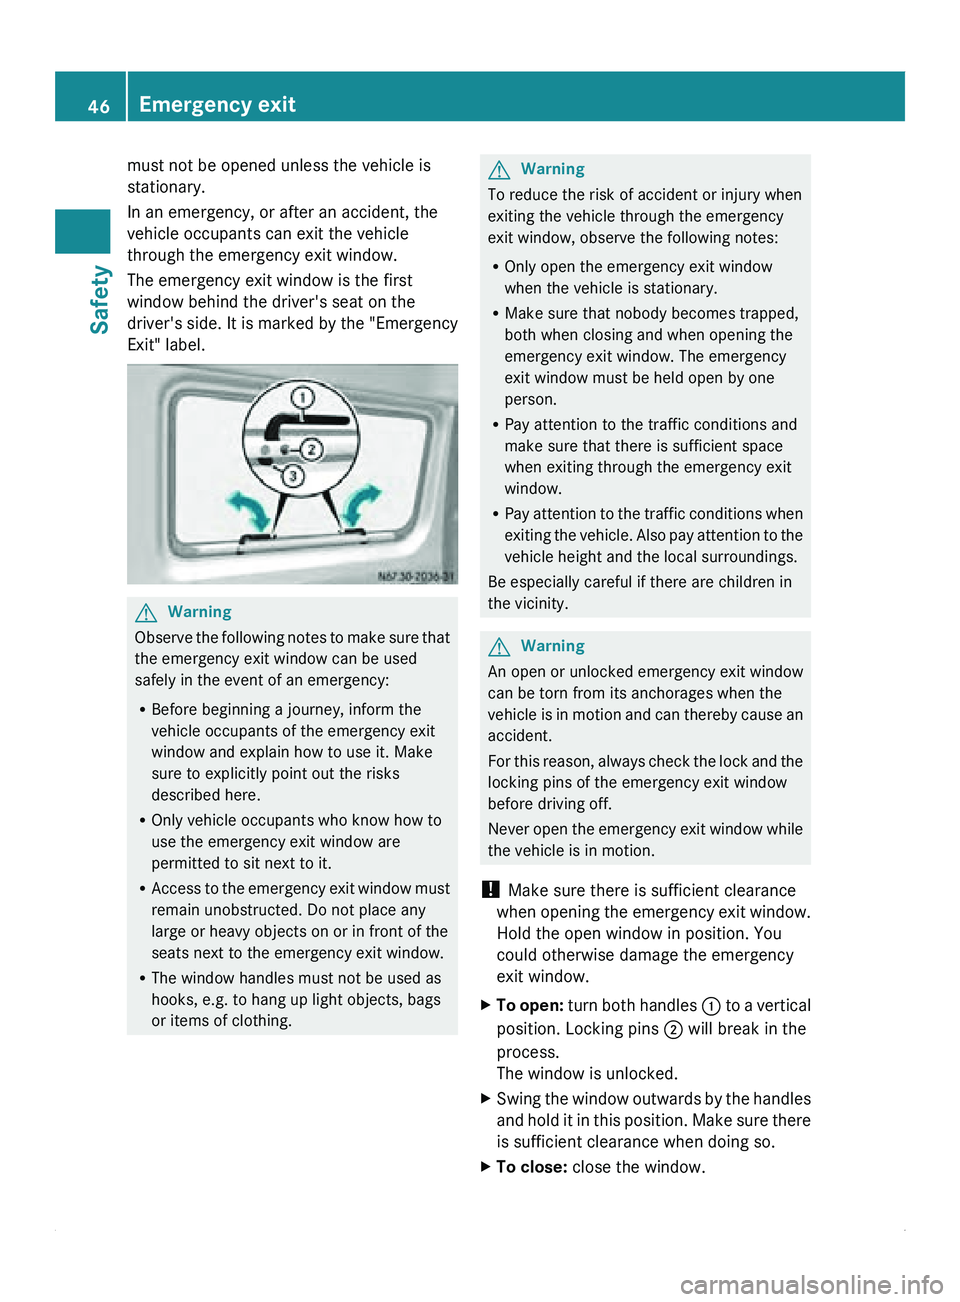
The emergency exit window is the first
window behind the driver's seat on the
driver's side.
It
is marked by the "Emergency
Exit" label. G
Warning
Observe the following notes to make sure that
the emergency exit window can be used
safely in the event of an emergency:
R Before beginning a journey, inform the
vehicle occupants of the emergency exit
window and explain how to use it. Make
sure to explicitly point out the risks
described here.
R Only vehicle occupants who know how to
use the emergency exit window are
permitted to sit next to it.
R Access to the
emergency exit window must
remain unobstructed. Do not place any
large or heavy objects on or in front of the
seats next to the emergency exit window.
R The window handles must not be used as
hooks, e.g. to hang up light objects, bags
or items of clothing. G
Warning
To reduce the risk of accident or injury when
exiting the vehicle through the emergency
exit window, observe the following notes:
R Only open the emergency exit window
when the vehicle is stationary.
R Make sure that nobody becomes trapped,
both when closing and when opening the
emergency exit window. The emergency
exit window must be held open by one
person.
R Pay attention to the traffic conditions and
make sure that there is sufficient space
when exiting through the emergency exit
window.
R Pay attention to
the traffic conditions when
exiting the vehicle. Also pay attention to the
vehicle height and the local surroundings.
Be especially careful if there are children in
the vicinity. G
Warning
An open or unlocked emergency exit window
can be torn from its anchorages when the
vehicle is in
motion and can thereby cause an
accident.
For this reason, always check the lock and the
locking pins of the emergency exit window
before driving off.
Never open the emergency exit window while
the vehicle is in motion.
! Make sure there is sufficient clearance
when opening the emergency exit window.
Hold the open window in position. You
could otherwise damage the emergency
exit window.
X To open: turn both handles 0046
to a vertical
position. Locking pins 0047 will break in the
process.
The window is unlocked.
X Swing the window outwards by the handles
and hold
it
in this position. Make sure there
is sufficient clearance when doing so.
X To close: close the window.46
Emergency exit
Safety
Page 71 of 292
The three red indicator lamps in button 0046
show the activated heating level
1 to 3.
The system automatically switches down
from level 3
to level 2 after approximately five
minutes.
The system automatically switches down
from level 2 to level 1 after approximately ten
minutes.
! When you leave your seat, do not place
anything on the seat and switch off the seat
heating. Do not switch the seat heating on
when the seat is not occupied, e.g. when
driving without a co-driver. The seat
heating may otherwise overheat, causing
damage to the seat.
At level 1, the seat heating remains in
continuous operation.
X To switch on: make sure
that the key is in
position 1 in the ignition lock.
X Press button 0046 repeatedly until the
desired heating level is set.
X To switch off: press button 0046 repeatedly
until all indicator lamps go out. Steering wheel
G
Warning
Only adjust the steering wheel when the
vehicle is stationary. Only drive with the
steering wheel locked in position.
An incorrectly secured steering wheel could
make it more difficult to steer the vehicle
safely since the steering wheel could move
unexpectedly when turned. This could result
in you losing control of the vehicle and
causing an accident, thereby endangering
yourself and others. G
Warning
Never leave children unsupervised in the
vehicle. They could
become trapped if they try
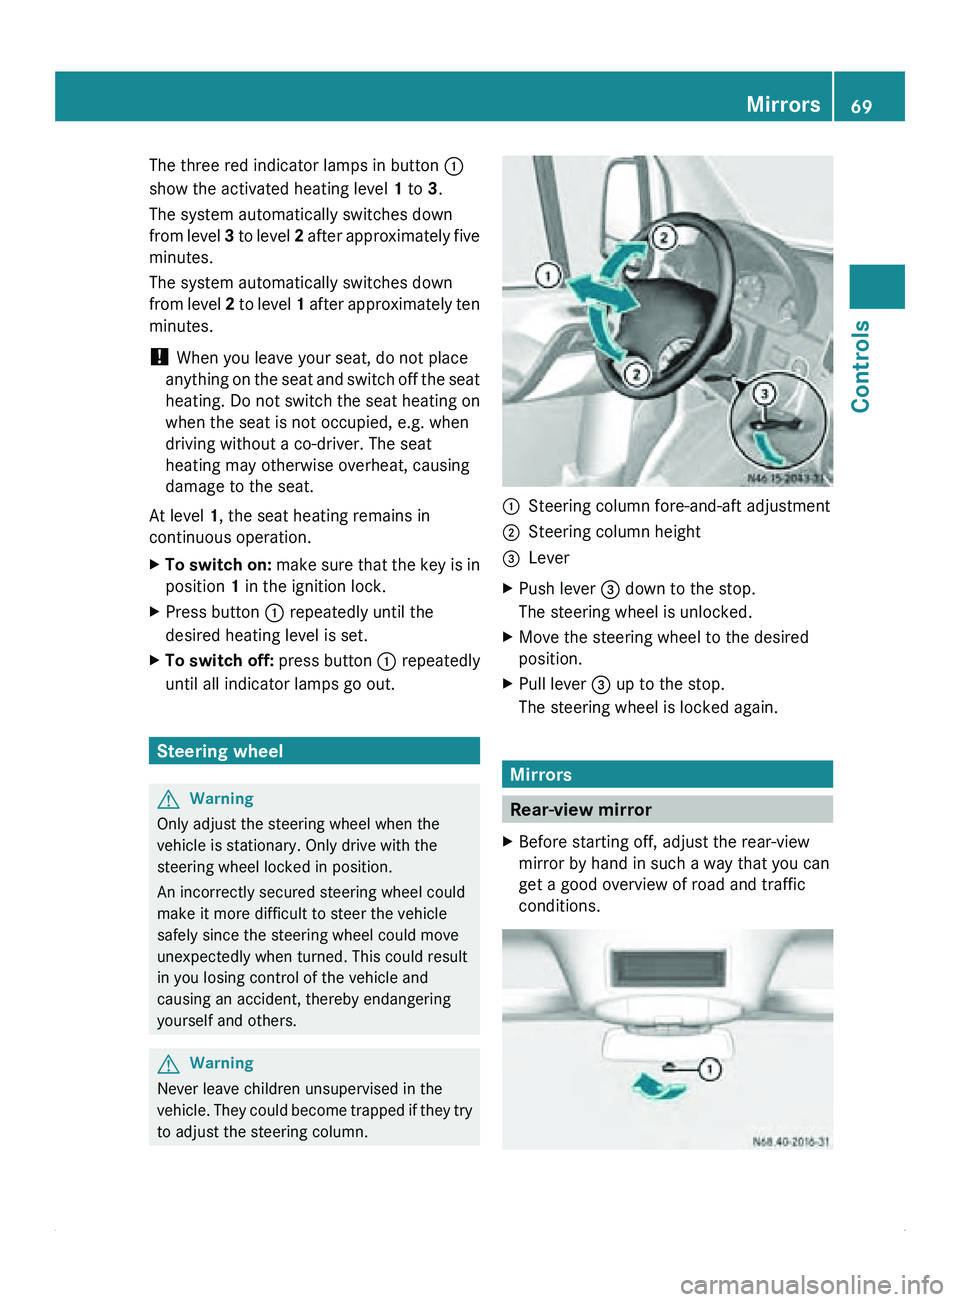
to adjust the steering column. 0046
Steering column fore-and-aft adjustment
0047 Steering column height
008A Lever
X Push lever 008A down to the stop.
The steering wheel is unlocked.
X Move the steering wheel to the desired
position.
X Pull lever 008A up to the stop.
The steering wheel is locked again. Mirrors
Rear-view mirror
X Before starting off, adjust the rear-view
mirror by hand in such a way that you can
get a good overview of road and traffic
conditions. Mirrors
69
Controls Z
Page 247 of 292
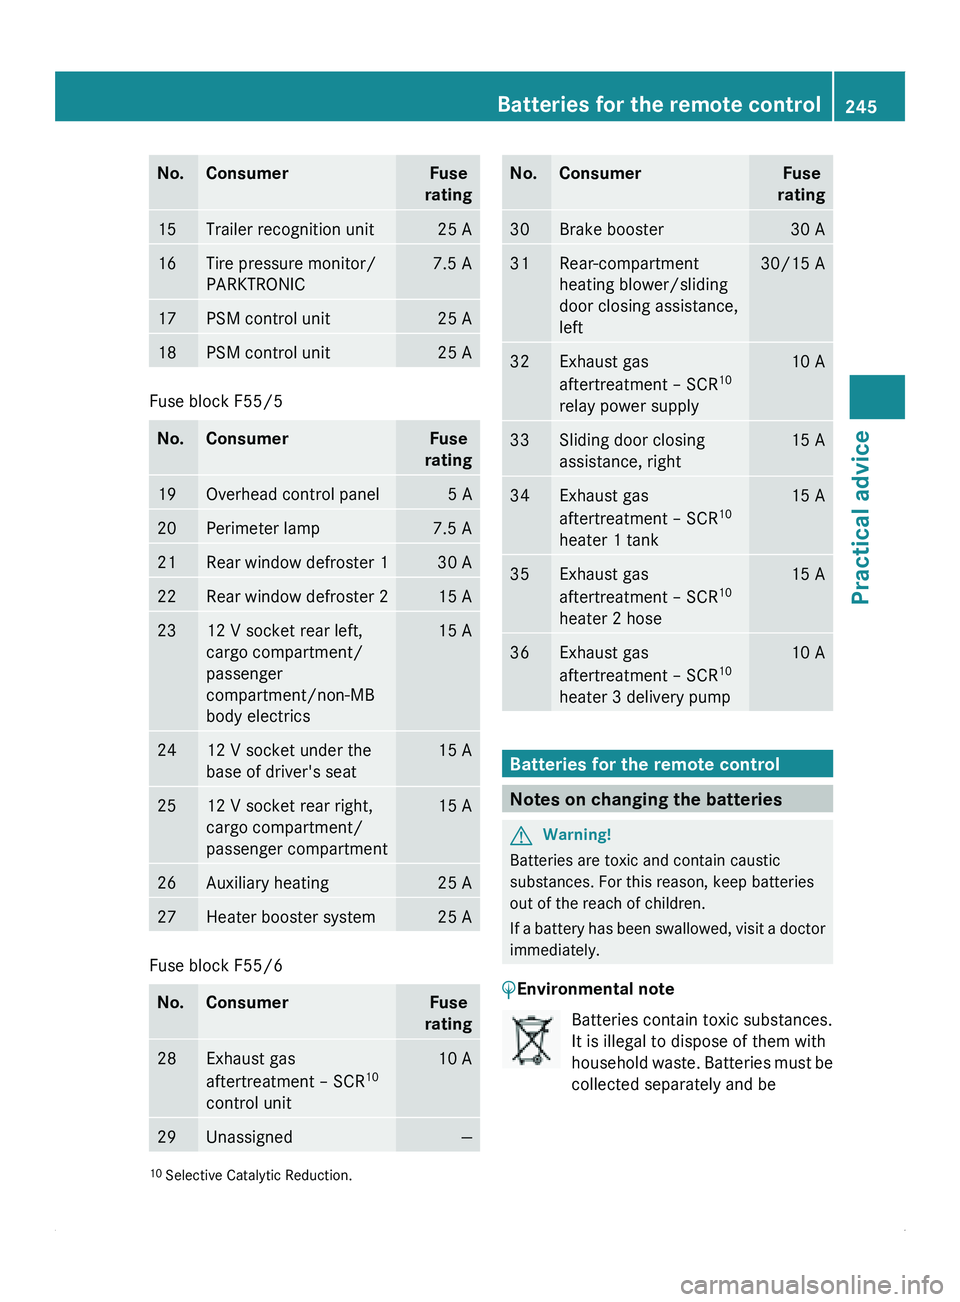
No. Consumer Fuse
rating 15 Trailer recognition unit 25 A
16 Tire pressure monitor/
PARKTRONIC 7.5 A
17 PSM control unit 25 A
18 PSM control unit 25 A
Fuse block F55/5
No. Consumer Fuse
rating 19 Overhead control panel 5 A
20 Perimeter lamp 7.5 A
21 Rear window defroster 1 30 A
22 Rear window defroster 2 15 A
23 12 V socket rear left,
cargo compartment/
passenger
compartment/non-MB
body electrics 15 A
24 12 V socket under the
base of driver's seat 15 A
25 12 V socket rear right,
cargo compartment/
passenger compartment 15 A
26 Auxiliary heating 25 A
27 Heater booster system 25 A
Fuse block F55/6
No. Consumer Fuse
rating 28 Exhaust gas
aftertreatment – SCR
10
control unit 10 A
29 Unassigned — No. Consumer Fuse
rating 30 Brake booster 30 A
31 Rear-compartment
heating blower/sliding
door closing assistance,
left 30/15 A
32 Exhaust gas
aftertreatment – SCR
10
relay power supply 10 A
33 Sliding door closing
assistance, right 15 A
34 Exhaust gas
aftertreatment – SCR
10
heater 1 tank 15 A
35 Exhaust gas
aftertreatment – SCR
10
heater 2 hose 15 A
36 Exhaust gas
aftertreatment – SCR
10
heater 3 delivery pump 10 A
Batteries for the remote control
Notes on changing the batteries
G
Warning!
Batteries are toxic and contain caustic
substances. For this reason, keep batteries
out of the reach of children.
If a battery
has been swallowed, visit a doctor
immediately.
0040Environmental note Batteries contain toxic substances.
It is illegal to dispose of them with
household
waste. Batteries
must be
collected separately and be
10 Selective Catalytic Reduction. Batteries for the remote control
245
Practical advice Z