heating MERCEDES-BENZ SPRINTER 2012 MY12 Operator’s Manual
[x] Cancel search | Manufacturer: MERCEDES-BENZ, Model Year: 2012, Model line: SPRINTER, Model: MERCEDES-BENZ SPRINTER 2012Pages: 292, PDF Size: 6.75 MB
Page 30 of 292
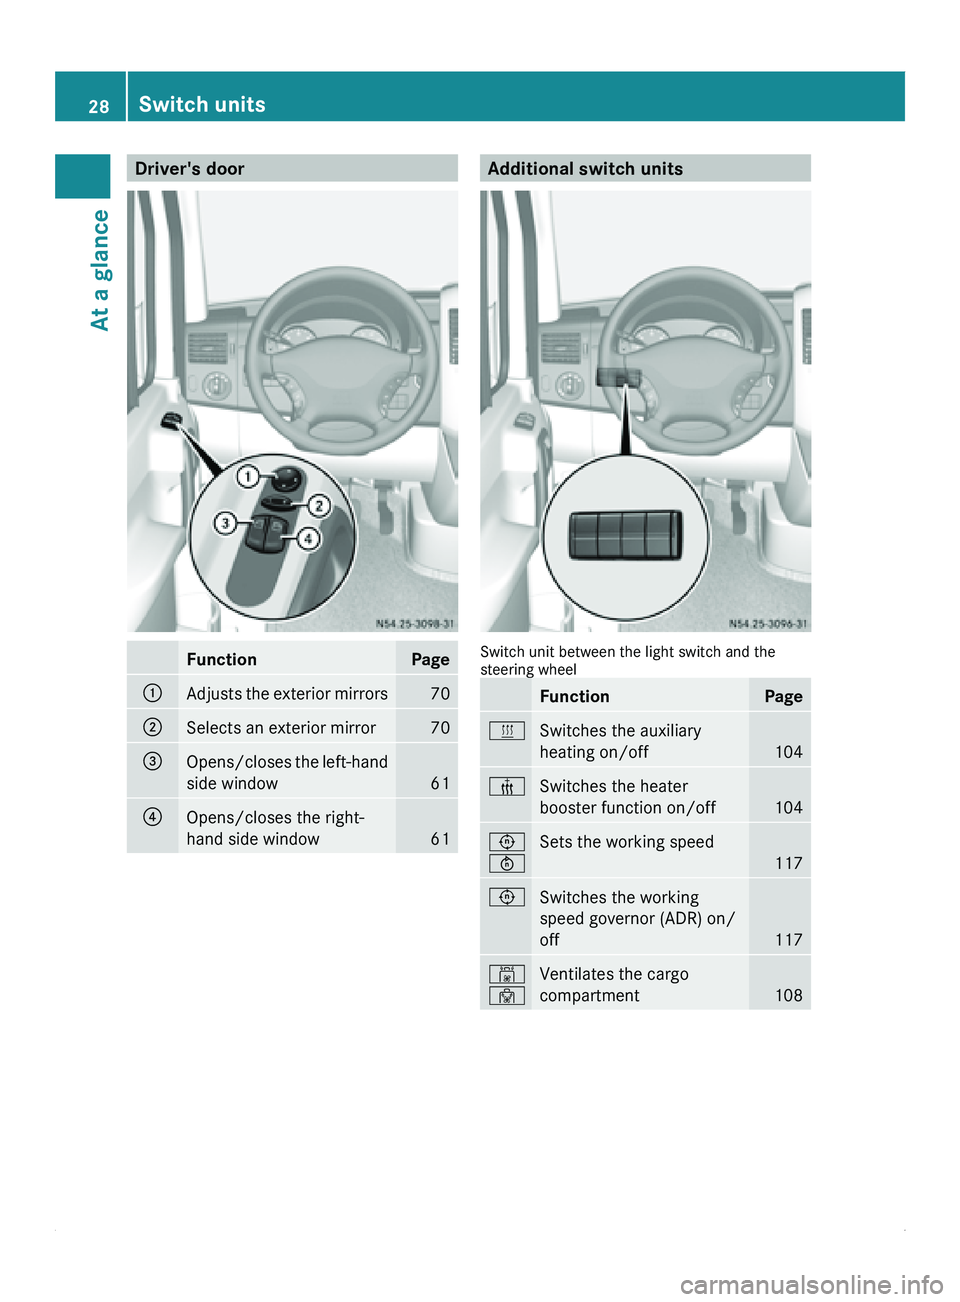
Driver's door
Function Page
0046
Adjusts the exterior mirrors 70
0047
Selects an exterior mirror 70
008A
Opens/closes the left-hand
side window 61
0088
Opens/closes the right-
hand side window
61 Additional switch units
Switch unit between the light switch and the
steering wheel
Function Page
0086
Switches the auxiliary
heating on/off
104
00B7
Switches the heater
booster function on/off
104
0093
0094
Sets the working speed
117
0093
Switches the working
speed governor (ADR) on/
off
117
00B4
00B3
Ventilates the cargo
compartment
10828
Switch units
At a glance
Page 51 of 292
G
Warning
Never switch off ASR when you see the
0067 warning lamp
flashing in the instrument
cluster. In this case proceed as follows:
R when driving off, apply as little throttle as
possible.
R while driving, ease off the accelerator
pedal.
R adapt your speed and driving style to the
prevailing road conditions.
Failure to observe these guidelines could
cause the vehicle to skid. ESP ®
cannot
prevent accidents resulting from excessive
speed.
If, taking tires, cargo load and gradient into
consideration, the surface driven on still
provides insufficient traction, you may
experience difficulties in pulling away despite
ASR.
Vehicles without steering-wheel buttons:
the 003D indicator lamp in the instrument
cluster lights up when you switch on the
ignition. It goes out when the engine is
running.
Activating/deactivating ASR G
Warning
ASR should
not be switched off during normal
driving other than in the circumstances
described below. Deactivating
the system will
reduce vehicle stability in driving maneuvers.
Do not switch off ASR when a spare wheel is
mounted.
ASR is activated automatically when the
engine is running.
It may be best to deactivate ASR briefly in the
following situations:
R when using snow chains
R in deep snow
R on sand or gravel If you deactivate ASR:
R
the engine's torque
is no longer limited and
the drive wheels can spin. The spinning of
the wheels results in a cutting action, which
provides better grip.
R brake intervention will continue to improve
traction where a drive wheel begins to spin,
e.g. if only the side of the road is slippery.
The wheel will be braked to increase
traction under such circumstances.
R active brake intervention by ESP ®
to
increase driving stability remains active. G
Warning
Even with ASR deactivated, ESP ®
remains
active and continues to perform brake
interventions where this is necessary to
improve driving stability. The 0067 warning
lamp flashes.
With ASR deactivated, there is an increased
risk of your vehicle's brake system
overheating and suffering damage due to
prolonged application. A
hot brake system will
also result in increased stopping distance.
Therefore, only deactivate ASR when
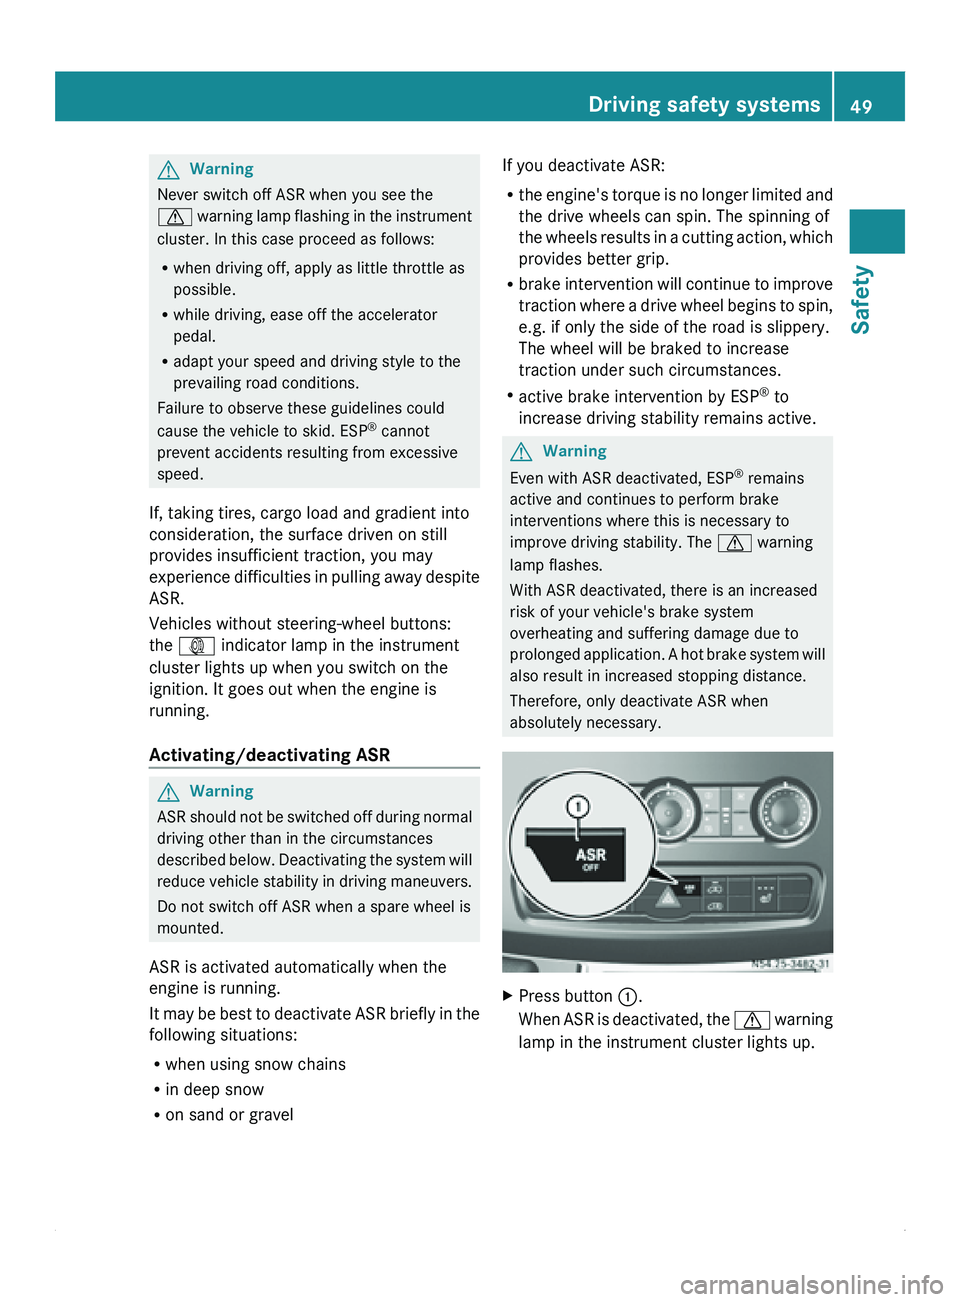
absolutely necessary. X
Press button 0046
.
When ASR is
deactivated, the 0067 warning
lamp in the instrument cluster lights up. Driving safety systems
49
Safety Z
Page 64 of 292
X
To arm: close all doors.
X Lock the vehicle using the 0037 button on
the key.
The indicator lamp in the upper central
locking button ( Y
page 55) flashes.
X To deactivate: unlock the
vehicle using the
0036 button on the remote control.
The indicator lamp in the upper central
locking button (Y page 55) goes out.
i Cargo van and passenger van only:
Unless you open
a door within 40 seconds
after unlocking the vehicle:
R the vehicle will be locked again.
R the anti-theft alarm system will be re-
armed.
i The alarm system will be triggered if the
vehicle was previously locked with the key
and is then unlocked from the inside.
X To stop the alarm: insert the key into the
ignition lock.
or
X Press the 0036 button on the remote
control.
The alarm is switched off. Tow-away alarm
A visual and audible alarm is triggered if the
inclination of the vehicle changes when tow-
away protection is armed.
i The alarm signal
is triggered, for example
if the vehicle is being jacked up on one side,
shortly before the wheel leaves the ground.
Tow-away protection is automatically armed
approximately 20 seconds after you lock the
vehicle.
Tow-away protection is automatically
deactivated when you unlock the vehicle.
Deactivate tow-away protection if the vehicle
is being transported or loaded onto another
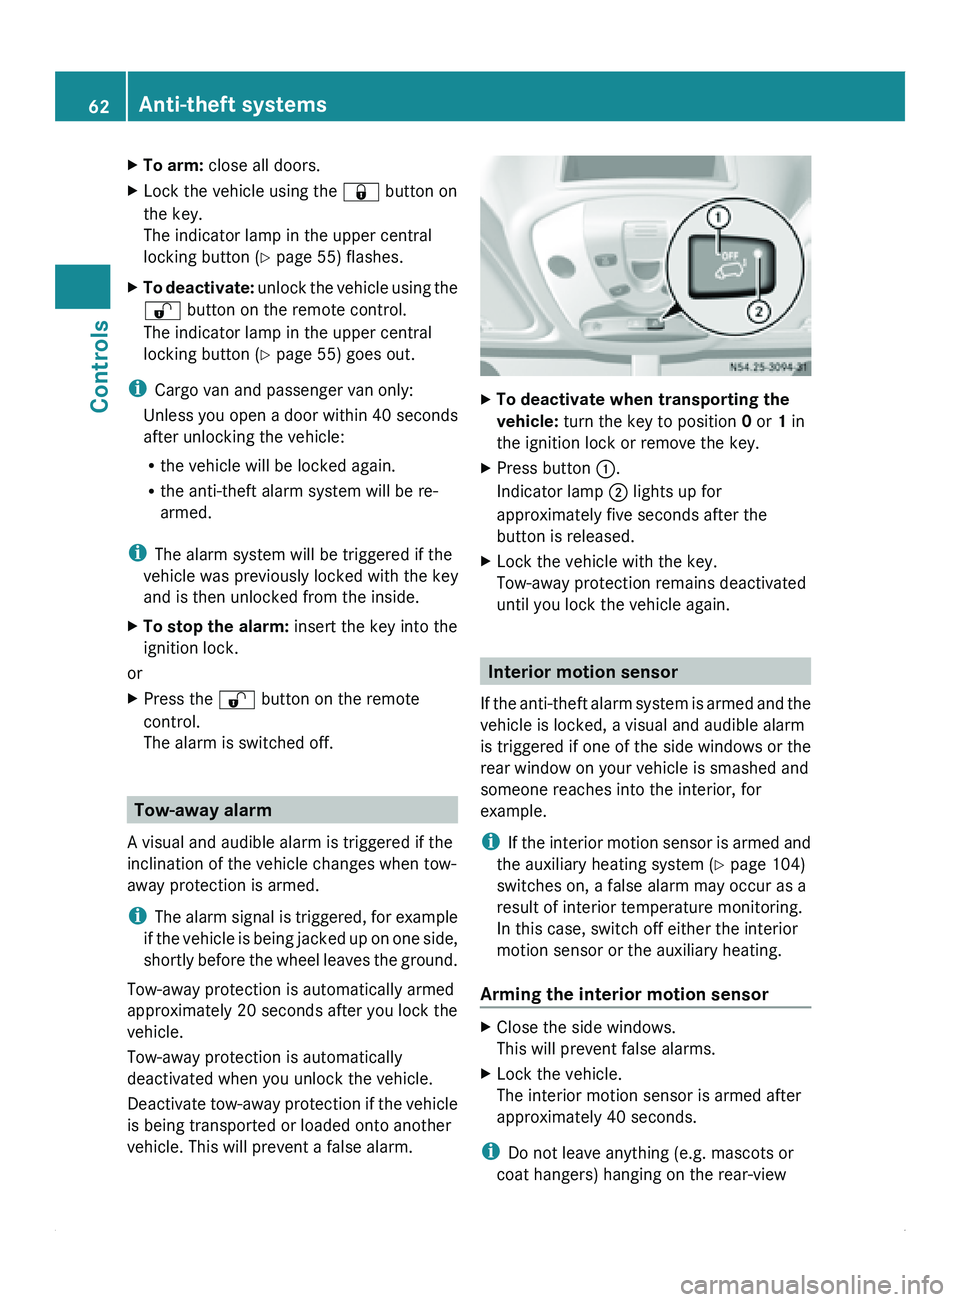
vehicle. This will prevent a false alarm. X
To deactivate when transporting the
vehicle: turn the key to position 0 or 1 in
the ignition lock or remove the key.
X Press button 0046.
Indicator lamp 0047 lights up for
approximately five seconds after the
button is released.
X Lock the vehicle with the key.
Tow-away protection remains deactivated
until you lock the vehicle again. Interior motion sensor
If the anti-theft
alarm system is armed and the
vehicle is locked, a visual and audible alarm
is triggered if one of the side windows or the
rear window on your vehicle is smashed and
someone reaches into the interior, for
example.
i If the interior motion sensor is armed and
the auxiliary heating system (Y page 104)
switches on, a false alarm may occur as a
result of interior temperature monitoring.
In this case, switch off either the interior
motion sensor or the auxiliary heating.
Arming the interior motion sensor X
Close the side windows.
This will prevent false alarms.
X Lock the vehicle.
The interior motion sensor is armed after
approximately 40 seconds.
i Do not leave anything (e.g. mascots or
coat hangers) hanging on the rear-view 62
Anti-theft systems
Controls
Page 70 of 292
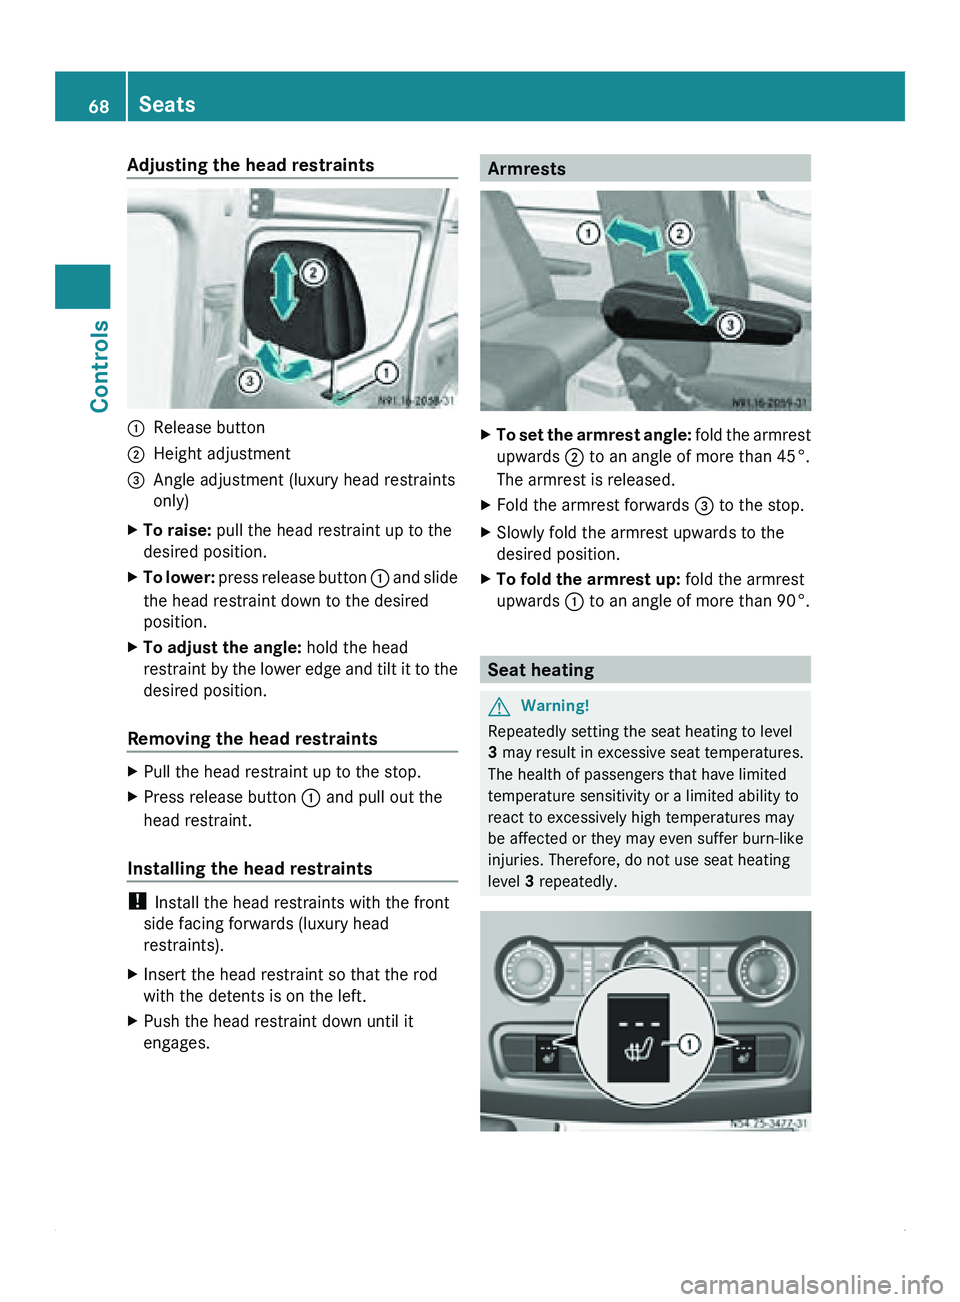
Adjusting the head restraints
0046
Release button
0047 Height adjustment
008A Angle adjustment (luxury head restraints
only)
X To raise: pull the head restraint up to the
desired position.
X To lower: press release button
0046 and slide
the head restraint down to the desired
position.
X To adjust the angle: hold the head
restraint by the
lower edge and tilt it to the
desired position.
Removing the head restraints X
Pull the head restraint up to the stop.
X Press release button 0046 and pull out the
head restraint.
Installing the head restraints !
Install the head restraints with the front
side facing forwards (luxury head
restraints).
X Insert the head restraint so that the rod
with the detents is on the left.
X Push the head restraint down until it
engages. Armrests
X
To set the armrest angle: fold the
armrest
upwards 0047 to an angle of more than 45°.
The armrest is released.
X Fold the armrest forwards 008A to the stop.
X Slowly fold the armrest upwards to the
desired position.
X To fold the armrest up: fold the armrest
upwards 0046 to an angle of more than 90°. Seat heating
G
Warning!
Repeatedly setting the seat heating to level
3 may result in excessive seat temperatures.
The health of passengers that have limited
temperature sensitivity or a limited ability to
react to excessively high temperatures may
be affected or they may even suffer burn-like
injuries. Therefore, do not use seat heating
level 3 repeatedly.68
Seats
Controls
Page 71 of 292
The three red indicator lamps in button 0046
show the activated heating level
1 to 3.
The system automatically switches down
from level 3
to level 2 after approximately five
minutes.
The system automatically switches down
from level 2 to level 1 after approximately ten
minutes.
! When you leave your seat, do not place
anything on the seat and switch off the seat
heating. Do not switch the seat heating on
when the seat is not occupied, e.g. when
driving without a co-driver. The seat
heating may otherwise overheat, causing
damage to the seat.
At level 1, the seat heating remains in
continuous operation.
X To switch on: make sure
that the key is in
position 1 in the ignition lock.
X Press button 0046 repeatedly until the
desired heating level is set.
X To switch off: press button 0046 repeatedly
until all indicator lamps go out. Steering wheel
G
Warning
Only adjust the steering wheel when the
vehicle is stationary. Only drive with the
steering wheel locked in position.
An incorrectly secured steering wheel could
make it more difficult to steer the vehicle
safely since the steering wheel could move
unexpectedly when turned. This could result
in you losing control of the vehicle and
causing an accident, thereby endangering
yourself and others. G
Warning
Never leave children unsupervised in the
vehicle. They could
become trapped if they try
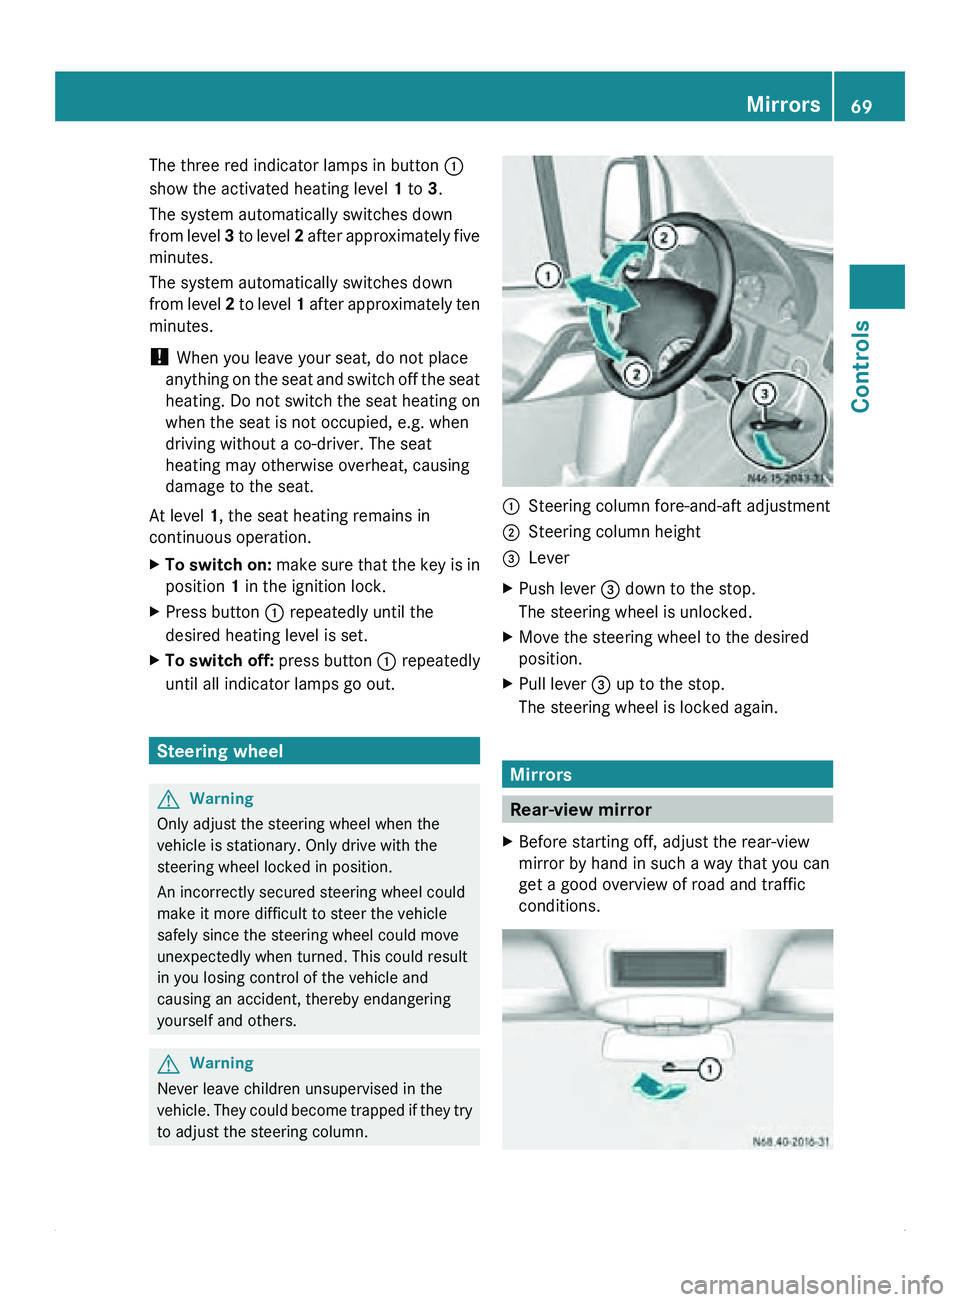
to adjust the steering column. 0046
Steering column fore-and-aft adjustment
0047 Steering column height
008A Lever
X Push lever 008A down to the stop.
The steering wheel is unlocked.
X Move the steering wheel to the desired
position.
X Pull lever 008A up to the stop.
The steering wheel is locked again. Mirrors
Rear-view mirror
X Before starting off, adjust the rear-view
mirror by hand in such a way that you can
get a good overview of road and traffic
conditions. Mirrors
69
Controls Z
Page 75 of 292
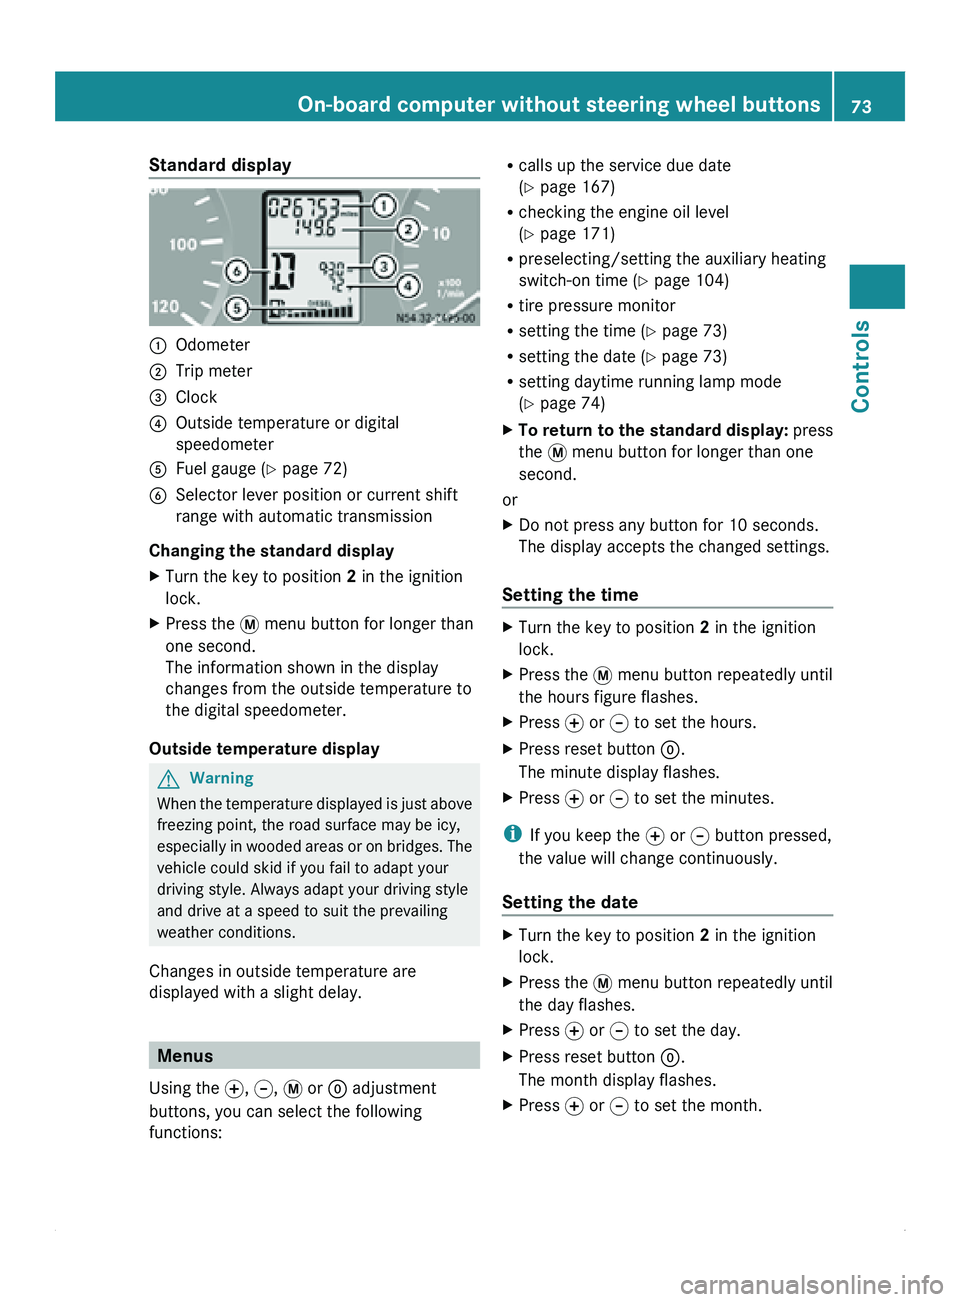
Standard display
0046
Odometer
0047 Trip meter
008A Clock
0088 Outside temperature or digital
speedometer
0086 Fuel gauge ( Y page 72)
0087 Selector lever position or current shift
range with automatic transmission
Changing the standard display
X Turn the key to position 2 in the ignition
lock.
X Press the 007B menu button for longer than
one second.
The information shown in the display
changes from the outside temperature to
the digital speedometer.
Outside temperature display G
Warning
When the temperature displayed is just above
freezing point, the road surface may be icy,
especially in wooded
areas or on bridges. The
vehicle could skid if you fail to adapt your
driving style. Always adapt your driving style
and drive at a speed to suit the prevailing
weather conditions.
Changes in outside temperature are
displayed with a slight delay. Menus
Using the 0069, 006A, 007B or 0048 adjustment
buttons, you can select the following
functions: R
calls up the service due date
(Y page 167)
R checking the engine oil level
(Y page 171)
R preselecting/setting the auxiliary heating
switch-on time ( Y page 104)
R tire pressure monitor
R setting the time (Y
page 73)
R setting the date ( Y page 73)
R setting daytime running lamp mode
(Y page 74)
X To return to the standard display: press
the 007B menu button for longer than one
second.
or
X Do not press any button for 10 seconds.
The display accepts the changed settings.
Setting the time X
Turn the key to position 2 in the ignition
lock.
X Press the 007B menu button repeatedly until
the hours figure flashes.
X Press 0069 or 006A to set the hours.
X Press reset button 0048.
The minute display flashes.
X Press 0069 or 006A to set the minutes.
i If you keep the 0069 or 006A button pressed,
the value will change continuously.
Setting the date X
Turn the key to position 2 in the ignition
lock.
X Press the 007B menu button repeatedly until
the day flashes.
X Press 0069 or 006A to set the day.
X Press reset button 0048.
The month display flashes.
X Press 0069 or 006A to set the month. On-board computer without steering wheel buttons
73
Controls Z
Page 82 of 292
R
Lighting (Y page 82)
-Activating/deactivating daytime running
lamp
mode and surround lighting (locator
lighting)
- Setting the exterior lighting delayed
switch-off
R Vehicle ( Y page 84)
- Setting the radio station selection
- Setting the windshield wiper sensitivity
R Auxiliary heating( Y page 104)
R Convenience(Y page 85)
-Key-dependent settings
Instrument cluster submenu Selecting the unit for temperature
Using the steering wheel buttons
X
Press the 0059 or 0058 button repeatedly
until the Settings menu appears in the
display.
X Press 0029 to switch to the submenu
selection.
X Press 005A or 005B button to select the
Inst. cluster submenu.
X Press 0029 to select the Temperat.
function.
The selection marker is on the current
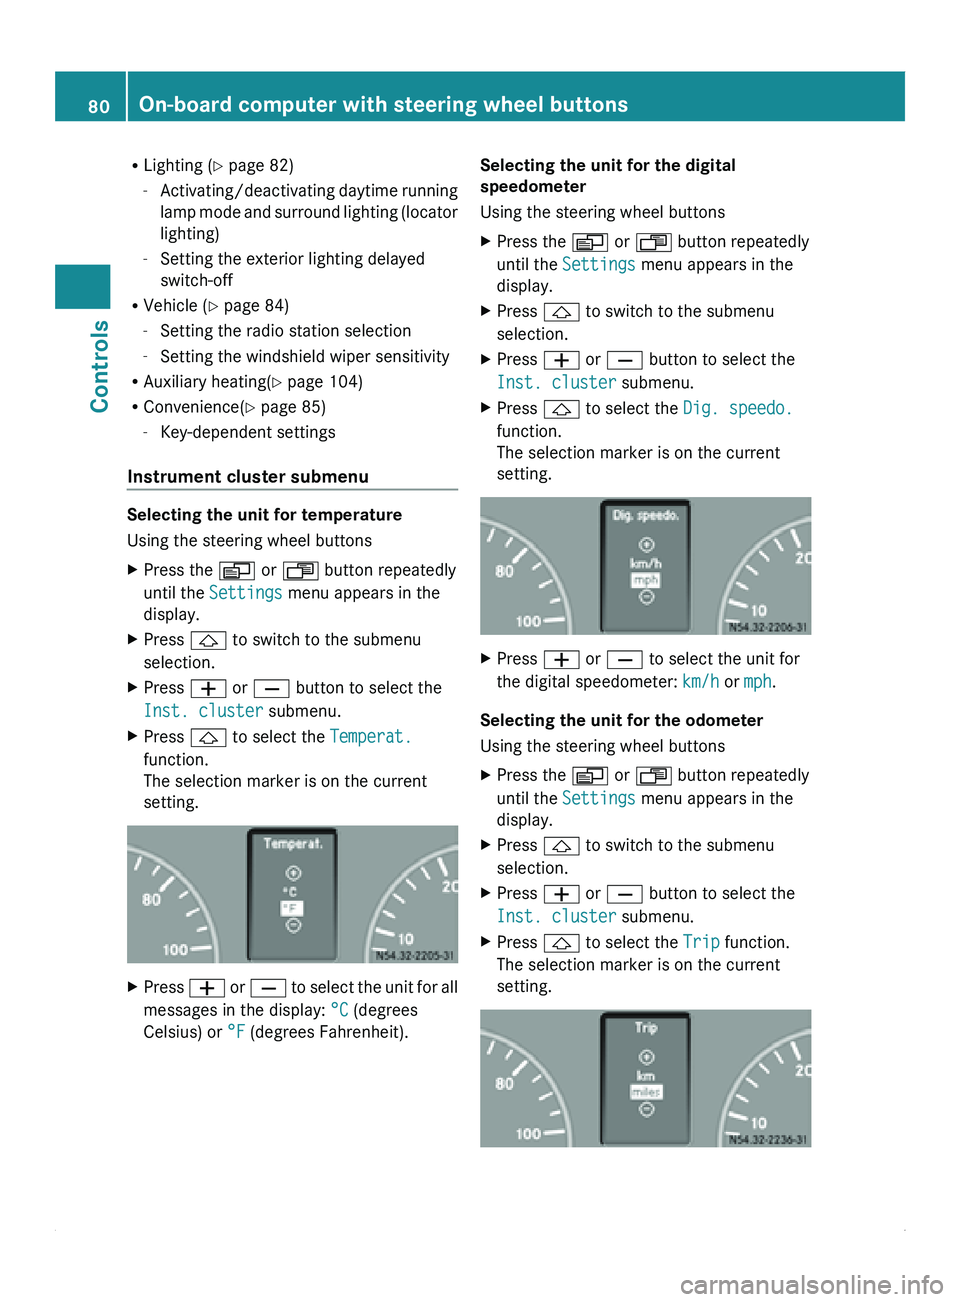
setting. X
Press 005A or 005B
to select the unit for all
messages in the display: °C (degrees
Celsius) or °F (degrees Fahrenheit). Selecting the unit for the digital
speedometer
Using the steering wheel buttons
X
Press the 0059 or 0058 button repeatedly
until the Settings menu appears in the
display.
X Press 0029 to switch to the submenu
selection.
X Press 005A or 005B button to select the
Inst. cluster submenu.
X Press 0029 to select the Dig. speedo.
function.
The selection marker is on the current
setting. X
Press 005A or 005B to select the unit for
the digital speedometer: km/h or mph.
Selecting the unit for the odometer
Using the steering wheel buttons
X Press the 0059 or 0058 button repeatedly
until the Settings menu appears in the
display.
X Press 0029 to switch to the submenu
selection.
X Press 005A or 005B button to select the
Inst. cluster submenu.
X Press 0029 to select the Trip function.
The selection marker is on the current
setting. 80
On-board computer with steering wheel buttons
Controls
Page 97 of 292
i
Use washer fluid
to wipe the rear window
even when it is raining. This prevents the
rear window from smearing. Windshield washer system
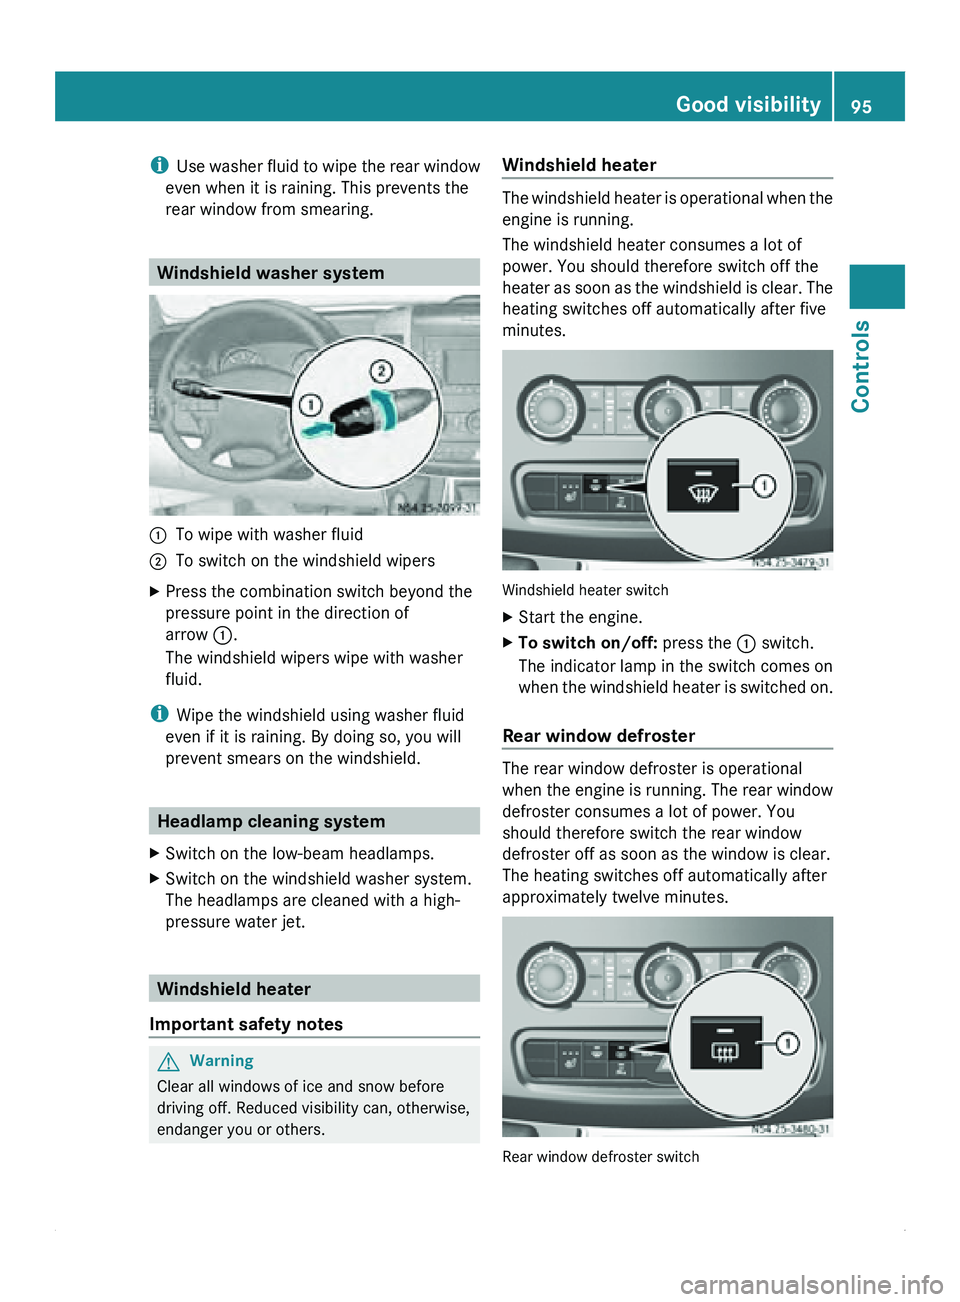
0046
To wipe with washer fluid
0047 To switch on the windshield wipers
X Press the combination switch beyond the
pressure point in the direction of
arrow 0046.
The windshield wipers wipe with washer
fluid.
i Wipe the windshield using washer fluid
even if it is raining. By doing so, you will
prevent smears on the windshield. Headlamp cleaning system
X Switch on the low-beam headlamps.
X Switch on the windshield washer system.
The headlamps are cleaned with a high-
pressure water jet. Windshield heater
Important safety notes G
Warning
Clear all windows of ice and snow before
driving off. Reduced visibility can, otherwise,
endanger you or others. Windshield heater The windshield heater is operational when the
engine is running.
The windshield heater consumes a lot of
power. You should therefore switch off the
heater as
soon
as the windshield is clear. The
heating switches off automatically after five
minutes. Windshield heater switch
X
Start the engine.
X To switch on/off: press the 0046 switch.
The indicator lamp in the switch comes on
when the windshield
heater is switched on.
Rear window defroster The rear window defroster is operational
when the engine
is running. The rear window
defroster consumes a lot of power. You
should therefore switch the rear window
defroster off as soon as the window is clear.
The heating switches off automatically after
approximately twelve minutes. Rear window defroster switch Good visibility
95
Controls Z
Page 99 of 292
Climate control
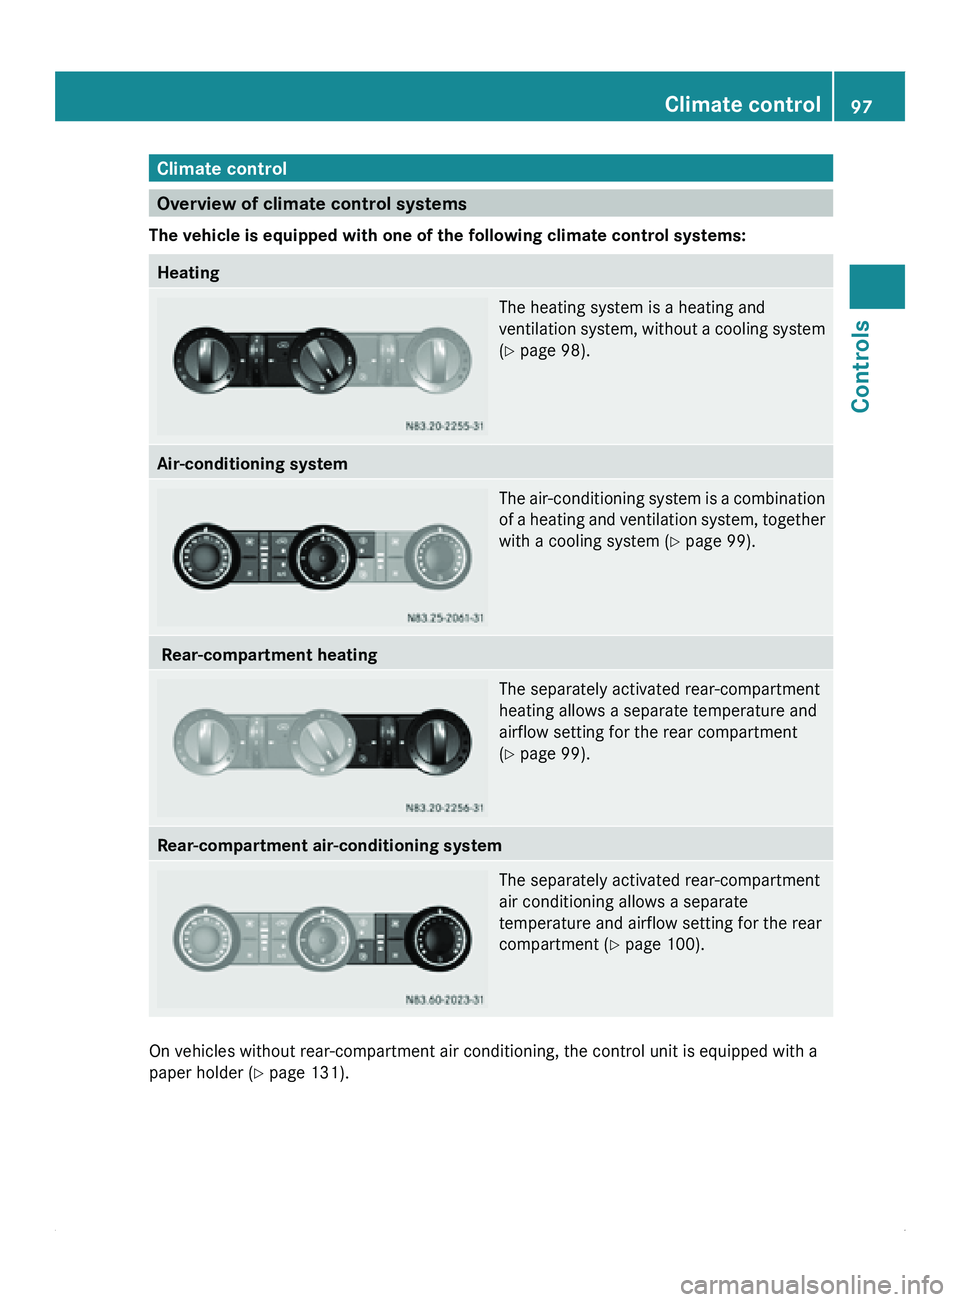
Overview of climate control systems
The vehicle is equipped with one of the following climate control systems: Heating
The heating system is a heating and
ventilation system,
without
a cooling system
(Y page 98). Air-conditioning system
The air-conditioning
system is a combination
of a heating
and ventilation system, together
with a cooling system ( Y page 99). Rear-compartment heating
The separately activated rear-compartment
heating allows a separate temperature and
airflow setting for the rear compartment
(Y
page 99).
Rear-compartment air-conditioning system
The separately activated rear-compartment
air conditioning allows a separate
temperature and airflow setting for the rear
compartment (
Y
page 100).On vehicles without rear-compartment air conditioning, the control unit is equipped with a
paper holder (
Y page 131). Climate control
97
Controls Z
Page 100 of 292
General notes
G
Warning
A driver's attention to the road and traffic
conditions must always be his/her primary
focus when driving.
For your safety and the safety of others, we
recommend that the
driver should only select
functions through the control panel of the
climate control system when traffic and road
conditions permit it to be done safely.
Bear in mind that at a speed of just 30 mph
(approximately 50 km/h), your vehicle is
covering a distance of 44 feet (approximately
14 m) every second.
The air-conditioning system regulates the
temperature and humidity of the vehicle
interior and filters undesired particles out of
the air.
The heating/air-conditioning system can only
be operated when the engine is running. The
system only functions optimally when the
side windows are closed.
The installed filter removes most dust
particles, pollen and unpleasant odors drawn
in from the outside air. A clogged filter
reduces the airflow into the vehicle interior.
The interval for replacing the filter depends
on environmental influences. The interval
may be shorter than that indicated in the
Maintenance Booklet.
i Ventilate the vehicle for a brief period
during warm weather or briefly switch to
air-recirculation mode to quickly cool down
the vehicle if you have air conditioning/
automatic climate control. In this way, you
will accelerate the cooling process and
achieve the desired temperature faster. G
Warning
Observe the settings recommended on the
following pages. The windows could
otherwise fog up.
This may obstruct your view
of the traffic situation and, as a result, you
may cause an accident. Electrical heater booster system The vehicle can be equipped with an
electrically-powered heater booster system.
The heater booster system ensures that the
vehicle interior is heated up very quickly
during the engine's warm-up phase.
i
The heater booster system switches on
automatically as required. Overview of the functions of the
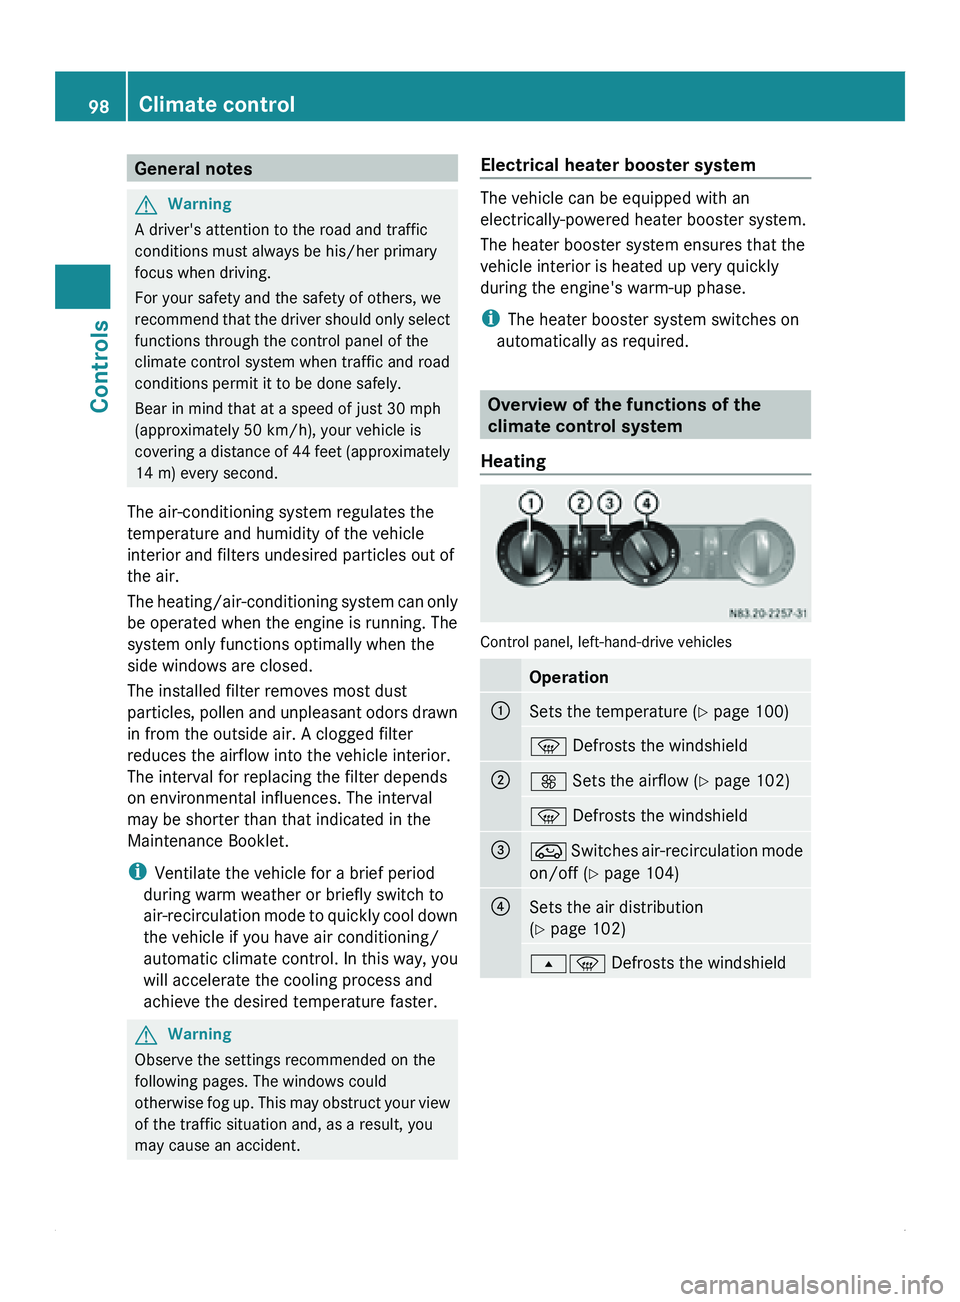
climate control system
Heating Control panel, left-hand-drive vehicles
Operation
0046
Sets the temperature (
Y page 100) 0087 Defrosts the windshield
0047
0099 Sets the airflow (
Y
page 102)
0087 Defrosts the windshield
008A
008C Switches air-recirculation mode
on/off ( Y page 104) 0088
Sets the air distribution
(Y
page 102)
00800087 Defrosts the windshield98
Climate control
Controls