instrument cluster MERCEDES-BENZ SPRINTER 2014 MY14 Operator’s Manual
[x] Cancel search | Manufacturer: MERCEDES-BENZ, Model Year: 2014, Model line: SPRINTER, Model: MERCEDES-BENZ SPRINTER 2014Pages: 338, PDF Size: 6.78 MB
Page 61 of 338
R
there is interference from other radar sour-
ces
R there are strong radar reflections, for
example in parking garages
R a narrow vehicle is traveling in front, e.g. a
motorbike
R a vehicle is traveling in front on a different
line
Following damage to the front end of the vehi-
cle, have the configuration and operation of
the radar sensor checked at a qualified spe-
cialist workshop. This also applies to colli-
sions at slow speeds where there is no visible
damage to the front of the vehicle.
Activating/deactivating the distance
warning function
When you switch on the engine, the distance
warning function switches on after a few sec-
onds.
X To deactivate: press the00D4button
(Y page 37).
Vehicles without steering wheel but-
tons: the00C7 warning lamp in the instru-
ment cluster lights up and the OFF
OFF message
flashes.
Vehicles with steering wheel buttons:
the 00C7 warning lamp in the instrument
cluster lights up and the message Dis‐ Dis‐
tance warning deactivated
tance warning deactivated appears.
X To activate: press the00D4button again
(Y page 37).
Vehicles without steering wheel but-
tons: the00C7 warning lamp in the instru-
ment cluster goes out and the ON
ON message
flashes.
Vehicles with steering wheel buttons:
the 00C7 warning lamp in the instrument
cluster goes out and the message Dis‐ Dis‐
tance
tance warning
warning activated
activated appears in the
multifunction display.
Adaptive Brake Assist
i Observe the "Important safety notes" sec-
tion for driving safety systems
(Y page 56). G
WARNING
Adaptive Brake Assist cannot always clearly
identify objects and complex traffic situa-
tions.
In such cases, Adaptive Brake Assist may:
R intervene unnecessarily
R not intervene
There is a risk of an accident.
Always pay careful attention to the traffic sit-
uation and be ready to brake. Terminate the
intervention in a non-critical driving situation. G
WARNING
Adaptive Brake Assist does not react:
R to people or animals
R to oncoming vehicles
R to crossing traffic
R to stationary obstacles
R when cornering
As a result, Adaptive Brake Assist may not
intervene in all critical conditions. There is a
risk of an accident.
Always pay careful attention to the traffic sit-
uation and be ready to brake.
Adaptive Brake Assist aids you when braking
during hazardous situations at speeds above
20 mph (30 km/h). With the help of the radar
sensor system, adaptive Brake Assist can rec-
ognize obstacles that are in the path of your
vehicle for an extended period of time.
When you approach an obstacle and adaptive
Brake Assist detects that there is a risk of a
collision, adaptive Brake Assist calculates the
braking force necessary to avoid a collision.
Should you apply the brakes forcefully, adap-
tive Brake Assist will automatically increase
the braking force to the calculated level.
X Keep the brake pedal depressed until the
emergency braking situation is over.
ABS prevents the wheels from locking. Driving safety systems
59Safety Z
Page 62 of 338
The brakes function as usual again if:
R you release the brake pedal
R there is no longer any danger of a collision
R no obstacle is detected in front of your
vehicle
Adaptive Brake Assist is then deactivated.
Up to the maximum vehicle speed, adaptive
Brake Assist can react to moving obstacles
that have already been recognized as such at
least once over the period of observation.
Adaptive Brake Assist does not react to sta-
tionary obstacles.
In particular, the detection of obstacles can
be impaired if:
R dirt on the sensors or anything else cover-
ing the sensors
R it is snowing or raining heavily
R there is interference from other radar sour-
ces
R there are strong radar reflections, for
example in parking garages
R a narrow vehicle is traveling in front, e.g. a
motorbike
R a vehicle is traveling in front on a different
line
If adaptive Brake Assist is not available due
to a malfunction in the radar sensor system,
the full brake boosting effect with the help of
BAS remains available.
Following damage to the front end of the vehi-
cle, have the configuration and operation of
the radar sensor checked at a qualified spe-
cialist workshop. This also applies to colli-
sions at slow speeds where there is no visible
damage to the front of the vehicle. ASR (acceleration skid control)
General notes Important safety notes
ASR can neither reduce the risk of an accident
nor suspend the laws of physics if the driver
does not pay attention when pulling away or accelerating. ASR is only an aid. Always adapt
your driving style to suit the prevailing road
and weather conditions.
Vehicles without steering wheel buttons: if
ASR is malfunctioning, the
003Dindicator
lamp lights up while the engine is running and
the engine power may be reduced
(Y page 221).
ASR significantly improves traction, i.e. the
transmission of power from the tires to the
road surface, and thus increases the vehicle's
driving stability. If the driving wheels start to
spin, ASR brakes individual drive wheels and
limits the engine torque. ASR thus signifi-
cantly assists you when pulling away and
accelerating, especially on wet or slippery
roads.
If traction on the road surface is not sufficient,
even ASR will not allow you to pull away with-
out difficulty. The type of tires and total
weight of the vehicle as well as the gradient
of the road also play a crucial role.
If ASR intervenes, the 0072warning lamp in
the instrument cluster flashes.
Activating/deactivating ASR G
WARNING
If deactivated, ASR will not attempt to stabi-
lize the vehicle during pulling away and accel-
eration. There is an increased risk of skidding
and of an accident.
Only deactivate ASR in the situations descri-
bed in the following.
! If you deactivate ASR, ESP ®
will still inter-
vene to stabilize the vehicle. Frequent brak-
ing automatically triggered by ESP ®
can
damage the brake system.
For this reason, deactivate ASR only briefly
and when absolutely necessary. 60
Driving safety systemsSafety
Page 63 of 338
When ESP
®
is intervening and the 0072warn-
ing lamp in the instrument cluster is flashing,
leave ASR on. In this case, only depress the
accelerator pedal as far as required when
pulling away.
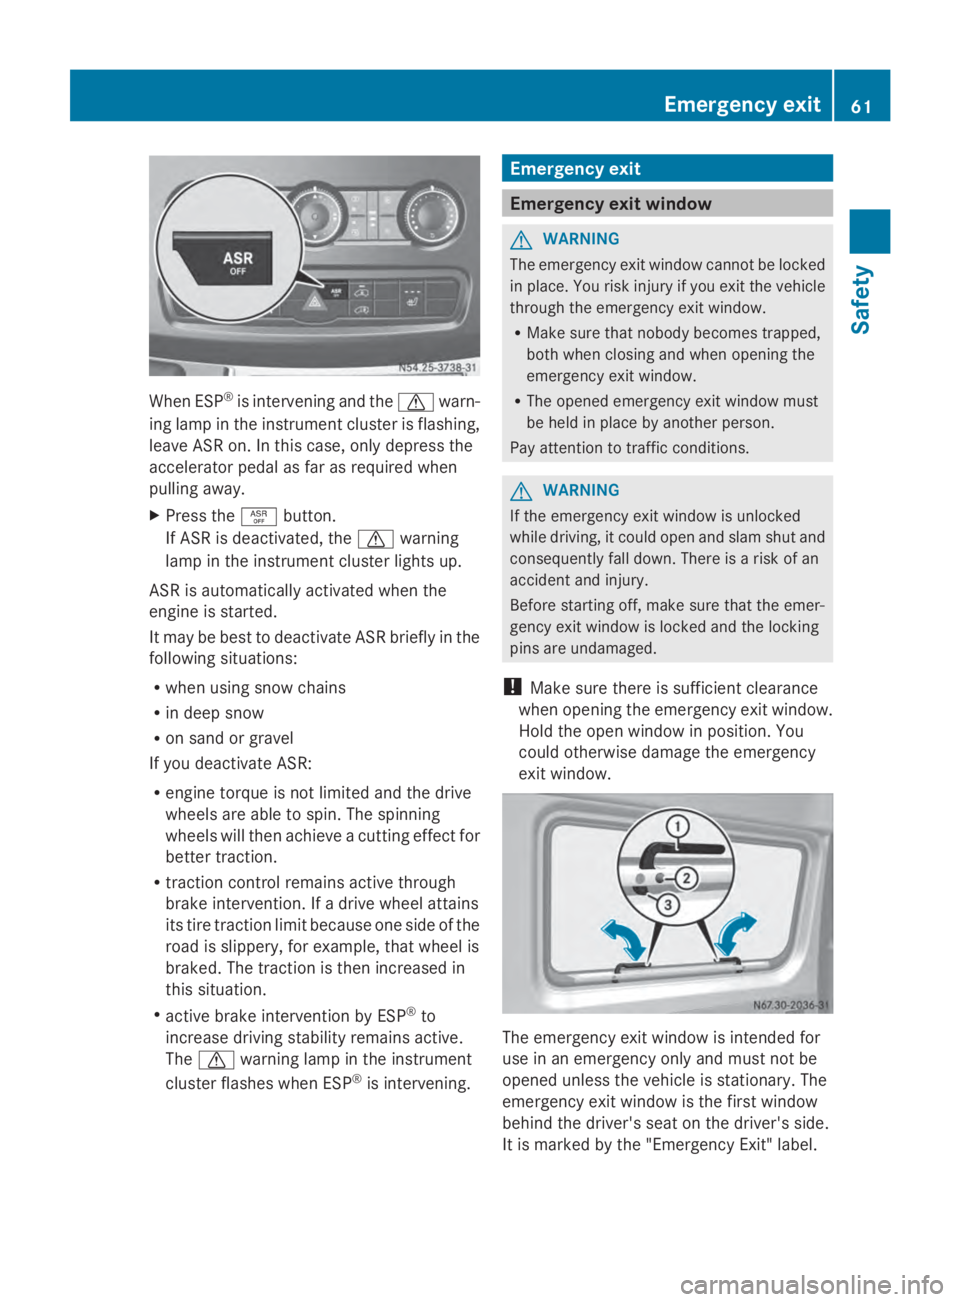
X Press the 00E3button.
If ASR is deactivated, the 0072warning
lamp in the instrument cluster lights up.
ASR is automatically activated when the
engine is started.
It may be best to deactivate ASR briefly in the
following situations:
R when using snow chains
R in deep snow
R on sand or gravel
If you deactivate ASR:
R engine torque is not limited and the drive
wheels are able to spin. The spinning
wheels will then achieve a cutting effect for
better traction.
R traction control remains active through
brake intervention. If a drive wheel attains
its tire traction limit because one side of the
road is slippery, for example, that wheel is
braked. The traction is then increased in
this situation.
R active brake intervention by ESP ®
to
increase driving stability remains active.
The 0072 warning lamp in the instrument
cluster flashes when ESP ®
is intervening. Emergency exit
Emergency exit window
G
WARNING
The emergency exit window cannot be locked
in place. You risk injury if you exit the vehicle
through the emergency exit window.
R Make sure that nobody becomes trapped,
both when closing and when opening the
emergency exit window.
R The opened emergency exit window must
be held in place by another person.
Pay attention to traffic conditions. G
WARNING
If the emergency exit window is unlocked
while driving, it could open and slam shut and
consequently fall down. There is a risk of an
accident and injury.
Before starting off, make sure that the emer-
gency exit window is locked and the locking
pins are undamaged.
! Make sure there is sufficient clearance
when opening the emergency exit window.
Hold the open window in position. You
could otherwise damage the emergency
exit window. The emergency exit window is intended for
use in an emergency only and must not be
opened unless the vehicle is stationary. The
emergency exit window is the first window
behind the driver's seat on the driver's side.
It is marked by the "Emergency Exit" label. Emergency exit
61Safety Z
Page 76 of 338
In order to reduce risks:
R
draw the passengers' attention to the elec-
trical step. Wait until the electrical step is
fully extended.
R do not jump out of the vehicle.
R only use the grab handle and step. Only
they are designed for such a load.
R keep grab handles, access steps and entry
sills free from dirt, e.g. mud, clay, snow and
ice. Operation and obstacle detection
Electrical step
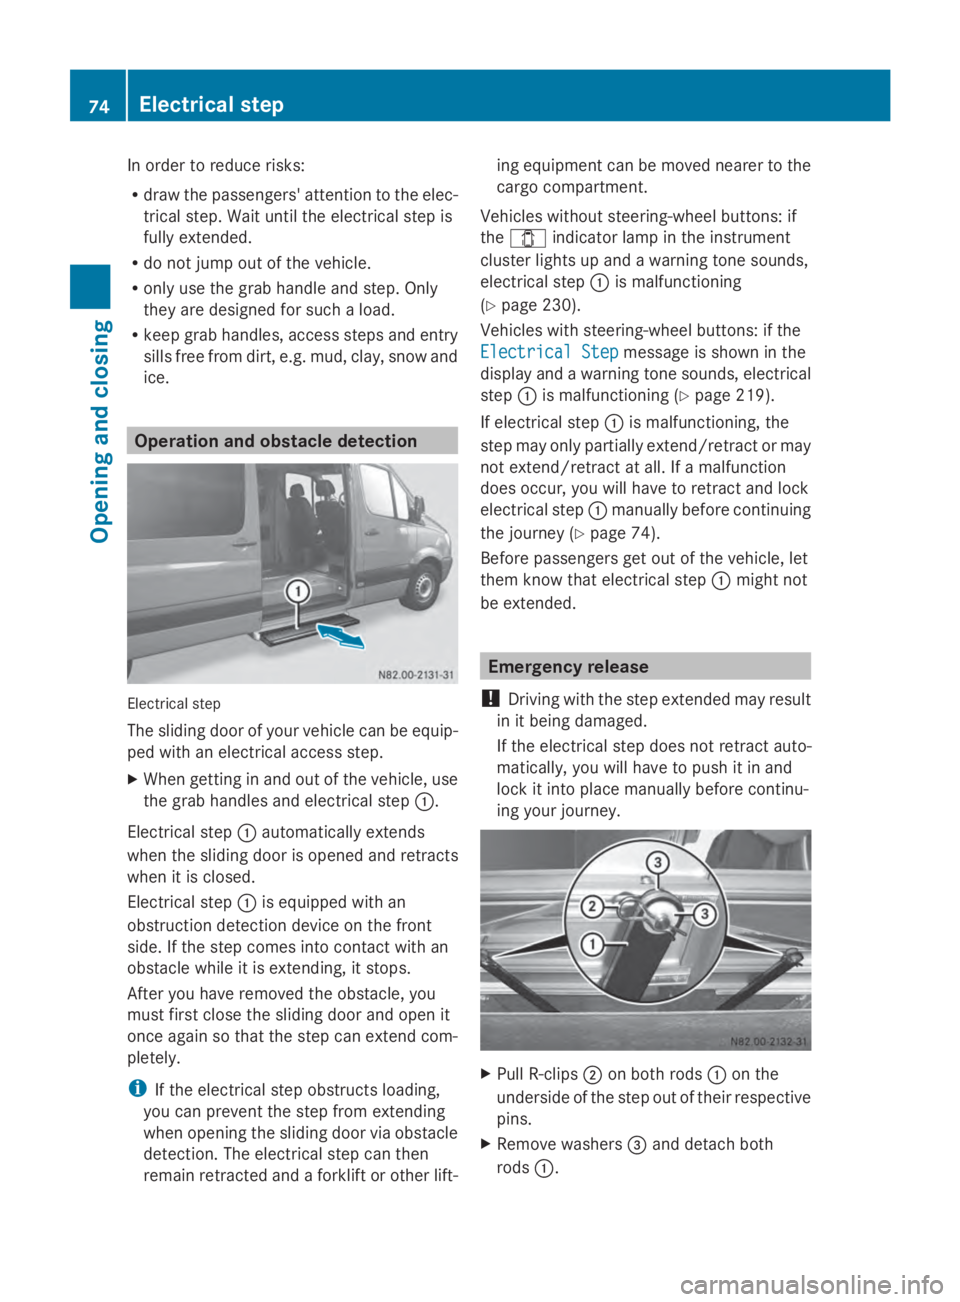
The sliding door of your vehicle can be equip-
ped with an electrical access step.
X When getting in and out of the vehicle, use
the grab handles and electrical step 0043.
Electrical step 0043automatically extends
when the sliding door is opened and retracts
when it is closed.
Electrical step 0043is equipped with an
obstruction detection device on the front
side. If the step comes into contact with an
obstacle while it is extending, it stops.
After you have removed the obstacle, you
must first close the sliding door and open it
once again so that the step can extend com-
pletely.
i If the electrical step obstructs loading,
you can prevent the step from extending
when opening the sliding door via obstacle
detection. The electrical step can then
remain retracted and a forklift or other lift- ing equipment can be moved nearer to the
cargo compartment.
Vehicles without steering-wheel buttons: if
the 003E indicator lamp in the instrument
cluster lights up and a warning tone sounds,
electrical step 0043is malfunctioning
(Y page 230).
Vehicles with steering-wheel buttons: if the
Electrical Step
Electrical Step message is shown in the
display and a warning tone sounds, electrical
step 0043is malfunctioning (Y page 219).
If electrical step 0043is malfunctioning, the
step may only partially extend/retract or may
not extend/retract at all. If a malfunction
does occur, you will have to retract and lock
electrical step 0043manually before continuing
the journey (Y page 74).
Before passengers get out of the vehicle, let
them know that electrical step 0043might not
be extended. Emergency release
! Driving with the step extended may result
in it being damaged.
If the electrical step does not retract auto-
matically, you will have to push it in and
lock it into place manually before continu-
ing your journey. X
Pull R-clips 0044on both rods 0043on the
underside of the step out of their respective
pins.
X Remove washers 0087and detach both
rods 0043. 74
Electrical stepOpening and closing
Page 95 of 338
For this reason, check the condition and func-
tion of your vehicle's lighting system and, if
necessary, that of the trailer before each jour-
ney.
The bulb failure indicator monitors all of the
exterior lighting lamps, except the perimeter
lamp and the trailer lighting. If a bulb fails,
either the 0049(Ypage 35) indicator lamp
lights up, or you will see a corresponding
message in the display (Y page 210).
i Depending on the equipment, the bulb
failure indicator can fail for all lamps with
the exception of the turn signal lamps. Light switch
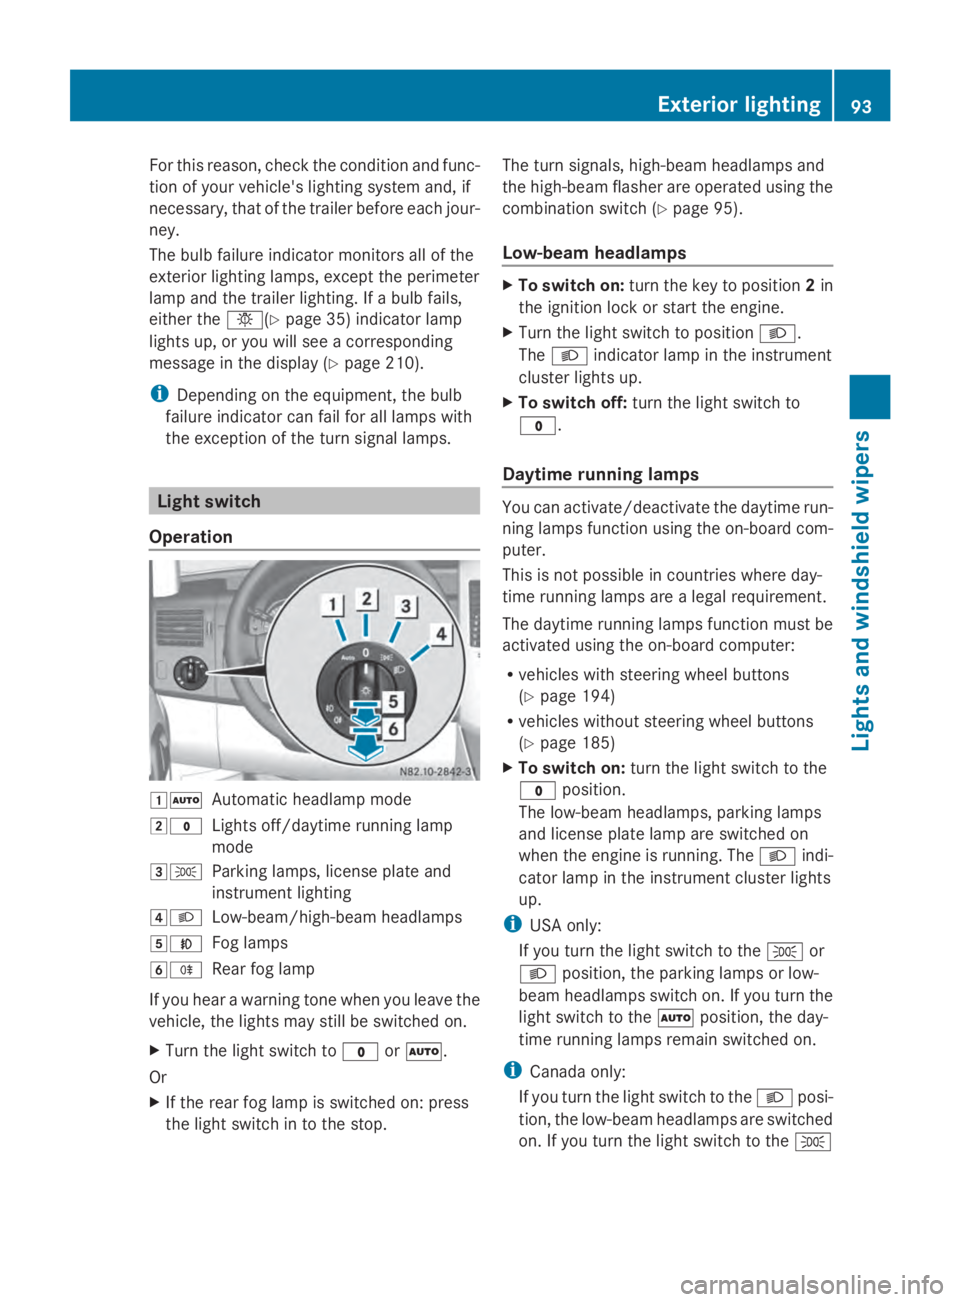
Operation 00470058
Automatic headlamp mode
0048003F Lights off/daytime running lamp
mode
00490060 Parking lamps, license plate and
instrument lighting
004A0058 Low-beam/high-beam headlamps
004B005A Fog lamps
004C005E Rear fog lamp
If you hear a warning tone when you leave the
vehicle, the lights may still be switched on.
X Turn the light switch to 003For0058.
Or
X If the rear fog lamp is switched on: press
the light switch in to the stop. The turn signals, high-beam headlamps and
the high-beam flasher are operated using the
combination switch (Y
page 95).
Low-beam headlamps X
To switch on: turn the key to position 2in
the ignition lock or start the engine.
X Turn the light switch to position 0058.
The 0058 indicator lamp in the instrument
cluster lights up.
X To switch off: turn the light switch to
003F.
Daytime running lamps You can activate/deactivate the daytime run-
ning lamps function using the on-board com-
puter.
This is not possible in countries where day-
time running lamps are a legal requirement.
The daytime running lamps function must be
activated using the on-board computer:
R
vehicles with steering wheel buttons
(Y page 194)
R vehicles without steering wheel buttons
(Y page 185)
X To switch on: turn the light switch to the
003F position.
The low-beam headlamps, parking lamps
and license plate lamp are switched on
when the engine is running. The 0058indi-
cator lamp in the instrument cluster lights
up.
i USA only:
If you turn the light switch to the 0060or
0058 position, the parking lamps or low-
beam headlamps switch on. If you turn the
light switch to the 0058position, the day-
time running lamps remain switched on.
i Canada only:
If you turn the light switch to the 0058posi-
tion, the low-beam headlamps are switched
on. If you turn the light switch to the 0060 Exterior lighting
93Lights and windshield wipers Z
Page 96 of 338
or
0058 position, the daytime running
lamps remain switched on.
Automatic headlamp mode G
WARNING
When the light switch is set to 0058, the low-
beam headlamps may not be switched on
automatically if there is fog, snow or other
causes of poor visibility due to the weather
conditions such as spray. There is a risk of an
accident.
In such situations, turn the light switch to
0058.
Automatic headlamp mode is only a driving
aid. You are responsible for the vehicle light-
ing at all times.
Depending on ambient light, the rain and light
sensor automatically switches on the parking
lamps, low-beam headlamps and the license
plate lamp. This excludes weather-related
impairments to visibility, such as snow, fog or
spray.
If there is fog, snow or spray, turn the light
switch quickly from 0058to0058. You could
otherwise briefly interrupt operation of the
headlamps.
X To switch on automatic headlamp
mode: turn the light switch to 0058.
SmartKey in position 1in the ignition lock:
the parking lamps switch on or off auto-
matically depending on the ambient light.
When the engine is running: if you activate
the "daytime running lamps" function using
the on-board computer, the daytime run-
ning lamps are switched on. The parking
lamps and low-beam headlamps also
switch on or off automatically, depending
on the ambient light.
When the low-beam headlamps are
switched on, the 0058indicator lamp in the
instrument cluster lights up. Fog lamp/rear fog lamp G
WARNING
If you suspect that driving conditions will be
foggy, turn the light switch to 0058before you
start your journey. Your vehicle may other-
wise not be visible and you could endanger
yourself and others. G
WARNING
In low ambient lighting or foggy conditions,
only switch from position 0058to0058 with
the vehicle at a standstill in a safe location.
Switching from 0058to0058 will briefly
switch off the headlamps. Doing so while driv-
ing in low ambient lighting conditions may
result in an accident.
X Turn the ignition key to position 2in the
ignition lock or start the engine.
X Turn the light switch to 0058or0060.
i If your vehicle is only equipped with one
rear fog lamp, you must turn the light
switch to 0058.
i When the light switch is set to 0058, you
cannot switch on the front or rear fog
lamps.
X To switch on the front fog lamps: pull the
light switch out to the first locking point.
The green 005Aindicator lamp on the light
switch lights up.
X To switch on the rear fog lamp: pull the
light switch out to the second locking point.
The yellow 005Eindicator lamp on the light
switch lights up.
X To switch off the front fog lamps/rear
fog lamp: push in the light switch to the
stop.
The 005E and005A indicator lamp on the
light switch go out. 94
Exterior lightingLights and windshield wipers
Page 97 of 338
Combination switch
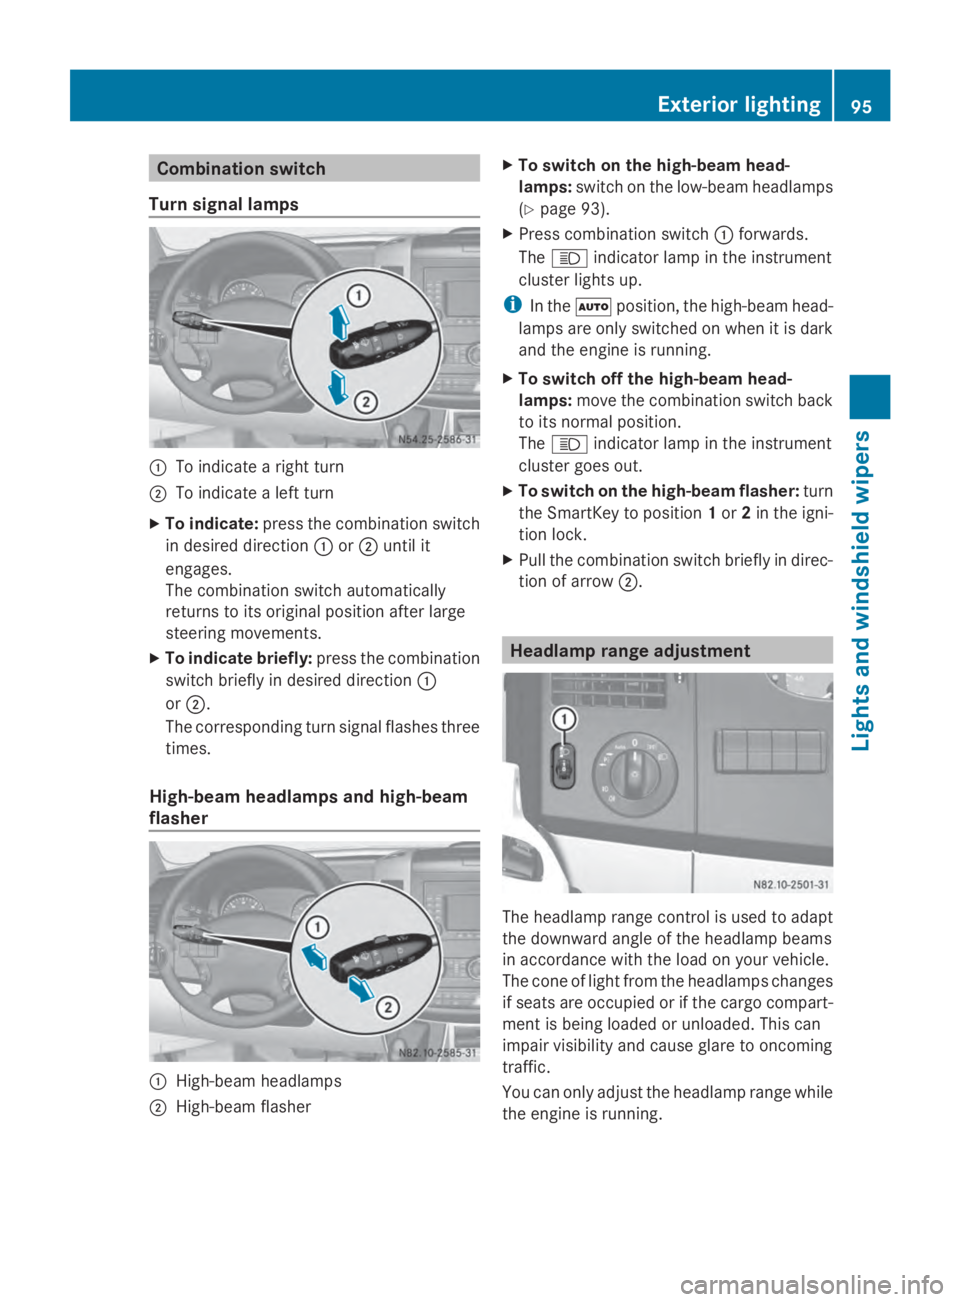
Turn signal lamps 0043
To indicate a right turn
0044 To indicate a left turn
X To indicate: press the combination switch
in desired direction 0043or0044 until it
engages.
The combination switch automatically
returns to its original position after large
steering movements.
X To indicate briefly: press the combination
switch briefly in desired direction 0043
or 0044.
The corresponding turn signal flashes three
times.
High-beam headlamps and high-beam
flasher 0043
High-beam headlamps
0044 High-beam flasher X
To switch on the high-beam head-
lamps: switch on the low-beam headlamps
(Y page 93).
X Press combination switch 0043forwards.
The 0057 indicator lamp in the instrument
cluster lights up.
i In the 0058position, the high-beam head-
lamps are only switched on when it is dark
and the engine is running.
X To switch off the high-beam head-
lamps: move the combination switch back
to its normal position.
The 0057 indicator lamp in the instrument
cluster goes out.
X To switch on the high-beam flasher: turn
the SmartKey to position 1or 2in the igni-
tion lock.
X Pull the combination switch briefly in direc-
tion of arrow 0044. Headlamp range adjustment
The headlamp range control is used to adapt
the downward angle of the headlamp beams
in accordance with the load on your vehicle.
The cone of light from the headlamps changes
if seats are occupied or if the cargo compart-
ment is being loaded or unloaded. This can
impair visibility and cause glare to oncoming
traffic.
You can only adjust the headlamp range while
the engine is running. Exterior lighting
95Lights and windshield wipers Z
Page 99 of 338
Active light function
The active light function is a system that
moves the headlamps according to the steer-
ing movements of the front wheels. In this
way, relevant areas will be illuminated to a
greater extent while driving. This allows you
to recognize pedestrians, cyclists and ani-
mals.
Active: when the lights are switched on. Highbeam Assist
General notes You can use this function to set the head-
lamps to change between high beam and low
beam automatically. The system recognizes
vehicles with their lights on, either approach-
ing from the opposite direction or traveling in
front of your vehicle, and consequently
switches the headlamps from high beam to
low beam.
Once the system no longer detects any other
vehicles, it reactivates the high-beam head-
lamps.
The system's optical sensor is located behind
the windshield near the overhead control
panel.
Important safety notes G
WARNING
Highbeam Assist does not recognize road
users:
R who have no lights, e.g. pedestrians
R who have poor lighting, e.g. cyclists
R whose lighting is blocked, e.g. by a barrier
In very rare cases, Highbeam Assist may fail
to recognize other road users who have lights,
or may recognize them too late. In this or sim-
ilar situations, the automatic high-beam head-
lamps will not be deactivated or will be acti-
vated regardless. There is a risk of an acci-
dent. Always carefully observe the traffic conditions
and switch off the high-beam headlamps in
good time.
Highbeam Assist cannot take into account
road, weather or traffic conditions. Highbeam
Assist is only an aid. You are responsible for
adjusting the vehicle's lighting to the prevail-
ing light, visibility and traffic conditions.
In particular, the detection of obstacles can
be restricted if there is:
R poor visibility, e.g. due to fog, heavy rain or
snow
R dirt on the sensors or anything else cover-
ing the sensors
Activating/deactivating Highbeam
Assist X
To activate: switch on the Highbeam
Assist function using the on-board com-
puter (Y page 194).
X Turn the light switch to the 0058position.
X Press the combination switch beyond the
pressure point in the direction of arrow 0043
(Y page 95).
Highbeam Assist is active.
The or
00CE indicator lamp in the
multifunction display lights up when it is
dark and the light sensor activates the low-
beam headlamps.
If you are driving at speeds above approx-
imately 22 mph (35 km/h) and no other
road users have been detected:
The high-beam headlamps are switched on
automatically. The 0057indicator lamp in
the instrument cluster also lights up.
If you are driving at speeds below approx-
imately 19 mph (30 km/h) other road users
are recognized or the roads are adequately
lit:
The high-beam headlamps are switched off
automatically. The 0057indicator lamp in
the instrument cluster goes out. The 00CE Exterior lighting
97Lights and windshield wipers Z
Page 126 of 338
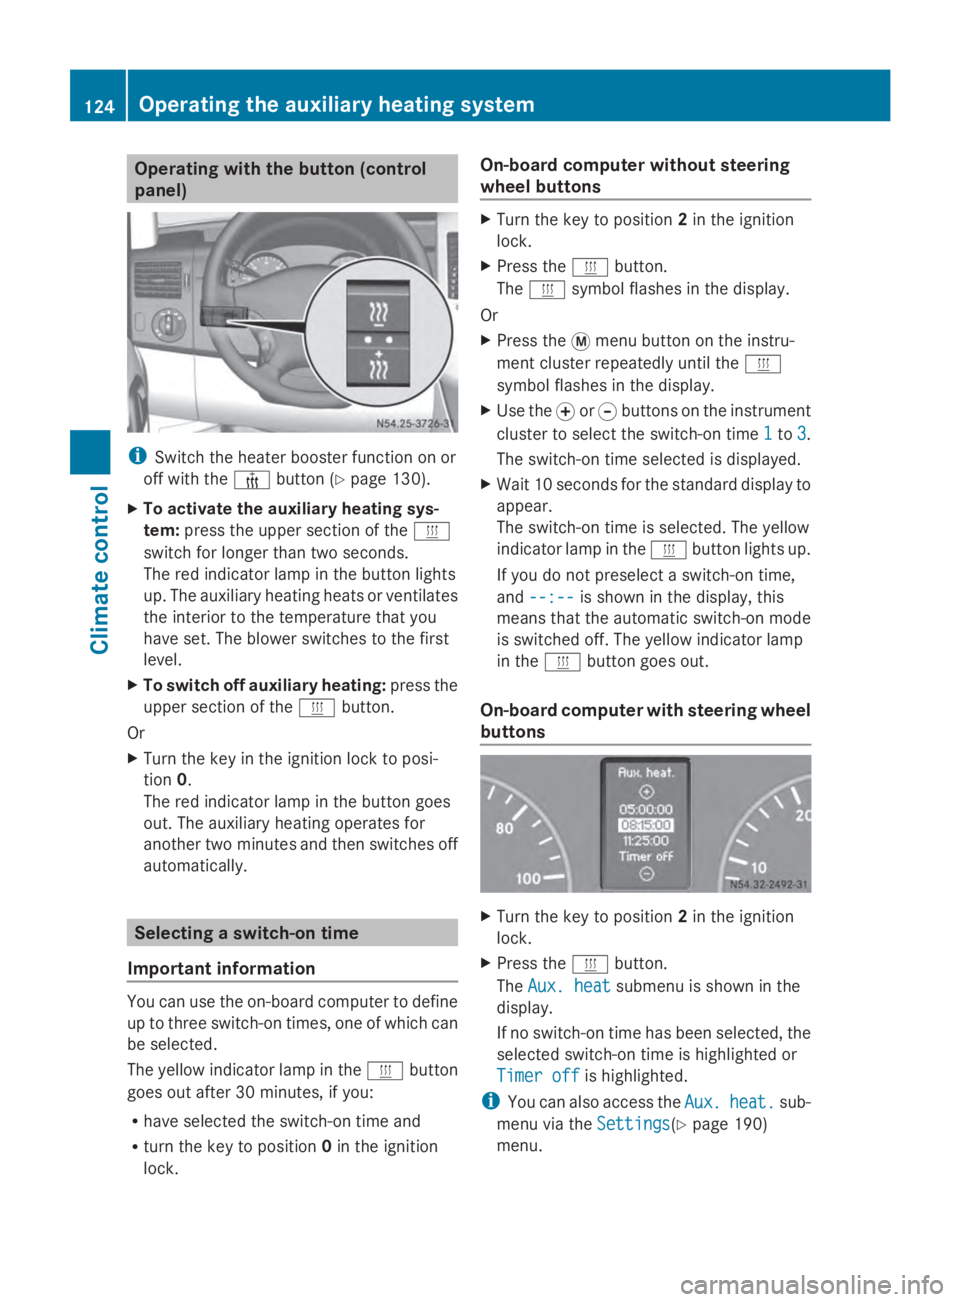
Operating with the button (control
panel)
i
Switch the heater booster function on or
off with the 006Abutton (Y page 130).
X To activate the auxiliary heating sys-
tem: press the upper section of the 0084
switch for longer than two seconds.
The red indicator lamp in the button lights
up. The auxiliary heating heats or ventilates
the interior to the temperature that you
have set. The blower switches to the first
level.
X To switch off auxiliary heating: press the
upper section of the 0084button.
Or
X Turn the key in the ignition lock to posi-
tion 0.
The red indicator lamp in the button goes
out. The auxiliary heating operates for
another two minutes and then switches off
automatically. Selecting a switch-on time
Important information You can use the on-board computer to define
up to three switch-on times, one of which can
be selected.
The yellow indicator lamp in the 0084button
goes out after 30 minutes, if you:
R have selected the switch-on time and
R turn the key to position 0in the ignition
lock. On-board computer without steering
wheel buttons X
Turn the key to position 2in the ignition
lock.
X Press the 0084button.
The 0084 symbol flashes in the display.
Or
X Press the 0079menu button on the instru-
ment cluster repeatedly until the 0084
symbol flashes in the display.
X Use the 0074or0075 buttons on the instrument
cluster to select the switch-on time 1
1 to 3 3.
The switch-on time selected is displayed.
X Wait 10 seconds for the standard display to
appear.
The switch-on time is selected. The yellow
indicator lamp in the 0084button lights up.
If you do not preselect a switch-on time,
and --:-- --:-- is shown in the display, this
means that the automatic switch-on mode
is switched off. The yellow indicator lamp
in the 0084button goes out.
On-board computer with steering wheel
buttons X
Turn the key to position 2in the ignition
lock.
X Press the 0084button.
The Aux. heat Aux. heat submenu is shown in the
display.
If no switch-on time has been selected, the
selected switch-on time is highlighted or
Timer off
Timer off is highlighted.
i You can also access the Aux. Aux.heat.
heat. sub-
menu via the Settings
Settings(Ypage 190)
menu. 124
Operating the auxiliary heating systemClimate control
Page 141 of 338
X
Before starting the engine, make sure that:
R all the doors are closed.
R all the vehicle occupants are wearing
their seat belts correctly.
R the parking brake is applied.
i If you depress the brake pedal before
starting the engine, the pedal travel is short
and pedal resistance is high.
If you depress the brake pedal again after
starting the engine, pedal travel and resist-
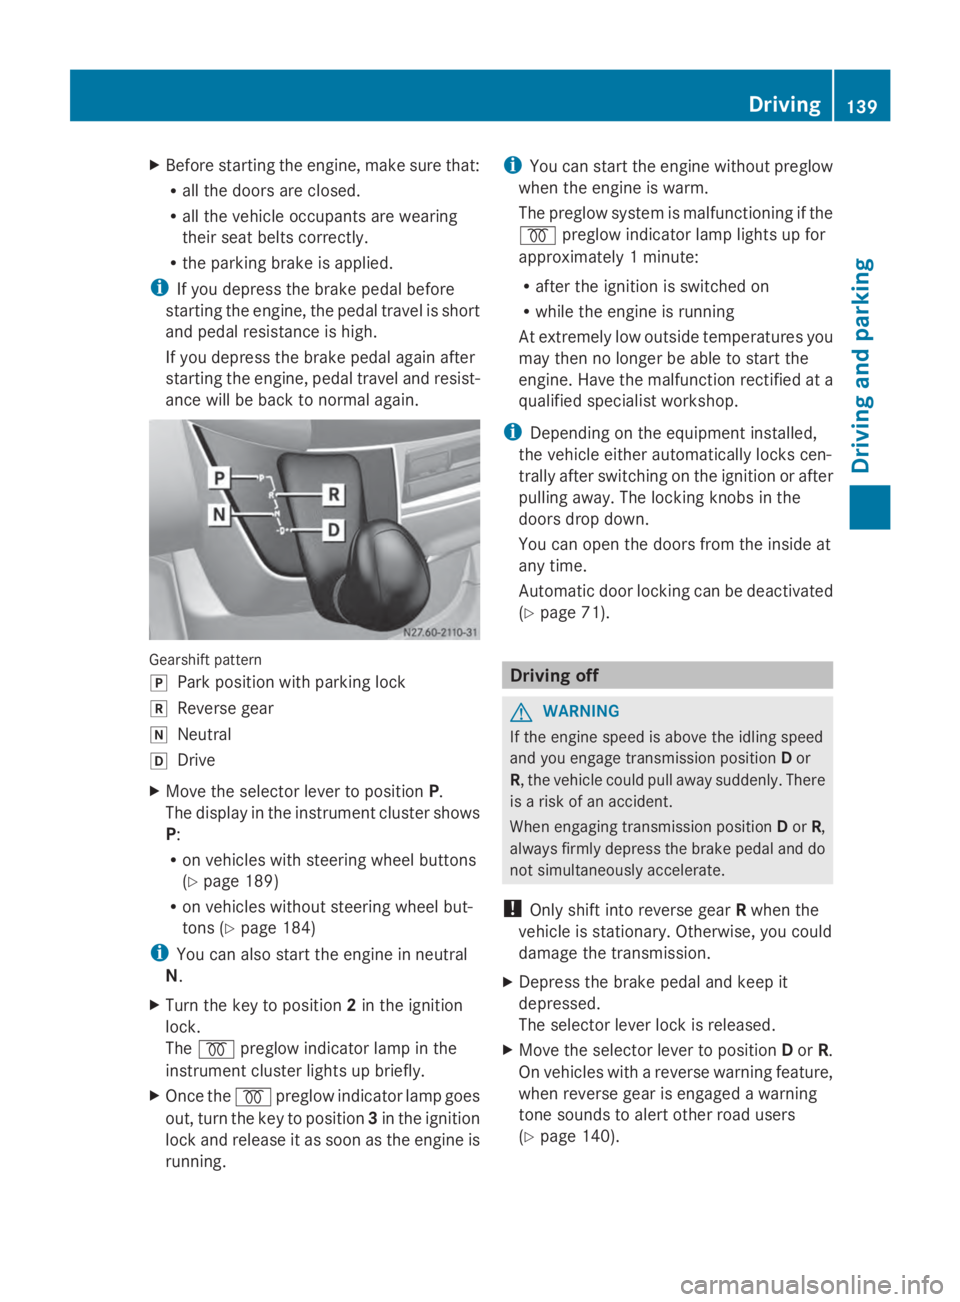
ance will be back to normal again. Gearshift pattern
005D
Park position with parking lock
005E Reverse gear
005C Neutral
005B Drive
X Move the selector lever to position P.
The display in the instrument cluster shows
P:
R on vehicles with steering wheel buttons
(Y page 189)
R on vehicles without steering wheel but-
tons ( Ypage 184)
i You can also start the engine in neutral
N.
X Turn the key to position 2in the ignition
lock.
The 0028 preglow indicator lamp in the
instrument cluster lights up briefly.
X Once the 0028preglow indicator lamp goes
out, turn the key to position 3in the ignition
lock and release it as soon as the engine is
running. i
You can start the engine without preglow
when the engine is warm.
The preglow system is malfunctioning if the
0028 preglow indicator lamp lights up for
approximately 1 minute:
R after the ignition is switched on
R while the engine is running
At extremely low outside temperatures you
may then no longer be able to start the
engine. Have the malfunction rectified at a
qualified specialist workshop.
i Depending on the equipment installed,
the vehicle either automatically locks cen-
trally after switching on the ignition or after
pulling away. The locking knobs in the
doors drop down.
You can open the doors from the inside at
any time.
Automatic door locking can be deactivated
(Y page 71). Driving off
G
WARNING
If the engine speed is above the idling speed
and you engage transmission position Dor
R, the vehicle could pull away suddenly. There
is a risk of an accident.
When engaging transmission position Dor R,
always firmly depress the brake pedal and do
not simultaneously accelerate.
! Only shift into reverse gear Rwhen the
vehicle is stationary. Otherwise, you could
damage the transmission.
X Depress the brake pedal and keep it
depressed.
The selector lever lock is released.
X Move the selector lever to position Dor R.
On vehicles with a reverse warning feature,
when reverse gear is engaged a warning
tone sounds to alert other road users
(Y page 140). Driving
139Driving and parking Z