phone MERCEDES-BENZ SPRINTER 2014 MY14 Operator’s Manual
[x] Cancel search | Manufacturer: MERCEDES-BENZ, Model Year: 2014, Model line: SPRINTER, Model: MERCEDES-BENZ SPRINTER 2014Pages: 338, PDF Size: 6.78 MB
Page 190 of 338
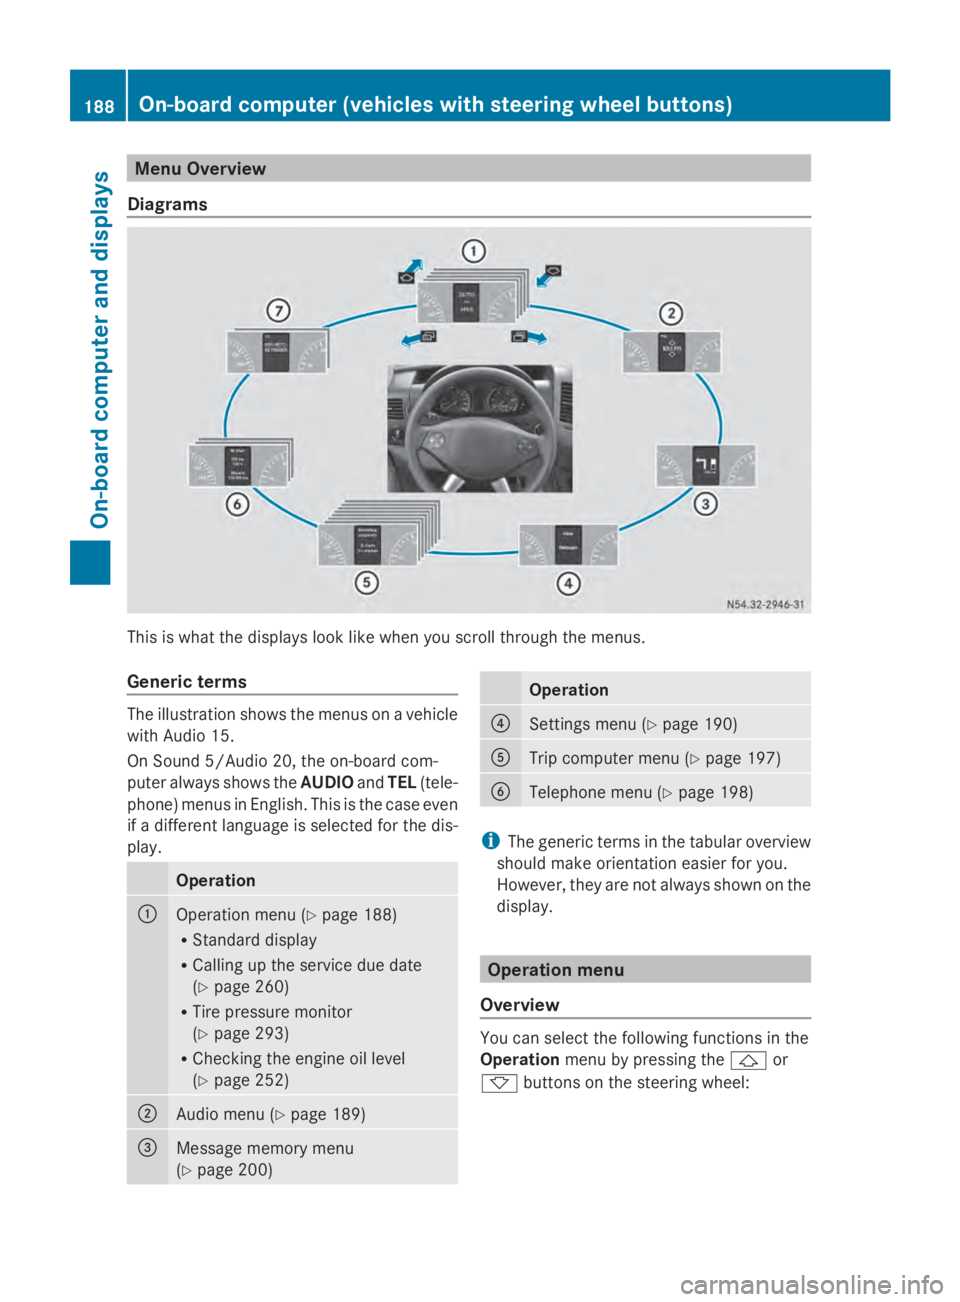
Menu Overview
Diagrams This is what the displays look like when you scroll through the menus.
Generic terms The illustration shows the menus on a vehicle
with Audio 15.
On Sound 5/Audio 20, the on-board com-
puter always shows the AUDIOandTEL (tele-
phone) menus in English. This is the case even
if a different language is selected for the dis-
play. Operation
0043
Operation menu (Y
page 188)
R Standard display
R Calling up the service due date
(Y page 260)
R Tire pressure monitor
(Y page 293)
R Checking the engine oil level
(Y page 252) 0044
Audio menu (Y
page 189) 0087
Message memory menu
(Y
page 200) Operation
0085
Settings menu (Y
page 190) 0083
Trip computer menu (Y
page 197) 0084
Telephone menu (Y
page 198) i
The generic terms in the tabular overview
should make orientation easier for you.
However, they are not always shown on the
display. Operation menu
Overview You can select the following functions in the
Operation
menu by pressing the 0041or
0068 buttons on the steering wheel: 188
On-board computer (vehicles with steering wheel buttons)On-board computer and displays
Page 200 of 338
Telephone menu
Introduction G
WARNING
If you operate information systems and com-
munication equipment integrated in the vehi-
cle while driving, you will be distracted from
traffic conditions. You could also lose control
of the vehicle. There is a risk of an accident.
Only operate the equipment when the traffic
situation permits. If you are not sure that this
is possible, park the vehicle paying attention
to traffic conditions and operate the equip-
ment when the vehicle is stationary.
You must observe the legal requirements for
the country in which you are currently driving
when operating a mobile phone in the vehicle.
If it is permitted to operate a mobile phone
while the vehicle is in motion, only operate it
when road and traffic conditions permit.
If you have connected a mobile phone to the
Sprinter hands-free system, you can operate
it using the functions in the TEL
TEL menu.
X Switch on the mobile phone (see the sep-
arate operating instructions).
X Switch on the audio equipment (see the
separate operating instructions).
X Establish a Bluetooth ®
connection
between the mobile phone and the audio
equipment (see the separate operating
instructions).
X Press the 0080or007F button on the steer-
ing wheel to select the TEL
TEL menu.
X When Please enter PIN: Please enter PIN: appears in the
display, enter the PIN using the mobile
phone or audio equipment.
The mobile phone searches for a network.
The display remains blank during this time.
You will see the mobile phone operational
readiness display once the mobile phone
has found a network.
i You can obtain further information about
suitable mobile phones and connecting mobile phones via Bluetooth
®
at any quali-
fied specialist workshop.
i If the mobile phone operational readiness
symbol goes out, your vehicle is outside of
the transmission and reception range.
Accepting a call X
Press the 0061button on the steering
wheel to accept an incoming call.
The display shows the call duration.
Rejecting or ending a call X
Press the 0076button on the steering
wheel to reject or end a call.
The caller then hears the engaged tone.
The display shows the mobile phone opera-
tional readiness symbol again.
Dialing a number from the phone book You can use the mobile phone to enter new
telephone numbers into the phone book (see
the separate operating instructions). If your
mobile phone is able to receive calls, you can
search for and dial a number from the phone
book.
Using the steering wheel buttons
X
Use the 0080or007F buttons to select the
TEL TEL menu.
The display shows the mobile phone opera-
tional readiness symbol.
X Press the 0041or0068 buttons to switch
to the phone book.
The on-board computer reads the phone
book stored on the SIM card or in the
mobile phone. This may take more than a
minute.
When the message is no longer displayed,
reading has ended. 198
On-board computer (vehicles
with steering wheel buttons)On-boardcomputer and displays
Page 201 of 338
X
Press the 0041or0068 button to select the
desired name.
Or
X To start rapid scrolling: press and hold
the 0041 or0068 button longer than 1 sec-
ond.
Rapid scrolling stops when you release the
button or reach the end of the list.
Using the steering wheel buttons
X To start dialing: press the0061button.
The on-board computer dials the corre-
sponding phone number.
When a connection is established, the
name of the other person and/or the call
duration appear in the display.
X To exit the telephone book: press the
0076 button.
Redialing The on-board computer saves the last names
or numbers dialed in the redial memory.
Using the steering wheel buttons
X Use the 0080or007F buttons to select the
TEL
TEL menu.
The display shows the mobile phone opera-
tional readiness symbol.
X Press the 0061button.
The display shows the most recently dialed
numbers or names in the redial memory.
X Press the 0041or0068 button to select the
desired name or number.
X To start dialing: press the0061button.
The on-board computer dials the corre-
sponding phone number.
When a connection is established, the
name of the other person and/or the call
duration appear in the display.
Or
X To exit the redial memory: press the
0076 button. Display messages
Notes on display messages
Important safety notes G
WARNING
No information will be displayed if either the
instrument cluster or the display is inopera-
tive.
As a result, you will not be able to see warning
and indicator lamps or information about the
driving conditions, such as speed or outside
temperature. Driving characteristics may be
impaired. Adjust your driving style and vehicle
speed accordingly.
Contact a qualified specialist workshop
immediately. G
WARNING
If service work is not carried out correctly, the
operating safety of your vehicle may be
affected. This could cause you to lose control
of your vehicle and cause an accident. More-
over, the safety systems may no longer be
able to protect you or others as they are
designed to do.
Always have service work carried out at a
qualified specialist workshop.
i If you turn the key to position 2in the
ignition, a display check is performed. All
warning/indicator lamps (except the turn
signal indicator lamps) and the display are
activated. Before starting the journey,
check that the warning and indicator lamps
are operating correctly.
Vehicles without steering wheel but-
tons Warnings, malfunctions or additional infor-
mation may also be shown in the display. The
following tables show all the display mes-
sages. A warning tone sounds with certain
display messages. Display messages
199On-board computer and displays Z
Page 222 of 338
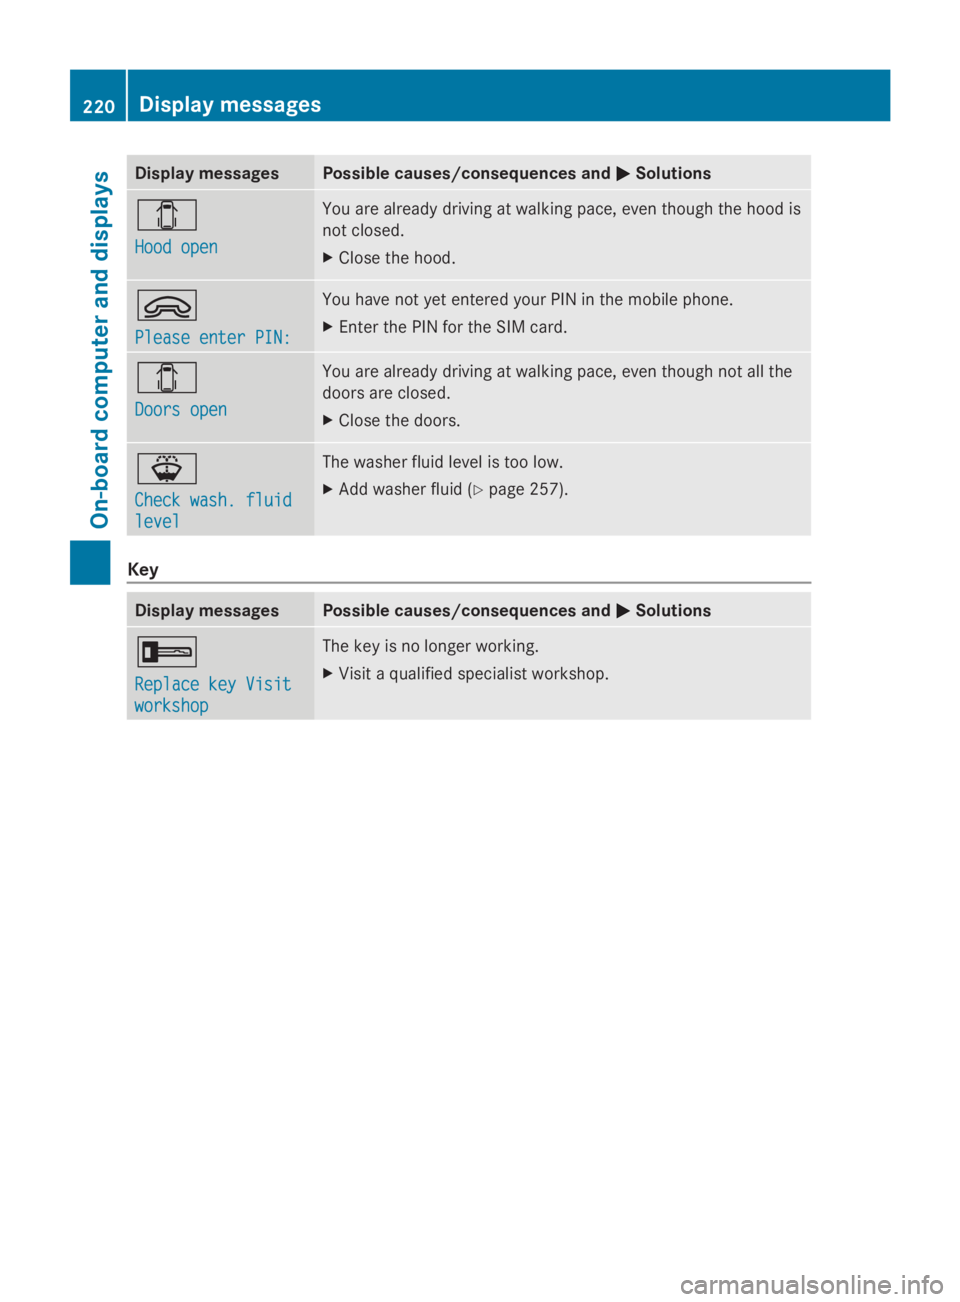
Display messages Possible causes/consequences and
0050
0050Solutions 003E
Hood open Hood open You are already driving at walking pace, even though the hood is
not closed.
X
Close the hood. 0064
Please enter PIN: Please enter PIN: You have not yet entered your PIN in the mobile phone.
X
Enter the PIN for the SIM card. 003E
Doors open Doors open You are already driving at walking pace, even though not all the
doors are closed.
X
Close the doors. 00B1
Check wash. fluid Check wash. fluid
level level The washer fluid level is too low.
X
Add washer fluid ( Ypage 257). Key
Display messages Possible causes/consequences and
0050 0050Solutions 0039
Replace key Visit Replace key Visit
workshop workshop The key is no longer working.
X
Visit a qualified specialist workshop. 220
Display
messagesOn-board computer and displays
Page 233 of 338
Useful information
............................232
Stowage spaces and stowage com-
partments .......................................... 232
Folding table in the twin co-driver's
seat .................................................... 236
Cup holder ......................................... 236
Bottle holder ..................................... 237
Ashtray .............................................. 237
Cigarette lighter ................................ 238
12 V socket ....................................... 238
Mobile phone ..................................... 239
Additional communications equip-
ment ................................................... 239 231Stowing and features
Page 235 of 338
Eyeglasses compartment in the over-
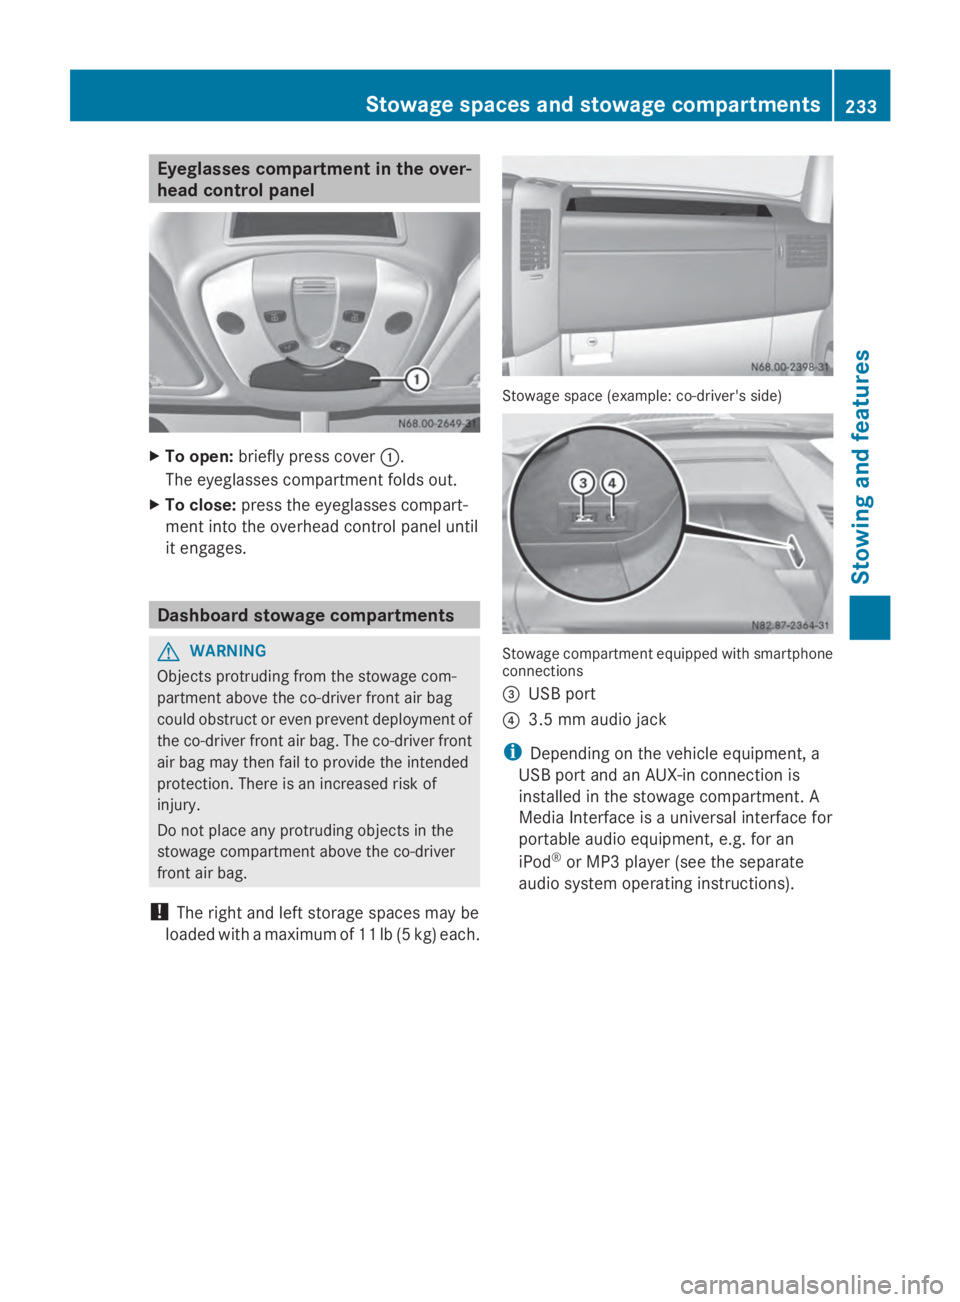
head control panel X
To open: briefly press cover 0043.
The eyeglasses compartment folds out.
X To close: press the eyeglasses compart-
ment into the overhead control panel until
it engages. Dashboard stowage compartments
G
WARNING
Objects protruding from the stowage com-
partment above the co-driver front air bag
could obstruct or even prevent deployment of
the co-driver front air bag. The co-driver front
air bag may then fail to provide the intended
protection. There is an increased risk of
injury.
Do not place any protruding objects in the
stowage compartment above the co-driver
front air bag.
! The right and left storage spaces may be
loaded with a maximum of 11 lb (5 kg) each. Stowage space (example: co-driver's side)
Stowage compartment equipped with smartphone
connections
0087
USB port
0085 3.5 mm audio jack
i Depending on the vehicle equipment, a
USB port and an AUX-in connection is
installed in the stowage compartment. A
Media Interface is a universal interface for
portable audio equipment, e.g. for an
iPod ®
or MP3 player (see the separate
audio system operating instructions). Stowage spaces and stowage compartments
233Stowing and features Z
Page 241 of 338
You can use the 12 V sockets (15 A) for
accessories with a maximum power con-
sumption of 180 W. You can connect acces-
sories with a maximum power consumption
of 300 W to the 12 V socket (25 A) on the
lower section of the center console.
i The sockets are supplied with power even
when the key is removed from the ignition
lock. If accessories, e.g. a coolbox, remain
connected while the engine is not running,
the battery will discharge. Mobile phone
Important safety notes
G
WARNING
If you operate information systems and com-
munication equipment integrated in the vehi-
cle while driving, you will be distracted from
traffic conditions. You could also lose control
of the vehicle. There is a risk of an accident.
Only operate the equipment when the traffic
situation permits. If you are not sure that this
is possible, park the vehicle paying attention
to traffic conditions and operate the equip-
ment when the vehicle is stationary.
You must observe the legal requirements for
the country in which you are currently driving
when operating mobile phones.
Bear in mind that at a speed of just 30 mph
(approximately 50 km/h), your vehicle is cov-
ering a distance of 44 feet (approximately
14 m) every second.
You and others can suffer health-related dam-
age through electromagnetic radiation. By
using an exterior antenna, a possible health
risk caused by electromagnetic fields, as dis-
cussed in scientific circles, is taken into
account. Only have the exterior antenna
installed by a qualified specialist workshop.
We recommend the use of an approved exte-
rior antenna for operating the mobile phone.
Only in this way can optimal mobile phone
reception quality in the vehicle be ensured and mutual interference between the vehicle
electronics and mobile phones minimized.
Observe the legal requirements for each indi-
vidual country. Mobile phone pre-installation
The mobile phone pre-installation includes a
hands-free system integrated into the vehi-
cle. The microphone for the hands-free sys-
tem is installed in the overhead control panel
or in the overhead stowage compartment
together with the front interior light.
In order to use the hands-free system, you will
need a special bracket. The Sprinter acces-
sories include brackets for various mobile
phone models.
i Mobile phone brackets which are availa-
ble from various manufacturers on the
open market are not compatible with the
Sprinter telephone system. You can recog-
nize suitable holders for your mobile phone
by the imprinted star and the B6 spare part
number on the back of the bracket.
Detailed instructions for use can be found in
the operating instructions for the mobile
phone bracket and in the separate operating
instructions for the mobile phone pre-instal-
lation.
i The mobile phone battery is charged
depending on the condition of charge and
the position of the key in the ignition lock.
The mobile phone display indicates the
charging process. Additional communications equip-
ment
Important safety notes
G
WARNING
If you operate mobile communication equip-
ment while driving, you will be distracted from
traffic conditions. You could also lose control
of the vehicle. There is a risk of an accident. Additional communications equipment
239Stowing and features
Z
Page 256 of 338
For vehicles with a red oil dipstick, only check
the oil level when the engine is at normal
operating temperature:
X Stop your vehicle as far away from traffic
as possible on level ground.
X Secure the vehicle to prevent it from rolling
away.
X Switch off the engine.
X Wait for five minutes.
For vehicles with a yellow oil dipstick, only
check the oil level when the engine is cold.
X Stop your vehicle as far away from traffic
as possible on level ground.
X Secure the vehicle to prevent it from rolling
away.
X Open the hood (Y page 250).
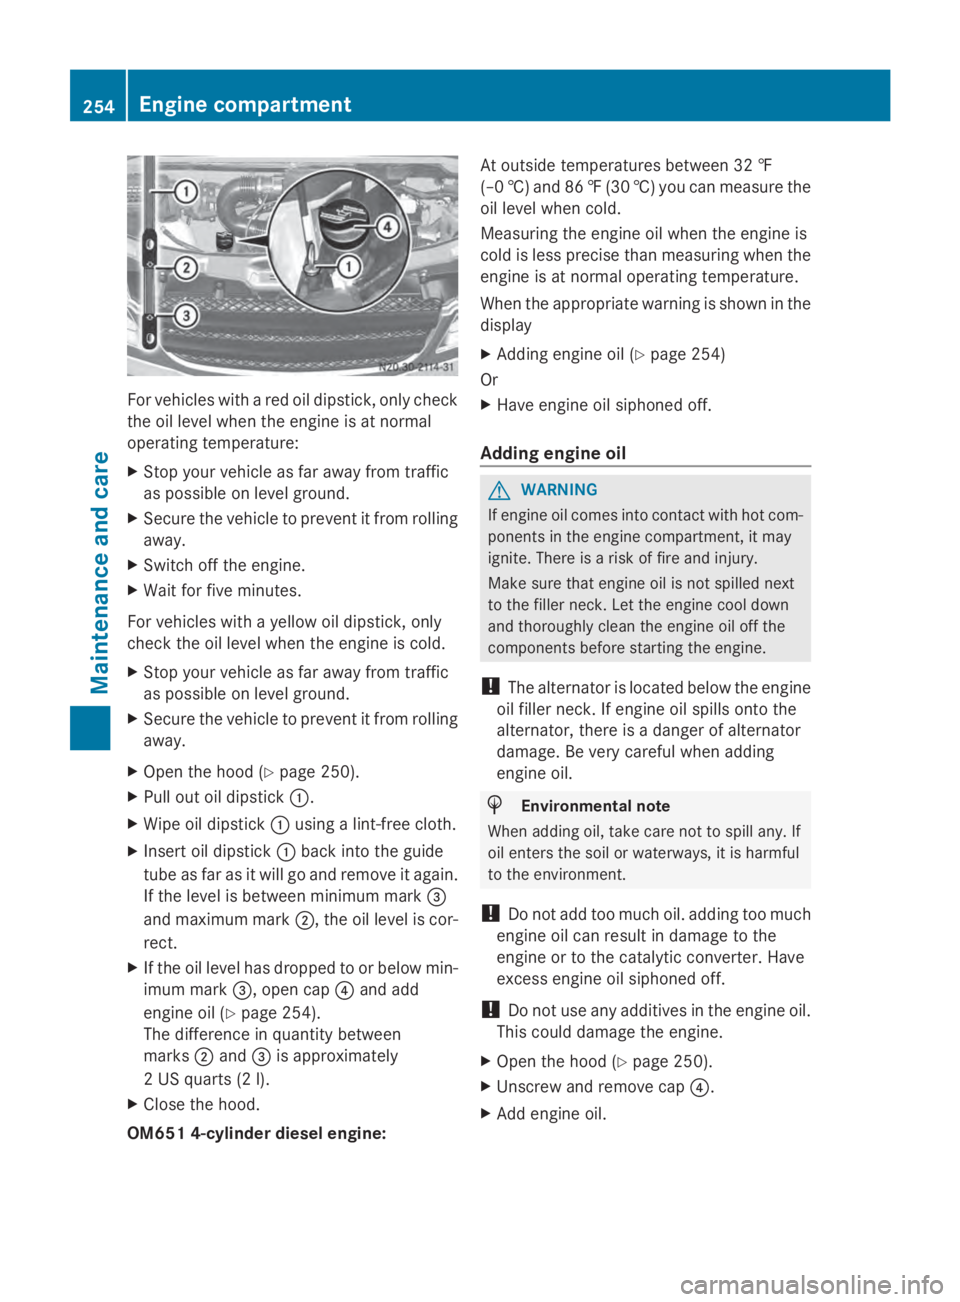
X Pull out oil dipstick 0043.
X Wipe oil dipstick 0043using a lint-free cloth.
X Insert oil dipstick 0043back into the guide
tube as far as it will go and remove it again.
If the level is between minimum mark 0087
and maximum mark 0044, the oil level is cor-
rect.
X If the oil level has dropped to or below min-
imum mark 0087, open cap 0085and add
engine oil (Y page 254).
The difference in quantity between
marks 0044and 0087is approximately
2 US quarts (2 l).
X Close the hood.
OM651 4-cylinder diesel engine: At outside temperatures between 32 ‡
(–0 †) and 86
‡(30 †) you can measure the
oil level when cold.
Measuring the engine oil when the engine is
cold is less precise than measuring when the
engine is at normal operating temperature.
When the appropriate warning is shown in the
display
X Adding engine oil (Y page 254)
Or
X Have engine oil siphoned off.
Adding engine oil G
WARNING
If engine oil comes into contact with hot com-
ponents in the engine compartment, it may
ignite. There is a risk of fire and injury.
Make sure that engine oil is not spilled next
to the filler neck. Let the engine cool down
and thoroughly clean the engine oil off the
components before starting the engine.
! The alternator is located below the engine
oil filler neck. If engine oil spills onto the
alternator, there is a danger of alternator
damage. Be very careful when adding
engine oil. H
Environmental note
When adding oil, take care not to spill any. If
oil enters the soil or waterways, it is harmful
to the environment.
! Do not add too much oil. adding too much
engine oil can result in damage to the
engine or to the catalytic converter. Have
excess engine oil siphoned off.
! Do not use any additives in the engine oil.
This could damage the engine.
X Open the hood (Y page 250).
X Unscrew and remove cap 0085.
X Add engine oil. 254
Engine compartmentMaintenance and care
Page 270 of 338
!
Make sure that:
R the side windows and the roof are com-
pletely closed
R the climate control blower is switched off
R the windshield wiper switch is at position
0
The vehicle could otherwise be damaged.
You can wash the vehicle in an automatic car
wash from the very start.
Wash off excess dirt before cleaning the vehi-
cle in an automatic car wash.
After putting the vehicle through an auto-
matic car wash, wipe off wax from:
R the rear view camera lens (Y page 271)
R the windshield
R the windshield wiper blades
This will prevent smears and reduce wiping
noises caused by residue on the wind-
shield.
Washing by hand In some countries, washing by hand is only
allowed at specially equipped washing bays.
Observe the legal requirements for each indi-
vidual country.
X Do not use hot water and do not wash the
vehicle in direct sunlight.
X Use a soft car sponge.
X Use a mild cleaning agent, e.g. a car sham-
poo approved for use with Sprinter vehi-
cles.
X Thoroughly hose down the vehicle with a
gentle jet of water.
X Do not point the water jet directly towards
the air inlets.
X Use plenty of water and rinse out the
sponge frequently.
X Rinse the vehicle with clean water and dry
thoroughly with a chamois.
X Do not let the cleaning agents dry on the
paintwork. When using the vehicle in winter, remove all
traces of road salt deposits carefully and as
soon as possible.
High-pressure cleaning equipment G
WARNING
The water jet from a circular jet nozzle (dirt
blasters) can cause invisible exterior damage
to the tires or chassis components. Compo-
nents damaged in this way may fail unexpect-
edly. There is a risk of an accident.
Do not use power washers with circular jet
nozzles to clean the vehicle. Have damaged
tires or chassis components replaced imme-
diately.
! Under no circumstances use power wash-
ers in the vehicle interior. The pressurized
water and associated spray produced by
the power washer could cause extensive
damage to the vehicle.
! Observe the minimum distance to be
maintained between the nozzle of the
power washer and object to be cleaned, as
outlined below:
R approximately 2.2 ft(70 cm) when using
round-jet nozzles
R approximately 1 ft (30 cm) when using
25°flat-spray jets and dirt blasters
Keep the water jet moving while cleaning.
To avoid causing damage, do not point the
water jet directly at:
R door joints
R brake hoses
R electrical components
R electrical connections
R seals
R drive train, especially not at the inter-
mediate bearing of the propeller shaft
R rear view camera (camera lens and
microphone opening on the bottom)
Keep a minimum distance of
1.6 ft(50 cm). 268
CareMaintenance and care
Page 273 of 338
X
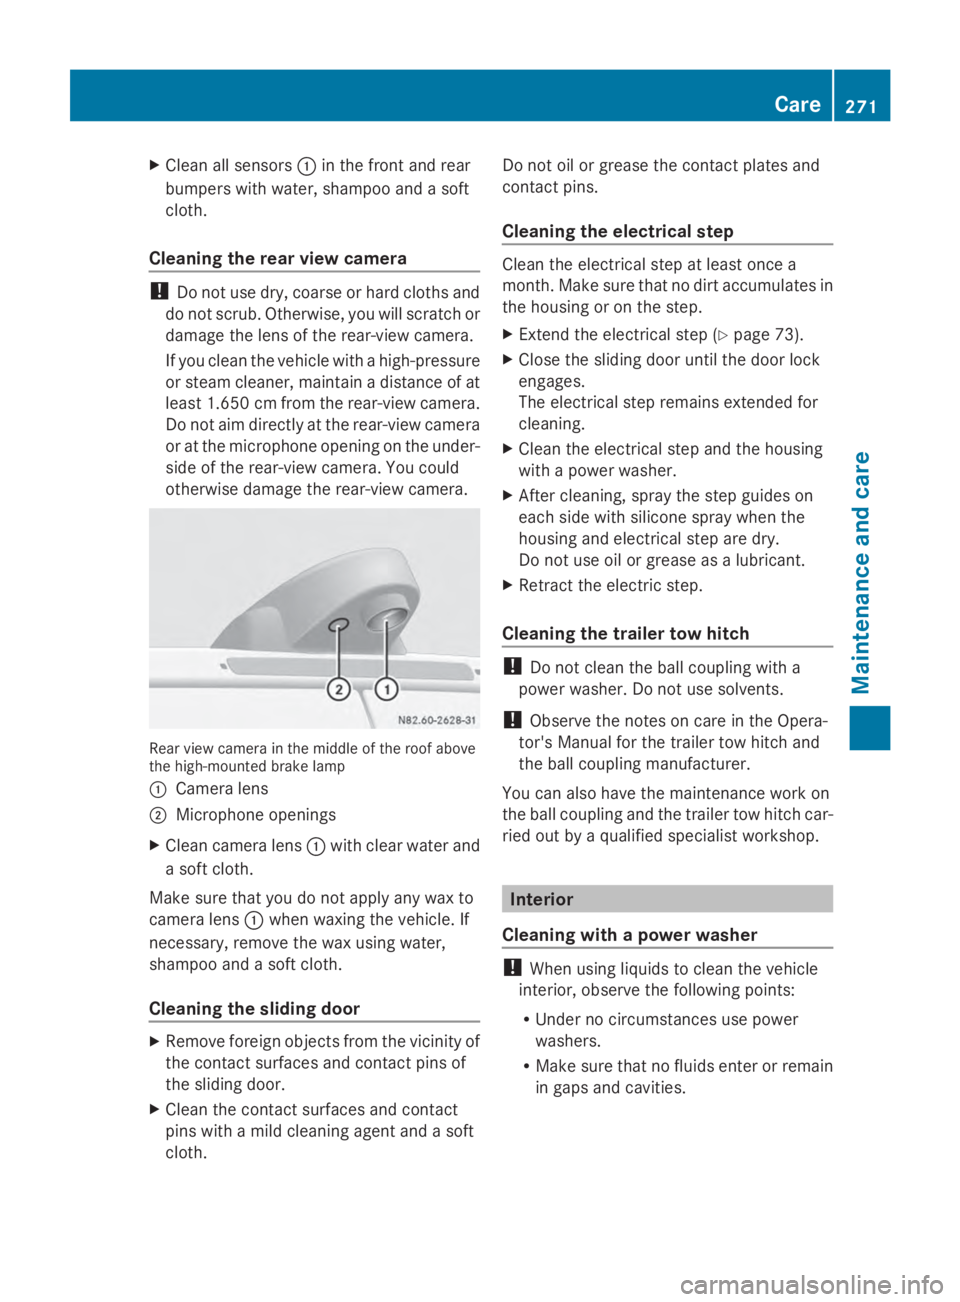
Clean all sensors 0043in the front and rear
bumpers with water, shampoo and a soft
cloth.
Cleaning the rear view camera !
Do not use dry, coarse or hard cloths and
do not scrub. Otherwise, you will scratch or
damage the lens of the rear-view camera.
If you clean the vehicle with a high-pressure
or steam cleaner, maintain a distance of at
least 1.650 cm from the rear-view camera.
Do not aim directly at the rear-view camera
or at the microphone opening on the under-
side of the rear-view camera. You could
otherwise damage the rear-view camera. Rear view camera in the middle of the roof above
the high-mounted brake lamp
0043 Camera lens
0044 Microphone openings
X Clean camera lens 0043with clear water and
a soft cloth.
Make sure that you do not apply any wax to
camera lens 0043when waxing the vehicle. If
necessary, remove the wax using water,
shampoo and a soft cloth.
Cleaning the sliding door X
Remove foreign objects from the vicinity of
the contact surfaces and contact pins of
the sliding door.
X Clean the contact surfaces and contact
pins with a mild cleaning agent and a soft
cloth. Do not oil or grease the contact plates and
contact pins.
Cleaning the electrical step Clean the electrical step at least once a
month. Make sure that no dirt accumulates in
the housing or on the step.
X
Extend the electrical step (Y page 73).
X Close the sliding door until the door lock
engages.
The electrical step remains extended for
cleaning.
X Clean the electrical step and the housing
with a power washer.
X After cleaning, spray the step guides on
each side with silicone spray when the
housing and electrical step are dry.
Do not use oil or grease as a lubricant.
X Retract the electric step.
Cleaning the trailer tow hitch !
Do not clean the ball coupling with a
power washer. Do not use solvents.
! Observe the notes on care in the Opera-
tor's Manual for the trailer tow hitch and
the ball coupling manufacturer.
You can also have the maintenance work on
the ball coupling and the trailer tow hitch car-
ried out by a qualified specialist workshop. Interior
Cleaning with a power washer !
When using liquids to clean the vehicle
interior, observe the following points:
R Under no circumstances use power
washers.
R Make sure that no fluids enter or remain
in gaps and cavities. Care
271Maintenance and care Z