parking brake MERCEDES-BENZ SPRINTER 2014 MY14 Operator’s Manual
[x] Cancel search | Manufacturer: MERCEDES-BENZ, Model Year: 2014, Model line: SPRINTER, Model: MERCEDES-BENZ SPRINTER 2014Pages: 338, PDF Size: 6.78 MB
Page 283 of 338

Removing the front towing eye
X
Remove the screwdriver from the vehicle
tool kit.
X Insert the screwdriver into the towing eye
and turn the screwdriver counter-clock-
wise.
X Unscrew the towing eye.
X Insert cover 0043with the lug at the bottom
and press it in at the top until it engages.
X Place the towing eye and screwdriver back
in the vehicle tool kit. Towing in the event of malfunctions
With transmission damage !
Always use new bolts when installing the
propeller shafts.
i Only have the propeller shafts fitted/
removed at a qualified specialist workshop.
If the vehicle has transmission damage, have
the propeller shaft removed before towing
away.
In the event of damage to the electrical
system If the battery is defective, the automatic
transmission will be locked in position P. In
order to be able to shift the automatic trans-
mission to position N, you must provide
power to the vehicle's 12 V electrical system
in the same way as when jump-starting
(Y page 278).
Have the vehicle transported on a transporter
or trailer. Towing with the front or rear axle
raised
General notes !
The ignition must be switched off if the
vehicle is being towed with the front or rear axle raised. Otherwise, ESP
®
may intervene
and damage the brake system.
! Always use new bolts when installing the
propeller shafts.
i Only have the propeller shafts fitted/
removed at a qualified specialist workshop.
Observe the following before towing a vehicle
with a raised front or rear axle:
R the information on towing in the event of
malfunctions (Y page 281) and
R the important safety notes (Y page 279).
If the front axle is damaged, raise the vehicle
at the front axle and if the rear axle is dam-
aged, raise the vehicle at the rear axle.
Towing If the front axle is raised, the vehicle may be
towed a maximum of 30 miles
(50 km). For a
towing distance of over 30 miles (50 km), you
must remove the propeller shafts to the
driven axles.
X Turn the key to position 2in the ignition
lock.
X Depress the brake pedal and keep it
depressed.
X Shift the automatic transmission to posi-
tion N.
X Release the brake pedal.
X Release the parking brake.
X Turn the key to position 1in the ignition
lock and leave it in this position.
X Switch on the hazard warning lamps
(Y page 96).
X If the front axle is raised, do not exceed the
towing speed of 30 mph (50 km/h) and the
towing distance of 30 miles (50 km). Tow-starting and towing away
281Breakdown assistance Z
Page 284 of 338

Towing the vehicle with both axles on
the ground
Important safety notes G
WARNING
You can no longer steer the vehicle if the
steering wheel lock has been engaged. There
is a risk of an accident.
Always switch off the ignition when towing the
vehicle with a tow cable or a tow bar.
! Do not exceed a towing speed of
31 mph (50 km/h). You could otherwise
damage the transmission.
! Always use new bolts when installing the
propeller shafts.
i Only have the propeller shafts fitted/
removed at a qualified specialist workshop.
Before towing the vehicle, observe the fol-
lowing:
R the information on towing in the event of
malfunctions (Y page 281) and
R the important safety notes (Y page 279).
Towing You may only tow the vehicle a maximum dis-
tance of 30 miles (50 km). For a towing dis-
tance of over 30 miles (50 km), you must
remove the propeller shafts to the driven
axles.
X Turn the key to position 2in the ignition
lock.
X Depress the brake pedal and keep it
depressed.
X Shift the automatic transmission to posi-
tion N.
X Release the brake pedal.
X Release the parking brake.
X Leave the key in position 2in the ignition
lock. X
Switch on the hazard warning lamps
(Y page 96).
X Do not exceed the towing speed of
30 mph (50 km/h) and the towing distance
of 30 miles (50 km). Recovering a vehicle that is stuck
! When recovering a vehicle that has
become stuck, pull it as smoothly and
evenly as possible. Excessive tractive
power could damage the vehicles.
If the drive wheels get trapped on loose or
muddy ground, recover the vehicle with the
utmost care. This is especially the case if the
vehicle is laden.
Never attempt to recover a vehicle with a
trailer attached.
Pull out the vehicle backwards, if possible,
using the tracks it made when it became
stuck. Transporting the vehicle
! You may only secure the vehicle by the
wheels, not by parts of the vehicle such as
axle or steering components. Otherwise,
the vehicle could be damaged. Tow-starting (emergency engine
starting)
Vehicles with automatic transmission !
Vehicles with automatic transmission
must not be tow-started. You could other-
wise damage the automatic transmission.
Information on "Jump-starting" can be found
at the beginning of the "Breakdown assis-
tance" section ( Ypage 278). 282
Tow-starting and towing awayBreakdown assistance
Page 310 of 338

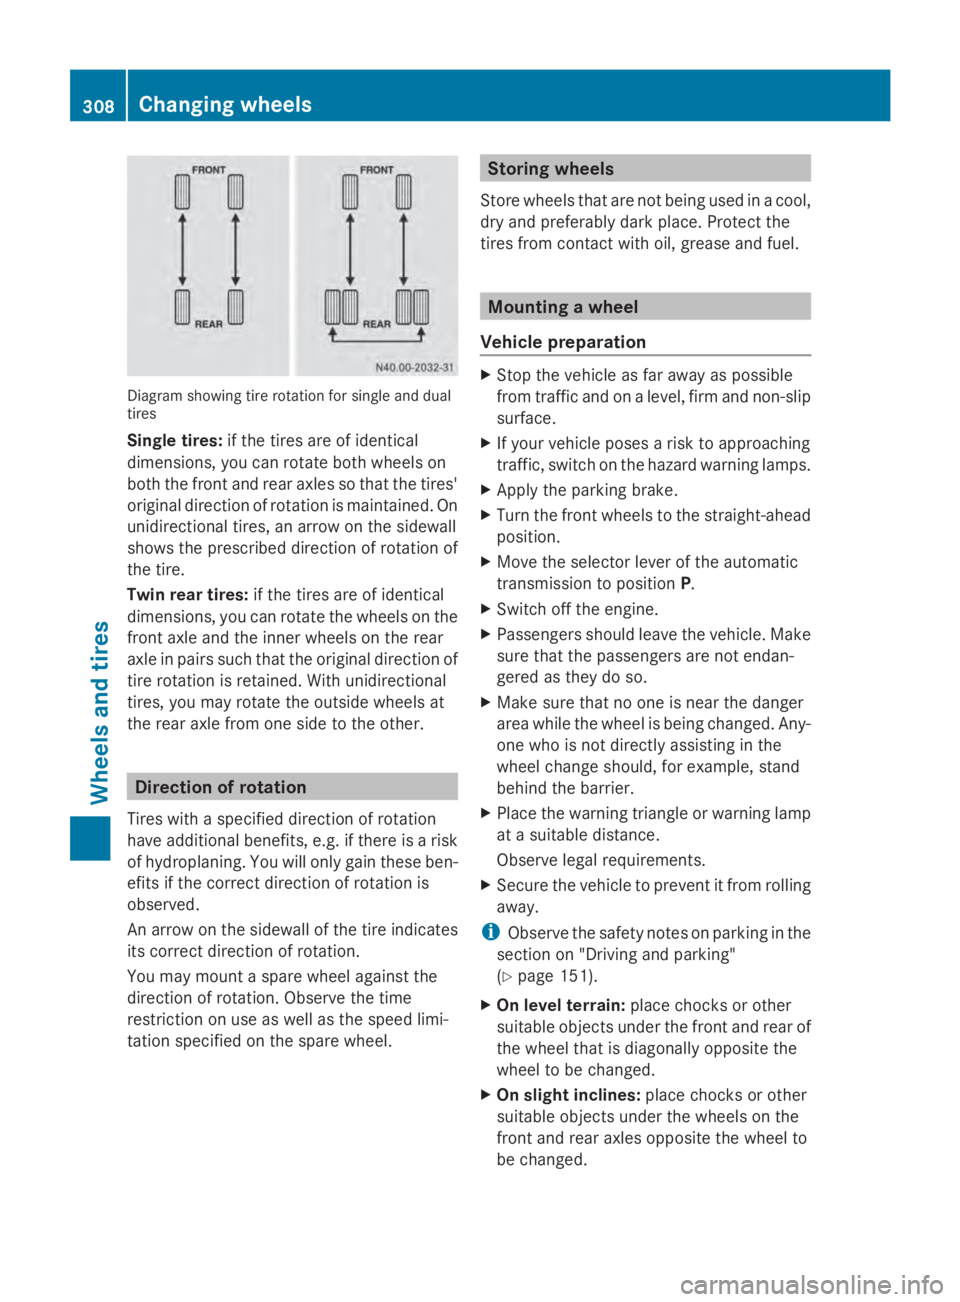
Diagram showing tire rotation for single and dual
tires
Single tires: if the tires are of identical
dimensions, you can rotate both wheels on
both the front and rear axles so that the tires'
original direction of rotation is maintained. On
unidirectional tires, an arrow on the sidewall
shows the prescribed direction of rotation of
the tire.
Twin rear tires: if the tires are of identical
dimensions, you can rotate the wheels on the
front axle and the inner wheels on the rear
axle in pairs such that the original direction of
tire rotation is retained. With unidirectional
tires, you may rotate the outside wheels at
the rear axle from one side to the other. Direction of rotation
Tires with a specified direction of rotation
have additional benefits, e.g. if there is a risk
of hydroplaning. You will only gain these ben-
efits if the correct direction of rotation is
observed.
An arrow on the sidewall of the tire indicates
its correct direction of rotation.
You may mount a spare wheel against the
direction of rotation. Observe the time
restriction on use as well as the speed limi-
tation specified on the spare wheel. Storing wheels
Store wheels that are not being used in a cool,
dry and preferably dark place. Protect the
tires from contact with oil, grease and fuel. Mounting a wheel
Vehicle preparation X
Stop the vehicle as far away as possible
from traffic and on a level, firm and non-slip
surface.
X If your vehicle poses a risk to approaching
traffic, switch on the hazard warning lamps.
X Apply the parking brake.
X Turn the front wheels to the straight-ahead
position.
X Move the selector lever of the automatic
transmission to position P.
X Switch off the engine.
X Passengers should leave the vehicle. Make
sure that the passengers are not endan-
gered as they do so.
X Make sure that no one is near the danger
area while the wheel is being changed. Any-
one who is not directly assisting in the
wheel change should, for example, stand
behind the barrier.
X Place the warning triangle or warning lamp
at a suitable distance.
Observe legal requirements.
X Secure the vehicle to prevent it from rolling
away.
i Observe the safety notes on parking in the
section on "Driving and parking"
(Y page 151).
X On level terrain: place chocks or other
suitable objects under the front and rear of
the wheel that is diagonally opposite the
wheel to be changed.
X On slight inclines: place chocks or other
suitable objects under the wheels on the
front and rear axles opposite the wheel to
be changed. 308
Changing wheelsWheels and tires
Page 311 of 338

X
Take the vehicle tool kit and the jack from
the footwell on the co-driver's side
(Y page 276).
X Remove the spare wheel from the spare
wheel bracket (Y page 314). Observe the
safety notes in the "Spare wheel" section
(Y page 313).
X On wheels with wheel bolts, remove the
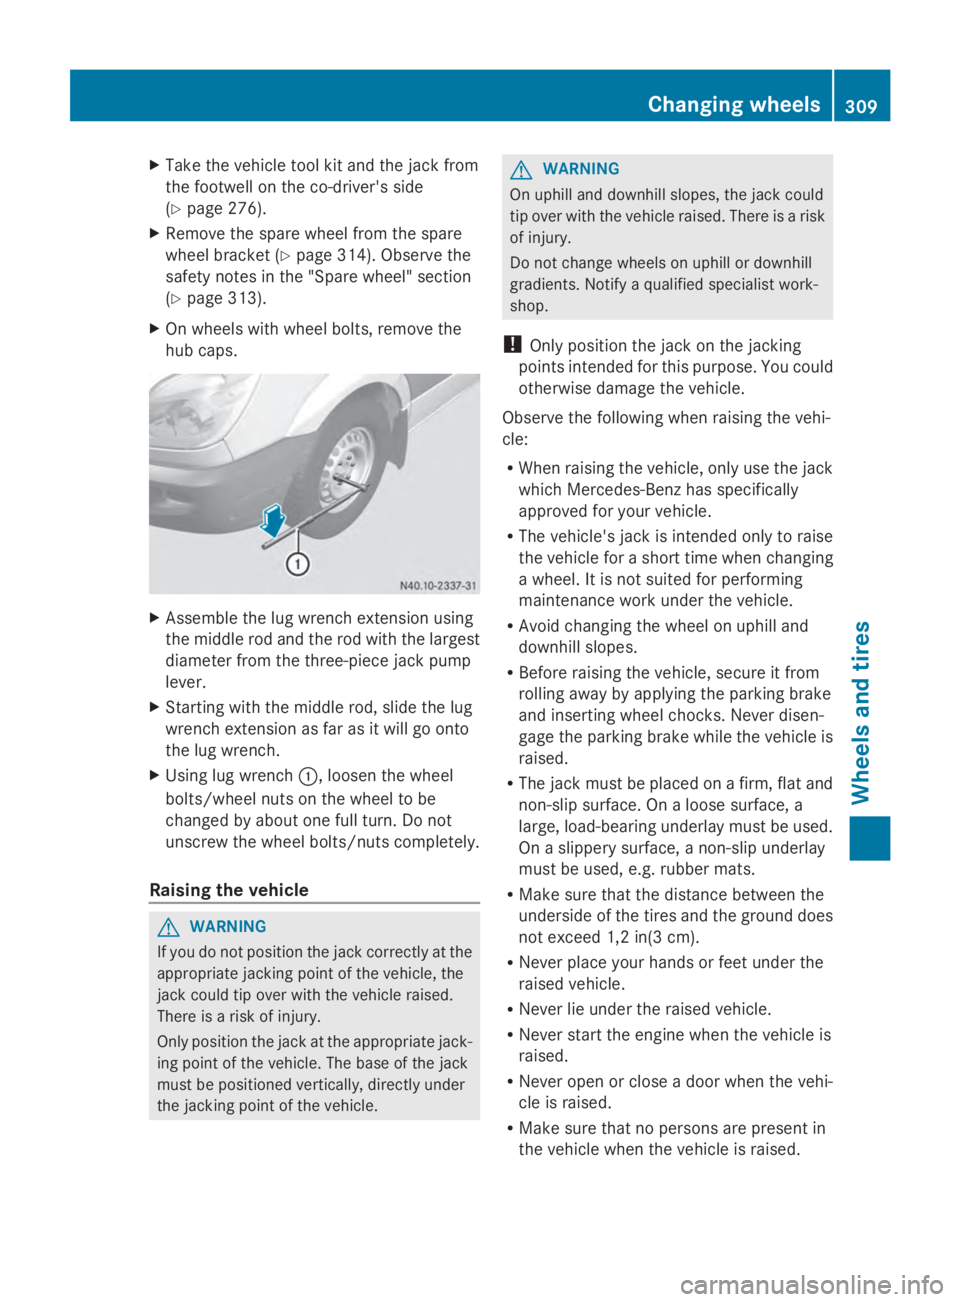
hub caps. X
Assemble the lug wrench extension using
the middle rod and the rod with the largest
diameter from the three-piece jack pump
lever.
X Starting with the middle rod, slide the lug
wrench extension as far as it will go onto
the lug wrench.
X Using lug wrench 0043, loosen the wheel
bolts/wheel nuts on the wheel to be
changed by about one full turn. Do not
unscrew the wheel bolts/nuts completely.
Raising the vehicle G
WARNING
If you do not position the jack correctly at the
appropriate jacking point of the vehicle, the
jack could tip over with the vehicle raised.
There is a risk of injury.
Only position the jack at the appropriate jack-
ing point of the vehicle. The base of the jack
must be positioned vertically, directly under
the jacking point of the vehicle. G
WARNING
On uphill and downhill slopes, the jack could
tip over with the vehicle raised. There is a risk
of injury.
Do not change wheels on uphill or downhill
gradients. Notify a qualified specialist work-
shop.
! Only position the jack on the jacking
points intended for this purpose. You could
otherwise damage the vehicle.
Observe the following when raising the vehi-
cle:
R When raising the vehicle, only use the jack
which Mercedes-Benz has specifically
approved for your vehicle.
R The vehicle's jack is intended only to raise
the vehicle for a short time when changing
a wheel. It is not suited for performing
maintenance work under the vehicle.
R Avoid changing the wheel on uphill and
downhill slopes.
R Before raising the vehicle, secure it from
rolling away by applying the parking brake
and inserting wheel chocks. Never disen-
gage the parking brake while the vehicle is
raised.
R The jack must be placed on a firm, flat and
non-slip surface. On a loose surface, a
large, load-bearing underlay must be used.
On a slippery surface, a non-slip underlay
must be used, e.g. rubber mats.
R Make sure that the distance between the
underside of the tires and the ground does
not exceed 1,2 in(3 cm).
R Never place your hands or feet under the
raised vehicle.
R Never lie under the raised vehicle.
R Never start the engine when the vehicle is
raised.
R Never open or close a door when the vehi-
cle is raised.
R Make sure that no persons are present in
the vehicle when the vehicle is raised. Changing wheels
309Wheels and tires Z