technical data MERCEDES-BENZ SPRINTER 2015 MY15 Operator’s Manual
[x] Cancel search | Manufacturer: MERCEDES-BENZ, Model Year: 2015, Model line: SPRINTER, Model: MERCEDES-BENZ SPRINTER 2015Pages: 334, PDF Size: 5.94 MB
Page 245 of 334
maximum loading capacity of the weakest
cargo tie-down point into account.
If you brake hard, for example, the forces
acting could be up to several times the
weight force of the load. Always use multi-
ple cargo tie-down points in order to dis-
tribute the force absorption. Load the
anchorages evenly.
Spread the load evenly between the cargo tie- down points or tie-down rings.
Please also refer to the notes about qualified
specialist workshops (Y page 25).
Always observe the operating instructions or
the notes of the lashing strap manufacturer
for the operation of the lashing strap.
Information about the maximum loading
capacity of the cargo tie-down points can be
found in the "Technical data" section
(Y page 327).
As the driver, you are responsible for ensuring that:
R The applicable requirements and guide-
lines relating to load-securing practices
must be met.
If this is not the case, this may constitute a punishable offense, depending on local leg-
islation and any ensuing consequences.
You should therefore observe the respec-
tive legal requirements for the relevant
country.
Make sure that the load is secure before every journey and at regular intervals during a long
journey. Correct an incorrectly or inade-
quately secured load if necessary.
You can obtain information about securing
the load correctly from the manufacturer of
the load securing aids or tie down for securing the load.
X Fill spaces between the load and the cargo
compartment walls or wheel housings
(form-locking). Use rigid load securing aids,
such as wedges, wooden fixings or pad-
ding.
X Attach secured and stabilized loads in all
directions. Use the cargo tie-down points or cargo tie-down rings and the loading rails
in the cargo compartment or on the cargo
area.
Only use tie downs, such as lashing rods or lashing nets and lashing straps, that have
been tested in accordance with current
standards (e.g. DIN EN).
Always use the cargo tie-down rings closest
to the load to secure it and pad sharp edges
for protection.
Loads, and heavy loads in particular, should
preferably be secured using the cargo tie-
down rings.
i Tie downs tested in accordance with cur-
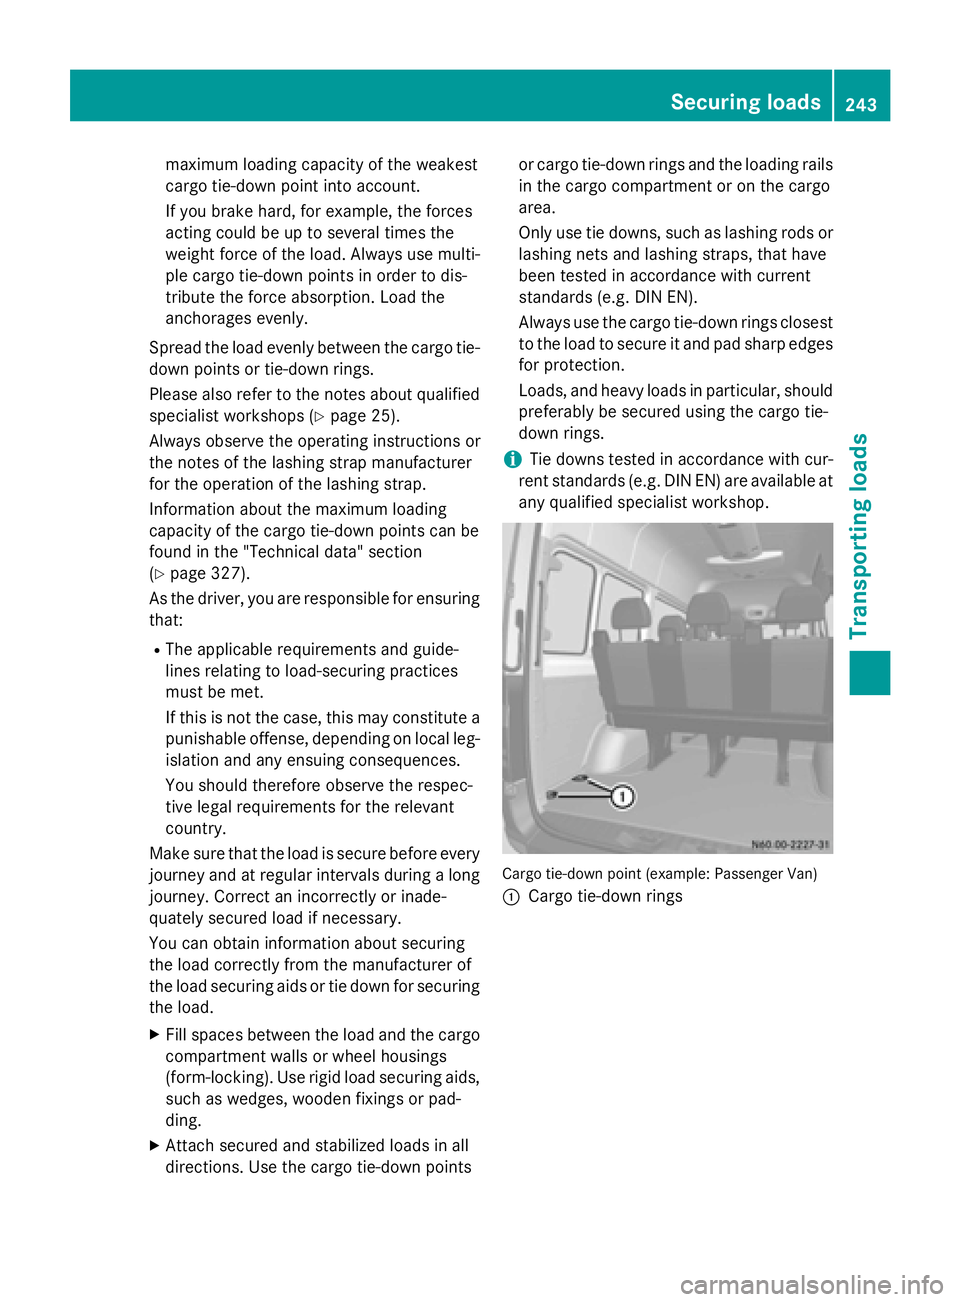
rent standards (e.g. DIN EN) are available at any qualified specialist workshop. Cargo tie-down point (example: Passenger Van)
0043 Cargo tie-down rings Securing loads
243Transporting loads Z
Page 247 of 334
the locking mechanism and out of the load-
ing rail through a recess. Carrier systems
Roof carrier
G
WARNING
When you load the roof, the center of gravity
of the vehicle rises and the driving character- istics change. If you exceed the maximum roof
load, the driving characteristics, as well as
steering and braking, will be greatly impaired. There is a risk of an accident.
Never exceed the maximum roof load and
adjust your driving style.
You can find information about the maximum
roof load in the "Technical data" section
(Y page 328).
! Make sure that:
R the screws for the roof carrier are tight-
ened in the sliding blocks to a torque of
6.0 – 7.4 lb-ft (8 – 10 Nm)
R the bolts, when tightened, do not touch
the rails.
R the slot nuts are not located in the area of
the plastic caps.
R the slot nuts have the right cross-section.
R the mounting rails in the interior are free
of dirt.
R the screws are retightened evenly after
approximately 300 miles (500 km).
We recommend that you only use roof
racks tested and approved by Sprinter.
These help avoid vehicle damage.
! If you want to retrofit securing rails, have
it done at a qualified specialist workshop.
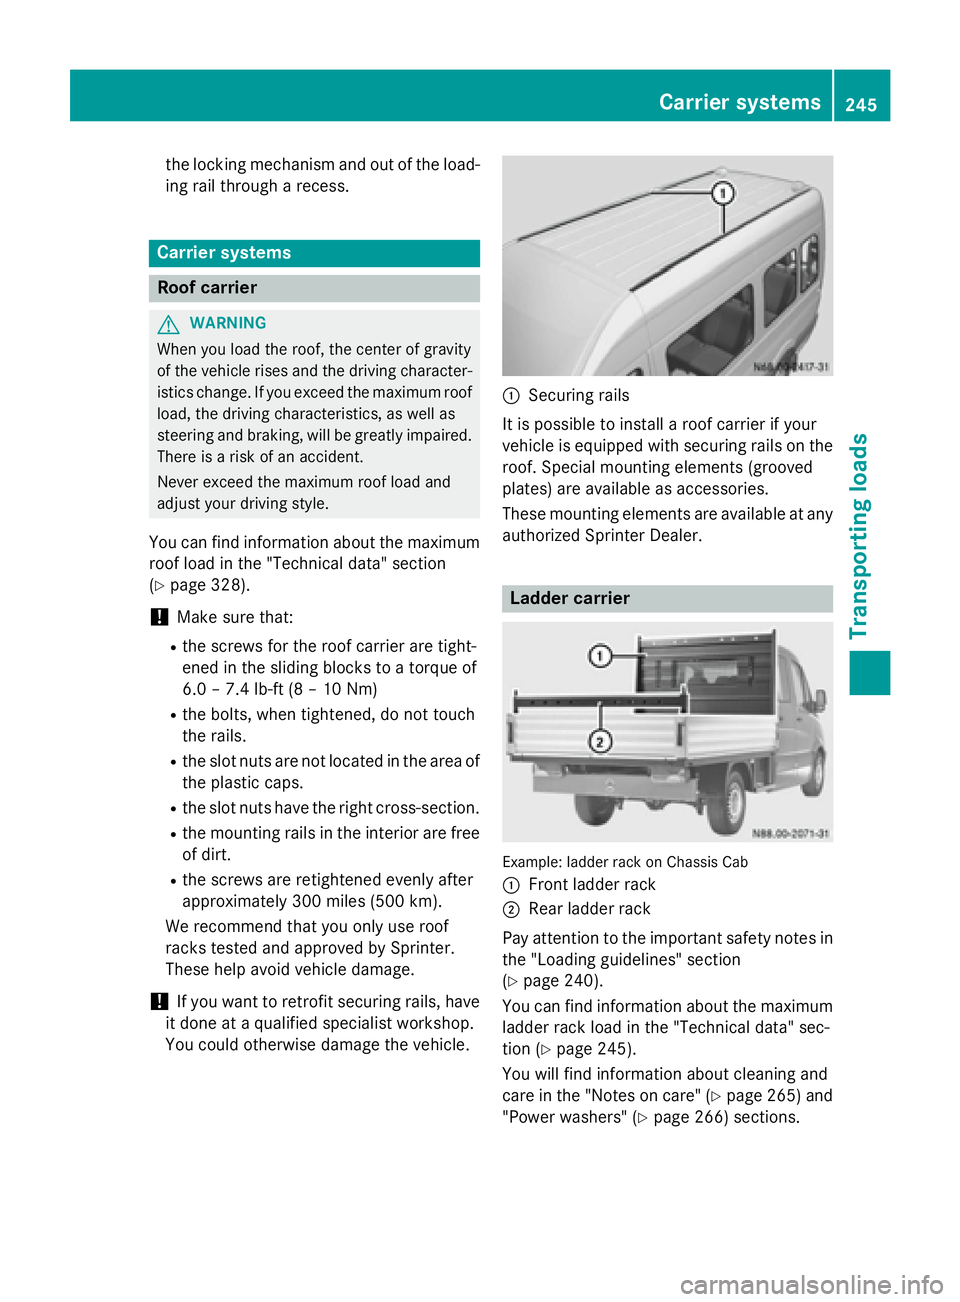
You could otherwise damage the vehicle. 0043
Securing rails
It is possible to install a roof carrier if your
vehicle is equipped with securing rails on the roof. Special mounting elements (grooved
plates) are available as accessories.
These mounting elements are available at any
authorized Sprinter Dealer. Ladder carrier
Example: ladder rack on Chassis Cab
0043
Front ladder rack
0044 Rear ladder rack
Pay attention to the important safety notes in the "Loading guidelines" section
(Y page 240).
You can find information about the maximum
ladder rack load in the "Technical data" sec-
tion (Y page 245).
You will find information about cleaning and
care in the "Notes on care" (Y page 265) and
"Power washers" (Y page 266) sections. Carrier systems
245Transporting loads Z
Page 252 of 334
Overview of the engine compartment
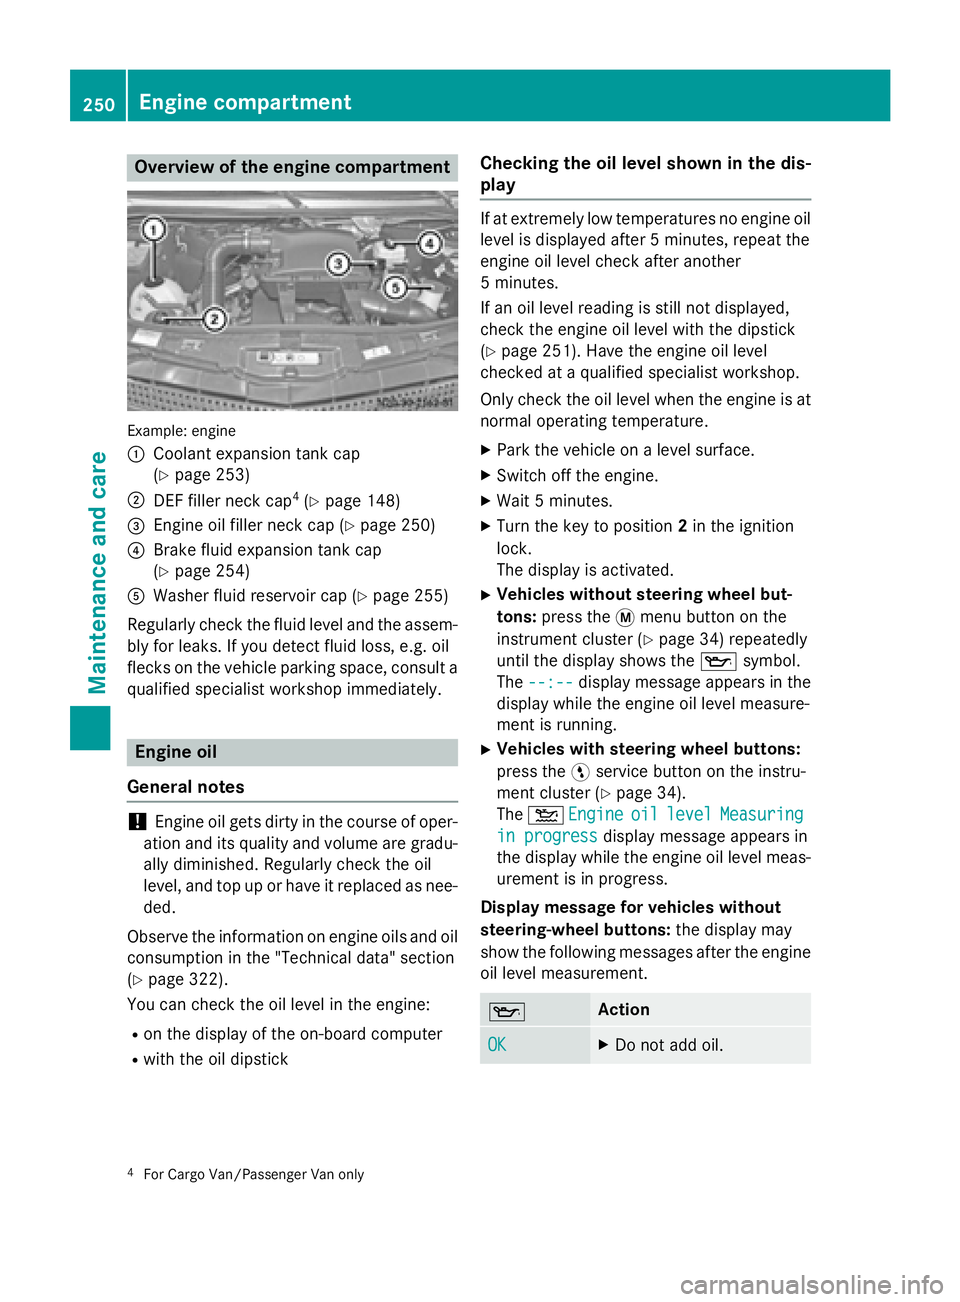
Example: engine
0043
Coolant expansion tank cap
(Ypage 253)
0044 DEF filler neck cap 4
(Y page 148)
0087 Engine oil filler neck cap (Y page 250)
0085 Brake fluid expansion tank cap
(Ypage 254)
0083 Washer fluid reservoir cap (Y page 255)
Regularly check the fluid level and the assem- bly for leaks. If you detect fluid loss, e.g. oil
flecks on the vehicle parking space, consult a qualified specialist workshop immediately. Engine oil
General notes !
Engine oil gets dirty in the course of oper-
ation and its quality and volume are gradu- ally diminished. Regularly check the oil
level, and top up or have it replaced as nee-
ded.
Observe the information on engine oils and oil
consumption in the "Technical data" section
(Y page 322).
You can check the oil level in the engine:
R on the display of the on-board computer
R with the oil dipstick Checking the oil level shown in the dis-
play If at extremely low temperatures no engine oil
level is displayed after 5 minutes, repeat the
engine oil level check after another
5 minutes.
If an oil level reading is still not displayed,
check the engine oil level with the dipstick
(Y page 251). Have the engine oil level
checked at a qualified specialist workshop.
Only check the oil level when the engine is at
normal operating temperature.
X Park the vehicle on a level surface.
X Switch off the engine.
X Wait 5 minutes.
X Turn the key to position 2in the ignition
lock.
The display is activated.
X Vehicles without steering wheel but-
tons: press the 0079menu button on the
instrument cluster (Y page 34) repeatedly
until the display shows the 00AFsymbol.
The --:--
--:-- display message appears in the
display while the engine oil level measure-
ment is running.
X Vehicles with steering wheel buttons:
press the 0098service button on the instru-
ment cluster (Y page 34).
The 00B2 Engine Engine oil
oillevel
level Measuring
Measuring
in progress
in progress display message appears in
the display while the engine oil level meas-
urement is in progress.
Display message for vehicles without
steering-wheel buttons: the display may
show the following messages after the engine oil level measurement. 00AF Action
OK OK X
Do not add oil. 4
For Cargo Van/Passenger Van only 250
Engine compartmentMaintenance and care
Page 256 of 334
Adding coolant
X If the coolant drops under the minimum
mark on coolant expansion tank 0044, add
coolant to the maximum mark.
Observe the information on coolant mix-
ture ratio and water quality in the "Techni-
cal data" section (Y page 325). To prevent
damage to the engine cooling system, use
only approved corrosion inhibitor/anti-
freeze that comply with the Mercedes-Benz Specifications for Service Products.
X Replace cap 0043and turn it clockwise to
tighten.
X Start the engine.
X After approximately 5 minutes, switch off
the engine and allow it to cool down.
X Check the coolant level again and add cool-
ant if necessary.
X Close the hood. Brake fluid
G
WARNING
Service products may be poisonous and haz-
ardous to health. There is a risk of injury.
Comply with instructions on the use, storage
and disposal of service products on the labels of the respective original containers. Always
store service products sealed in their original containers. Always keep service products out
of the reach of children.
Brake fluid is hazardous to health. Also
observe the safety notes in the "Service prod-
ucts and capacities" section (Y page 318).G
WARNING
The brake fluid constantly absorbs moisture
from the air. This lowers the boiling point of
the brake fluid. If the boiling point of the brake fluid is too low, vapor pockets may form in the brake system when the brakes are applied
hard. This would impair braking efficiency.
There is a risk of an accident. You should have the brake fluid renewed at
the specified intervals.
! Brake fluid corrodes paint, plastic and
rubber. If paint, plastic or rubber has come into contact with brake fluid, rinse with
water immediately.
Have the brake fluid renewed every 2 years at
a qualified specialist workshop. Observe the
information on brake fluid in the "Technical
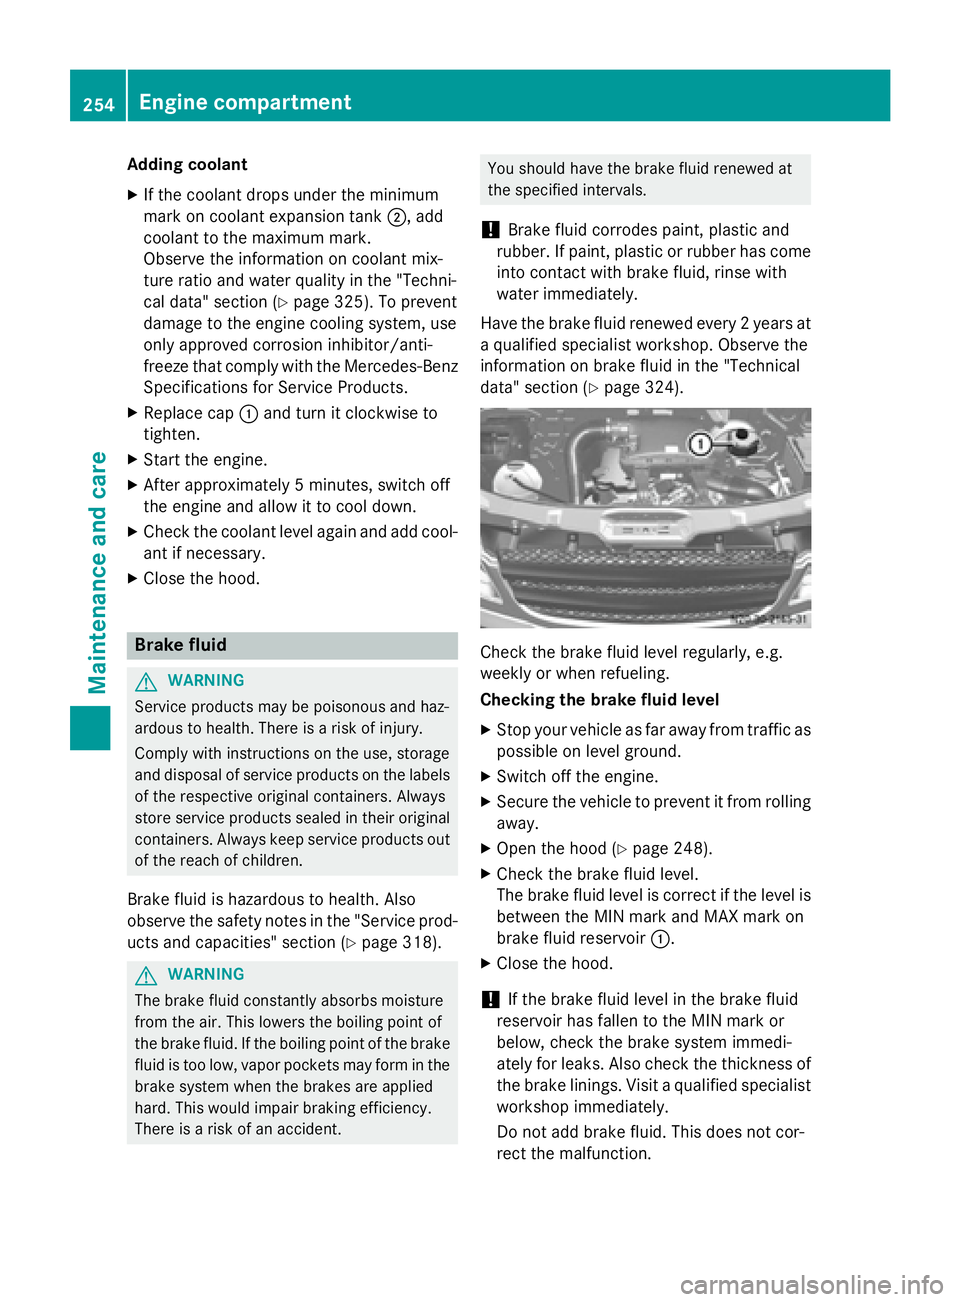
data" section (Y page 324). Check the brake fluid level regularly, e.g.
weekly or when refueling.
Checking the brake fluid level
X Stop your vehicle as far away from traffic as
possible on level ground.
X Switch off the engine.
X Secure the vehicle to prevent it from rolling
away.
X Open the hood (Y page 248).
X Check the brake fluid level.
The brake fluid level is correct if the level is
between the MIN mark and MAX mark on
brake fluid reservoir 0043.
X Close the hood.
! If the brake fluid level in the brake fluid
reservoir has fallen to the MIN mark or
below, check the brake system immedi-
ately for leaks. Also check the thickness of the brake linings. Visit a qualified specialist
workshop immediately.
Do not add brake fluid. This does not cor-
rect the malfunction. 254
Engine compartmentMaintenance and care
Page 257 of 334
Washer fluid
G
WARNING
Windshield washer concentrate could ignite if it comes into contact with hot engine compo-
nents or the exhaust system. There is a risk of
fire and injury.
Make sure that no windshield washer con-
centrate is spilled next to the filler neck.
! Only use washer fluid that is suitable for
plastic lamp lenses, e.g. MB SummerFit or
MB WinterFit. Unsuitable washer fluid
could damage the plastic lenses of the
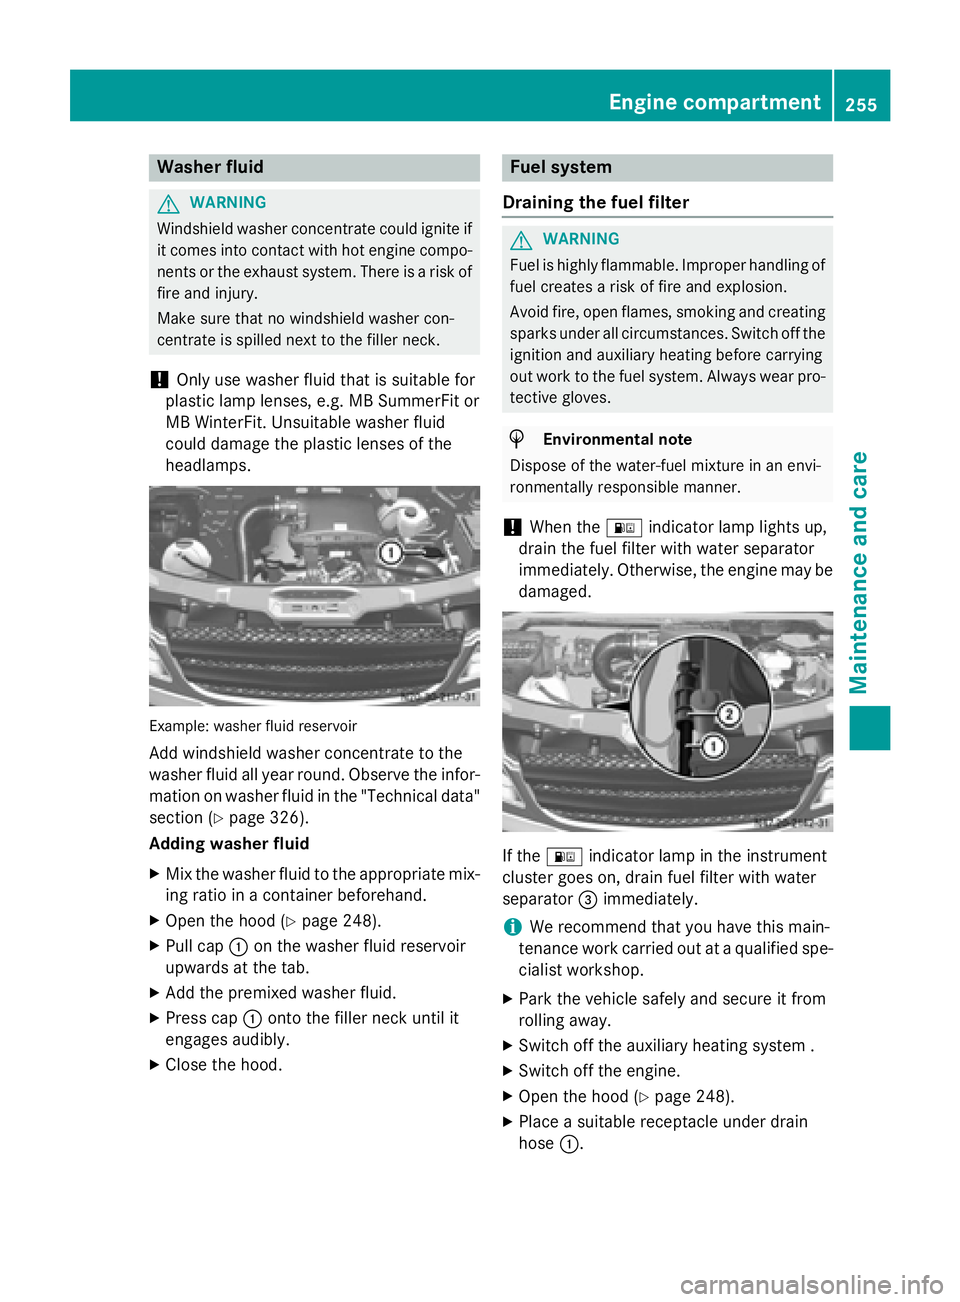
headlamps. Example: washer fluid reservoir
Add windshield washer concentrate to the
washer fluid all year round. Observe the infor- mation on washer fluid in the "Technical data"
section (Y page 326).
Adding washer fluid
X Mix the washer fluid to the appropriate mix-
ing ratio in a container beforehand.
X Open the hood (Y page 248).
X Pull cap 0043on the washer fluid reservoir
upwards at the tab.
X Add the premixed washer fluid.
X Press cap 0043onto the filler neck until it
engages audibly.
X Close the hood. Fuel system
Draining the fuel filter G
WARNING
Fuel is highly flammable. Improper handling of fuel creates a risk of fire and explosion.
Avoid fire, open flames, smoking and creatingsparks under all circumstances. Switch off the
ignition and auxiliary heating before carrying
out work to the fuel system. Always wear pro- tective gloves. H
Environmental note
Dispose of the water-fuel mixture in an envi-
ronmentally responsible manner.
! When the
00B8indicator lamp lights up,
drain the fuel filter with water separator
immediately. Otherwise, the engine may be
damaged. If the
00B8 indicator lamp in the instrument
cluster goes on, drain fuel filter with water
separator 0087immediately.
i We recommend that you have this main-
tenance work carried out at a qualified spe-
cialist workshop.
X Park the vehicle safely and secure it from
rolling away.
X Switch off the auxiliary heating system .
X Switch off the engine.
X Open the hood (Y page 248).
X Place a suitable receptacle under drain
hose 0043. Engine compartment
255Maintenance and care Z
Page 259 of 334
responsible manner. Comply with the instruc-
tions for use of the care products.
Do not run the engine for longer than neces-
sary when the vehicle is stationary.
Before having maintenance and repairs per-
formed, it is essential to read the materials
related to the maintenance and repairs: R the applicable sections of the technical
documentation, e.g. the Operator's Manual
and workshop information.
R regulations such as industrial safety regu-
lations and accident prevention regula-
tions.
While working under the vehicle, you must
secure the vehicle on jack stands with suffi-
cient load capacity.
Never use the jack as a substitute. The vehi-
cle's jack is intended only to raise the vehicle for a short time when changing a wheel. It is
not suited for performing maintenance work
under the vehicle.
Please also refer to the notes about qualified
specialist workshops (Y page 25).
The scope and regularity of the inspection
and maintenance work primarily depend on
the often diverse operating conditions. Spe-
cialist knowledge beyond the scope of this
Operator's Manual is required when carrying
out testing and maintenance work. This work
should only be carried out by trained staff.
The vehicle Maintenance Booklet describes
the scope and frequency of maintenance
work and contains additional notes on the
New Vehicle Limited Warranty and on service products.
Maintenance services must be carried out in
accordance with the provisions and recom-
mendations in the Maintenance Booklet. Not
doing so could void the warranty claim and
lead to refusal of goodwill gestures after the
manufacturer has submitted a damage
report. i
Observe the information on Sprinter orig-
inal parts in the "Technical data" section
(Y page 27). Service interval display
General notes A service that is due is displayed in the service
interval display about 1 month in advance. A
message is then displayed while the vehicle is in motion or when the ignition is switched on.
i The service interval display does not pro-
vide information about the engine oil level. The service interval display should there-
fore not be confused with the 00B3engine
oil level display.
The service due date is displayed in days or
miles (kilometers), depending on the total
distance driven.
The symbols or letters on the service display
show the type of service that is due.
0099 orA A for a minor service
009A orB
B for a major service
Service due date display Vehicles with steering wheel buttons:
the
following messages may be displayed.
R 0099 Service A due in ... days Service A due in ... days
R 0099 Service A due in ... mi
Service A due in ... mi (kmkm)
R 0099 Service A Carry out now
Service A Carry out now
Vehicles without steering wheel buttons:
the following messages may be displayed.
R 0099 for service A
R 009A for Service B
Additionally, you will see the remaining dis-
tance in miles (mi mi) or kilometers (km km) or the
remaining time in days (d d). Maintenance
257Maintenance and care Z
Page 317 of 334
Vehicle electronics
...........................316
Identification plates .........................316
Service products and capacities .....318
Vehicle data ....................................... 327 315Technical data
Page 318 of 334
Vehicle electronics
Tampering with the engine electron-
ics G
WARNING
Always have work on the engine electronics
and related components carried out at a quali- fied specialist workshop. Otherwise, the vehi-cle's operating safety could be affected.
! Only have engine electronics and the cor-
responding parts, such as control units,
sensors or connector leads, serviced in a
qualified specialist workshop. Otherwise,
the vehicle parts may wear more quickly.
This can lead to loss of the New Vehicle
Limited Warranty. Installing electrical or electronic
equipment
G
WARNING
You and others may damage your health due
to excessive electromagnetic radiation. By
using an external antenna, the possible health risks of electromagnetic fields, which are
under discussion among the scientific com-
munity, should be largely prevented.
Therefore, only have the exterior antenna
installed at a qualified specialist workshop.
Electrical and electronic devices may have a
detrimental effect on both the comfort and
the operating safety of the vehicle. If equip-
ment of this kind is installed, its electromag-
netic compatibility must be checked and veri-
fied.
If these devices are linked to functions asso-
ciated with resistance to interference, they
must have type approval. This applies to the
device or its interfaces to the vehicle elec-
tronics, e.g. charging brackets.
A telephone or two-way radio to be installed in
the vehicle must be approved. Further infor-
mation can be obtained from any Sprinter
Dealer. For operation of mobile phones and two-way
radios, Mercedes Benz recommends connec- tion to an approved exterior antenna. This is
the only way to ensure optimum reception
quality inside the vehicle and to minimize
mutual interference between the vehicle elec-
tronics, mobile phones and two-way radios.
The transmission output of the mobile phone
or two-way radio may not exceed the follow-
ing maximum transmission output (PEAK): Frequency range Maximum trans-
mission output
(PEAK) Shortwave
(f < 50 MHz) 100 W
4 m waveband 30 W
2 m waveband 50 W
Trunked radio/Tetra 35 W
70 cm waveband 35 W
GSM/UMTS/LTE 10 W
Identification plates
Vehicle identification plate with vehi-
cle identification number (VIN)
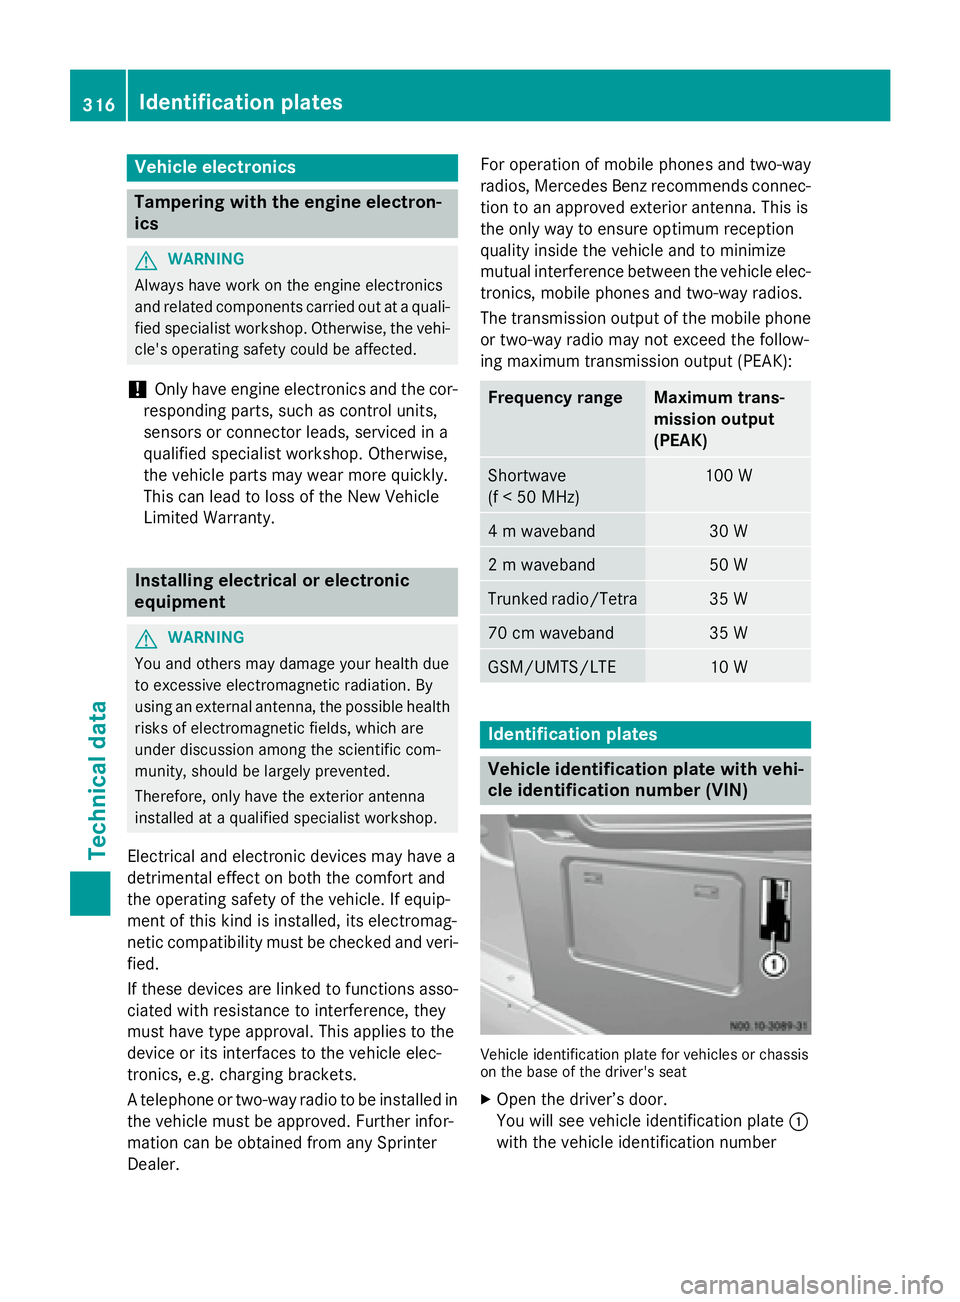
Vehicle identification plate for vehicles or chassis
on the base of the driver's seat
X Open the driver’s door.
You will see vehicle identification plate 0043
with the vehicle identification number 316
Identification platesTechnical data
Page 319 of 334
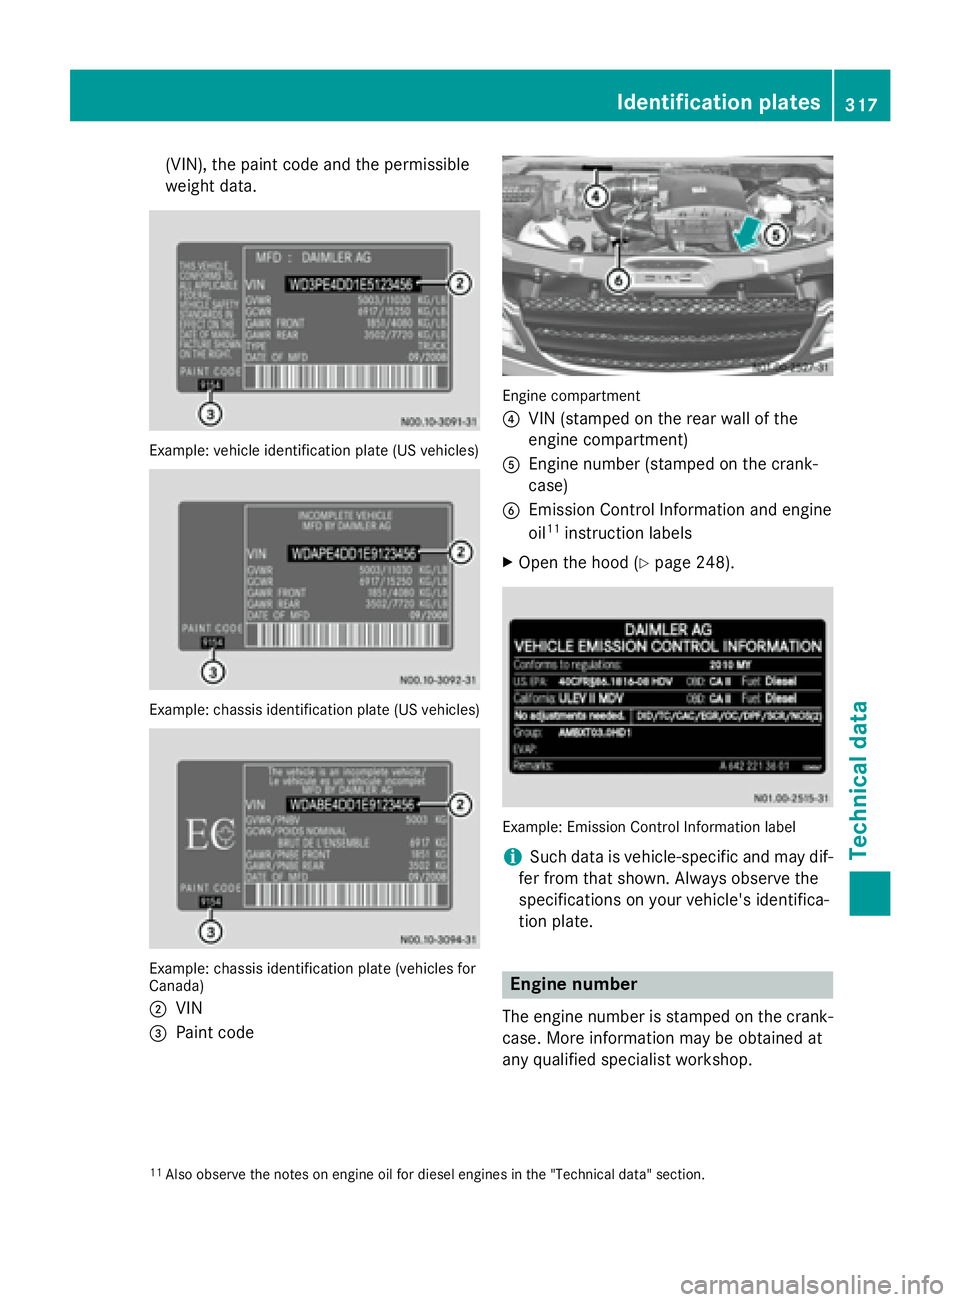
(VIN), the paint code and the permissible
weight data.
Example: vehicle identification plate (US vehicles)
Example: chassis identification plate (US vehicles)
Example: chassis identification plate (vehicles for
Canada)
0044
VIN
0087 Paint code Engine compartment
0085
VIN (stamped on the rear wall of the
engine compartment)
0083 Engine number (stamped on the crank-
case)
0084 Emission Control Information and engine
oil 11
instruction labels
X Open the hood (Y page 248). Example: Emission Control Information label
i
Such data is vehicle-specific and may dif-
fer from that shown. Always observe the
specifications on your vehicle's identifica-
tion plate. Engine number
The engine number is stamped on the crank-
case. More information may be obtained at
any qualified specialist workshop.
11 Also observe the notes on engine oil for diesel engines in the "Technical data" section. Identification plates
317Technical data Z
Page 320 of 334
Service products and capacities
Important safety notes
G
WARNING
Service products may be poisonous and haz-
ardous to health. There is a risk of injury.
Comply with instructions on the use, storage
and disposal of service products on the labels of the respective original containers. Always
store service products sealed in their original containers. Always keep service products out
of the reach of children. H
Environmental note
Dispose of service products in an environ-
mentally responsible manner.
Service products include the following:
R Fuels, e.g. diesel
R Additives for the exhaust gas aftertreat-
ment, e.g. Diesel Exhaust Fluid (DEF)
R Lubricants, e.g. engine oil, transmission oil
R Coolant
R Brake fluid
R Washer fluid
R Climate control system refrigerants
Approved service products comply with the
highest quality standards and are listed in the MB Specifications for Service Products. Only
use service products approved for the vehi-
cle. This is an important condition for the war-
ranty.
You will recognize the approved service prod- ucts by the inscription on the container: MB
Approval (e.g. MB Approval 228.5)
Other identifications and recommendations
refer to quality level or a specification accord-
ing to an MB Sheet Number (e.g. MB 228.5).
They are therefore not necessarily approved.
Further information can be obtained at any
qualified specialist workshop.
Additives for approved service products are
neither required nor permitted. Approved fuel additives are the exception. Additives can cause engine damage and must therefore not
be added to the service products.
The use of additives is always the responsi-
bility of the vehicle operator. The use of addi- tives may result in the restriction or loss of
your Limited Warranty entitlements. Fuel
Important safety notes G
WARNING
Fuel is highly flammable. Improper handling of fuel creates a risk of fire and explosion.
Avoid fire, open flames, smoking and creatingsparks under all circumstances. Switch off the
engine and, if applicable, the auxiliary heating before refueling. G
WARNING
Fuel is poisonous and hazardous to health.
There is a risk of injury.
You must make sure that fuel does not come into contact with your skin, eyes or clothing
and that it is not swallowed. Do not inhale fuel
vapors. Keep fuel away from children.
If you or others come into contact with fuel,
observe the following:
R Wash away fuel from skin immediately
using soap and water.
R If fuel comes into contact with your eyes,
immediately rinse them thoroughly with
clean water. Seek medical assistance with-
out delay.
R If fuel is swallowed, seek medical assis-
tance without delay. Do not induce vomit-
ing.
R Immediately change out of clothing which
has come into contact with fuel.
When handling, storing and disposing of fuels,
please observe the relevant regulations. 318
Service products and capacitiesTechnical data