clock MERCEDES-BENZ SPRINTER 2016 MY16 Operator’s Manual
[x] Cancel search | Manufacturer: MERCEDES-BENZ, Model Year: 2016, Model line: SPRINTER, Model: MERCEDES-BENZ SPRINTER 2016Pages: 290, PDF Size: 6.44 MB
Page 107 of 290
Heating and air-conditioning system
Air-recirculation mode switches off automati-
cally after about 10 to 30 minutes, depending on
the outside temperature.
XSwitch on climate control (Ypage 101).
XTo activate/deactivate:press theebut-
ton.
If the indicator lamp in the ebutton lights
up, air-recirculation mode is activated.
Rear-compartment heating and rear-
compartment air-conditioning system
On vehicles with rear-compartment heating and
a rear-compartment air-conditioning system,
you can activate or deactivate air-recirculation
mode for the rear-compartment climate control.
XSwitch on climate control (Ypage 101).
XTo activate: set the temperature control of
rear-compartment heating =(Ypage 100) or
rear-compartment air conditioning system ;
(
Ypage 101) to the center position.
Only one of the two climate control systems in
the rear compartment is activated and is in
air-recirculation mode.
XTo deactivate: turn the temperature control
of rear-compartment heating =(Ypage 100)
or rear-compartment air-conditioning sys-
tem ;(
Ypage 101) clockwise or counter-
clockwise. Only change the temperature in
small increments.
Adjusting the air vents
Important safety notes
GWARNING
Very hot or very cold air can flow from the air
vents. This could result in burns or frostbite in
the immediate vicinity of the air vents. There
is a risk of injury.
Make sure that all vehicle occupants always
maintain a sufficient distance to the air out-
lets. If necessary, redirect the airflow to
another area of the vehicle interior.
The center and side air vents are adjustable. On vehicles with a rear-compartment air-condi-
tioning system, you can also adjust the air vents
in the roof duct.
iFor virtually draft-free ventilation, adjust the
sliders of the center air vents to the center
position.
In order to ensure the direct flow of fresh air
through the air vents into the vehicle interior,
please observe the following notes:
Rkeep the air inlet grille on the hood free of
blockages, such as ice, snow or leaves.
Rnever cover the vents or the ventilation grilles
in the vehicle interior.
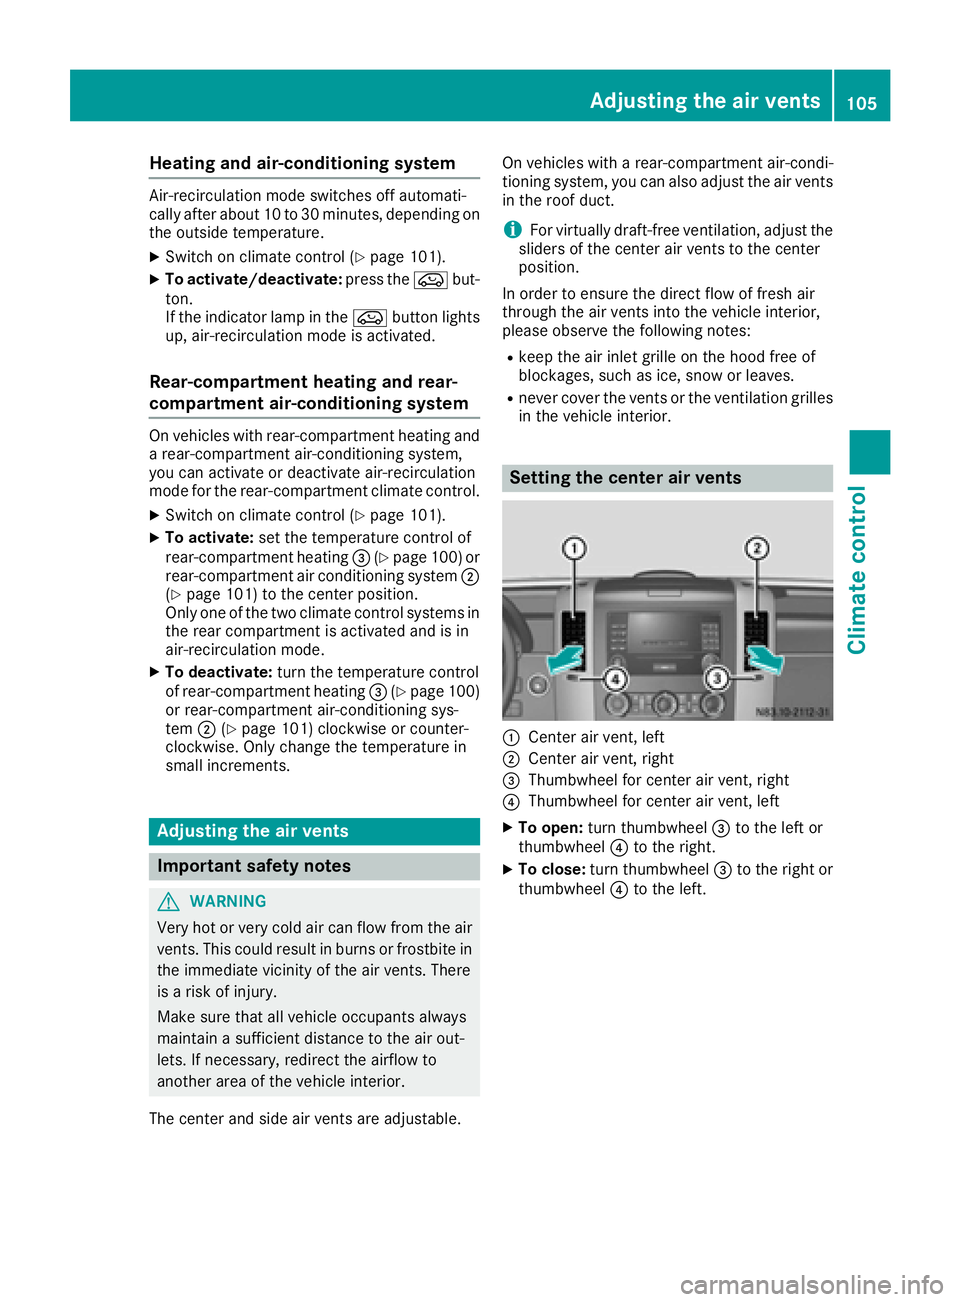
Setting the center air vents
:Center air vent, left
;Center air vent, right
=Thumbwheel for center air vent, right
?Thumbwheel for center air vent, left
XTo open: turn thumbwheel =to the left or
thumbwheel ?to the right.
XTo close: turn thumbwheel =to the right or
thumbwheel ?to the left.
Adjusting the air vents105
Climate control
Z
Page 114 of 290
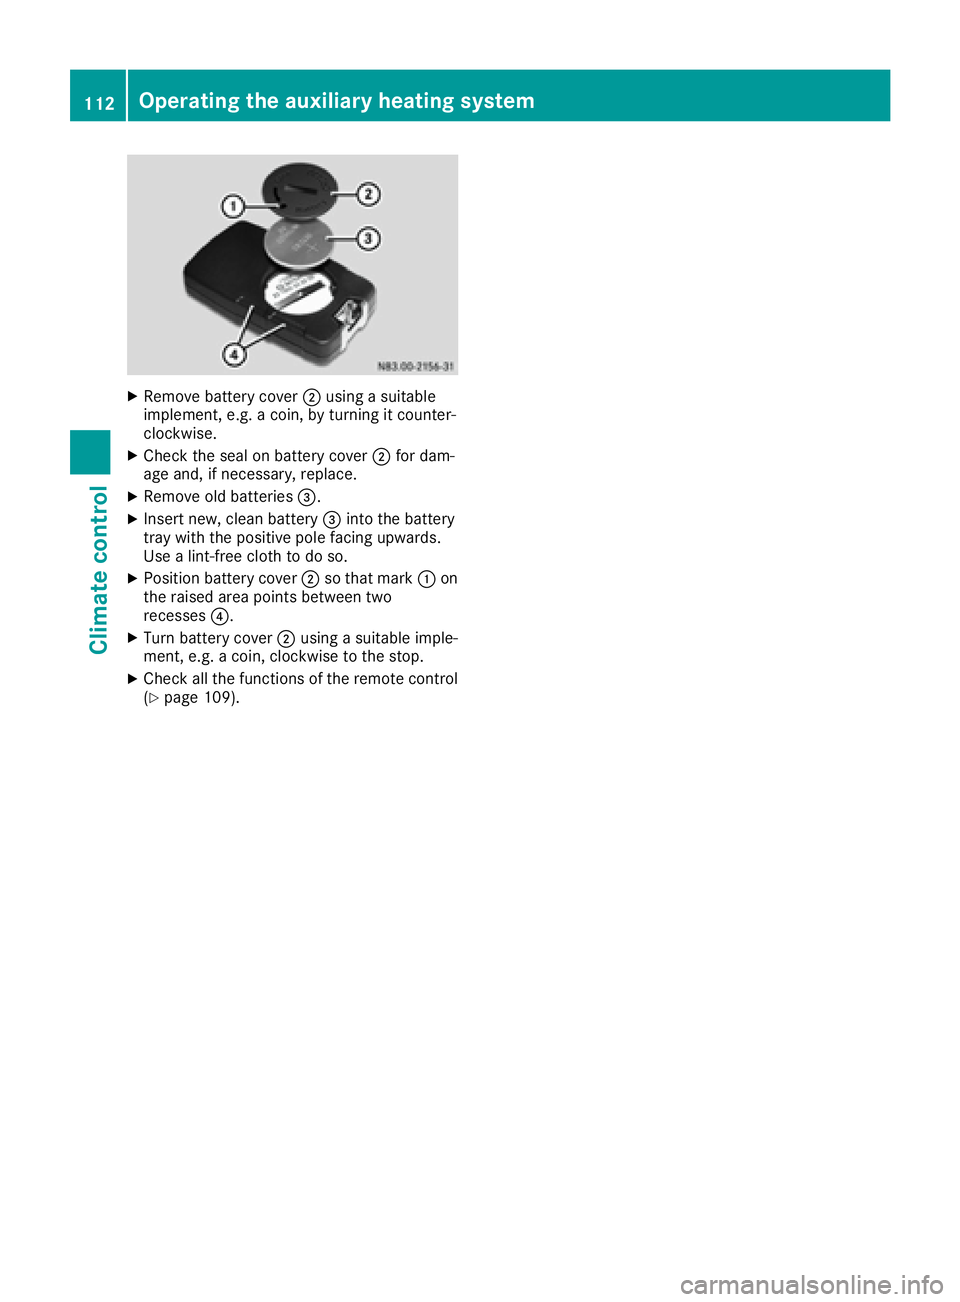
XRemove battery cover;usin g asuitable
implement ,e.g. acoin, by turnin git counter-
clockwise.
XChec kth eseal on battery cover ;for dam-
age and ,if necessary, replace .
XRemove old batteries=.
XInser tnew, clean battery =intoth ebattery
tray wit hth epositive pole facing upwards.
Use alint-free cloth to do so.
XPosition battery cover ;so that mar k: on
th eraised area points between two
recesses ?.
XTurn battery cover ;usin g asuitable imple-
ment, e.g. acoin, clockwise to th estop.
XChec kall th efunction sof th eremot econtrol
(Ypage 109).
112Operating the auxiliary heating system
Climate control
Page 117 of 290
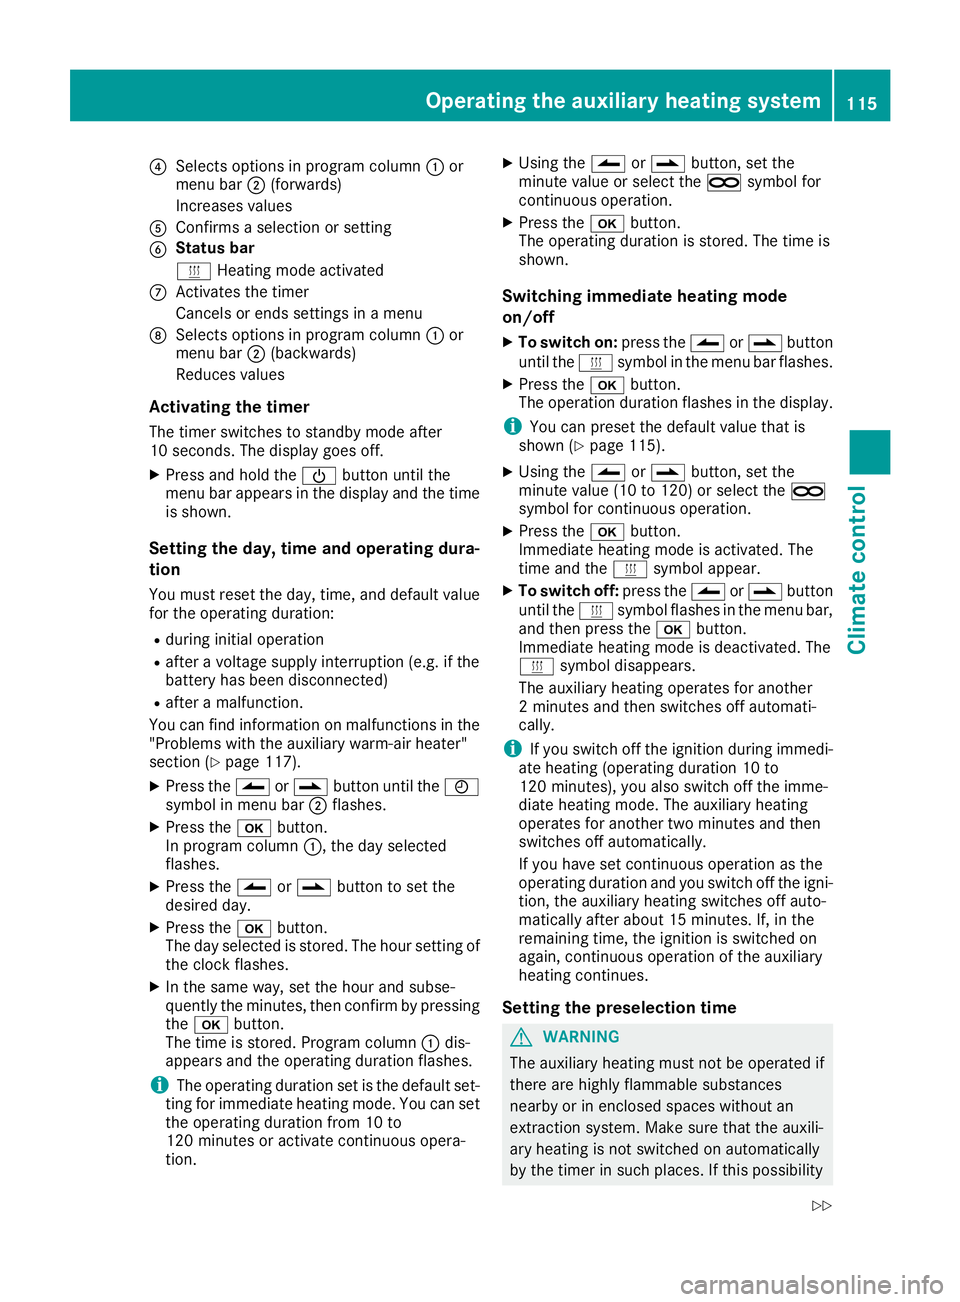
?Selects options in program column:or
menu bar ;(forwards)
Increases values
AConfirms a selection or setting
BStatus bar
y Heating mode activated
CActivates the timer
Cancels or ends settings in a menu
DSelects options in program column :or
menu bar ;(backwards)
Reduces values
Activating the timer
The timer switches to standby mode after
10 seconds. The display goes off.
XPress and hold the Übutton until the
menu bar appears in the display and the time
is shown.
Setting the day, time and operating dura-
tion
You must reset the day, time, and default value
for the operating duration:
Rduring initial operation
Rafter a voltage supply interruption (e.g. if the
battery has been disconnected)
Rafter a malfunction.
You can find information on malfunctions in the
"Problems with the auxiliary warm-air heater"
section (
Ypage 117).
XPress the Ûorâ button until the Ñ
symbol in menu bar ;flashes.
XPress the bbutton.
In program column :, the day selected
flashes.
XPress the Ûorâ button to set the
desired day.
XPress the bbutton.
The day selected is stored. The hour setting of the clock flashes.
XIn the same way, set the hour and subse-
quently the minutes, then confirm by pressingthe b button.
The time is stored. Program column :dis-
appea rs a
nd the operating duration flashes.
iThe operating duration set is the default set-
ting for immediate heating mode. You can set
the operating duration from 10 to
120 minutes or activate continuous opera-
tion.
XUsing the Ûorâ button, set the
minute value or select the àsymbol for
continuous operation.
XPress the bbutton.
The operating duration is stored. The time is
shown.
Switching immediate heating mode
on/off
XTo switch on: press theÛorâ button
until the ysymbol in the menu bar flashes.
XPress the bbutton.
The operation duration flashes in the display.
iYou can preset the default value that is
shown (Ypage 115).
XUsing the Ûorâ button, set the
minute value (10 to 120) or select the à
symbol for continuous operation.
XPress the bbutton.
Immediate heating mode is activated. The
time and the ysymbol appear.
XTo switch off: press theÛorâ button
until the ysymbol flashes in the menu bar,
and then press the bbutton.
Immediate heating mode is deactivated. The
y symbol disappears.
The auxiliary heating operates for another
2 minutes and then switches off automati-
cally.
iIf you switch off the ignition during immedi-
ate heating (operating duration 10 to
120 minutes), you also switch off the imme-
diate heating mode. The auxiliary heati
ng
operates for another two minutes and then
switches off automatically.
If you have set continuous operation as the
operating duration and you switch off the igni-
tion, the auxiliary heating switches off auto-
matically after about 15 minutes. If, in the
remaining time, the ignition is switched on
again, continuous operation of the auxiliary
heating continues.
Setting the preselection time
GWARNING
The auxiliary heating must not be operated if
there are highly flammable substances
nearby or in enclosed spaces without an
extraction system. Make sure that the auxili-
ary heating is not switched on automatically
by the timer in such places. If this possibility
Operating the auxiliary heating system115
Climate control
Z
Page 130 of 290
and that it is not swallowed. Do not inhale fuelvapors. Keep fuel away from children.
If you or others come into contact with fuel,
observe the following:
RWash away fuel from skin immediately
using soap and water.
RIf fuel comes into contact with your eyes,
immediately rinse them thoroughly with
clean water. Seek medical assistance with-
out delay.
RIf fuel is swallowed, seek medical assis-
tance without delay. Do not induce vomit-
ing.
RImmediately change out of clothing which
has come into contact with fuel.
GWARNING
If you mix diesel fuel with gasoline, the flash
point is lower than that of pure diesel fuel.
When the engine is running, exhaust system
components could overheat without being
noticed. There is a risk of fire.
Never refuel with gasoline. Never mix gasoline with diesel fuel.
HEnvironmental note
If fuels are handled improperly, they pose a
danger to persons and the environment. Do
not allow fuels to run into the sewage system,
the surface waters, the ground water or into
the ground.
!Do not use gasoline to refuel vehicles with a
diesel engine. Even small amounts of gasoline
will cause damage to the fuel system and
engine.
!Do not switch on the ignition if you acciden-
tally refuel with the wrong fuel. Otherwise, the
fuel will enter the fuel lines. Notify a qualified
specialist workshop and have the fuel tank
and fuel lines drained completely.
!Overfilling the fuel tank could damage the
fuel system.
!Take care not to spill any fuel on painted
surfaces. You could otherwise damage the
paintwork.
!Filter the fuel before transferring it to the
vehicle if you are refueling the vehicle from
barrels or containers.
This will prevent malfunctions in the fuel sys-
tem due to contaminated fuel.
Further information on fuel and on fuel grades
can be found in the "Technical data" section
(
Ypage 277).
Refueling procedure
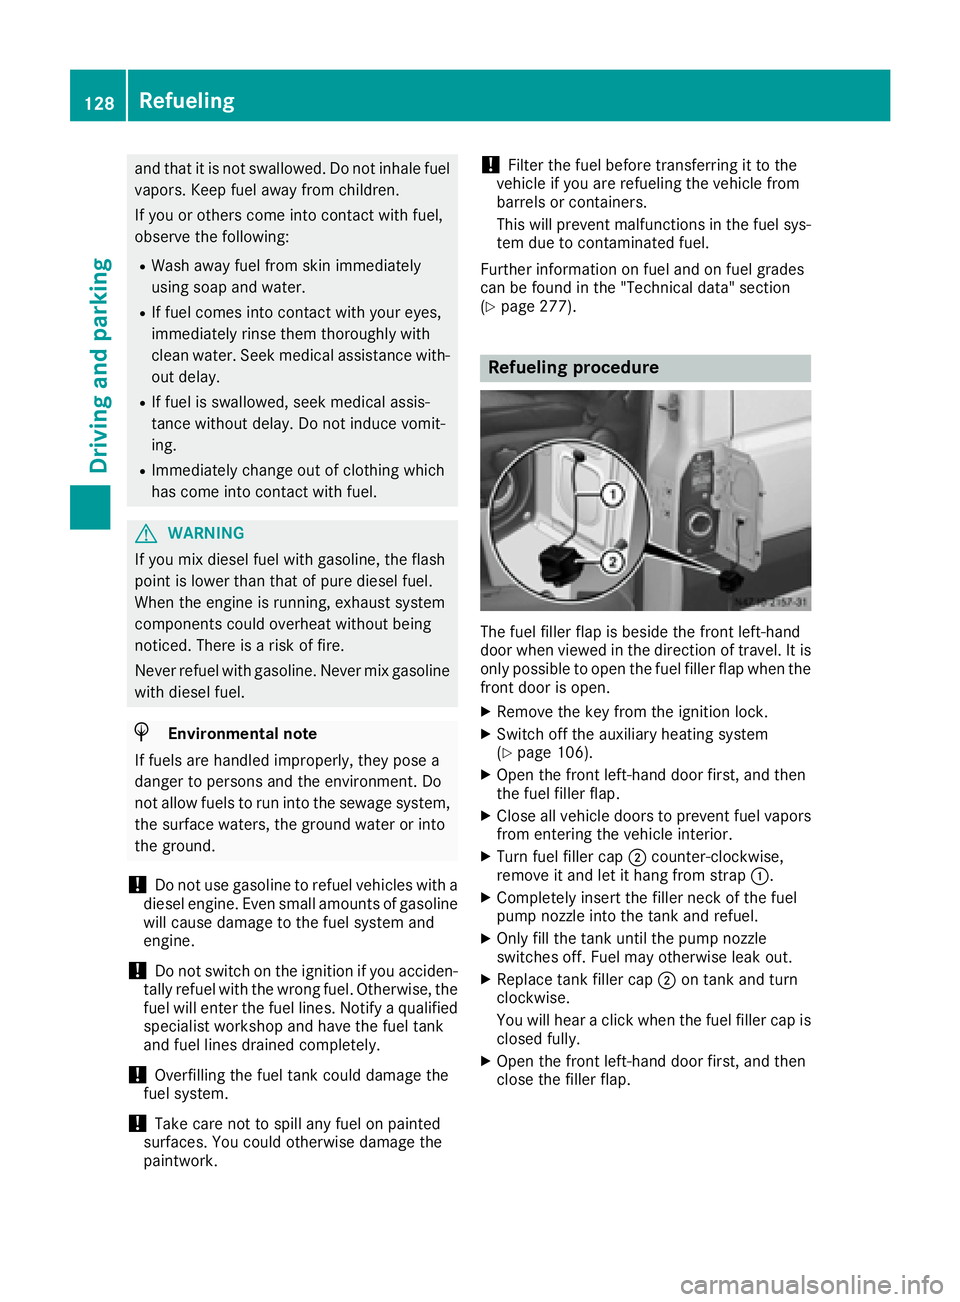
The fuel filler flap is beside the front left-hand
door when viewed in the direction of travel. It is
only possible to open the fuel filler flap when the front door is open.
XRemove the key from the ignition lock.
XSwitch off the auxiliary heating system
(Ypage 106).
XOpen the front left-hand door first, and then
the fuel filler flap.
XClose all vehicle doors to prevent fuel vaporsfrom entering the vehicle interior.
XTurn fuel filler cap ;counter-clockwise,
remove it and let it hang from strap :.
XCompletely insert the filler neck of the fuel
pump nozzle into the tank and refuel.
XOnly fill the tank until the pump nozzle
switches off. Fuel may otherwise leak out.
XReplace tank filler cap;on tank and turn
clockwise.
You will hear a click when the fuel filler cap is
closed fully.
XOpen the front left-hand door first, and then
close the filler flap.
128Refueling
Driving and parking
Page 131 of 290
Problems with the fuel and fuel tank
If your vehicle is losing fuel, the fuel lines or thefuel tank are defective.
XTurn the key immediately to position 0in the
ignition lock and remove it.
XDo not restart the engine under any circum-
stances.
XConsult a qualified specialist workshop.
If the fuel tank has been run dry, after refueling
carry out the following steps:
XBefore starting the engine: switch on the igni-
tion three or four times.
XTurn the key to position 2in the ignition lock
(Ypage 119).
The % preglow indicator lamp in the instru-
ment cluster lights up briefly.
XOnce the %preglow indicator lamp goes
out, turn the key to position 3in the ignition
lock and release it as soon as the engine is
running.
You can start the diesel engine without preglow
when the engine is warm.
Diesel Exhaust Fluid (DEF)
Important safety notes
!Only use DEF in accordance with
ISO 22241. Never mix DEF with additives or
thin it with tap water. The exhaust gas after-
treatment may otherwise be damaged.
Observe the MB Specifications for Service
Products, Sheet 352.0.
Damage that results from the use of additives
or tap water leads to the loss of the New
Vehicle Limited Warranty.
!If DEF comes into contact with a painted or
aluminum surface, wash the surface off
immediately with plenty of water.
!DEF is not a diesel additive and must not be
mixed with fuel in the tank. Even small
amounts of DEF can cause engine damage.
Damage that results from the blending of DEF
will not be covered by the New Vehicle Limi-
ted Warranty.
iIf the outside temperature is below 12 ‡
( Ò 11 †) it may be difficult to top up. If the DEF
is frozen and there is an active warning indi- cator, topping up may not be possible. Park
the vehicle in a warm place, e.g. in a garage,
until the DEF has become liquid again. Top-
ping up is then possible again. Alternatively,
have the DEF tank refilled at a qualified spe-
cialist workshop.
iIf you add DEF at temperatures below 12 ‡
( Ò 11 †) it is possible that the level is not
shown correctly due to the frozen DEF.
Drive for at least 20 minute s(heating phase in
the tank activated) and then st
op the vehicle
for at least 30 seconds. The level is then
shown correctly.
You will find further information on DEF in the
"Service products" section (
Ypage 277).
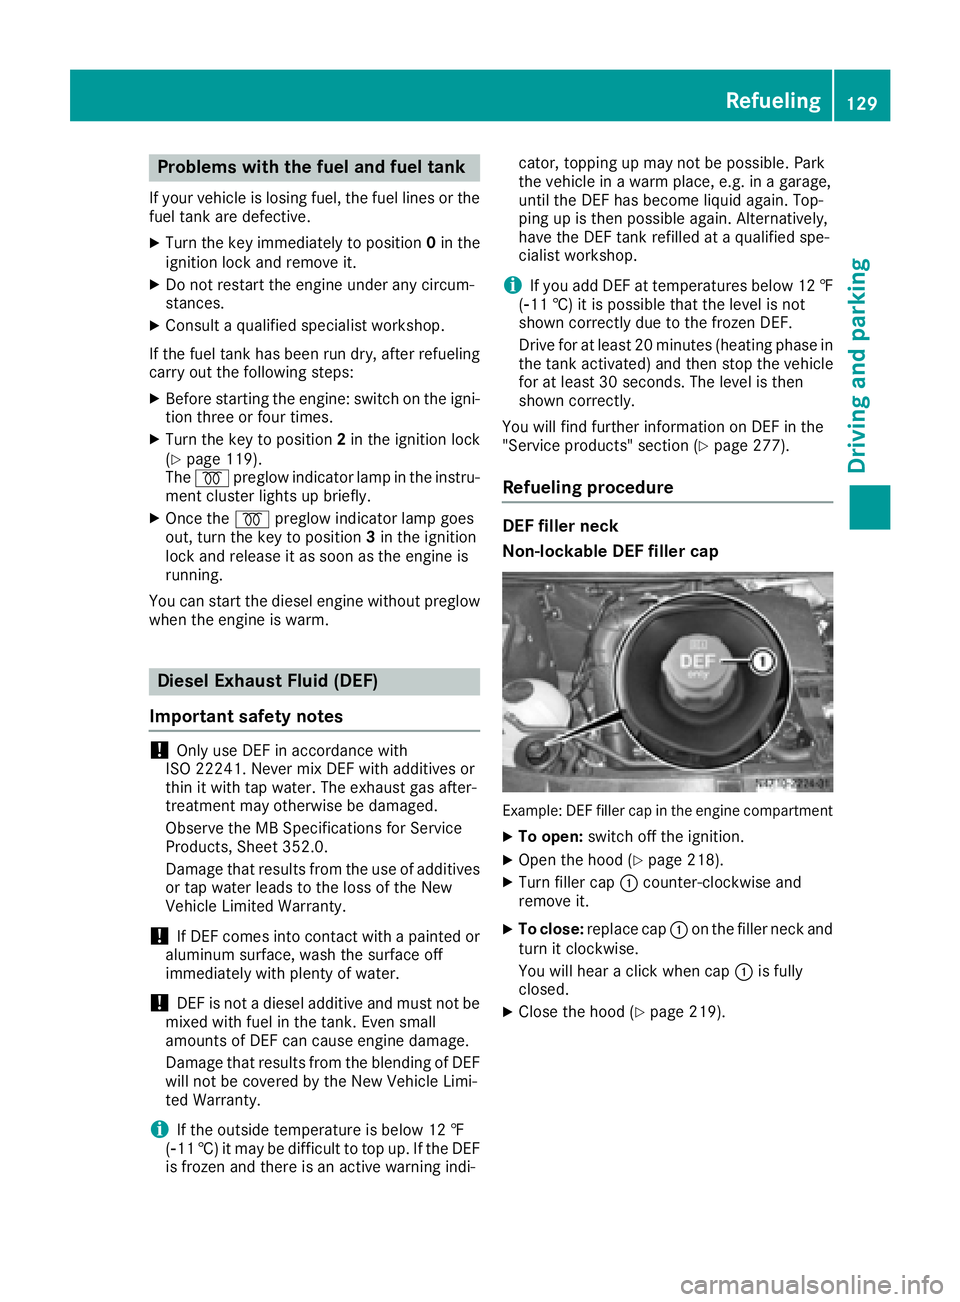
Refueling procedure
DEF filler neck
Non-lockable DEF filler cap
Example: DEF filler cap in the engine compartment
XTo open: switch off the ignition.
XOpen the hood (Ypage 218).
XTurn filler cap :counter-clockwise and
remove it.
XTo close: replace cap :on the filler neck and
turn it clockwise.
You will hear a click when cap :is fully
closed.
XClose the hood (Ypage 219).
Refueling129
Driving and parking
Z
Page 132 of 290
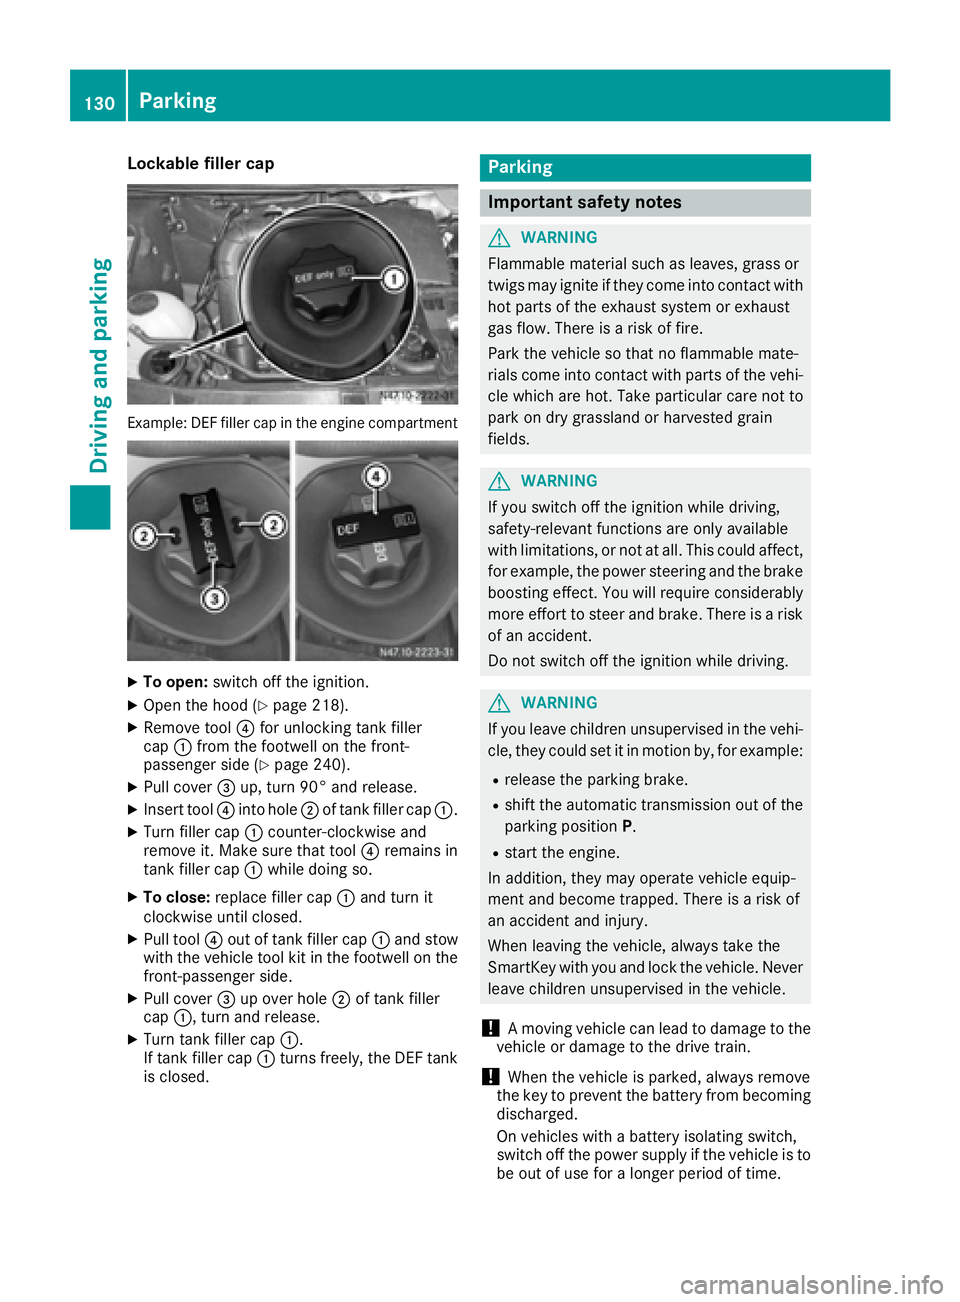
Lockable filler cap
Example: DEF filler cap in the engine compartment
XTo open:switch off the ignition.
XOpen the hood (Ypage 218).
XRemove tool ?for unlocking tank filler
cap :from the footwell on the front-
passenger side (
Ypage 240).
XPull cover =up, turn 90° and release.
XInsert tool ?into hole ;of tank filler cap :.
XTurn filler cap:counter-clockwise and
remove it. Make sure that tool ?remains in
tank filler cap :while doing so.
XTo close: replace filler cap :and turn it
clockwise until closed.
XPull tool ?out of tank filler cap :and stow
with the vehicle tool kit in the footwell on the
front-passenger side.
XPull cover =up over hole ;of tank filler
cap :, turn and release.
XTurn tank filler cap :.
If tank filler cap :turns freely, the DEF tank
is closed.
Parking
Important safety notes
GWARNING
Flammable material such as leaves, grass or
twigs may ignite if they come into contact with
hot parts of the exhaust system or exhaust
gas flow. There is a risk of fire.
Park the vehicle so that no flammable mate-
rials come into contact with parts of the vehi-
cle which are hot. Take particular care not to
park on dry grassland or harvested grain
fields.
GWARNING
If you switch off the ignition while driving,
safety-relevant functions are only available
with limitations, or not at all. This could affect, for example, the power steering and the brake
boosting effect. You will require considerably
more effort to steer and brake. There is a risk
of an accident.
Do not switch off the ignition while driving.
GWARNING
If you leave children unsupervised in the vehi-
cle, they could set it in motion by, for example:
Rrelease the parking brake.
Rshift the automatic transmission out of the
parking position P.
Rstart the engine.
In addition, they may operate vehicle equip-
ment and become trapped. There is a risk of
an accident and injury.
When leaving the vehicle, always take the
SmartKey with you and lock the vehicle. Never
leave children unsupervised in the vehicle.
!A moving vehicle can lead to damage to the
vehicle or damage to the drive train.
!When the vehicle is parked, always remove
the key to prevent the battery from becoming
discharged.
On vehicles with a battery isolating switch,
switch off the power supply if the vehicle is to
be out of use for a longer period of time.
130Parking
Driving and parking
Page 165 of 290
If the supply of DEF falls below the reserve range
of 0.8 US gal (3.0l), the StArtS RExxmessage
appears in the display. In addition, the yellow
å DEF indicator lamp lights up in the instru-
ment cluster and three warning tones sound.
In the display, xx
corresponds to the number of
possible remaining engine starts (16to 0).
When the display shows that the number of
remaining starts is 0
, theStArtSIdLEmessage
appears in the display and three warning tones
sound.
In addition, the yellow åDEF indicator lamp
and the ;Check Engine indicator lamp light
up in the instrument cluster and three warning
tones sound.
The engine management only allows speeds of
up to 5 mph (8 km/h).
Add at least 1.5 US gal (5.5 l) of DEF
(
Ypage 129).
The display message only disappears when the
vehicle is stationary, at the latest after
20 seconds as soon as you switch on the ignition or start the engine after refueling.
Vehicles with steering wheel buttons
If the supply of DEF is less than 1.5 US gal
(5.5 l), the Check Diesel Exhaust Fluid
see Operator's Manualmessage appears in
the display.
If the supply of DEF falls below the reserve range
of 0.8 US gal (3.0 l), the XX
startsremainingmessage is displayed.
Three short warning tones also sound.
In the display,xx
corresponds to the number of
possible remaining engine starts (16to 0).
When the display shows that the number of
remaining starts is 0
, theStArtSIdLEmessage
appears in the display.
The yellow ;Check Engine indicator lamp
also lights up and three short warning tones
sound.
The engine management only allows speeds of
up to 5 mph (8 km/h).
Add at least 1.5 US gal (5.5 l) of DEF
(
Ypage 129).
The display message only disappears when the
vehicle is stationary, at the latest after
20 seconds as soon as you switch on the ignition or start the engine after refueling.
On-board computer (vehicles without
steering wheel buttons)
Operating the on-board computer
General notes
The on-board computer is activated as soon as
you turn the key to position 1in the ignition lock.
The on-board computer shows vehicle informa-
tion and settings in the display.
You can control the display and the settings in
the on-board computer using the adjustment
buttons on the instrument cluster.
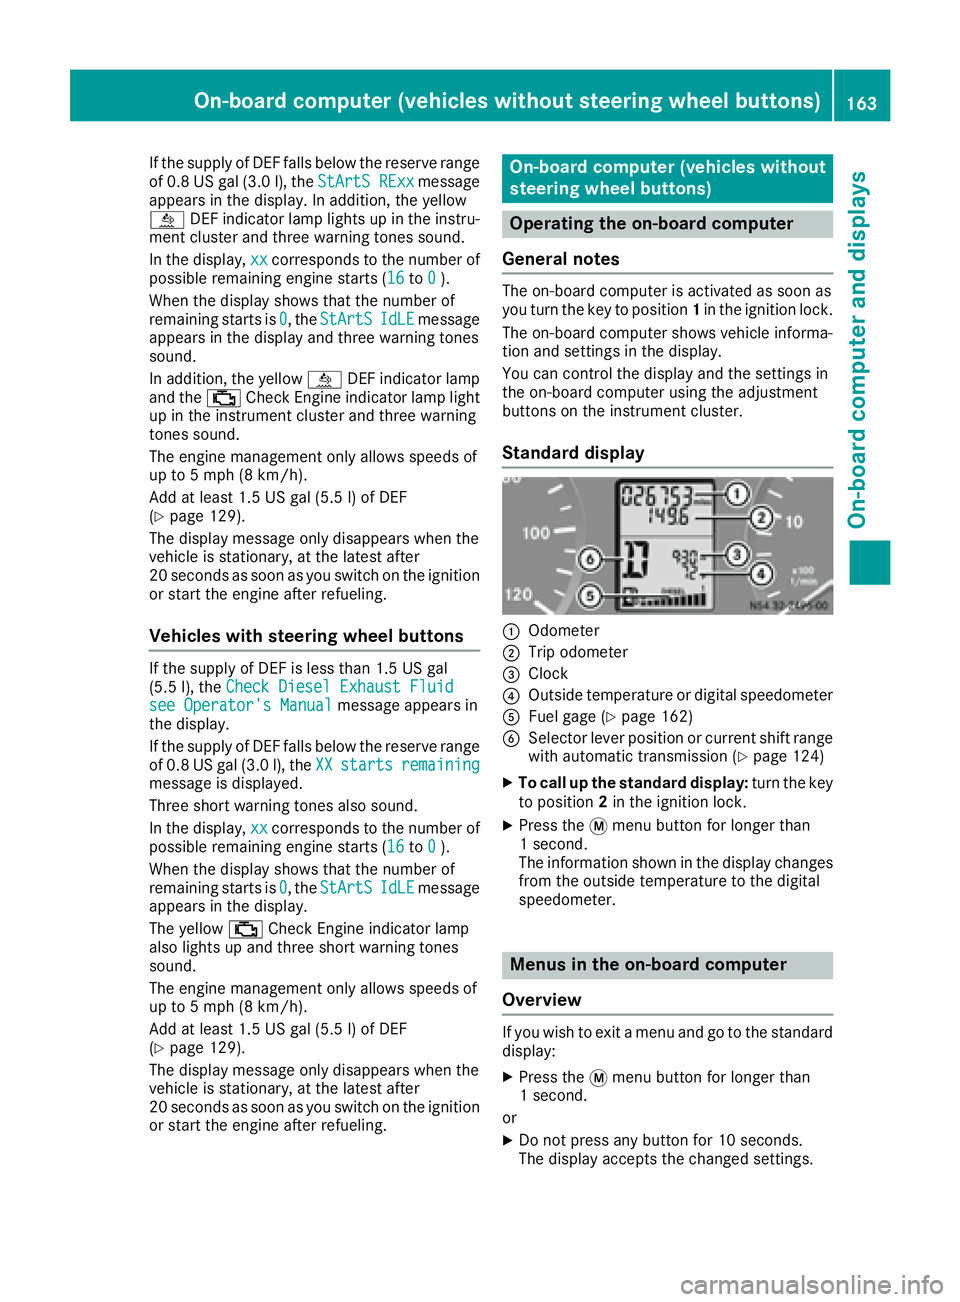
Standard display
:Odometer
;Trip odometer
=Clock
?Outside temperature or digital speedometer
AFuel gage (Ypage 162)
BSelector lever position or current shift range
with automatic transmission (Ypage 124)
XTo call up the standard display: turn the key
to position 2in the ignition lock.
XPress the 4menu button for longer than
1 second.
The information shown in the display changes
from the outside temperature to the digital
speedometer.
Menus in the on-board computer
Overview
If you wish to exit a menu and go to the standard display:
XPress the 4menu button for longer than
1 second.
or
XDo not press any button for 10 seconds.
The display accepts the changed settings.
On-board computer (vehicles without steering wheel buttons)163
On-board computer and displays
Z
Page 169 of 290
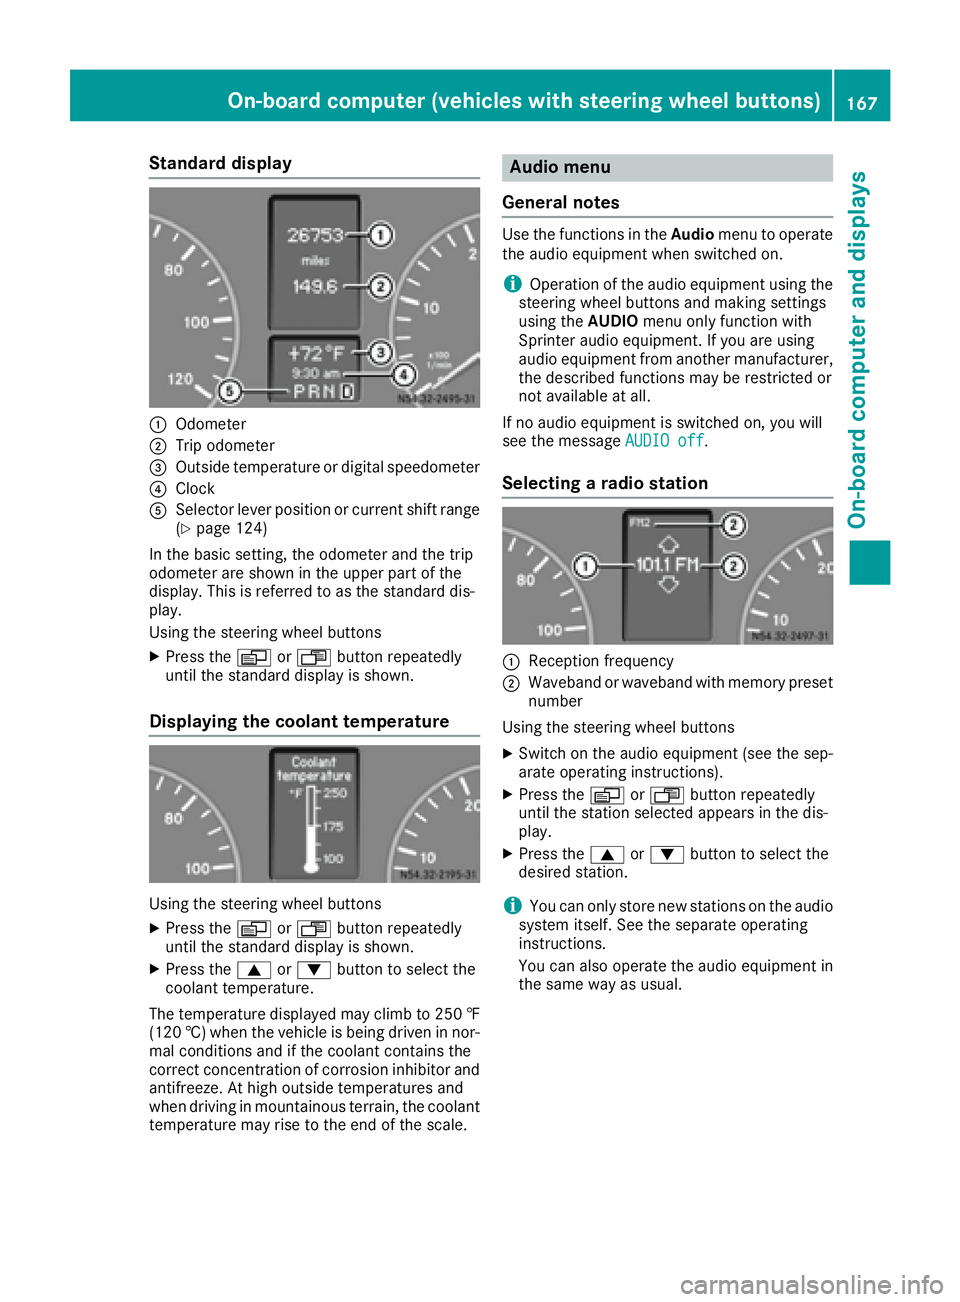
Standard display
:Odometer
;Trip odometer
=Outside temperature or digital speedometer
?Clock
ASelector lever position or current shift range
(Ypage 124)
In the basic setting, the odometer and the trip
odometer are shown in the upper part of the
display. This is referred to as the standard dis-
play.
Using the steering wheel buttons
XPress the VorU button repeatedly
until the standard display is shown.
Displaying the coolant temperature
Using the steering wheel buttons
XPress the VorU button repeatedly
until the standard display is shown.
XPress the 9or: button to select the
coolant temperature.
The temperature displayed may climb to 250 ‡
(120 †) when the vehicle is being driven in nor-
mal conditions and if the coolant contains the
correct concentration of corrosion inhibitor and
antifreeze. At high outside temperatures and
when driving in mountainous terrain, the coolant
temperature may rise to the end of the scale.
Audio menu
General notes
Use the functions in the Audiomenu to operate
the audio equipment when switched on.
iOperation of the audio equipment using the
steering wheel buttons and making settings
using the AUDIOmenu only function with
Sprinter audio equipment. If you are using
audio equipment from another manufacturer,
the described functions may be restricted or
not available at all.
If no audio equipment is switched on, you will
see the message AUDIO off
.
Selecting a radio station
:Reception frequency
;Waveband or waveband with memory preset
number
Using the steering wheel buttons
XSwitch on the audio equipment (see the sep-
arate operating instructions).
XPress the VorU button repeatedly
until the station selected appears in the dis-
play.
XPress the 9or: button to select the
desired station.
iYou can only store new stations on the audio
system itself. See the separate operating
instructions.
You can also operate the audio equipment in
the same way as usual.
On-board computer (vehicles with steering wheel buttons)167
On-board computer and displays
Z
Page 173 of 290
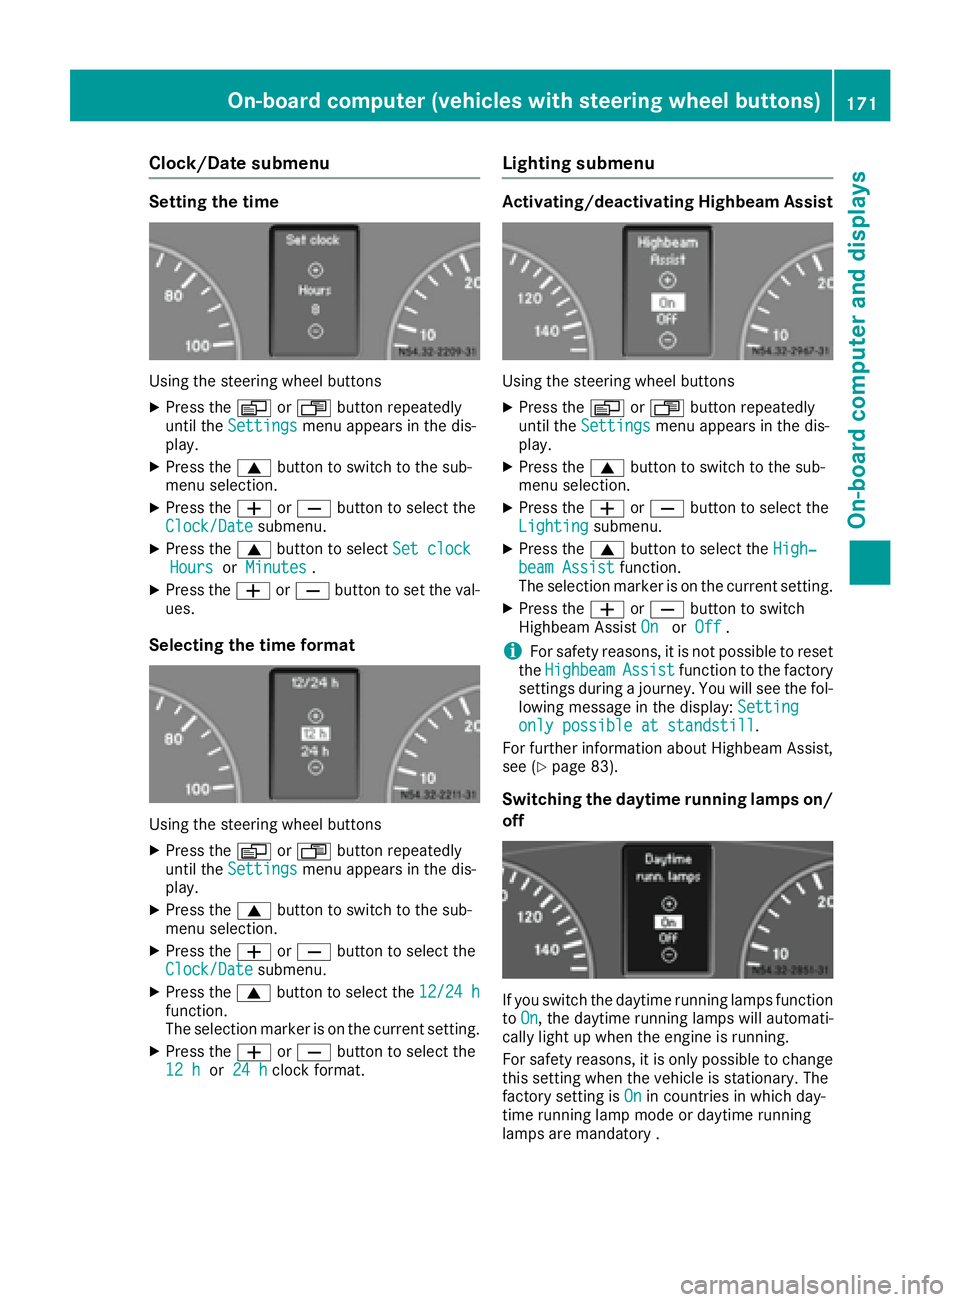
Clock/Date submenu
Setting the time
Using the steering wheel buttons
XPress theVorU button repeatedly
until the Settingsmenu appears in the dis-
play.
XPress the 9button to switch to the sub-
menu selection.
XPress the WorX button to select the
Clock/Datesubmenu.
XPress the 9button to select Set clockHoursorMinutes.
XPress the WorX button to set the val-
ues.
Selecting the time format
Using the steering wheel buttons
XPress the VorU button repeatedly
until the Settingsmenu appears in the dis-
play.
XPress the 9button to switch to the sub-
menu selection.
XPress the WorX button to select the
Clock/Datesubmenu.
XPress the 9button to select the 12/24 hfunction.
The selection marker is on the current setting.
XPress theWorX button to select the
12 hor 24 hclock format.
Lighting submenu
Activating/deactivating Highbeam Assist
Using the steering wheel buttons
XPress the VorU button repeatedly
until the Settingsmenu appears in the dis-
play.
XPress the 9button to switch to the sub-
menu selection.
XPress the WorX button to select the
Lightingsubmenu.
XPress the 9button to select the High‐beam Assistfunction.
The selection marker is on the current setting.
XPress the WorX button to switch
Highbeam Assist OnorOff.
iFor safety reasons, it is not possible to reset
the HighbeamAssistfunction to the factory
settings during a journey. You will see the fol-
lowing message in the display: Setting
only possible at standstill.
For further information about Highbeam Assist,
see (
Ypage 83).
Switching the daytime running lamps on/
off
If you switch the daytime running lamps function
to On, the daytime running lamps will automati-
cally light up when the engine is running.
For safety reasons, it is only possible to change
this setting when the vehicle is stationary. The
factory setting is On
in countries in which day-
time running lamp mode or daytime running
lamps are mandatory .
On-board computer (vehicles with steering wheel buttons)171
On-board computer and displays
Z
Page 225 of 290
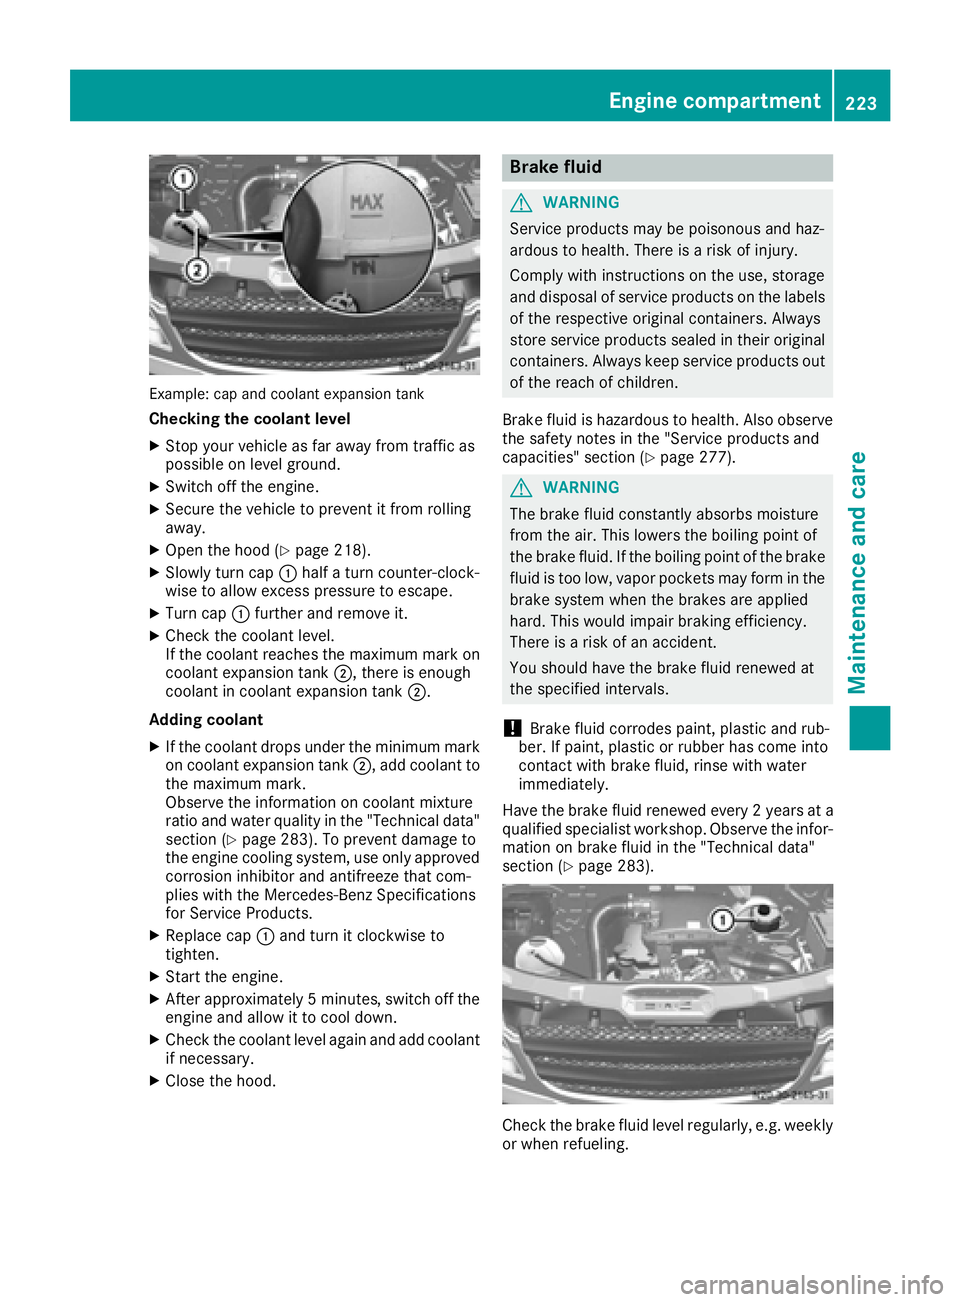
Example: cap and coolant expansion tank
Checking the coolant level
XStop your vehicle as far away from traffic as
possible on level ground.
XSwitch off the engine.
XSecure the vehicle to prevent it from rolling
away.
XOpen the hood (Ypage 218).
XSlowly turn cap:half a turn counter-clock-
wise to allow excess pressure to escape.
XTurn cap :further and remove it.
XCheck the coolant level.
If the coolant reaches the maximum mark on
coolant expansion tank ;, there is enough
coolant in coolant expansion tank ;.
Adding coolant
XIf the coolant drops under the minimum mark
on coolant expansion tank ;, add coolant to
the maximum mark.
Observe the information on coolant mixture
ratio and water quality in the "Technical data"
section (
Ypage 283). To prevent damage to
the engine cooling system, use only approved
corrosion inhibitor and antifreeze that com-
plies with the Mercedes-Benz Specifications
for Service Products.
XReplace cap :and turn it clockwise to
tighten.
XStart the engine.
XAfter approximately 5 minutes, switch off the
engine and allow it to cool down.
XCheck the coolant level again and add coolant
if necessary.
XClose the hood.
Brake fluid
GWARNING
Service products may be poisonous and haz-
ardous to health. There is a risk of injury.
Comply with instructions on the use, storage
and disposal of service products on the labels
of the respective original containers. Always
store service products sealed in their original
containers. Always keep service products out
of the reach of children.
Brake fluid is hazardous to health. Also observe
the safety notes in the "Service products and
capacities" section (
Ypage 277).
GWARNING
The brake fluid constantly absorbs moisture
from the air. This lowers the boiling point of
the brake fluid. If the boiling point of the brake
fluid is too low, vapor pockets may form in the
brake system when the brakes are applied
hard. This would impair braking efficiency.
There is a risk of an accident.
You should have the brake fluid renewed at
the specified intervals.
!Brake fluid corrodes paint, plastic and rub-
ber. If paint, plastic or rubber has come into
contact with brake fluid, rinse with water
immediately.
Have the brake fluid renewed every 2 year sat a
qualified specialist workshop. Observe the infor- mation on brake fluid in the "Technical data"
section (
Ypage 283).
Check the brake fluid level regularly, e.g. weekly
or when refueling.
Engine compartment223
Maintenance and care
Z