ignition MERCEDES-BENZ SPRINTER 2016 MY16 Operator’s Manual
[x] Cancel search | Manufacturer: MERCEDES-BENZ, Model Year: 2016, Model line: SPRINTER, Model: MERCEDES-BENZ SPRINTER 2016Pages: 290, PDF Size: 6.44 MB
Page 13 of 290
G
GasolineReserve fuel warning lamp ............. 200
General driving tips
Driving short distances .................. 134
Genuine parts ...................................... 28
Glove box ........................................... 204
GTW (Gross Trailer Weight) (defini-
tion) .................................................... 264
H
Handbrake
see Parking brake
Hazard warning lamps ........................ 82
Head restraints
Adjusting .........................................7 6
Adjusting (rear) ................................ 76
Headlamps
Adding fluid to cleaning system ..... 224
Cleaning system (function) .............. 82
Fogging up ....................................... 83
see Automatic headlamp mode
Headliner (cleaning instructions) .... 238
Heating
see Climate control
High-beam headlamps
Highbeam Assist .............................. 83
Replacing bulbs ............................... 87
Switching on/off .............................. 81
Highbeam Assist
Function/notes ................................ 83
Switching Highbeam Assist on/
off .................................................. 171
Hood
Closing ........................................... 219
Display message ............................ 192
Important safety notes .................. 218
Indicator lamp ................................ 203
Opening ......................................... 218
Hot-water auxiliary heater
Problem (malfunction) ................... 113
Hydroplaning ..................................... 136
I
Ignition lock
see Key positions Immobilizer
.......................................... 56
Indicator lamp
see Warning and indicator lamps
Indicators
see Turn signals
Insect protection on the radiator ...... 28
Installing a wheel
Installing the adapter (spare
wheel) ............................................ 269
Instrument cluster
Fuel gage ....................................... 162
Important safety notes .................. 161
Instrument cluster lighting ............. 162
Outside temperature display .......... 162
Overview .......................................... 32
Speedometer ................................. 162
Tachometer ................................... 162
Warning and indicator lamps ........... 33
Instrument cluster lighting .............. 162
Instrument lighting
see Instrument cluster lighting
Interior lighting ................................... 84
Front ................................................ 84
Motion detectors ............................. 85
Notes on replacing bulbs ................. 92
Overview .......................................... 84
Replacing bulbs ............................... 92
Switching the rear compartment
lighting on centrally ......................... 84
Interior motion sensor
Arming ............................................. 57
Deactivating ..................................... 58
Function ........................................... 57
Switching off .................................... 57
J
JackJacking points ................................ 268
Preparation .................................... 268
Storage location ............................ 240
Using ............................................. 268
Jump-starting ..................................... 242
K
Key
Position in the ignition lock ............ 119
Index11
Page 18 of 290
Correct usage .................................. 41
Display message ............................ 184
Fastening ........................................ .42
Important safety guidelines .............4 0
Introduction .....................................4 0
Releasin g ......................................... 42
Warning lamp ................................. 203
Warning lamp (function) ................... 43
Seat heating ......................................... 76
Seats
Adjusting lumbar support ................ 73
Adjusting the front-passenger
seat .................................................. 73
Adjusting the head restraint ............ 76
Armrest ............................................ 76
Cleaning the cover ......................... 238
Correct driver's seat position ........... 72
Folding seat ..................................... 74
Important safety notes .................... 72
Rear bench seat ............................... 75
Seat heating .................................... 76
Setting the driver's seat ................... 73
Swivel seat ....................................... 73
Twin front-passenger seat ................ 74
Securing loads
Important safety notes .................. 214
Selector lever
Cleaning ......................................... 238
Sensors (cleaning instructions) ....... 236
Service center
see Qualified specialist workshop
Service interval display
Calling up the service due date ...... 226
Exceeding a service due date ........ 226
Notes ............................................. 226
Service due date (automatic dis-
play) ............................................... 226
Service products
Brake fluid ..................................... 283
Coolant (engine) ............................ 283
Diesel Exhaust Fluid (DEF) ............. 279
Engine oil ....................................... 280
Fuel ................................................ 277
Important safety notes .................. 277
Power steering fluid ....................... 283
Refrigerant ..................................... 284
Transmission oi l ............................. 282
W
asher fluid ................................... 284 Setting the air distribution
............... 102
Setting the airflow ............................ 102
Setting the clock
Vehicles with steering wheel but-
tons ............................................... 171
Vehicles without steering wheel
buttons .......................................... 164
Settings
Resetting all (vehicles with steer-
ing wheel buttons) ......................... 168
Resetting submenus (vehicles
with steering wheel buttons) ......... 168
Short journeys (diesel particle fil-
ter) ...................................................... 134
Side impact air bag ............................. 45
Side windows
Cleaning ......................................... 235
Hinged side windows ....................... 70
Important safety information ........... 70
Opening/closing .............................. 71
Overview .......................................... 70
Problem (malfunction) ..................... 71
Resetting ......................................... 71
Sliding door
Cleaning ......................................... 237
Closing assist ................................... 66
Important safety notes .................... 65
Opening/closing .............................. 65
Opening/closing from the inside ..... 66
Opening/closing from the out-
side .................................................. 66
SmartKey
Changing the battery ....................... 61
Changing the locking system set-
tings ............................................... 173
Checking the battery ....................... 61
Display message ............................ 193
Door central locking/unlocking ....... 59
Important safety notes .................... 59
Loss ................................................. 63
Problem (malfunction) ..................... 63
SmartKey positions (ignition lock) .. 119
Snow chains ...................................... 249
Sockets .............................................. 210
Spare wheel
General notes ................................ 273
Important safety notes .................. 272
16Index
Page 33 of 290
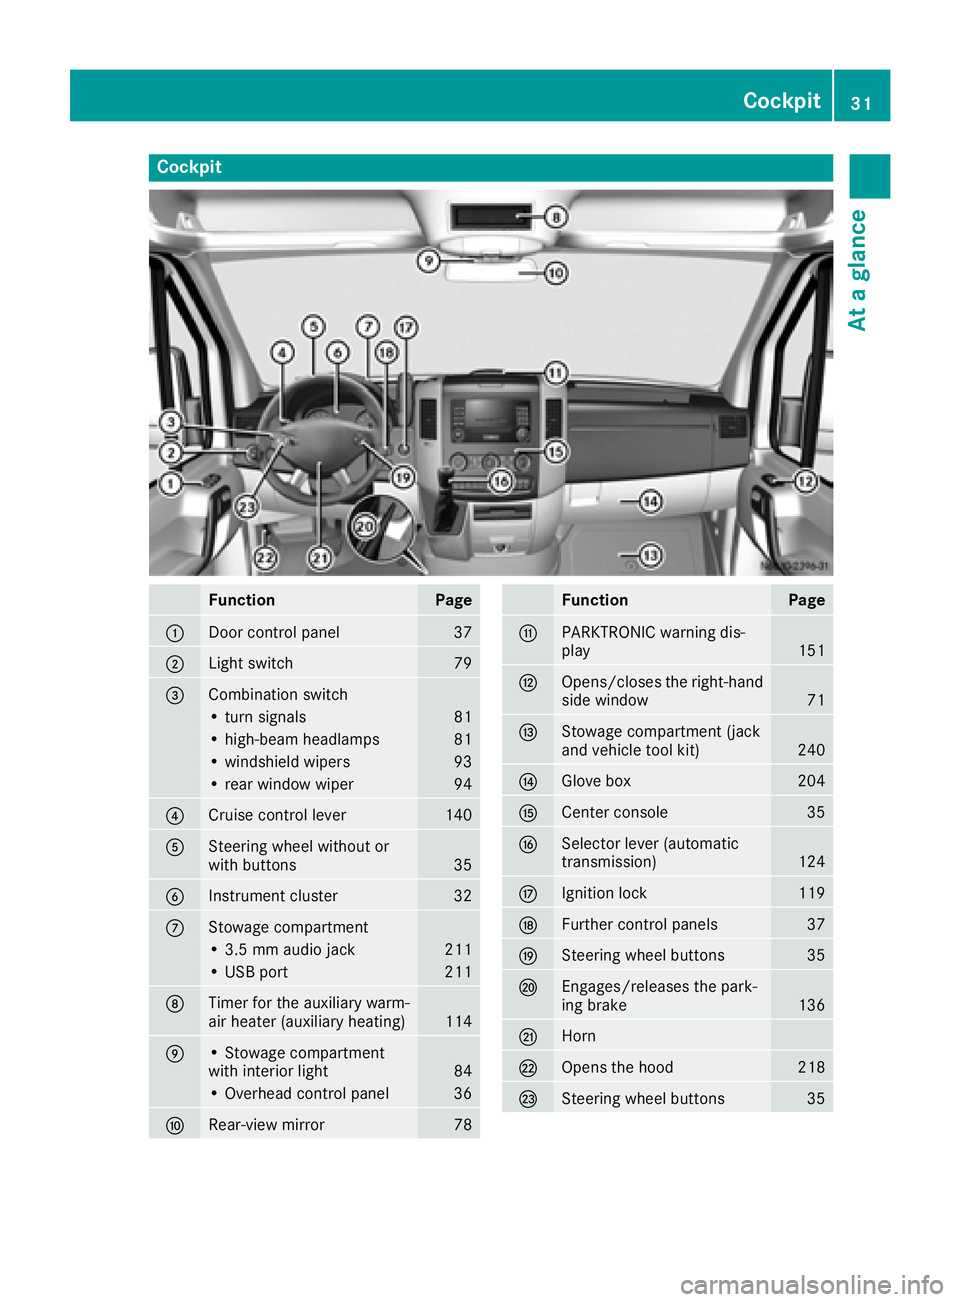
Cockpit
FunctionPage
:Door control panel37
;Light switch79
=Combination switch
• turn signals81
• high-beam headlamps81
• windshield wipers93
• rear window wiper94
?Cruise control lever140
ASteering wheel without or
with buttons35
BInstrument cluster32
CStowage compartment
• 3.5 mm audio jack211
• USB port211
DTimer for the auxiliary warm-
air heater (auxiliary heating)114
E• Stowage compartment
with interior light84
• Overhead control panel36
FRear-view mirror78
FunctionPage
GPARKTRONIC warning dis-
play151
HOpens/closes the right-hand
side window71
IStowage compartment (jack
and vehicle tool kit)240
JGlove box204
KCenter console35
LSelector lever (automatic
transmission)124
MIgnition lock119
NFurther control panels37
OSteering wheel buttons35
PEngages/releases the park-
ing brake136
QHorn
ROpens the hood218
SSteering wheel buttons35
Cockpit31
At a glance
Page 40 of 290
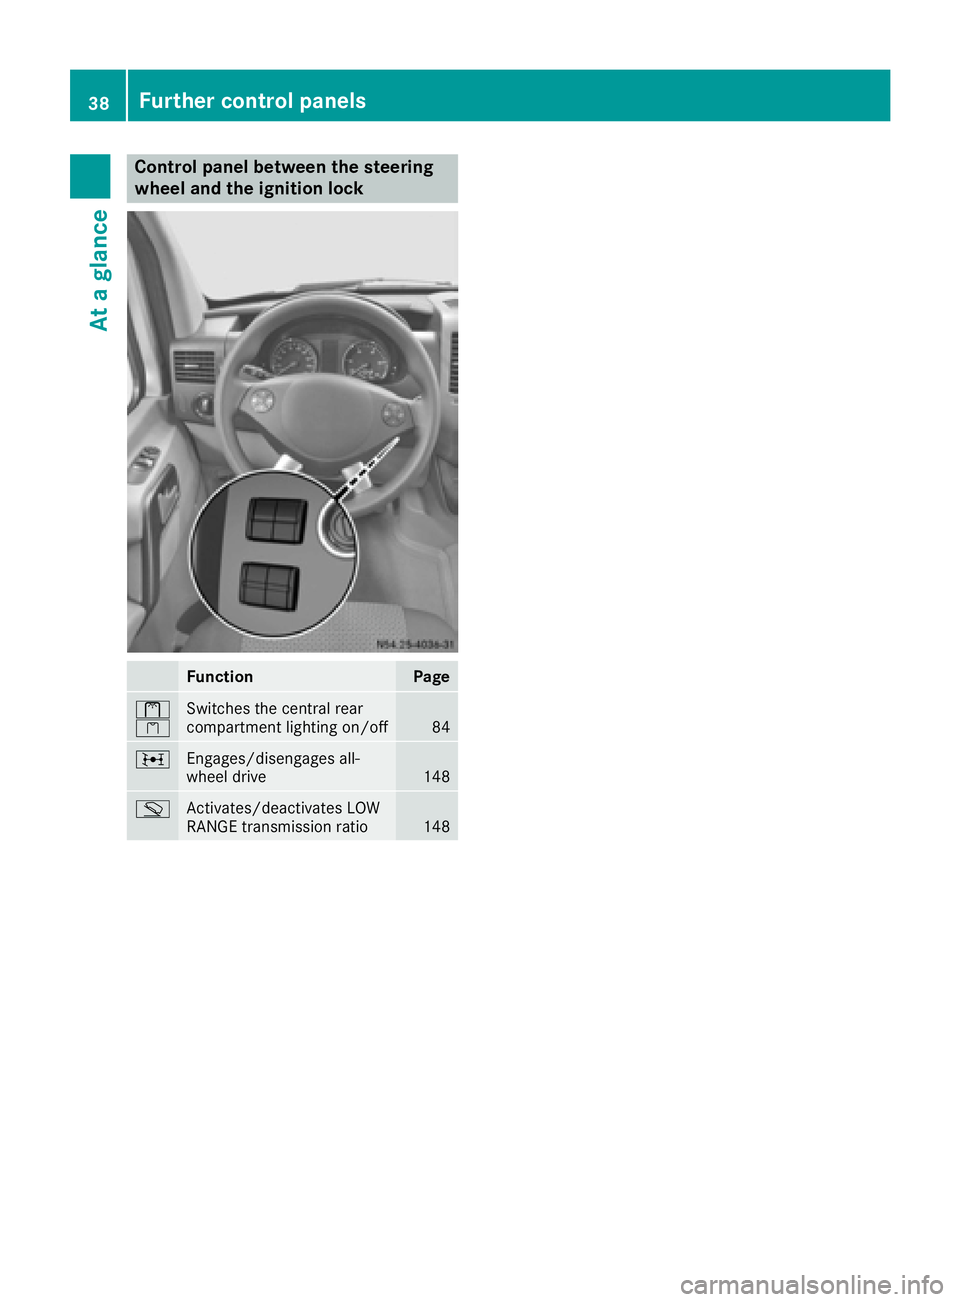
Control panel between the steering
wheel and the ignition lock
FunctionPage
l
kSwitches the central rear
compartment lighting on/off84
;Engages/disengages all-
wheel drive148
mActivates/deactivates LOW
RANGE transmission ratio148
38Further control panels
At a glance
Page 41 of 290
Useful information
This Operator's Manual describes all models as
well as standard and optional equipment of your
vehicle that were available at the time of going
to print. Country-specific variations are possi-
ble. Note that your vehicle may not be equipped
with all of the described functions. This also
applies to systems and functions relevant to
safety.
Read the information on qualified specialist
workshops (
Ypage 26).
Occupant safety
Restraint system introduction
The restraint system can reduce the risk of vehi-cle occupants coming into contact with parts of
the vehicle's interior in the event of an accident.
Furthermore, the restraint system may also
reduce the forces exerted on the vehicle occu-
pants when an accident occurs.
The restraint system includes:
RSeat belt system
RAir bags
RChild restraint system
RChild seat securing systems
The components of the restraint system work in
conjunction with each other. They can only offer
the intended level of protection if all vehicle
occupants:
Rare correctly wearing their seat belts.
(Ypage 41)
Radjust their seat and head restraint properly
(Ypage 72).
The driver is also responsible for ensuring that
the steering wheel has been correctly posi-
tioned. Observe the information relating to the
correct driver's seat position (
Ypage 72).
Always ensure the air bag can inflate properly if
deployed (
Ypage 43).
An air bag supplements a correctly fastened
seat belt. As an additional safety device, the air bag increases the level of protection for vehicle
occupants in the event of an accident. For exam-
ple, if the protection already provided by a cor-
rectly fastened seat belt will suffice, the air bags
are not deployed. Furthermore, only the air bags
that would increase the degree of protection
afforded to the vehicle occupants in the event of an accident are deployed. Seat belts and air
bags generally do not protect against objects
penetrating the vehicle from the outside.
Information on restraint system operation can
be found under "Triggering of Emergency Ten-
sioning Devices and air bags" (
Ypage 45).
See “Children in the vehicle” for information on children traveling with you as well as vehicle
restraint systems (
Ypage 47).
Important safety notes
GWARNING
Modifications to the restraint system, may
cause it to no longer work as intended. The
restraint system may then not perform its
intended protective function and may fail in an
accident or trigger unexpectedly, for example.
This poses an increased risk of injury or even fatal injury.
Never modify parts of the restraint system.
Never tamper with the wiring, the electronic
components or their software.
If it is necessary to modify an airbag system to
accommodate a person with disabilities, con-
tact an authorized Sprinter dealership for
details. USA only: contact our Customer
Assistance Center at 1‑ 877‑762‑8267 for
details.
Restraint system warning lamp
The functions of the restraint system are
checked after the ignition is switched on and at
regular intervals while the engine is running.
Therefore, malfunctions can be detected in
good time.
The 6 restraint system warning lamp in the
instrument cluster lights up when the ignition is
switched on. It goes out no later than a few sec-
onds after the vehicle is started. The compo-
nents of the restraint system are in operational
readiness.
Occupant safety39
Safety
Z
Page 42 of 290
A malfunction has occurred if the6restraint
system warning lamp:
Rdoes not light up after the ignition is switched
on
Rdoes not go out after a few seconds
Rgoes out but then lights up again while the
engine is running, for example
GWARNING
If restraint system is malfunctioning, restraint
system components may be triggered unin-
tentionally or might not be triggered at all in
the event of an accident with a high rate of
vehicle deceleration. This can affect the Emer- gency Tensioning Device or air bag, for exam-
ple. This poses an increased risk of injury or
even fatal injury.
Have the restraint system checked and
repaired in a qualified specialist workshop as
soon as possible.
Seat belts
Introduction
A correctly fastened seat belt is the most effec- tive means of restraining the movement of vehi-
cle occupants in the event of an accident or the
vehicle rolling over. This reduces the risk of
vehicle occupants coming into contact with
parts of the vehicle interior or being thrown from
the vehicle. Furthermore, the seat belt helps to
keep the vehicle occupants in the best position
in relation to the air bag.
The seat belt system consists of:
RSeat belts
REmergency Tensioning Devices for the front
seat belts
If the vehicle is equipped with a front air bag,the seat belt system also includes a seat belt
force limiter for the corresponding seat.
On vehicles with a front-passenger bench
seat, only the seat belt of the outer front-
passenger seat has a seat belt force limiter.
If the vehicle does not have a driver's air bag, the
seat belt system does not include an Emergency
Tensioning Device or a seat belt force limiter.
If the seat belt is pulled quickly or suddenly from
the belt outlet, the inertia reel locks. The belt
strap cannot be pulled out further. Emergency Tensioning Devices tighten the seat
belts in an accident, pulling them close against
the occupant's body. They do not, howe
ver, pull
vehicle occupants back towards the backrest.
Emergency Tensioning Devices do not correct
an incorrect seat position or incorrectly worn
seat belts.
When triggered, the seat belt force limiter
reduces the force exerted by the seat belt on the
vehicle occupant.
The seat belt force limiters are synchronized
with the front air bags, which absorb part of the
deceleration force. This makes it possible to
reduce the forces to which vehicle occupants
are subjected during an accident.
The Emergency Tensioning Device of the co-
driver's seat is triggered independently of the
lock status of the seat belt.
Important safety notes
The use of seat belts and child restraint systems
is required by law in:
Rall 50 states
Rthe U.S. territories
Rthe District of Columbia
Rall Canadian provinces
Even where this is not required by law, all vehicle
occupants should correctly fasten their seat
belts before starting the journey.
GWARNING
If the seat belt is incorrectly fastened, it can-
not protect as intended. Furthermore, an
incorrectly fastened seat belt can cause addi-
tional injury, for example, in an accident, dur-
ing braking or when abruptly changing direc-
tion. This poses an increased risk of injury or
even fatal injury.
Make sure that all vehicle occupants are
seated properly with a correctly fastened seat belt.
GWARNING
The seat belt does not offer the intended level of protection if you have not moved the back-
rest to an almost vertical position. When brak-
ing or in the event of an accident, you could
slide underneath the seat belt and sustain
abdomen or neck injuries, for example. This
40Occupant safety
Safety
Page 45 of 290
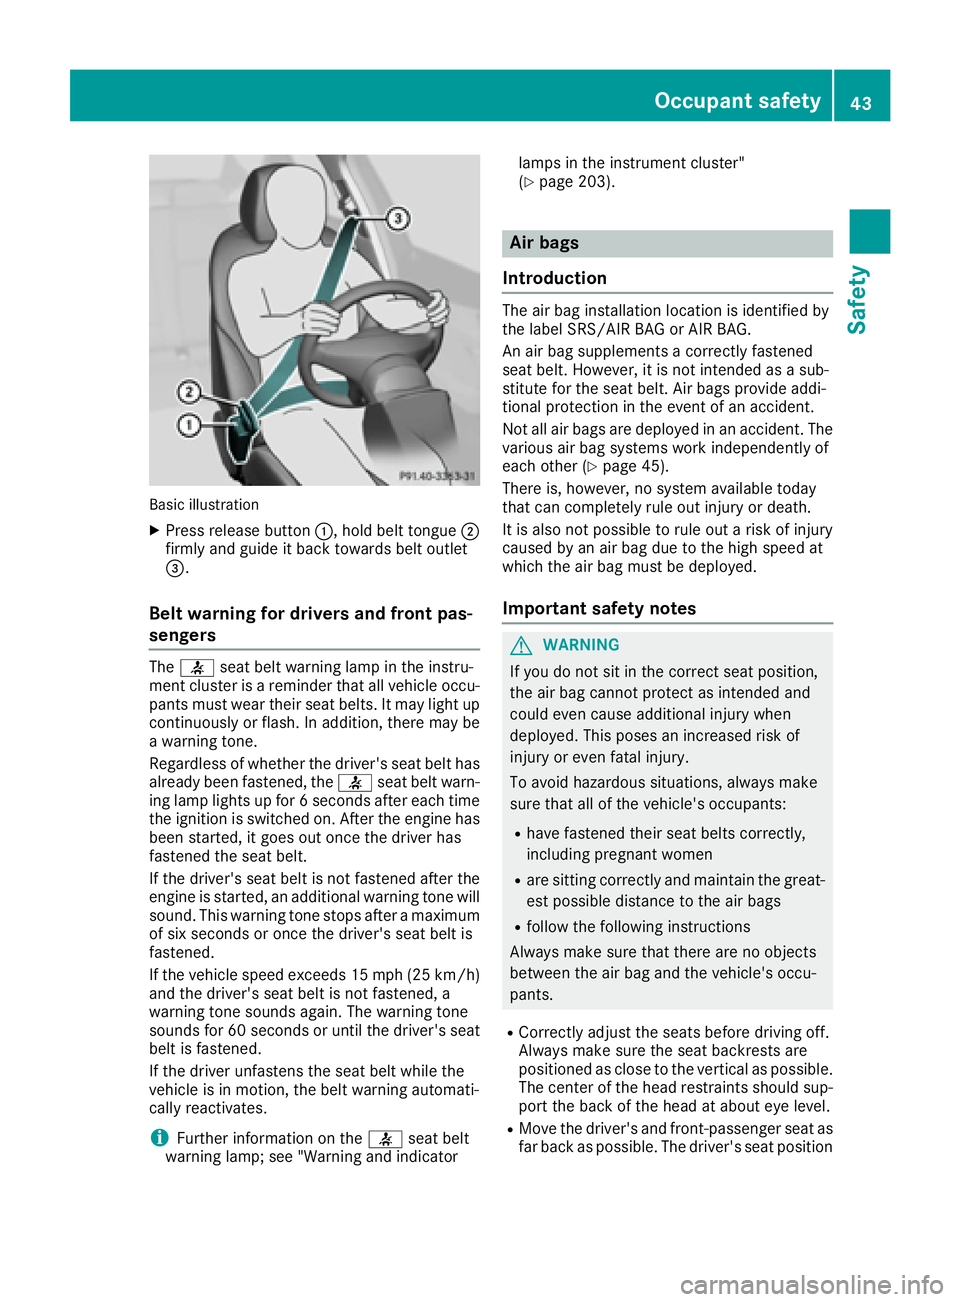
Basic illustration
XPress release button:, hold belt tongue;
firmly and guide it back towards belt outlet
=.
Belt warning for drivers and front pas-
sengers
The 7 seat belt warning lamp in the instru-
ment cluster is a reminder that all vehicle occu-
pants must wear their seat belts. It may light up
continuously or flash. In addition, there may be
a warning tone.
Regardless of whether the driver's seat belt has
already been fastened, the 7seat belt warn-
ing lamp lights up for 6 seconds after each time
the ignition is switched on. After the engine has
been started, it goes out once the driver has
fastened the seat belt.
If the driver's seat belt is not fastened after the
engine is started, an additional warning tone will
sound. This warning tone stops after a maximum
of six seconds or once the driver's seat belt is
fastened.
If the vehicle speed exceeds 15 mph (25 km/h)
and the driver's seat belt is not fastened, a
warning tone sounds again. The warning tone
sounds for 60 seconds or until the driver's seat
belt is fastened.
If the driver unfastens the seat belt while the
vehicle is in motion, the belt warning automati-
cally reactivates.
iFurther information on the 7seat belt
warning lamp; see "Warning and indicator lamps in the instrument cluster"
(
Ypage 203).
Air bags
Introduction
The air bag installation location is identified by
the label SRS/AIR BAG or AIR BAG.
An air bag supplements a correctly fastened
seat belt. However, it is not intended as a sub-
stitute for the seat belt. Air bags provide addi-
tional protection in the event of an accident.
Not all air bags are deployed in an accident. The
various air bag systems work independently of
each other (
Ypage 45).
There is, however, no system available today
that can completely rule out injury or death.
It is also not possible to rule out a risk of injury
caused by an air bag due to the high speed at
which the air bag must be deployed.
Important safety notes
GWARNING
If you do not sit in the correct seat position,
the air bag cannot protect as intended and
could even cause additional injury when
deployed. This poses an increased risk of
injury or even fatal injury.
To avoid hazardous situations, always make
sure that all of the vehicle's occupants:
Rhave fastened their seat belts correctly,
including pregnant women
Rare sitting correctly and maintain the great-
est possible distance to the air bags
Rfollow the following instructions
Always make sure that there are no objects
between the air bag and the vehicle's occu-
pants.
RCorrectly adjust the seats before driving off.
Always make sure the seat backrests are
positioned as close to the vertical as possible.
The center of the head restraints should sup-
port the back of the head at about eye level.
RMove the driver's and front-passenger seat as
far back as possible. The driver's seat position
Occupant safety43
Safety
Z
Page 48 of 290
and to have any malfunctioning air bags
repaired. This will help to make sure the air bags
continue to perform their protective function for
the vehicle occupants in the event of a crash.
GWARNING
Pyrotechnic Emergency Tensioning Devices
that have been deployed are no longer opera-
tional and are unable to perform their inten-
ded protective function. This poses an
increased risk of injury or even fatal injury.
Therefore, have pyrotechnic Emergency Ten-
sioning Devices which have been triggered
immediately replaced at a qualified specialist workshop.
If the Emergency Tensioning Devices or air bags
are deployed, you will hear a bang and a small
amount of powder may also be released. The
6 restraint system warning lamp will light up.
Only in rare cases will the bang affect your hear-
ing. The powder released is generally not haz-
ardous to health, it could however cause short-
term breathing difficulties in people with asthma
or other respiratory problems. If it is safe to do
so, you should leave the vehicle immediately or
open a window in order to prevent breathing
difficulties.
Air bags and pyrotechnic Emergency Tensioning
Devices (ETDs) contain perchlorate material,
which may require special handling and regard
for the environment. Check with your local gov- ernment’s disposal guidelines. California resi-
dents, see www.dtsc.ca.gov/
HazardousWaste/Perchlorate/index.cfm .
Method of operation
During the first stage of a collision, the restraint
system control unit evaluates important physi-
cal data relating to vehicle deceleration or accel-
eration, such as:
RDuration
RDirection
RIntensity
Based on the evaluation of this data, the
restraint system control unit triggers the Emer-
gency Tensioning Devices in the event of a fron-
tal or rear-end collision. An Emergency Tensioning Device can only be
triggered if:
Rthe ignition is switched on
Rthe components of the restraint system are
operational. You can find further information
under "Restraint system warning lamp"
(
Ypage 39)
Rthe belt tongue is inserted into the buckle on
the respective front seat
The Emergency Tensioning Device of the co-
driver's seat is triggered independently of the
lock status of the seat belt.
If the restraint system control unit detects a high
accident severity, additional components of the
restraint system are deployed independently of
one another in certain frontal collision situa-
tions:
RFront air bags
RWindow curtain air bag on side of collision
The deployment thresholds for the Emergency
Tensioning Devices and air bags are calculated
on the basis of the vehicle deceleration or accel-
eration occurring at various points in the vehi-
c
le. This process is pre-emptive in nature. The
air bag must be deployed on time, at the start of the collision.
The rate of vehicle deceleration or acceleration
and the direction of the force are essentially
determined by:
Rdistribution of the force during the impact
Rcollision angle
Rdeformation characteristics of the vehicle
Rcharacteristics of the object with which the
vehicle has collided
Factors which can only be seen and measured
after the collision has occurred do not play a
decisive role in the deployment of an air bag, nor
do they provide an indication of air bag deploy-
ment.
The vehicle may be considerably deformed with-
out an air bag being deployed. This is the case if
only relatively easily deformable parts have
been hit and a high rate of deceleration has not been reached. Conversely, an air bag may be
deployed even though the vehicle suffers only
minor deformation. This is the case if, for exam-
ple, very rigid vehicle parts such as the longitu-
dinal body members are hit in an accident and
the rate of deceleration is sufficient.
46Occupant safety
Safety
Page 55 of 290
Pay particular attention to the information
regarding tires, tire tread and winter operation
under "Wheels and tires" (
Ypage 247).
ABS (Anti-lock Braking System)
Important safety notes
Observe the important safety guidelines for the
driving safety system (Ypage 52).
GWARNING
If ABS is faulty, the wheels could lock when
braking. The steerability and braking charac-
teristics may be severely impaired. Addition-
ally, further driving safety systems are deac-
tivated. There is an increased danger of skid-
ding and accidents.
Drive on carefully. Have ABS checked imme-
diately at a qualified specialist workshop.
If ABS is malfunctioning, other systems will also
fail, including driving safety systems. Observe
the information relating to the !warning
lamp (
Ypage 195).
ABS regulates brake pressure in such a way that
the wheels do not lock when you brake. This
allows you to continue steering the vehicle when
braking.
ABS works from a speed of about 5 mph
(8 km/h), regardless of road-surface conditions. ABS works on slippery surfaces, even when you
only brake gently.
The yellow !warning lamp in the instrument
cluster lights up when the ignition is switched
on. The lamp goes out when the engine starts
running.
Braking
If ABS intervenes when braking, you will feel a
pulsating in the brake pedal.
The pulsating brake pedal can be an indication
of hazardous road conditions and functions as a
reminder to take extra care while driving.
XIf ABS intervenes: continue to depress the
brake pedal with force until the braking sit-
uation is over.
XTo make a full brake application: depress
the brake pedal with full force.
ASR (acceleration skid control)
General notes
Important safety notes
Observe the important safety guidelines for the
driving safety system (Ypage 52).
ASR can neither reduce the risk of an accident
nor suspend the laws of physics if the driver
does not pay attention when pulling away or
accelerating. ASR is only an aid. Always adapt
your driving style to suit the prevailing road and
weather conditions.
If you activate or deactivate the all-wheel drive
in a vehicle with this option, ASR will be deacti- vated for the duration of the activation/deacti-
vation process.
Vehicles without steering wheel buttons: if ASR
is malfunctioning, the :indicator lamp lights
up while the engine is running and the engine
power may be reduced (
Ypage 195).
ASR significantly improves traction, i.e. the
transmission of power from the tires to the road surface, and thus increases the vehicle's driving
stability. If the driving wheels start to spin, ASR
brakes individual drive wheels and limits the
engine torque. ASR thus significantly assists you
when pulling away and accelerating, especially
on wet or slippery roads.
If traction on the road surface is not sufficient,
even ASR will not allow you to pull away without
difficulty. The type of tires and total weight of the
vehicle as well as the gradient of the road also
play a crucial role.
If ASR intervenes, the dwarning lamp in the
instrument cluster flashes.
Activating/deactivating ASR
GWARNING
If deactivated, ASR will not attempt to stabi-
lize the vehicle during pulling away and accel- eration. There is an increased risk of skidding
and of an accident.
Only deactivate ASR in the situations descri-
bed in the following.
!If you deactivate ASR, ESP®will still inter-
vene to stabilize the vehicle. Frequent braking
automatically triggered by ESP
®can damage
the brake system.
Driving safety systems53
Safety
Z
Page 58 of 290
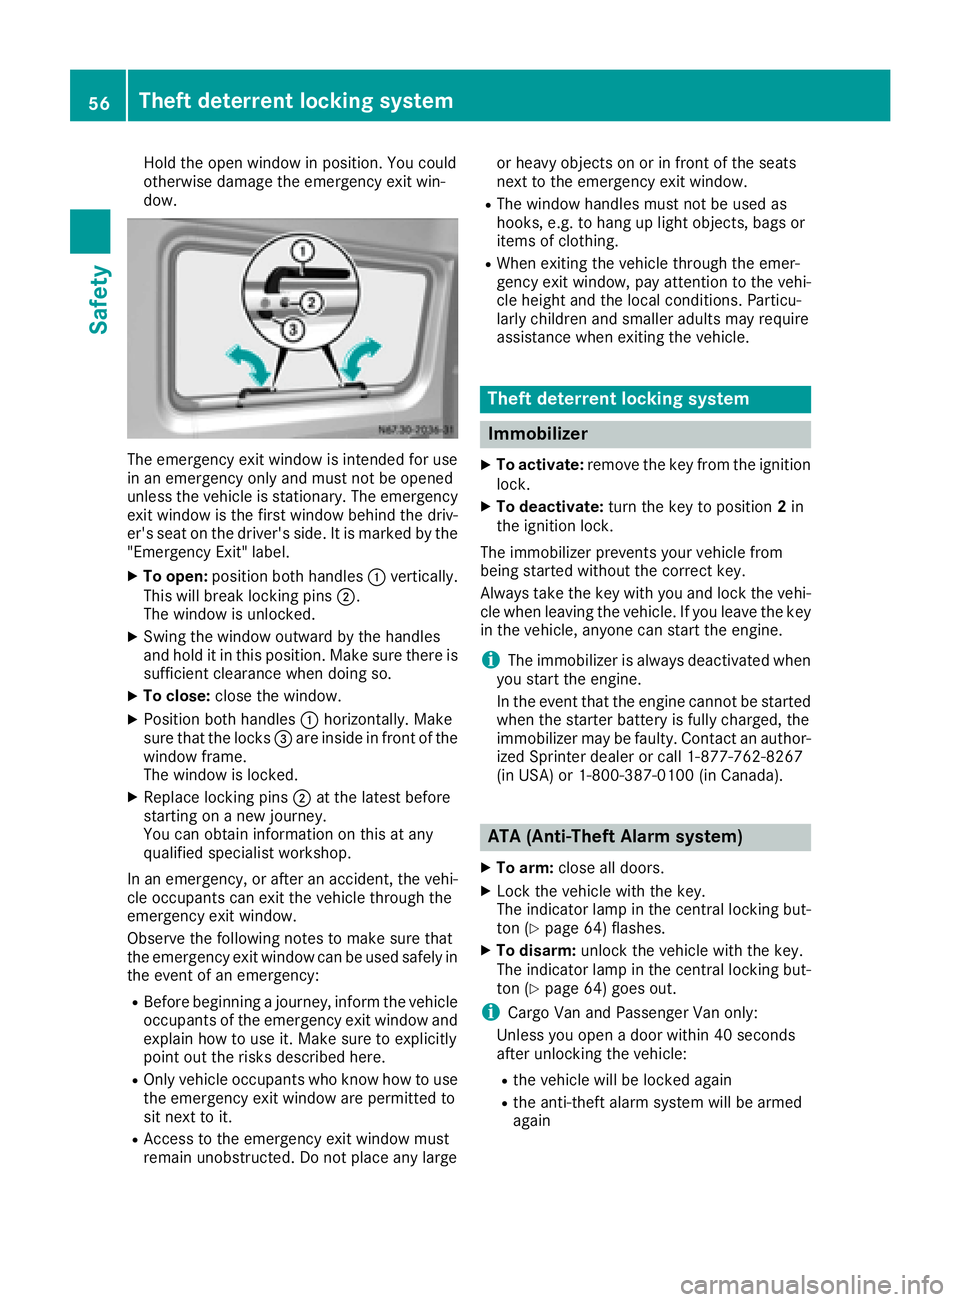
Hold the open window in position. You could
otherwise damage the emergency exit win-
dow.
The emergency exit window is intended for use
in an emergency only and must not be opened
unless the vehicle is stationary. The emergency
exit window is the first window behind the driv-
er's seat on the driver's side. It is marked by the
"Emergency Exit" label.
XTo open:position both handles :vertically.
This will break locking pins ;.
The window is unlocked.
XSwing the window outward by the handles
and hold it in this position. Make sure there is
sufficient clearance when doing so.
XTo close: close the window.
XPosition both handles :horizontally. Make
sure that the locks =are inside in front of the
window frame.
The window is locked.
XReplace locking pins ;at the latest before
starting on a new journey.
You can obtain information on this at any
qualified specialist workshop.
In an emergency, or after an accident, the vehi-
cle occupants can exit the vehicle through the
emergency exit window.
Observe the following notes to make sure that
the emergency exit window can be used safely in
the event of an emergency:
RBefore beginning a journey, inform the vehicle
occupants of the emergency exit window and explain how to use it. Make sure to explicitly
point out the risks described here.
ROnly vehicle occupants who know how to use
the emergency exit window are permitted to
sit next to it.
RAccess to the emergency exit window must
remain unobstructed. Do not place any large or heavy objects on or in front of the seats
next to the emergency exit window
.
RThe window handles must not be used as
hooks, e.g. to hang up light objects, bags or
items of clothing.
RWhen exiting the vehicle through the emer-
gency exit window, pay attention to the vehi-
cle height and the local conditions. Particu-
larly children and smaller adults may require
assistance when exiting the vehicle.
Theft deterrent locking system
Immobilizer
XTo activate:
remove the key from the ignition
lock.
XTo deactivate: turn the key to position 2in
the ignition lock.
The immobilizer prevents your vehicle from
being started without the correct key.
Always take the key with you and lock the vehi-
cle when leaving the vehicle. If you leave the key
in the vehicle, anyone can start the engine.
iThe immobilizer is always deactivated when
you start the engine.
In the event that the engine cannot be started
when the starter battery is fully charged, the
immobilizer may be faulty. Contact an author-
ized Sprinter dealer or call 1-877-762-8267
(in USA) or 1-800-387-0100 (in Canada).
ATA (Anti-Theft Alarm system)
XTo arm: close all doors.
XLock the vehicle with the key.
The indicator lamp in the central locking but-
ton (
Ypage 64) flashes.
XTo disarm: unlock the vehicle with the key.
The indicator lamp in the central locking but-
ton (
Ypage 64) goes out.
iCargo Van and Passenger Van only:
Unless you open a door within 40 seconds
after unlocking the vehicle:
Rthe vehicle will be locked again
Rthe anti-theft alarm system will be armed
again
56Theft deterrent locking system
Safety