MERCEDES-BENZ SPRINTER 2017 MY17 Operator’s Manual
Manufacturer: MERCEDES-BENZ, Model Year: 2017, Model line: SPRINTER, Model: MERCEDES-BENZ SPRINTER 2017Pages: 286, PDF Size: 4.36 MB
Page 231 of 286
!Do not use cleaning agents containing fuel.
Cleaning agents containing fuel corrode the
battery housing.
!If dirt gets into the battery cell, battery self-
discharge will increase and the battery may
be damaged.
The following points on battery care must be
observed:
XRegularly check the battery terminals and the
fastening of the negative cable to the chassis
to ensure that they are firmly seated.
XAlways keep the battery terminals and battery
surfaces clean and dry.
XLightly grease the undersides of the battery
terminals with acid-resistant grease.
XOnly clean the battery casing with a commer-
cially available cleaning product.
Care
Notes on care
GWARNING
If you use openings in the bodywork or
detachable parts as steps, you could:
Rslip and/or fall
Rdamage the vehicle and cause yourself to
fall.
There is a risk of injury.
Always use secure climbing aids, e.g. a suita-
ble ladder.
!For cleaning your vehicle, do not use any of
the following:
Rdry, rough or hard cloths
Rabrasive cleaning agents
Rsolvents
Rcleaning agents containing solvents
Do not scrub.
Do not touch the surfaces or protective films
with hard objects, e.g. a ring or ice scraper.
You could otherwise scratch or damage the
surfaces and protective film.
!Do not park your vehicle for a long period of
time directly after cleaning, particularly after
cleaning the wheel rim with wheel cleaner.
Wheel cleaner can lead to the increased cor- rosion of the brake discs and pads. Therefore,
drive for a few minutes after cleaning. By
heating up the brakes, the brake discs and
pads dry. The vehicle can then be parked for a
long period of time.
HEnvironmental note
Only clean your vehicle at specially designed
wash bays. Dispose of empty containers and
used cleaning products in an environmentally
responsible manner.
HEnvironmental note
Dispose of empty packaging and cleaning
cloths in an environmentally responsible man-
ner.
Regular care of your vehicle is a condition for
retaining the quality in the long term.
Use care products and cleaning agents recom-
mended and approved for Sprinter vehicles.
Washing the vehicle and cleaning the
paintwork
Automatic car wash
GWARNING
Braking efficiency is reduced after washing
the vehicle. There is a risk of an accident.
After the vehicle has been washed, brake
carefully while paying attention to the traffic
conditions until full braking power is restored.
!Never clean your vehicle in a Touchless
Automatic Car Wash as these use special
cleaning agents. These cleaning agents can
damage the paintwork or plastic parts.
!Make sure that the automatic car wash is
suitable for the size of the vehicle.
Before washing the vehicle in an automatic
car wash, fold in the exterior mirrors and
remove any additional antennas. Otherwise,
the exterior mirror, antenna or the vehicle
itself could be damaged.
Make sure that the exterior mirrors are fully
folded out again and that any additional
antennas are re-installed when you leave the
automatic car wash.
Care229
Maintenance and care
Z
Page 232 of 286
!Make sure that:
Rthe side windows and the roof are com-
pletely closed
Rthe climate control blower is switched off
Rthe windshield wiper switch is at position0
The vehicle could otherwise be damaged.
You can wash the vehicle in an automatic car
wash from the very start.
Wash off excess dirt before cleaning the vehicle
in an automatic car wash.
After putting the vehicle through an automatic
car wash, wipe off wax from:
Rthe rear view camera lens (Ypage 232)
Rthe windshield
Rthe windshield wiper blades
This will prevent smears and reduce wiping
noises caused by residue on the windshield.
Washing by hand
In some countries, washing by hand is only
allowed at specially equipped washing bays.
Observe the legal requirements of the country
you are currently in when washing by hand.
XDo not use hot water and do not wash the
vehicle in direct sunlight.
XUse a soft car sponge.
XUse a mild cleaning agent, e.g. a car shampoo
approved for use with Sprinter vehicles.
XThoroughly hose down the vehicle with a gen-
tle jet of water.
XDo not point the water jet directly towards the
air inlets.
XUse plenty of water and rinse out the sponge
frequently.
XRinse the vehicle with clean water and dry
thoroughly with a chamois.
XDo not let the cleaning agents dry on the
paintwork.
When using the vehicle in winter, remove all
traces of road salt deposits carefully and as
soon as possible.
Power washers
GWARNING
The water jet from a circular jet nozzle (dirt
blasters) can cause invisible exterior damage
to the tires or chassis components. Compo-
nents damaged in this way may fail unexpect-
edly. There is a risk of an accident.
Do not use power washers with circular jet
nozzles to clean the vehicle. Have damaged
tires or chassis components replaced imme-
diately.
!Under no circumstances use power washers
in the vehicle interior. The pressurized water
and associated spray produced by the power washer could cause extensive damage to the
vehicle.
!Observe the minimum distance to be main-
tained between the nozzle of the high-pres-
sure cleaner and the object to be cleaned:
Rapproximately 2.2 ft(70 cm) when using
round-jet nozzles
Rapproximately 1 ft (30 cm) when using 25°
flat-spray jets and concentrated-power jets
Keep the water jet moving while cleaning. To
avoid causing damage, do not point the water jet directly at:
Rdoor joints
Rbrake hoses
Relectrical components
Relectrical connections
Rseals
Rdrive train, especially not at the intermedi-
ate bearing of the propeller shaft
Rrear view camera
Keep a minimum distance of 1.6 ft(50 cm).
Cleaning the engine
!Water must not enter intake or ventilation
openings. When cleaning with high pressure
water or steam cleaners, the spray must not
be aimed directly at electrical components or
the terminals of electrical lines.
Preserve the engine after the engine has been
cleaned. Protect the belt drive system from
exposure to the preservative agent.
Also observe the information under "Power
washers" (
Ypage 230).
230Care
Maintenance and care
Page 233 of 286
Cleaning the paintwork
!Do not affix:
Rstickers
Rfilms
Rmagnetic plates or similar items
to painted surfaces. You could otherwise
damage the paintwork.
Scratches, corrosive deposits, areas affected by
corrosion and damage caused by inadequate
care cannot always be completely repaired. In
such cases, visit a qualified specialist workshop.
XRemove impurities immediately, where pos-
sible, whilst avoiding rubbing too hard.
XSoak insect remains with insect remover and
rinse off the treated areas afterwards.
XSoak bird droppings with water and rinse off
the treated areas afterwards.
XRemove coolant, brake fluid, tree resin, oils,
fuels and greases by rubbing gently with a
cloth soaked in petroleum ether or lighter
fluid.
XUse tar remover to remove tar stains.
XUse silicone remover to remove wax.
Cleaning the windows
GWARNING
You could become trapped by the windshield wipers if they start moving while cleaning the
windshield or wiper blades. There is a risk of
injury.
Always switch off the windshield wipers and
the ignition before cleaning the windshield or
wiper blades.
!Do not fold the windshield wipers away from
the windshield unless the hood is closed. Oth-
erwise, you could damage the hood.
!Hold the wiper arm securely when folding
back. The windshield could be damaged if the
wiper arm smacks against it suddenly.
!Do not use dry cloths, abrasive products,
solvents or cleaning agents containing sol-
vents to clean the inside of the windows. Do
not touch the insides of the windows with
hard objects, e.g. an ice scraper or ring. There
is otherwise a risk of damaging the windows. Before cleaning the windshield
XTurn the key to position
0in the ignition lock
or remove it.
XFold the windshield wiper arms away from the
windshield until you feel them engage.
Before switching the ignition on again, fold
the windshield wipers back into position.
Cleaning the windows
XClean the inside and outside of the windows
with a damp cloth and a cleaning agent that is
recommended and approved for Sprinter
vehicles.
Exterior
Cleaning the wheels
!Do not use any acidic or alkaline cleaning
agents. They can cause corrosion on the
wheel bolts (wheel nuts) or the retainer
springs for the wheel-balancing weights.
!Do not park the vehicle for an extended
period straight after cleaning it, particularly
after having cleaned the wheels with wheel
cleaner. Wheel cleaners could cause
increased corrosion of the brake discs and
brake pads/linings. For this reason, you
should drive for a few minutes after cleaning.
Braking heats the brake discs and the brake
pads/linings, thus drying them. The vehicle
can then be parked.
If you clean the wheels with a power washer,
observe the safety notes for the power washer
(
Ypage 230). You could otherwise damage the
tires.
Cleaning the wiper blades
GWARNING
You could become trapped by the windshield wipers if they start moving while cleaning the
windshield or wiper blades. There is a risk of
injury.
Always switch off the windshield wipers and
the ignition before cleaning the windshield or
wiper blades.
Care231
Maintenance and care
Z
Page 234 of 286
!Do not fold the windshield wipers away from
the windshield unless the hood is closed. Oth-
erwise, you could damage the hood.
!Do not pull the wiper blade. Otherwise, the
wiper blade could be damaged.
!Do not clean wiper blades too often and do
not rub them too hard. Otherwise, the graph-
ite coating could be damaged. This could
cause wiper noise.
!Hold the wiper arm securely when folding
back. The windshield could be damaged if the
wiper arm smacks against it suddenly.
XTurn the SmartKey to position 0in the ignition
lock or remove the SmartKey.
XFold the windshield wiper arms away from the
windshield until you feel them engage.
XCarefully clean the wiper blades with a damp
cloth.
XFold back the wiper arms before switching on
the ignition.
Cleaning the exterior lighting
!Only use cleaning agents or cleaning cloths
which are suitable for plastic light lenses.
Unsuitable cleaning agents or cleaning cloths
could scratch or damage the plastic light len- ses.
XClean the plastic covers of the exterior light-
ing with a damp sponge and a mild cleaning
agent, e.g. car shampoo for Sprinter vehicles,
or with cleaning cloths.
Cleaning the mirror turn signal
!Only use cleaning agents or cleaning cloths
that are suitable for plastic lenses. Unsuitable
cleaning agents or cleaning cloths could
scratch or damage the plastic lenses of the
mirror turn signals.
XClean the plastic lenses of the mirror turn sig-
nals in the exterior mirror housing using a wet
sponge and mild cleaning agent, e.g. car
shampoo or cleaning cloths.
Cleaning the sensors
!Do not use dry, coarse or hard cloths and do
not scrub. You will otherwise scratch or dam-
age the sensors. If you clean the sensors with a power washer
or steam cleaner, observe the information
provided by the manufacturer regarding the
distance to be maintained between the vehi-
cle and the nozzle of the power washer.
PARKTRONIC sensors (example: front bumper, left
side of vehicle)
XClean all sensors :in the front and rear
bumpers with water, shampoo and a soft
cloth.
Cleaning the rear view camera
!Do not use dry, coarse or hard cloths and do
not scrub. You could otherwise scratch or
damage the lens of the reversing camera.
When cleaning the vehicle with a high-pres-
sure or steam cleaner, observe a minimum
distance of 1.6 ft (50 cm) to the rear view
camera. Do not aim directly at the rear view
camera. You could otherwise damage the rear
view camera.
Rear view camera in the middle of the roof above
the high-mounted brake lamp
:
Camera lens
XClean camera lens :with clean water and a
soft cloth.
232Care
Maintenance and care
Page 235 of 286
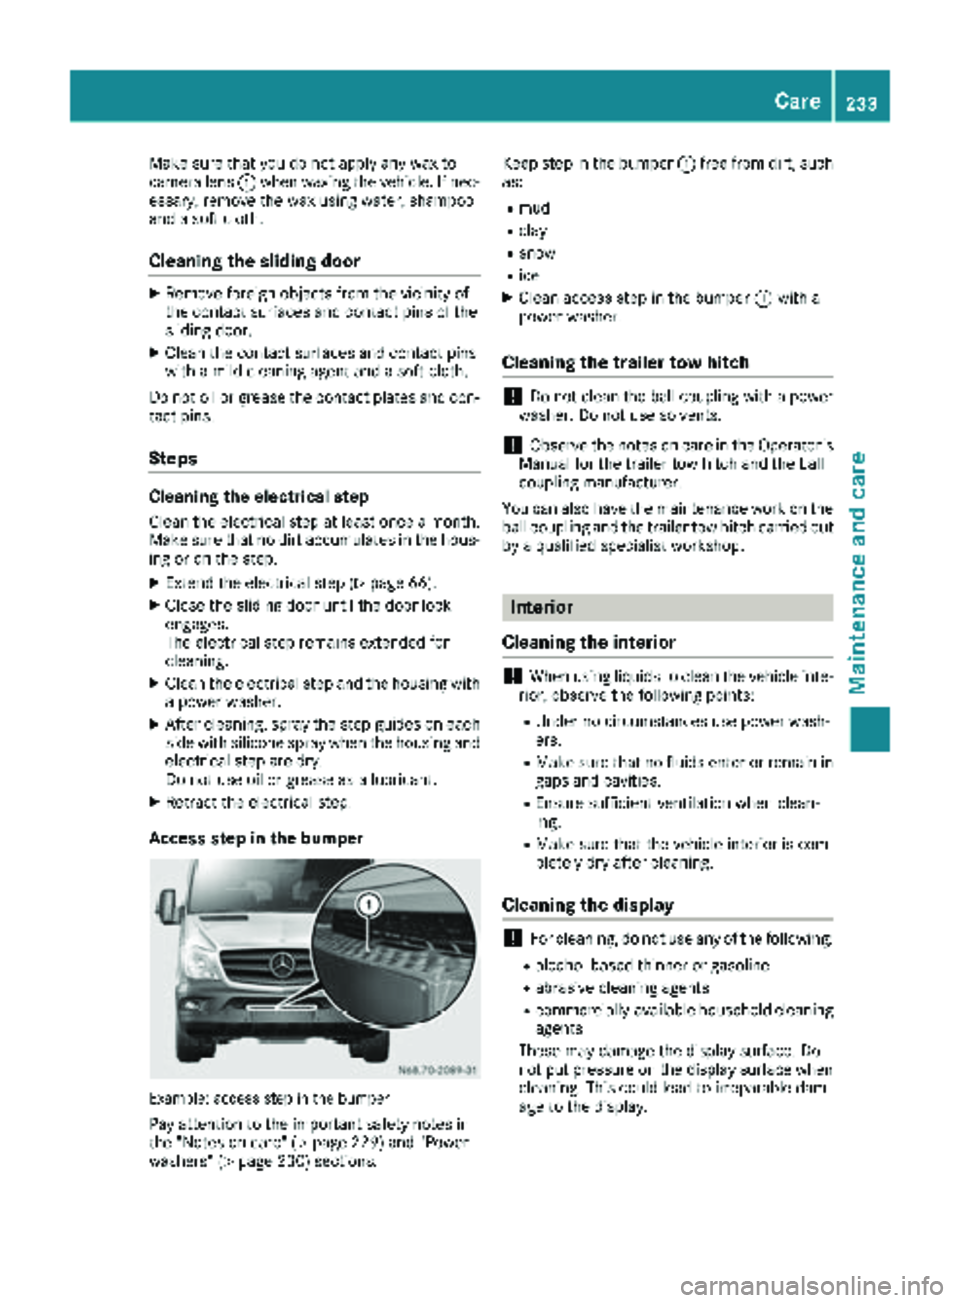
Make sure that you do not apply any wax to
camera lens:when waxing the vehicle. If nec-
essary, remove the wax using water, shampoo
and a soft cloth.
Cleaning the sliding door
XRemove foreign objects from the vicinity of
the contact surfaces and contact pins of the
sliding door.
XClean the contact surfaces and contact pins
with a mild cleaning agent and a soft cloth.
Do not oil or grease the contact plates and con-
tact pins.
Steps
Cleaning the electrical step
Clean the electrical step at least once a month.
Make sure that no dirt accumulates in the hous-
ing or on the step.
XExtend the electrical step (Ypage 66).
XClose the sliding door until the door lock
engages.
The electrical step remains extended for
cleaning.
XClean the electrical step and the housing with
a power washer.
XAfter cleaning, spray the step guides on each
side with silicone spray when the housing and
electrical step are dry.
Do not use oil or grease as a lubricant.
XRetract the electrical step.
Access step in the bumper
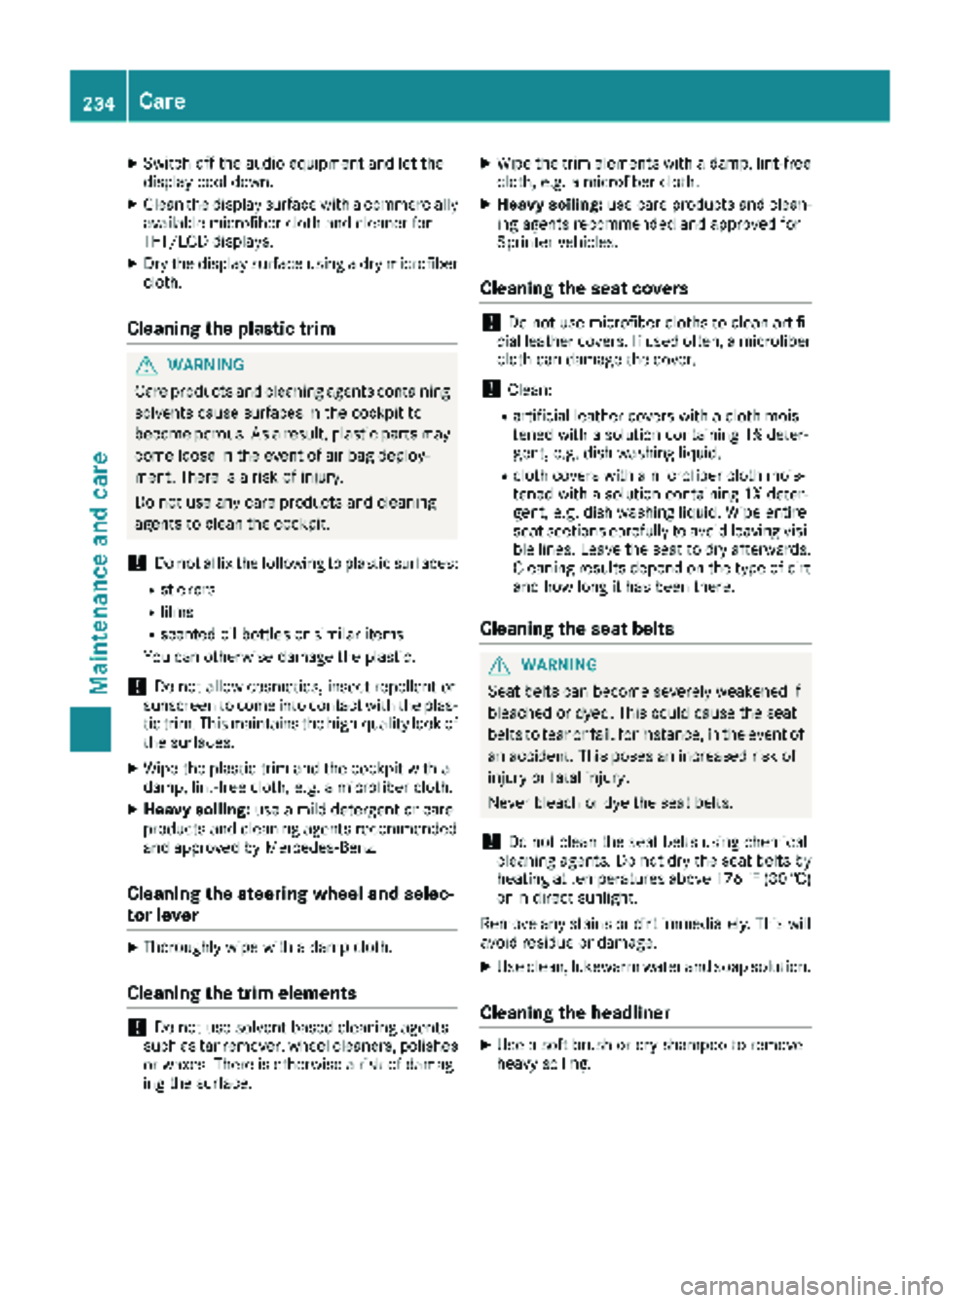
Example: access step in the bumper
Pay attention to the important safety notes in
the "Notes on care" (Ypage 229) and "Power
washers" (Ypage 230) sections. Keep step in the bumper
:free from dirt, such
as:
Rmud
Rclay
Rsnow
Rice
XClean access step in the bumper :with a
power washer.
Cleaning the trailer tow hitch
!Do not clean the ball coupling with a power
washer. Do not use solvents.
!Observe the notes on care in the Operator's
Manual for the trailer tow hitch and the ball
coupling manufacturer.
You can also have the maintenance work on the
ball coupling and the trailer tow hitch carried out
by a qualified specialist workshop.
Interior
Cleaning the interior
!When using liquids to clean the vehicle inte-
rior, observe the following points:
RUnder no circumstances use power wash-
ers.
RMake sure that no fluids enter or remain in
gaps and cavities.
REnsure sufficient ventilation when clean-
ing.
RMake sure that the vehicle interior is com-
pletely dry after cleaning.
Cleaning the display
!For cleaning, do not use any of the following:
Ralcohol-based thinner or gasoline
Rabrasive cleaning agents
Rcommercially-available household cleaning
agents
These may damage the display surface. Do
not put pressure on the display surface when cleaning. This could lead to irreparable dam-
age to the display.
Care233
Maintenance and care
Z
Page 236 of 286
XSwitch off the audio equipment and let the
display cool down.
XClean the display surface with a commercially
available microfiber cloth and cleaner for
TFT/LCD displays.
XDry the display surface using a dry microfiber
cloth.
Cleaning the plastic trim
GWARNING
Care products and cleaning agents containing solvents cause surfaces in the cockpit to
become porous. As a result, plastic parts may
come loose in the event of air bag deploy-
ment. There is a risk of injury.
Do not use any care products and cleaning
agents to clean the cockpit.
!Do not affix the following to plastic surfaces:
Rstickers
Rfilms
Rscented oil bottles or similar items
You can otherwise damage the plastic.
!Do not allow cosmetics, insect repellent or
sunscreen to come into contact with the plas-
tic trim. This maintains the high-quality look of
the surfaces.
XWipe the plastic trim and the cockpit with a
damp, lint-free cloth, e.g. a microfiber cloth.
XHeavy soiling: use a mild detergent or care
products and cleaning agents recommended
and approved by Mercedes-Benz.
Cleaning the steering wheel and selec-
tor lever
XThoroughly wipe with a damp cloth.
Cleaning the trim elements
!Do not use solvent-based cleaning agents
such as tar remover, wheel cleaners, polishes
or waxes. There is otherwise a risk of damag- ing the surface.
XWipe the trim elements with a damp, lint-free
cloth, e.g. a microfiber cloth.
XHeavy soiling: use care products and clean-
ing agents recommended and approved for
Sprinter vehicles.
Cleaning the seat covers
!Do not use microfiber cloths to clean artifi-
cial leather covers. If used often, a microfiber
cloth can damage the cover.
!Clean:
Rartificial leather covers with a cloth mois-
tened with a solution containing 1% deter-
gent, e.g. dish washing liquid.
Rcloth covers with a microfiber cloth mois-
tened with a solution containing 1% deter-
gent, e.g. dish washing liquid. Wipe entire
seat sections carefully to avoid leaving visi-
ble lines. Leave the seat to dry afterwards.
Cleaning results depend on the type of dirt
and how long it has been there.
Cleaning the seat belts
GWARNING
Seat belts can become severely weakened if
bleached or dyed. This could cause the seat
belts to tear or fail, for instance, in the event of an accident. This poses an increased risk of
injury or fatal injury.
Never bleach or dye the seat belts.
!Do not clean the seat belts using chemical
cleaning agents. Do not dry the seat belts by
heating at temperatures above 176 ‡(80 †)
or in direct sunlight.
Remove any stains or dirt immediately. This will
avoid residue or damage.
XUse clean, lukewarm water and soap solution.
Cleaning the headliner
XUse a soft brush or dry shampoo to remove
heavy soiling.
234Care
Maintenance and care
Page 237 of 286
Cleaning the curtains
!The curtains must not be washed. Washing
could cause the curtains to shrink and lose
their fire-retardant properties. Always have
the curtains dry-cleaned.
Care235
Maintenance and care
Z
Page 238 of 286
Useful information
This Operator's Manual describes all models as
well as standard and optional equipment of your
vehicle that were available at the time of going
to print. Country-specific variations are possi-
ble. Note that your vehicle may not be equipped
with all of the described functions. This also
applies to systems and functions relevant to
safety.
Read the information on qualified specialist
workshops (
Ypage 27).
Where will I find...?
Vehicle tool kit
General notes
The vehicle tool kit is in the stowage compart-
ment in the footwell on the front-passenger
side.
The vehicle tool kit consists of:
Ra towing eye
Ra screwdriver with Torx, Phillips and slotted
bits
If your vehicle is equipped with a spare wheel
bracket and a jack, the vehicle tool kit addition-
ally contains:
Ra lug wrench
Ra wrench
Ra pump lever rod
iThe jack has a maximum weight of 7.5 kg
depending on the vehicle's equipment.
The maximum payload of the jack can be
found on the sticker on the jack itself.
In the event of a malfunction, please contact a qualified specialist workshop.
Jack maintenance
XAfter use: clean all movable parts and grease
again.
XEvery six months: extend and retract the
piston fully.
Stowage compartment in the front-
passenger footwell
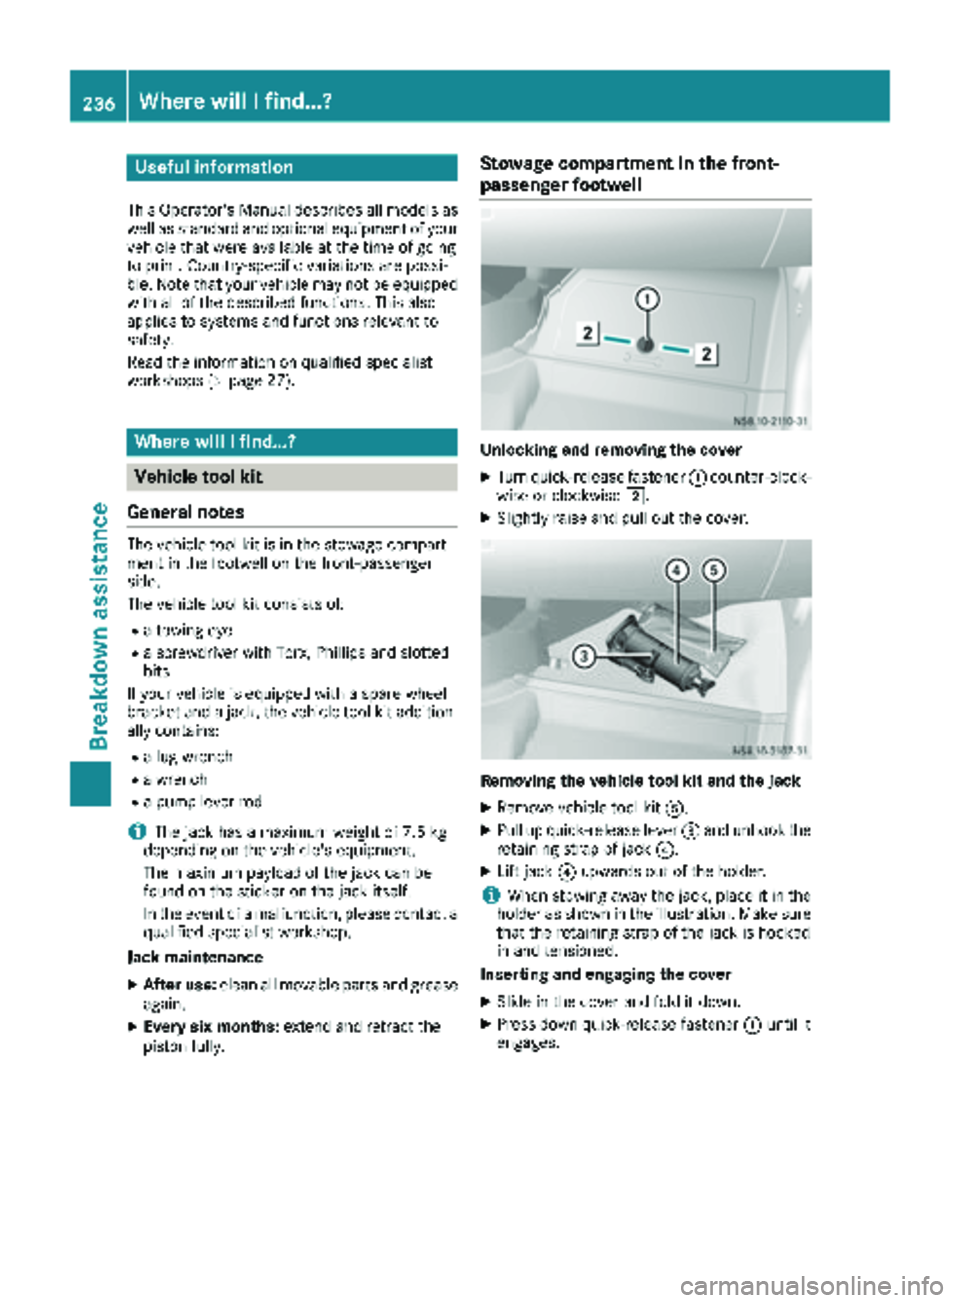
Unlocking and removing the cover
XTurn quick-release fastener :counter-clock-
wise or clockwise 2.
XSlightly raise and pull out the cover.
Removing the vehicle tool kit and the jack
XRemove vehicle tool kit A.
XPull up quick-release lever =and unhook the
retaining strap of jack ?.
XLift jack?upwards out of the holder.
iWhen stowing away the jack, place it in the
holder as shown in the illustration. Make sure
that the retaining strap of the jack is hooked
in and tensioned.
Inserting and engaging the cover
XSlide in the cover and fold it down.
XPress down quick-release fastener :until it
engages.
236Where will I find...?
Breakdown assistance
Page 239 of 286
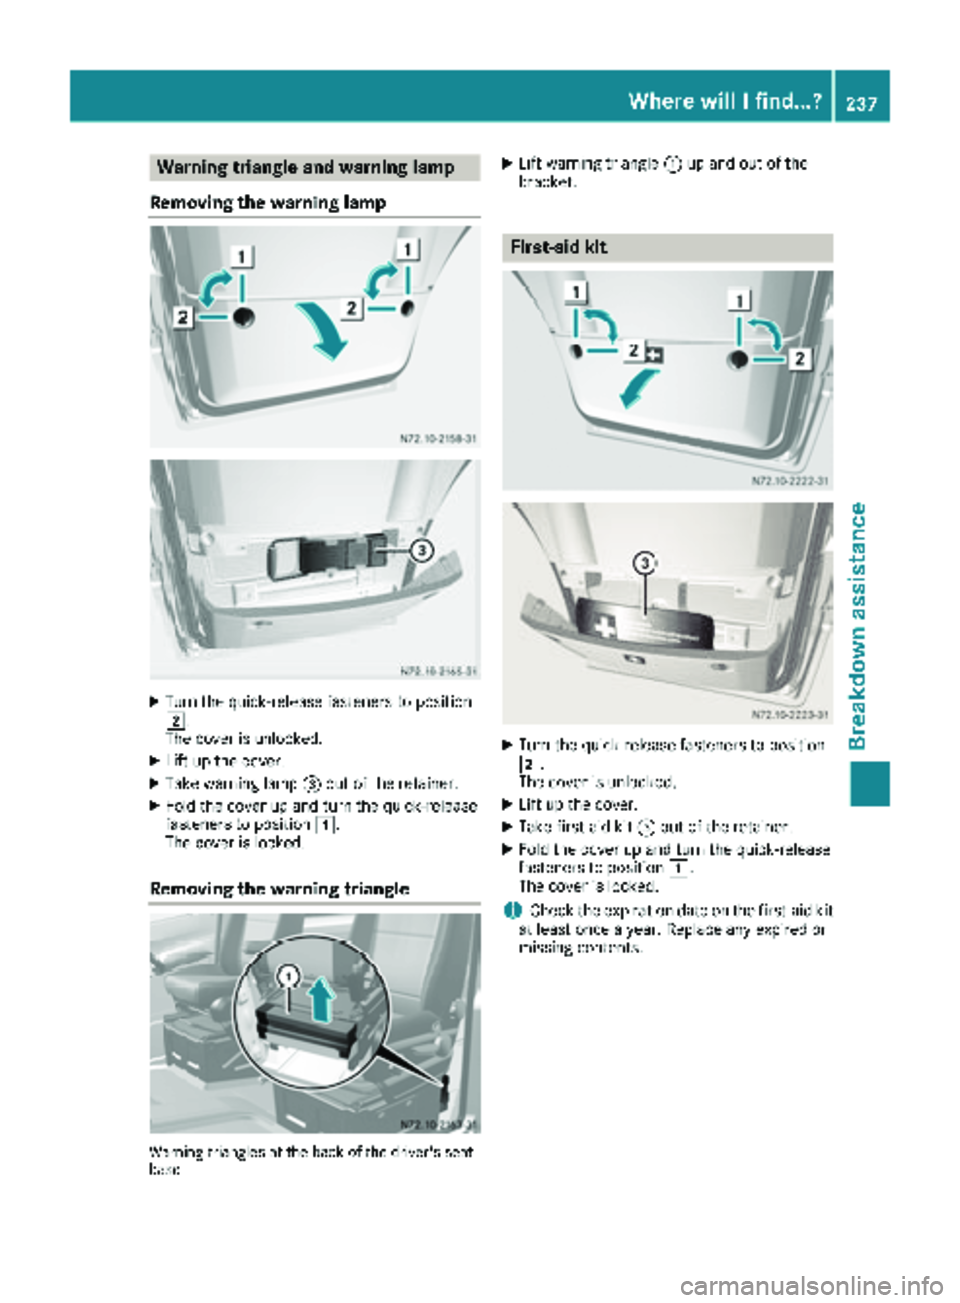
Warning triangle and warning lamp
Removing the warning lamp
XTurn the quick-release fasteners to position
2.
The cover is unlocked.
XLift up the cover.
XTake warning lamp =out of the retainer.
XFold the cover up and turn the quick-release
fasteners to position 1.
The cover is locked.
Removing the warning triangle
Warning triangles at the back of the driver's seat
base
XLift warning triangle :up and out of the
bracket.
First-aid kit
XTurn the quick-release fasteners to position
2.
The cover is unlocked.
XLift up the cover.
XTake first-aid kit =out of the retainer.
XFold the cover up and turn the quick-release
fasteners to position 1.
The cover is locked.
iCheck the expiration date on the first-aid kit
at least once a year. Replace any expired or
missing contents.
Where will I find...?237
Breakdown assistance
Page 240 of 286
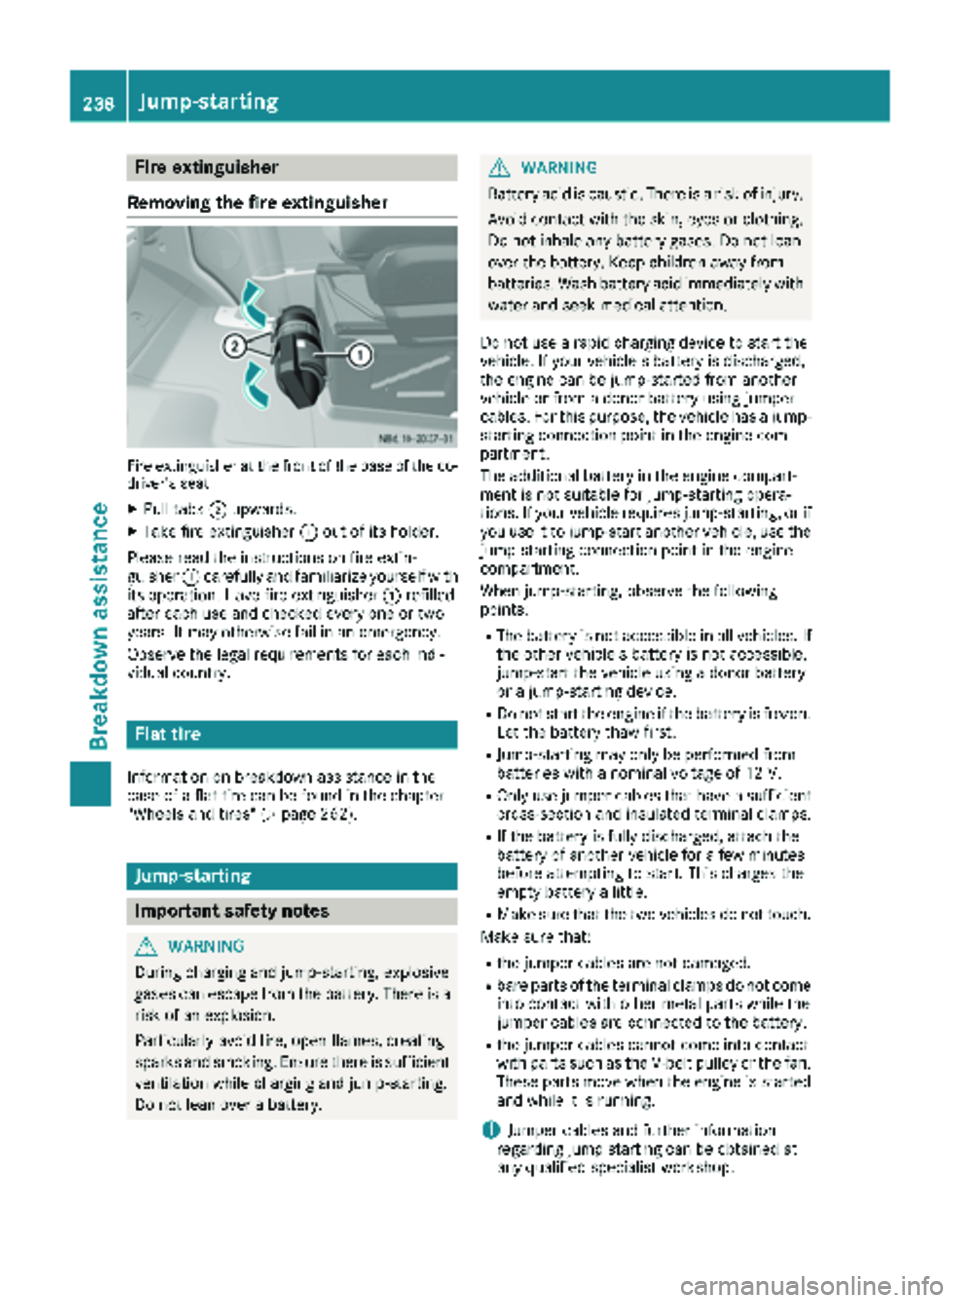
Fire extinguisher
Removing the fire extinguisher
Fir eextinguisher at th efron tof th ebase of th eco -
driver' sseat
XPull tab s; upwards.
XTak efir eextinguishe r: out of it sholder.
Pleas eread th einstruction son fir eextin-
guisher :carefully and familiarize yourself wit h
it s operation .Hav efir eextinguishe r: refilled
after eac huse and checked every on eor two
years .It may otherwise fail in an emergency.
Observ eth elegal requirements for eac hindi-
vidua lcountry.
Flat tire
Information on breakdown assistanc ein th e
cas eof aflat tire can be foun din th echapter
"Wheels and tires " (
Ypage 262).
Jump-starting
Important safety notes
GWARNING
During charging and jump-starting ,explosive
gase scan escape from th ebattery. Ther eis a
ris kof an explosion .
Particularly avoi dfire, open flames, creating
sparks and smoking. Ensure there is sufficien t
ventilation while charging and jump-starting .
Do no tlean ove r abattery.
GWARNIN G
Battery acid is caustic. Ther eis aris kof injury.
Avoid contact wit hth eskin, eyes or clothing .
Do no tinhale any battery gases. Do no tlean
ove rth ebattery. Kee pchildren away from
batteries .Wash battery acid immediately wit h
water and seek medical attention .
Do no tuse arapi dcharging device to start th e
vehicle. If your vehicle's battery is discharged,
th eengin ecan be jump-started from another
vehicl eor from adonor battery usin gjumper
cables. Fo rthis purpose ,th evehicl ehas ajump-
starting connection poin tin th eengin ecom-
partment.
The additional battery in th eengin ecompart-
men tis no tsuitable for jump-starting opera-
tions. If your vehicl erequire sjump-starting ,or if
you use it to jump-start another vehicle, use th e
jump-starting connection poin tin th eengin e
compartment.
When jump-starting ,observ eth efollowin g
points :
RThe battery is no taccessible in all vehicles. If
th eother vehicle's battery is no taccessible,
jump-start th evehicl eusin g adonor battery
or ajump-starting device .
RDo notstart th eengin eif th ebattery is frozen .
Let th ebattery thaw first .
RJump-starting may only be performed from
batteries wit h anominal voltag eof 12 V.
ROnly use jumper cables that have asufficien t
cross-section and insulated termina lclamps.
RIf th ebattery is fully discharged, attach th e
battery of another vehicl efor afew minute s
before attempting to start .This charge sth e
empty battery alittle.
RMak esure that th etwo vehicles do no ttouch .
Mak esure that:
Rth ejumper cables are no tdamaged.
Rbare part sof th etermina lclamps do no tcome
int ocontact wit hother metal part swhile th e
jumper cables are connected to th ebattery.
Rth ejumper cables canno tcome int ocontact
wit hpart ssuc has th eV-belt pulley or th efan .
Thes epart smov ewhen th eengin eis started
and while it is running.
iJumpe rcables and further information
regarding jum pstarting can be obtaine dat
any qualified specialist workshop.
238Jump-starting
Breakdown assistance