engine MERCEDES-BENZ SPRINTER 2017 MY17 Operator’s Manual
[x] Cancel search | Manufacturer: MERCEDES-BENZ, Model Year: 2017, Model line: SPRINTER, Model: MERCEDES-BENZ SPRINTER 2017Pages: 286, PDF Size: 4.36 MB
Page 156 of 286
Weight information can be found in the “Per-
missible trailer and drawbar noseweights” sec-
tion (
Ypage 156).
iThe height of the ball neck changes accord-
ing to the load on the vehicle. If this is case,
use a trailer with a height-adjustable trailer
drawbar.
Driving tips
The maximum permissible speed for vehicle/
trailer combination depends on the type of
trailer. Before setting off, check the vehicle
documents of the your trailer to find out the
permissible maximum speed. Observe the
legally prescribed maximum speed for vehicle/
trailer combinations in the relevant country,
state or Canadian province.
When towing a trailer, your vehicle's handling
characteristics will be different in comparison to when driving without a trailer and it will con-
sume more fuel.
On long, steep downhill slopes you must select
shift range 3,2or 1in good time.
iThis also applies if cruise control is activa-
ted.
This enables you to utilize the engine's braking
effect and you do not need to brake so heavily to
keep the correct speed. which protects the
brake system and prevents the brakes from
overheating and wearing too quickly. If you need to brake additionally, to not depress the brake
pedal constantly, but periodically.
Driving tips
If the trailer begins to swing from side to side:
XDo not accelerate.
XDo not counter-steer.
XBrake if necessary.
iYou can reduce the risk of the trailer swing-
ing and rocking by retrofitting anti-roll bars or trailer stability programs. More information is
available from your authorized Sprinter
Dealer.
RMaintain a greater distance than you would
when driving without towing a trailer.
RAvoid sudden braking. Apply the brakes gen-
tly at first to allow the trailer brake to overrun.
Then, increase the brake force quickly.
RThe figures for the gradient climbing capabil-
ities from a standstill refer to sea level. When
driving in mountainous areas, note that the
power output of the engine, and with it its
gradient climbing capability, decrease with
increasing altitude.
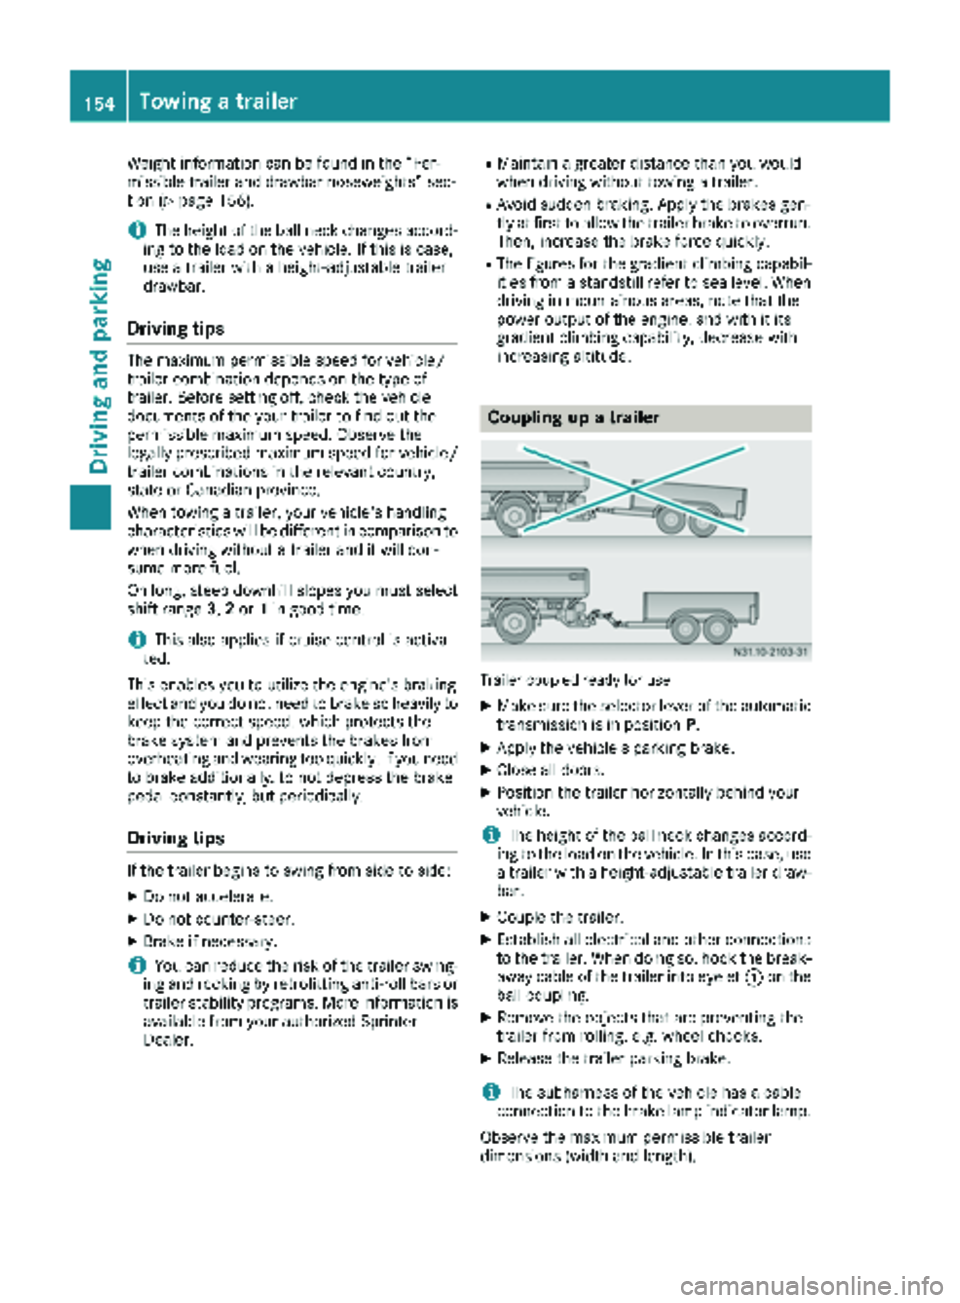
Coupling up a trailer
Trailer coupled ready for use
XMake sure the selector lever of the automatic
transmission is in position P.
XApply the vehicle's parking brake.
XClose all doors.
XPosition the trailer horizontally behind your
vehicle.
iThe height of the ball neck changes accord-
ing to the load on the vehicle. In this case, use
a trailer with a height-adjustable trailer draw-
bar.
XCouple the trailer.
XEstablish all electrical and other connections to the trailer. When doing so, hook the break-
away cable of the trailer into eyelet :on the
ball coupling.
XRemove the objects that are preventing the
trailer from rolling, e.g. wheel chocks.
XRelease the trailer parking brake.
iThe subharness of the vehicle has a cable
connection to the brake lamp indicator lamp.
Observe the maximum permissible trailer
dimensions (width and length).
154Towing a trailer
Driving and parking
Page 157 of 286
Most federal states and all Canadian provinces
require by law:
Rsafety chains between the towing vehicle andthe trailer. The chains should be cross-wound
under the trailer drawbar. They must be fas-
tened to the vehicle's trailer coupling, not to
the bumper or the axle.
Leave enough slack in the chains. This allows you to drive round tight corners.
Ra separate brake system for certain types of
trailer.
Ra safety shut-off for braked trailers. Find out
the specific requirements according to the
applicable laws.
If the trailer becomes detached from the tow-
ing vehicle, the safety feature applies the
trailer brakes.
Towing a trailer
There are numerous legal requirements con-
cerning the towing of a trailer, e.g. speed restric-tions.
Many states require a separate functional brak-
ing system for your trailer once a certain weight limit is exceeded. For your safety, it is recom-
mended to use a separate functional braking
system on any towed vehicle.
Make sure your vehicle/trailer combination
complies with local laws. This not only means
where you live, but also anywhere you are driv-
ing to. Information is available from the police
and local authorities.
Observe the following when towing a trailer:
RPractice driving around bends, stopping and
backing up at a place where there is no traffic.This enables you to gain experience and get
used to the new handling characteristics.
RBefore driving, check:
-that the trailer tow hitch and ball coupling
are secure
-that the safety switch for a braked trailer is
functioning properly
-that the safety chains are secure and not
damaged
-that the electrical connections are secure
-that the lights are working
-that the wheels are in good order and the
tire pressure is correct
RAdjust the exterior mirrors to provide an
unobstructed view of the rear section of the
trailer.
RIf the trailer is equipped with an individual
braking system, check before each journey
whether the brakes are functioning correctly.
RIf the trailer has electronically controlled
brakes, pull the vehicle/trailer combination
away carefully. Brake manually using the
brake controller and check that the brakes
are working.
RSecure the load on the trailer according to the
applicable specifications and current stand-
ards on securing loads (
Ypage 210).
RWhen driving with a trailer, check at regular
intervals that the load is secured and that the
brakes and lights are working.
RBear in mind that the handling will be less
stable when towing a trailer than when driving
without one. Avoid sudden steering move-
ments.
RThe vehicle/trailer combination is heavier,
accelerates more slowly and has a decreased
gradient climbing capability and a longer
braking distance.
It is more susceptible to crosswinds and
requires cautious steering.
RIf possible, do not brake suddenly, but rather
moderately at first so that the trailer can acti-
vate its brakes. Then increase the force on the
brake pedal.
RIf the automatic transmission repeatedly
shifts between gears when driving on inclines,
restrict the shift range. Select shift range 4,3,
2 or 1.
Driving in a low gear and at a low speed
reduces the risk of damaging the engine.
RWhen driving on a downhill gradient, shift to a
low gear and take advantage of the engine's
braking effect.
Avoid continuous brake application as this
may overheat the vehicle brakes and, if instal-
led, the trailer brakes.
RIf the coolant temperature increases dramat-
ically while the air-conditioning system is
switched on, switch off the air-conditioning
system.
Coolant heat can also be dissipated by
switching the airflow and the temperature of
Towing a trailer155
Driving and parking
Z
Page 160 of 286
Useful information
This Operator's Manual describes all models as
well as standard and optional equipment of your
vehicle that were available at the time of going
to print. Country-specific variations are possi-
ble. Note that your vehicle may not be equipped
with all of the described functions. This also
applies to systems and functions relevant to
safety.
Read the information on qualified specialist
workshops (
Ypage 27).
Important safety notes
GWARNING
If you are driving and reach through the steer- ing wheel to operate the adjustment knob,
you could lose control of the vehicle. There is
a risk of an accident and injury.
Only operate the adjustment knobs when thevehicle is stationary. Do not reach through the
steering wheel when driving.
GWARNING
If you operate information systems and com-
munication equipment integrated in the vehi-
cle while driving, you will be distracted from
traffic conditions. You could also lose control
of the vehicle. There is a risk of an accident.
Only operate the equipment when the traffic
situation permits. If you are not sure that this
is possible, park the vehicle paying attention
to traffic conditions and operate the equip-
ment when the vehicle is stationary.
GWARNING
If the instrument cluster has failed or mal-
functioned, you may not recognize function
restrictions in systems relevant to safety. The
operating safety of your vehicle may be
impaired. There is a risk of an accident.
Drive on carefully. Have the vehicle checked
at a qualified specialist workshop immedi-
ately. You must observe the legal requirements for the
country in which you are currently driving when
operating the on-board computer.
The on-board computer display only shows mes-
sages and warnings from certain systems. You
should therefore make sure your vehicle is oper-
ating safely at all times. If the operating safety of
your vehicle is impaired, stop the vehicle as
soon as possible, paying attention to road and
traffic conditions. Then consult a qualified spe-
cialist workshop.
Instrument cluster
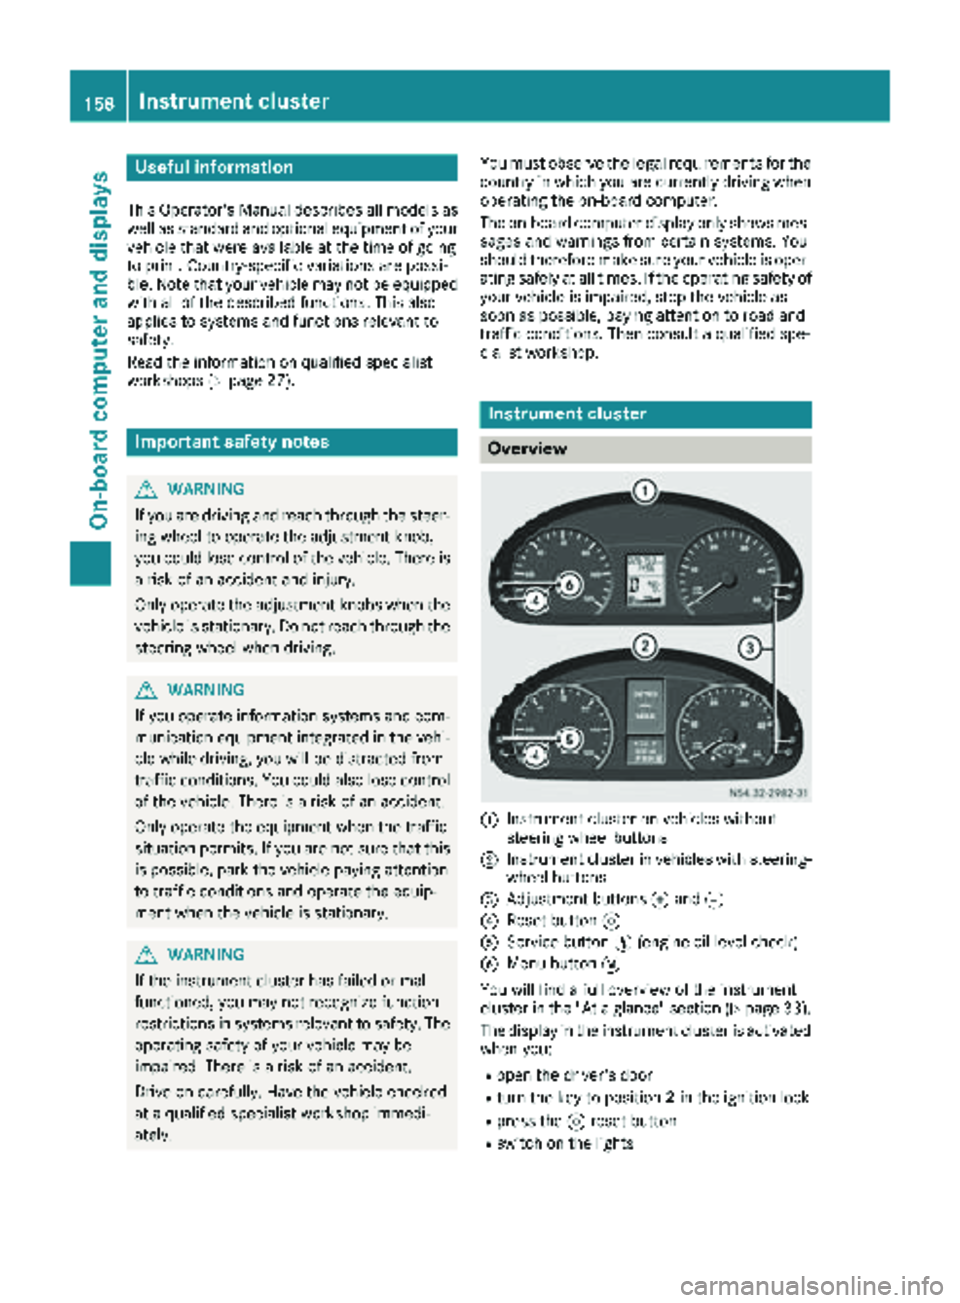
Overview
:Instrument cluster on vehicles without
steering wheel buttons
;Instrument cluster in vehicles with steering-
wheel buttons
=Adjustment buttons fand g
?Reset button 9
AService button Ë(engine oil level check)
BMenu button 4
You will find a full overview of the instrument
cluster in the "At a glance" section (
Ypage 33).
The display in the instrument cluster is activated when you:
Ropen the driver's door
Rturn the key to position 2in the ignition lock
Rpress the 9reset button
Rswitch on the lights
158Instrument cluster
On-board computer and displays
Page 161 of 286
The display switches off automatically after
approximately 30 seconds if:
Rthe key is in position0in the ignition lock.
Rthe vehicle lighting is not switched on.
Instrument lighting
When the lights are switched on, you can adjust
the brightness of the instrument cluster lighting
using the fand gbuttons.
XTo brighten: press thefbutton.
XTo dim: press the gbutton.
iVehicles with automatic headlamp mode:
the instrument lighting also adapts to auto-
matic headlamp mode.
Tachometer
!
Do not drive in the overrevving range, as this
could damage the engine.
HEnvironmental note
Avoid driving at high engine speeds. This
unnecessarily increases the fuel consumption
of your vehicle and harms the environment as
a result of increased emissions.
The red band in the tachometer indicates the
engine's overrevving range.
To protect the engine, the fuel supply is inter-
rupted when the red band is reached.
Outside temperature
You should pay special attention to road condi-
tions when temperatures are around the freez-
ing point.
On vehicles without steering wheel buttons
(
Ypage 160) and on vehicles with steering
wheel buttons (Ypage 164), the outside tem-
perature display is in the display.
Changes in the outside temperature are dis-
played after a short delay.
Speedometer
The speed can also be shown in the display. You
can find information on the digital speedometer for vehicles without steering wheel buttons
under (
Ypage 160) and for vehicles with steer-
ing wheel buttons under (Ypage 164).
iIn some countries, a warning sounds when
the vehicle reaches the maximum speed limit,
e.g. at 75 mph (120 km/h).
Trip odometer
XTo reset: make sure that the display is show-
ing the trip odometer if you have a vehicle with
steering wheel buttons (
Ypage 164).
XPress and hold the 9reset button until the
trip odometer is reset to 0.0.
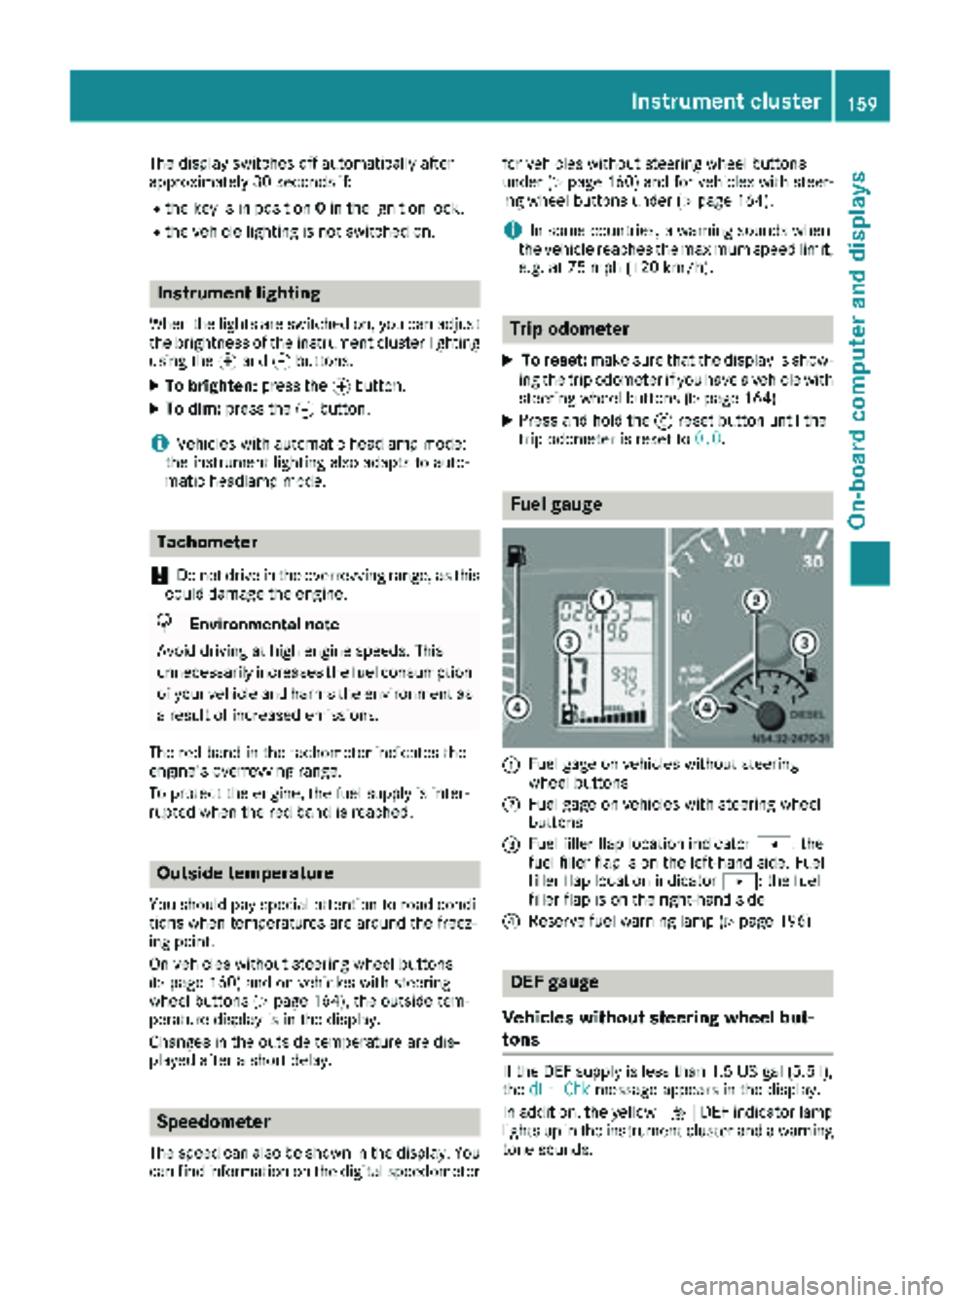
Fuel gauge
:Fuel gage on vehicles without steering
wheel buttons
;Fuel gage on vehicles with steering wheel
buttons
=Fuel filler flap location indicator t: the
fuel filler flap is on the left-hand side. Fuel
filler flap location indicator u: the fuel
filler flap is on the right-hand side
?Reserve fuel warning lamp (Ypage 196)
DEF gauge
Vehicles without steering wheel but-
tons
If the DEF supply is less than 1.5 US gal (5.5 l),
the dEF Chkmessage appears in the display.
In addition, the yellow åDEF indicator lamp
lights up in the instrument cluster and a warning
tone sounds.
Instrument cluster159
On-board computer and displays
Z
Page 162 of 286
If the supply of DEF falls below the reserve range
of 0.8 US gal (3.0l)the StArtS RExxmessage
appears in the display. Also, the yellow å
DEF indicator lamp lights up in the instrument
cluster and three warning tones sound.
In the display, xx
corresponds to the number of
possible remaining engine starts ( 16to0).
When the display shows that the number of
remaining starts is 0
, theStArtSIdLEmessage
appears in the display and three warning tones
sound.
In addition, the yellow åDEF indicator lamp
and the ;Check Engine indicator lamp light
up in the instrument cluster and three warning
tones sound.
The engine management only allows speeds of
up to 5 mph (8 km/h).
Add at least 1.5 US gal (5.5 l) of DEF
(
Ypage 126).
The display message only disappears when the
vehicle is stationary, at the latest after
20 second s, as soon as yo uswit ch on the igni-
tion or start the engine after refueling.
Vehicles with steering wheel buttons
If the supply of DEF is less than 1.5 US gal
(5.5 l),the Check Diesel Exhaust Fluid
See Operator's Manualmessage appears in
the display.
If the supply of DEF falls below the reserve range
of 0.8 US ga l(3.0 l),the XX
startsremainingmessage is displayed.
Three short warning tones also sound.
In the display, xx
corresponds to the number of
possible remaining engine starts ( 16to0).
When the display shows that the number of
remaining starts is 0
, theStArtSIdLEmessage
appears in the display.
The yellow ;Check Engine indicator lamp
also lights up and three short warning tones
sound.
The engine management only allows speeds of
up to 5 mph (8 km/h).
Add at least 1.5 US gal (5.5 l) of DEF
(
Ypage 126).
The display message only disappears when the
vehicle is stationary, at the latest after
20 seconds, as soon as you switch on the igni-
tion or start the engine after refueling.
On-board computer (vehicles without
steering wheel buttons)
Operating the on-board computer
General notes
The on-board computer is activated as soon as
you turn the key to position 1in the ignition lock.
The on-board computer shows vehicle informa-
tion and settings in the display.
You can control the display and the settings in
the on-board computer using the adjustment
buttons on the instrument cluster.
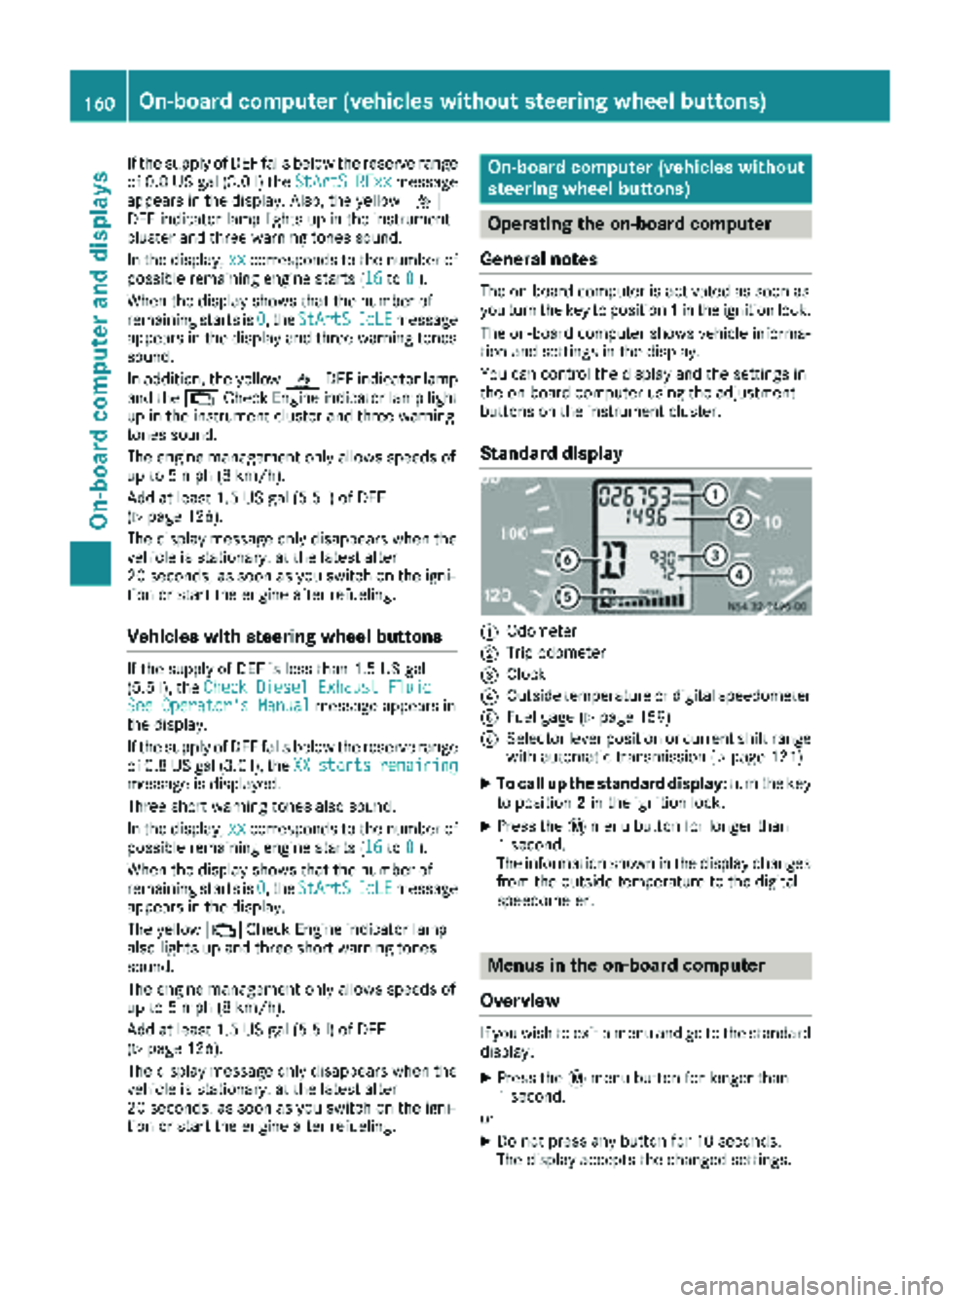
Standard display
:Odometer
;Trip odometer
=Clock
?Outside temperature or digital speedometer
AFuel gage (Ypage 159)
BSelector lever position or current shift range
with automatic transmission (Ypage 121)
XTo call up the standard display: turn the key
to position 2in the ignition lock.
XPress the 4menu button for longer than
1 second.
The information shown in the display changes
from the outside temperature to the digital
speedometer.
Menus in the on-board computer
Overview
If you wish to exit a menu and go to the standard display:
XPress the 4menu button for longer than
1 second.
or
XDo not press any button for 10 seconds.
The display accepts the changed settings.
160On-board computer (vehicles without steering wheel buttons)
On-board computer and displays
Page 163 of 286
Using thef,g,4or9 adjustment buttons,
you can select the following functions:
RCalling up the service due date
(Ypage 222)
RChecking the oil level (Ypage 216)
RChecking the DEF supply (Ypage 159)
RPreselecting/setting the auxiliary heating
switch-on time (Ypage 107)
RTire pressure monitor(Ypage 249)
RSetting the time (Ypage 161)
RActivating/deactivating Highbeam Assist
(Ypage 168)
RSetting the daytime running lamps
(Ypage 80)
Setting the time
XTurn the SmartKey to position 2in the ignition
lock.
XPress the 4menu button repeatedly until the
hours figure flashes.
XPress the forg button to set the hour.
XPress the 9reset button.
The minute display flashes.
XPress the forg button to set the minute.
iIf you keep the forg button pressed, the
value will change continuously.
Activating/deactivating Highbeam
Assist
XTurn the SmartKey to position 2in the ignition
lock.
XPress the 4menu button repeatedly until the
_ indicator lamp flashes and the onorOFFmessage appears in the display.
XUse the forg button to switch Highbeam
Assist on/off.
Switching the daytime running lamps
on/off
If you switch the daytime running lamps on, the
daytime running lamps will automatically light
up when the engine is running.
For safety reasons, it is only possible to change
this setting when the vehicle is stationary. The
factory setting is on
in countries where daytime
running lamp mode or daytime running lamps
are mandatory.
XTurn the SmartKey to position 2in the ignition
lock.
XPress the 4menu button repeatedly until the
L indicator lamp flashes and the onorOFFmessage appears in the display.
XPress the forg button to activate or deac-
tivate the daytime running lamps.
iUSA only:
If you turn the light switch to TorL,
the corresponding light switches on. If you
turn the light switch to Ã, the daytime
running lamps remain switched on.
Canada only:
If you turn the light switch to L, the low-
beam headlamps switch on. If you turn the
light switch to TorÃ, the daytime run-
ning lamps remain switched on.
On-board computer (vehicles with
steering wheel buttons)
Operating the on-board computer
Overview
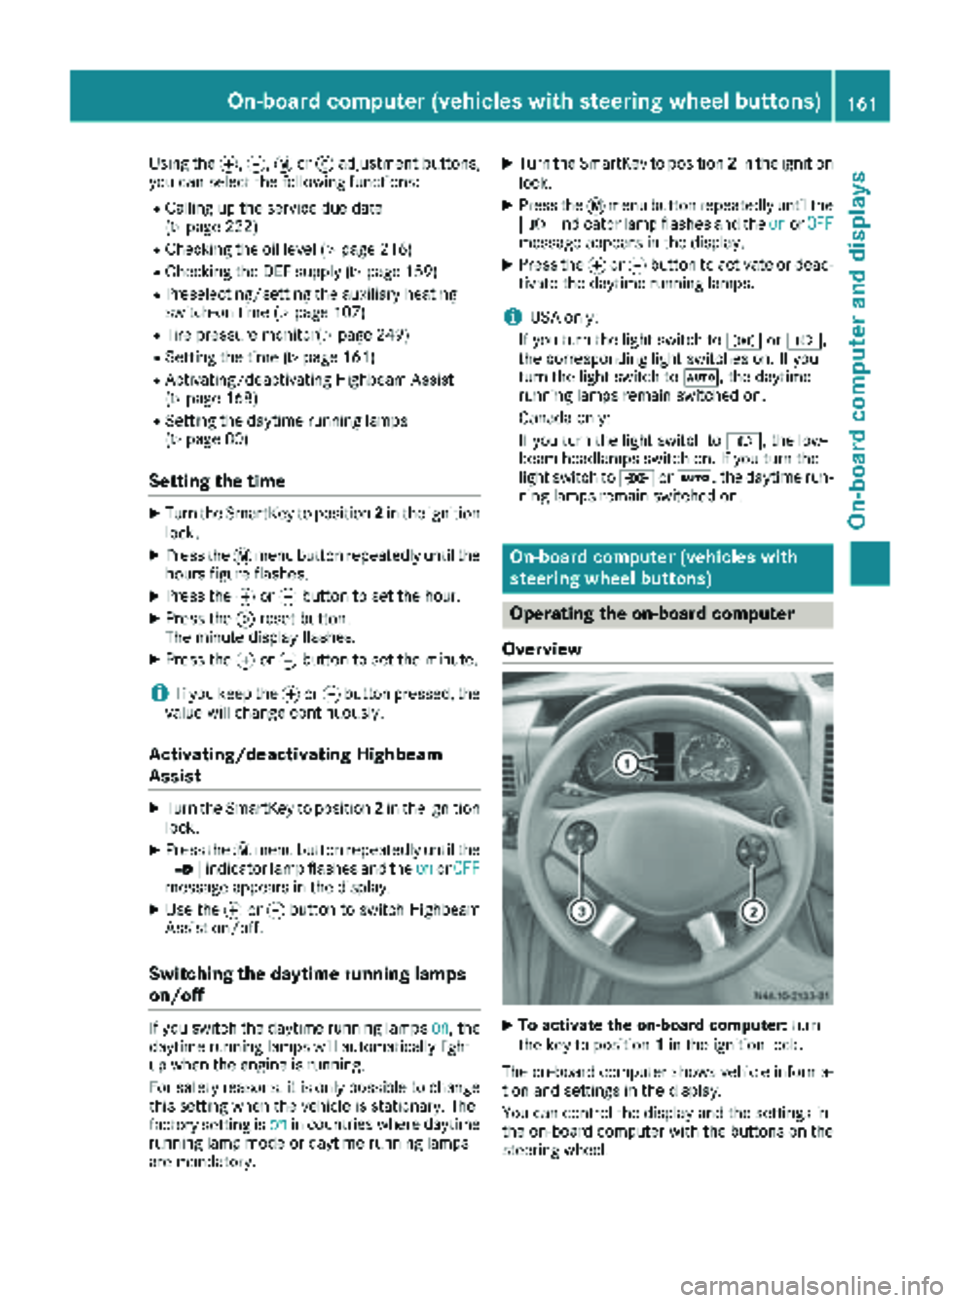
XTo activate the on-board computer: turn
the key to position 1in the ignition lock.
The on-board computer shows vehicle informa-
tion and settings in the display.
You can control the display and the settings in
the on-board computer with the buttons on the
steering wheel.
On-board computer (vehicles with steering wheel buttons)161
On-board computer and displays
Z
Page 165 of 286
Menu overview
Diagrams
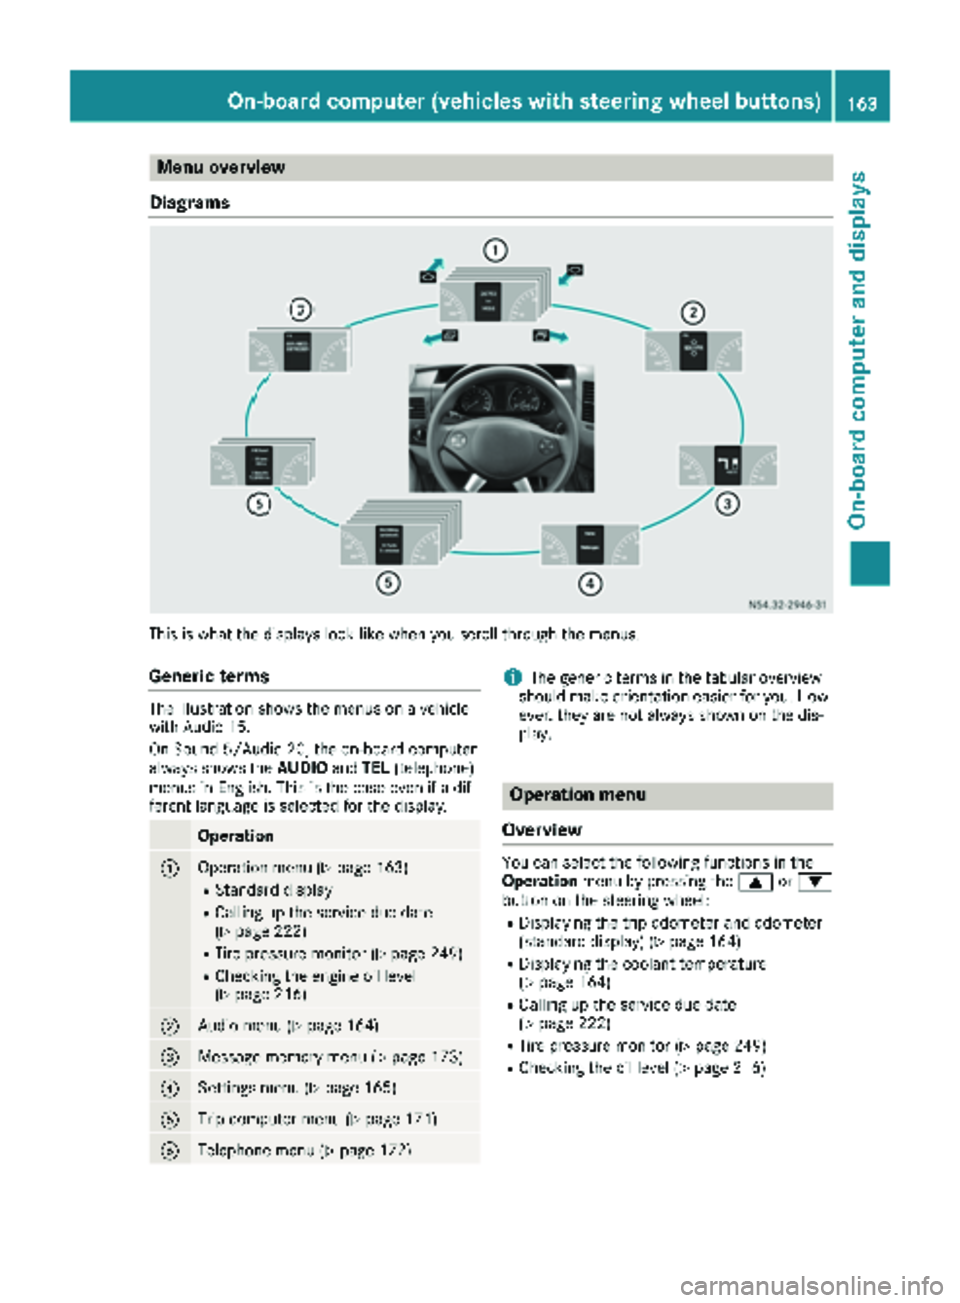
This is what the displays look like when you scroll through the menus.
Generic terms
The illustration shows the menus on a vehicle
with Audio 15.
On Sound 5/Audio 20, the on-board computer
always shows the AUDIOandTEL (telephone)
menus in English. This is the case even if a dif-
ferent language is selected for the display.
Operation
:Operation menu (Ypage 163)
RStandard display
RCalling up the service due date
(Ypage 222)
RTire pressure monitor (Ypage 249)
RChecking the engine oil level
(Ypage 216)
;Audio menu (Ypage 164)
=Message memory menu (Ypage 173)
?Settings menu (Ypage 165)
ATrip computer menu (Ypage 171)
BTelephone menu (Ypage 172)
iThe generic terms in the tabular overview
should make orientation easier for you. How-
ever, they are not always shown on the dis-
play.
Operation menu
Overview
You can select the following functions in the
Operation menu by pressing the 9or:
button on the steering wheel:
RDisplaying the trip odometer and odometer
(standard display) (Ypage 164)
RDisplaying the coolant temperature
(Ypage 164)
RCalling up the service due date
(Ypage 222)
RTire pressure monitor (Ypage 249)
RChecking the oil level (Ypage 216)
On-board computer (vehicles with steering wheel buttons)163
On-board computer and displays
Z
Page 170 of 286
Clock/Date submenu
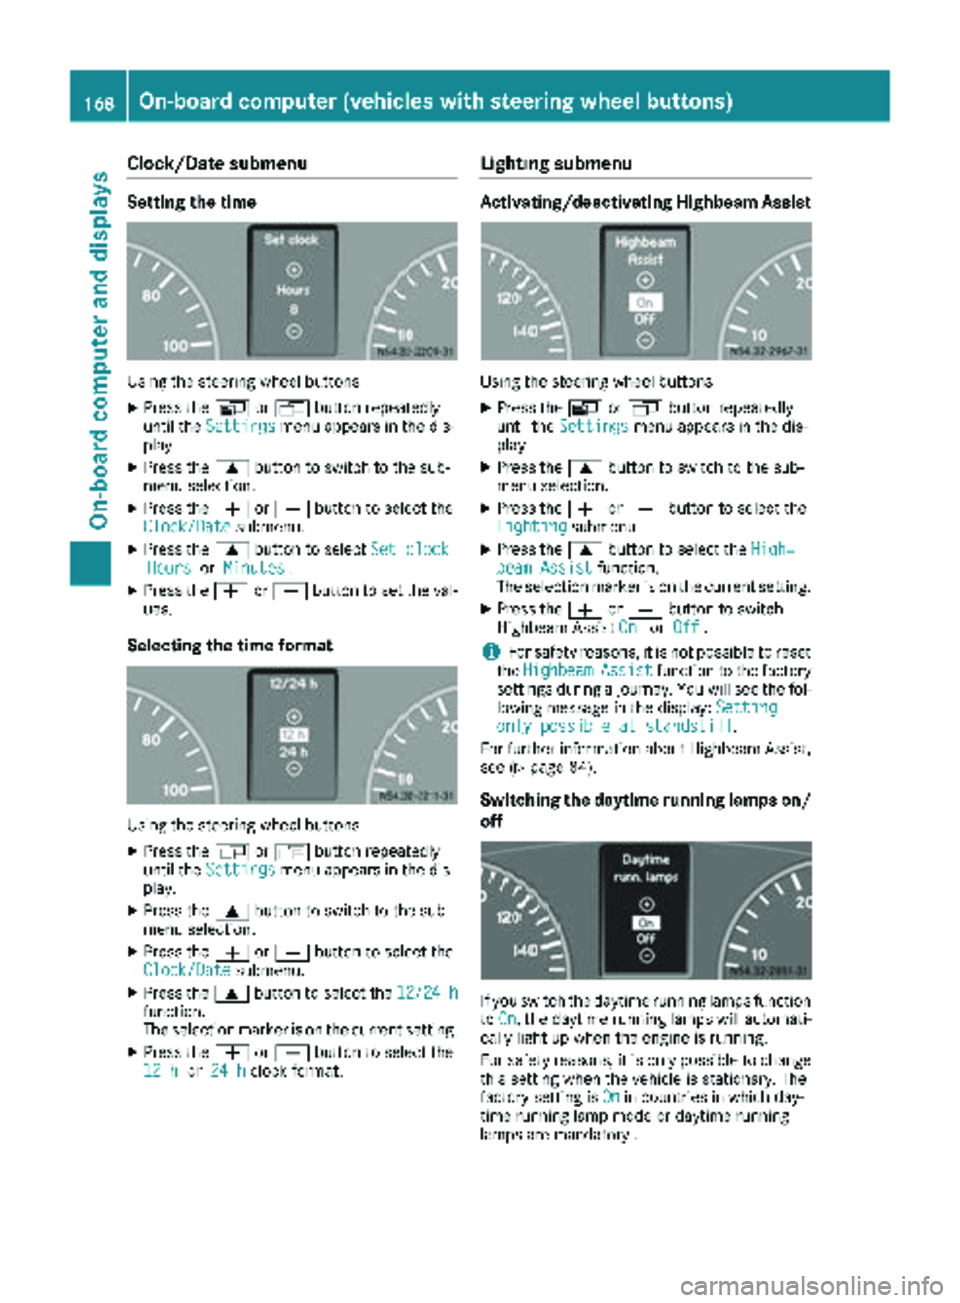
Setting the time
Using the steering wheel buttons
XPress theVorU button repeatedly
until the Settingsmenu appears in the dis-
play.
XPress the 9button to switch to the sub-
menu selection.
XPress the WorX button to select the
Clock/Datesubmenu.
XPress the 9button to select Set clockHoursorMinutes.
XPress the WorX button to set the val-
ues.
Selecting the time format
Using the steering wheel buttons
XPress the VorU button repeatedly
until the Settingsmenu appears in the dis-
play.
XPress the 9button to switch to the sub-
menu selection.
XPress the WorX button to select the
Clock/Datesubmenu.
XPress the 9button to select the 12/24 hfunction.
The selection marker is on the current setting.
XPress theWorX button to select the
12 hor 24 hclock format.
Lighting submenu
Activating/deactivating Highbeam Assist
Using the steering wheel buttons
XPress the VorU button repeatedly
until the Settingsmenu appears in the dis-
play.
XPress the 9button to switch to the sub-
menu selection.
XPress the WorX button to select the
Lightingsubmenu.
XPress the 9button to select the High‐beam Assistfunction.
The selection marker is on the current setting.
XPress the WorX button to switch
Highbeam Assist OnorOff.
iFor safety reasons, it is not possible to reset
the HighbeamAssistfunction to the factory
settings during a journey. You will see the fol-
lowing message in the display: Setting
only possible at standstill.
For further information about Highbeam Assist,
see (
Ypage 84).
Switching the daytime running lamps on/
off
If you switch the daytime running lamps function
to On, the daytime running lamps will automati-
cally light up when the engine is running.
For safety reasons, it is only possible to change
this setting when the vehicle is stationary. The
factory setting is On
in countries in which day-
time running lamp mode or daytime running
lamps are mandatory .
168On-board computer (vehicles with steering wheel buttons)
On-board computer and displays
Page 171 of 286
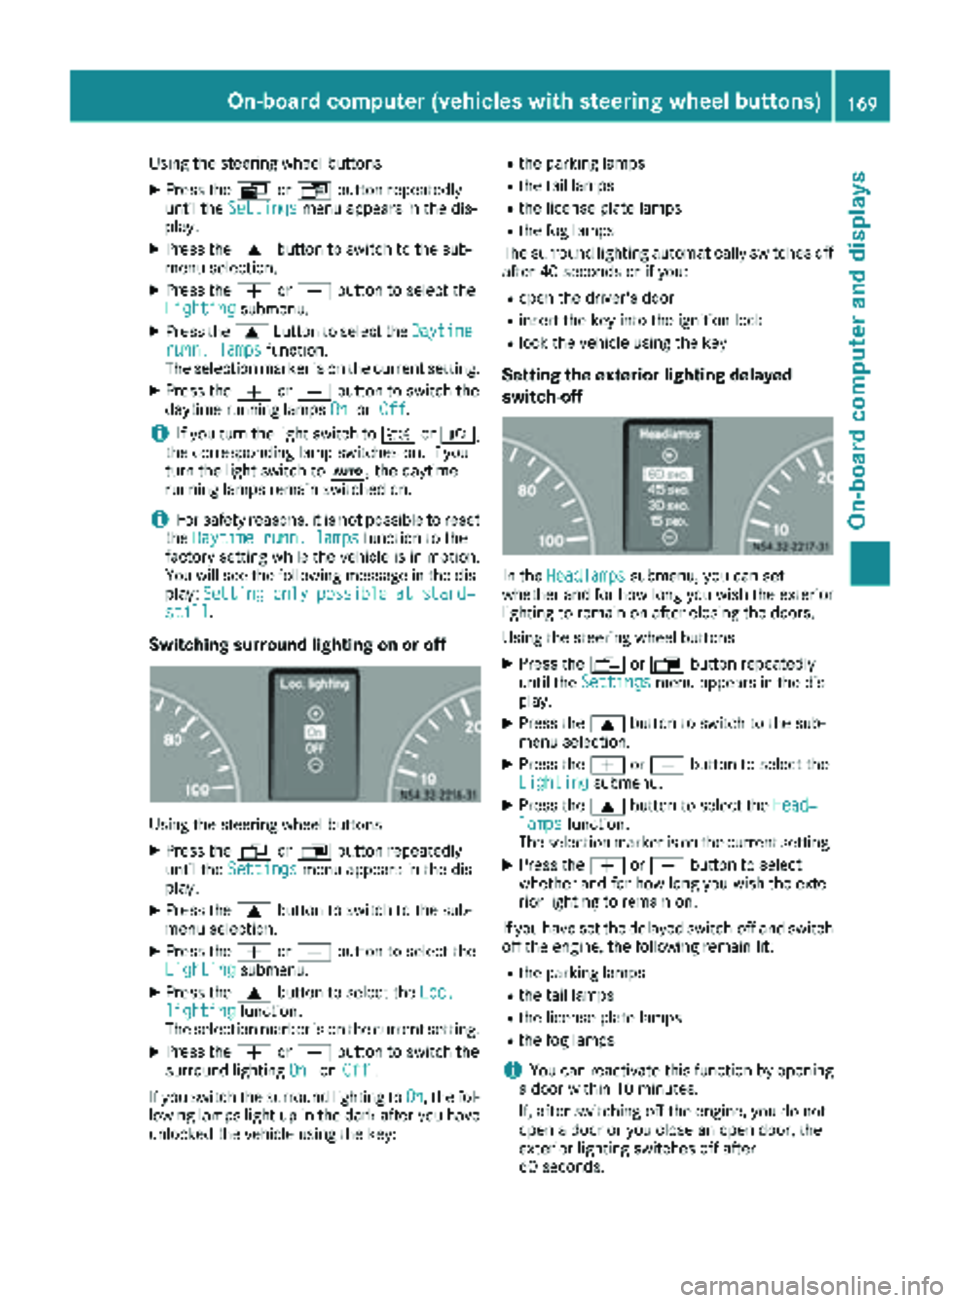
Using the steering wheel buttons
XPress theVorU button repeatedly
until the Settingsmenu appears in the dis-
play.
XPress the 9button to switch to the sub-
menu selection.
XPress the WorX button to select the
Lightingsubmenu.
XPress the 9button to select the Daytimerunn. lampsfunction.
The selection marker is on the current setting.
XPress the WorX button to switch the
daytime running lamps OnorOff.
iIf you turn the light switch to TorL,
the corresponding lamp switches on. If you
turn the light switch to Ã, the daytime
running lamps remain switched on.
iFor safety reasons, it is not possible to reset
the Daytime runn. lampsfunction to the
factory setting while the vehicle is in motion.
You will see the following message in the dis-
play: Setting only possible at stand‐
still.
Switching surround lighting on or off
Using the steering wheel buttons
XPress the VorU button repeatedly
until the Settingsmenu appears in the dis-
play.
XPress the 9button to switch to the sub-
menu selection.
XPress the WorX button to select the
Lightingsubmenu.
XPress the 9button to select the Loc.lightingfunction.
The selection marker is on the current setting.
XPress the WorX button to switch the
surround lighting OnorOff.
If you switch the surround lighting to On
, the fol-
lowing lamps light up in the dark after you have
unlocked the vehicle using the key:
Rthe parking lamps
Rthe tail lamps
Rthe license plate lamps
Rthe fog lamps
The surround lighting automatically switches off
after 40 seconds or if you:
Ropen the driver's door
Rinsert the key into the ignition lock
Rlock the vehicle using the key
Setting the exterior lighting delayed
switch-off
In the Headlampssubmenu, you can set
whether and for how long you wish the exterior
lighting to remain on after closing the doors.
Using the steering wheel buttons
XPress the VorU button repeatedly
until the Settingsmenu appears in the dis-
play.
XPress the 9button to switch to the sub-
menu selection.
XPress the WorX button to select the
Lightingsubmenu.
XPress the 9button to select the Head‐lampsfunction.
The selection marker is on the current setting.
XPress the WorX button to select
whether and for how long you wish the exte-
rior lighting to remain on.
If you have set the delayed switch-off and switch
off the engine, the following remain lit:
Rthe parking lamps
Rthe tail lamps
Rthe license plate lamps
Rthe fog lamps
iYou can reactivate this function by opening
a door within 10 minutes.
If, after switching off the engine, you do not
open a door or you close an open door, the
exterior lighting switches off after
60 seconds.
On-board computer (vehicles with steering wheel buttons)169
On-board computer and displays
Z
Page 177 of 286
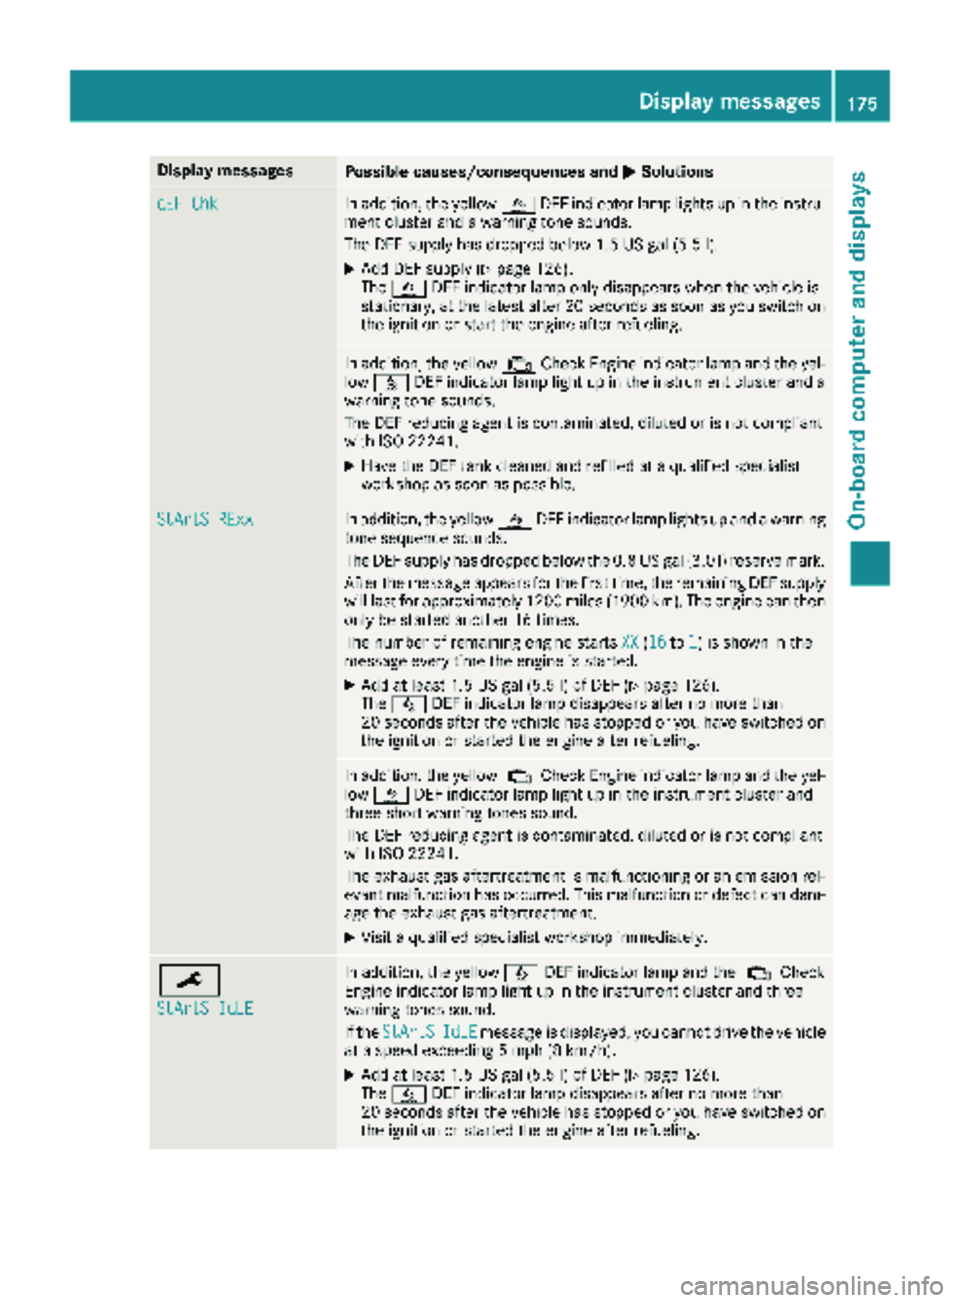
Display messagesPossible causes/consequences andMSolutions
dEF ChkIn addition,th eyellow åDEFindicator lamp lights up in th einstru-
men tcluste rand awarning tone sounds.
The DE Fsupply has dropped belo w1.5US gal (5.5l).
XAdd DEF supply (Ypage 126).
The å DEF indicator lamp only disappears when the vehicle is
stationary, at the latest after 20 secondsa s soon as you switch on
the ignition or start the engine after refueling.
In addition, the yellow ;Check Engine indicator lamp and the yel-
low å DEF indicator lamp light up in the instrument cluster and a
warning tone sounds.
The DEF reducing agent is contaminated, diluted or is not compliant
with ISO 22241.
XHave the DEF tank cleaned and refilled at a qualified specialist
workshop as soon as possible.
StArtS RExxIn addition, the yellow åDEF indicator lamp lights up and a warning
tone sequence sounds.
The DEF supply has dropped below the 0.8 US gal (3.0 l) reserve mark.
After the message appears for the first time, the remaining DEF supply
will last for approximately 1200 miles (1900 km). The engine can then
only be started another 16 times.
The number of remaining engine starts XX
(16to1) is shown in the
message every time the engine is started.
XAdd at least 1.5 US gal (5.5 l) of DEF (Ypage 126).
The å DEF indicator lamp disappears after no more than
20 seconds after the vehicle has stopped or you have switched on the ignition or started the engine after refueling.
In addition, the yellow ;Check Engine indicator lamp and the yel-
low å DEF indicator lamp light up in the instrument cluster and
three short warning tones sound.
The DEF reducing agent is contaminated, diluted or is not compliant
with ISO 22241.
The exhaust gas aftertreatment is malfunctioning or an emission rel-
evant malfunction has occurred. This malfunction or defect can dam- age the exhaust gas aftertreatment.
XVisit a qualified specialist workshop immediately.
¯
StArtS IdLE
In addition, the yellow åDEF indicator lamp and the ;Check
Engine indicator lamp light up in the instrument cluster and three
warning tones sound.
If the StArtS
IdLEmessage is displayed, you cannot drive the vehicle
at a speed exceeding 5 mph (8 km/h).
XAdd at least 1.5 US gal (5.5 l) of DEF (Ypage 126).
The å DEF indicator lamp disappears after no more than
20 seconds after the vehicle has stopped or you have switched on the ignition or started the engine after refueling.
Display messages175
On-board computer and displays
Z