ignition MERCEDES-BENZ SPRINTER 2017 MY17 Operator’s Manual
[x] Cancel search | Manufacturer: MERCEDES-BENZ, Model Year: 2017, Model line: SPRINTER, Model: MERCEDES-BENZ SPRINTER 2017Pages: 286, PDF Size: 4.36 MB
Page 14 of 286
Fuel tanksee Fuel tank
Fuel tank content
Reserve, display message .............. 185
Fuses .................................................. 242
G
Gasoline
Reserve fuel warning lamp ............ .196
General driving tips
Driving short distances .................. 131
Genuine parts ...................................... 29
Glove box ...........................................2 00
GTW (Gross Trailer Weight) (defini-
tion) .................................................... 260
H
Handbrake
see Parking brake
Handbrake
see Parking brake
Hazard warning lamps ........................ 83
Head restraints
Adjusting ......................................... 76
Adjusting (rear) ................................ 76
Headlamps
Adding fluid to cleaning system ..... 220
Cleaning system (function) .............. 83
Fogging up ....................................... 84
see Automatic headlamp mode
Headliner (cleaning instructions) .... 234
Heating
see Climate control
High-beam headlamps
Highbeam Assist .............................. 84
Replacing bulbs ............................... 88
Switching on/off .............................. 82
Highbeam Assist
Function/notes ................................ 84
Switching Highbeam Assist
on/off ............................................ 168
Hood
Closing ...........................................2 15
Display message ............................ 189
Important safety notes .................. 214
Indicator lamp ................................ 198 Opening ......................................... 214
Hot-water auxiliary heater
Problem (malfunction) ................... 111
Hydroplaning ..................................... 134
I
Ignition lock
see Key positions
Ignition lock
see SmartKey positions (ignition lock)
Immobilizer .......................................... 57
Indicator lamp
see Warning and indicator lamps
Indicators
see Turn signals
Insect protection on the radiator ...... 29
Installing a wheel
Installing the adapter (spare
wheel) ............................................ 265
Instrument cluster
Fuel gage ....................................... 159
Important safety notes .................. 158
Instrument cluster lighting ............. 159
Outside temperature display .......... 159
Overview .......................................... 33
Speedometer ................................. 159
Tachometer ................................... 159
Warning and indicator lamps ........... 34
Instrument cluster lighting .............. 159
Instrument lighting
see Instrument cluster lighting
Interior lighting ................................... 85
Front ................................................ 85
Motion detectors ............................. 86
Notes on replacing bulbs ................. 93
Overview .......................................... 85
Replacing bulbs ............................... 93
Switching the rear compartment
lighting on centrally ......................... 85
Interior motion sensor
Arming ............................................. 58
Deactivating ..................................... 58
Function ........................................... 58
Switching off .................................... 58
12Index
Page 15 of 286
J
JackJacking points ................................ 263
Preparation .................................... 263
Storage location ............................2 36
Using ............................................. 263
Jump-starting ..................................... 238
K
Key
Position in the ignition lock ............ 117
Key positions ..................................... 117
Kickdown ...........................................1 23
L
Lamps
see Warning and indicator lamps
Lane Keeping Assist
Activating/deactivating ................. 144
Function/notes .............................1 43
Language
Display (vehicles with steering
wheel buttons) ............................... 167
Lashing points and tie downs
Permissible tensile load ................. 281
LATCH-type (ISOFIX) child seat
anchors ................................................ 50
License plate lamp
Replacing bulbs ............................... 91
License plate lamp (Chassis Cab)
Replacing bulbs ............................... 91
Light sensor ......................................... 81
Lighting
see Lights
Lights
Activating/deactivating daytime
running lamps (on-board com-
puter with steering wheel but-
tons) .............................................. 168
Activating/deactivating surround
lighting (vehicles with steering
wheel buttons) ............................... 169
Automatic headlamp mode .............. 81
Bulb failure indicator ........................ 80
Cornering light function ................... 83
Driving abroad ............................... 132 Fog lamps ........................................ 81
Hazard warning lamps ..................... 83
Headlamp range .............................. 82
High beam flasher ............................ 82
High-beam headlamps ..................... 82
Highbeam Assist .............................. 84
Important safety notes .................... 80
Light switch ..................................... 80
Low-beam headlamps ...................... 80
Parking lamps .................................. 80
Rear fog lamp .................................. 81
Setting the exterior lighting
delayed switch-off (vehicles with
steering wheel buttons) ................. 169
Switching the daytime running
lamps on/off (switch) ...................... 80
Turn signals ..................................... 82
see Changing a bulb
see Interior lighting
Limited Warranty ................................ 23
Load distribution ............................... 210
Load securing aids
Carrier systems ............................. 212
Loading gui deli
nes
Important safety notes .................. 208
Loading rails
Installing cargo tie-down rings ....... 212
Maximum tensile strength ............. 282
Loads
Securing ........................................ 210
Transporting .................................. 208
Locator lighting
Setting (vehicles with steering
wheel buttons) ............................... 169
Locking
see Central locking
Locking and unlocking manually ....... 63
Locking centrally
see Central locking
LOW RANGE ....................................... 145
LOW RANGE transmission ratio ....... 145
Low-beam headlamps
Display message ............................ 182
Driving abroad ............................... 132
Replacing bulbs ............................... 88
Switching on/off .............................. 80
Lumbar support ................................... 73
Index13
Page 20 of 286
Checking the battery .......................61
Display message ............................ 189
Door central locking/unlocking ....... 59
Important safety notes .................... 59
Loss ................................................. 62
Problem (malfunction) ..................... 62
SmartKey positions (ignition lock) .. 117
Snow chains ...................................... 246
Sockets .............................................. 206
Spare wheel
General notes ................................ 268
Important safety notes .................. 268
Removing/mounting ...................... 269
Special seat belt retractor .................. 48
Specialist workshop ............................ 27
Speed, controlling
see Cruise control
Speedometer
Digital (vehicles with steering
wheel buttons) ............................... 167
Digital (vehicles without steering
wheel buttons) ............................... 160
Selecting display unit (vehicles
with steering- wheel buttons) ........ 167
see Instrument cluster
Sprinter dealer
see Qualified specialist workshop
Standing lamps
Replacing bulbs ............................... 88
Replacing bulbs (rear) ...................... 90
Standing lamps (Chassis Cab)
Replacing bulbs (rear) ...................... 91
Start-off assist
Display message ............................ 179
Starting (engine) ................................ 118
Station
see Radio
Steering wheel
Adjusting ......................................... 77
Button overview ............................... 36
Cleaning ......................................... 234
Step
see Electrical step
Stickers
General safety notes ........................ 25 Stowage spaces
see Stowage spaces and stowage
compartments
Stowage spaces and stowage com-
partments
Eyeglasses compartment ............... 201
Glove box ....................................... 200
Important safety notes .................. 200
Paper holder .................................. 203
Stowage co
mpartment above the
windshield ..................................... 202
Stowage compartment in the cen-
ter console ..................................... 202
Stowage compartment in the
dashboard ...................................... 201
Stowage space above the head-
liner ............................................... 202
Stowage space under the rear
bench seat ..................................... 203
Stowage space under the twin co-
driver's seat ................................... 202
Summer tires ..................................... 245
Switch unit
see Control panel
Switching off the alarm (ATA) ............ 57
Switching the heater booster func-
tion on/off ......................................... 110
Switching the surround lighting
on/off (on-board computer) ............. 169
Swivel seat ........................................... 73
T
Tachometer ........................................ 159
Tail lamps
Changing ......................................... 91
Replacing bulbs ............................... 90
see Lights
Tail lamps (Chassis Cab)
Replacing bulbs ............................... 91
Tank content
Fuel gauge ..................................... 159
Range (vehicles with steering
wheel buttons) ............................... 171
Reserve fuel warning lamp ............. 196
Technical data
Capacities ...................................... 273
Cargo tie-down points .................... 281
18Index
Page 34 of 286
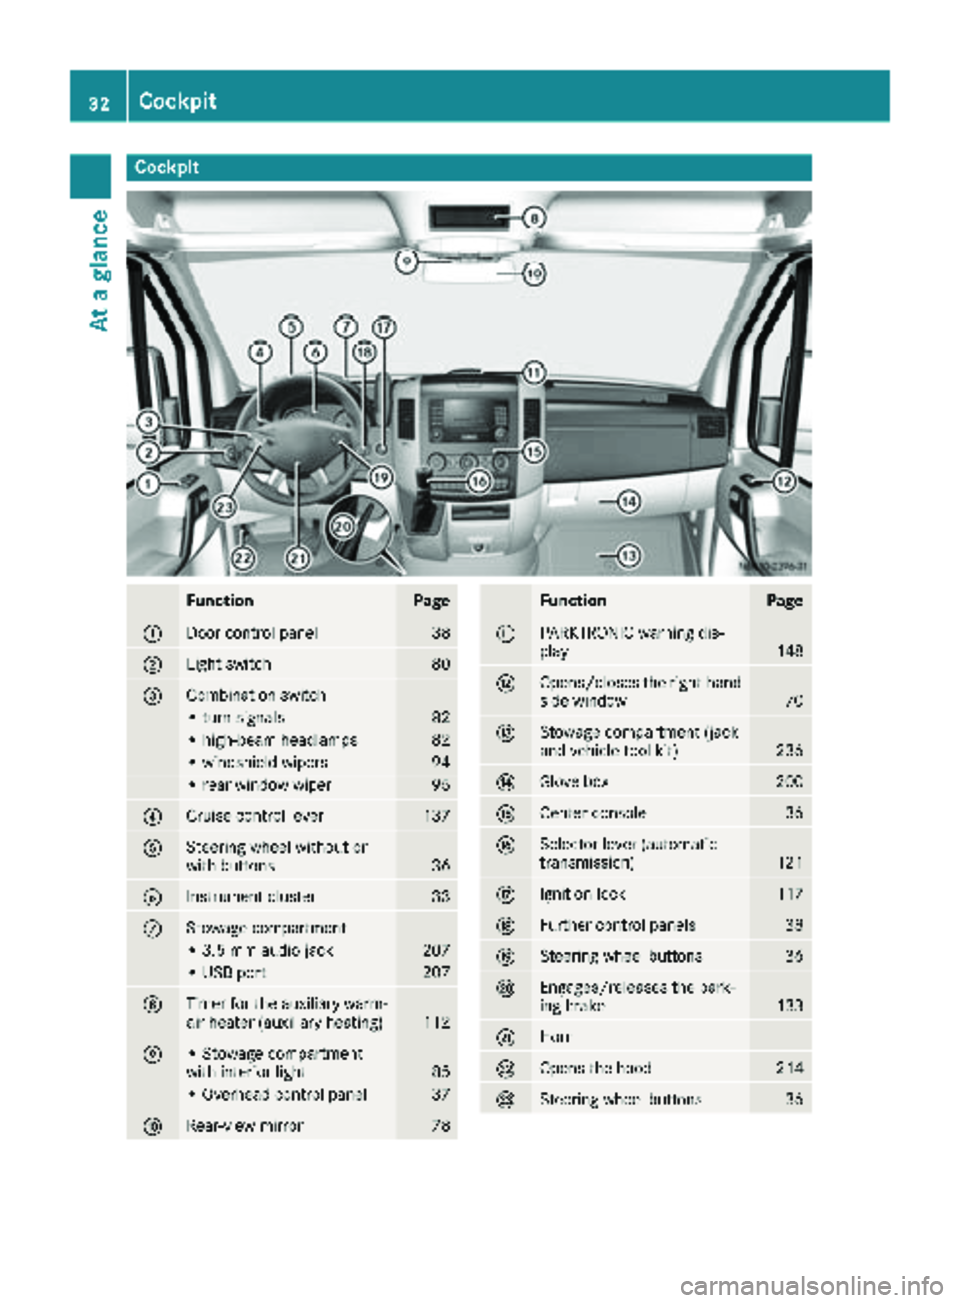
Cockpit
FunctionPage
:Door control panel38
;Light switch80
=Combination switch
• turn signals82
• high-beam headlamps82
• windshield wipers94
• rear window wiper95
?Cruise control lever137
ASteering wheel without or
with buttons36
BInstrument cluster33
CStowage compartment
• 3.5 mm audio jack207
• USB port207
DTimer for the auxiliary warm-
air heater (auxiliary heating)112
E• Stowage compartment
with interior light85
• Overhead control panel37
FRear-view mirror78
FunctionPage
GPARKTRONIC warning dis-
play148
HOpens/closes the right-hand
side window70
IStowage compartment (jack
and vehicle tool kit)236
JGlove box200
KCenter console36
LSelector lever (automatic
transmission)121
MIgnition lock117
NFurther control panels38
OSteering wheel buttons36
PEngages/releases the park-
ing brake133
QHorn
ROpens the hood214
SSteering wheel buttons36
32Cockpit
At a glance
Page 41 of 286
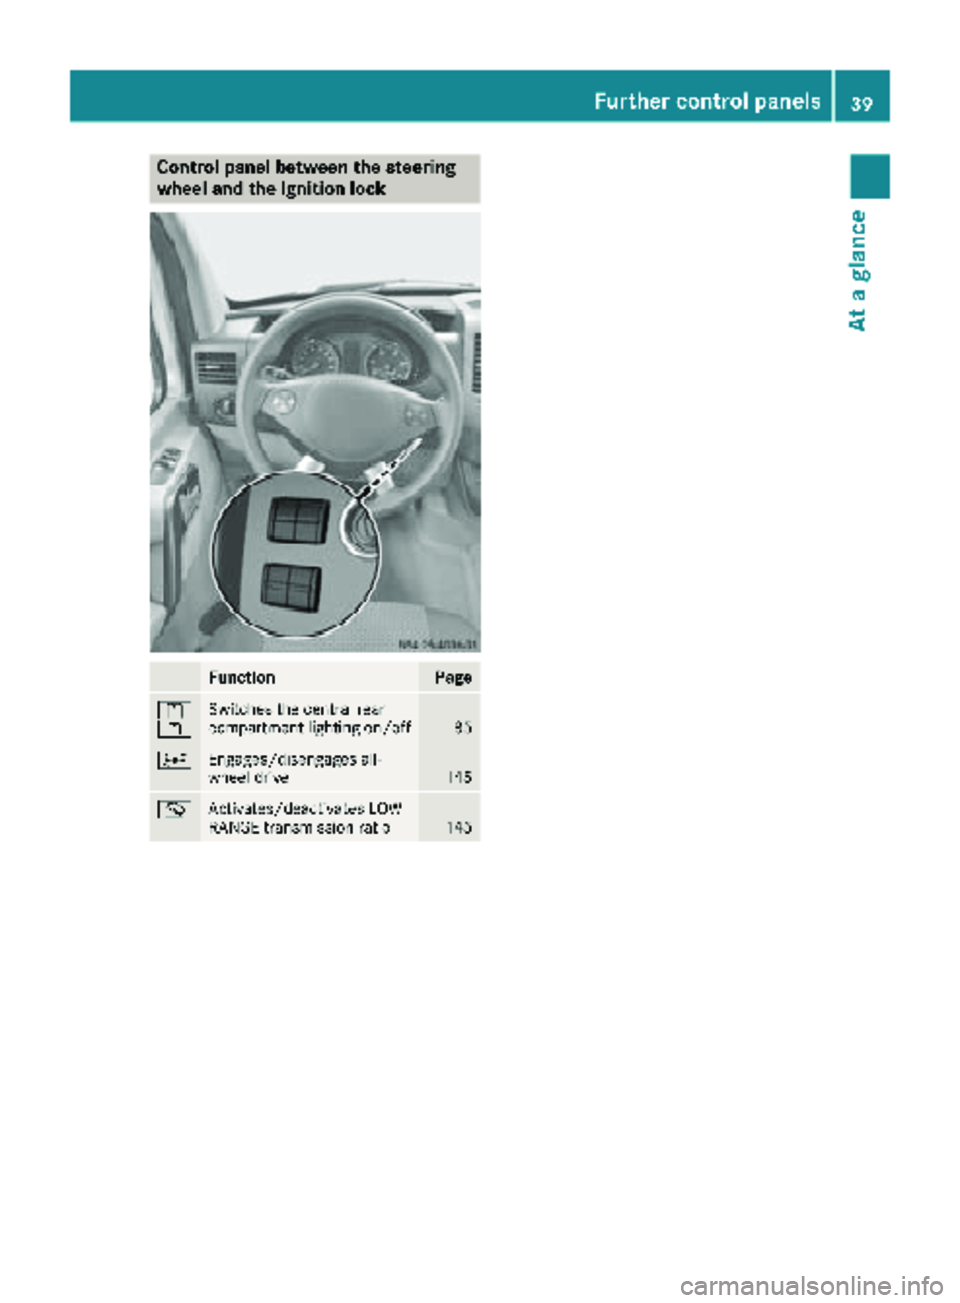
Control panel between the steering
wheel and the ignition lock
FunctionPage
l
kSwitches the central rear
compartment lighting on/off85
;Engages/disengages all-
wheel drive145
mActivates/deactivates LOW
RANGE transmission ratio145
Further control panels39
At a glance
Page 42 of 286
Useful information
This Operator's Manual describes all models as
well as standard and optional equipment of your
vehicle that were available at the time of going
to print. Country-specific variations are possi-
ble. Note that your vehicle may not be equipped
with all of the described functions. This also
applies to systems and functions relevant to
safety.
Read the information on qualified specialist
workshops (
Ypage 27).
Occupant safety
Restraint system introduction
The restraint system can reduce the risk of vehi-cle occupants coming into contact with parts of
the vehicle's interior in the event of an accident.
The restraint system can also reduce the forces to which vehicle occupants are subjected during
an accident.
The restraint system comprises:
RSeat belt system
RAir bags
RChild restraint system
RChild seat securing systems
The components of the restraint system work in
conjunction with each other. They can only
deploy their protective function if, at all times, all
vehicle occupants:
Rhave fastened their seat belts correctly
(Ypage 42)
Rhave the seat and head restraint adjusted
properly (Ypage 72)
As the driver, you also have to make sure that
the steering wheel is adjusted correctly.
Observe the information relating to the correct
driver's seat position (
Ypage 72).
You also have to make sure that an air bag can
inflate properly if deployed (
Ypage 44).
An air bag supplements a correctly worn seat
belt. As an additional safety device, the air bag
increases the level of protection for vehicle
occupants in the event of an accident. For exam-
ple, if, in the event of an accident, the protection
offered by the seat belt is sufficient, the air bags are not deployed. When an accident occurs, only
the air bags that increase protection in that par-
ticular accident situation are deployed. How- ever, seat belts and air bags generally do not
protect against objects penetrating the vehicle
from the outside.
Information on restraint system operation can
be found under "Triggering of the Emergency
Tensioning Devices and air bags" (
Ypage 46).
See "Children in the vehicle" for information on
children traveling with you in the vehicle as well
as on child restraint systems (
Ypage 47).
Important safety notes
GWARNING
Modifications to the restraint system may
cause it to no longer work as intended. The
restraint system may then not perform its
intended protective function and may fail in an
accident or trigger unexpectedly, for example.
This poses an increased risk of injury or even fatal injury.
Never modify parts of the restraint system.
Never tamper with the wiring, the electronic
components or their software.
If it is necessary to modify components of the
restraint system to accommodate a person with
disabilities, contact an authorized Sprinter
dealer for details. USA only: contact our Cus-
tomer Assistance Center at 1‑ 877‑762‑ 8267 for
details.
Restraint system warning lamp
The functions of the restraint system are
checked after the ignition is switched on and at regular intervals while the engine is running.
Therefore, malfunctions can be detected in
good time.
The 6 restraint system warning lamp on the
instrument cluster lights up when the ignition is
switched on. It goes out no later than a few sec-
onds after the vehicle is started. The compo-
nents of the restraint system are in operational
readiness.
40Occupant safety
Safety
Page 43 of 286
A malfunction has occurred if the6restraint
system warning lamp:
Rdoes not light up after the ignition is switched
on
Rdoes not go out after a few seconds
Rgoes out but then lights up again while the
engine is running, for example
GWARNING
If the restraint system is malfunctioning,
restraint system components may be trig-
gered unintentionally or may not deploy as
intended during an accident. This can affect
for example the Emergency Tensioning
Device or the air bag. This poses an increased
risk of injury or even fatal injury.
Have the restraint system checked and
repaired in a qualified specialist workshop as
soon as possible.
Seat belts
Introduction
Seat belts are the most effective means of
restricting the movement of vehicle occupants
in the event of an accident or the vehicle rolling
over. This reduces the risk of vehicle occupants coming into contact with parts of the vehicle
interior or being ejected from the vehicle. Fur-
thermore, the seat belt helps to keep the vehicle
occupant in the best position in relation to the
air bag.
The seat belt system comprises:
RSeat belts
REmergency Tensioning Devices for the front
seat belts
The seat belt system also includes a belt force
limiter for the relevant seat if the vehicle is
equipped with a front air bag.
On vehicles with a front-passenger bench
seat, only the seat belt of the outer front-
passenger seat has a belt force limiter.
The seat belt system does not include an Emer- gency Tensioning Device and a belt force limiter
if the vehicle does not have a driver's air bag.
If the seat belt is pulled out of the belt outlet
quickly or with a jerky movement, the belt
retractor locks. The belt strap cannot be extrac-
ted any further. The Emergency Tensioning Device tightens the
seat belt in an accident, pulling the belt close
against the body. However it does not pull the
vehicle
occup
ant back in the direction of the
backrest.
The Emergency Tensioning Device does not cor-
rect an incorrect seat position or the routing of
an incorrectly fastened seat belt.
When triggered, a belt force limiter helps to
reduce the force exerted by the seat belt on the
vehicle occupant.
The belt force limiters are synchronized with the
front air bags which absorb part of the deceler-
ation force. This can reduce the force exerted on
the vehicle occupants during an accident.
The Emergency Tensioning Device of the front-
passenger seat is triggered independently of the
lock status of the seat belt.
Important safety notes
The use of seat belts and child restraint systems
is required by law in:
Rall 50 states
Rthe U.S. territories
Rthe District of Columbia
Rall Canadian provinces
Even where this is not required by law, all vehicle
occupants should correctly fasten their seat
belts before starting the journey.
GWARNING
If the seat belt is not worn correctly, it cannot
perform its intended protective function. An
incorrectly fastened seat belt can also cause
injuries, for example, in the event of an acci-
dent or when braking or changing direction
abruptly. This poses an increased risk of injury
or even fatal injury.
Always ensure that all vehicle occupants have
their seat belts fastened correctly and are sit-
ting properly.
GWARNING
The seat belt does not offer the intended level of protection if you have not moved the back-
rest to an almost vertical position. When brak-
ing or in the event of an accident, you could
slide underneath the seat belt and sustain
abdomen or neck injuries, for example. This
Occupant safety41
Safety
Z
Page 46 of 286
Belt warning for drivers and front pas-
sengers
The7 seat belt warning lamp in the instru-
ment cluster is a reminder that all vehicle occu-
pants must wear their seat belts. It may light up continuously or flash. In addition, there may be
a warning tone.
Regardless of whether the driver's seat belt has
already been fastened, the 7seat belt warn-
ing lamp lights up for 6 seconds after each time
the ignition is switched on. After the engine has
been started, it goes out once the driver has
fastened the seat belt.
If the driver's seat belt is not fastened when the
engine is started, an additional warning tone will
sound. This warning tone stops after a maximum
of six seconds or once the driver's seat belt is
fastened.
If the vehicle's speed exceeds 15 mph
(25 km/h) once and the driver's seat belt is not
fastened, a warning tone sounds. The warning
tone sounds for 60 seconds or until the driver's
seat belt is fastened.
If the driver's seat belt is unfastened during the
journey, the seat belt warning is activated again.
Air bags
Introduction
The installation point of an air bag can be rec-
ognized by the SRS/AIRBAG or AIRBAG mark-
ing.
An air bag complements the correctly fastened
seat belt. It is no substitute for the seat belt. The
air bag provides additional protection in appli-
cable accident situations.
Not all air bags are deployed in an accident. The
different air bag systems function independ-
ently from one another (
Ypage 46).
However, no system available today can com-
pletely eliminate injuries and fatalities.
It is also not possible to rule out a risk of injury
caused by an air bag due to the high speed at
which the air bag must be deployed.
Important safety notes
GWARNING
If you do not sit in the correct seat position,
the air bag cannot protect as intended and
could even cause additional injury when
deployed. This poses an increased risk of
injury or even fatal injury.
To avoid hazardous situations, always make
sure that all of the vehicle's occupants:
Rhave fastened their seat belts correctly,
including pregnant women
Rare sitting correctly and maintain the great-
est possible distance to the air bags
Rfollow the following instructions
Always make sure that there are no objects
between the air bag and the vehicle's occu-
pants.
RAdjust the seats properly before beginning
your journey. Always make sure that the seat
is in an almost upright position. The center of
the head restraint must support the head at
about eye level.
RMove the driver's and front-passenger seats
as far back as possible. The driver's seat posi-
tion must allow the vehicle to be driven safely.
ROnly hold the steering wheel on the outside.
This allows the air bag to be fully deployed.
RAlways lean against the backrest while driv-
ing. Do not lean forward or lean against the
door or side window. You may otherwise be in
the deployment area of the air bags.
RAlways keep your feet in the footwell in front
o
f the seat. Do not put your feet on the dash-
board, for example. Your feet may otherwise
be in the deployment area of the air bag.
RFor this reason, always secure persons less
than 5 ft (1.50 m)tall in suitable restraint sys-
tems. Up to this height, the seat belt cannot
be worn correctly.
If a child is traveling in your vehicle, also
observe the following notes:
RAlways secure children under twelve years of
age and less than 5 ft (1.50 m)tall in suitable
child restraint systems.
RChild restraint systems should be installed on
the rear seats.
RAlways secure a child in a rearward-facing
child restraint system on a suitable rear seat.
The front-passenger front air bag cannot be
deactivated.
RAlways observe the instructions and safety
notes on "Children in the vehicle"
(
Ypage 47) and on the "Child restraint sys-
44Occupant safety
Safety
Page 49 of 286
Method of operation
During the first stage of a collision, the restraint
system control unit evaluates important physi-
cal data relating to vehicle deceleration or accel-
eration, such as:
Rduration
Rdirection
Rintensity
Based on the evaluation of this data, the
restraint system control unit triggers the Emer-
gency Tensioning Devices during a frontal or
rear collision.
An Emergency Tensioning Device can only be
triggered, if:
Rthe ignition is switched on
Rthe components of the restraint system are
operational. You can find further information
under: "Restraint system warning lamp"
(
Ypage 40)
Rthe seat belt buckle tongue has engaged in
the belt buckle of the respective front seat
The Emergency Tensioning Device of the front-
passenger seat is triggered independently of the
lock status of the seat belt.
If the restraint system control unit detects a
more severe accident, further components of
the restraint system are activated independ-
ently of each other in certain frontal collision
situations:
RFront air bags
RWindow curtain air bag on the side on which
the impact occurs
The activation threshold of the Emergency Ten-
sioning Devices and the air bag are determined
by evaluating the rate of vehicle deceleration or
acceleration which occurs at various points in
the vehicle. This process is pre-emptive in
nature. Deployment should take place in good
time at the start of the collision.
The rate of vehicle deceleration or acceleration
and the direction of the force are essentially
determined by:
Rthe distribution of forces during the collision
Rthe collision angle
Rthe deformation characteristics of the vehicle
Rthe characteristics of the object with which
the vehicle has collided
Factors which can only be seen and measured
after a collision has occurred do not play a deci-
sive role in the deployment of an air bag . Nor dothey provide a
n indication of air bag deploy-
ment.
The vehicle can be deformed considerably, with-
out an air bag being deployed. This is the case if
only parts which are relatively easily deformed
are affected and the rate of deceleration is not
high. Conversely, air bags may be deployed even though the vehicle suffers only minor deforma-
tion. This is the case if, for example, very rigid
vehicle parts such as longitudinal body mem-
bers are hit, and sufficient deceleration occurs
as a result.
If the restraint system control unit detects a side
impact, the relevant restraint system compo-
nents are deployed independently of each other.
If the system determines a need for additional
protection for the vehicle occupants, the Emer-
gency Tensioning Devices are triggered.
RSide impact air bag on the side of impact,
independently of the Emergency Tensioning
Device and the use of the seat belt
RWindow curtain air bag on the side of impact,independently of the use of the seat belt and
independently of whether the front-
passenger seat is occupied
iNot all air bags are deployed in an accident.
The different air bag systems work independ-
ently of each other.
How the air bag system works is determined
by the severity of the accident detected,
especially the vehicle deceleration or accel-
eration and the apparent type of accident:
Rfrontal collision
Rside impact
Children in the vehicle
Important safety notes
Accident statistics show that children secured
in the rear seats are safer than children secured
in the front-passenger seat. For this reason, we
strongly advise that you install a child restraint
system on a rear seat. Children are generally
better protected there.
If a child younger than twelve years old and
under 5 ft (1.50 m) in height is traveling in the
vehicle:
Ralways secure the child in a child restraint
system suitable for this vehicle. The child
Children in the vehicle47
Safety
Z
Page 55 of 286
As a result, they could:
Ractivate vehicle equipment and become
trapped, for example
Ractivate or deactivate systems, thereby
endangering other road users
Unsecured animals could also be flung around
the vehicle in the event of an accident or sud-
den steering or braking, thereby injuring vehi- cle occupants. There is a risk of an accident
and injury.
Never leave animals unattended in the vehi-
cle. Always secure animals properly during
the journey, e.g. use a suitable animal trans-
port box.
Driving safety systems
Overview
In this section, you will find information about
the following driving safety systems:
RABS ( Anti-lock Braking System)
RASR (Acceleration SkidControl)
RBAS ( Brake Assist System)
REBD ( Electronic Brake Force Distribution)
RESP®(E lectronic StabilityProgram)
Important safety notes
If you fail to adapt your driving style or if you are
inattentive, the driving safety systems can nei-
ther reduce the risk of accident nor override the
laws of physics. Driving safety systems are
merely aids designed to assist driving. You are
responsible for the distance to the vehicle in
front, for vehicle speed, braking in good time
and for staying in your lane. Always adapt your
driving style to the prevailing road and weather
conditions and maintain a sufficient, safe dis-
tance from other road users. Drive carefully.
Please note that the driving safety systems
described only work optimally when:
Rthere is adequate contact between the tires
and the road surface
Ryou use winter tires (M+S tires), with snow
chains if necessary, when the road conditions
are wintry Pay particular attention to the information
regarding tires, tire tread and winter operation
under "Wheels and tires" (
Ypage 243).
ABS (Anti-lock Braking System)
Important safety notes
Observe the important safety guidelines for the
driving safety system (Ypage 53).
GWARNING
If ABS is faulty, the wheels could lock when
braking. The steerability and braking charac-
teristics may be severely impaired. Addition-
ally, further driving safety systems are deac-
tivated. There is an increased danger of skid-
ding and accidents.
Drive on carefully. Have ABS checked imme-
diately at a qualified specialist workshop.
If ABS is malfunctioning, other systems will also
fail, including driving safety systems. Observe
the information relating to the !warning
lamp (
Ypage 191).
ABS regulates brake pressure in such a way that
the wheels do not lock when you brake. This
allows you to continue steering the vehicle when
braking.
ABS works from a speed of about 5 mph
(8 km/h), regardless of road-surface conditions. ABS works on slippery surfaces, even when you
only brake gently.
The yellow !warning lamp in the instrument
cluster lights up when the ignition is switched
on. The lamp goes out when the engine starts
running.
Braking
If ABS intervenes when braking, you will feel a
pulsating in the brake pedal.
The pulsating brake pedal can be an indication
of hazardous road conditions and functions as a
reminder to take extra care while driving.
XIf ABS intervenes: continue to depress the
brake pedal with force until the braking sit-
uation is over.
XTo make a full brake application: depress
the brake pedal with full force.
Driving safety systems53
Safety
Z