air condition MERCEDES-BENZ SPRINTER 2018 MY18 Operator’s Manual
[x] Cancel search | Manufacturer: MERCEDES-BENZ, Model Year: 2018, Model line: SPRINTER, Model: MERCEDES-BENZ SPRINTER 2018Pages: 294, PDF Size: 4.36 MB
Page 33 of 294
data. These data document the vehicle's tech-
nical states, are used to help in finding malfunc-
tions and improving quality and are sent to the
manufacturer where necessary. In addition, the
manufacturer is subject to product liability. The
manufacturer needs technical data from vehi-
cles for this purpose.
Malfunction memories in the vehicle can be
reset by a service center during repair or service
work.
You can incorporate data into the vehicle's com-
fort and infotainment functions yourself as part
of the selected equipment.
These include:
RMultimedia data such as music, films or pho-
tos for playback in an integrated multimedia
system
RAddress book data for use in conjunction with
an integrated hands-free system or an inte-
grated navigation system
RNavigation destinations that have been
entered
RData about using Internet services
These data can be saved locally in the vehicle or are located on a device that you have connected
to the vehicle. If these data are saved in the
vehicle, you can delete them at any time. These data are sent to third parties only at your
request, particularly when you use online serv-
ices in accordance with the settings that you
have selected.
You can save and change comfort settings/
customizations in the vehicle at any time.
Depending on the equipment, these settings
include:
RSeat and steering wheel position settings
RSuspension and climate control settings
RCustom settings such as interior lighting
If your vehicle is equipped appropriately, you
can connect your smartphone or another mobile terminal to the vehicle. You can control this by
means of the control elements integrated in the
vehicle. The smartphone's picture and sound
can be output via the multimedia system. Spe-
cific items of information are also sent to your
smartphone.
Depending on the type of integration, such infor-
mation includes:
RGeneral vehicle information
RPosition data This allows you to use selected apps on your
smartphon
e, such as navigation or music play-
back. There is no additional interaction between
the smartphone and the vehicle, particularly
active access to vehicle data. The type of addi-
tional data processing is determined by the pro- vider of the app being used. Whether you can
configure settings for it and, if so, which ones,
depends on the app and your smartphone's
operating system.
Service provider
Wireless network connection
If your vehicle has a wireless network connec-
tion, it enables data to be exchanged between
your vehicle and other systems. The wireless
network connection is enabled by either an in-
vehicle transmitter and receiver or your own
mobile end device (e.g. smartphone). Online
functions can be used via this wireless connec-
tion. These include online services and applica-
tions/apps provided by the manufacturer or
other providers.
Manufacturer's own services
In the case of the manufacturer's online serv-
ices, the manufacturer describes the functions
in a suitable place and the associated informa-
tion subject to data protection legislation. Per-
sonal data can be used in the provision of online
services. Data are exchanged via a secure con-
nection (e.g. using the IT system specially pro-
vided for this purpose by the manufacturer).
Collecting, processing and using personal data
beyond the provision of services is permitted
only on the basis of a statutory permit or decla-
ration of consent.
You can usually activate and deactivate the serv-
ices and functions (some of which are subject to
charge). In many cases, this also applies to the
vehicle's entire data connection. However, this
does not apply in particular to legally prescribed
functions and services such as the "eCall" emer-
gency call system.
Services from third parties
If it is possible to use online services from other
providers, these services are the responsibility
of the provider in question and subject to that
provider's data protection conditions and terms
Introduction31
Z
Page 39 of 294
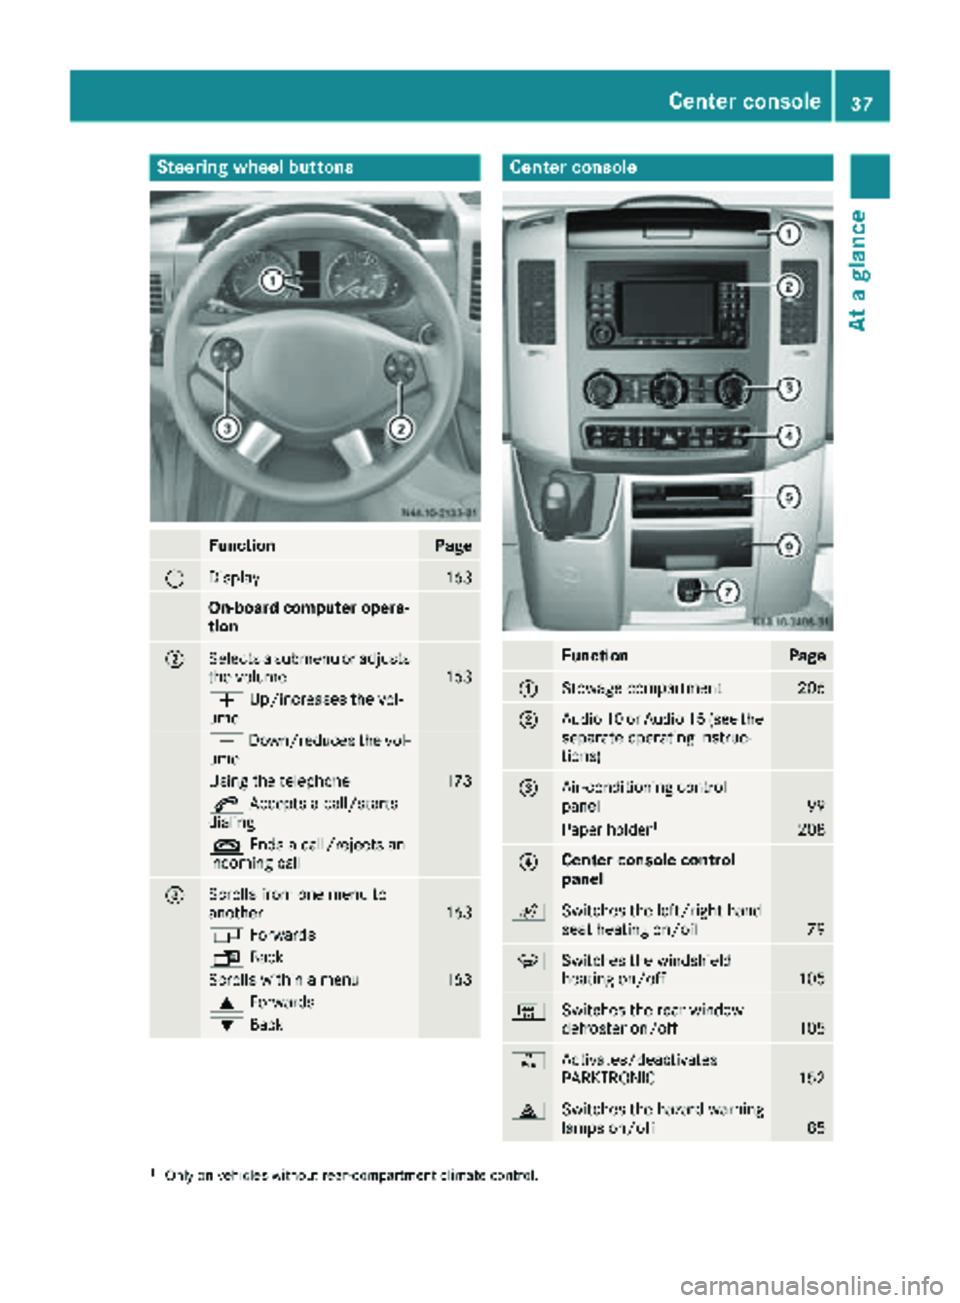
Steering wheel buttons
FunctionPage
:Display163
On-board computer opera-
tion
;Selects a submenu or adjusts
the volume163
WUp/increases the vol-
ume
X Down/reduces the vol-
ume
Using the telephone173
6 Accepts a call/starts
dialing
~ Ends a call/rejects an
incoming call
=Scrolls from one menu to
another163
V Forwards
UBack
Scrolls within a menu163
9Forwards
:Back
Center console
FunctionPage
:Stowage compartment206
;Audio 10 or Audio 15 (see the
separate operating instruc-
tions)
=Air-conditioning control
panel99
Paper holder1208
?Center console control
panel
cSwitches the left/right-hand
seat heating on/off79
zSwitches the windshield
heating on/off105
|Switches the rear window
defroster on/off105
fActivates/deactivates
PARKTRONIC152
£Switches the hazard warning
lamps on/off85
1Only on vehicles without rear-compartment climate control.
Center console37
At a glance
Page 56 of 294
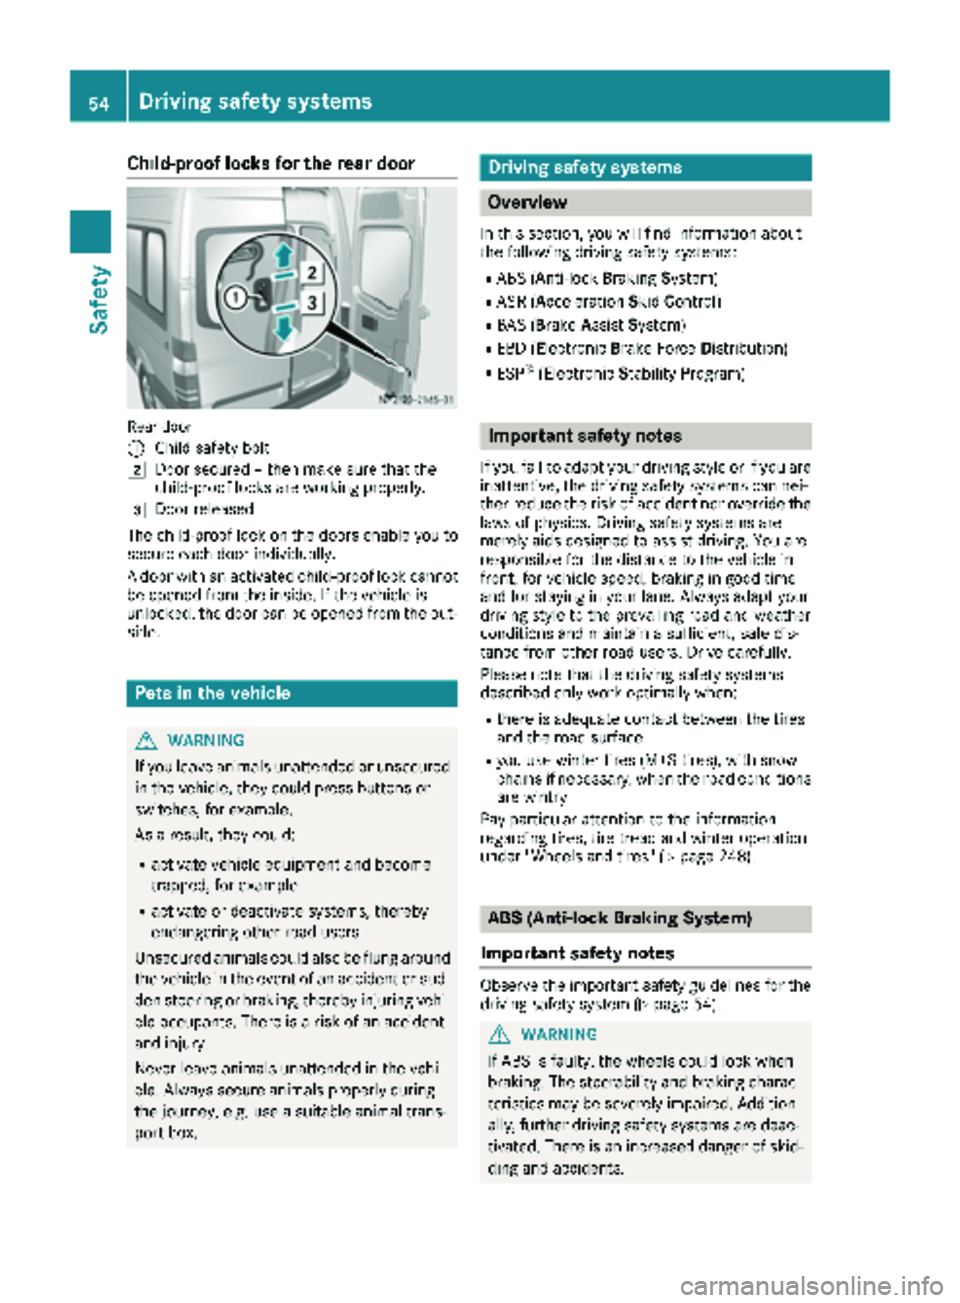
Child-proof locks for the rear door
Rear door
:
Child safety bolt
2Door secured – then make sure that the
child-proof locks are working properly.
3Door released
The child-proof lock on the doors enable you to
secure each door individually.
A door with an activated child-proof lock cannot
be opened from the inside. If the vehicle is
unlocked, the door can be opened from the out-
side.
Pets in the vehicle
GWARNING
If you leave animals unattended or unsecured
in the vehicle, they could press buttons or
switches, for example.
As a result, they could:
Ractivate vehicle equipment and become
trapped, for example
Ractivate or deactivate systems, thereby
endangering other road users
Unsecured animals could also be flung around
the vehicle in the event of an accident or sud-
den steering or braking, thereby injuring vehi-
cle occupants. There is a risk of an accident
and injury.
Never leave animals unattended in the vehi-
cle. Always secure animals properly during
the journey, e.g. use a suitable animal trans-
port box.
Driving safety systems
Overview
In this section, you will find information about
the following driving safety systems:
RABS (Anti-lock Braking System)
RASR (Acceleration SkidControl)
RBAS (B rakeAssist System)
REBD (Electronic Brake Force Distribution)
RESP®(Electronic StabilityProgram)
Important safety notes
If you fail to adapt your driving style or if you are
inattentive, the driving safety systems can nei-
ther reduce the risk of accident nor override the
laws of physics. Driving safety systems are
merely aids designed to assist driving. You are
responsible for the distance to the vehicle in
front, for vehicle speed, braking in good time
and for staying in your lane. Always adapt your
driving style to the prevailing road and weather
conditions and maintain a sufficient, safe dis-
tance from other road users. Drive carefully.
Please note that the driving safety systems
described only work optimally when:
Rthere is adequate contact between the tires
and the road surface
Ryou use winter tires (M+S tires), with snow
chains if necessary, when the road conditions
are wintry
Pay particular attention to the information
regarding tires, tire tread and winter operation
under "Wheels and tires" (
Ypage 248).
ABS (Anti-lock Braking System)
Important safety notes
Observe the important safety guidelines for the
driving safety system (Ypage 54).
GWARNING
If ABS is faulty, the wheels could lock when
braking. The steerability and braking charac-
teristics may be severely impaired. Addition-
ally, further driving safety systems are deac-
tivated. There is an increased danger of skid-
ding and accidents.
54Driving safety systems
Safety
Page 59 of 294
4ETS (Electronic Traction System)
!A function or performance test should only
be carried out on a two-axle dynamometer.
Before you operate the vehicle on such a
dynamometer, please consult a qualified
workshop. You could otherwise damage the
drive train or the brake system.
4ETS is only active when all-wheel drive is acti-
vated (
Ypage 147).
4ETS ensures permanent drive for all four
wheels, and together with ESP
®it improves the
vehicle's traction.
If a driven wheel spins due to lack of traction:
RWhen pulling away, make use of the traction
control integrated in ESP®. Depress the
accelerator pedal as far as necessary.
RWhile driving, slowly take your foot off the
accelerator pedal.
In wintry driving conditions, always use winter
tires (M+S tires) and if necessary, snow chains
(
Ypage 251). This is the only way to get the full
benefit from the all-wheel drive system.
Crosswind Assist
Crosswind Assist does not work if ESP®is deac-
tivated or disabled because of a malfunction.
Crosswind Assist does not react:
Rin the event of severe jolts and vibrations, e.g.
as a result of uneven surfaces or potholes.
Rif the vehicle loses traction, e.g. on snow or
ice or when hydroplaning.
Rto large and sudden steering movements by
the driver.
Crosswind Assist is operational again as soon as
the driving conditions return to normal.
Crosswind Assist detects strong crosswind
gusts that can impair the road holding of your
vehicle when driving straight ahead. Crosswind
Assist intervenes depending on the direction
and strength of the crosswind.
A stabilizing brake application helps you to keep
the vehicle on track.
Information appears in the instrument cluster In
the event that Crosswind Assist intervenes
noticeably.
On vehicles without steering wheel buttons: the d indicator lamp in the instrument clus-
ter flashes. On vehicles with steering wheel buttons:
the
d indicator lamp in the instrument cluster
flashes and the message Crosswind Assist
Interventionappears in the multifunction dis-
play.
Crosswind Assist is active above a vehicle speed
of 50 mph (80 km/h) when the vehicle is driving
straight ahead or cornering gently.
Emergency exit
Emergency exit window
GWARNING
The emergency exit window cannot be locked in place. You risk injury if you exit the vehicle
through the emergency exit window.
RMake sure that nobody becomes trapped,
both when closing and when opening the
emergency exit window.
RThe opened emergency exit window must
be held in place by another person.
Pay attention to traffic conditions.
GWARNING
If the emergency exit window is unlocked
while driving, it could open and slam shut and consequently fall down. There is a risk of an
accident and injury.
Before starting off, make sure that the emer-
gency exit window is locked and the locking
pins are undamaged.
!Make sure there is sufficient clearance
when opening the emergency exit window.
Hold the open window in position. You could
otherwise damage the emergency exit win-
dow.
Emergency exit57
Safety
Z
Page 85 of 294
The daytime running lamps function must be
activated using the on-board computer:
Rvehicles with steering wheel buttons
(Ypage 170)
Rvehicles without steering wheel buttons
(Ypage 163)
XTo switch on:turn the light switch to the
$ position.
The low-beam headlamps, parking lamps and
license plate lamp are switched on when the
engine is running. The Lindicator lamp in
the instrument cluster lights up.
iUSA only:
If you turn the light switch to the TorL
position, the parking lamps or low-beam
headlamps switch on. If you turn the light
switch to the Ãposition, the daytime run-
ning lamps remain switched on.
iCanada only:
If you turn the light switch to the Lposi-
tion, the low-beam headlamps are switched
on. If you turn the light switch to the Tor
à position, the daytime running lamps
remain switched on.
Automatic headlamp mode
GWARNING
When the light switch is set to Ã, the low-
beam headlamps may not be switched on
automatically if there is fog, snow or other
causes of poor visibility due to the weather
conditions such as spray. There is a risk of an
accident.
In such situations, turn the light switch to
L.
Automatic headlamp mode is only a driving aid.
You are responsible for the vehicle lighting at all
times.
Depending on ambient light, the rain and light
sensor automatically switches on the parking
lamps, low-beam headlamps and the license
plate lamp. This excludes weather-related
impairments to visibility, such as snow, fog or
spray.
If there is fog, snow or spray, turn the light
switch quickly from ÃtoL. You could
otherwise briefly interrupt operation of the
headlamps.
XTo switch on automatic headlamp mode:
turn the light switch to Ã.
Key in position 1in the ignition lock: the park-
ing lamps switch on or off automatically
depending on the ambient light.
When the engine is running: if you activate the
"daytime running lamps" function using the
on-board computer, the daytime running
lamps are switched on. The parking lamps and
low-beam headlamps also switch on or off
automatically, depending on the ambient
light.
When the low-beam headlamps are switched
on, the Lindicator lamp in the instrument
cluster lights up.
Fog lamps/rear fog lamp
GWARNING
If you suspect that driving conditions will be
foggy, turn the light switch to Lbefore you
start your journey. Your vehicle may other-
wise not be visible and you could endanger
yourself and others.
GWARNING
In low ambient lighting or foggy conditions,
only switch from position ÃtoL with
the vehicle at a standstill in a safe location.
Switching from ÃtoL will briefly
switch off the headlamps. Doing so while driv-
ing in low ambient lighting conditions may
result in an accident.
XTurn the key to position 2in the ignition lock
or start the engine.
XTurn the light switch to LorT.
iIf your vehicle is only equipped with one rear
fog lamp, you must turn the light switch to
L.
iWhen the light switch is set to Ãyou
cannot switch on the front and rear fog lamps.
XTo switch on the front fog lamp: pull the
light switch out to the first detent.
The green Nindicator lamp on the light
switch lights up.
Exterior lighting83
Lights and windshield wipers
Z
Page 90 of 294
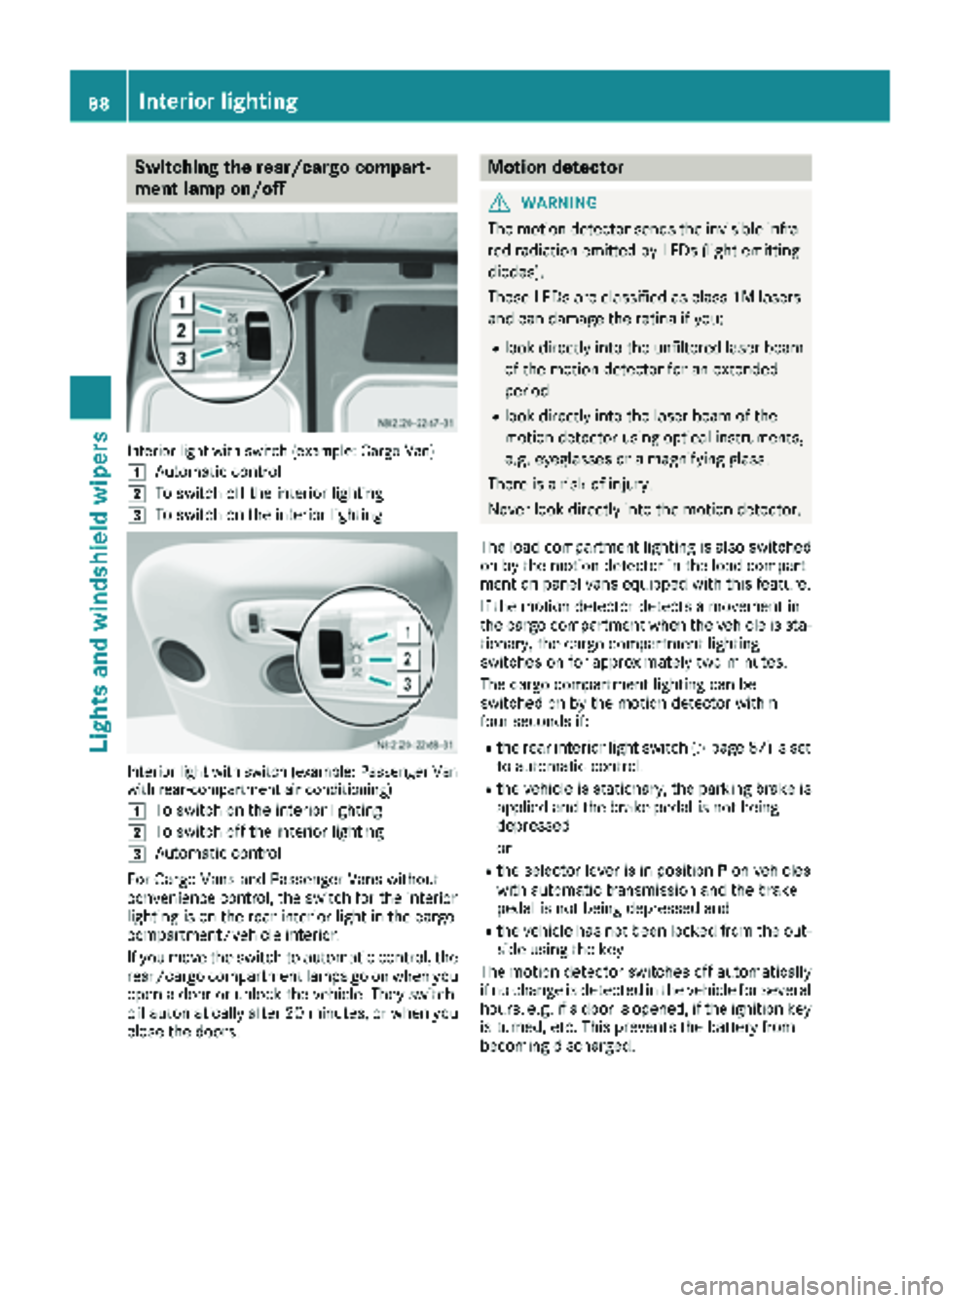
Switching the rear/cargo compart-
ment lamp on/off
Interior light with switch (example: Cargo Van)
1
Automatic control
2To switch off the interior lighting
3To switch on the interior lighting
Interior light with switch (example: Passenger Van
with rear-compartment air conditioning)
1
To switch on the interior lighting
2To switch off the interior lighting
3Automatic control
For Cargo Vans and Passenger Vans without
convenience control, the switch for the interior
lighting is on the rear interior light in the cargo
compartment/vehicle interior.
If you move the switch to automatic control, the
rear/cargo compartment lamps go on when you
open a door or unlock the vehicle. They switch
off automatically after 20 minutes, or when you
close the doors.
Motion detector
GWARNING
The motion detector sends the invisible infra- red radiation emitted by LEDs (light emitting
diodes).
These LEDs are classified as class 1M lasers
and can damage the retina if you:
Rlook directly into the unfiltered laser beam
of the motion detector for an extended
period
Rlook directly into the laser beam of the
motion detector using optical instruments,
e.g. eyeglasses or a magnifying glass.
There is a risk of injury.
Never look directly into the motion detector.
The load compartment lighting is also switched
on by the motion detector in the load compart-
ment on panel vans equipped with this feature.
If the motion detector detects a movement in
the cargo compartment when the vehicle is sta-
tionary, the cargo compartment lighting
switches on for approximately two minutes.
The cargo compartment lighting can be
switched on by the motion detector within
four seconds if:
Rthe rear interior light switch (Ypage 87) is set
to automatic control.
Rthe vehicle is stationary, the parking brake is
applied and the brake pedal is not being
depressed
or
Rthe selector lever is in position Pon vehicles
with automatic transmission and the brake
pedal is not being depressed and
Rthe vehicle has not been locked from the out-
side using the key
The motion detector switches off automatically
if no change is detected in the vehicle for several
hours, e.g. if a door is opened, if the ignition key
is turned, etc. This prevents the battery from
becoming discharged.
88Interior lighting
Lights and windshield wipers
Page 102 of 294
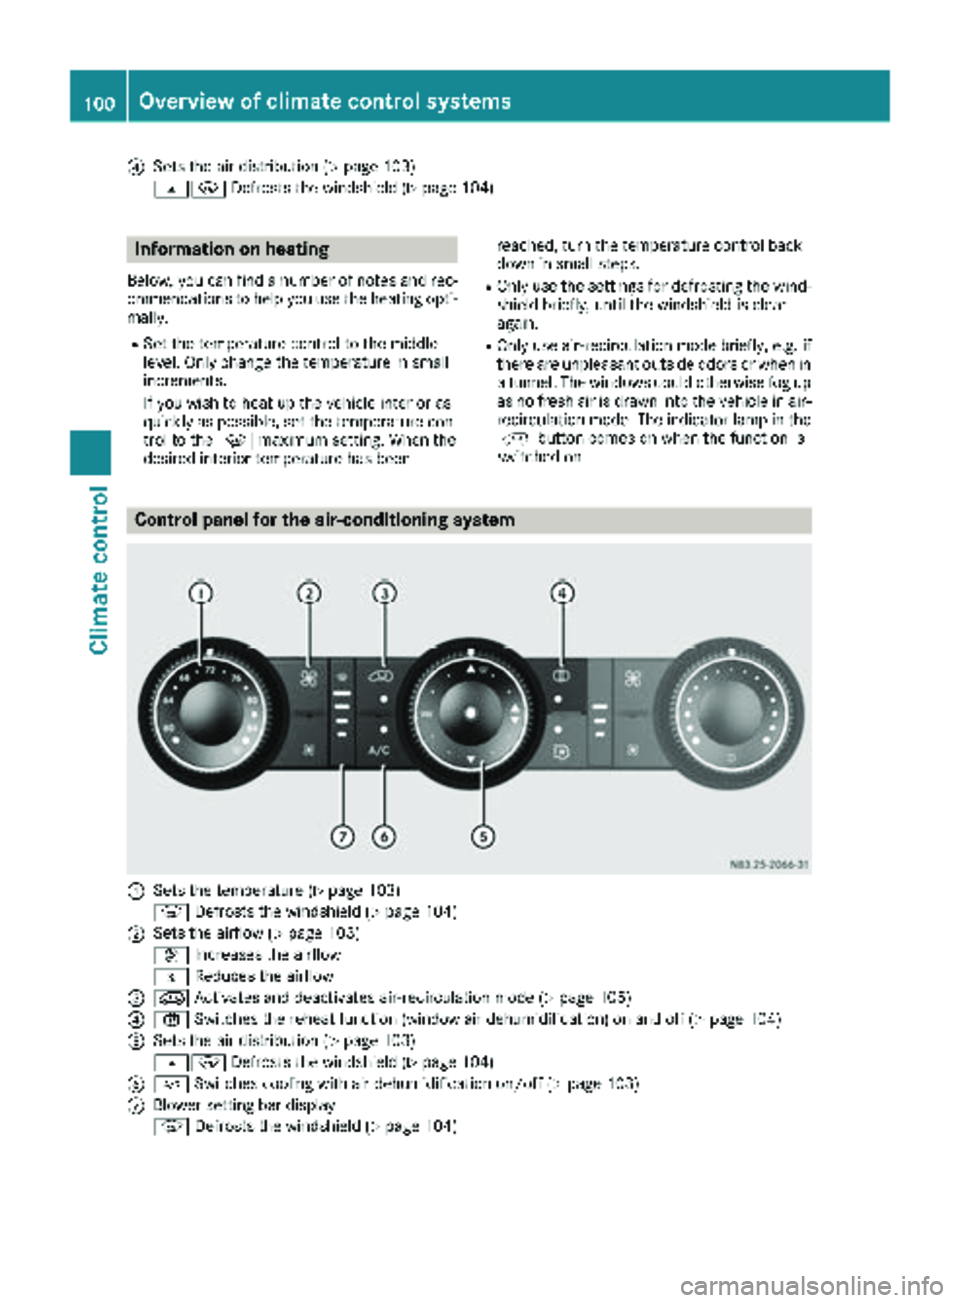
?Sets the air distribution (Ypage 103)
sz Defrosts the windshield (
Ypage 104)
Information on heating
Below, you can find a number of notes and rec-
ommendations to help you use the heating opti-
mally.
RSet the temperature control to the middle
level. Only change the temperature in small
increments.
If you wish to heat up the vehicle interior as
quickly as possible, set the temperature con-
trol to thezmaximum setting. When the
desired interior temperature has been reached, turn the temperature control back
down in small steps.
ROnly use the settings for defrosting the wind-
shield briefly, until the windshield is clear
again.
ROnly use air-recirculation mode briefly, e.g. if
there are unpleasant outside odors or when in
a tunnel. The windows could otherwise fog up
as no fresh air is drawn into the vehicle in air-
recirculation mode. The indicator lamp in the
h button comes on when the function is
switched on.
Control panel for the air-conditioning system
:Sets the temperature (Ypage 103)
z Defrosts the windshield (
Ypage 104)
;Sets the airflow (Ypage 103)
K Increases the airflow
I Reduces the airflow
=eActivates and deactivates air-recirculation mode (Ypage 105)
?xSwitches the reheat function (window air dehumidification) on and off (Ypage 104)
ASets the air distribution (Ypage 103)
sz Defrosts the windshield (
Ypage 104)
B¿Switches cooling with air dehumidification on/off (Ypage 103)
CBlower setting bar display
zDefrosts the windshield (
Ypage 104)
100Overview of climate control systems
Climate control
Page 103 of 294
Optimum use of the air-conditioning
system
Below, you can find a number of notes and rec-
ommendations to help you use the air-condi-
tioning system optimally.
RSwitch on the cooling with air dehumidifica-
tion function. The indicator lamp above the
rocker switch lights up.
RSet the temperature to 72 ‡ (22 †). Only
change the temperature in small increments.
ROnly use the "Windshield defrosting" function
briefly until the windshield is clear again.
ROnly use air-recirculation mode briefly, e.g. if
there are unpleasant outside odors or when in
a tunnel. The windows could otherwise fog up
as no fresh air is drawn into the vehicle in air-
recirculation mode.
ROnly use reheat mode until the windows are
clear again.
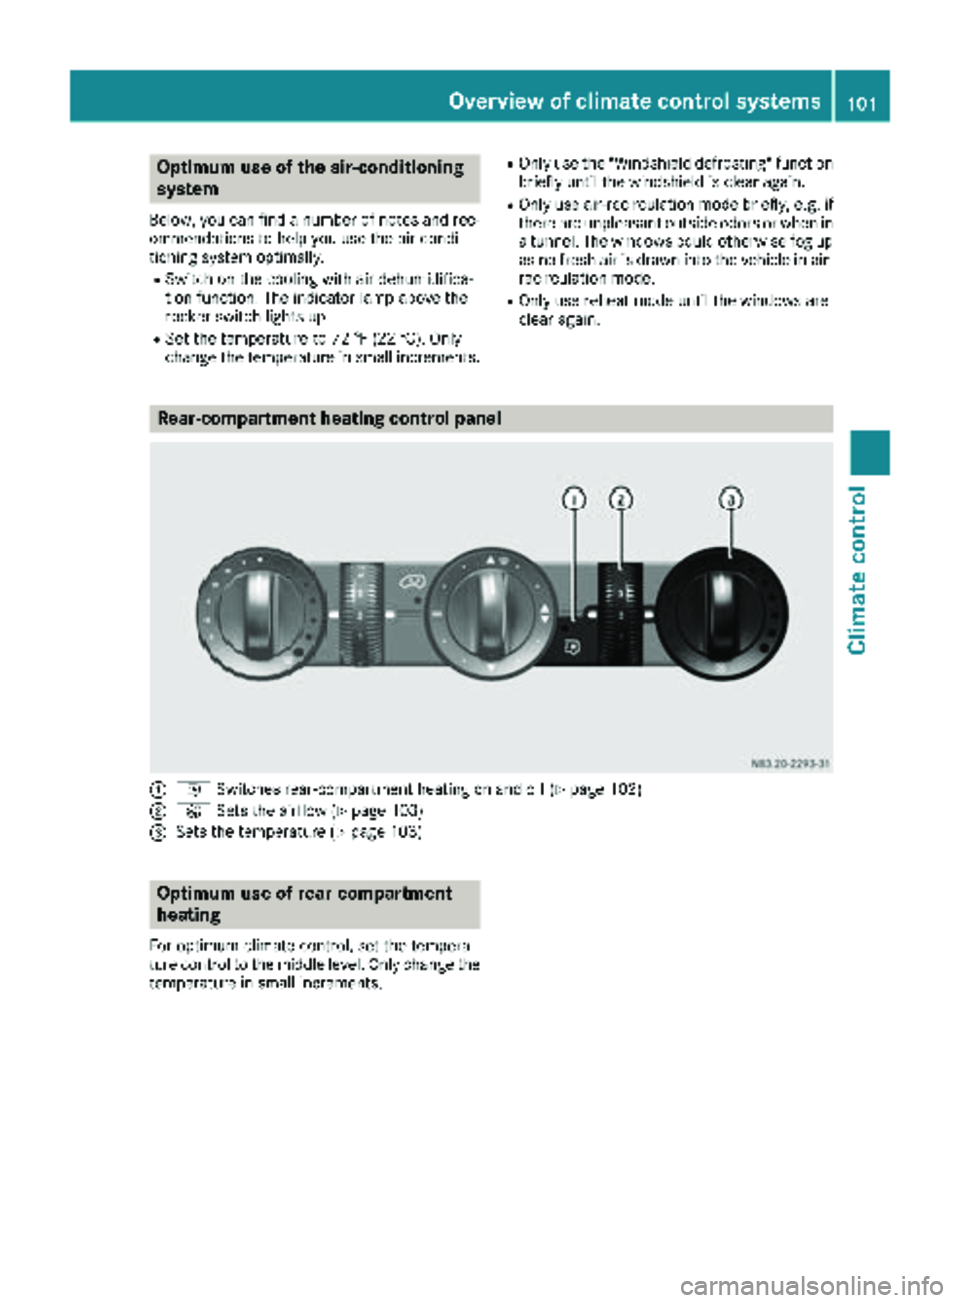
Rear-compartment heating control panel
:i Switches rear-compartment heating on and off (Ypage 102)
;KSets the airflow (Ypage 103)
=Sets the temperature (Ypage 103)
Optimum use of rear-compartment
heating
For optimum climate control, set the tempera-
ture control to the middle level. Only change the
temperature in small increments.
Overview of climate control systems101
Climate control
Page 104 of 294
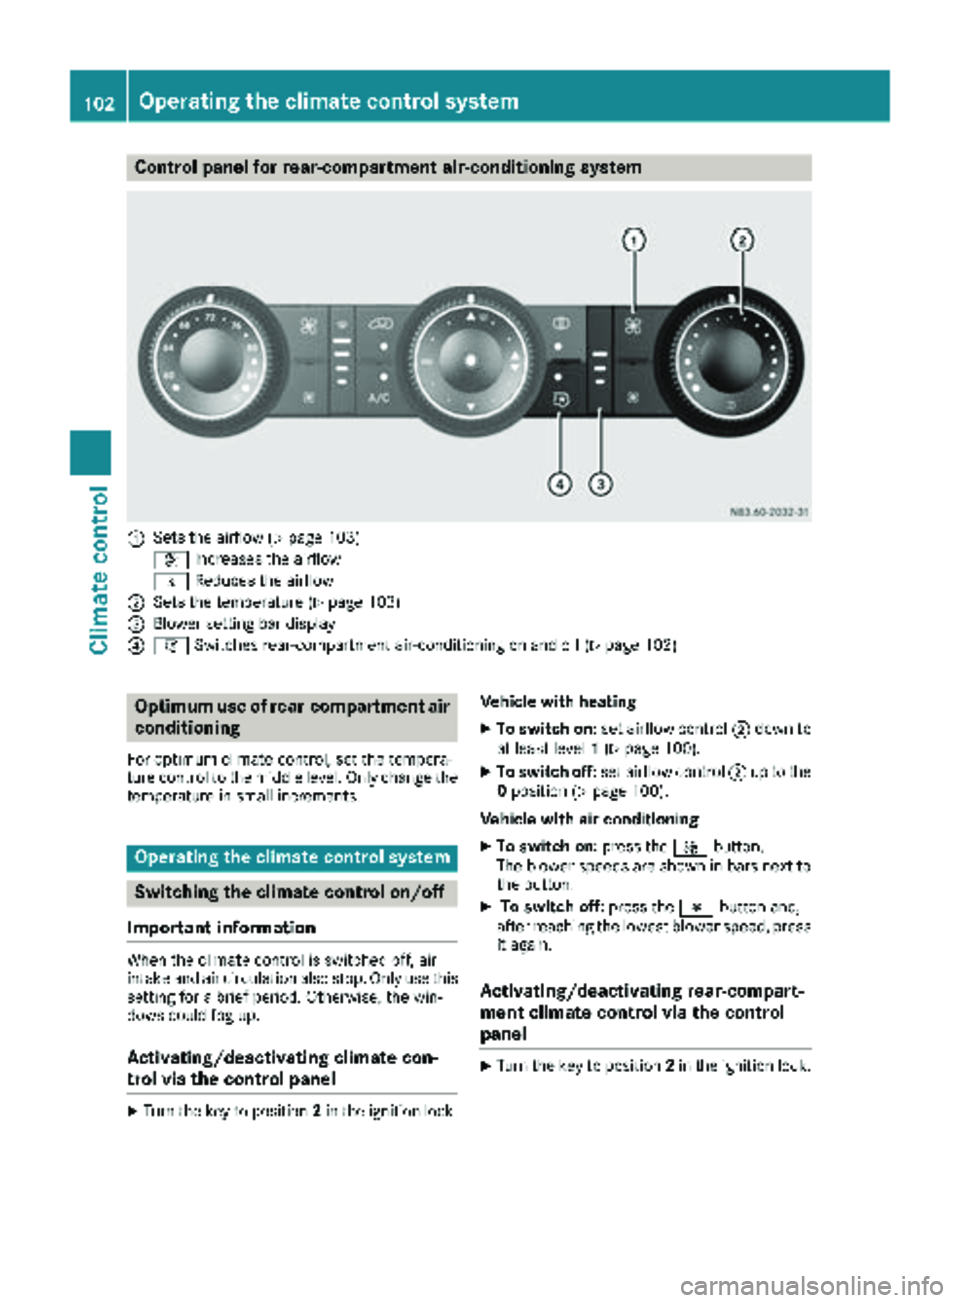
Control panel for rear-compartment air-conditioning system
:Sets the airflow (Ypage 103)
K Increases the airflow
I Reduces the airflow
;Sets the temperature (Ypage 103)
=Blower setting bar display
?iSwitches rear-compartment air-conditioning on and off (Ypage 102)
Optimum use of rear-compartment air
conditioning
For optimum climate control, set the tempera-
ture control to the middle level. Only change the
temperature in small increments.
Operating the climate control system
Switching the climate control on/off
Important information
When the climate control is switched off, air
intake and air circulation also stop. Only use this
setting for a brief period. Otherwise, the win-
dows could fog up.
Activating/deactivating climate con-
trol via the control panel
XTurn the key to position 2in the ignition lock. Vehicle with heating
XTo switch on:
set airflow control ;down to
at least level 1(Ypage 100).
XTo switch off: set airflow control ;up to the
0 position (Ypage 100).
Vehicle with air conditioning
XTo switch on: press theKbutton.
The blower speeds are shown in bars next to
the button.
XTo switch off: press theIbutton and,
after reaching the lowest blower speed, press
it again.
Activating/deactivating rear-compart-
ment climate control via the control
panel
XTurn the key to position 2in the ignition lock.
102Operating the climate control system
Climate control
Page 105 of 294
Vehicle with rear-compartment heating/
rear-compartment air conditioning
XTo switch on/off:press theiswitch.
If the indicator lamp in the button lights up,
the rear-compartment heating/rear-com-
partment air conditioning is switched on.
Switching the cooling with air dehu-
midification function on/off
Important information
If you switch off the "Cooling with air dehumid-
ification" function, the air inside the vehicle will
not be cooled (in warm weather) or dehumidi-
fied. The windows could fog up more quickly.
The cooling with air dehumidification function is
only available when the engine is running. The
air inside the vehicle is cooled and dehumidified
according to the temperature selected.
Condensation may appear on the underside of
the vehicle when in cooling mode. This is normal
and not a sign that there is a malfunction.
Switching on and off
Vehicle with air conditioning
XPress the ¿button.
If the indicator lamp in the button lights up,
cooling with air dehumidification is switched
on.
Setting the temperature
Increasing and reducing temperature in
the front compartment via the control
panel
Only change the temperature in small incre-
ments. Start at the center position, or at 72 ‡
(22 †).
XSwitch on climate control (Ypage 102).
XTurn temperature control :clockwise to
increase or counterclockwise to reduce the
temperature (
Ypage 100).
Increasing and reducing temperature in
the rear compartment via the control
panel
Only change the temperature in small incre-
ments.
XSwitch on climate control (Ypage 102).
XTurn rear-compartment temperature control
= (Ypage 101) or rear-compartment air-
conditioning system ;(Ypage 102) clock-
wise to increase or counterclockwise to
reduce the temperature.
iVehicles with additional air conditioning and
heating in the rear compartment: if you set
the temperature control to the center posi-
tion, only one of the two climate control sys-
tems works in the rear compartment and in
air-recirculation mode (
Ypage 105).
Setting the air distribution
Air distribution settings
The air distribution symbols have the following
meanings:
m Directs air through the center and side
air vents
s
z Directs air to the windshield and the air
vents
q Directs air to the windshield, the air
vents and into the footwell
r Directs air to the air vents and into the
footwell
Adjusting
XSwitch on climate control (Ypage 102).
XSet air-distribution control ?for the heating
(Ypage 99) or air-conditioning system A
(Ypage 100) to the corresponding symbol.
Setting the airflow
XSwitch on climate control (Ypage 102).
XVehicle with heating/rear-compartment
heating: set airflow control ;of the heating
(
Ypage 99) or of the rear-compartment heat-
ing (Ypage 101) to the desired level.
XVehicle with air conditioning/rear-com-
partment air conditioning: press theI
Operating the climate control system103
Climate control