seats MERCEDES-BENZ V-CLASS MPV 2021 User Guide
[x] Cancel search | Manufacturer: MERCEDES-BENZ, Model Year: 2021, Model line: V-CLASS MPV, Model: MERCEDES-BENZ V-CLASS MPV 2021Pages: 337, PDF Size: 9.88 MB
Page 46 of 337
0073
Do not put
thech ild restra int sy stem under
st ra in by the head restra int. Adjust the head
re stra ints as appropriate. 1
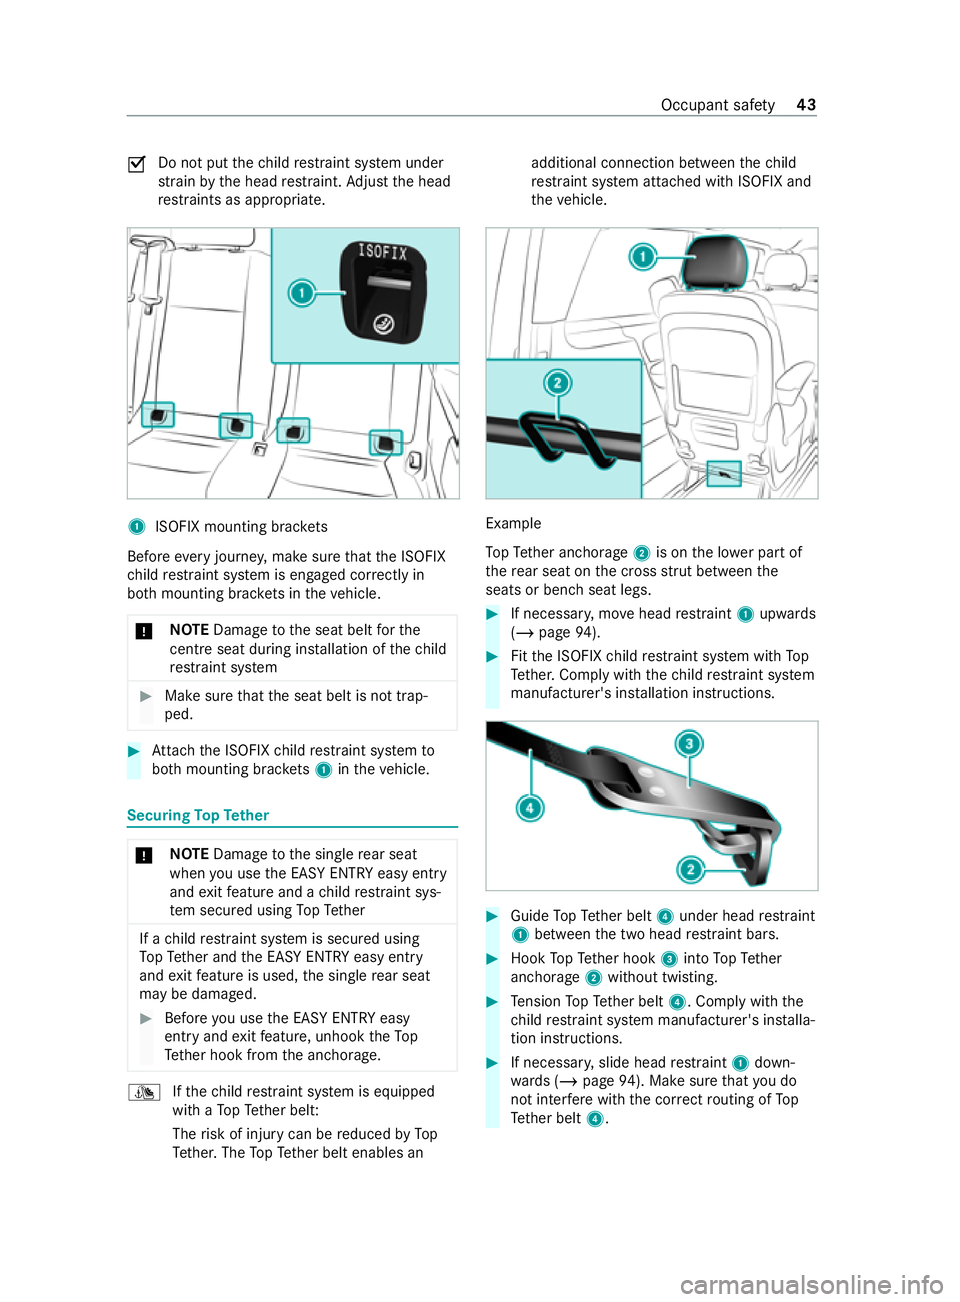
ISOFIX mounting brac kets
Before every journe y,make sure that the ISOFIX
ch ild restra int sy stem is engaged cor rectly in
bo th mounting brac kets in theve hicle.
* NO
TEDama getothe seat belt forthe
centre seat du ring ins tallation of thech ild
re stra int sy stem #
Make sure that the seat belt is not trap‐
ped. #
Attach the ISOFIX child restra int sy stem to
bo th mounting brac kets 1 intheve hicle. Securing
TopTe ther *
NO
TEDama getothe single rear seat
when you use the EASY ENTRY easy entry
and exitfeature and a child restra int sys‐
te m secured using TopTe ther If a
child restra int sy stem is secured using
To pTe ther and the EASY ENTRY easy entry
and exitfeature is used, the single rear seat
may be damaged. #
Before you use the EASY ENTRY easy
entry and exitfeature, unhook theTo p
Te ther hook from the anchorage. ¯
Ifth ech ild restra int sy stem is equipped
with a TopTe ther belt:
The risk of injury can be reduced byTo p
Te ther. The TopTe ther belt enables an additional connection between
thech ild
re stra int sy stem attached with ISOFIX and
th eve hicle. Example
To
pTe ther anchorage 2is on the lo wer part of
th ere ar seat on the cross stru t between the
seats or bench seat legs. #
If necessar y,mo vehead restra int 1 upwards
(/ page 94). #
Fitthe ISOFIX child restra int sy stem with To p
Te ther. Comply with thech ild restra int sy stem
manufacturer's ins tallation instructions. #
Guide TopTe ther belt 4under head restra int
1 between the two head restra int bars. #
Hook TopTe ther hook 3into TopTe ther
anchorage 2without twisting. #
Tension TopTe ther belt 4. Comply with the
ch ild restra int sy stem manufacturer's ins talla‐
tion instructions. #
If necessar y,slide head restra int 1 down‐
wa rds (/ page94). Ma kesure that you do
not inter fere with the cor rect routing of To p
Te ther belt 4. Occupant saf
ety43
Page 47 of 337

Securing
thech ild restra int sy stem with the
seat belt Note
s onthe suitability of seats for attaching
belt-secured child restra int sy stems
Suitability of seats for attaching belt-secu red
ch ild restra int sy stems
Re ar seats
We ight category 0: up to10 kg
Re ar seat
U1
Re ar ben chseat
U1
, L 1
We ight category 0+: up to13 kg
Re ar seat
U1
Re ar ben chseat
U1
, L 1
We ight category I: 9 to18 kg
Re ar seat
U1
, L 1
Re ar ben chseat
U1
, L 1 We
ight category II: 15to25 kg
Re ar seat U, L
Re ar ben chseat U, L
We ight category III: 22 to36 kg
Re ar seat U, L
Re ar ben chseat U, L
U Suitable forch ild restra int sy stems of the "Univer‐
sal" category in this we ight categor y.
L Suitable for semi-universal child restrai nt sy stems
according totheta ble in "Recommended child
re stra int sy stems", or if theve hicle and the seat are
lis ted in thech ild restra int sy stem manufacturer's
ve hicle model list.
1 The seat must be installed in the direction of
tr ave l. Co-driver seat –
Notes Note
s onchild restra int sy stems on the co-d rive r seat
R If it is absolutely necessa ryforyo uto fit a child restra int sy stem tothe co-driver seat, be sure to
obser vethe information on child restra int sy stems on the co-driver seat (/ page 46).
Obser vethe specific instructions forth ere ar wa rd-facing and forw ard-facing child restra int sys‐
te ms. If the co-driver seat is occupied, ensure, bo thbefore and during the journe y,that thest atus
of the co-driver airbag is cor rect forth e cur rent situation (/ page 34). Co-driver seat/co-driver ben
chseat
We ight category 0: up to10 kg
Co-driver airbag enabled X
Co-driver airbag disabled 1
U2
, L
We ight category 0+: up to13 kg
Co-driver airbag enabled X
Co-driver airbag disabled 1
U2
, L
We ight category I: 9 to18 kg
Co-driver airbag enabled UF2
, L
Co-driver airbag disabled 1
U2
, L
We ight category II: 15to25 kg Co-driver airbag enabled
UF2
, L
Co-driver airbag disabled 1
U2
, L
We ight category III: 22 to36 kg
Co-driver airbag enabled UF2
, L
Co-driver airbag disabled 1
U2
, L
X Not suitable forch ildren in this we ight categor y.
U Suitable forch ild restrai nt sy stems of the "Univer‐
sal" category in this we ight categor y.
UF Suitable forfo rw ard-facing child restrai nt sys‐
te ms of the "Universal" category in this we ight cate‐
gor y. 44
Occupant saf ety
Page 48 of 337

L Suitable
for semi-universal child restra int sy stems
according totheta ble in "Recommended child
re stra int sy stems", or if theve hicle and the seat are
lis ted in thech ild restrai nt sy stem manufacturer's
ve hicle model list.
1 The vehicle is equipped with automatic co-driver
airbag shutoff. The PASSENGER AIR BAG OFF indi‐
cator lamp must be lit.
2 In combination with a long seat belt buckle
(police seat) not suitable forch ild restrai nt sy stems. Securing
thech ild restra int sy stem with the
seat belt on there ar seat
When fitting a belt-secu redch ild restra int sy stem,
obser vethefo llowing:
0073 Alw
ays comply with the manufacturer's
ins tallation and operating instructions forthe
ch ild restra int sy stem used.
0073 Fo
r a child restra int sy stem in the "Univer‐
sal" or "Semi-Universal" categor y,make sure
th at the sy stem has been appr oved forthe
ve hicle seat.
Obser vethe no tes under "Suitability of seats
fo r attaching belt-secu redch ild restra int sys‐
te ms" (/ page44).
0073 When using a
category 0/0+ baby car
seat and a category I rear wa rd-facing
ch ild restra int sy stem on a rear seat:
adju stthe front seat so that the seat does
not touch thech ild restra int sy stem.
0073 When using a category I
forw ard-facing
ch ild restra int sy stem: remo vethe head
re stra int from there spective seat, if possi‐
ble.
Af terth ech ild restra int sy stem has been
re mo ved, replace the head restra int immedi‐
ately and adjust all head restra ints cor rectly.
0073 The ba
ckrest of thefo rw ard-facing child
re stra int sy stem must, as far as possible, be
re sting on the seat backrest of there ar seat.
0073 Fo
r cer tain child restra int sy stems in weight
category II or III, there may be restrictions on
th e maximum size setting, e.g. due topossi‐
ble conta ct with th ero of.
0073 The
child restra int sy stem must not be put
under stra in between thero of and the seat
cushion and/or be fitted facing the wrong
direction. Where possible, adjust the seat
cushion inclination according ly.0073
The
child restra int sy stem must not be put
under stra in by the head restra int. Adjust the
head restra ints as appropriate.
0073 Make sure
that thech ild's feet do not touch
th e front seat. If necessar y,mo vethe front
seat slightly forw ards. #
Install thech ild restra int sy stem.
The entire base of thech ild restra int sy stem
must alw aysre st on the sitting sur face of the
re ar seat. #
Always make sure that the shoulder belt strap
is cor rectly routed from the seat belt outlet of
th eve hicle tothe shoulder belt guide on the
ch ild restra int sy stem.
The shoulder belt stra p must be routed for‐
wa rds and down wards from the seat belt out‐
let.
Instructions forve hicles without automatic
co-driver airbag shutoff The
sticke r is visible when the co-driver door is
open:
Ve hicles without an automatic co-driver airbag
shutoff ha vea special sticke r af fixe dto the side
of the cockpit on the co-driver side.
If yo u turn theke yto position 0048inthe ignition
loc k,thePA SSENGER AIR BAG OFF and
PA SSENGER AIR BAG ON indicator lamps light up
brief ly. Ho wever,th ey have no function and are
not an indication of the automatic co-driver air‐
bag shutoff. Occupant saf
ety45
Page 49 of 337
Be sure
toobser vethefo llowing no tes:
R Neverfit a rear wa rd-facing child restra int sys‐
te m to the co-driver seat.
R Alwaysfit a rear wa rd-facing child restra int
sy stem toa suitable rear seat
- Suitability of seats for attaching belt-
secured child restra int sy stems
(/ page 44)
- Secu ring thech ild restra int sy stem with
th e seat belt on there ar seat
(/ page 45)
R Notes on rear wa rd-facing and forw ard-facing
ch ild restra int sy stems on the co-driver seat
(/ page 46)
Note s onrear wa rd-facing and forw ard-facing
ch ild restra int sy stems on the co-d rive r seat &
WARNING Risk of injury or death when
using a child restra int sy stem while the
co-driver airbag is enabled
If yo u secure a child in a child restra int sys‐
te m on the co-driver seat and the
PA SSENGER AIR BAG OFF indicator lamp is
off, the co-driver airbag can deploy in the
eve nt of an accident.
The child could be stru ck bythe airbag. #
Always ensure that the co-driver airbag
is disabled. The PASSENGER AIR BAG
OFF indicator lamp must be lit.
NEVER use a rear wa rdfacing child restra int
on a seat pr otected byan ENABLED AIRB AG
in front of it, DE ATH or SERIOUS INJU RYto
th eCH ILD may occur. Obser
vethe specific instructions forth ere ar‐
wa rd-facing and forw ard-facing child restra int
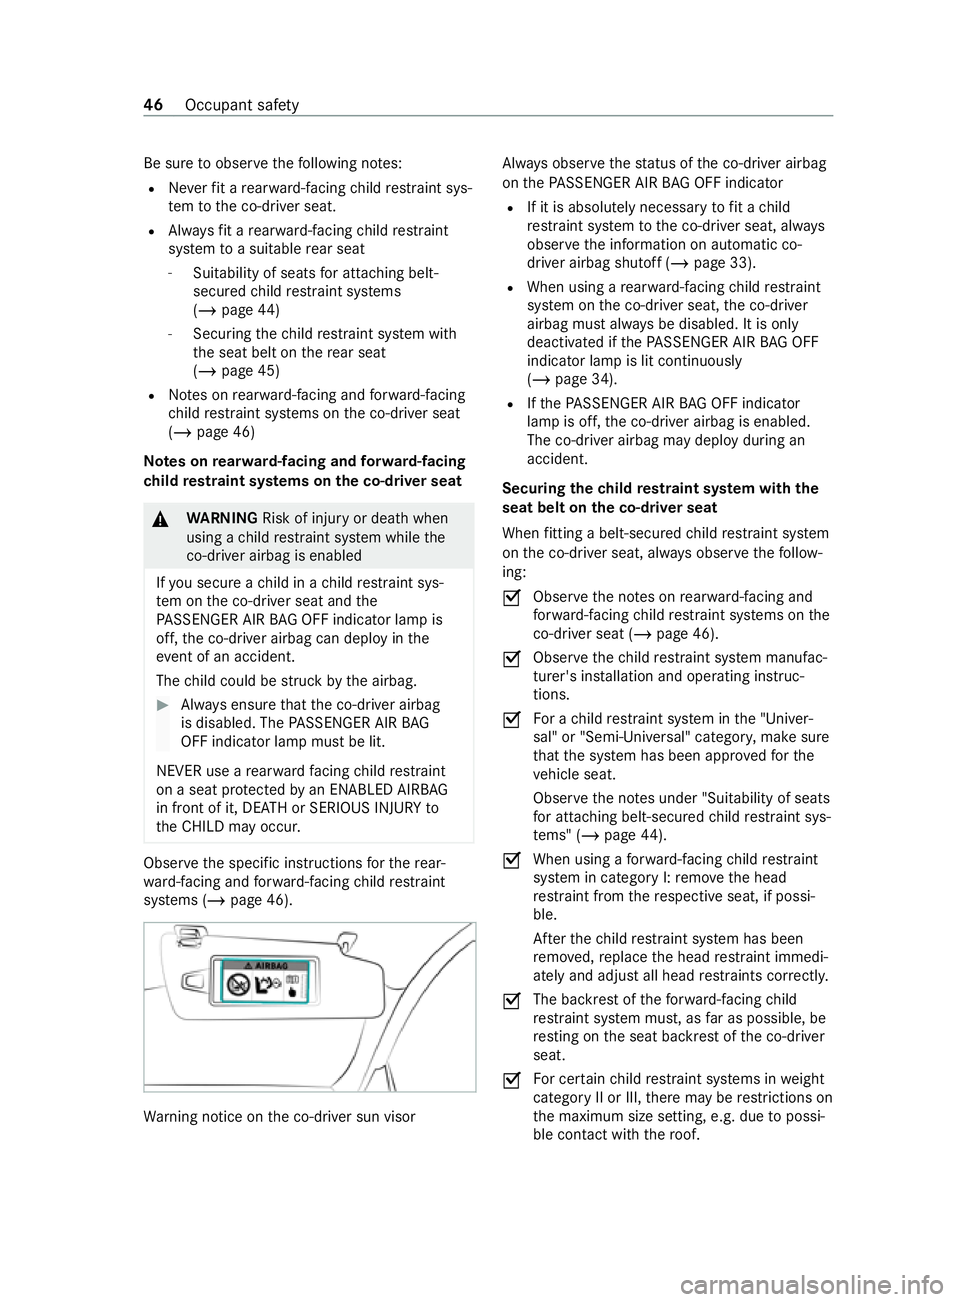
sy stems (/ page 46). Wa
rning notice on the co-driver sun visor Alw
ays obser vethest atus of the co-driver airbag
on thePA SSENGER AIR BAG OFF indicator
R If it is absolutely necessary tofit a child
re stra int sy stem tothe co-driver seat, alw ays
obser vethe information on automatic co-
driver airbag shutoff (/ page 33).
R When using a rear wa rd-facing child restra int
sy stem on the co-driver seat, the co-driver
airbag must alw ays be disabled. It is only
deactivated if thePA SSENGER AIR BAG OFF
indicator lamp is lit continuously
(/ page 34).
R Ifth ePA SSENGER AIR BAG OFF indicator
lamp is off, the co-driver airbag is enabled.
The co-driver airbag may deploy during an
accident.
Securing thech ild restra int sy stem with the
seat belt on the co-d rive r seat
When fitting a belt-secu redch ild restra int sy stem
on the co-driver seat, alw ays obser vethefo llow‐
ing:
0073 Obser
vethe no tes on rear wa rd-facing and
fo rw ard-facing child restra int sy stems on the
co-driver seat (/ page 46).
0073 Obse
rveth ech ild restra int sy stem manufac‐
turer's ins tallation and operating instruc‐
tions.
0073 Fo
r a child restra int sy stem in the "Univer‐
sal" or "Semi-Universal" categor y,make sure
th at the sy stem has been appr oved forthe
ve hicle seat.
Obser vethe no tes under "Suitability of seats
fo r attaching belt-secu redch ild restra int sys‐
te ms" (/ page44).
0073 When using a
forw ard-facing child restra int
sy stem in category I: remo vethe head
re stra int from there spective seat, if possi‐
ble.
Af terth ech ild restra int sy stem has been
re mo ved, replace the head restra int immedi‐
ately and adjust all head restra ints cor rectl y.
0073 The backrest of
thefo rw ard-facing child
re stra int sy stem must, as far as possible, be
re sting on the seat backrest of the co-driver
seat.
0073 Fo
r cer tain child restra int sy stems in weight
category II or III, there may be restrictions on
th e maximum size setting, e.g. due topossi‐
ble conta ct with th ero of. 46
Occupant saf ety
Page 55 of 337
Centrally locking and unlocking
the door from
th e inside &
WARNING Risk of accident and inju ry
due toleaving children unat tended in the
ve hicle
If ch ildren are left unat tended in theve hicle,
th ey could, in part icular:
R open doors, thereby endangering other
persons or road users.
R get out and be stru ck byoncoming traf fic.
R operate vehicle equipment and become
trapped, forex ample.
In addition, thech ildren could also set the
ve hicle in motion by,fo rex ample:
R releasing the parking brake.
R changing the transmission position.
R starting theve hicle. #
Never lea vechildren unat tended in the
ve hicle. #
When leaving theve hicle, alw aysta ke
th eke y with you and lock theve hicle. #
Keep theve hicle key out of there ach of
ch ildren. &
WARNING Dangertolife due toexposure
to extreme heat or cold in theve hicle
If people, particular lych ildren, are exposed to
ex treme temp eratures over an extended
pe riod of time, there is a risk of serious injury
or danger tolife. #
Never lea vepersons, children in particu‐
lar, unat tended in theve hicle. Yo
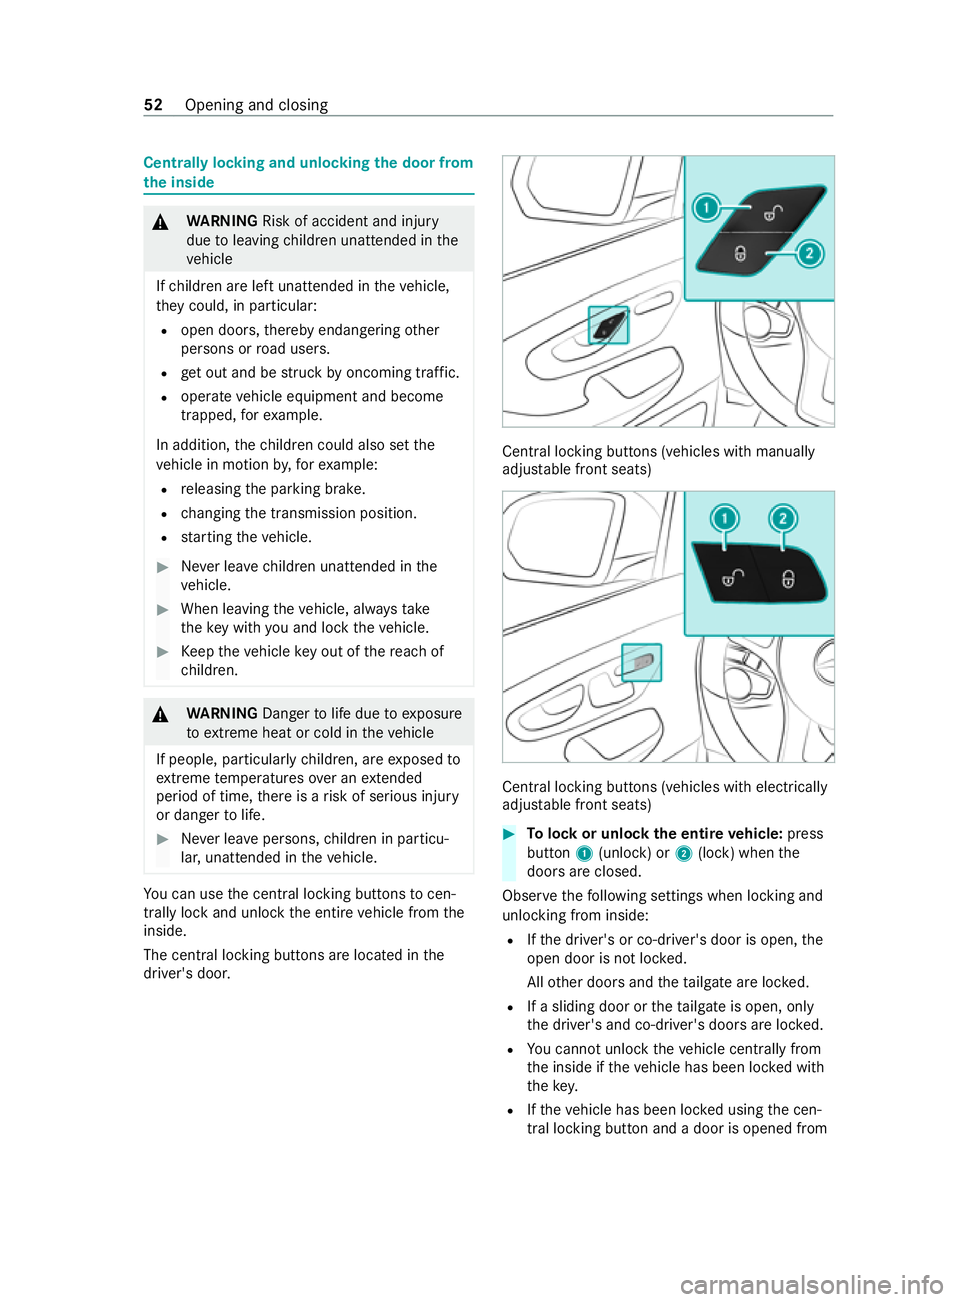
u can use the cent ral locking buttons tocen‐
trally lock and unlock the entire vehicle from the
inside.
The central locking buttons are located in the
driver's door. Central locking buttons (vehicles with manually
adjus
table front seats) Central locking buttons (vehicles with electrically
adjus
table front seats) #
Tolock or unlock the entire vehicle: press
button 1(unlock) or 2(lock) when the
doors are closed.
Obser vethefo llowing settings when locking and
unlocking from inside:
R Ifth e driver's or co-driver's door is open, the
open door is not loc ked.
All other doors and theta ilgate are loc ked.
R If a sliding door or theta ilgate is open, only
th e driver's and co-driver's doors are loc ked.
R You cannot unlo cktheve hicle centra lly from
th e inside if theve hicle has been loc ked with
th ekey.
R Ifth eve hicle has been loc ked using the cen‐
tral locking button and a door is opened from 52
Opening and closing
Page 56 of 337
th
e inside, only the door that has been
opened is unlo cked.
R Ifth eve hicle has pr eviously been loc ked with
th eke y,opening a door from the inside will
trigger the anti- theft alarm sy stem. Switch off
th e alarm (/ page67). Ac
tivating/deactivating the automatic lo ck‐
ing mechanism Re
quirements
R The po wer supply or the ignition is switched
on.
R The doors are closed.
When the ignition is switched on and theve hicle
is tr avelling at a speed abo ve15 km/h, theve hi‐
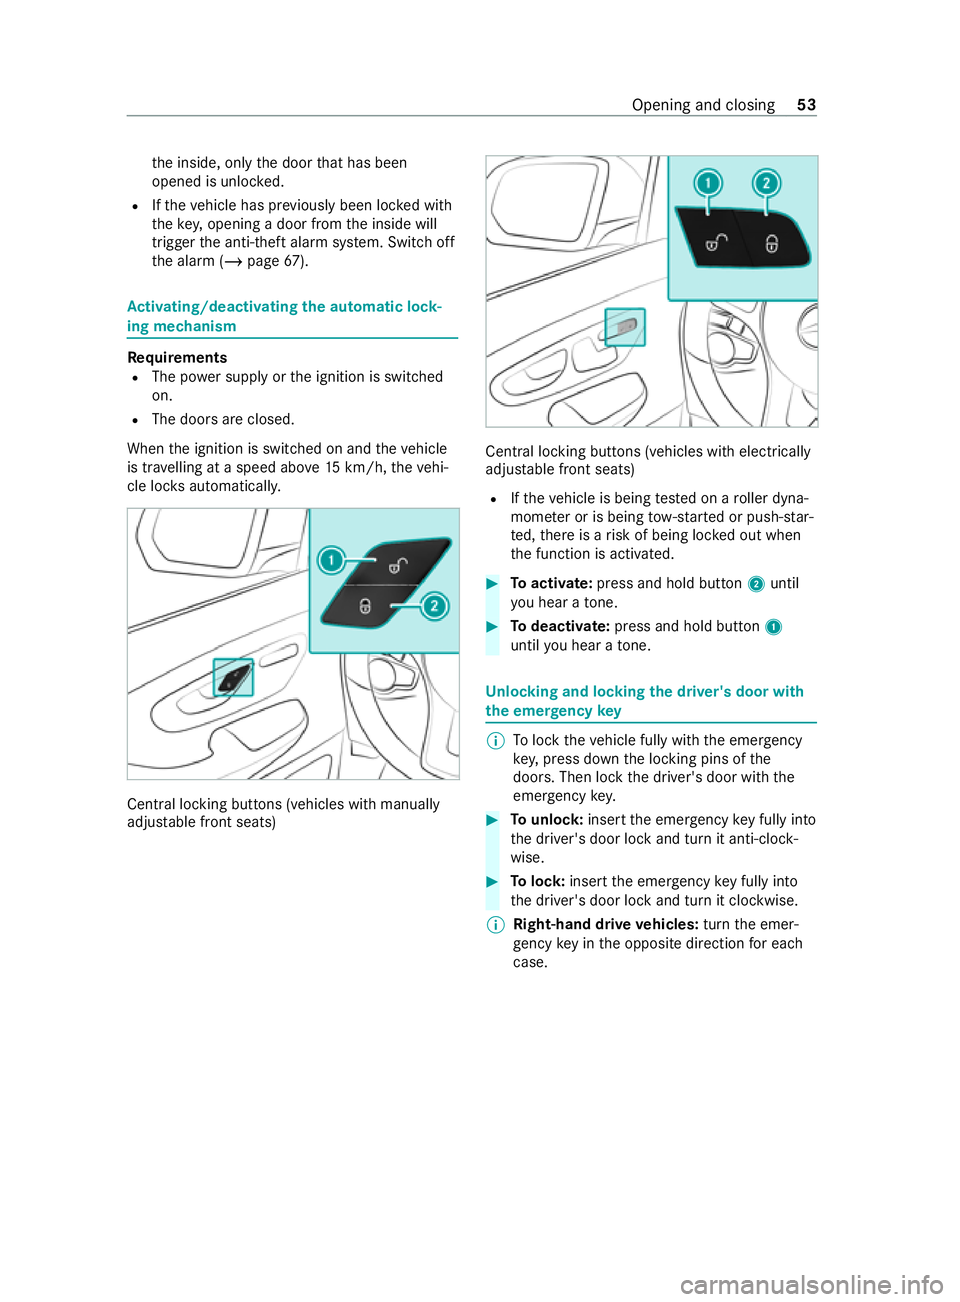
cle loc ksautomaticall y. Cent
ral locking buttons (vehicles with manually
adjus table front seats) Central locking buttons (vehicles with electrically
adjus
table front seats)
R Ifth eve hicle is being tested on a roller dyna‐
mome ter or is being tow- star ted or push-s tar‐
te d, there is a risk of being loc ked out when
th e function is activated. #
Toactivate: press and hold button 2until
yo u hear a tone. #
Todeactivate: press and hold button 1
until you hear a tone. Un
locking and locking the driver's door with
th e emer gency key %
To
lock theve hicle fully with the emer gency
ke y,press down the locking pins of the
doors. Then lock the driver's door with the
emer gency key. #
Tounlo ck:insert the emer gency key fully into
th e driver's door lock and turn it anti-clock‐
wise. #
Tolock: insert the emer gency key fully into
th e driver's door lock and turn it clockwise.
% Right-hand drive
vehicles: turnthe emer‐
ge ncy key in the opposite direction for each
case. Opening and closing
53
Page 72 of 337

Note
s onthe cor rect driver's seat position &
WARNING Risk of injury ifve hicle set‐
tings are adjus ted while theve hicle is in
motion
Yo u could lose control of theve hicle in partic‐
ular in thefo llowing situations:
R Ifyo u adjust the driver's seat, the head
re stra ints, thesteering wheel or the mir‐
ro r while theve hicle is in motion.
R Ifyo ufast enyour seat belt while theve hi‐
cle is in motion. #
Before starting the engine: adjust the
driver's seat, head restra ints, steering
wheel and mir ror in particular and fas‐
te nyo ur seat belt. Ensure
thefo llowing when adjusting steering
wheel 3, seat belt 2and driver's seat 1:
R You are sitting as faraw ay from the driver's
airbag as possible.
R You are sitting in an upright position.
R Your thighs are gently suppor tedby the seat
cushion.
R Your legs are not fully extended and you can
re ach the pedals easily.
R The back of your head is suppo rted at eye
le ve lby the middle part of the head restra int
R You can hold thesteering wheel with your
arms slightly bent.
R You can mo veyour legs without any restric‐
tions.
R You can see all of the instrument clus ter dis‐
pla yswe ll R
You ha vea good overview of the tra ffic condi‐
tions.
R Your seat belt sits snugly against your body
and passes across the cent reofyour shoul‐
der and across your hips in the pelvic area. Seats
Ad
justing the front seat mechanically &
WARNING Risk of becoming trapped if
th e seats are adjus tedby children
Children could become trapped if they adjust
th e seats, particular lywhen unat tended. #
When le aving theve hicle, alw aysta ke
th eke y with you and lock theve hicle. #
Never lea vechildren unat tended in the
ve hicle. &
WARNING Risk of injury ifve hicle set‐
tings are adjus ted while theve hicle is in
motion
Yo u could lose control of theve hicle in partic‐
ular in thefo llowing situations:
R Ifyo u adjust the driver's seat, the head
re stra ints, thesteering wheel or the mir‐
ro r while theve hicle is in motion.
R Ifyo ufast enyour seat belt while theve hi‐
cle is in motion. #
Before starting the engine: adjust the
driver's seat, head restra ints, steering
wheel and mir ror in particular and fas‐
te nyo ur seat belt. &
WARNING Risk of becoming trapped dur‐
ing seat adjustment
When you adjust a seat, you or other vehicle
occupants could become trapped, e.g. on the
seat guide rail. #
Make sure when adjusting a seat that
no one has any body parts in the sweep
of the seat. &
WARNING Risk of accident due tothe
driver's seat not being engaged
The driver's seat may mo veunexpectedly
while driving.
This could cause youto lose control of the
ve hicle. Seats and
stowage 69
Page 73 of 337
#
Always make sure that the driver's seat
is engaged before starting theve hicle. &
WARNING Risk of injury or death dueto
th e front seat being positioned too close
to the cockpit
The front airbags can also injure the occu‐
pants in the front of theve hicle. #
Always adjust the front seats so they
are as faraw ay as possible from the
front airbags. #
In addition, obser vethe no tes on cor‐
re ct seat adjustment. &
WARNING Risk of injury or death dueto
incor rect seat position
The seat belt will not of ferth e intended le vel
of pr otection if you ha venot mo vedth e seat
backrest toan almost vertical position.
In particular, you may slip under the seatbelt
and injure yourself. #
Adjust the seat properly before begin‐
ning your journe y. #
Always ensure that the seat backrest is
in an almost vertical position and that
th e shoulder section of your seat belt is
ro uted across the cent reofyour shoul‐
der. &
WARNING Risk of injury duetohead
re stra ints not being fitted or being adjus‐
te d incor rectly
If head restra ints ha venot been ins talled or
ha ve not been adjus ted cor rectly, there is an
increased risk of injury in the head and neck
area, e.g. in theev ent of an accident or when
braking. #
Always drive with the head restra ints fit‐
te d. #
Before driving off, make sure forev ery
ve hicle occupant that the cent reofthe
head restra int supports the back of the
head at about eye le vel. &
WARNING Risk of burn s from hot ampli‐
fi ers under the driver's seat
Ve hicles with amplifiers under the driver's
seat: The amplifier can become hot during opera‐
tion.
Yo
u could burn yourself if youto uch the
amplifier. #
Do not reach unde rneath the driver's
seat. #
Adjust the driver's seat carefully. *
NO
TEDama getothe seats and the seat
heating due tofluids, sharp objects or
insulating materials To
avo id damage tothe seats or seat heating,
ta ke thefo llowing steps: #
Do not spill any fluids on tothe seats. If
some thing does get spilt onto the seats,
dry the seats as quickly as possible. #
Ifth e seat co vers are moist or wet, do
not switch the seat heating on. Do not
use the seat heating todry the seats. #
Clean the seats as recommended. See
th e "Cleaning and care" section. #
Do not transport any heavy loads on the
seats. Do not place any sharp objects
such as knives, nails or tools on the
seats. Use the seats only for people if
possible. #
While the seat heating is in operation,
do not co verth e seats with insulating
materials such as blank ets, coats, bags,
pr otective co vers,ch ild seats or boos ter
seats. Ad
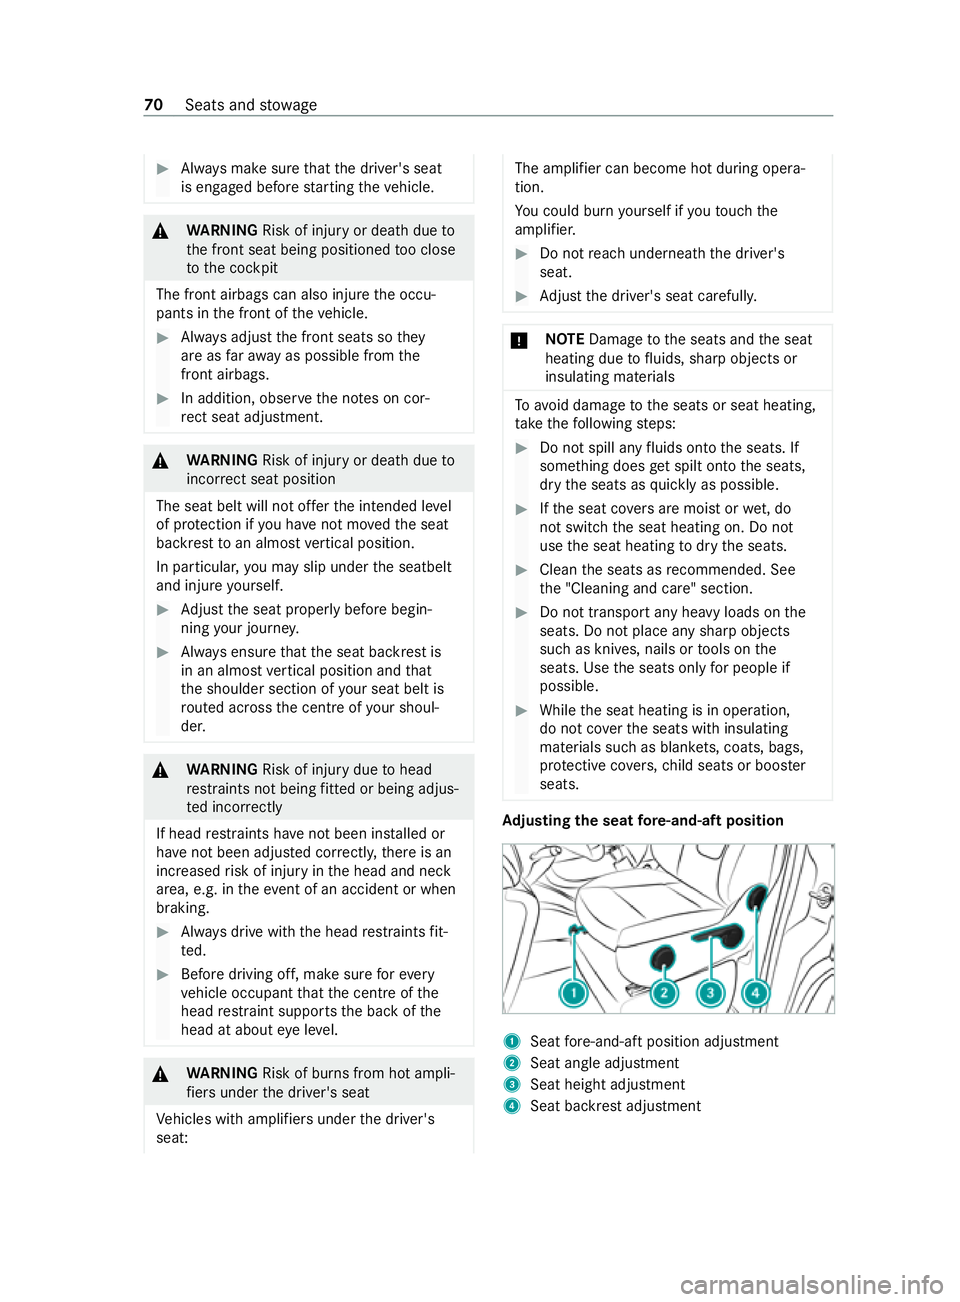
justing the seat fore -and-aft position 1
Seat fore -and-aft position adjustment
2 Seat angle adjustment
3 Seat height adjustment
4 Seat ba ckrest adjustment 70
Seats and stowage
Page 74 of 337

#
Pull le ver1 upwards and slide the seat for‐
wa rds or back until the desired position has
been reached. #
Release le ver1 and push the seat back or
fo rw ards until you hear the seat engage.
% Fo
r front swivel seats, the le ver in position
1 is used torelease the swivel seat. The
le ve rto adjust thefo re -and-aft position is in
th efo rm of a bar in front of the seat
(/ page 74).
Ad justing the seat height #
Pull or push le ver3 repeatedly until the
desired seat height has been reached.
Ad justing the seat backrest #
Turn handwheel 4forw ards.
The seat backrest will mo vetoave rtical posi‐
tion. #
Turn handwheel 4backwards.
The seat backrest will tilt bac k.
Ad justing the seat angle #
Turn handwheel 2forw ards.
The front of the seat cushion will tilt down. #
Turn handwheel 2backwards.
The front of the seat cushion will tilt up. Ad
justing the front seat electrically &
WARNING Risk of becoming trapped if
th e seats are adjus tedby children
Children could become trapped if they adjust
th e seats, particularly when unattended. #
When leaving theve hicle, alw aysta ke
th eke y with you and lock theve hicle. #
Never lea vechildren unat tended in the
ve hicle. The seats can be adjus
ted when there is no key in
th e ignition loc k. &
WARNING Risk of injury ifve hicle set‐
tings are adjus ted while theve hicle is in
motion
Yo u could lose control of theve hicle in partic‐
ular in thefo llowing situations:
R Ifyo u adjust the driver's seat, the head
re stra ints, thesteering wheel or the mir‐
ro r while theve hicle is in motion.
R Ifyo ufast enyour seat belt while theve hi‐
cle is in motion. #
Before starting the engine: adjust the
driver's seat, head restra ints, steering
wheel and mir ror in particular and fas‐
te nyo ur seat belt. &
WARNING Risk of becoming trapped dur‐
ing seat adjustment
When you adjust a seat, you or other vehicle
occupants could become trapped, e.g. on the
seat guide rail. #
Make sure when adjusting a seat that
no one has any body parts in the sweep
of the seat. Obser
vethe saf ety no tes on "Airbags" and "Chil‐
dren in theve hicle". &
WARNING Risk of injury or death dueto
th e front seat being positioned too close
to the cockpit
The front airbags can also injure the occu‐
pants in the front of theve hicle. #
Always adjust the front seats so they
are as faraw ay as possible from the
front airbags. #
In addition, obser vethe no tes on cor‐
re ct seat adjustment. &
WARNING Risk of injury or death dueto
incor rect seat position
The seat belt will not of ferth e intended le vel
of pr otection if you ha venot mo vedth e seat
backrest toan almost vertical position.
In particular, you may slip under the seatbelt
and injure yourself. #
Adjust the seat properly before begin‐
ning your journe y. #
Always ensure that the seat backrest is
in an almost vertical position and that Seats and
stowage 71
Page 75 of 337
th
e shoulder section of your seat belt is
ro uted across the cent reofyour shoul‐
der. &
WARNING Risk of injury duetohead
re stra ints not being fitted or being adjus‐
te d incor rectly
If head restra ints ha venot been ins talled or
ha ve not been adjus ted cor rectly, there is an
increased risk of injury in the head and neck
area, e.g. in theev ent of an accident or when
braking. #
Always drive with the head restra ints fit‐
te d. #
Before driving off, make sure forev ery
ve hicle occupant that the cent reofthe
head restra int supports the back of the
head at about eye le vel. Do not inter
change the head restra ints of the
front and rear seats. Otherwise, you will not be
able toset the height and inclination of the head
re stra ints tothe cor rect position. &
WARNING Risk of burn s from hot ampli‐
fi ers under the driver's seat
Ve hicles with amplifiers under the driver's
seat:
The amplifier can become hot during opera‐
tion.
Yo u could burn yourself if youto uch the
amplifier. #
Do not reach unde rneath the driver's
seat. #
Adjust the driver's seat carefully. *
NO
TEDama getothe seats and the seat
heating due tofluids, sharp objects or
insulating materials To
avo id damage tothe seats or seat heating,
ta ke thefo llowing steps: #
Do not spill any fluids on tothe seats. If
some thing does get spilt onto the seats,
dry the seats as quickly as possible. #
Ifth e seat co vers are moist or wet, do
not switch the seat heating on. Do not
use the seat heating todry the seats. #
Clean the seats as recommended. See
th e "Cleaning and care" section. #
Do not transport any heavy loads on the
seats. Do not place any sharp objects
such as knives, nails or tools on the
seats. Use the seats only for people if
possible. #
While the seat heating is in operation,
do not co verth e seats with insulating
materials such as blank ets, coats, bags,
pr otective co vers,ch ild seats or boos ter
seats. Re
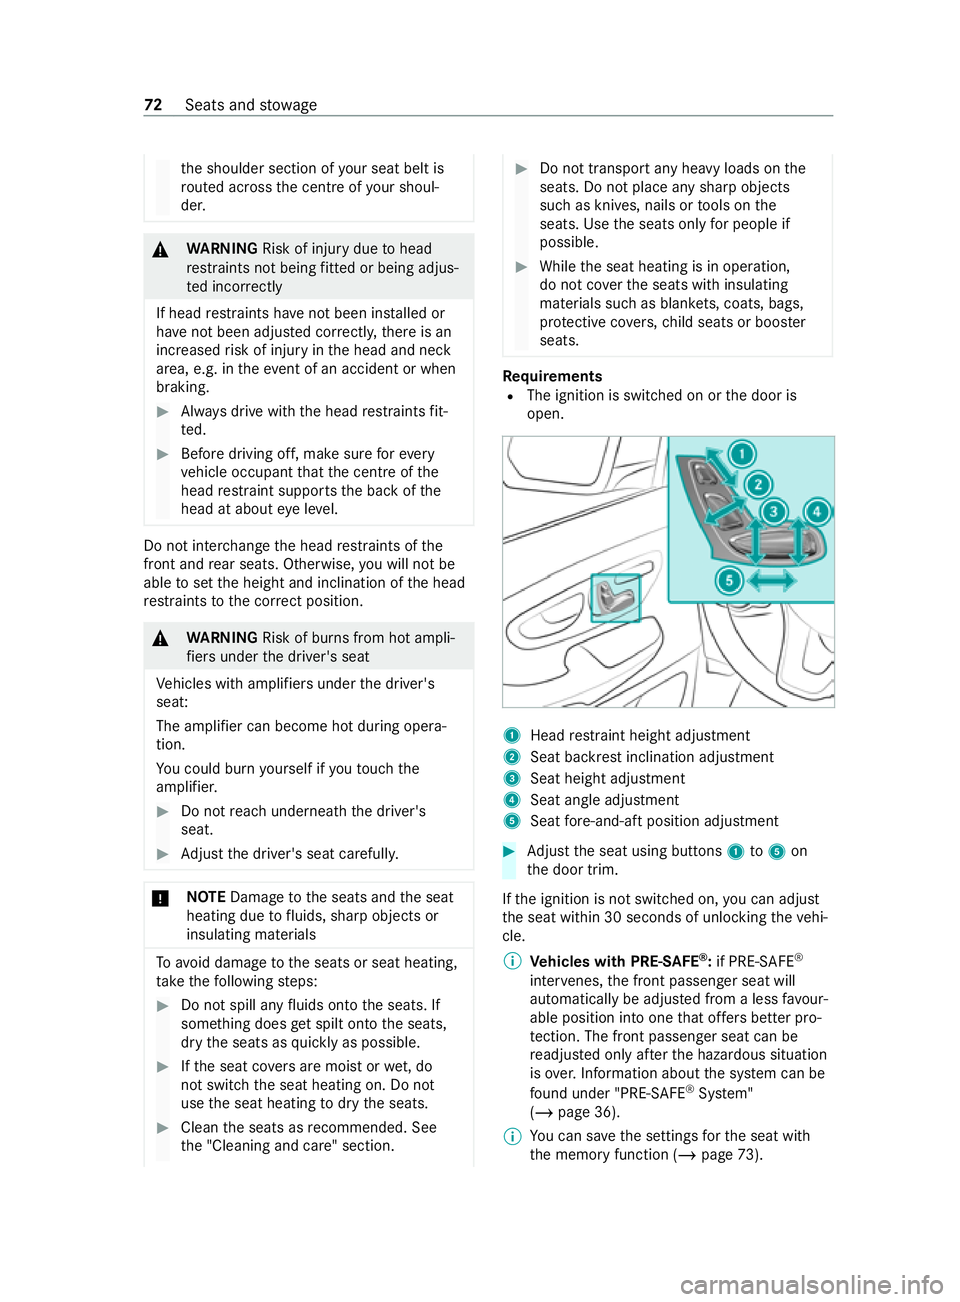
quirements
R The ignition is switched on or the door is
open. 1
Head restra int height adjustment
2 Seat backrest inclination adjustment
3 Seat height adjustment
4 Seat angle adjustment
5 Seat fore -and-aft position adjustment #
Adjust the seat using buttons 1to5 on
th e door trim.
If th e ignition is not switched on, you can adjust
th e seat within 30 seconds of unlocking theve hi‐
cle.
% Vehicles with PRE-SAFE ®
:if PRE-SAFE ®
inter venes, the front passenger seat will
automatically be adjus ted from a less favo ur‐
able position into one that of fers better pro‐
te ction. The front passenger seat can be
re adjus ted only af terth e hazardous situation
is ove r.Information about the sy stem can be
fo und under "PRE-SAFE ®
Sy stem"
(/ page 36).
% Yo
u can sa vethe settings forth e seat with
th e memory function (/ page73). 72
Seats and stowage