ESP Mercury Grand Marquis 1011 Owner's Manuals
[x] Cancel search | Manufacturer: MERCURY, Model Year: 1011, Model line: Grand Marquis, Model: Mercury Grand Marquis 2011Pages: 333, PDF Size: 2.23 MB
Page 5 of 333
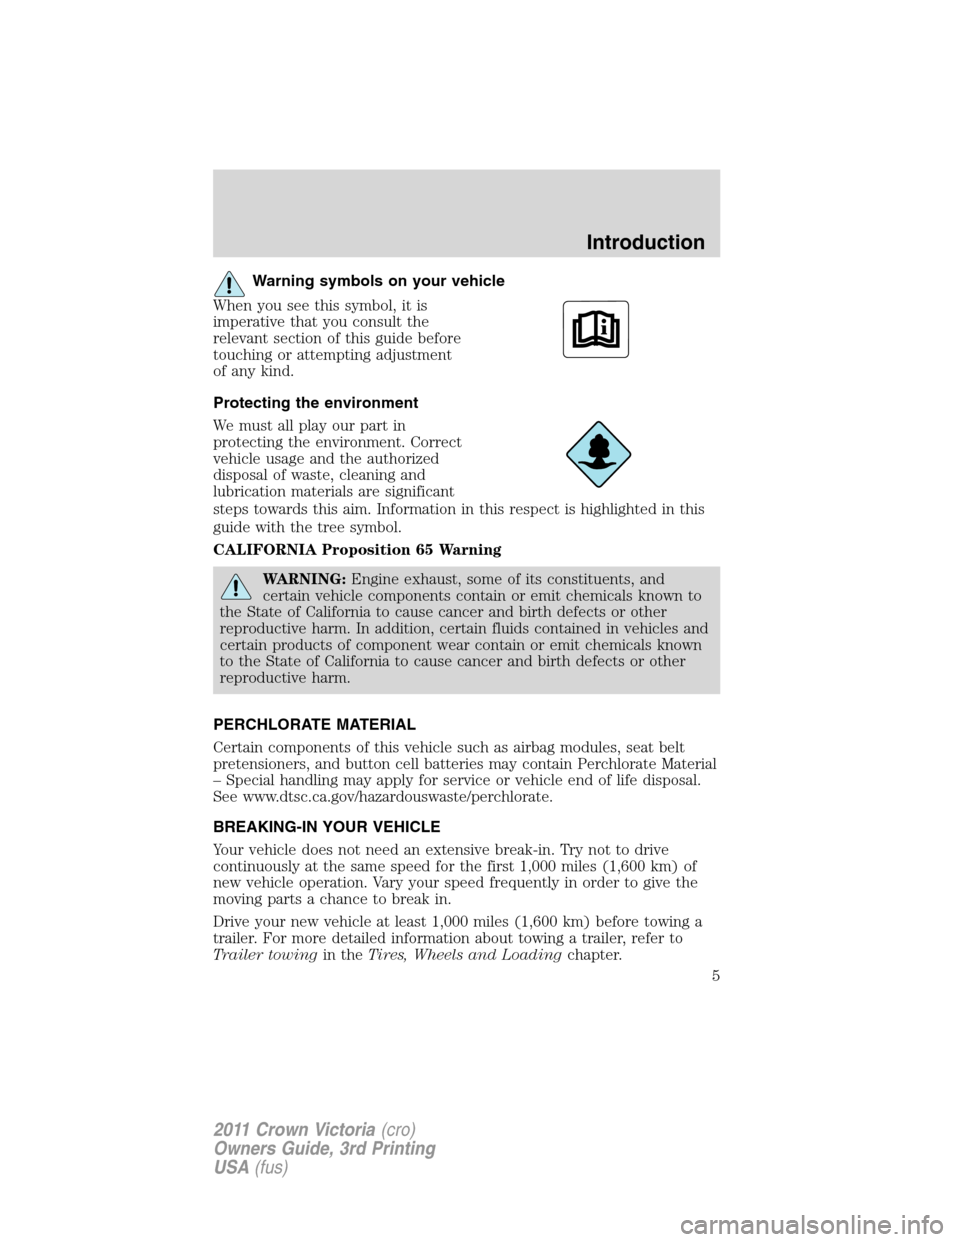
Warning symbols on your vehicle
When you see this symbol, it is
imperative that you consult the
relevant section of this guide before
touching or attempting adjustment
of any kind.
Protecting the environment
We must all play our part in
protecting the environment. Correct
vehicle usage and the authorized
disposal of waste, cleaning and
lubrication materials are significant
steps towards this aim. Information in this respect is highlighted in this
guide with the tree symbol.
CALIFORNIA Proposition 65 Warning
WARNING:Engine exhaust, some of its constituents, and
certain vehicle components contain or emit chemicals known to
the State of California to cause cancer and birth defects or other
reproductive harm. In addition, certain fluids contained in vehicles and
certain products of component wear contain or emit chemicals known
to the State of California to cause cancer and birth defects or other
reproductive harm.
PERCHLORATE MATERIAL
Certain components of this vehicle such as airbag modules, seat belt
pretensioners, and button cell batteries may contain Perchlorate Material
– Special handling may apply for service or vehicle end of life disposal.
See www.dtsc.ca.gov/hazardouswaste/perchlorate.
BREAKING-IN YOUR VEHICLE
Your vehicle does not need an extensive break-in. Try not to drive
continuously at the same speed for the first 1,000 miles (1,600 km) of
new vehicle operation. Vary your speed frequently in order to give the
moving parts a chance to break in.
Drive your new vehicle at least 1,000 miles (1,600 km) before towing a
trailer. For more detailed information about towing a trailer, refer to
Trailer towingin theTires, Wheels and Loadingchapter.
Introduction
5
2011 Crown Victoria(cro)
Owners Guide, 3rd Printing
USA(fus)
Page 9 of 333
CELL PHONE USE
The use of Mobile Communications Equipment has become increasingly
important in the conduct of business and personal affairs. However,
drivers must not compromise their own or others’ safety when using
such equipment. Mobile Communications can enhance personal safety
and security when appropriately used, particularly in emergency
situations. Safety must be paramount when using mobile communications
equipment to avoid negating these benefits.
Mobile Communication Equipment includes, but is not limited to, cellular
phones, pagers, portable email devices, text messaging devices and
portable two-way radios.
WARNING:Driving while distracted can result in loss of vehicle
control, accident and injury. Ford strongly recommends that you
use extreme caution when using any device or feature that may take
your focus off the road. Your primary responsibility is the safe
operation of your vehicle.
We recommend against the use of any handheld device while driving
and that you comply with all applicable laws.
EXPORT UNIQUE (NON–UNITED STATES/CANADA) VEHICLE
SPECIFIC INFORMATION
For your particular global region, your vehicle may be equipped with
features and options that are different from the features and options that
are described in this Owner’s Guide. A market unique supplement may
be supplied that complements this book. By referring to the market
unique supplement, if provided, you can properly identify those features,
recommendations and specifications that are unique to your vehicle. This
Owner’s Guide is written primarily for the U.S. and Canadian Markets.
Features or equipment listed as standard may be different on units built
for Export.Refer to this Owner’s Guide for all other required
information and warnings.
Introduction
9
2011 Crown Victoria(cro)
Owners Guide, 3rd Printing
USA(fus)
Page 12 of 333
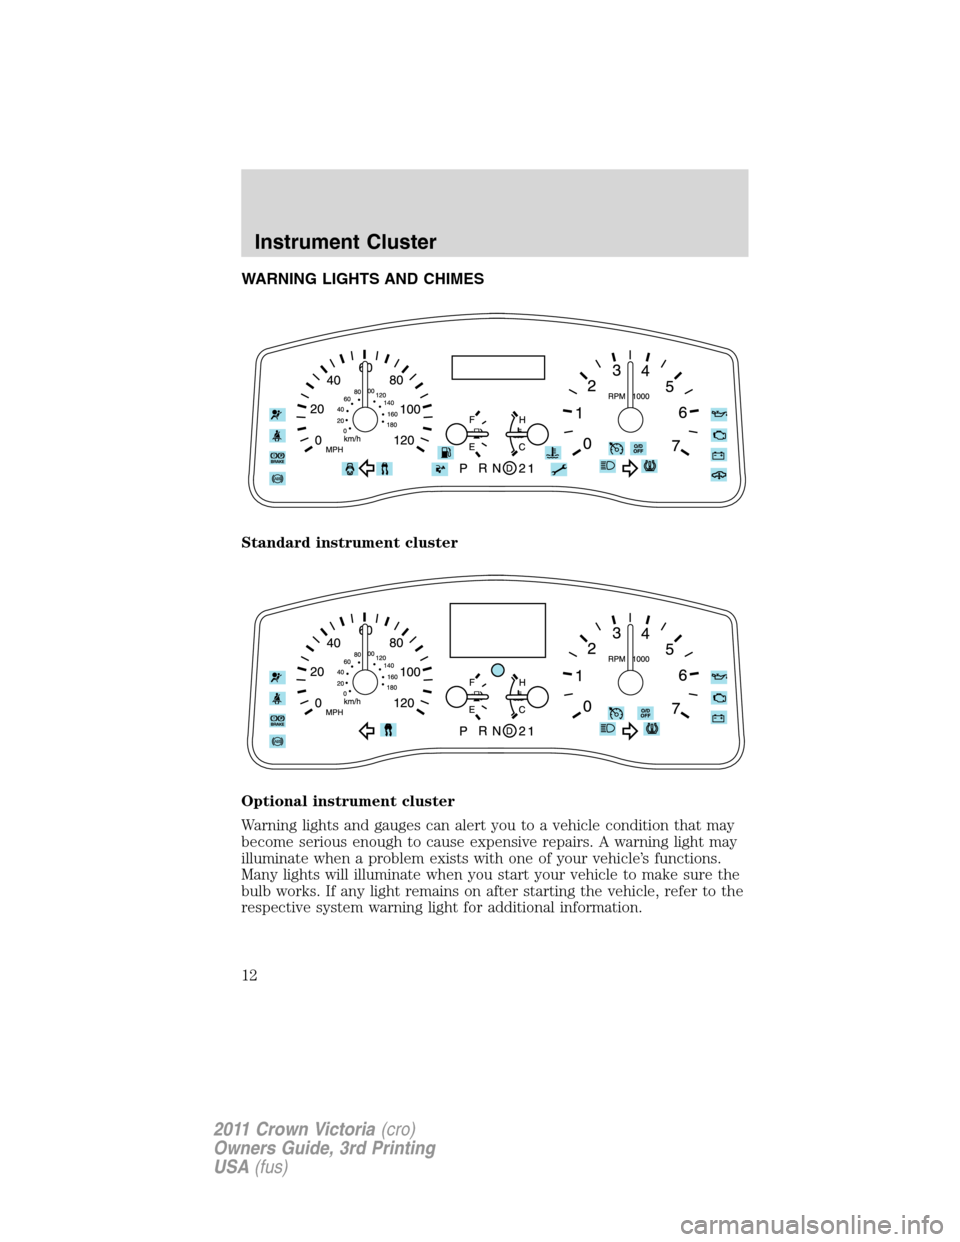
WARNING LIGHTS AND CHIMES
Standard instrument cluster
Optional instrument cluster
Warning lights and gauges can alert you to a vehicle condition that may
become serious enough to cause expensive repairs. A warning light may
illuminate when a problem exists with one of your vehicle’s functions.
Many lights will illuminate when you start your vehicle to make sure the
bulb works. If any light remains on after starting the vehicle, refer to the
respective system warning light for additional information.
Instrument Cluster
12
2011 Crown Victoria(cro)
Owners Guide, 3rd Printing
USA(fus)
Page 23 of 333
UNITS
Displays the current units English or Metric.
Press SELECT to change the display units.
•ENGLISH
•METRIC
LANGUAGE
Displays the current language selected.
Press SELECT to change the display language.
•ENGLISH
•ESPANOL
•FRANCAIS
OIL LIFE START VALUE PRESS SELECT TO CHANGE
Press SELECT to change the oil life start value. OIL LIFE START VALUE
SET TO XXX% will be displayed.
To reset the oil monitoring system to 100% after each oil change,
perform the following:
1. Press and hold the RESET control for two seconds and release. Oil life
is set to 100% and “OIL LIFE XXX% HOLD RESET IF NEW OIL” is
displayed.
2. Press and hold the RESET control for three seconds and release. Oil
life is set to 100% and “OIL LIFE START VALUE SET TO XXX%” is
displayed.
System warnings
System warnings alert you to possible problems or malfunctions in your
vehicle’s operating systems.
In the event of a multiple warning situation, the message center will
cycle the display to show all warnings by displaying each one for four
seconds.
The message center will display the last selected feature if there are no
more warning messages. This allows you to use the full functionality of
the message center after you acknowledge the warning by pressing the
RESET control and clearing the warning message.
Instrument Cluster
23
2011 Crown Victoria(cro)
Owners Guide, 3rd Printing
USA(fus)
Page 26 of 333
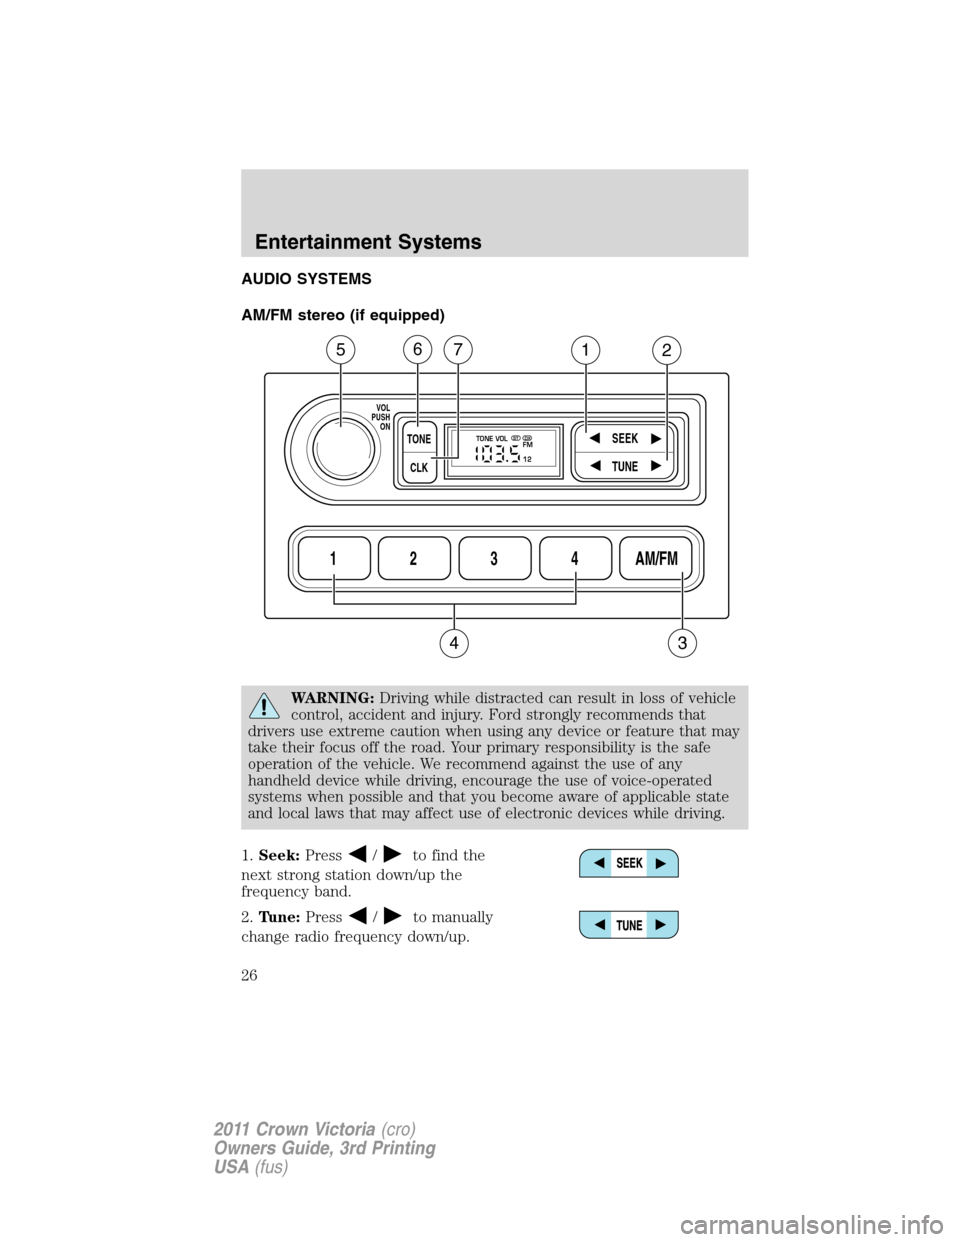
AUDIO SYSTEMS
AM/FM stereo (if equipped)
WARNING:Driving while distracted can result in loss of vehicle
control, accident and injury. Ford strongly recommends that
drivers use extreme caution when using any device or feature that may
take their focus off the road. Your primary responsibility is the safe
operation of the vehicle. We recommend against the use of any
handheld device while driving, encourage the use of voice-operated
systems when possible and that you become aware of applicable state
and local laws that may affect use of electronic devices while driving.
1.Seek:Press
/to find the
next strong station down/up the
frequency band.
2.Tune:Press
/to manually
change radio frequency down/up.
1234AM/FM
SEEKTONE
CLK
TUNE
TONE VOL
12 FMSTDX
VOL
PUSH
ON
5
3
67
4
12
Entertainment Systems
26
2011 Crown Victoria(cro)
Owners Guide, 3rd Printing
USA(fus)
Page 28 of 333
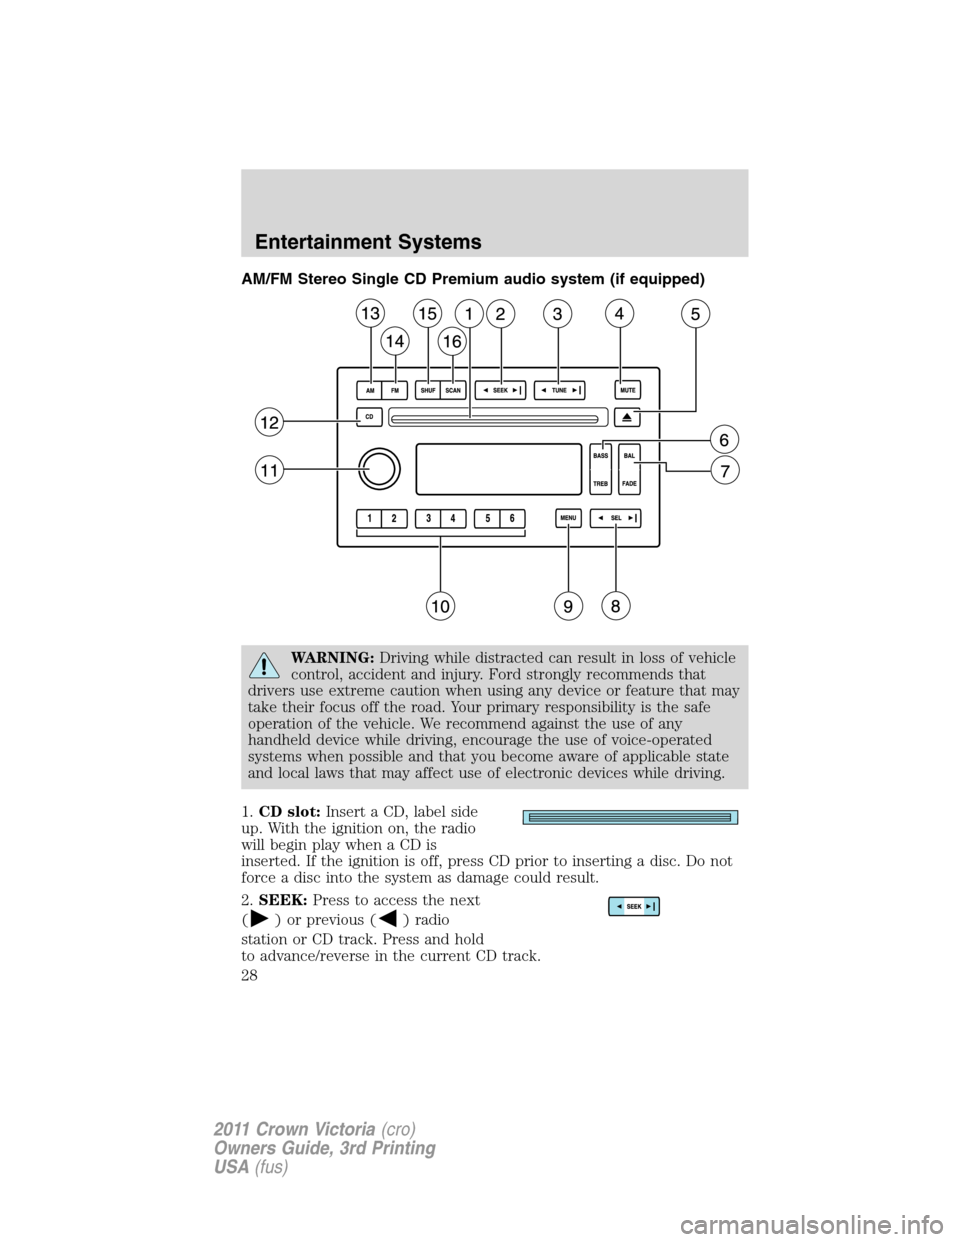
AM/FM Stereo Single CD Premium audio system (if equipped)
WARNING:Driving while distracted can result in loss of vehicle
control, accident and injury. Ford strongly recommends that
drivers use extreme caution when using any device or feature that may
take their focus off the road. Your primary responsibility is the safe
operation of the vehicle. We recommend against the use of any
handheld device while driving, encourage the use of voice-operated
systems when possible and that you become aware of applicable state
and local laws that may affect use of electronic devices while driving.
1.CD slot:Insert a CD, label side
up. With the ignition on, the radio
will begin play when a CD is
inserted. If the ignition is off, press CD prior to inserting a disc. Do not
force a disc into the system as damage could result.
2.SEEK:Press to access the next
(
) or previous () radio
station or CD track. Press and hold
to advance/reverse in the current CD track.
Entertainment Systems
28
2011 Crown Victoria(cro)
Owners Guide, 3rd Printing
USA(fus)
Page 32 of 333
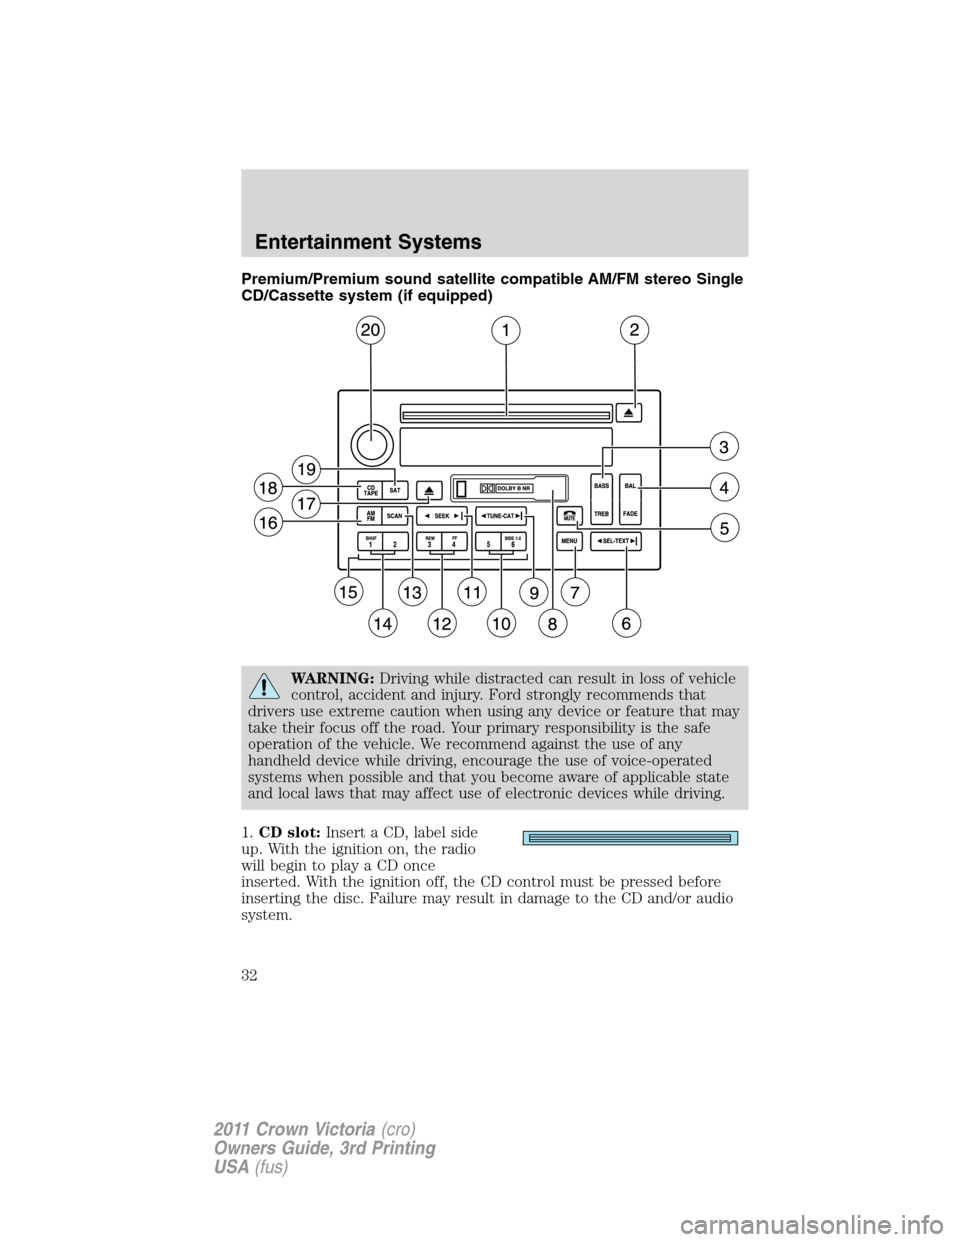
Premium/Premium sound satellite compatible AM/FM stereo Single
CD/Cassette system (if equipped)
WARNING:Driving while distracted can result in loss of vehicle
control, accident and injury. Ford strongly recommends that
drivers use extreme caution when using any device or feature that may
take their focus off the road. Your primary responsibility is the safe
operation of the vehicle. We recommend against the use of any
handheld device while driving, encourage the use of voice-operated
systems when possible and that you become aware of applicable state
and local laws that may affect use of electronic devices while driving.
1.CD slot:Insert a CD, label side
up. With the ignition on, the radio
will begin to play a CD once
inserted. With the ignition off, the CD control must be pressed before
inserting the disc. Failure may result in damage to the CD and/or audio
system.
Entertainment Systems
32
2011 Crown Victoria(cro)
Owners Guide, 3rd Printing
USA(fus)
Page 37 of 333
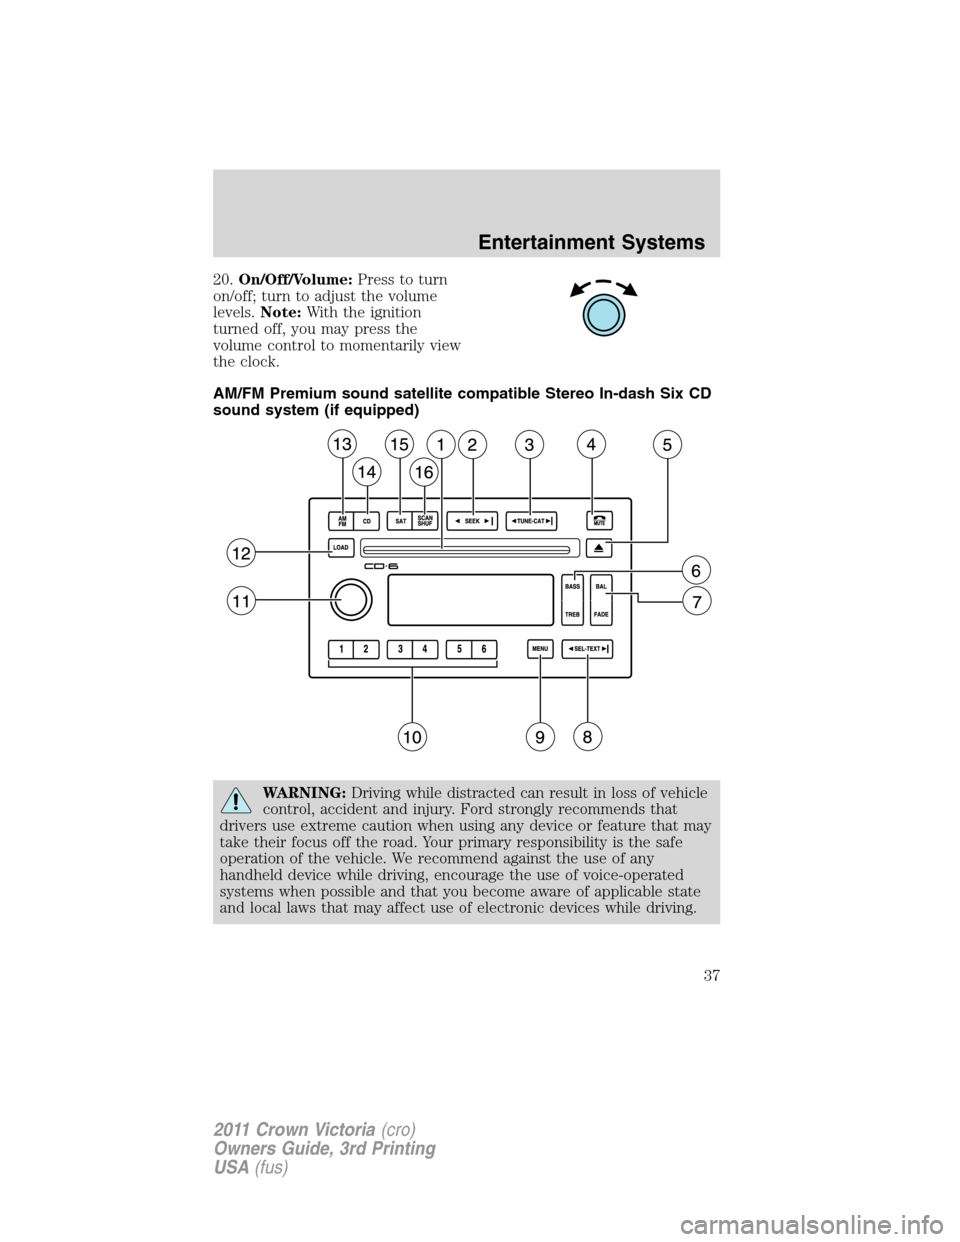
20.On/Off/Volume:Press to turn
on/off; turn to adjust the volume
levels.Note:With the ignition
turned off, you may press the
volume control to momentarily view
the clock.
AM/FM Premium sound satellite compatible Stereo In-dash Six CD
sound system (if equipped)
WARNING:Driving while distracted can result in loss of vehicle
control, accident and injury. Ford strongly recommends that
drivers use extreme caution when using any device or feature that may
take their focus off the road. Your primary responsibility is the safe
operation of the vehicle. We recommend against the use of any
handheld device while driving, encourage the use of voice-operated
systems when possible and that you become aware of applicable state
and local laws that may affect use of electronic devices while driving.
Entertainment Systems
37
2011 Crown Victoria(cro)
Owners Guide, 3rd Printing
USA(fus)
Page 38 of 333
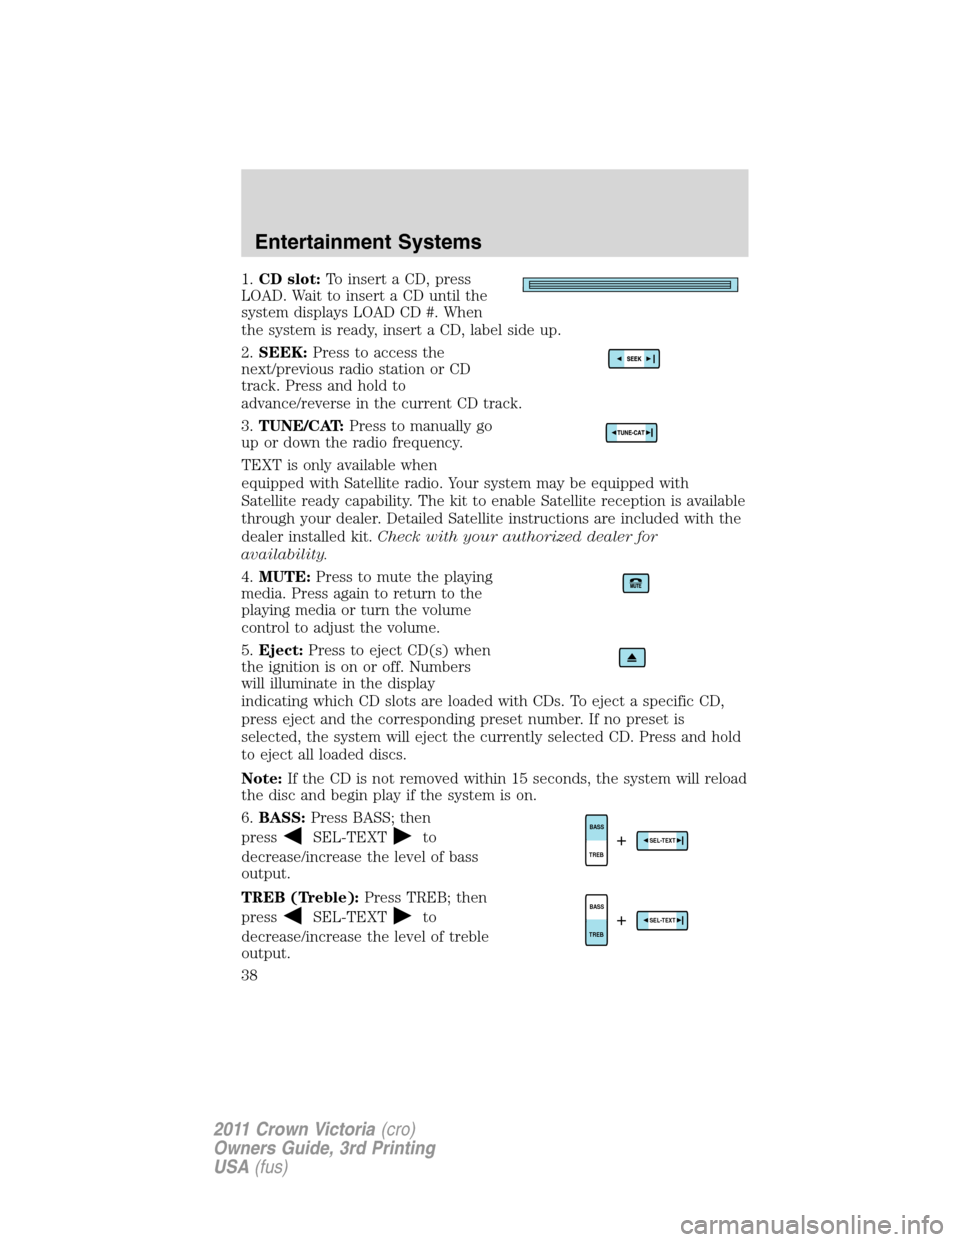
1.CD slot:To insert a CD, press
LOAD. Wait to insert a CD until the
system displays LOAD CD #. When
the system is ready, insert a CD, label side up.
2.SEEK:Press to access the
next/previous radio station or CD
track. Press and hold to
advance/reverse in the current CD track.
3.TUNE/CAT:Press to manually go
up or down the radio frequency.
TEXT is only available when
equipped with Satellite radio. Your system may be equipped with
Satellite ready capability. The kit to enable Satellite reception is available
through your dealer. Detailed Satellite instructions are included with the
dealer installed kit.Check with your authorized dealer for
availability.
4.MUTE:Press to mute the playing
media. Press again to return to the
playing media or turn the volume
control to adjust the volume.
5.Eject:Press to eject CD(s) when
the ignition is on or off. Numbers
will illuminate in the display
indicating which CD slots are loaded with CDs. To eject a specific CD,
press eject and the corresponding preset number. If no preset is
selected, the system will eject the currently selected CD. Press and hold
to eject all loaded discs.
Note:If the CD is not removed within 15 seconds, the system will reload
the disc and begin play if the system is on.
6.BASS:Press BASS; then
press
SEL-TEXTto
decrease/increase the level of bass
output.
TREB (Treble):Press TREB; then
press
SEL-TEXTto
decrease/increase the level of treble
output.
TREBBASSSEL-TEXT+
TREBBASSSEL-TEXT+
Entertainment Systems
38
2011 Crown Victoria(cro)
Owners Guide, 3rd Printing
USA(fus)
Page 50 of 333
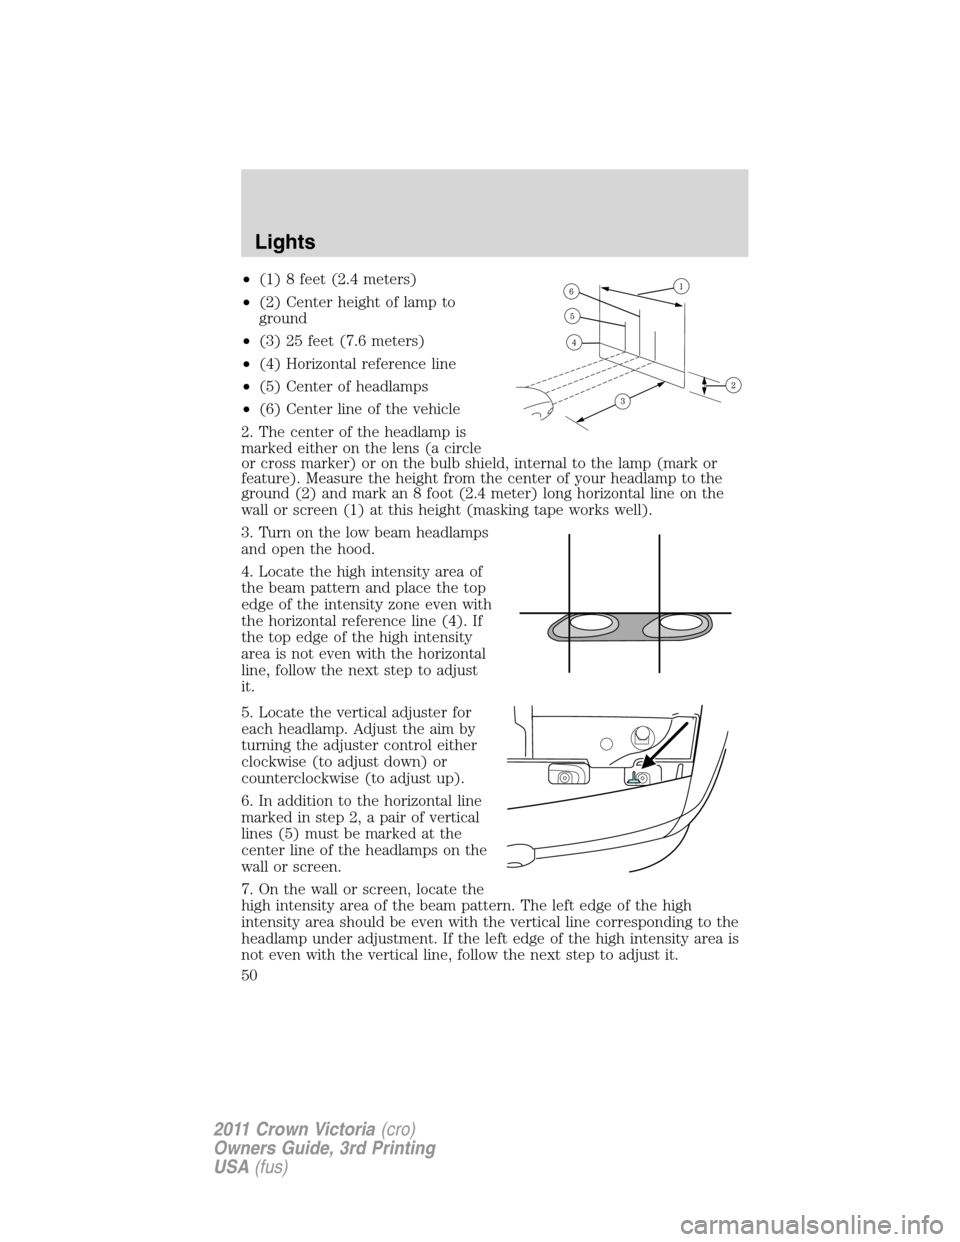
•(1) 8 feet (2.4 meters)
•(2) Center height of lamp to
ground
•(3) 25 feet (7.6 meters)
•(4) Horizontal reference line
•(5) Center of headlamps
•(6) Center line of the vehicle
2. The center of the headlamp is
marked either on the lens (a circle
or cross marker) or on the bulb shield, internal to the lamp (mark or
feature). Measure the height from the center of your headlamp to the
ground (2) and mark an 8 foot (2.4 meter) long horizontal line on the
wall or screen (1) at this height (masking tape works well).
3. Turn on the low beam headlamps
and open the hood.
4. Locate the high intensity area of
the beam pattern and place the top
edge of the intensity zone even with
the horizontal reference line (4). If
the top edge of the high intensity
area is not even with the horizontal
line, follow the next step to adjust
it.
5. Locate the vertical adjuster for
each headlamp. Adjust the aim by
turning the adjuster control either
clockwise (to adjust down) or
counterclockwise (to adjust up).
6. In addition to the horizontal line
marked in step 2, a pair of vertical
lines (5) must be marked at the
center line of the headlamps on the
wall or screen.
7. On the wall or screen, locate the
high intensity area of the beam pattern. The left edge of the high
intensity area should be even with the vertical line corresponding to the
headlamp under adjustment. If the left edge of the high intensity area is
not even with the vertical line, follow the next step to adjust it.
Lights
50
2011 Crown Victoria(cro)
Owners Guide, 3rd Printing
USA(fus)