transmission Mercury Grand Marquis 2000 s User Guide
[x] Cancel search | Manufacturer: MERCURY, Model Year: 2000, Model line: Grand Marquis, Model: Mercury Grand Marquis 2000Pages: 224, PDF Size: 1.61 MB
Page 128 of 224
Do not exceed the GVWR or the GAWR specified on the
certification label.
Do not use replacement tires with lower load carrying capacities than the
originals because they may lower the vehicle's GVWR and GAWR
limitations. Replacement tires with a higher limit than the originals do
not increase the GVWR and GAWR limitations.
The Certification Label, found on the inside pillar of the driver's door,
lists several important vehicle weight rating limitations. Before adding
any additional equipment, refer to these limitations. If you are adding
weight to the front of your vehicle, (potentially including weight added
to the cab), the weight added should not exceed the front axle reserve
capacity (FARC). Additional frontal weight may be added to the front
axle reserve capacity provided you limit your payload in other ways (i.e.
restrict the number of passengers or amount of cargo carried).
You may add equipment throughout your vehicle if the total weight
added is equal to or less than the total axle reserve capacity (TARC)
weight. You should NEVER exceed the total axle reserve capacity.
Always ensure that the weight of passengers, cargo and equipment being
carried is within the weight limitations that have been established for
your vehicle including both gross vehicle weight and front and rear gross
axle weight rating limits. Under no circumstance should these limitations
be exceeded. Exceeding any vehicle weight rating limitation could result
in serious damage to the vehicle and/or personal injury.
The weight of your loaded trailer should not exceed 907 kg (2 000 lbs).
The GCW of your vehicle and trailer should not exceed 2 993 kg (6 600
lbs).
TRAILER TOWING
Your vehicle is classified as a light duty towing vehicle. Do not tow a
trailer until your vehicle has been driven at least 3 200 km (2 000 miles).
Towing a trailer places an additional load on your vehicle's engine,
transmission, brakes, tires and suspension. Inspect these components
carefully after towing.
Your loaded trailer should weigh no more than 907 kg (2 000 lbs.).
Do not exceed the GVWR or the GAWR specified on the
certification label.
Driving
128
Page 129 of 224
Towing trailers beyond the maximum recommended gross trailer
weight could result in engine damage, transmission/axle damage,
structural damage, loss of control, and personal injury.
Preparing to tow
Use the proper equipment for towing a trailer, and make sure it is
properly attached to your vehicle. See your dealer or a reliable trailer
dealer if you require assistance.
Hitches
Do not use hitches that clamp onto the vehicle bumper. Use a load
carrying hitch. You must distribute the load in your trailer so that 10% of
the total weight of the trailer is on the tongue.
Safety chains
Always connect the trailer's safety chains to the frame or hook retainers
of the vehicle. To connect the trailer's safety chains, cross the chains
under the trailer tongue and allow slack for turning corners.
If you use a rental trailer, follow the instructions that the rental agency
gives to you.
Do not attach safety chains to the bumper.
Trailer brakes
Electric brakes and manual, automatic or surge-type trailer brakes are
safe if installed properly and adjusted to the manufacturer's
specifications. The trailer brakes must meet local and Federal
regulations.
Do not connect a trailer's hydraulic brake system directly to your
vehicle's brake system. Your vehicle may not have enough
braking power and your chances of having a collision greatly increase.
The braking system of the tow vehicle is rated for operation at the
GVWR not GCWR.
Trailer lamps
Trailer lamps are required on most towed vehicles. Make sure your
trailer lamps conform to local and Federal regulations. See your dealer or
trailer rental agency for proper instructions and equipment for hooking
up trailer lamps.
Driving
129
Page 130 of 224
Driving while you tow
When towing a trailer:
²Ensure that you turn off your speed control. The speed control may
shut off automatically when you are towing on long, steep grades.
²Consult your local motor vehicle speed regulations for towing a trailer.
²Use a lower gear when towing up or down steep hills. This will
eliminate excessive downshifting and upshifting for optimum fuel
economy and transmission cooling.
²Anticipate stops and brake gradually.
Exceeding the GCWR rating may cause internal transmission
damage and void your warranty coverage.
Servicing after towing
If you tow a trailer for long distances, your vehicle will require more
frequent service intervals. Refer to your Scheduled Maintenance guide
for more information.
Trailer towing tips
²Practice turning, stopping and backing up in an area before starting on
a trip to get the feel of the vehicle trailer combination. When turning,
make wider turns so the trailer wheels will clear curbs and other
obstacles.
²Allow more distance for stopping with a trailer attached.
²The trailer tongue weight should be 10% of the loaded trailer weight.
²After you have traveled 80 km (50 miles), thoroughly check your
hitch, electrical connections and trailer wheel lug nuts.
²When stopped in traffic for long periods of time in hot weather, place
the gearshift in P (Park) and increase idle speed. This aids engine
cooling and air conditioner efficiency.
²Vehicles with trailers should not be parked on a grade. If you must
park on a grade, place wheel chocks under the trailer's wheels.
Launching or retrieving a boat
When backing down a ramp during boat launching or retrieval,
²Do not allow the static water level to rise above the bottom edge of
the rear bumper and
Driving
130
Page 131 of 224
²Do not allow waves to break higher than 15 cm (6 inches) above the
bottom edge of the rear bumper.
Exceeding these limits may allow water to enter critical vehicle
components, adversely affecting driveability, emissions, reliability and
causing internal transmission damage.
Replace the rear axle lubricant anytime the axle has been submerged in
water. Rear axle lubricant quantities are not to be checked or changed
unless a leak is suspected or repair required.
Disconnect the wiring to the trailer before backing the trailer into the
water. Reconnect the wiring to the trailer after the trailer is removed
from the water.
Recreational towing (all wheels on the ground)
Follow these guidelines for your specific powertrain combination to tow
your vehicle with all four wheels on the ground (such as behind a
recreational vehicle).
These guidelines are designed to ensure that your transmission is not
damaged due to insufficient lubrication.
All Rear Wheel Drive (RWD) vehicles
This applies to all cars and 4x2 trucks/sport utilities with rear wheel
drive capability.
An example of recreational towing is towing your vehicle behind a
Motorhome. The following recreational towing guidelines are designed to
ensure that your transmission is not damaged.
²Place the transmission in N (Neutral).
²Maximum speed is 56 km/h (35 mph).
²Maximum distance is 80 km (50 miles).
If a distance of 80 km (50 miles) or a speed of 56 km/h (35 mph) must
be exceeded, you must disconnect the driveshaft. Ford recommends the
driveshaft be removed/installed only by a qualified technician. See your
local dealer for driveshaft removal/installation.
Improper removal/installation of the driveshaft can cause
transmission fluid loss, damage to the driveshaft and internal
transmission components.
Driving
131
Page 132 of 224
DRIVING THROUGH WATER
Do not drive quickly through standing water, especially if the depth is
unknown. Traction or brake capability may be limited and if the ignition
system gets wet, your engine may stall. Water may also enter your
engine's air intake and severely damage your engine.
If driving through deep or standing water is unavoidable, proceed very
slowly. Never drive through water that is higher than the bottom of the
hubs (for trucks) or the bottom of the wheel rims (for cars).
Once through the water, always try the brakes. Wet brakes do not stop
the vehicle as effectively as dry brakes. Drying can be improved by
moving your vehicle slowly while applying light pressure on the brake
pedal.
Driving through deep water where the transmission vent tube is
submerged may allow water into the transmission and cause
internal transmission damage.
Driving
132
Page 138 of 224
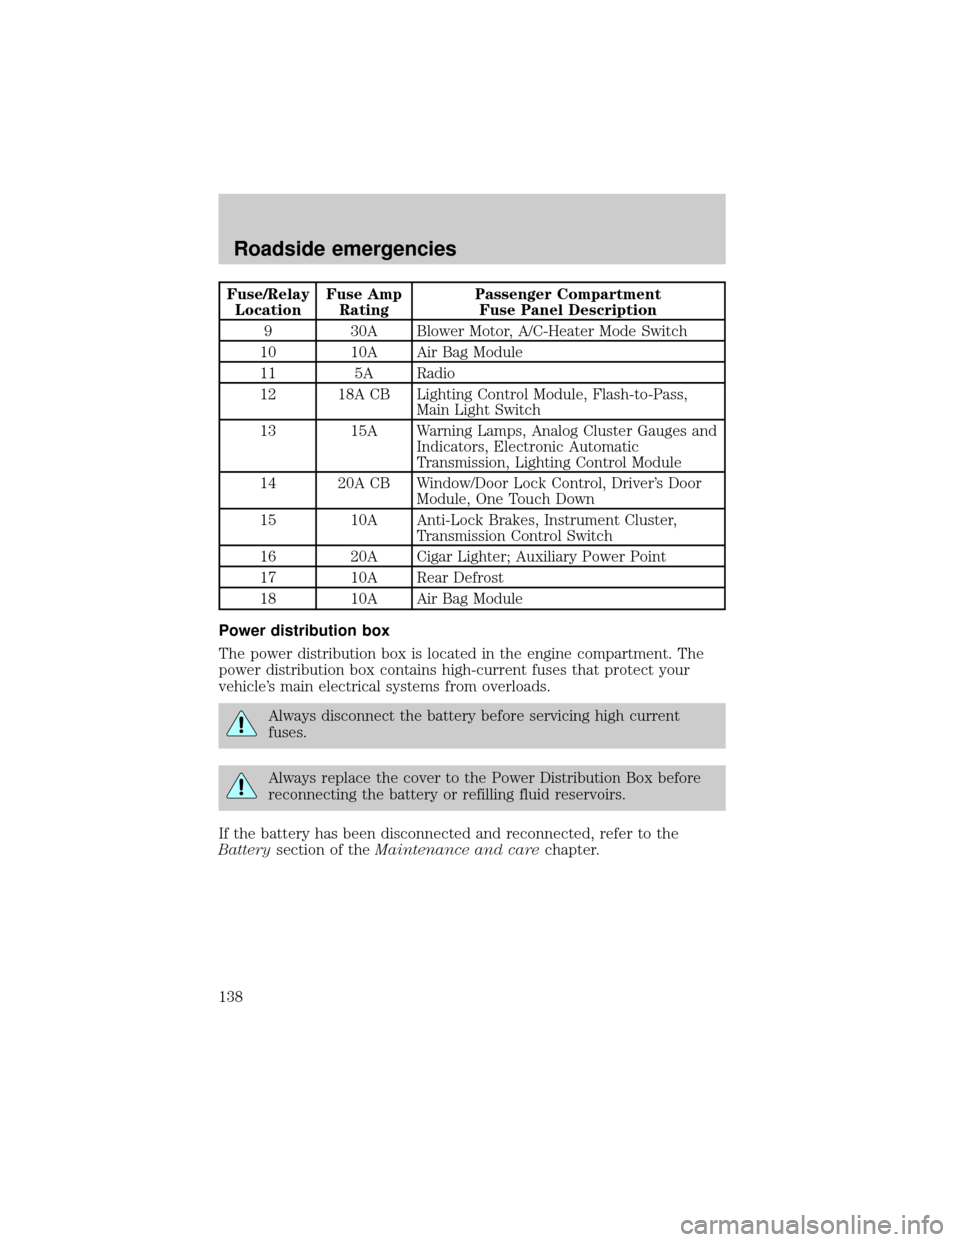
Fuse/Relay
LocationFuse Amp
RatingPassenger Compartment
Fuse Panel Description
9 30A Blower Motor, A/C-Heater Mode Switch
10 10A Air Bag Module
11 5A Radio
12 18A CB Lighting Control Module, Flash-to-Pass,
Main Light Switch
13 15A Warning Lamps, Analog Cluster Gauges and
Indicators, Electronic Automatic
Transmission, Lighting Control Module
14 20A CB Window/Door Lock Control, Driver's Door
Module, One Touch Down
15 10A Anti-Lock Brakes, Instrument Cluster,
Transmission Control Switch
16 20A Cigar Lighter; Auxiliary Power Point
17 10A Rear Defrost
18 10A Air Bag Module
Power distribution box
The power distribution box is located in the engine compartment. The
power distribution box contains high-current fuses that protect your
vehicle's main electrical systems from overloads.
Always disconnect the battery before servicing high current
fuses.
Always replace the cover to the Power Distribution Box before
reconnecting the battery or refilling fluid reservoirs.
If the battery has been disconnected and reconnected, refer to the
Batterysection of theMaintenance and carechapter.
Roadside emergencies
138
Page 145 of 224
Do not attempt to push start your vehicle. Automatic
transmissions do not have push-start capability.
Preparing your vehicle
1.Use only a 12±volt supply to start your vehicle.
2. Do not disconnect the battery of the disabled vehicle as this could
damage the vehicle's electrical system.
3. Park the booster vehicle close to the hood of the disabled vehicle
making sure the two vehiclesdo nottouch. Set the parking brake on
both vehicles and stay clear of the engine cooling fan and other moving
parts.
4. Check all battery terminals and remove any excessive corrosion before
you attach the battery cables. Ensure that vent caps are tight and level.
5. Turn the heater fan on in both vehicles to protect any electrical
surges. Turn all other accessories off.
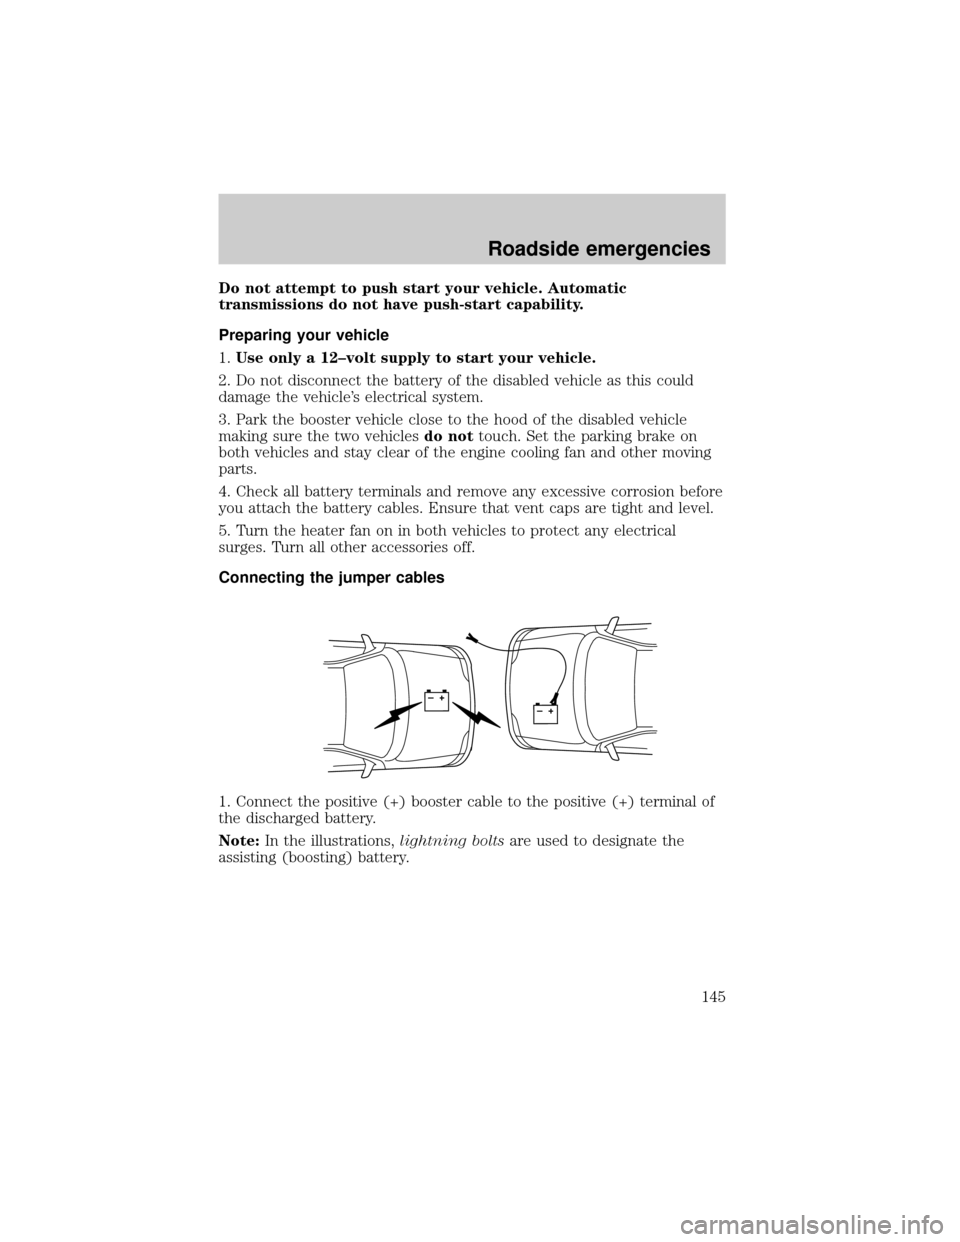
Connecting the jumper cables
1. Connect the positive (+) booster cable to the positive (+) terminal of
the discharged battery.
Note:In the illustrations,lightning boltsare used to designate the
assisting (boosting) battery.
+–+–
Roadside emergencies
145
Page 152 of 224

IDENTIFYING COMPONENTS IN THE ENGINE COMPARTMENT
4.6L SOHC V8 engine
1. Brake fluid reservoir
2. Engine oil dipstick
3. Engine oil filler cap
4. Windshield washer fluid reservoir
5. Air filter assembly
6. Power steering fluid reservoir
7. Engine coolant reservoir
8. Battery
9. Automatic transmission fluid dipstick
912
3
6578
4
Maintenance and care
152
Page 164 of 224
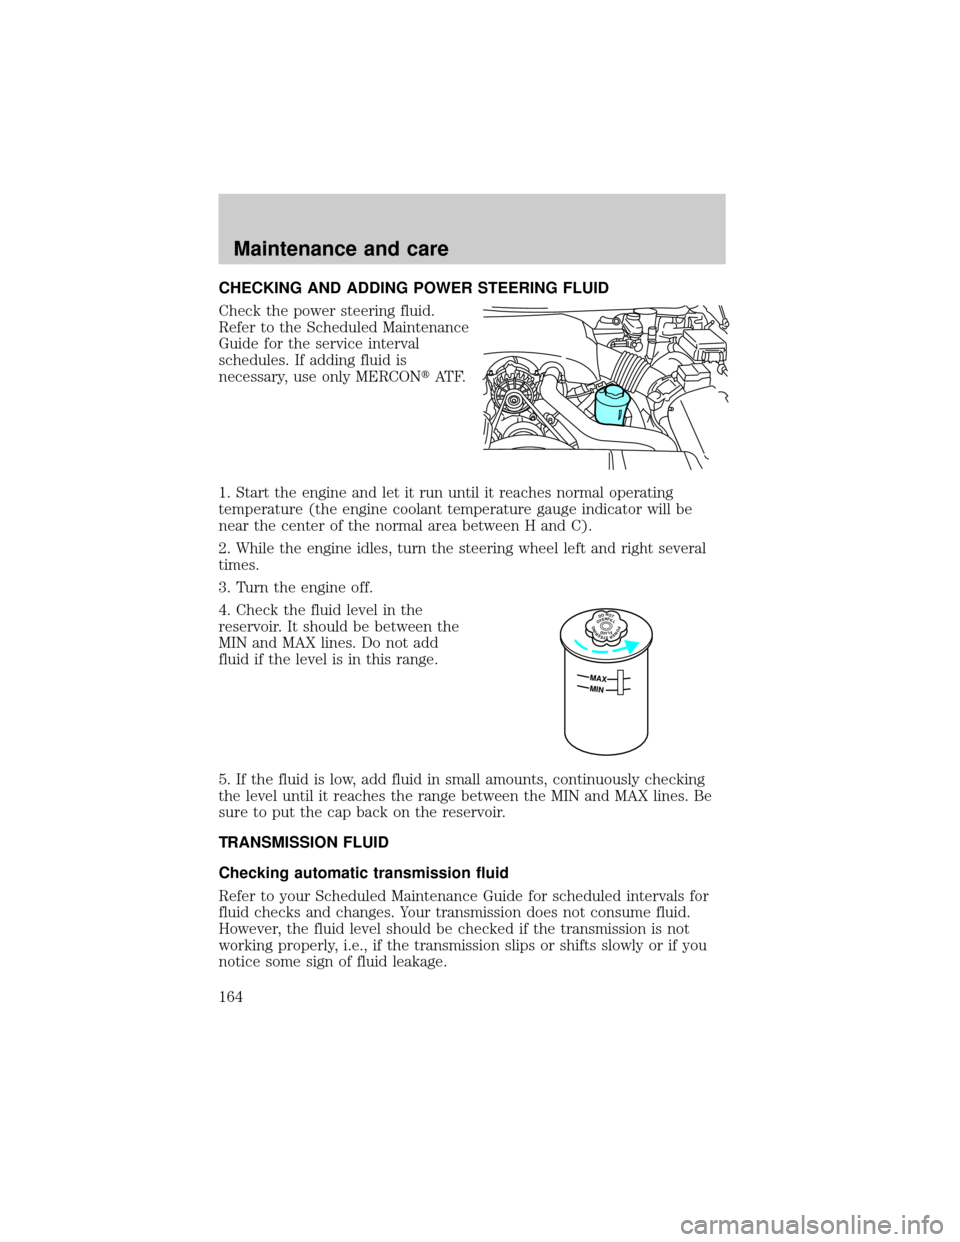
CHECKING AND ADDING POWER STEERING FLUID
Check the power steering fluid.
Refer to the Scheduled Maintenance
Guide for the service interval
schedules. If adding fluid is
necessary, use only MERCONtAT F.
1. Start the engine and let it run until it reaches normal operating
temperature (the engine coolant temperature gauge indicator will be
near the center of the normal area between H and C).
2. While the engine idles, turn the steering wheel left and right several
times.
3. Turn the engine off.
4. Check the fluid level in the
reservoir. It should be between the
MIN and MAX lines. Do not add
fluid if the level is in this range.
5. If the fluid is low, add fluid in small amounts, continuously checking
the level until it reaches the range between the MIN and MAX lines. Be
sure to put the cap back on the reservoir.
TRANSMISSION FLUID
Checking automatic transmission fluid
Refer to your Scheduled Maintenance Guide for scheduled intervals for
fluid checks and changes. Your transmission does not consume fluid.
However, the fluid level should be checked if the transmission is not
working properly, i.e., if the transmission slips or shifts slowly or if you
notice some sign of fluid leakage.
DONOTOVERFILLPOWERSTEERINGFLUID
MAX
MIN
Maintenance and care
164
Page 165 of 224

Automatic transmission fluid expands when warmed. To obtain an
accurate fluid check, drive the vehicle until it is at normal operating
temperature (approximately 30 km [20 miles]). If your vehicle has been
operated for an extended period at high speeds, in city traffic during hot
weather or pulling a trailer, the vehicle should be turned off for about 30
minutes to allow fluid to cool before checking.
1. Drive the vehicle 30 km (20 miles) or until it reaches normal operating
temperature.
2. Park the vehicle on a level surface and engage the parking brake.
3. With the parking brake engaged and your foot on the brake pedal,
start the engine and move the gearshift lever through all of the gear
ranges. Allow sufficient time for each gear to engage.
4. Latch the gearshift lever in P (Park) and leave the engine running.
5. Remove the dipstick, wiping it clean with a clean, dry lint free rag. If
necessary, refer toIdentifying components in the engine compartment
in this chapter for the location of the dipstick.
6. Install the dipstick making sure it is fully seated in the filler tube.
7. Remove the dipstick and inspect the fluid level. The fluid should be in
the designated area for normal operating temperature or ambient
temperature.
Low fluid level
Do not drive the vehicle if the fluid
level is at the bottom of the dipstick
and the ambient temperature is
above 10ÉC (50ÉF).
Correct fluid level
The transmission fluid should be checked at normal operating
temperature 66ÉC-77ÉC (150ÉF-170ÉF) on a level surface. The normal
operating temperature can be reached after approximately 30 km (20
miles) of driving.
You can check the fluid without driving if the ambient temperature is
above 10ÉC (50ÉF). However, if fluid is added at this time, an overfill
condition could result when the vehicle reaches normal operating
temperature.
DON’T ADD
Maintenance and care
165