headlamp Mercury Grand Marquis 2004 s User Guide
[x] Cancel search | Manufacturer: MERCURY, Model Year: 2004, Model line: Grand Marquis, Model: Mercury Grand Marquis 2004Pages: 240, PDF Size: 1.92 MB
Page 43 of 240
Replacing front parking/cornering/turn signal lamp bulbs
The park/turn/cornering lamp bulbs can be replaced with out removing
the headlamp assembly.
1. Make sure headlamp switch is in OFF position, then open the hood.
2. Remove the three pin type retainers and the radiator shield.
3. Loosen the parking lamp attachments, on the back side of the lamp,
and pull the lamp assembly forward.
4. Remove the bulb from the side turn lamp assembly.
5. Disconnect the electrical connector from the bulb and replace the
bulb.
Note: The parking lamp/turn signal bulbs should not be removed from
the lamp until just before a replacement bulb is installed. Removing the
bulb for an extended period of time may affect headlamp bulb
performance. Contaminants may enter the headlamp where they can
settle on the lens and reflector. Never turn the lamps on with the bulb
removed.
6. To install, reverse the order of the removal procedure.
Replacing tail lamp/brake/turn lamp bulbs
The tail lamp, the brake lamp and the turn signal lamp bulbs are located
in the tail lamp assembly. Follow the same steps to replace either bulb.
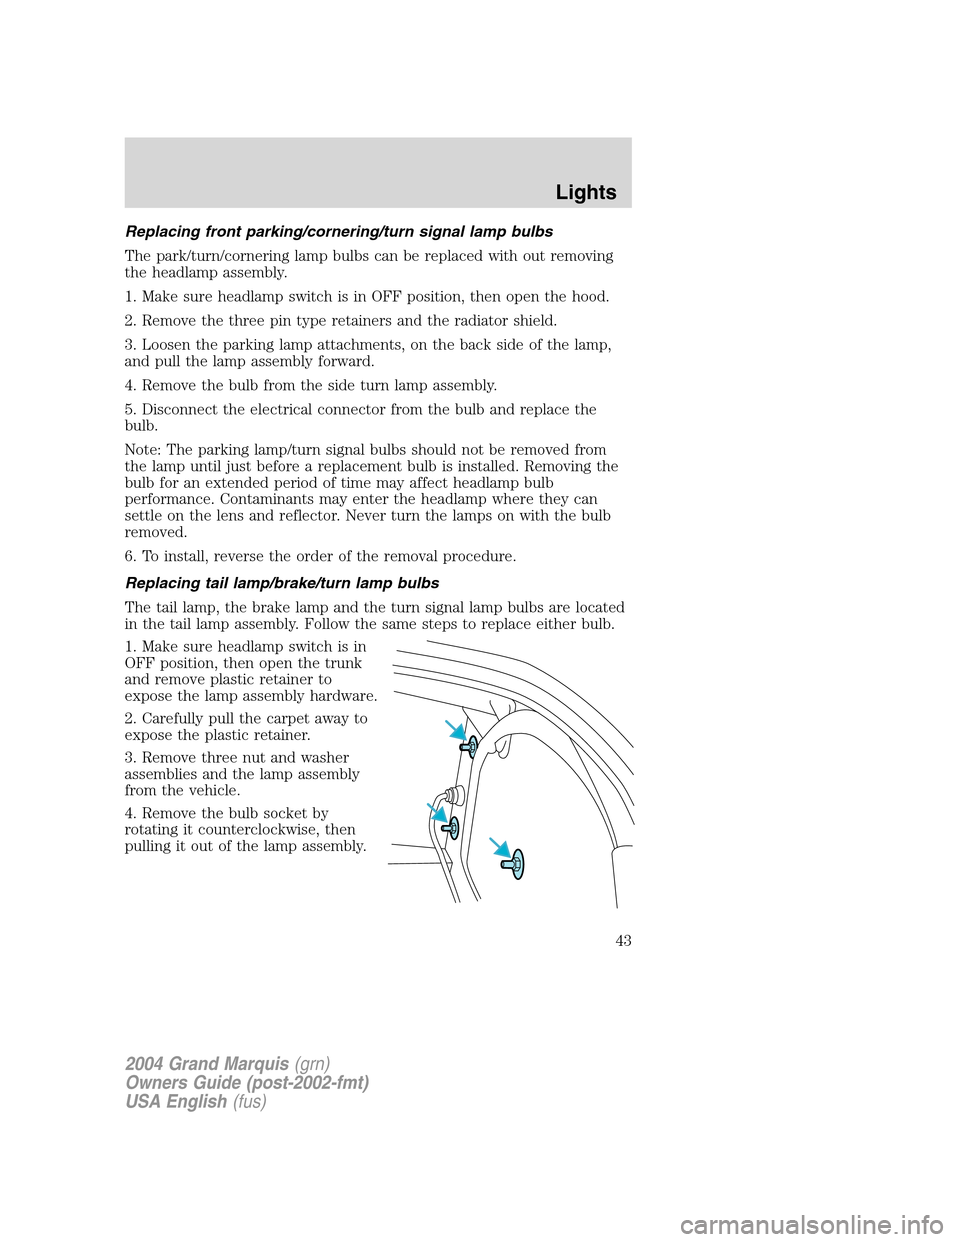
1. Make sure headlamp switch is in
OFF position, then open the trunk
and remove plastic retainer to
expose the lamp assembly hardware.
2. Carefully pull the carpet away to
expose the plastic retainer.
3. Remove three nut and washer
assemblies and the lamp assembly
from the vehicle.
4. Remove the bulb socket by
rotating it counterclockwise, then
pulling it out of the lamp assembly.
2004 Grand Marquis(grn)
Owners Guide (post-2002-fmt)
USA English(fus)
Lights
43
Page 44 of 240
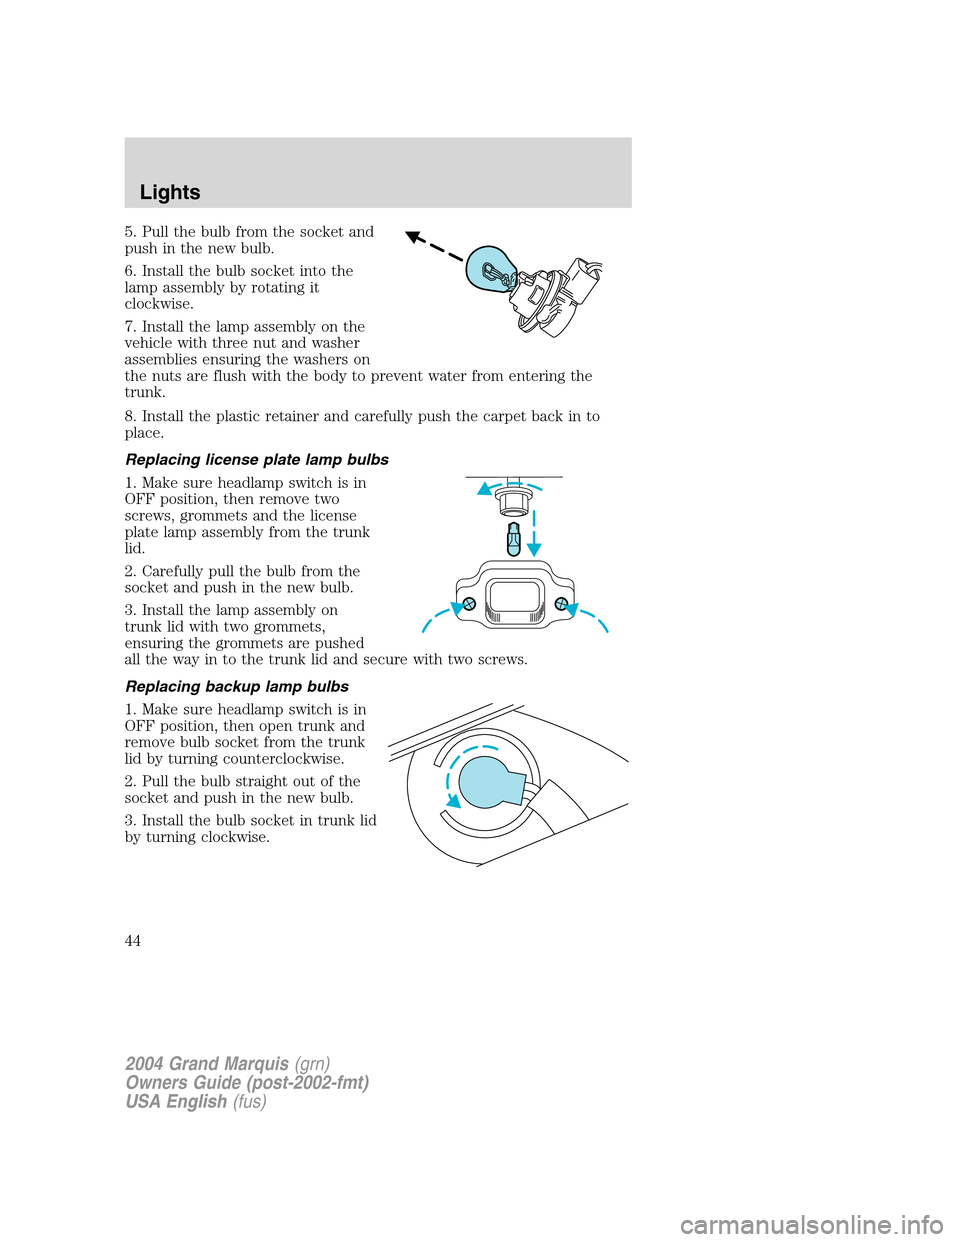
5. Pull the bulb from the socket and
push in the new bulb.
6. Install the bulb socket into the
lamp assembly by rotating it
clockwise.
7. Install the lamp assembly on the
vehicle with three nut and washer
assemblies ensuring the washers on
the nuts are flush with the body to prevent water from entering the
trunk.
8. Install the plastic retainer and carefully push the carpet back in to
place.
Replacing license plate lamp bulbs
1. Make sure headlamp switch is in
OFF position, then remove two
screws, grommets and the license
plate lamp assembly from the trunk
lid.
2. Carefully pull the bulb from the
socket and push in the new bulb.
3. Install the lamp assembly on
trunk lid with two grommets,
ensuring the grommets are pushed
all the way in to the trunk lid and secure with two screws.
Replacing backup lamp bulbs
1. Make sure headlamp switch is in
OFF position, then open trunk and
remove bulb socket from the trunk
lid by turning counterclockwise.
2. Pull the bulb straight out of the
socket and push in the new bulb.
3. Install the bulb socket in trunk lid
by turning clockwise.
2004 Grand Marquis(grn)
Owners Guide (post-2002-fmt)
USA English(fus)
Lights
44
Page 45 of 240
Replacing high-mount brakelamp bulbs
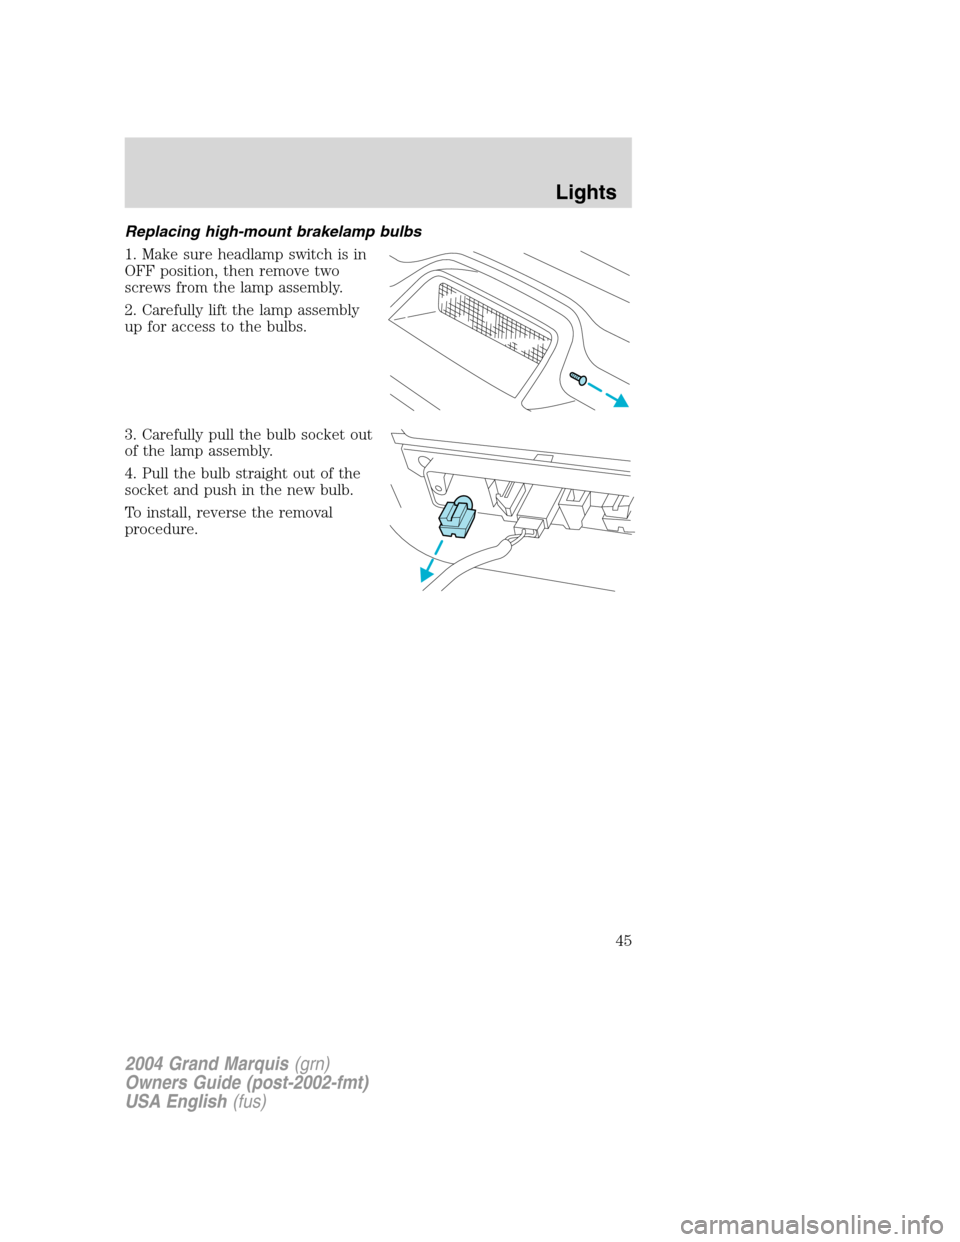
1. Make sure headlamp switch is in
OFF position, then remove two
screws from the lamp assembly.
2. Carefully lift the lamp assembly
up for access to the bulbs.
3. Carefully pull the bulb socket out
of the lamp assembly.
4. Pull the bulb straight out of the
socket and push in the new bulb.
To install, reverse the removal
procedure.
2004 Grand Marquis(grn)
Owners Guide (post-2002-fmt)
USA English(fus)
Lights
45
Page 46 of 240
MULTI-FUNCTION LEVER
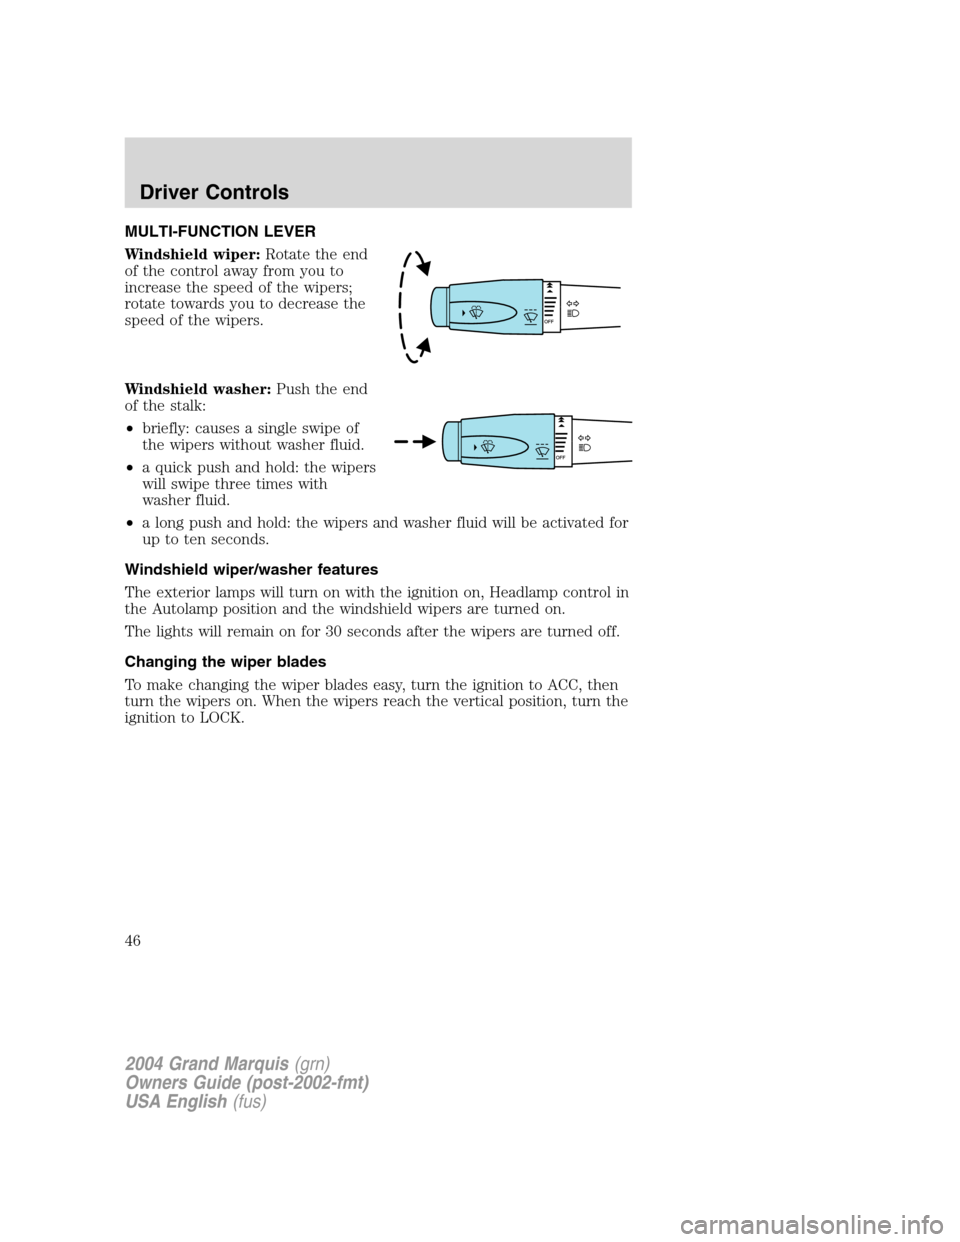
Windshield wiper:Rotate the end
of the control away from you to
increase the speed of the wipers;
rotate towards you to decrease the
speed of the wipers.
Windshield washer:Push the end
of the stalk:
•briefly: causes a single swipe of
the wipers without washer fluid.
•a quick push and hold: the wipers
will swipe three times with
washer fluid.
•a long push and hold: the wipers and washer fluid will be activated for
up to ten seconds.
Windshield wiper/washer features
The exterior lamps will turn on with the ignition on, Headlamp control in
the Autolamp position and the windshield wipers are turned on.
The lights will remain on for 30 seconds after the wipers are turned off.
Changing the wiper blades
To make changing the wiper blades easy, turn the ignition to ACC, then
turn the wipers on. When the wipers reach the vertical position, turn the
ignition to LOCK.
2004 Grand Marquis(grn)
Owners Guide (post-2002-fmt)
USA English(fus)
Driver Controls
Driver Controls
46
Page 102 of 240

•The parklamps/headlamps are in OFF position (If vehicle is equipped
with Autolamps, this will not affect the procedure.)
To reduce the risk of injury, do not deactivate/activate the Belt
Minder feature while driving the vehicle.
1. Turn the ignition switch to the RUN (or ON) position. (DO NOT
START THE ENGINE)
2. Wait until the safety belt warning light turns off. (Approximately 1–2
minutes)
•Steps 3–5 must be completed within 60 seconds or the procedure will
have to be repeated.
3. Buckle then unbuckle the safety belt three times, ending with the
safety belt unbuckled. This can be done before or during BeltMinder
warning activation.
4. Turn on the parklamps/headlamps, turn off the parklamps/headlamps.
5. Buckle then unbuckle the safety belt three times, ending with the
safety belt unbuckled.
•After step 5 the safety belt warning light will be turned on for three
seconds.
6. Within seven seconds of the safety belt warning light turning off,
buckle then unbuckle the safety belt.
•This will disable BeltMinder if it is currently enabled, or enable
BeltMinder if it is currently disabled.
7. Confirmation of disabling BeltMinder is provided by flashing the safety
belt warning light four times per second for three seconds.
8. Confirmation of enabling BeltMinder is provided by flashing the safety
belt warning light four times per second for three seconds, followed by
three seconds with the safety belt warning light off, then followed by
flashing the safety belt warning light four times per second for three
seconds again.
9. After receiving confirmation, the deactivation/activation procedure is
complete.
2004 Grand Marquis(grn)
Owners Guide (post-2002-fmt)
USA English(fus)
Seating and Safety Restraints
102
Page 124 of 240
Do not park, idle, or drive your vehicle in dry grass or other dry
ground cover. The emission system heats up the engine
compartment and exhaust system, which can start a fire.
Do not start your vehicle in a closed garage or in other enclosed
areas. Exhaust fumes can be toxic. Always open the garage door
before you start the engine. SeeGuarding against exhaust fumesin
this chapter for more instructions.
If you smell exhaust fumes inside your vehicle, have your dealer
inspect your vehicle immediately. Do not drive if you smell
exhaust fumes.
Important safety precautions
A computer system controls the engine’s idle revolutions per minute
(RPM). When the engine starts, the idle RPM runs higher than normal in
order to warm the engine. If the engine idle speed does not slow down
automatically, have the vehicle checked. Do not allow the vehicle to idle
for more than 10 minutes at the higher engine RPM.
Before starting the vehicle:
1. Make sure all vehicle occupants have buckled their safety belts. For
more information on safety belts and their proper usage, refer to the
Seating and Safety Restraintschapter.
2. Make sure the headlamps and vehicle accessories are off.
3. Make sure the gearshift is in P
(Park).
2004 Grand Marquis(grn)
Owners Guide (post-2002-fmt)
USA English(fus)
Driving
124
Page 150 of 240
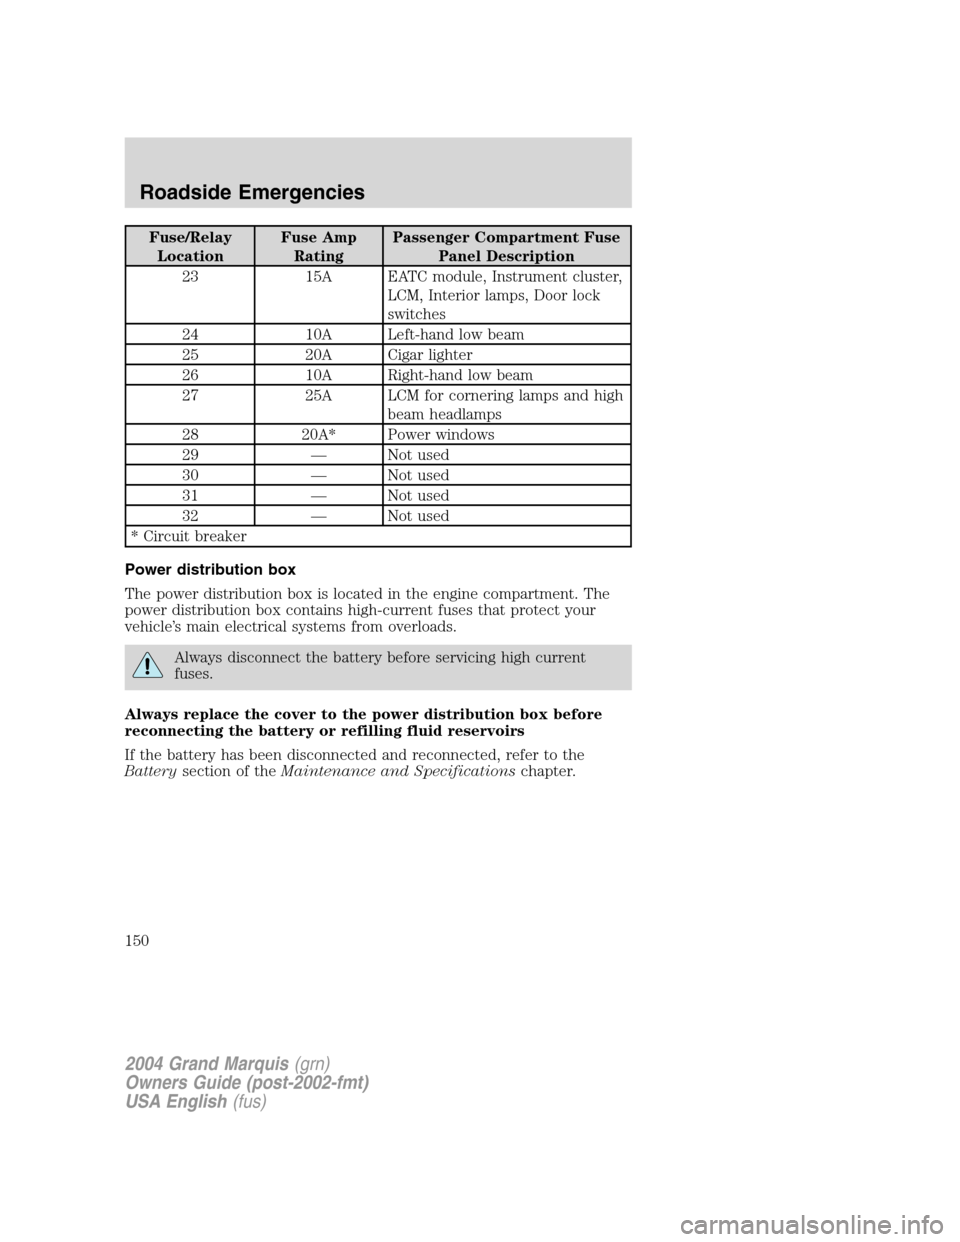
Fuse/Relay
LocationFuse Amp
RatingPassenger Compartment Fuse
Panel Description
23 15A EATC module, Instrument cluster,
LCM, Interior lamps, Door lock
switches
24 10A Left-hand low beam
25 20A Cigar lighter
26 10A Right-hand low beam
27 25A LCM for cornering lamps and high
beam headlamps
28 20A* Power windows
29—Not used
30—Not used
31—Not used
32—Not used
* Circuit breaker
Power distribution box
The power distribution box is located in the engine compartment. The
power distribution box contains high-current fuses that protect your
vehicle’s main electrical systems from overloads.
Always disconnect the battery before servicing high current
fuses.
Always replace the cover to the power distribution box before
reconnecting the battery or refilling fluid reservoirs
If the battery has been disconnected and reconnected, refer to the
Batterysection of theMaintenance and Specificationschapter.
2004 Grand Marquis(grn)
Owners Guide (post-2002-fmt)
USA English(fus)
Roadside Emergencies
150
Page 233 of 240
MERCURY ACCESSORIES FOR YOUR VEHICLE
A wide selection of genuine Mercury accessories are available for your
vehicle through your local authorized Mercury or Ford of Canada dealer.
These quality accessories have been specifically engineered to fulfill your
automotive needs; they are custom designed to complement the style
and aerodynamic appearance of your vehicle. In addition, each accessory
is made from high quality materials and meets or exceeds Mercury’s
rigorous engineering and safety specifications. Ford Motor Company will
repair or replace any properly dealer-installed Mercury accessory found
to be defective in factory-supplied materials or workmanship during the
warranty period, as well as any component damaged by the defective
accessory. The accessory will be warranted for whichever provides you
the greatest benefit:
•12 months or 20,000 km (12,000 miles) (whichever occurs first), or
•the remainder of your new vehicle limited warranty.
This means that genuine Mercury accessories purchased along with your
new vehicle and installed by the dealer are covered for the full length of
your New Vehicle’s Limited Warranty—3 years or 60,000 km (36,000 miles)(whichever occurs first). Contact your dealer for details and a copy of
the warranty.
Not all accessories are available for all models.
Following is a list of several Mercury Genuine Accessory products. Not
all accessories are available for all models. To find out what accessories
are available for your vehicle, please contact your dealer or visit our
online store at: www.mercuryaccessories.com.
Exterior style
Bug shields
Deflectors
Exterior trim kits
Front end covers
Grille inserts
Headlamps, fog lights and Daytime Running Lamps (DRLs)
Splash guards
Wheels
Interior style
Cell phone holders
Electrochromatic compass/temperature interior mirrors
2004 Grand Marquis(grn)
Owners Guide (post-2002-fmt)
USA English(fus)
Accessories
Accessories
233
Page 237 of 240
recommendations ...................187
refill capacities ........................225
specifications ..................226, 228
Exhaust fumes ..........................127
F
Fail safe cooling ........................195
Floor mats ...................................71
Fluid capacities .........................225
Fuel ............................................196
calculating fuel
economy ............................52, 201
cap ...........................................198
capacity ...................................225
choosing the right fuel ...........199
comparisons with EPA fuel
economy estimates .................204
detergent in fuel .....................200
filling your vehicle
with fuel ..................196, 198, 201
filter, specifications ........201, 224
fuel pump shut-off switch .....145
improving fuel economy ........201
octane rating ...................200, 228
quality ......................................200
running out of fuel .................200
safety information relating to
automotive fuels .....................196
Fuses ..................................146–147
G
Garage Door Opener
(see Homelink wireless control
system) ........................................63
Gas cap (see Fuel cap) ............198
Gas mileage
(see Fuel economy) .................201
Gauges .........................................15H
Hazard flashers .........................145
Head restraints ...........................86
Headlamps ...................................36
aiming ........................................38
autolamp system .......................36
bulb specifications ....................40
daytime running lights .............36
flash to pass ..............................37
high beam .................................37
replacing bulbs .........................41
turning on and off ....................36
Heating
heating and air conditioning
system .................................32–33
HomeLink universal
transceiver (see
Garage door opener) ............53, 66
Homelink wireless control
system ..........................................63
Hood ..........................................182
I
Ignition ...............................123, 228
Infant seats
(see Safety seats) .....................114
Inspection/maintenance
(I/M) testing ..............................206
Instrument panel
cleaning ...................................178
cluster ........................................10
lighting up panel
and interior ...............................37
J
Jack ............................................153
Index
237
Page 238 of 240
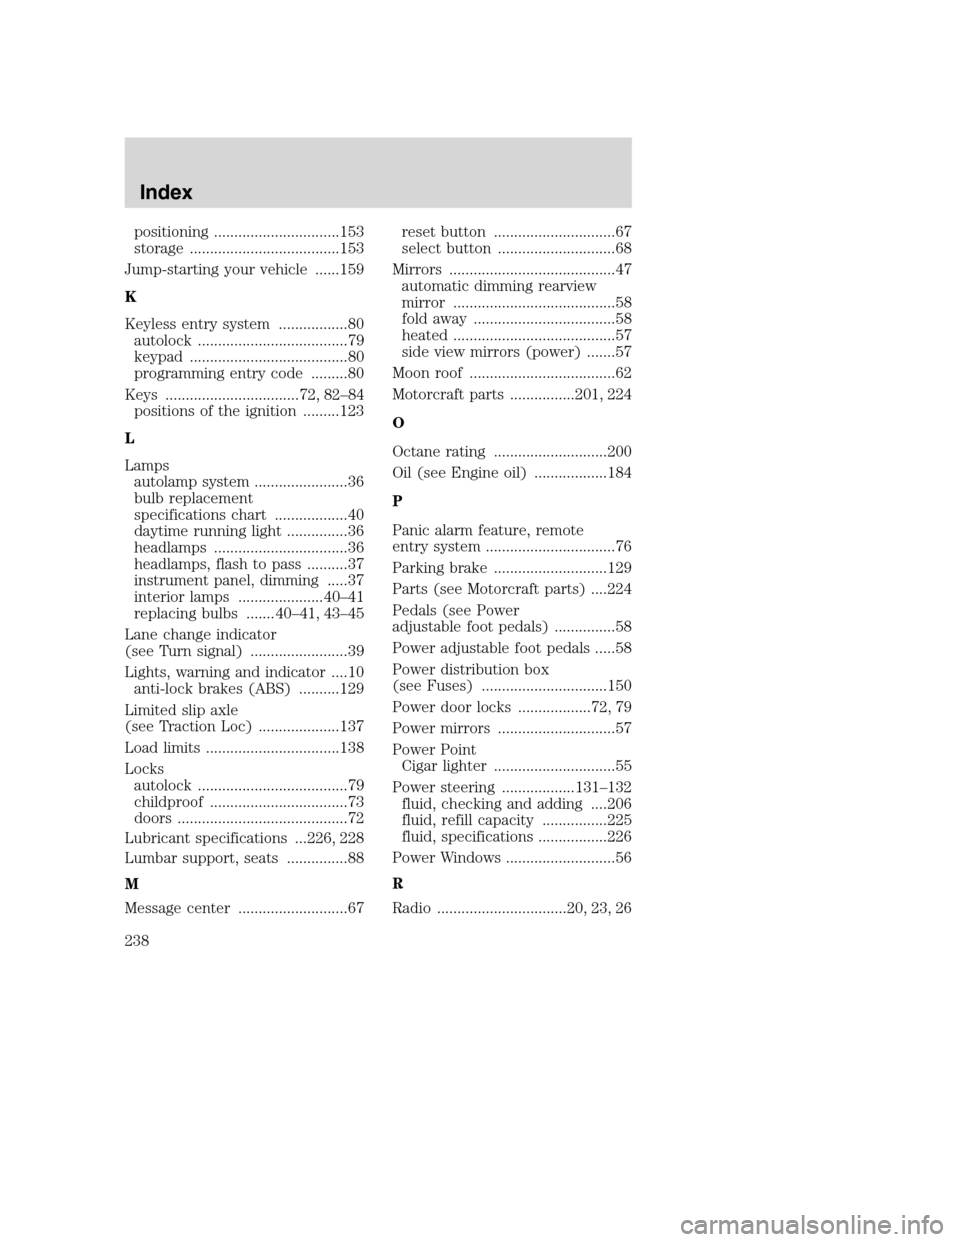
positioning ...............................153
storage .....................................153
Jump-starting your vehicle ......159
K
Keyless entry system .................80
autolock .....................................79
keypad .......................................80
programming entry code .........80
Keys .................................72, 82–84
positions of the ignition .........123
L
Lamps
autolamp system .......................36
bulb replacement
specifications chart ..................40
daytime running light ...............36
headlamps .................................36
headlamps, flash to pass ..........37
instrument panel, dimming .....37
interior lamps .....................40–41
replacing bulbs ....... 40–41, 43–45
Lane change indicator
(see Turn signal) ........................39
Lights, warning and indicator ....10
anti-lock brakes (ABS) ..........129
Limited slip axle
(see Traction Loc) ....................137
Load limits .................................138
Locks
autolock .....................................79
childproof ..................................73
doors ..........................................72
Lubricant specifications ...226, 228
Lumbar support, seats ...............88
M
Message center ...........................67reset button ..............................67
select button .............................68
Mirrors .........................................47
automatic dimming rearview
mirror ........................................58
fold away ...................................58
heated ........................................57
side view mirrors (power) .......57
Moon roof ....................................62
Motorcraft parts ................201, 224
O
Octane rating ............................200
Oil (see Engine oil) ..................184
P
Panic alarm feature, remote
entry system ................................76
Parking brake ............................129
Parts (see Motorcraft parts) ....224
Pedals (see Power
adjustable foot pedals) ...............58
Power adjustable foot pedals .....58
Power distribution box
(see Fuses) ...............................150
Power door locks ..................72, 79
Power mirrors .............................57
Power Point
Cigar lighter ..............................55
Power steering ..................131–132
fluid, checking and adding ....206
fluid, refill capacity ................225
fluid, specifications .................226
Power Windows ...........................56
R
Radio ................................20, 23, 26
Index
238