headlamp Mercury Grand Marquis 2004 Owner's Manuals
[x] Cancel search | Manufacturer: MERCURY, Model Year: 2004, Model line: Grand Marquis, Model: Mercury Grand Marquis 2004Pages: 240, PDF Size: 1.92 MB
Page 1 of 240
Introduction 4
Instrument Cluster 10
Warning and control lights 10
Gauges 15
Entertainment Systems 20
AM/FM stereo cassette with CD 20
AM/FM stereo with CD 23
AM/FM stereo cassette 26
CD changer 29
Climate Controls 32
Manual heating and air conditioning 32
Electronic automatic temperature control 33
Rear window defroster 35
Lights 36
Headlamps 36
Turn signal control 39
Bulb replacement 40
Driver Controls 46
Windshield wiper/washer control 46
Steering wheel adjustment 47
Power windows 56
Mirrors 57
Speed control 59
Message center 67
Locks and Security 72
Keys 72
Locks 72
Anti-theft system 74
Table of Contents
1
Page 13 of 240
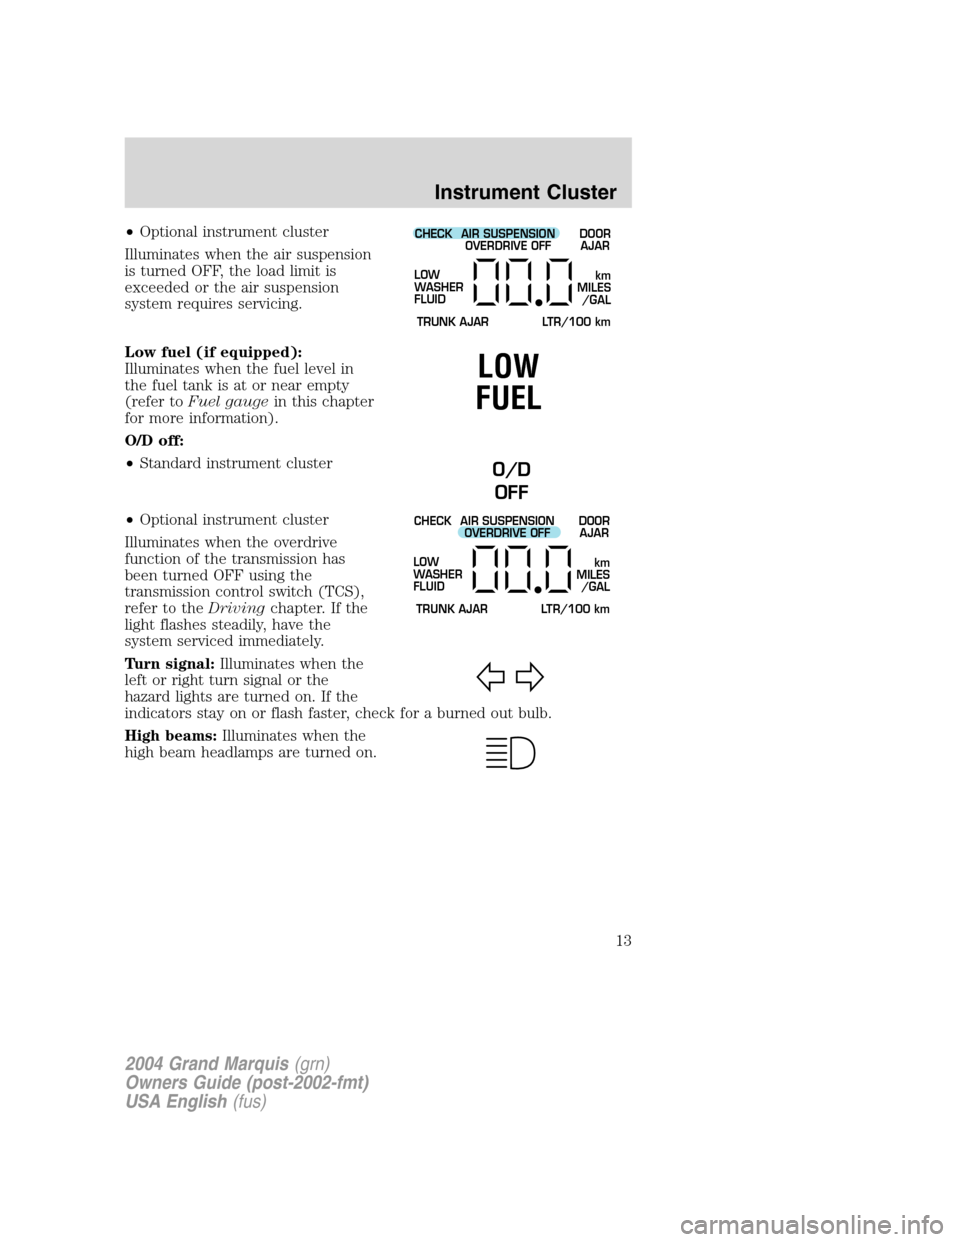
•Optional instrument cluster
Illuminates when the air suspension
is turned OFF, the load limit is
exceeded or the air suspension
system requires servicing.
Low fuel (if equipped):
Illuminates when the fuel level in
the fuel tank is at or near empty
(refer toFuel gaugein this chapter
for more information).
O/D off:
•Standard instrument cluster
•Optional instrument cluster
Illuminates when the overdrive
function of the transmission has
been turned OFF using the
transmission control switch (TCS),
refer to theDrivingchapter. If the
light flashes steadily, have the
system serviced immediately.
Turn signal:Illuminates when the
left or right turn signal or the
hazard lights are turned on. If the
indicators stay on or flash faster, check for a burned out bulb.
High beams:Illuminates when the
high beam headlamps are turned on.CHECK
TRUNK AJAR LTR/100 kmAIR SUSPENSION
OVERDRIVE OFFDOOR
AJAR
LOW
WASHER
FLUID
km
MILES
/GAL
LOW
FUEL
O/D
OFF
CHECK
TRUNK AJAR LTR/100 kmAIR SUSPENSION
OVERDRIVE OFFDOOR
AJAR
LOW
WASHER
FLUID
km
MILES
/GAL
2004 Grand Marquis(grn)
Owners Guide (post-2002-fmt)
USA English(fus)
Instrument Cluster
13
Page 14 of 240
MESSAGE CENTER INDICATOR LIGHTS (IF EQUIPPED)
Speed control:This light comes on
when either the SET/ACCEL or
RESUME controls are pressed. It
turns off when the speed control OFF control is pressed, the brake is
applied or the ignition is turned to the OFF position.
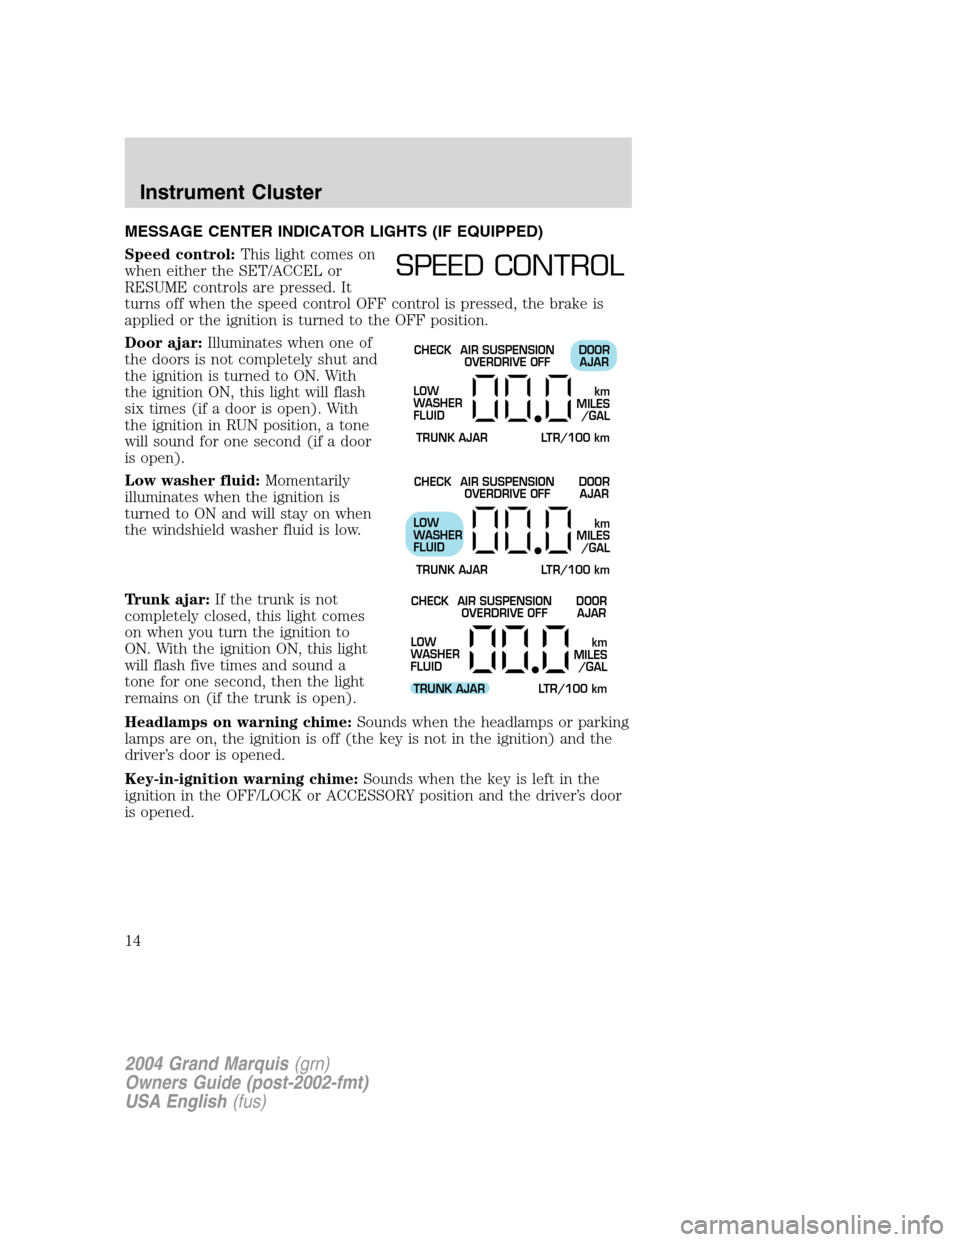
Door ajar:Illuminates when one of
the doors is not completely shut and
the ignition is turned to ON. With
the ignition ON, this light will flash
six times (if a door is open). With
the ignition in RUN position, a tone
will sound for one second (if a door
is open).
Low washer fluid:Momentarily
illuminates when the ignition is
turned to ON and will stay on when
the windshield washer fluid is low.
Trunk ajar:If the trunk is not
completely closed, this light comes
on when you turn the ignition to
ON. With the ignition ON, this light
will flash five times and sound a
tone for one second, then the light
remains on (if the trunk is open).
Headlamps on warning chime:Sounds when the headlamps or parking
lamps are on, the ignition is off (the key is not in the ignition) and the
driver’s door is opened.
Key-in-ignition warning chime:Sounds when the key is left in the
ignition in the OFF/LOCK or ACCESSORY position and the driver’s door
is opened.
SPEED CONTROL
CHECK
TRUNK AJAR LTR/100 kmAIR SUSPENSION
OVERDRIVE OFFDOOR
AJAR
LOW
WASHER
FLUID
km
MILES
/GAL
CHECK
TRUNK AJAR LTR/100 kmAIR SUSPENSION
OVERDRIVE OFFDOOR
AJAR
LOW
WASHER
FLUID
km
MILES
/GAL
CHECK
TRUNK AJAR LTR/100 kmAIR SUSPENSION
OVERDRIVE OFFDOOR
AJAR
LOW
WASHER
FLUID
km
MILES
/GAL
2004 Grand Marquis(grn)
Owners Guide (post-2002-fmt)
USA English(fus)
Instrument Cluster
14
Page 36 of 240
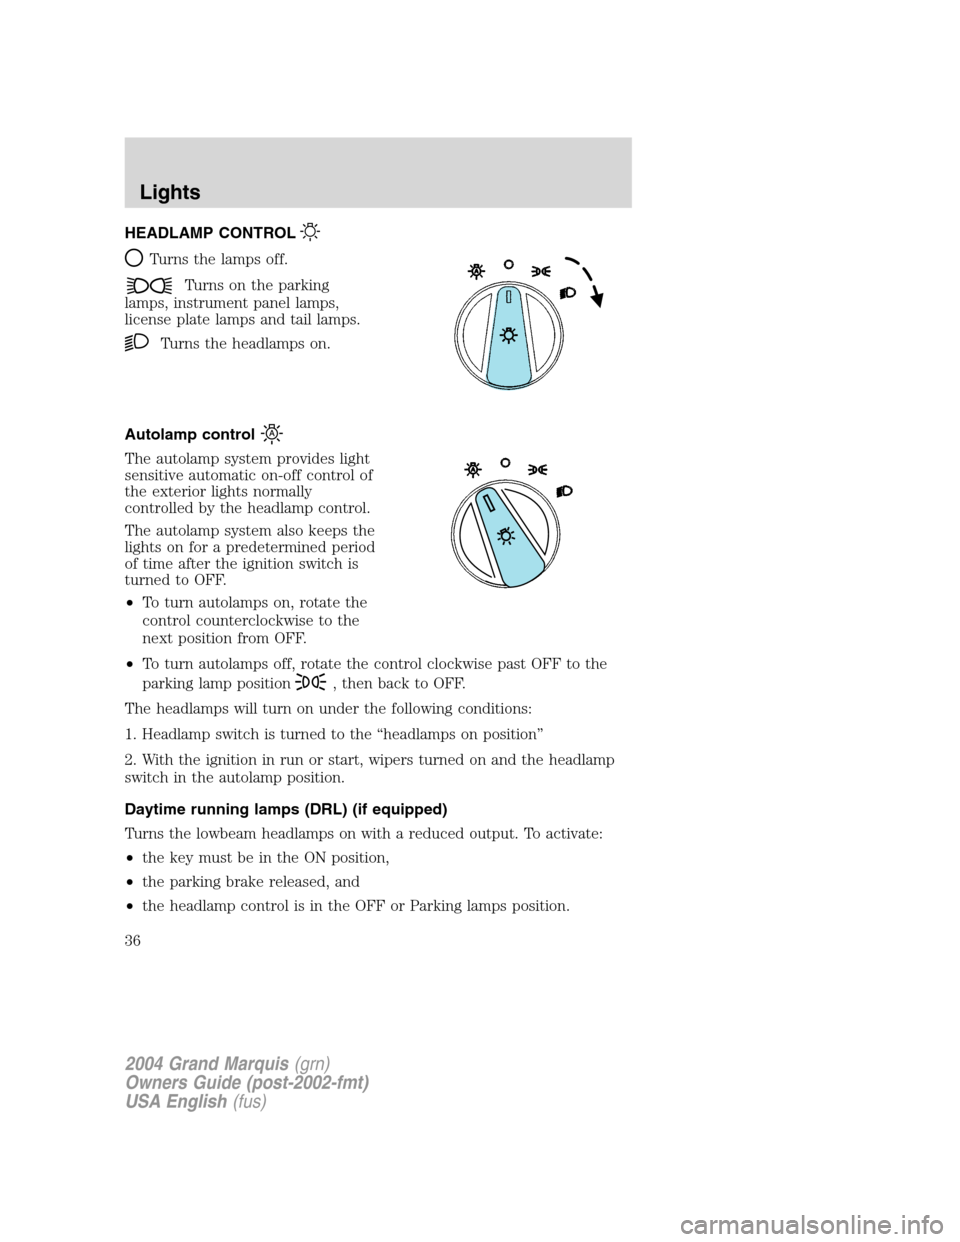
HEADLAMP CONTROL
Turns the lamps off.
Turns on the parking
lamps, instrument panel lamps,
license plate lamps and tail lamps.
Turns the headlamps on.
Autolamp control
The autolamp system provides light
sensitive automatic on-off control of
the exterior lights normally
controlled by the headlamp control.
The autolamp system also keeps the
lights on for a predetermined period
of time after the ignition switch is
turned to OFF.
•To turn autolamps on, rotate the
control counterclockwise to the
next position from OFF.
•To turn autolamps off, rotate the control clockwise past OFF to the
parking lamp position
, then back to OFF.
The headlamps will turn on under the following conditions:
1. Headlamp switch is turned to the“headlamps on position”
2. With the ignition in run or start, wipers turned on and the headlamp
switch in the autolamp position.
Daytime running lamps (DRL) (if equipped)
Turns the lowbeam headlamps on with a reduced output. To activate:
•the key must be in the ON position,
•the parking brake released, and
•the headlamp control is in the OFF or Parking lamps position.
2004 Grand Marquis(grn)
Owners Guide (post-2002-fmt)
USA English(fus)
Lights
Lights
36
Page 37 of 240
Always remember to turn on your headlamps at dusk or during
inclement weather. The Daytime Running Light (DRL) System
does not activate your tail lamps and generally may not provide
adequate lighting during these conditions. Failure to activate your
headlamps under these conditions may result in a collision.
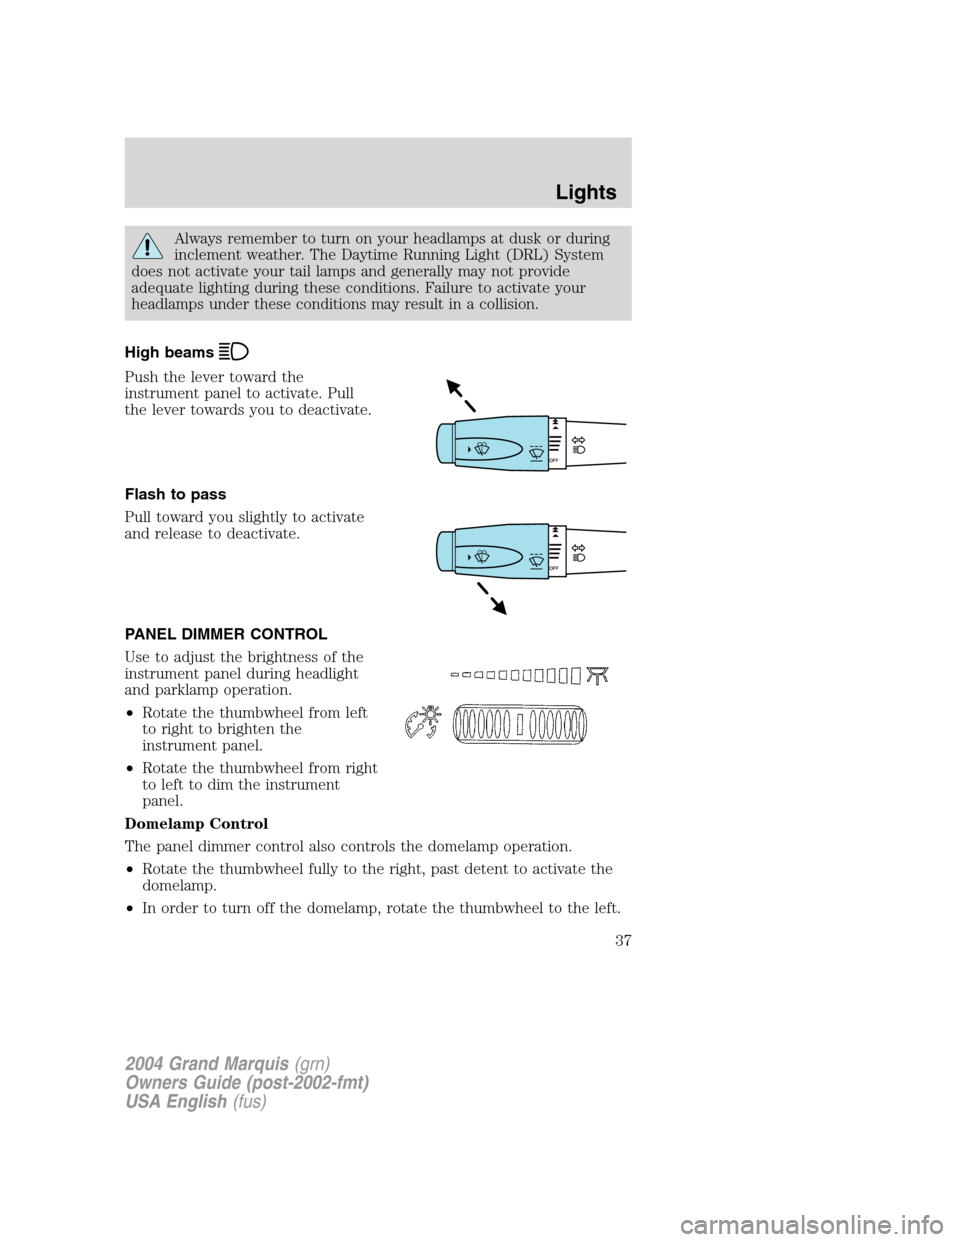
High beams
Push the lever toward the
instrument panel to activate. Pull
the lever towards you to deactivate.
Flash to pass
Pull toward you slightly to activate
and release to deactivate.
PANEL DIMMER CONTROL
Use to adjust the brightness of the
instrument panel during headlight
and parklamp operation.
•Rotate the thumbwheel from left
to right to brighten the
instrument panel.
•Rotate the thumbwheel from right
to left to dim the instrument
panel.
Domelamp Control
The panel dimmer control also controls the domelamp operation.
•Rotate the thumbwheel fully to the right, past detent to activate the
domelamp.
•In order to turn off the domelamp, rotate the thumbwheel to the left.
2004 Grand Marquis(grn)
Owners Guide (post-2002-fmt)
USA English(fus)
Lights
37
Page 38 of 240
AIMING THE HEADLAMPS
The headlamps on your vehicle are properly aimed at the assembly plant.
If your vehicle has been in an accident the alignment of your headlamps
should be checked by a qualified service technician.
Vertical aim adjustment
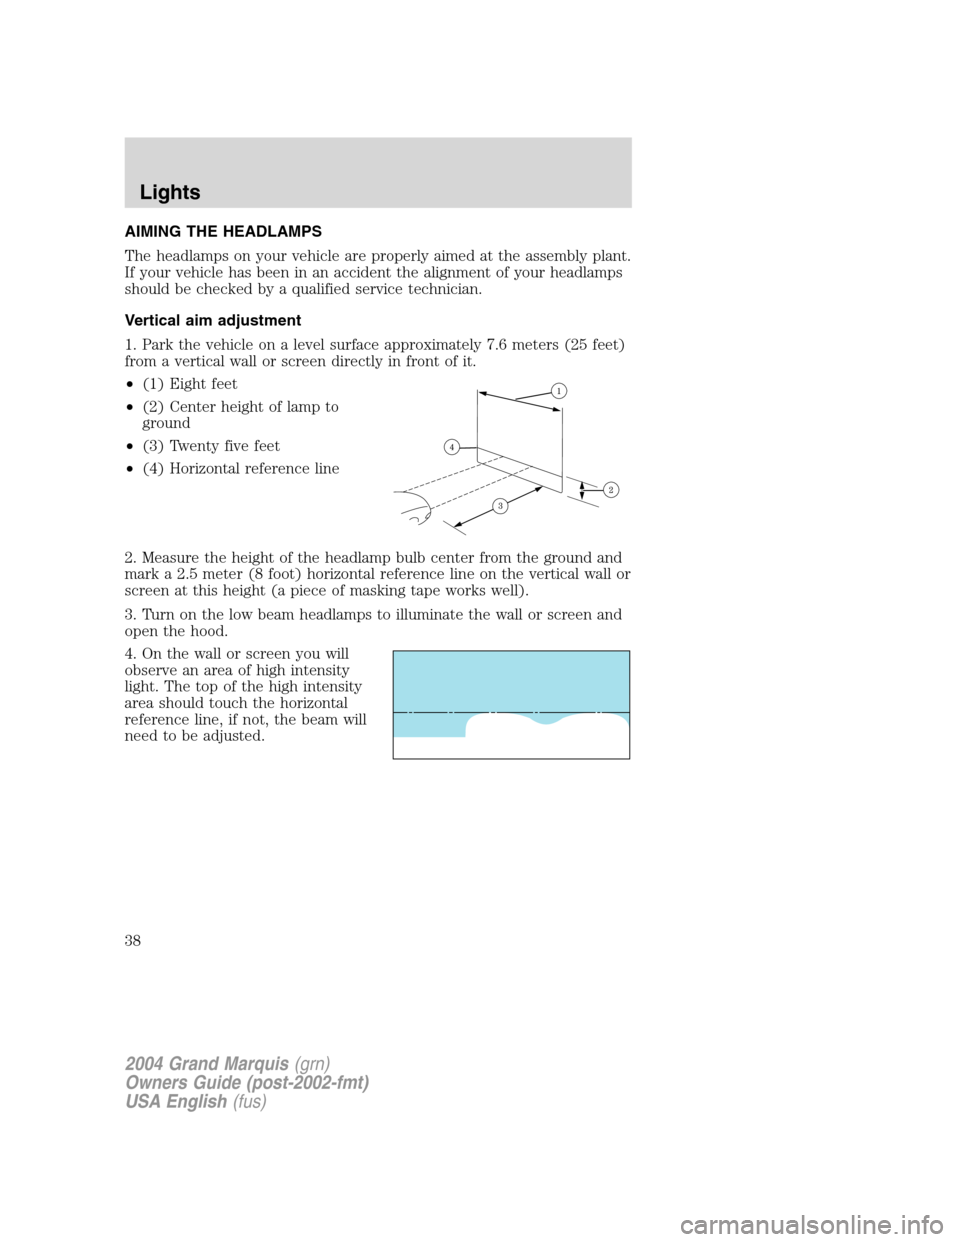
1. Park the vehicle on a level surface approximately 7.6 meters (25 feet)
from a vertical wall or screen directly in front of it.
•(1) Eight feet
•(2) Center height of lamp to
ground
•(3) Twenty five feet
•(4) Horizontal reference line
2. Measure the height of the headlamp bulb center from the ground and
mark a 2.5 meter (8 foot) horizontal reference line on the vertical wall or
screen at this height (a piece of masking tape works well).
3. Turn on the low beam headlamps to illuminate the wall or screen and
open the hood.
4. On the wall or screen you will
observe an area of high intensity
light. The top of the high intensity
area should touch the horizontal
reference line, if not, the beam will
need to be adjusted.
2004 Grand Marquis(grn)
Owners Guide (post-2002-fmt)
USA English(fus)
Lights
38
Page 39 of 240
To see a clearer light pattern for
adjusting, you may want to block
the light from one headlamp while
adjusting the other.
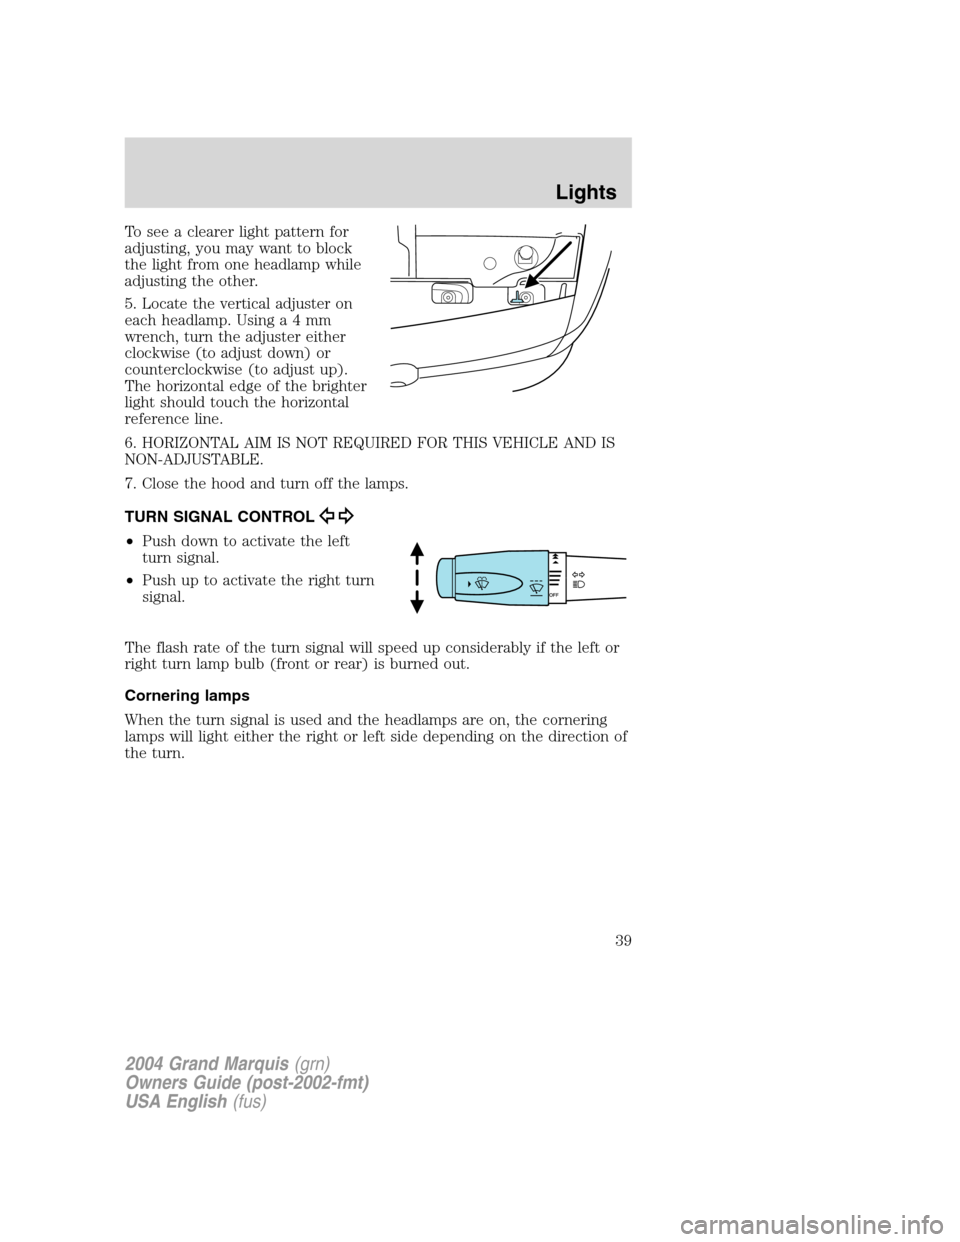
5. Locate the vertical adjuster on
each headlamp. Usinga4mm
wrench, turn the adjuster either
clockwise (to adjust down) or
counterclockwise (to adjust up).
The horizontal edge of the brighter
light should touch the horizontal
reference line.
6. HORIZONTAL AIM IS NOT REQUIRED FOR THIS VEHICLE AND IS
NON-ADJUSTABLE.
7. Close the hood and turn off the lamps.
TURN SIGNAL CONTROL
•Push down to activate the left
turn signal.
•Push up to activate the right turn
signal.
The flash rate of the turn signal will speed up considerably if the left or
right turn lamp bulb (front or rear) is burned out.
Cornering lamps
When the turn signal is used and the headlamps are on, the cornering
lamps will light either the right or left side depending on the direction of
the turn.
2004 Grand Marquis(grn)
Owners Guide (post-2002-fmt)
USA English(fus)
Lights
39
Page 40 of 240
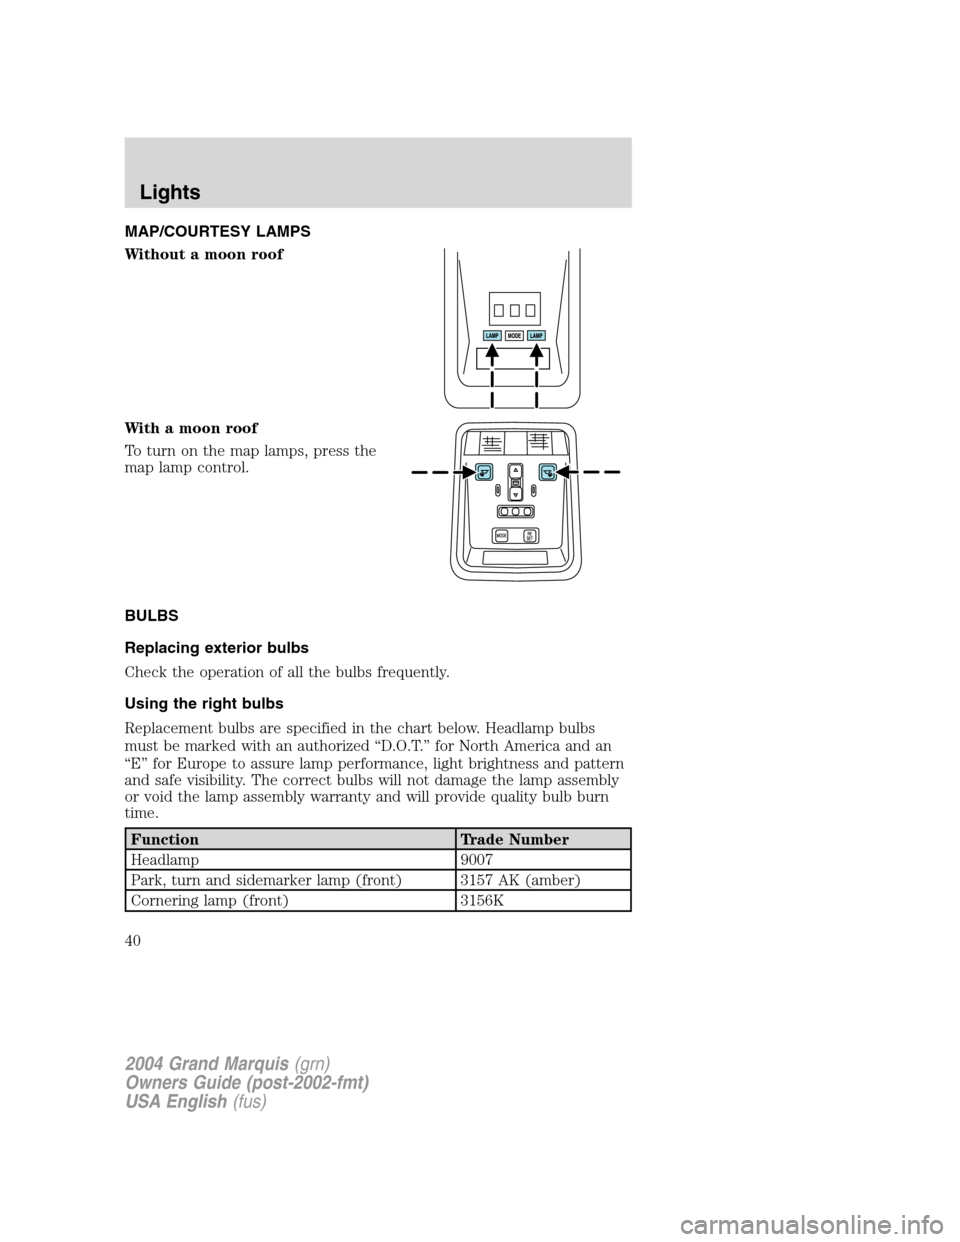
MAP/COURTESY LAMPS
Without a moon roof
With a moon roof
To turn on the map lamps, press the
map lamp control.
BULBS
Replacing exterior bulbs
Check the operation of all the bulbs frequently.
Using the right bulbs
Replacement bulbs are specified in the chart below. Headlamp bulbs
must be marked with an authorized“D.O.T.”for North America and an
“E”for Europe to assure lamp performance, light brightness and pattern
and safe visibility. The correct bulbs will not damage the lamp assembly
or void the lamp assembly warranty and will provide quality bulb burn
time.
Function Trade Number
Headlamp 9007
Park, turn and sidemarker lamp (front) 3157 AK (amber)
Cornering lamp (front) 3156K
2004 Grand Marquis(grn)
Owners Guide (post-2002-fmt)
USA English(fus)
Lights
40
Page 41 of 240
Function Trade Number
Tail, stop, turn and sidemarker lamp (rear) 3157K
Backup lamp 3156K
License plate lamp 168
High-mount brakelamp 912
Luggage compartment lamp 212-2
Dome lamp 906
Rear reading lamp 211-2
Map lamp 168
Illuminated visor mirror 7065
Dual floorwell lamp 906
Glove compartment 168
All replacement bulbs are clear in color except where noted.
To replace all instrument panel lights - see your dealer.
Replacing the interior bulbs
Check the operation of all bulbs frequently.
Replacing headlamp bulbs
To remove the headlamp bulb:
1. Make sure the headlamp control is in the OFF position, then open the
hood
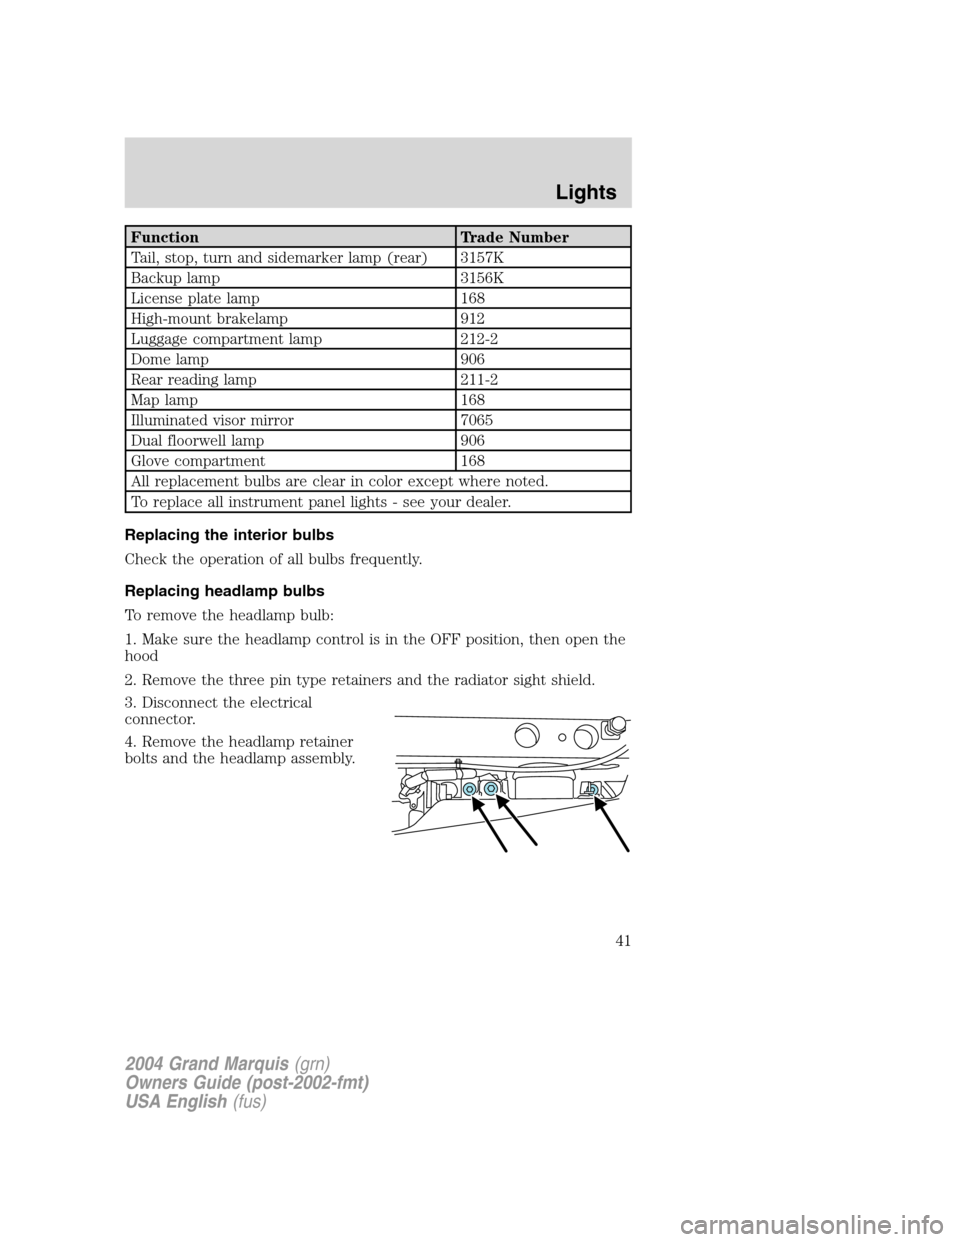
2. Remove the three pin type retainers and the radiator sight shield.
3. Disconnect the electrical
connector.
4. Remove the headlamp retainer
bolts and the headlamp assembly.
2004 Grand Marquis(grn)
Owners Guide (post-2002-fmt)
USA English(fus)
Lights
41
Page 42 of 240
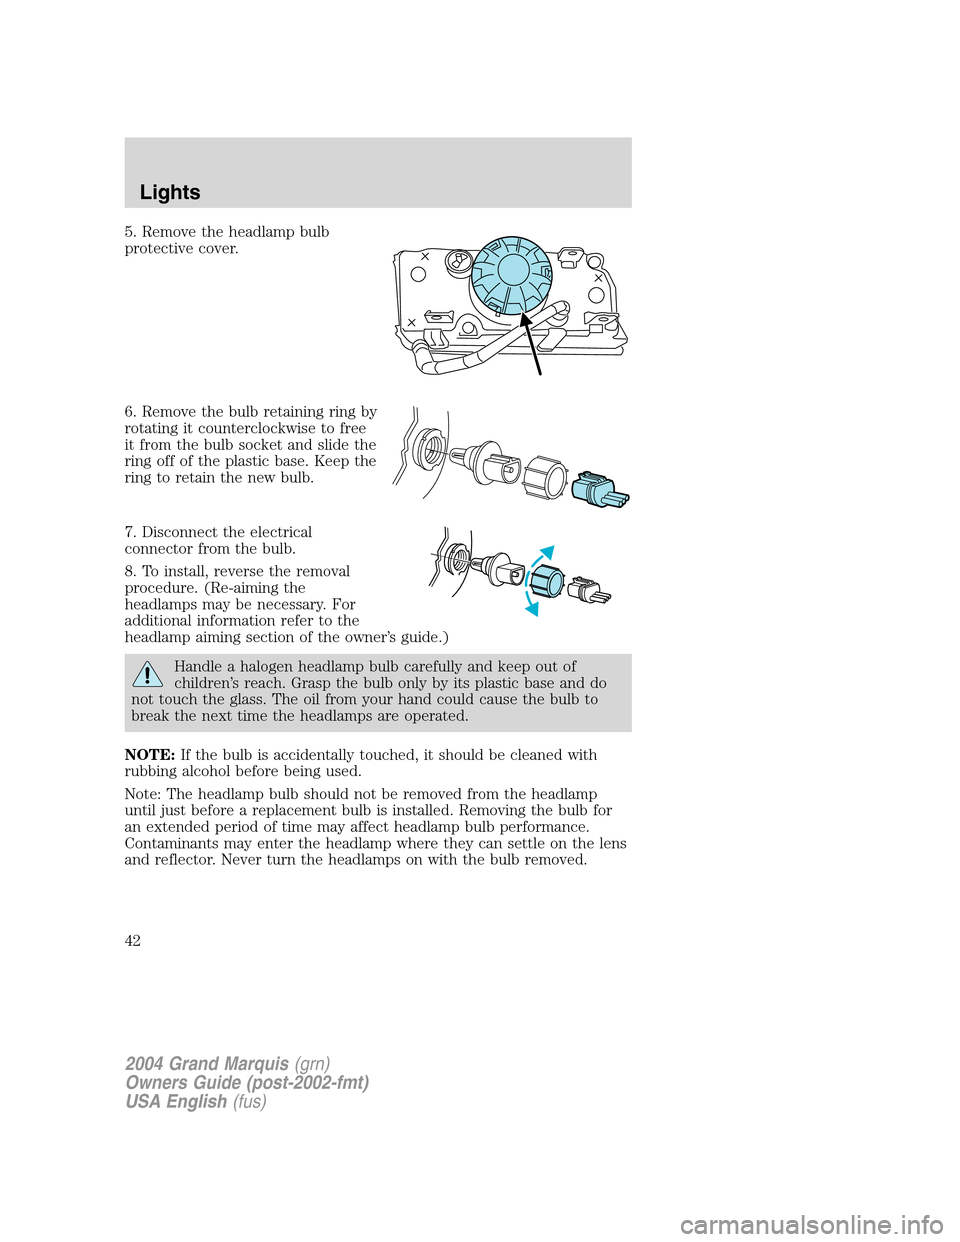
5. Remove the headlamp bulb
protective cover.
6. Remove the bulb retaining ring by
rotating it counterclockwise to free
it from the bulb socket and slide the
ring off of the plastic base. Keep the
ring to retain the new bulb.
7. Disconnect the electrical
connector from the bulb.
8. To install, reverse the removal
procedure. (Re-aiming the
headlamps may be necessary. For
additional information refer to the
headlamp aiming section of the owner’s guide.)
Handle a halogen headlamp bulb carefully and keep out of
children’s reach. Grasp the bulb only by its plastic base and do
not touch the glass. The oil from your hand could cause the bulb to
break the next time the headlamps are operated.
NOTE:If the bulb is accidentally touched, it should be cleaned with
rubbing alcohol before being used.
Note: The headlamp bulb should not be removed from the headlamp
until just before a replacement bulb is installed. Removing the bulb for
an extended period of time may affect headlamp bulb performance.
Contaminants may enter the headlamp where they can settle on the lens
and reflector. Never turn the headlamps on with the bulb removed.
2004 Grand Marquis(grn)
Owners Guide (post-2002-fmt)
USA English(fus)
Lights
42