clock Mercury Marauder 2003 Owner's Manuals
[x] Cancel search | Manufacturer: MERCURY, Model Year: 2003, Model line: Marauder, Model: Mercury Marauder 2003Pages: 232, PDF Size: 2.29 MB
Page 24 of 232
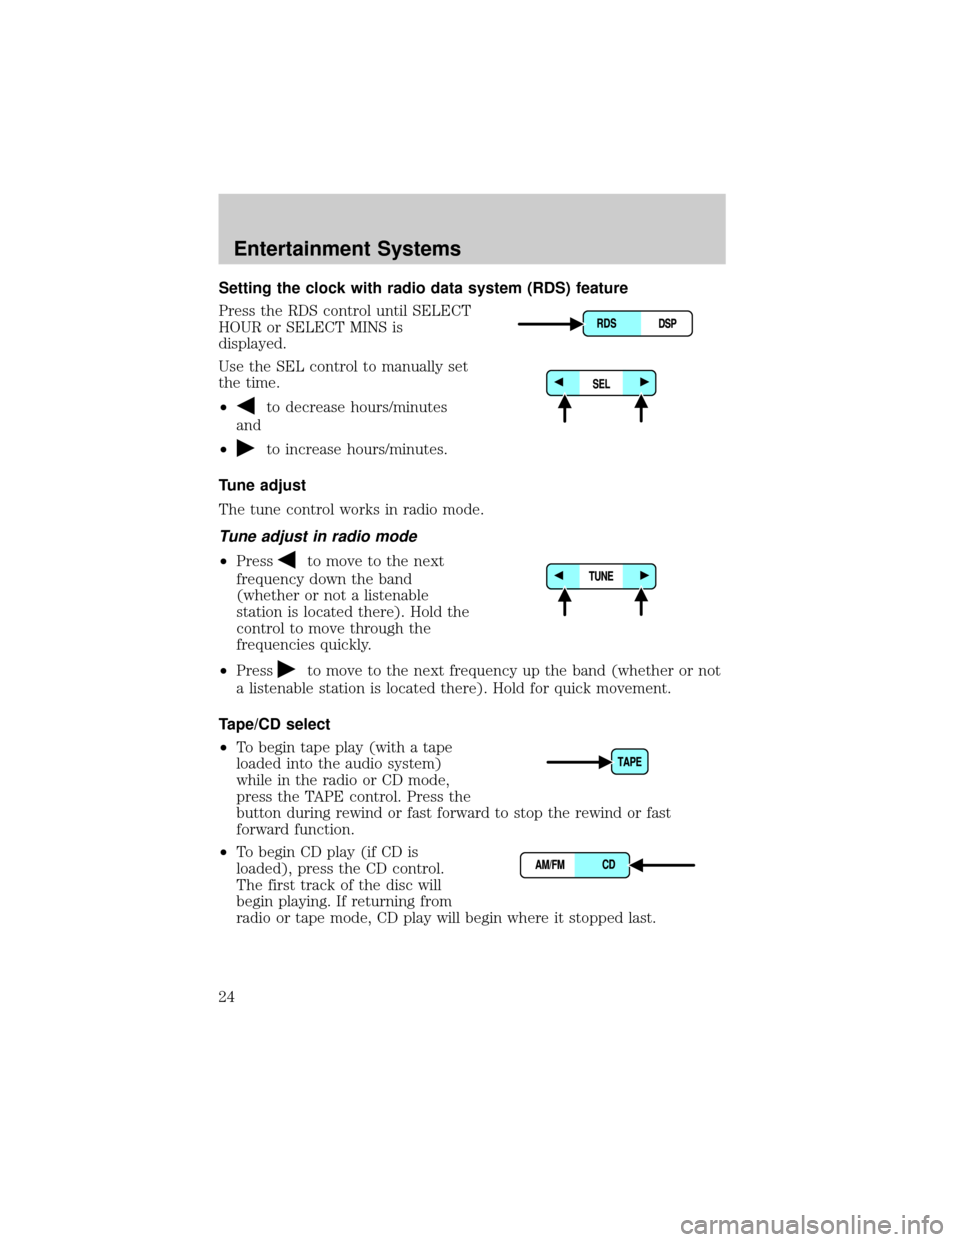
Setting the clock with radio data system (RDS) feature
Press the RDS control until SELECT
HOUR or SELECT MINS is
displayed.
Use the SEL control to manually set
the time.
²
to decrease hours/minutes
and
²
to increase hours/minutes.
Tune adjust
The tune control works in radio mode.
Tune adjust in radio mode
²Pressto move to the next
frequency down the band
(whether or not a listenable
station is located there). Hold the
control to move through the
frequencies quickly.
²Press
to move to the next frequency up the band (whether or not
a listenable station is located there). Hold for quick movement.
Tape/CD select
²To begin tape play (with a tape
loaded into the audio system)
while in the radio or CD mode,
press the TAPE control. Press the
button during rewind or fast forward to stop the rewind or fast
forward function.
²To begin CD play (if CD is
loaded), press the CD control.
The first track of the disc will
begin playing. If returning from
radio or tape mode, CD play will begin where it stopped last.
Entertainment Systems
24
Page 38 of 232
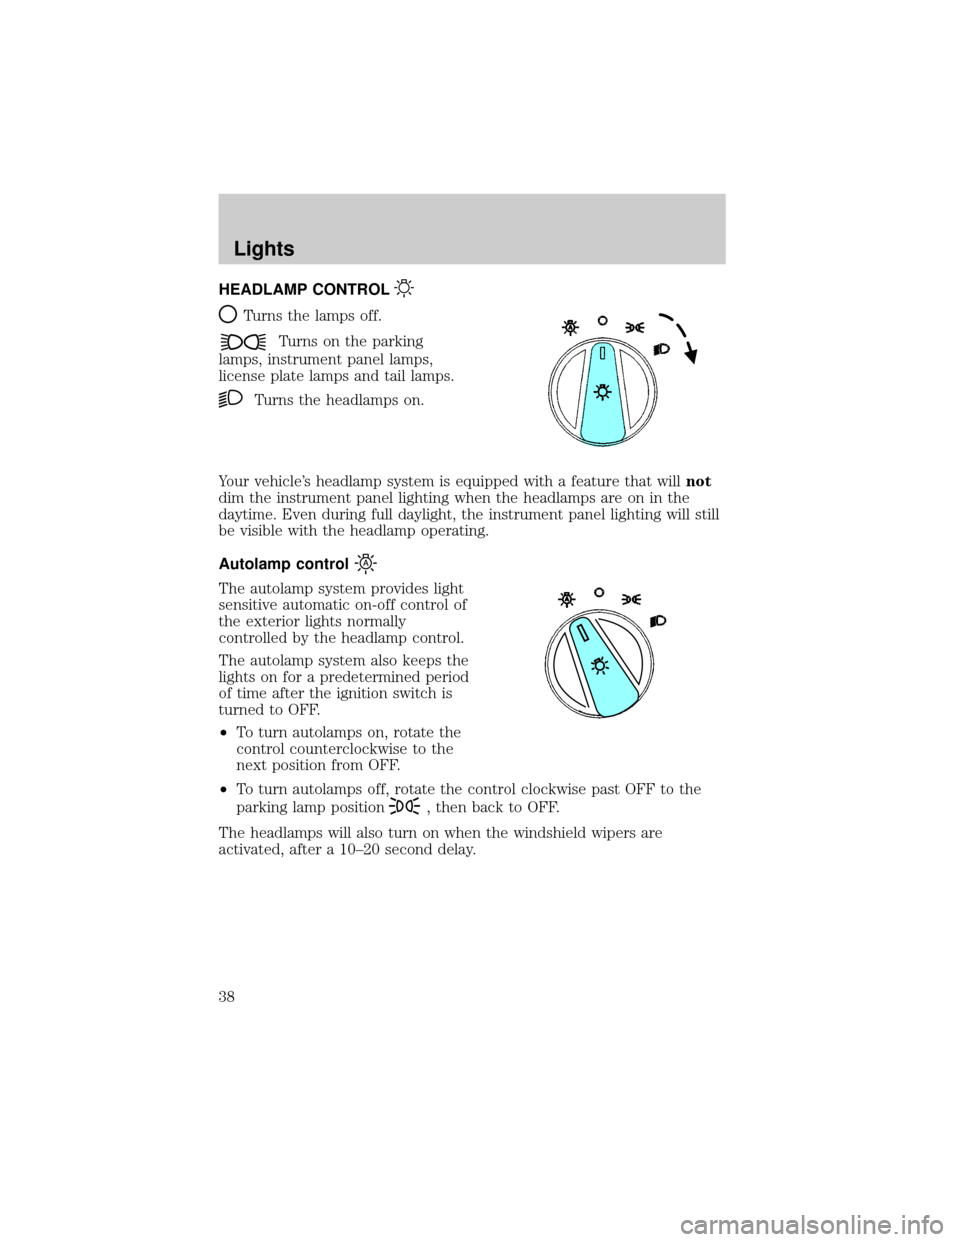
HEADLAMP CONTROL
Turns the lamps off.
Turns on the parking
lamps, instrument panel lamps,
license plate lamps and tail lamps.
Turns the headlamps on.
Your vehicle's headlamp system is equipped with a feature that willnot
dim the instrument panel lighting when the headlamps are on in the
daytime. Even during full daylight, the instrument panel lighting will still
be visible with the headlamp operating.
Autolamp control
The autolamp system provides light
sensitive automatic on-off control of
the exterior lights normally
controlled by the headlamp control.
The autolamp system also keeps the
lights on for a predetermined period
of time after the ignition switch is
turned to OFF.
²To turn autolamps on, rotate the
control counterclockwise to the
next position from OFF.
²To turn autolamps off, rotate the control clockwise past OFF to the
parking lamp position
, then back to OFF.
The headlamps will also turn on when the windshield wipers are
activated, after a 10±20 second delay.
Lights
38
Page 41 of 232
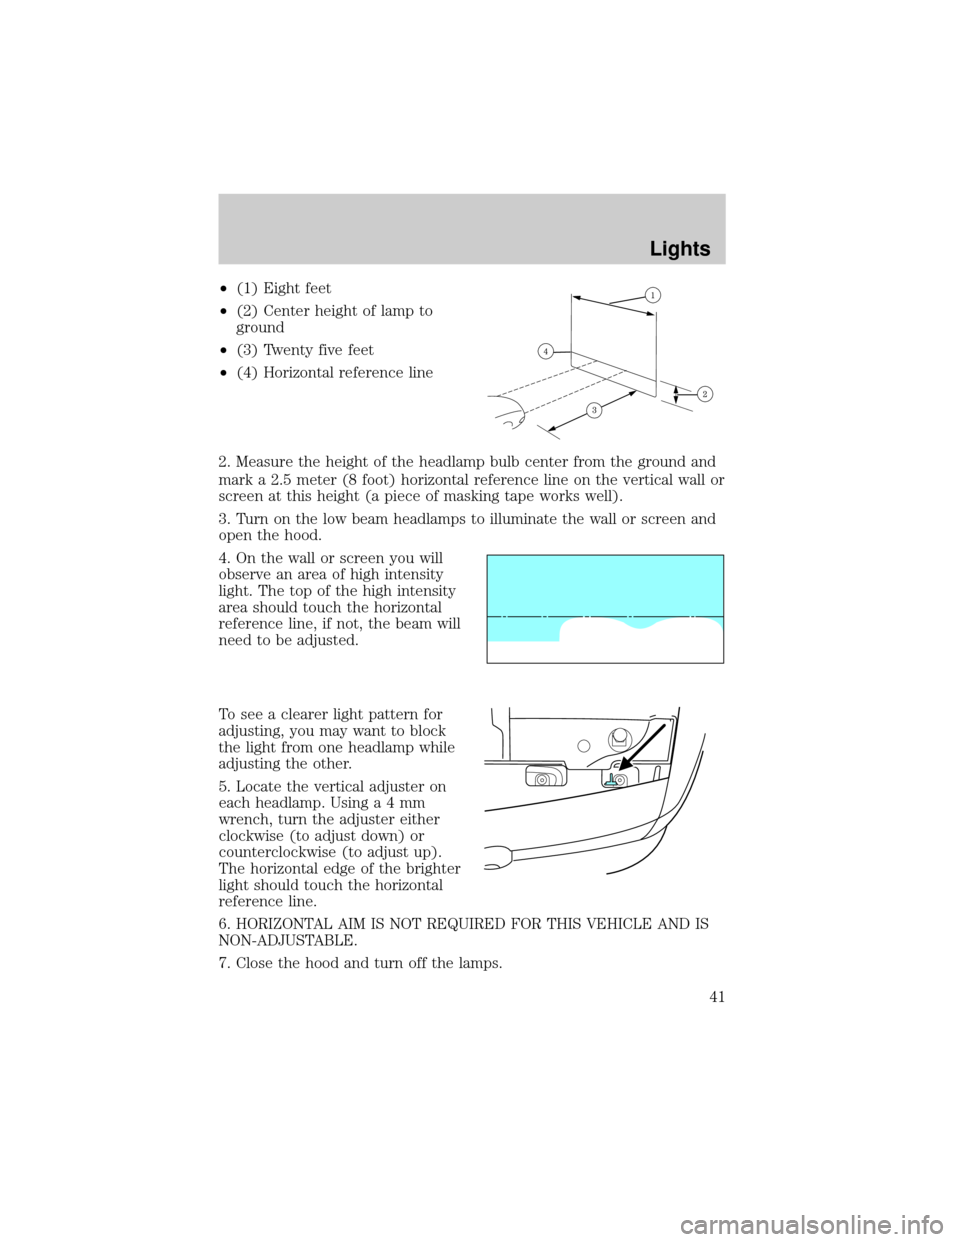
²(1) Eight feet
²(2) Center height of lamp to
ground
²(3) Twenty five feet
²(4) Horizontal reference line
2. Measure the height of the headlamp bulb center from the ground and
mark a 2.5 meter (8 foot) horizontal reference line on the vertical wall or
screen at this height (a piece of masking tape works well).
3. Turn on the low beam headlamps to illuminate the wall or screen and
open the hood.
4. On the wall or screen you will
observe an area of high intensity
light. The top of the high intensity
area should touch the horizontal
reference line, if not, the beam will
need to be adjusted.
To see a clearer light pattern for
adjusting, you may want to block
the light from one headlamp while
adjusting the other.
5. Locate the vertical adjuster on
each headlamp. Usinga4mm
wrench, turn the adjuster either
clockwise (to adjust down) or
counterclockwise (to adjust up).
The horizontal edge of the brighter
light should touch the horizontal
reference line.
6. HORIZONTAL AIM IS NOT REQUIRED FOR THIS VEHICLE AND IS
NON-ADJUSTABLE.
7. Close the hood and turn off the lamps.
Lights
41
Page 46 of 232
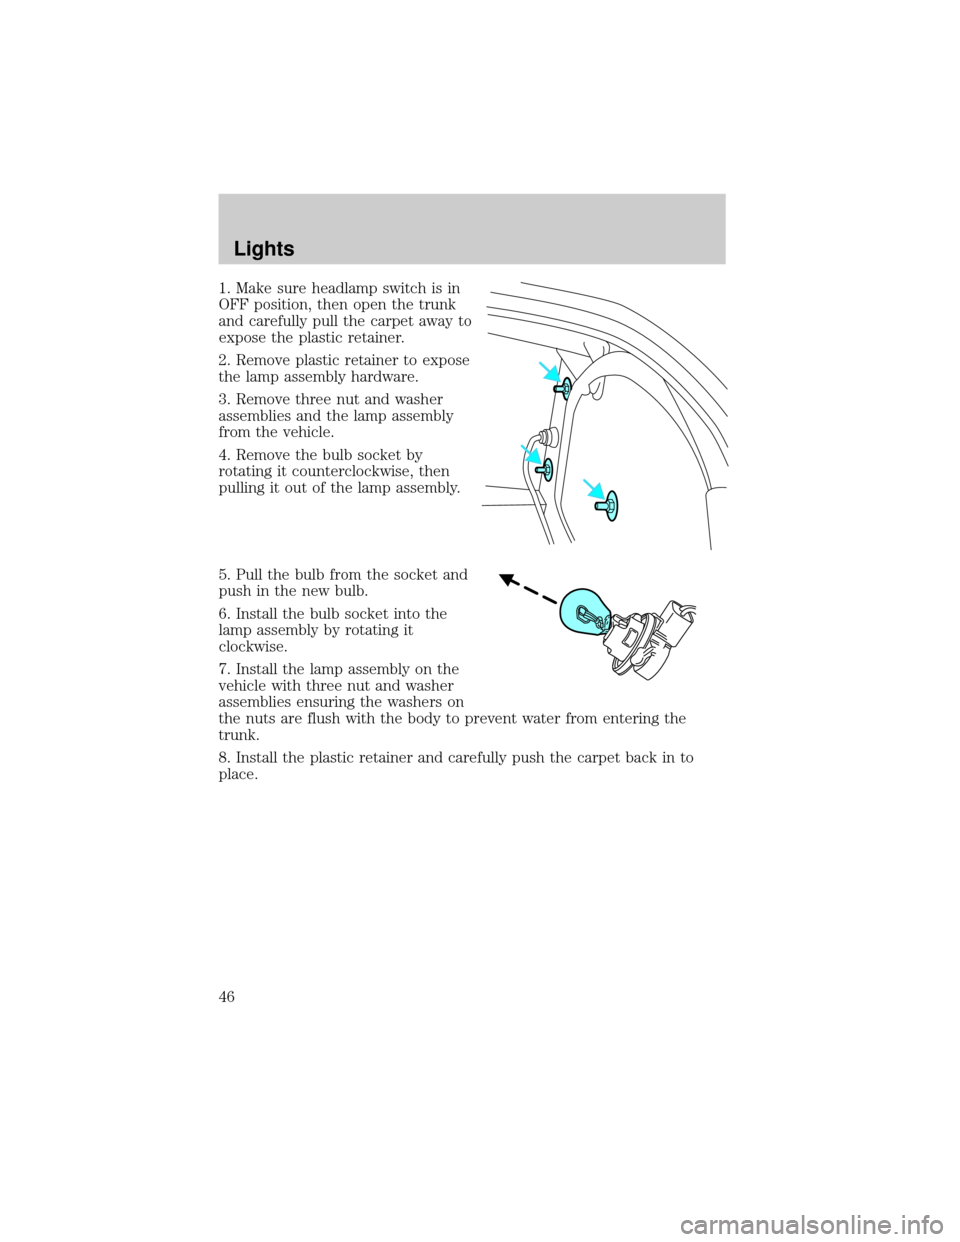
1. Make sure headlamp switch is in
OFF position, then open the trunk
and carefully pull the carpet away to
expose the plastic retainer.
2. Remove plastic retainer to expose
the lamp assembly hardware.
3. Remove three nut and washer
assemblies and the lamp assembly
from the vehicle.
4. Remove the bulb socket by
rotating it counterclockwise, then
pulling it out of the lamp assembly.
5. Pull the bulb from the socket and
push in the new bulb.
6. Install the bulb socket into the
lamp assembly by rotating it
clockwise.
7. Install the lamp assembly on the
vehicle with three nut and washer
assemblies ensuring the washers on
the nuts are flush with the body to prevent water from entering the
trunk.
8. Install the plastic retainer and carefully push the carpet back in to
place.
Lights
46
Page 47 of 232
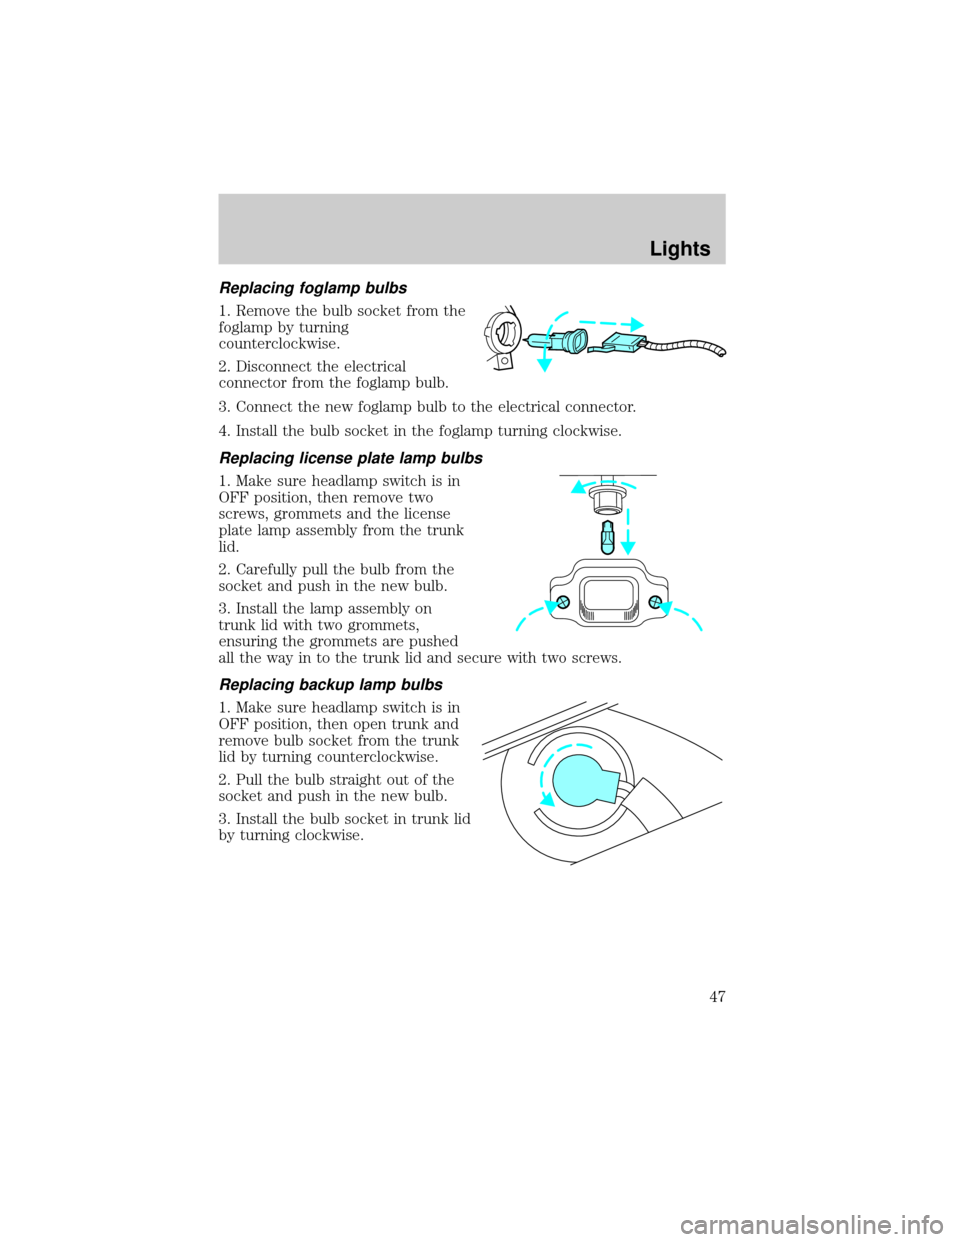
Replacing foglamp bulbs
1. Remove the bulb socket from the
foglamp by turning
counterclockwise.
2. Disconnect the electrical
connector from the foglamp bulb.
3. Connect the new foglamp bulb to the electrical connector.
4. Install the bulb socket in the foglamp turning clockwise.
Replacing license plate lamp bulbs
1. Make sure headlamp switch is in
OFF position, then remove two
screws, grommets and the license
plate lamp assembly from the trunk
lid.
2. Carefully pull the bulb from the
socket and push in the new bulb.
3. Install the lamp assembly on
trunk lid with two grommets,
ensuring the grommets are pushed
all the way in to the trunk lid and secure with two screws.
Replacing backup lamp bulbs
1. Make sure headlamp switch is in
OFF position, then open trunk and
remove bulb socket from the trunk
lid by turning counterclockwise.
2. Pull the bulb straight out of the
socket and push in the new bulb.
3. Install the bulb socket in trunk lid
by turning clockwise.
Lights
47
Page 147 of 232
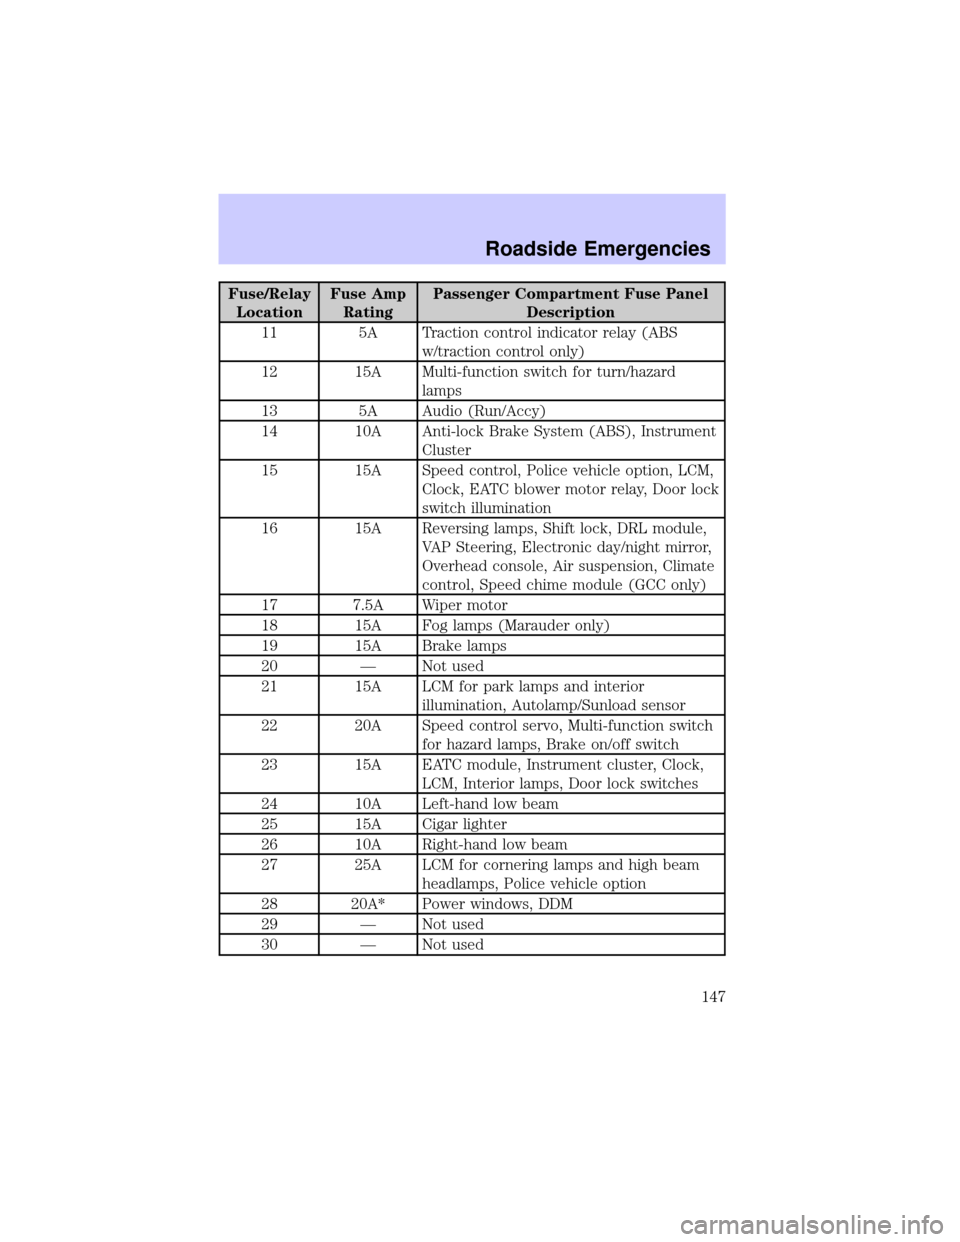
Fuse/Relay
LocationFuse Amp
RatingPassenger Compartment Fuse Panel
Description
11 5A Traction control indicator relay (ABS
w/traction control only)
12 15A Multi-function switch for turn/hazard
lamps
13 5A Audio (Run/Accy)
14 10A Anti-lock Brake System (ABS), Instrument
Cluster
15 15A Speed control, Police vehicle option, LCM,
Clock, EATC blower motor relay, Door lock
switch illumination
16 15A Reversing lamps, Shift lock, DRL module,
VAP Steering, Electronic day/night mirror,
Overhead console, Air suspension, Climate
control, Speed chime module (GCC only)
17 7.5A Wiper motor
18 15A Fog lamps (Marauder only)
19 15A Brake lamps
20 Ð Not used
21 15A LCM for park lamps and interior
illumination, Autolamp/Sunload sensor
22 20A Speed control servo, Multi-function switch
for hazard lamps, Brake on/off switch
23 15A EATC module, Instrument cluster, Clock,
LCM, Interior lamps, Door lock switches
24 10A Left-hand low beam
25 15A Cigar lighter
26 10A Right-hand low beam
27 25A LCM for cornering lamps and high beam
headlamps, Police vehicle option
28 20A* Power windows, DDM
29 Ð Not used
30 Ð Not used
Roadside Emergencies
147
Page 153 of 232
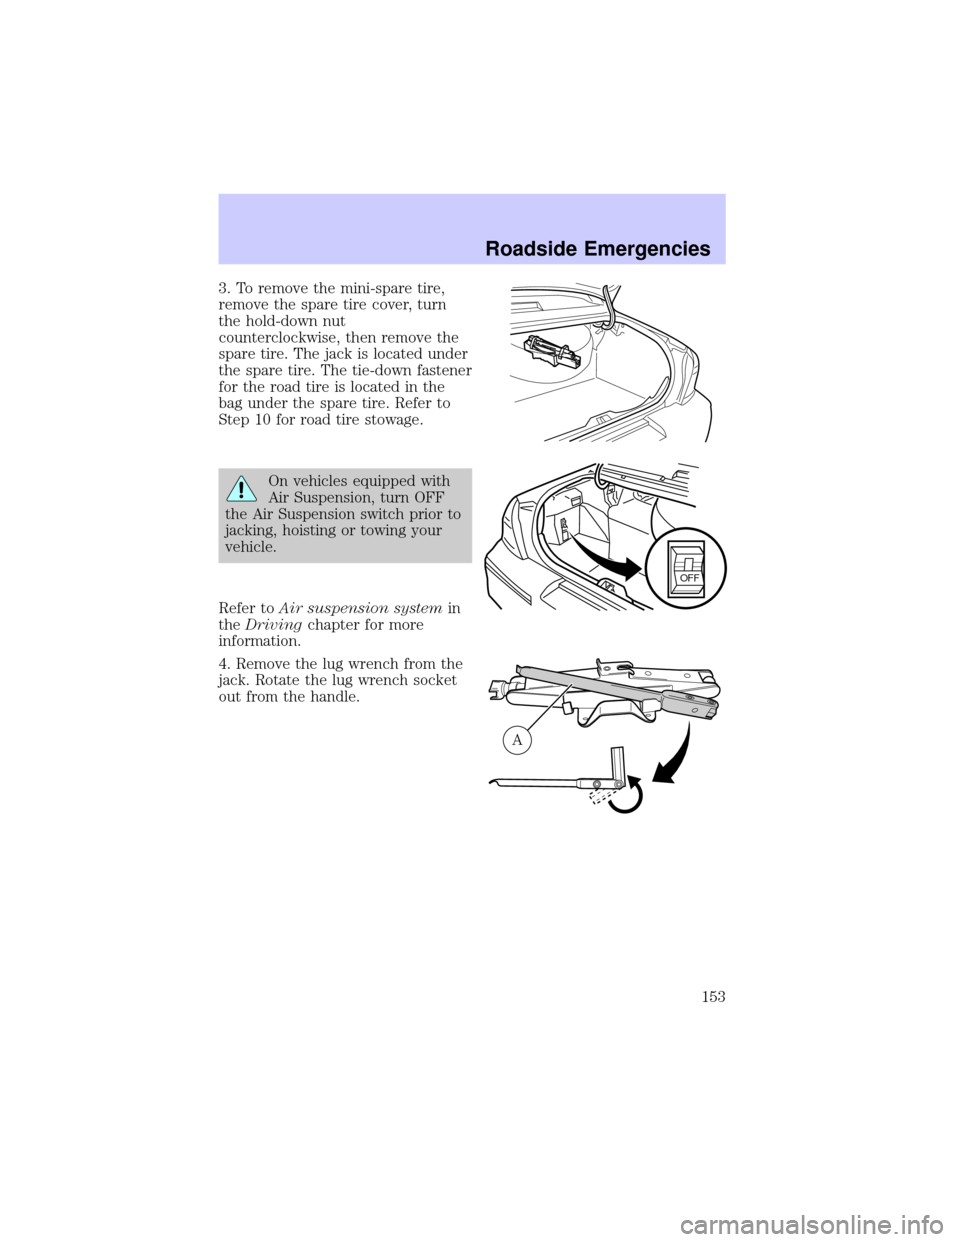
3. To remove the mini-spare tire,
remove the spare tire cover, turn
the hold-down nut
counterclockwise, then remove the
spare tire. The jack is located under
the spare tire. The tie-down fastener
for the road tire is located in the
bag under the spare tire. Refer to
Step 10 for road tire stowage.
On vehicles equipped with
Air Suspension, turn OFF
the Air Suspension switch prior to
jacking, hoisting or towing your
vehicle.
Refer toAir suspension systemin
theDrivingchapter for more
information.
4. Remove the lug wrench from the
jack. Rotate the lug wrench socket
out from the handle.
OFF
A
Roadside Emergencies
153
Page 154 of 232

5. Loosen each wheel lug nut
one-half turn counterclockwise but
do not remove them until the wheel
is raised off the ground.
Before placing the jack under the vehicle, NOTE the jack location
markings:
JACK LOCATION-FRONT
The jack location markings can be
foundon the lower outer edge of
the body.
²Locate the jack locator mark (B -
circle) on the body (C) near the
tire you are changing, then place
the jack (D)under the frame
(A) of the vehiclealigning it
with the mark (B -circle).
JACK LOCATION-REAR
The jack location markings can be
foundon the lower outer edge of
the body.
²Locate the jack locator mark (B -
triangle) on the body (C) near
the tire you are changing, then
place the jack (D)under the
frame (A) of the vehicle
aligning it with the mark (B -
triangle).
A
D
B
C
Roadside Emergencies
154
Page 155 of 232
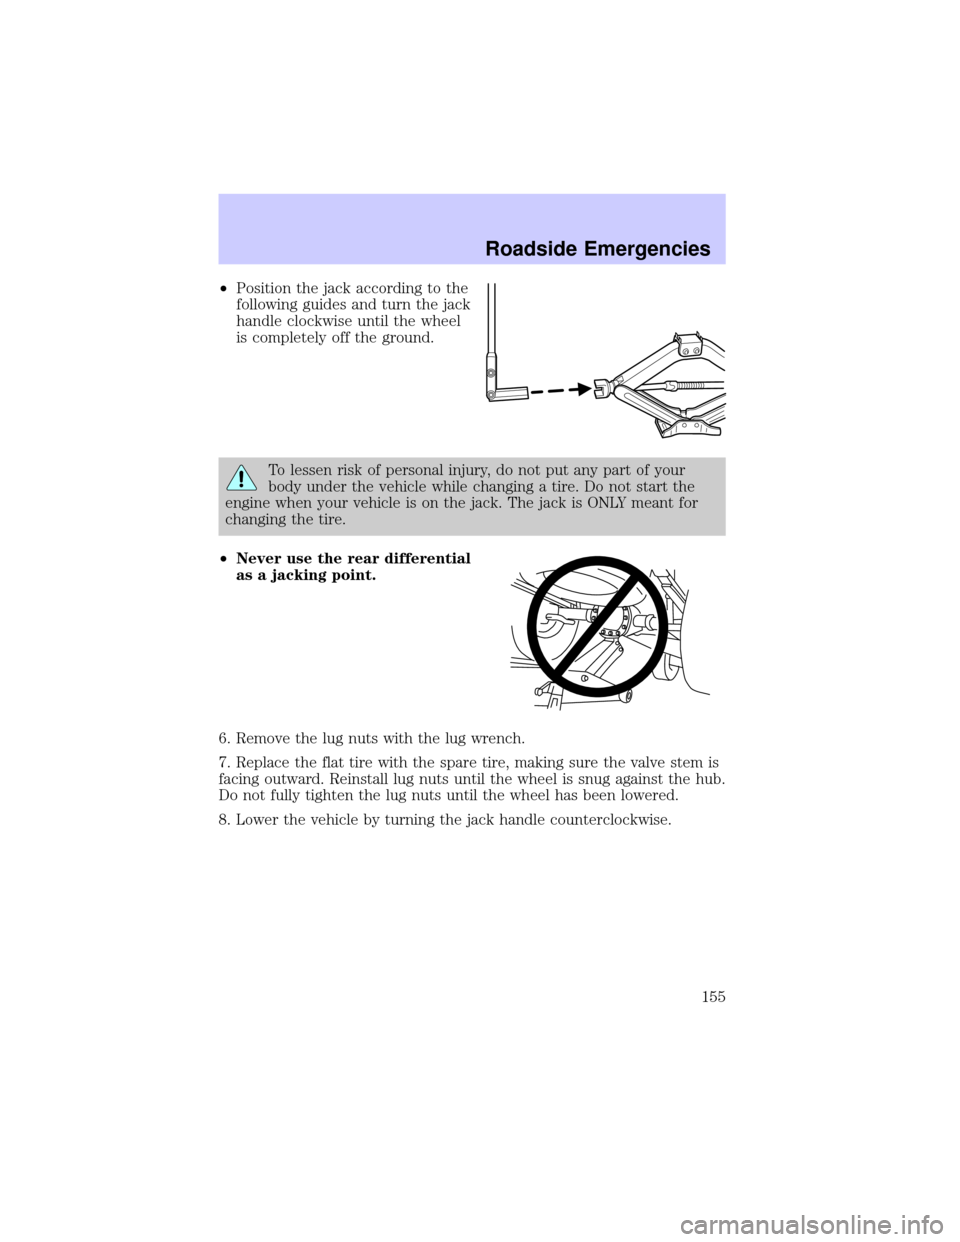
²Position the jack according to the
following guides and turn the jack
handle clockwise until the wheel
is completely off the ground.
To lessen risk of personal injury, do not put any part of your
body under the vehicle while changing a tire. Do not start the
engine when your vehicle is on the jack. The jack is ONLY meant for
changing the tire.
²Never use the rear differential
as a jacking point.
6. Remove the lug nuts with the lug wrench.
7. Replace the flat tire with the spare tire, making sure the valve stem is
facing outward. Reinstall lug nuts until the wheel is snug against the hub.
Do not fully tighten the lug nuts until the wheel has been lowered.
8. Lower the vehicle by turning the jack handle counterclockwise.
Roadside Emergencies
155
Page 156 of 232
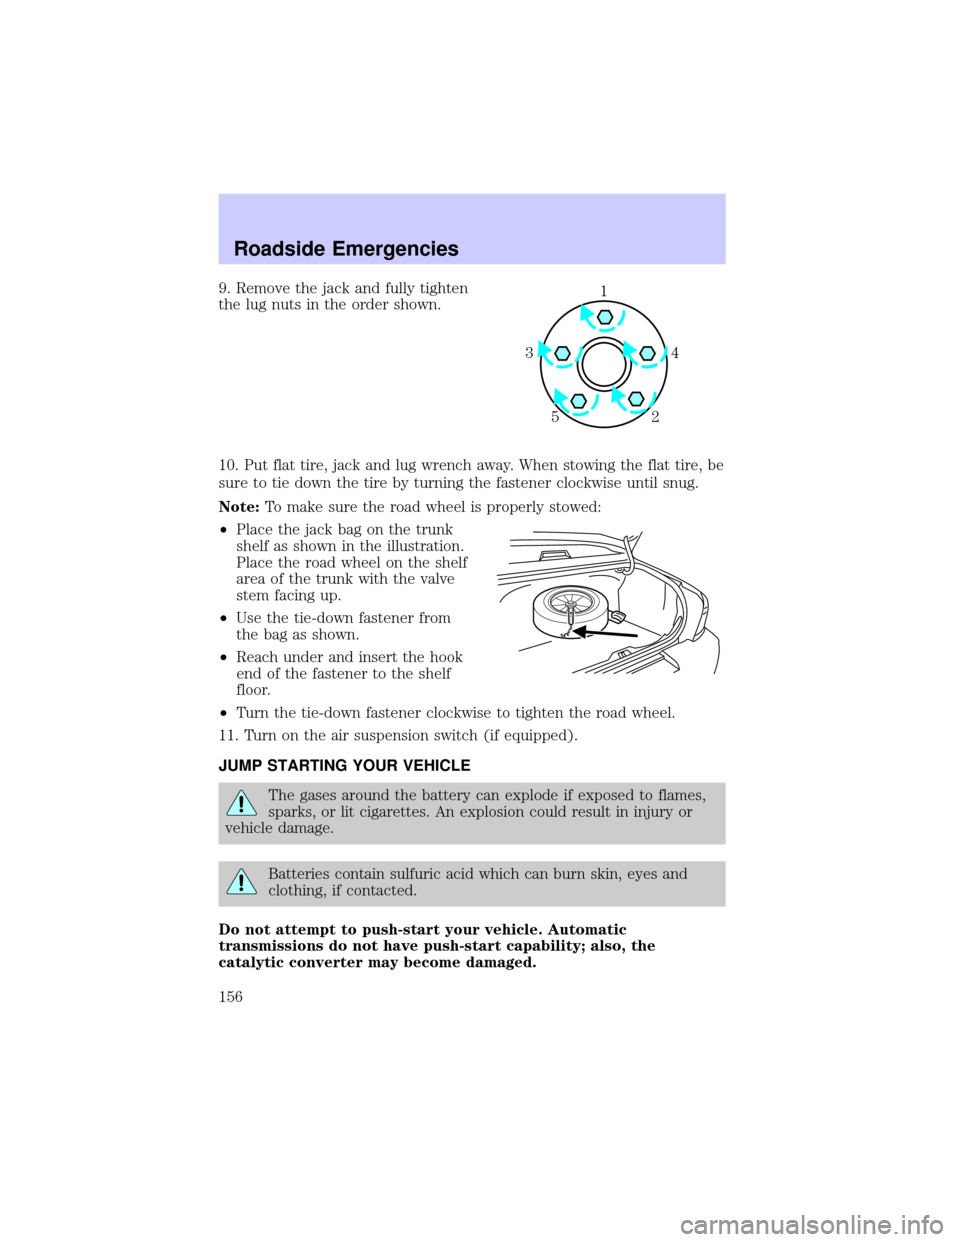
9. Remove the jack and fully tighten
the lug nuts in the order shown.
10. Put flat tire, jack and lug wrench away. When stowing the flat tire, be
sure to tie down the tire by turning the fastener clockwise until snug.
Note:To make sure the road wheel is properly stowed:
²Place the jack bag on the trunk
shelf as shown in the illustration.
Place the road wheel on the shelf
area of the trunk with the valve
stem facing up.
²Use the tie-down fastener from
the bag as shown.
²Reach under and insert the hook
end of the fastener to the shelf
floor.
²Turn the tie-down fastener clockwise to tighten the road wheel.
11. Turn on the air suspension switch (if equipped).
JUMP STARTING YOUR VEHICLE
The gases around the battery can explode if exposed to flames,
sparks, or lit cigarettes. An explosion could result in injury or
vehicle damage.
Batteries contain sulfuric acid which can burn skin, eyes and
clothing, if contacted.
Do not attempt to push-start your vehicle. Automatic
transmissions do not have push-start capability; also, the
catalytic converter may become damaged.
1
4 3
2 5
Roadside Emergencies
156