lock Mercury Mercury Cougar 2002 Owner's Manual
[x] Cancel search | Manufacturer: MERCURY, Model Year: 2002, Model line: Mercury Cougar, Model: Mercury Mercury Cougar 2002Pages: 216, PDF Size: 4.04 MB
Page 2 of 216

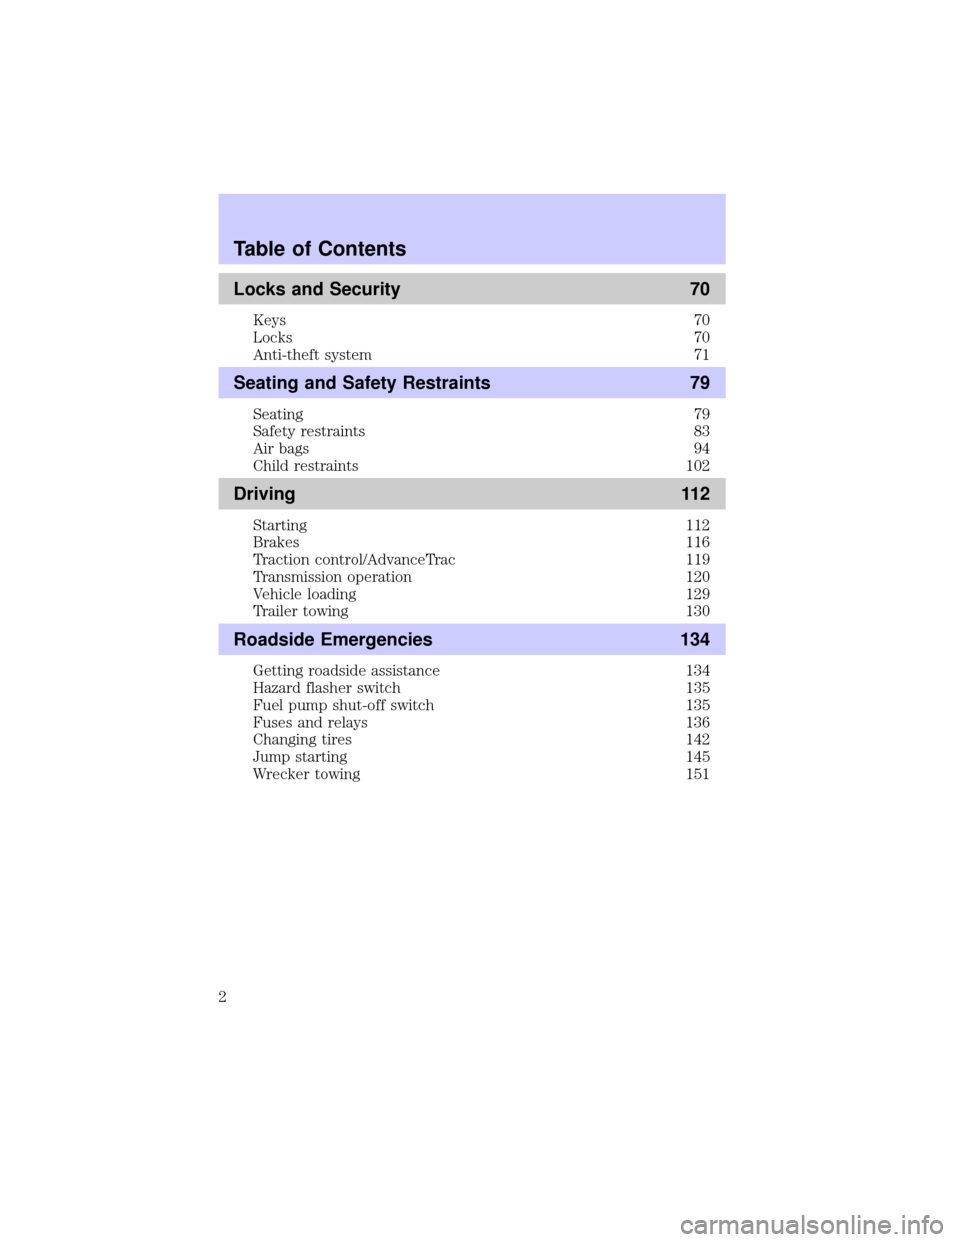
Locks and Security 70
Keys 70
Locks 70
Anti-theft system 71
Seating and Safety Restraints 79
Seating 79
Safety restraints 83
Air bags 94
Child restraints 102
Driving 112
Starting 112
Brakes 116
Traction control/AdvanceTrac 119
Transmission operation 120
Vehicle loading 129
Trailer towing 130
Roadside Emergencies 134
Getting roadside assistance 134
Hazard flasher switch 135
Fuel pump shut-off switch 135
Fuses and relays 136
Changing tires 142
Jump starting 145
Wrecker towing 151
Table of Contents
2
Page 8 of 216

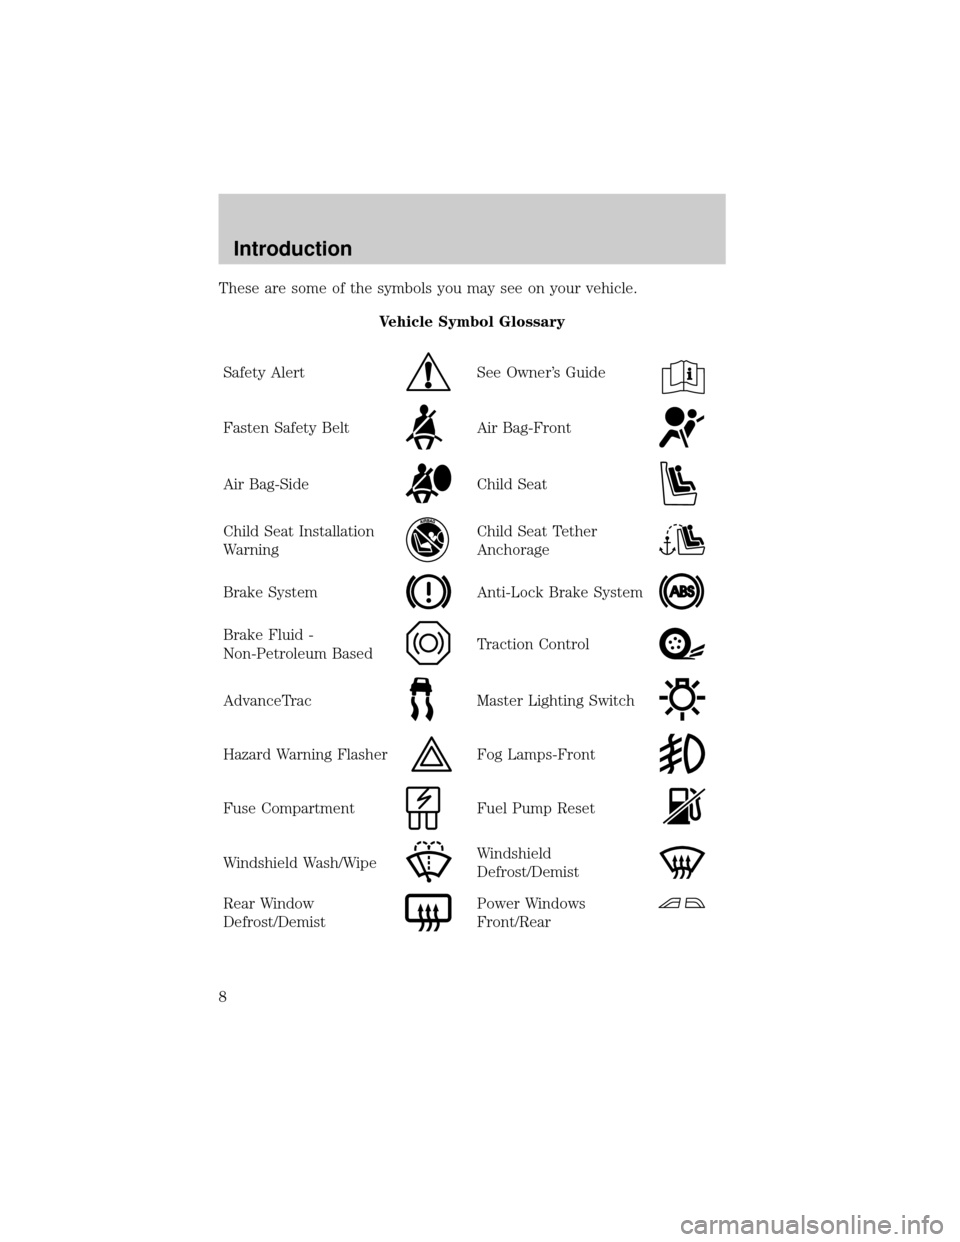
These are some of the symbols you may see on your vehicle.
Vehicle Symbol Glossary
Safety Alert
See Owner's Guide
Fasten Safety BeltAir Bag-Front
Air Bag-SideChild Seat
Child Seat Installation
WarningChild Seat Tether
Anchorage
Brake SystemAnti-Lock Brake System
Brake Fluid -
Non-Petroleum BasedTraction Control
AdvanceTracMaster Lighting Switch
Hazard Warning FlasherFog Lamps-Front
Fuse CompartmentFuel Pump Reset
Windshield Wash/WipeWindshield
Defrost/Demist
Rear Window
Defrost/DemistPower Windows
Front/Rear
Introduction
8
Page 9 of 216

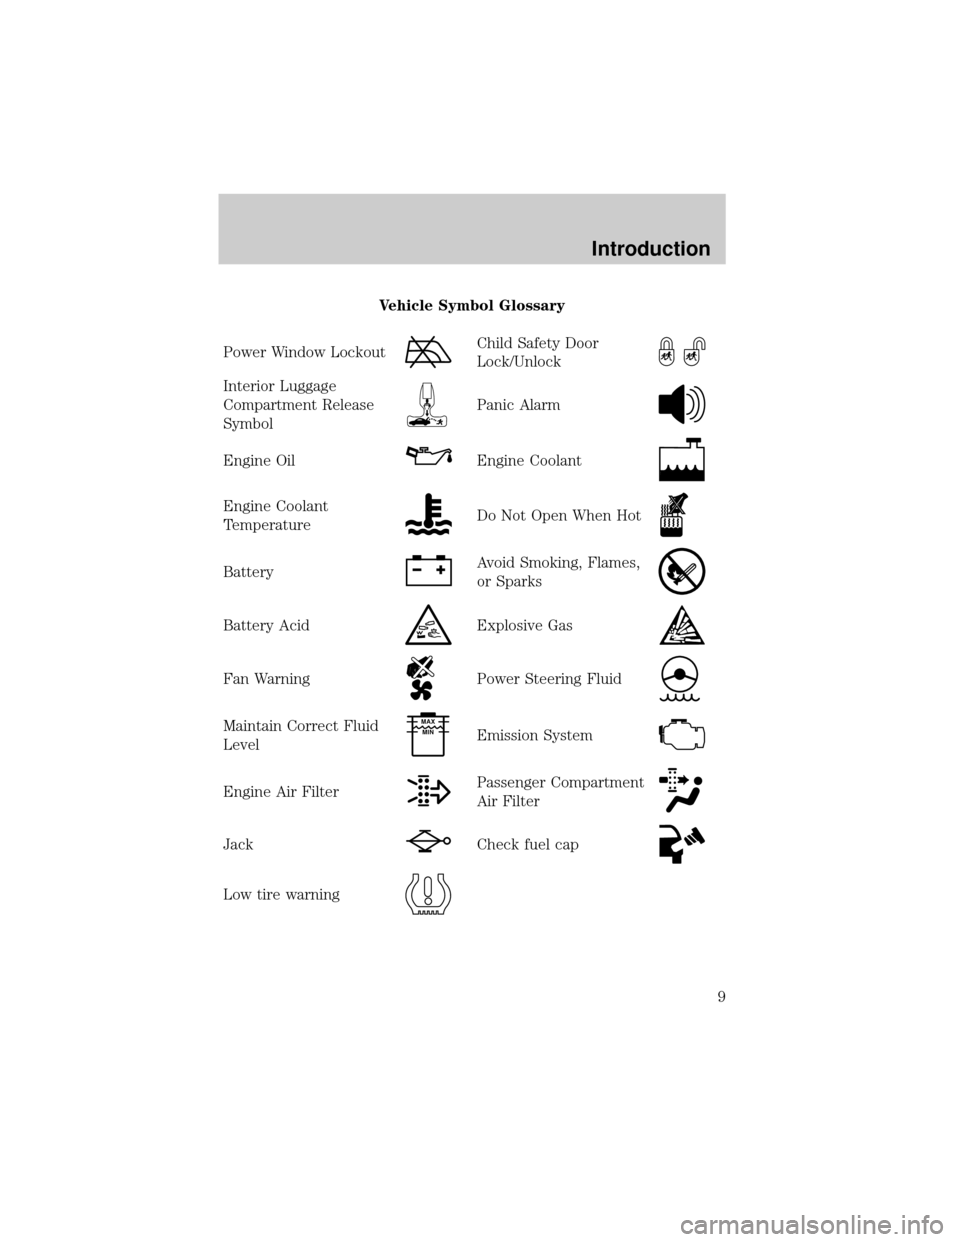
Vehicle Symbol Glossary
Power Window Lockout
Child Safety Door
Lock/Unlock
Interior Luggage
Compartment Release
Symbol
Panic Alarm
Engine OilEngine Coolant
Engine Coolant
TemperatureDo Not Open When Hot
BatteryAvoid Smoking, Flames,
or Sparks
Battery AcidExplosive Gas
Fan WarningPower Steering Fluid
Maintain Correct Fluid
LevelMAX
MIN
Emission System
Engine Air FilterPassenger Compartment
Air Filter
JackCheck fuel cap
Low tire warning
Introduction
9
Page 11 of 216

If the light remains on, have your vehicle serviced at the first available
opportunity.
Light is blinking:
Engine misfire is occurring which could damage your catalytic converter.
You should drive in a moderate fashion (avoid heavy acceleration and
deceleration) and have your vehicle serviced at the first available
opportunity.
Under engine misfire conditions, excessive exhaust temperatures
could damage the catalytic converter, the fuel system, interior
floor coverings or other vehicle components, possibly causing a
fire.
Brake system warning
To confirm the brake system
warning light is functional, it will
momentarily illuminate when the
ignition is turned to the ON position (alternatively for some vehicles
when the ignition is moved from the ON position to START position, the
light will momentarily illuminate prior to reaching the START position).
It also illuminates if the parking brake is engaged. If the brake system
warning light does not illuminate as described, seek service immediately.
Illumination after the parking brake is released indicates low brake fluid
level or a brake system malfunction and the brake system should be
serviced immediately by a qualified technician. Refer toBrakesin the
Drivingchapter for more information.
Anti-lock brake system (ABS)
To confirm the anti-lock brake
system (ABS) warning light is
functional it will momentarily
illuminate when the ignition is
turned to the ON position
(alternatively for some vehicles when the ignition is moved from the ON
position to the START position, the light will momentarily illuminate just
prior to reaching the START position). If the light remains on, continues
to flash or fails to illuminate, have the ABS serviced immediately. If the
ABS light remains on, it means the anti-lock brake system has
malfunctioned and is disabled, however, the normal brake system will
still function unless the brake warning light also remains illuminated and
parking brake is off. Refer toBrakesin theDrivingchapter for more
information.
ABS
Instrument Cluster
11
Page 26 of 216

Press the SEEK control to turn the
feature ON or OFF.
Menu mode
Press the MENU control to access
main menu features.
Use the SEEK control for
adjustments.
CD eject function
Press the eject control during CD
playback to eject the CD.
Setting the clock
Your vehicle is equipped with a separate instrument panel mounted
clock. Please refer toClockin theDriver controls chapterfor
instructions on setting the clock.
PREMIUM AM/FM STEREO/CASSETTE/SINGLE CD
SEEK
MENU
FM 1
AMC
BL RF
REW FFSCAN
BASS TREB SEL BALTAPE DISC
EJ CD
FADEAUTO
CLK
SIDE 1-2 COMP SHUFFLEEJ
MUTE
VOL PUSH ON
SEEK
TUNE AM FM
12 3456
DOLBY B NR
ST
Entertainment Systems
26
Page 33 of 216

DolbyTnoise reduction
Dolbytnoise reduction operates in
tape mode. Dolbytnoise reduction
reduces the amount of hiss and
static during tape playback.
Press the
control to activate (and deactivate) the Dolbytnoise
reduction.
Dolbytnoise reduction is manufactured under license from Dolbyt
Laboratories Licensing Corporation. ªDolbytº and the double-D
symbol
are registered trademarks of DolbytLaboratories Licensing
Corporation.
Compression adjust
Compression adjust brings soft and
loud CD passages together for a
more consistent listening level.
Press the COMP control to activate
and deactivate compression adjust.
Shuffle feature
The shuffle feature operates in CD
mode and plays all tracks on the
current disc in random order. If
equipped with the CD changer, the
shuffle feature continues to the next
disc after all tracks on the current disc are played.
Press to start this feature. Random order play will continue until the
control is pressed again.
Setting the clock
Your vehicle is equipped with a separate instrument panel mounted
clock. Please refer toClockin theDriver controls chapterfor
instructions on setting the clock.
4
COMP
5
SHUFFLE
6
Entertainment Systems
33
Page 41 of 216

Speaker balance adjust
Speaker sound distribution can be
adjusted between the right and left
speakers.
Press the BAL control. Use the SEL
control to adjust the sound between
the left and right speakers.
Speaker fade adjust
Speaker sound can be adjusted
between the front and rear
speakers.
Press the FADE control. Use the
SEL control to adjust the sound
between the front and rear speakers.
Mute mode
Press the control to mute the
playing media. Press the control
again to return to the playing media.
Setting the clock
Your vehicle is equipped with a separate instrument panel mounted
clock. Please refer toClockin theDriver controls chapterfor
instructions on setting the clock.
TROUBLESHOOTING THE CD PLAYER (IF EQUIPPED)
If sound skips:
²You may be traveling on a rough road, playing badly scratched discs or
the disc may be dirty. Skipping will not scratch the discs or damage
the player.
If player does not work:
²The disc is inserted with the label surface downward.
²The disc is dusty or defective.
²A disc with format and dimensions not within industry standards is
inserted.
BAL
FADE
SEL+
BAL
FADE
SEL+
Entertainment Systems
41
Page 52 of 216

Replacing headlamp bulbs
Make sure the headlamp switch is in the OFF position.
To remove the high or low beam headlamp bulb:
1. Lift the hood and release the wire
clip on the rear of the headlamp
assembly and remove the cover.
2. Disconnect the electrical
connector by turning the bulb
holder counterclockwise.
3. Pull the bulb holder straight out
to remove the bulb.
To install the new bulb:
Handle a halogen headlamp bulb carefully and keep out of
children's reach. Grasp the bulb by only its plastic base and do
not touch the glass. The oil from your hand could cause the bulb to
break the next time the headlamps are operated.
Note:If the bulb is accidentally touched, it should be cleaned with
rubbing alcohol before being used.
1. Install the new bulb in the lamp assembly by pushing it straight in and
turning to lock it in position. You may need to turn the bulb slightly to
align the grooves in the plastic base with the tabs in the lamp assembly.
Lights
52
Page 53 of 216

2. Connect the electrical connector to the bulb.
3. Install the protective cover and secure it with the wire clips.
4. Turn the headlamps on and make sure they work properly. if the
headlamp was correctly aligned before you changed the bulb, you need
to align it again.
Replacing front parking lamp/turn signal bulbs
1. Remove the headlamp assembly
cover.
2. Turn the bulb holder counter
clockwise.
3. Remove the bulb socket by
pulling it straight out from the lamp
assembly.
4. Pull the bulb straight out of the
socket and press in the new bulb.
5. Install the bulb socket into the
lamp assembly by turning clockwise.
Replacing side marker lamps
1. Push the complete light assembly
to the front and pull it out.
2. Remove the socket from the
assembly by turning it counter
clockwise.
3. Pull the bulb straight out and
replace it.
4. Install the bulb socket into the
assembly by turning it clockwise.
Replacing brake/turn signal/tail/backup lamps
The brake, turn signal, tail and backup lamps bulbs are located in the
same portion of the tail lamp assembly. Follow the same steps to replace
either bulb.
Lights
53
Page 54 of 216

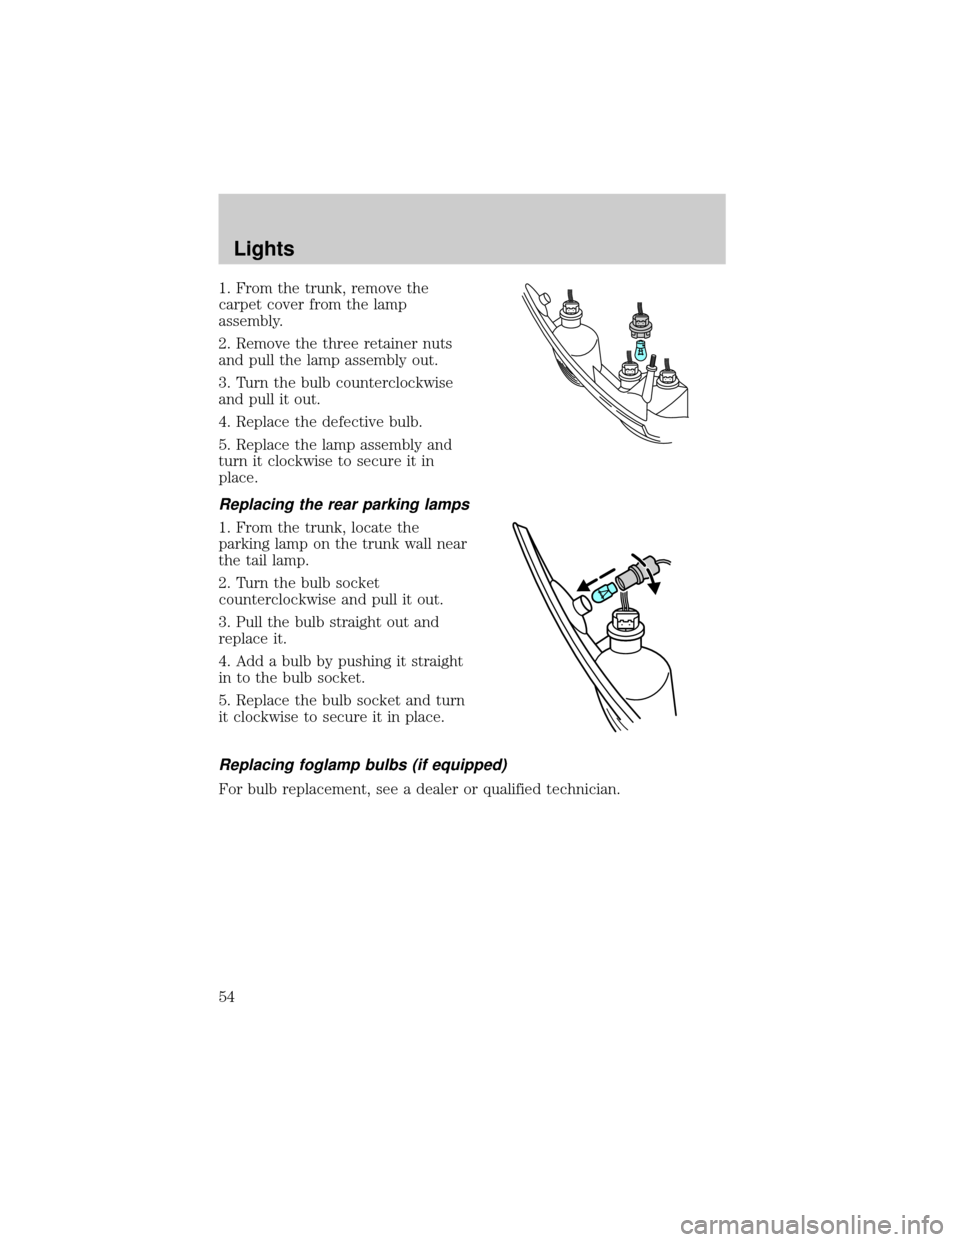
1. From the trunk, remove the
carpet cover from the lamp
assembly.
2. Remove the three retainer nuts
and pull the lamp assembly out.
3. Turn the bulb counterclockwise
and pull it out.
4. Replace the defective bulb.
5. Replace the lamp assembly and
turn it clockwise to secure it in
place.
Replacing the rear parking lamps
1. From the trunk, locate the
parking lamp on the trunk wall near
the tail lamp.
2. Turn the bulb socket
counterclockwise and pull it out.
3. Pull the bulb straight out and
replace it.
4. Add a bulb by pushing it straight
in to the bulb socket.
5. Replace the bulb socket and turn
it clockwise to secure it in place.
Replacing foglamp bulbs (if equipped)
For bulb replacement, see a dealer or qualified technician.
Lights
54