tow Mercury Mercury Cougar 2002 Owner's Manual
[x] Cancel search | Manufacturer: MERCURY, Model Year: 2002, Model line: Mercury Cougar, Model: Mercury Mercury Cougar 2002Pages: 216, PDF Size: 4.04 MB
Page 2 of 216

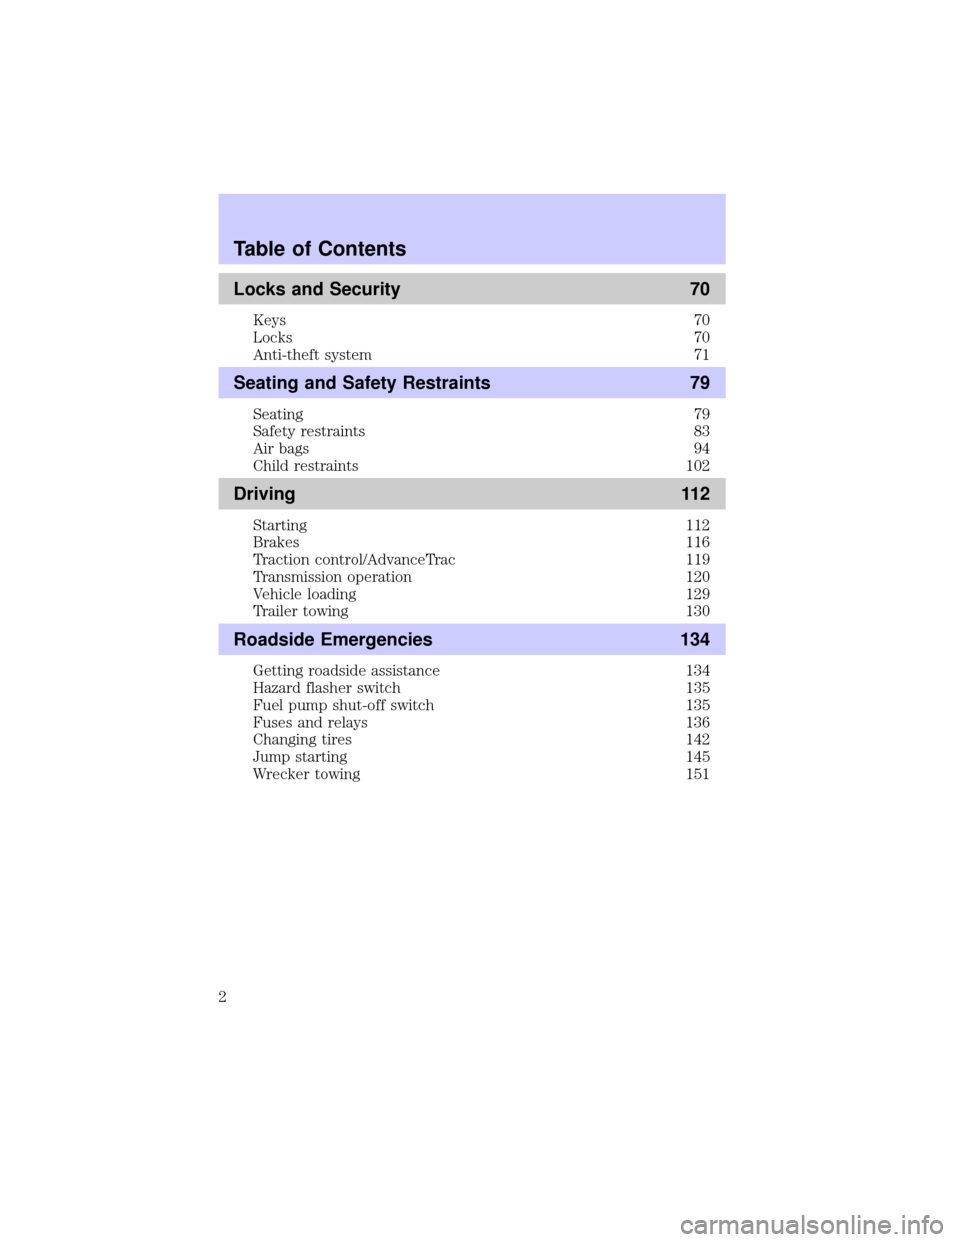
Locks and Security 70
Keys 70
Locks 70
Anti-theft system 71
Seating and Safety Restraints 79
Seating 79
Safety restraints 83
Air bags 94
Child restraints 102
Driving 112
Starting 112
Brakes 116
Traction control/AdvanceTrac 119
Transmission operation 120
Vehicle loading 129
Trailer towing 130
Roadside Emergencies 134
Getting roadside assistance 134
Hazard flasher switch 135
Fuel pump shut-off switch 135
Fuses and relays 136
Changing tires 142
Jump starting 145
Wrecker towing 151
Table of Contents
2
Page 6 of 216

Protecting the environment
We must all play our part in
protecting the environment. Correct
vehicle usage and the authorized
disposal of waste cleaning and
lubrication materials are significant
steps towards this aim. Information in this respect is highlighted in this
guide with the tree symbol.
BREAKING-IN YOUR VEHICLE
There are no particular guidelines for breaking-in your vehicle. During
the first 1,600 km (1,000 miles) of driving, vary speeds frequently. This is
recommended to give the moving parts a chance to break in.
SPECIAL NOTICES
Emission warranty
The New Vehicle Limited Warranty includes Bumper-to-Bumper
Coverage, Safety Restraint Coverage, Corrosion Coverage, and 7.3L
Power Stroke Diesel Engine Coverage. In addition, your vehicle is eligible
for Emissions Defect and Emissions Performance Warranties. For a
detailed description of what is covered and what is not covered, refer to
theWarranty Guidethat is provided to you along with your Owner's
Guide.
Introduction
6
Page 10 of 216

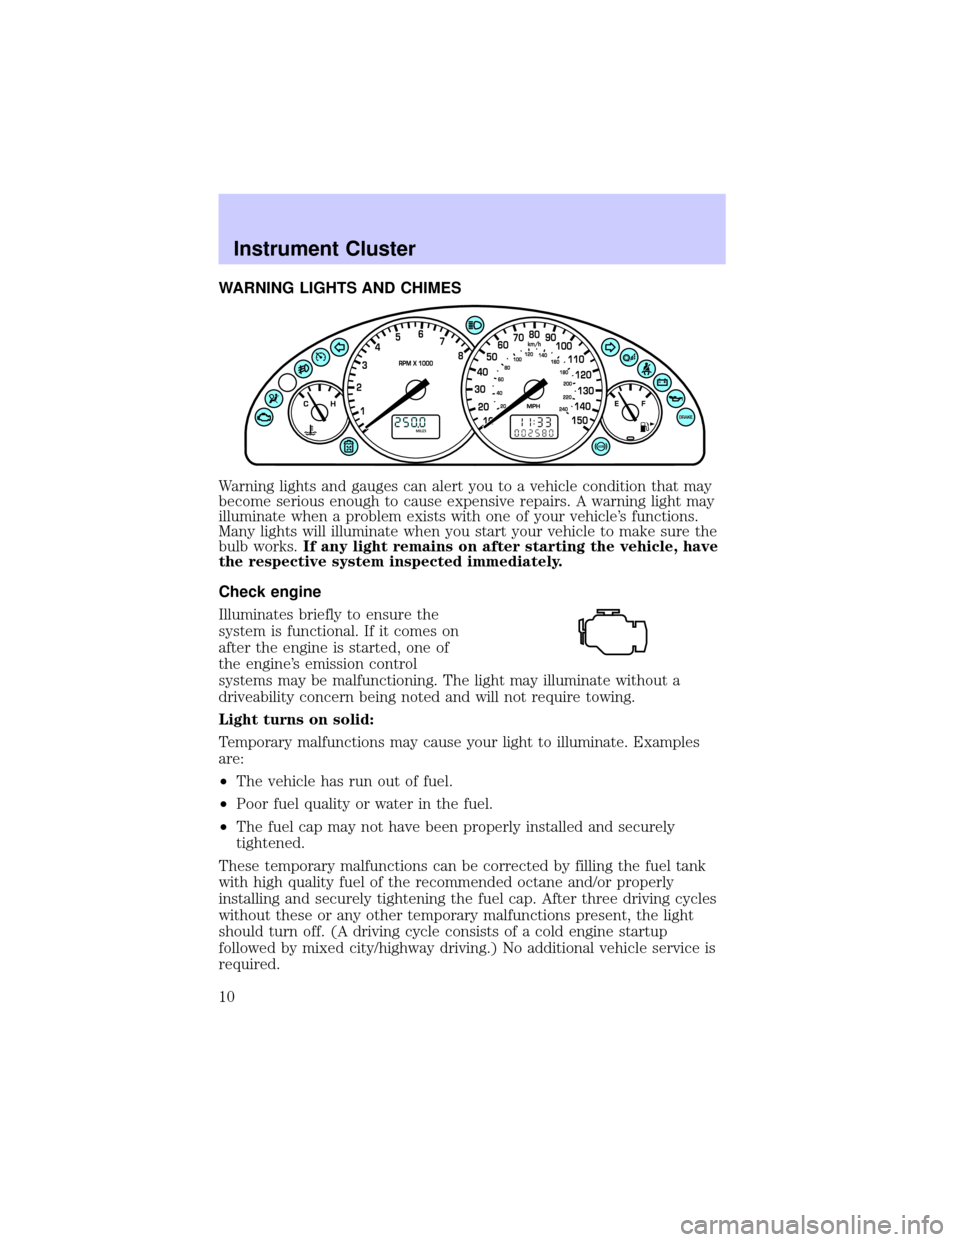
WARNING LIGHTS AND CHIMES
Warning lights and gauges can alert you to a vehicle condition that may
become serious enough to cause expensive repairs. A warning light may
illuminate when a problem exists with one of your vehicle's functions.
Many lights will illuminate when you start your vehicle to make sure the
bulb works.If any light remains on after starting the vehicle, have
the respective system inspected immediately.
Check engine
Illuminates briefly to ensure the
system is functional. If it comes on
after the engine is started, one of
the engine's emission control
systems may be malfunctioning. The light may illuminate without a
driveability concern being noted and will not require towing.
Light turns on solid:
Temporary malfunctions may cause your light to illuminate. Examples
are:
²The vehicle has run out of fuel.
²Poor fuel quality or water in the fuel.
²The fuel cap may not have been properly installed and securely
tightened.
These temporary malfunctions can be corrected by filling the fuel tank
with high quality fuel of the recommended octane and/or properly
installing and securely tightening the fuel cap. After three driving cycles
without these or any other temporary malfunctions present, the light
should turn off. (A driving cycle consists of a cold engine startup
followed by mixed city/highway driving.) No additional vehicle service is
required.
Instrument Cluster
10
Page 43 of 216

RADIO RECEPTION FACTORS
Three factors can affect radio reception:
²Distance/strength.The further an FM signal travels, the weaker it is.
The listenable range of the average FM station is approximately 40 km
(24 miles). This range can be affected by ªsignal modulation.º Signal
modulation is a process radio stations use to increase their
strength/volume relative to other stations.
²Terrain.Hills, mountains and tall buildings between your vehicle's
antenna and the radio station signal can cause FM reception problems.
Static can be caused on AM stations by power lines, electric fences,
traffic lights and thunderstorms. Moving away from an interfering
structure (out of its ªshadowº) returns your reception to normal.
²Station overload.Weak signals are sometimes captured by stronger
signals when you pass a broadcast tower. A stronger signal may
temporarily overtake a weaker signal and play while the weak station
frequency is displayed.
The audio system automatically switches to single channel reception if it
will improve the reception of a station normally received in stereo.
AUDIO SYSTEM WARRANTIES AND SERVICE
Refer to theWarranty Guidefor audio system warranty information.
If service is necessary, see your dealer or a qualified technician.
Entertainment Systems
43
Page 47 of 216

HEADLAMP CONTROL
Rotate the headlamp control to the
first position to turn on the parking
lamps.
Rotate to the second position to
turn on the headlamps.
Foglamp control (if equipped)
The headlamp control also operates
the foglamps. The foglamps can be
turned on when the headlamp
control is in the
or
the
position and the high
beams are not turned on.
Pull headlamp control towards you
to turn foglamps on. The foglamp
indicator light
will illuminate.
Daytime running lamps (DRL) (if equipped)
Turns the headlamps on with a reduced output.
To activate:
²the ignition must be in the ON position and
²the headlamp control is in the OFF or Parking lamps position.
Always remember to turn on your headlamps at dusk or during
inclement weather. The Daytime Running Lamp (DRL) system
does not activate with your tail lamps and generally may not provide
adequate lighting during these conditions. Failure to activate your
headlamps under these conditions may result in a collision.
Lights
47
Page 48 of 216

High beams
Push the lever toward the
instrument panel to activate. Pull
the lever towards you to deactivate.
Flash to pass
Pull toward you slightly to activate
and release to deactivate.
PANEL DIMMER CONTROL
Use to adjust the brightness of the
instrument panel during parklamp,
headlamp, and autolamp operation.
²Rotate up to brighten.
²Rotate down to dim.
²Rotate fully up to turn on the
interior lights.
Lights
48
Page 57 of 216

WINDSHIELD WIPER/WASHER CONTROLS
Lift the windshield wiper control to
the desired interval.
²Intermittent: push lever up to the
first position.
²Low: push lever up to the second
position.
²High: push lever up to the third
position.
For a single wipe, push the lever
downward.
Intermittent wiper control
Rotate the variable intermittent
wiper control to the desired speed.
²1 = Short time interval
²6 = Extended time interval
Washer
Pull the lever toward the steering
wheel. The washer operates in
conjunction with the windshield
wipers.
REAR WINDOW WIPER/WASHER (IF EQUIPPED)
Wiper
To turn it on, push the wiper
control inward. Push the control in
again to turn it off.
Washer
Push the lever away from the
steering wheel.
Driver Controls
57
Page 58 of 216

WINDSHIELD WIPER BLADES
Check the wiper blades for wear at least twice a year or when they seem
less effective. Substances such as tree sap and some hot wax treatments
used by commercial car washes reduce the effectiveness of wiper blades.
CHECKING WIPER BLADES
Check the wiper blades on your
vehicle for roughness by running the
tip of your fingers over the edge of
the blade.
Traces of grease, silicone and fuel
also prevent wiper blades from
functioning properly. Clean the
blades regularly using a damp cloth
or sponge soaked with diluted
windscreen or car wash detergent.
Change the wiper blades on your vehicle at least once a year.
CHANGING THE WIPER BLADES
To replace the wiper blades:
1. Pull the wiper arm away from the
windshield and lock into the service
position.
2. Turn the blade at an angle from
the wiper arm. Push the lock pin
manually to release the blade and
pull the wiper blade down toward
the windshield to remove it from the
arm.
3. Attach the new wiper to the
wiper arm and press it into place
until a click is heard.
Driver Controls
58
Page 73 of 216

Opening the luggage compartment
Press this control to open the
luggage compartment.
Be certain the luggage compartment
is closed before driving your vehicle.
The luggage compartment may
appear closed, but it may not be
latched. Failure to do so may cause
objects to fall out of the luggage
compartment or block rear view
vision.
Sounding a panic alarm
Press this control to activate the
alarm. The horn will sound and the
lights will flash for approximately
two minutes.
To deactivate the alarm, press the
control again or turn the ignition to
ON.
Replacing the batteries
The transmitter is powered by one coin type three-volt lithium batteries.
Typical operating range will allow you to be up to 10 meters (33 feet)
away from your vehicle. A decrease in operating range can be caused by:
²Weather conditions
²Nearby radio towers
²Structures around the vehicle
²Other vehicles parked next to the vehicle
To replace the batteries:
Locks and Security
73
Page 76 of 216

²A second key on the same key ring as thecoded key
If any of these items are present, you need to keep these objects from
touching thecoded keywhile starting the engine. These objects and
devices cannot damage thecoded key,but can cause a momentary ªno
startº condition if they are too close to the key during engine start. If a
problem occurs, turn ignition OFF and restart the engine with all other
objects on the key ring held away from the ignition key. Check to make
sure thecoded keyis an approved Mercurycoded key.
If your keys are lost or stolen you will need to do the following:
²Use your spare key to start the vehicle. or
²Have your vehicle towed to a dealership. The key codes will need to
be erased from your vehicle and new key codes will need to be
re-coded.
Replacing coded keys can be very costly and you may want to store an
extra programmed key away from the vehicle in a safe place to prevent
an unforeseen inconvenience.
The correctcoded keymust be used for your vehicle. The use of the
wrong type ofcoded keymay lead to a ªno startº condition.
If an unprogrammed key is used in the ignition it will cause a ªno
startº condition.
Programming spare keys
A maximum of seven keys can be coded to your vehicle. Only
SecuriLockykeys can be used. To program acoded keyyourself, you
will need two previously programmedcoded keys(keys that already
operate your vehicle's engine) and the new unprogrammed key(s) readily
accessible for timely implementation of each step in the procedure.
If two previously programmed coded keys are not available, you must
bring your vehicle to your dealership to have the spare coded key(s)
programmed.
Please read and understand the entire procedure before you begin.
Locks and Security
76