Mercury Milan 2011 s Repair Manual
Manufacturer: MERCURY, Model Year: 2011, Model line: Milan, Model: Mercury Milan 2011Pages: 354, PDF Size: 2.55 MB
Page 61 of 354
Replacing interior bulbs
Check the operation of all bulbs frequently.
Replacing exterior bulbs
Check the operation of all the bulbs frequently.
Replacing headlamp bulbs
High beam/low beam bulb replacement
For driver side replacement of this bulb, do the following:
WARNING:To reduce the risk of vehicle damage and/or
personal burn injuries do not start your engine with the air
cleaner removed and do not remove it while the engine is running.
1. Release the clamps that secure the air filter housing cover. See
Changing the air filter elementin theMaintenance & Specifications
section for more information.
2. Carefully separate the two halves of the air filter housing.
3. Locate the mass air flow sensor electrical connector on the air outlet
tube. This connector will need to be unplugged.
4. Remove the air filter assembly.
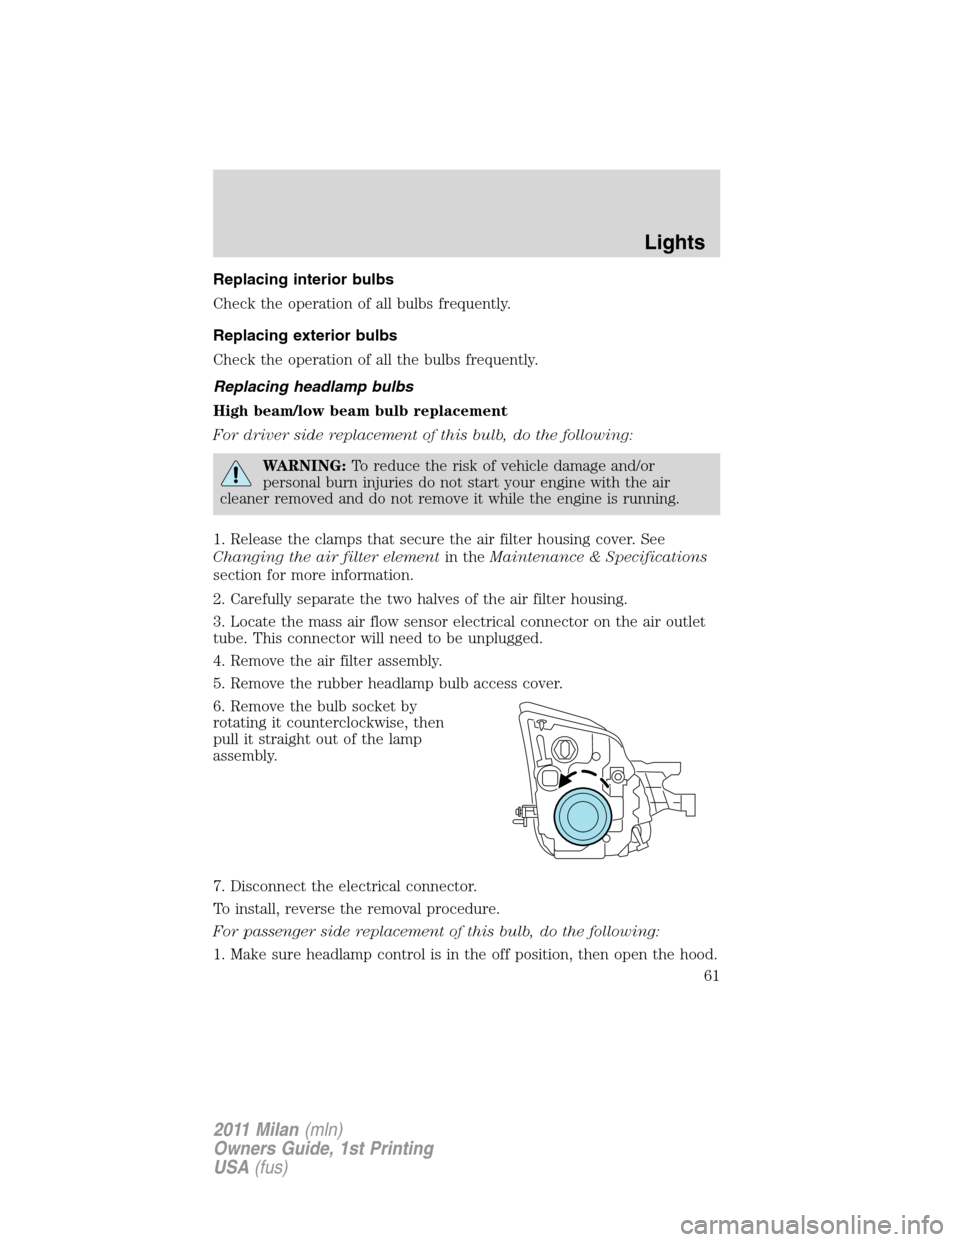
5. Remove the rubber headlamp bulb access cover.
6. Remove the bulb socket by
rotating it counterclockwise, then
pull it straight out of the lamp
assembly.
7. Disconnect the electrical connector.
To install, reverse the removal procedure.
For passenger side replacement of this bulb, do the following:
1. Make sure headlamp control is in the off position, then open the hood.
Lights
61
2011 Milan(mln)
Owners Guide, 1st Printing
USA(fus)
Page 62 of 354
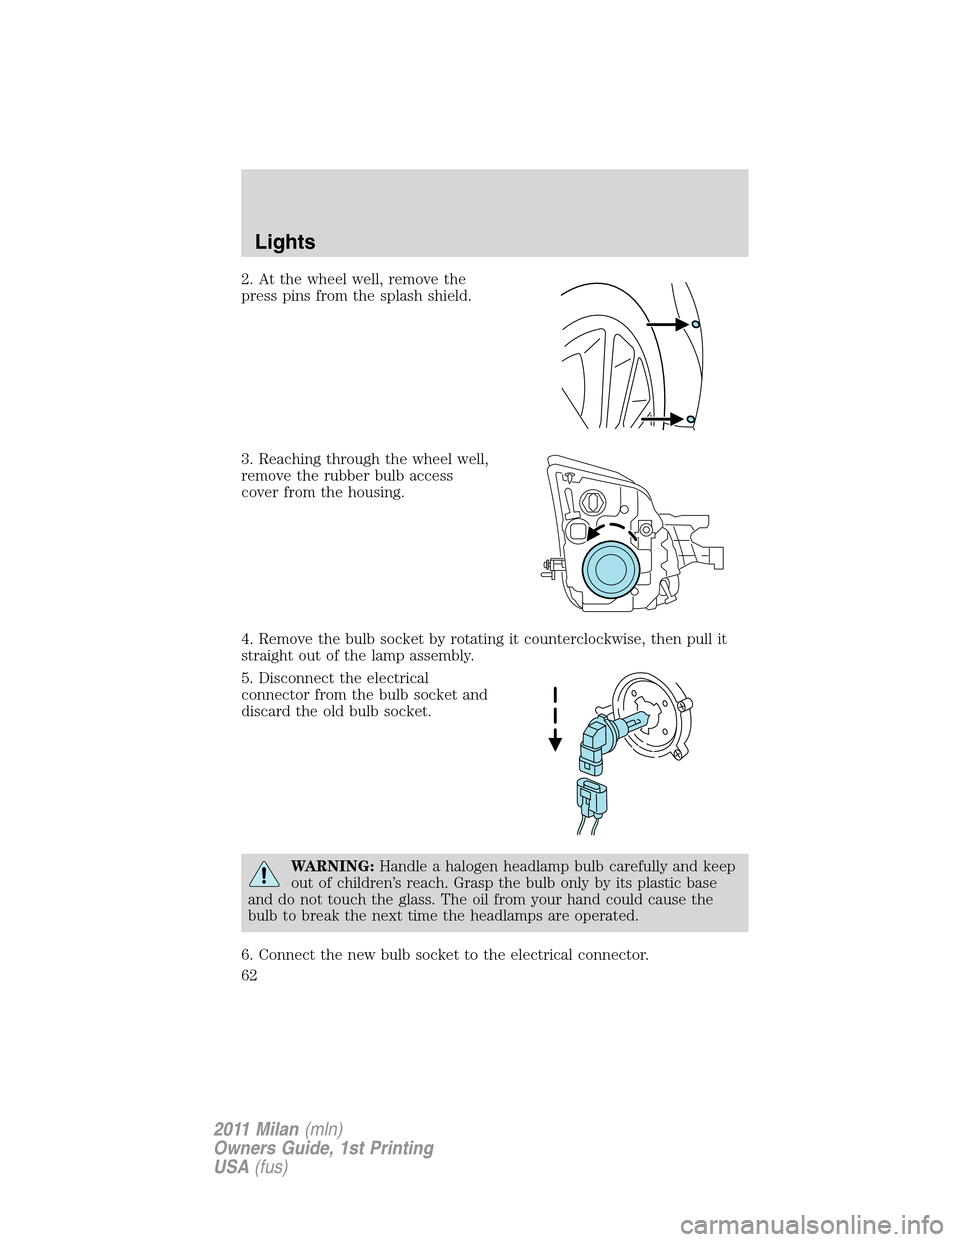
2. At the wheel well, remove the
press pins from the splash shield.
3. Reaching through the wheel well,
remove the rubber bulb access
cover from the housing.
4. Remove the bulb socket by rotating it counterclockwise, then pull it
straight out of the lamp assembly.
5. Disconnect the electrical
connector from the bulb socket and
discard the old bulb socket.
WARNING:Handle a halogen headlamp bulb carefully and keep
out of children’s reach. Grasp the bulb only by its plastic base
and do not touch the glass. The oil from your hand could cause the
bulb to break the next time the headlamps are operated.
6. Connect the new bulb socket to the electrical connector.
Lights
62
2011 Milan(mln)
Owners Guide, 1st Printing
USA(fus)
Page 63 of 354
7. Install the new bulb socket into the lamp assembly by aligning the
indexing fingers, then rotate clockwise to the locked position.
8. Install the rubber bulb access cover to the housing.
9. Re-apply pressure around the housing to make sure the protective
rubber cover is completely seated.
10. Turn the headlamps on and make sure they work properly. If the
headlamp was correctly aligned before you changed the bulb, you should
not need to align it again.
Replacing front parking lamp/turn signal bulbs
1. Make sure headlamp control is in the off position, then open the hood.
2. Reach over the front bolster.
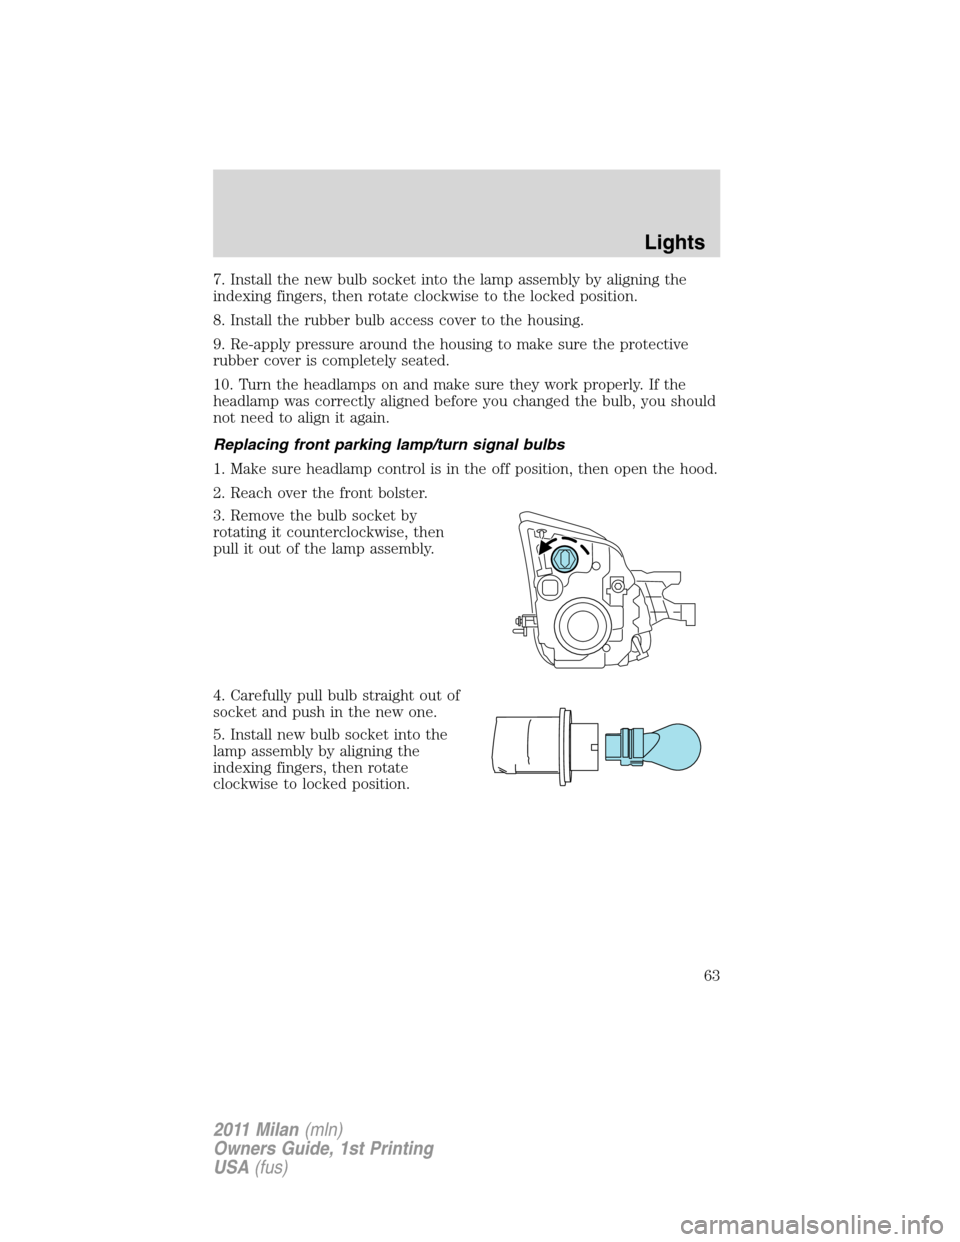
3. Remove the bulb socket by
rotating it counterclockwise, then
pull it out of the lamp assembly.
4. Carefully pull bulb straight out of
socket and push in the new one.
5. Install new bulb socket into the
lamp assembly by aligning the
indexing fingers, then rotate
clockwise to locked position.
Lights
63
2011 Milan(mln)
Owners Guide, 1st Printing
USA(fus)
Page 64 of 354
Replacing front side marker bulbs
1. Make sure the headlamp control
is in the off position.
2. From underneath the vehicle,
partially remove the tire splash
shield by removing the press pins.
After removing to allow free access
to the front side marker lamp bulb
and electrical wire harness, the
splash shield should be able to be
repositioned.
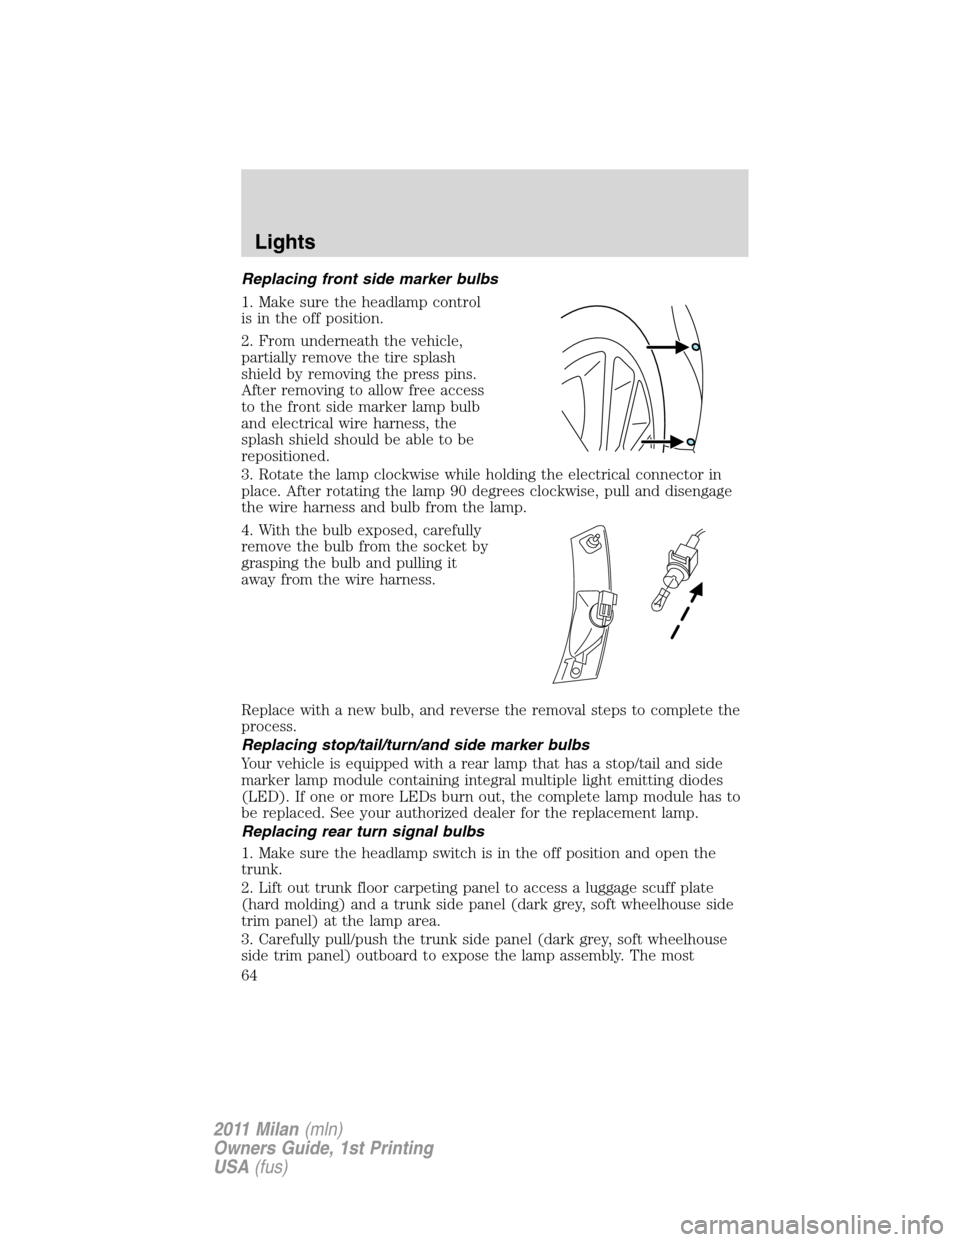
3. Rotate the lamp clockwise while holding the electrical connector in
place. After rotating the lamp 90 degrees clockwise, pull and disengage
the wire harness and bulb from the lamp.
4. With the bulb exposed, carefully
remove the bulb from the socket by
grasping the bulb and pulling it
away from the wire harness.
Replace with a new bulb, and reverse the removal steps to complete the
process.
Replacing stop/tail/turn/and side marker bulbs
Your vehicle is equipped with a rear lamp that has a stop/tail and side
marker lamp module containing integral multiple light emitting diodes
(LED). If one or more LEDs burn out, the complete lamp module has to
be replaced. See your authorized dealer for the replacement lamp.
Replacing rear turn signal bulbs
1. Make sure the headlamp switch is in the off position and open the
trunk.
2. Lift out trunk floor carpeting panel to access a luggage scuff plate
(hard molding) and a trunk side panel (dark grey, soft wheelhouse side
trim panel) at the lamp area.
3. Carefully pull/push the trunk side panel (dark grey, soft wheelhouse
side trim panel) outboard to expose the lamp assembly. The most
Lights
64
2011 Milan(mln)
Owners Guide, 1st Printing
USA(fus)
Page 65 of 354

effective point to grasp the trunk side panel when pulling it out from the
luggage scuff plate is at it’s bottom edge where that edge meets the
exposed sheet metal of the trunk floor.
Note:Do not allow the trunk side panel to remain bent and untucked
from the luggage scuff plate (hard molding) for a long period of time.
Doing so may result in permanent deformation.
4. Remove the bulb socket by
rotating it counterclockwise, then
pulling it out of the lamp assembly.
5. Pull the bulb from the socket and
push in the new bulb.
6. Install the bulb socket into the
lamp assembly by rotating it
clockwise.
7. Carefully push the trunk side
panel (dark grey, soft wheelhouse
side trim panel) back in position to the luggage scuff plate (hard
molding).
8. Install trunk floor carpeting panel.
Replacing backup lamp bulbs
The backup lamp bulbs are located in the trunk lid.
1. Make sure the headlamp switch is in the off position and open trunk
to access the lamp assembly.
2. Position the decklid trim aside by removing 3 to 4 pin-type retainers
to expose the lamp assembly.
3. Remove the bulb socket by
rotating it counterclockwise, then
pulling it out of the lamp assembly.
4. Pull the bulb from the socket and
push in the new bulb.
5. Install the bulb socket into the
lamp assembly by rotating it
clockwise.
6. Carefully reposition the trim back
to its original position and secure
the retainers.
Lights
65
2011 Milan(mln)
Owners Guide, 1st Printing
USA(fus)
Page 66 of 354
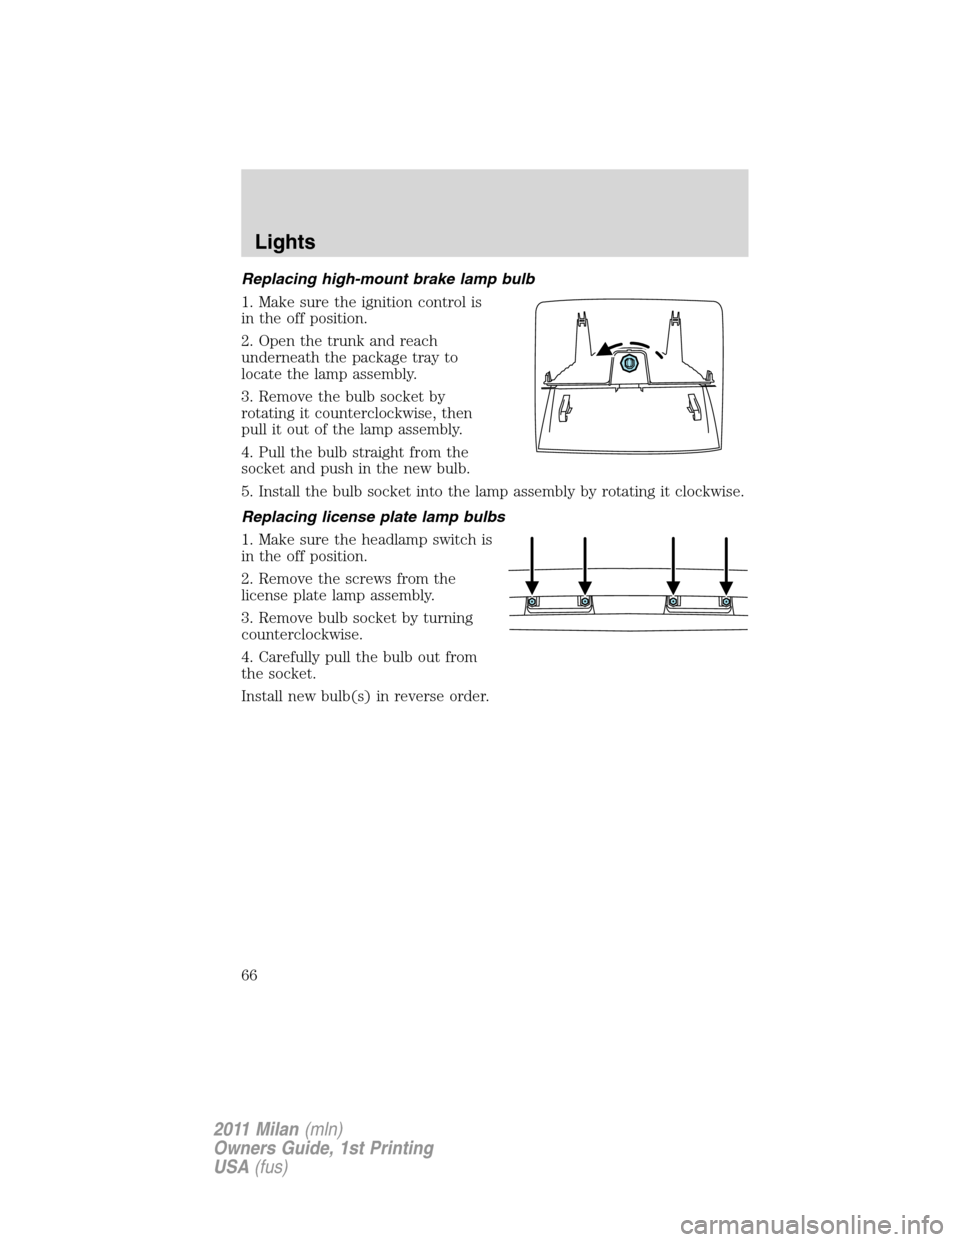
Replacing high-mount brake lamp bulb
1. Make sure the ignition control is
in the off position.
2. Open the trunk and reach
underneath the package tray to
locate the lamp assembly.
3. Remove the bulb socket by
rotating it counterclockwise, then
pull it out of the lamp assembly.
4. Pull the bulb straight from the
socket and push in the new bulb.
5. Install the bulb socket into the lamp assembly by rotating it clockwise.
Replacing license plate lamp bulbs
1. Make sure the headlamp switch is
in the off position.
2. Remove the screws from the
license plate lamp assembly.
3. Remove bulb socket by turning
counterclockwise.
4. Carefully pull the bulb out from
the socket.
Install new bulb(s) in reverse order.
Lights
66
2011 Milan(mln)
Owners Guide, 1st Printing
USA(fus)
Page 67 of 354

Replacing fog lamp bulbs
1. Make sure the fog lamp switch is
in the off position.
2. From underneath the vehicle,
partially remove the tire splash
shield by removing four drive
screws.
After removing to allow free access
to the front fog lamp bulb and
electrical wire harness, the splash shield flap can be repositioned.
3. Rotate the harness/bulb assembly
counterclockwise to remove from
the fog lamp.
4. Carefully disconnect the bulb
from the harness assembly via the
two snap clips.
Install the new bulb in reverse order.
Lights
67
2011 Milan(mln)
Owners Guide, 1st Printing
USA(fus)
Page 68 of 354

MULTI-FUNCTION LEVER
Windshield wiper:Rotate the end
of the control away from you to
increase the speed of the wipers;
rotate towards you to decrease the
speed of the wipers.
Speed dependent wipers:When the wiper control is set to any of the
interval settings except the longest pause setting, the pause time
between wiping will automatically adjust with the vehicle speed. The
faster your vehicle is travelling the shorter the pause time between wipes
will become.
Rain-sensing wipers (if equipped):The rain-sensing wipers will
automatically activate when moisture is present on the windshield and
the multi-function switch is set to one of five auto/interval moisture
sensitivity settings. Rotate the end of the control toward the windshield
to increase the sensitivity. The speed of the rain-sensitive wipers will
vary based on the amount of moisture detected on the windshield and
the auto/interval setting. There are no interval (intermittent wipe)
settings on vehicles with rain-sensing wipers. The wipers will continue to
wipe as long as the presence of moisture is detected on the windshield.
More or less wiping may occur depending on humidity, mist or light rain,
or road spray.
Keep the outside of the windshield clean, especially the area around the
rear view mirror where the sensor is located or rain sensor performance
may be affected.
Note:During winter driving conditions with ice, snow or a salty road
mist, inconsistent or unexpected wiping or smearing may occur. In these
conditions, you can lower the sensitivity to reduce the amount of
smearing or override the feature by selecting low- or high-speed wiping
or turning the wiper system off.
Note:The wipers must be turned off before entering a car wash.
Driver Controls
68
2011 Milan(mln)
Owners Guide, 1st Printing
USA(fus)
Page 69 of 354

Windshield washer:Press the end
of the stalk:
•briefly: causes a single swipe of
the wipers without washer fluid.
•a quick press and hold: the
wipers will swipe three times with
washer fluid.
•a long press and hold: the wipers
and washer fluid will be activated
for up to ten seconds.
Courtesy wipe feature:One extra wipe will occur a few seconds after
washing the front window to clear any excess washer fluid remaining on
the windshield.
Note:Do not operate the washer when the washer reservoir is empty.
This may cause the washer pump to overheat. Check the washer fluid
level frequently. Do not operate the wipers when the windshield is dry.
This may scratch the glass, damage the wiper blades and cause the wiper
motor to burn out. Before operating the wiper on a dry windshield,
always use the windshield washer. In freezing weather, be sure the wiper
blades are not frozen to the windshield before operating the wipers.
Windshield wiper rainlamp feature (if equipped with autolamp)
When the windshield wipers are turned on during daylight, and the
headlamp control is in the autolamp position, the exterior lamps will turn
on after a brief delay and will remain on until the wipers are turned off.
TILT/TELESCOPE STEERING WHEEL
To adjust the steering wheel:
1. Pull the lever down to unlock the
steering column.
2. While the lever is in the down
position, move the steering wheel
up or down and in or out until you
find the desired position.
3. While holding the steering wheel
in place, pull the lever up to its
original position to lock the steering
column.
Driver Controls
69
2011 Milan(mln)
Owners Guide, 1st Printing
USA(fus)
Page 70 of 354

WARNING:Never adjust the steering wheel when the vehicle is
moving.
ILLUMINATED VISOR MIRROR
Lift the mirror cover to turn on the
visor mirror lamps.
Slide-on-rod feature
Rotate the visor towards the side
window and extend it rearward for
additional sunlight coverage.
Note:To stow the visor back into
the headliner, visor must be
retracted before moving it back
towards the windshield.
OVERHEAD CONSOLE
The appearance of your vehicle’s overhead console will vary according to
your option package.
Driver Controls
70
2011 Milan(mln)
Owners Guide, 1st Printing
USA(fus)