low beam Mercury Monterey 2004 Owner's Manuals
[x] Cancel search | Manufacturer: MERCURY, Model Year: 2004, Model line: Monterey, Model: Mercury Monterey 2004Pages: 272, PDF Size: 4.29 MB
Page 37 of 272
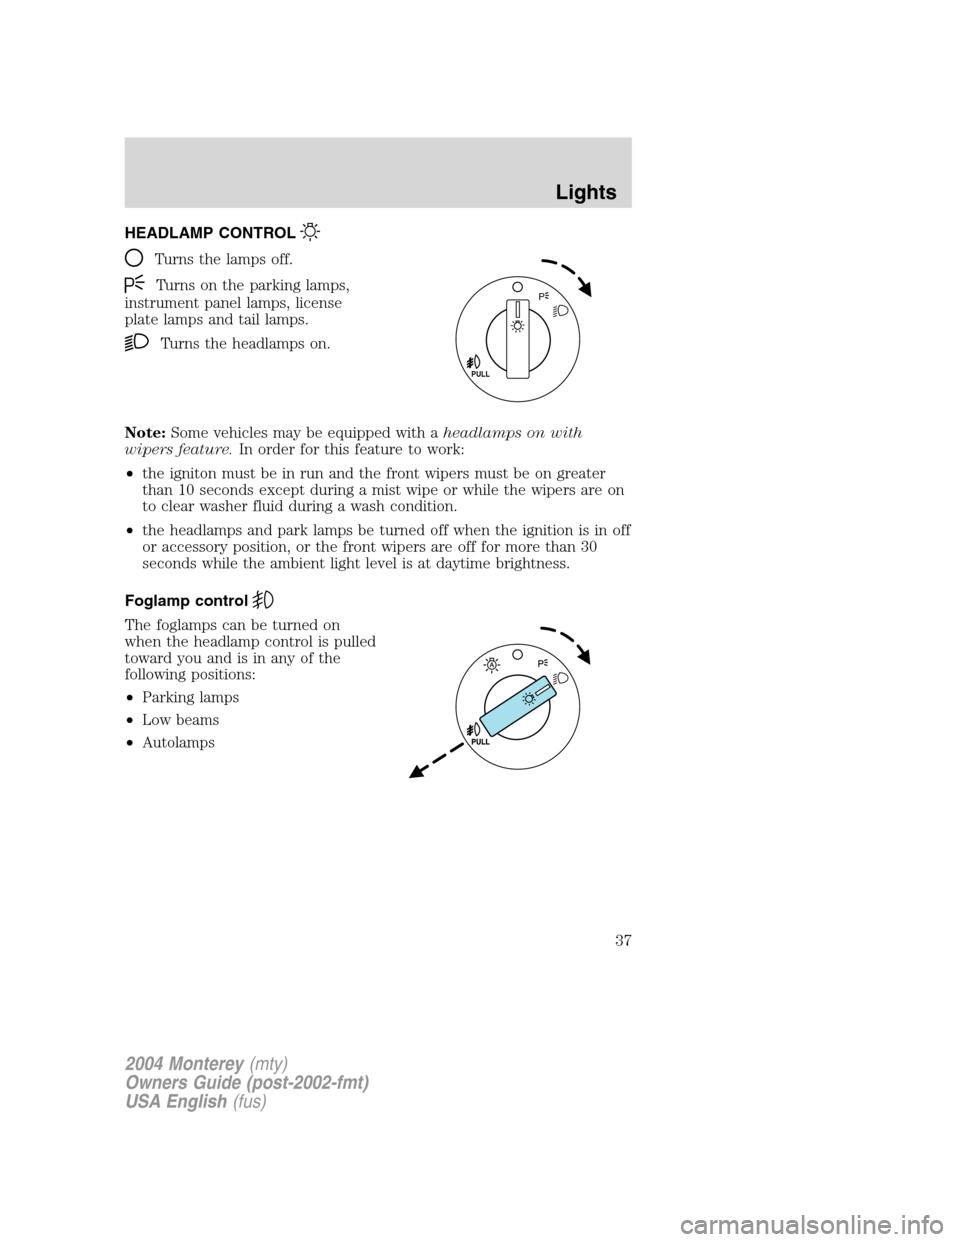
HEADLAMP CONTROL
Turns the lamps off.
Turns on the parking lamps,
instrument panel lamps, license
plate lamps and tail lamps.
Turns the headlamps on.
Note:Some vehicles may be equipped with aheadlamps on with
wipers feature.In order for this feature to work:
•the igniton must be in run and the front wipers must be on greater
than 10 seconds except during a mist wipe or while the wipers are on
to clear washer fluid during a wash condition.
•the headlamps and park lamps be turned off when the ignition is in off
or accessory position, or the front wipers are off for more than 30
seconds while the ambient light level is at daytime brightness.
Foglamp control
The foglamps can be turned on
when the headlamp control is pulled
toward you and is in any of the
following positions:
•Parking lamps
•Low beams
•Autolamps
PULL
P
2004 Monterey(mty)
Owners Guide (post-2002-fmt)
USA English(fus)
Lights
Lights
37
Page 38 of 272
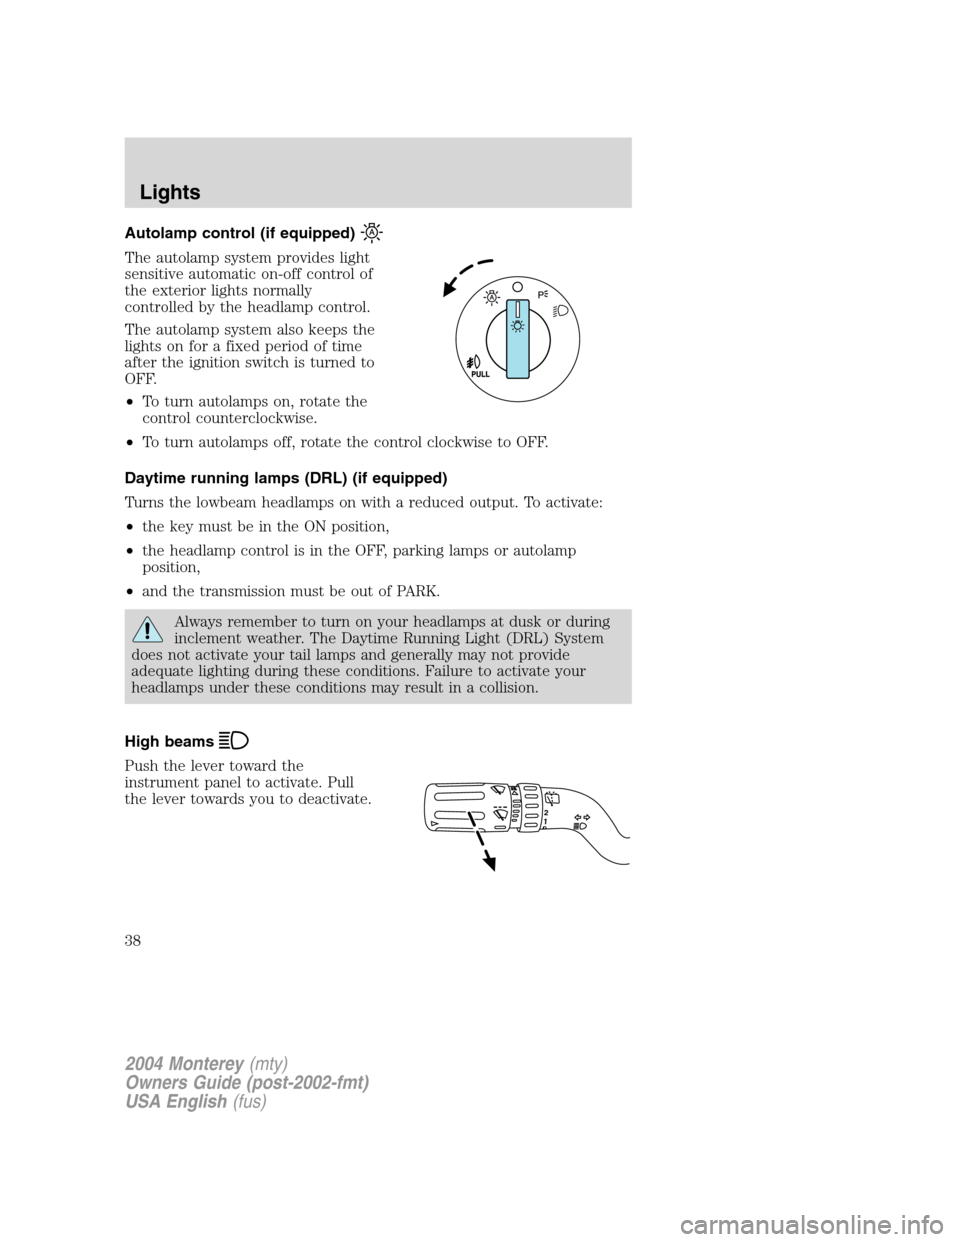
Autolamp control (if equipped)
The autolamp system provides light
sensitive automatic on-off control of
the exterior lights normally
controlled by the headlamp control.
The autolamp system also keeps the
lights on for a fixed period of time
after the ignition switch is turned to
OFF.
•To turn autolamps on, rotate the
control counterclockwise.
•To turn autolamps off, rotate the control clockwise to OFF.
Daytime running lamps (DRL) (if equipped)
Turns the lowbeam headlamps on with a reduced output. To activate:
•the key must be in the ON position,
•the headlamp control is in the OFF, parking lamps or autolamp
position,
•and the transmission must be out of PARK.
Always remember to turn on your headlamps at dusk or during
inclement weather. The Daytime Running Light (DRL) System
does not activate your tail lamps and generally may not provide
adequate lighting during these conditions. Failure to activate your
headlamps under these conditions may result in a collision.
High beams
Push the lever toward the
instrument panel to activate. Pull
the lever towards you to deactivate.
12
2004 Monterey(mty)
Owners Guide (post-2002-fmt)
USA English(fus)
Lights
38
Page 40 of 272
AIMING THE HEADLAMPS
The headlamps on your vehicle are properly aimed at the assembly plant.
If your vehicle has been in an accident the alignment of your headlamps
should be checked by a qualified service technician.
You will need one #2 Phillips screwdriver to make the adjustments.
Vertical aim adjustment
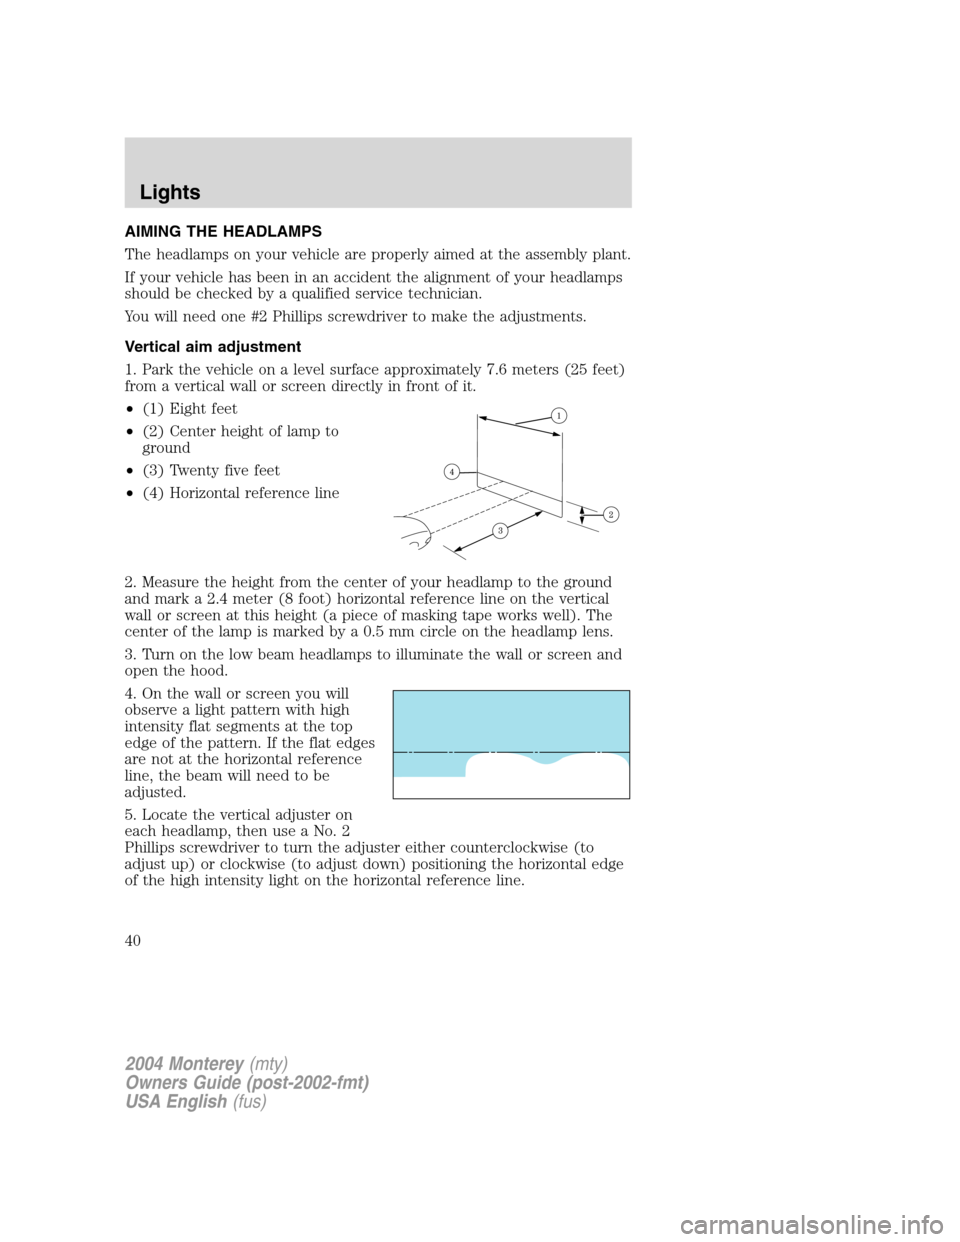
1. Park the vehicle on a level surface approximately 7.6 meters (25 feet)
from a vertical wall or screen directly in front of it.
•(1) Eight feet
•(2) Center height of lamp to
ground
•(3) Twenty five feet
•(4) Horizontal reference line
2. Measure the height from the center of your headlamp to the ground
and mark a 2.4 meter (8 foot) horizontal reference line on the vertical
wall or screen at this height (a piece of masking tape works well). The
center of the lamp is marked by a 0.5 mm circle on the headlamp lens.
3. Turn on the low beam headlamps to illuminate the wall or screen and
open the hood.
4. On the wall or screen you will
observe a light pattern with high
intensity flat segments at the top
edge of the pattern. If the flat edges
are not at the horizontal reference
line, the beam will need to be
adjusted.
5. Locate the vertical adjuster on
each headlamp, then use a No. 2
Phillips screwdriver to turn the adjuster either counterclockwise (to
adjust up) or clockwise (to adjust down) positioning the horizontal edge
of the high intensity light on the horizontal reference line.
2004 Monterey(mty)
Owners Guide (post-2002-fmt)
USA English(fus)
Lights
40
Page 184 of 272
Fuse/Relay
LocationFuse Amp
RatingPower Distribution Box
Description
8 40A** Anti-lock Brake System (ABS) #2
(coil power)
9 30A** Power liftgate
10 30A** SJB accessory #1 (passenger
window, radio, vent windows)
11 30A** Left power seat/heated seat
12 40A** ABS #1 (pump motor)
13 40A** Rear defroster
14 30A** Front climate control system
blower motor
15 30A** Right power seat/heated seat
16 30A** Left-hand power sliding door
20 Mini relay Powertrain Control Module (PCM)
power
21 Mini relay Horn
22 Micro relay A/C clutch
23 Micro relay High beams
24 Mini relay Starter
25 Micro relay Fuel pump
26 Micro relay Fog lamps
27—Not used
28 Mini relay Auxiliary blower
29 Micro relay Trailer park lamps
30 Micro relay Left trailer stop/turn lamps
31 Micro relay Right trailer stop/turn lamps
32 Mini relay Rear defroster
40 15A* Engine #1 (A/C relay coil, IMRC,
HEGO sensors, Canister purge,
Transaxle, Canister vent)
41 25A* Horn
42 10A* A/C clutch
2004 Monterey(mty)
Owners Guide (post-2002-fmt)
USA English(fus)
Roadside Emergencies
184
Page 186 of 272
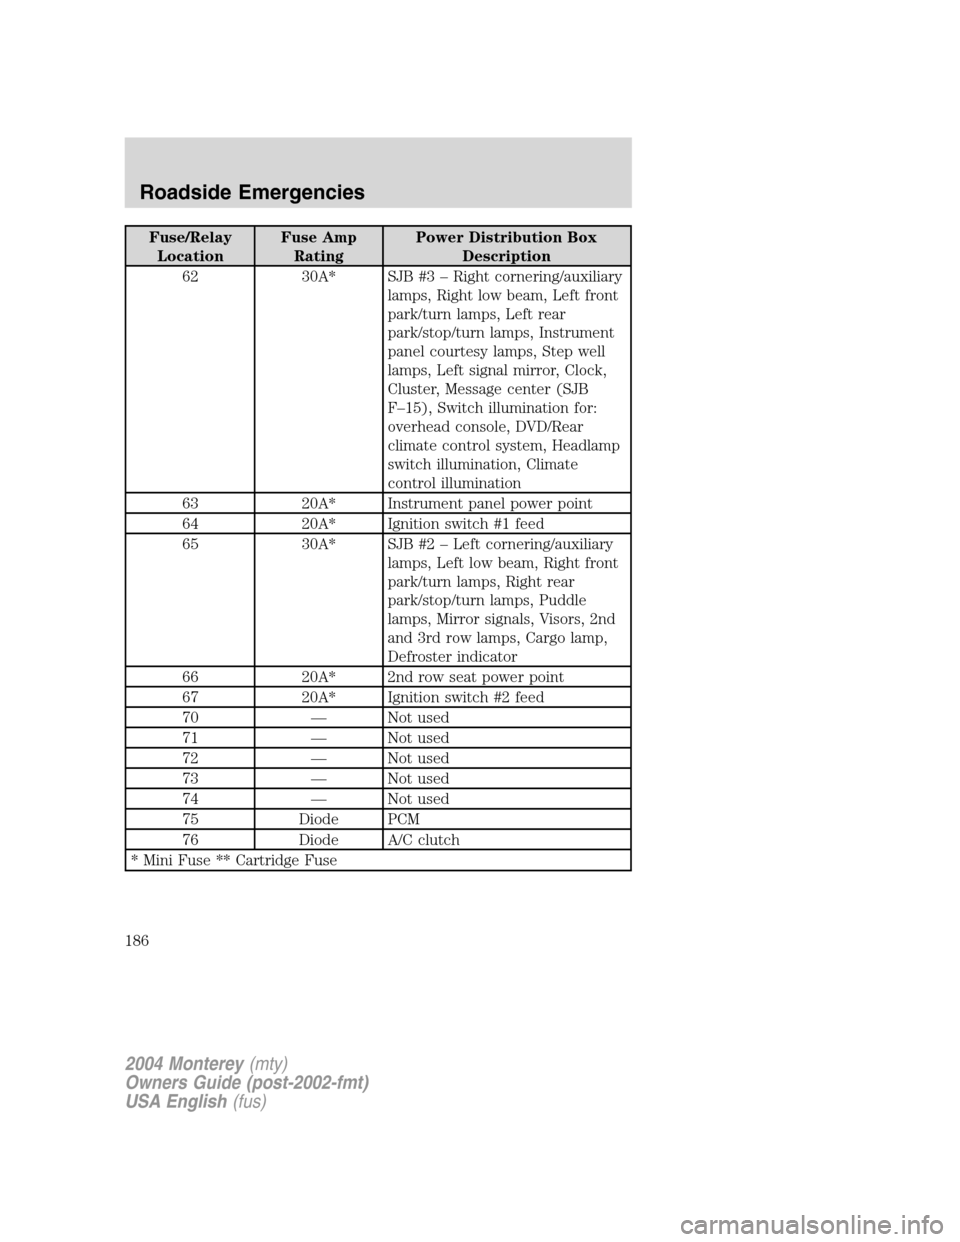
Fuse/Relay
LocationFuse Amp
RatingPower Distribution Box
Description
62 30A* SJB #3–Right cornering/auxiliary
lamps, Right low beam, Left front
park/turn lamps, Left rear
park/stop/turn lamps, Instrument
panel courtesy lamps, Step well
lamps, Left signal mirror, Clock,
Cluster, Message center (SJB
F–15), Switch illumination for:
overhead console, DVD/Rear
climate control system, Headlamp
switch illumination, Climate
control illumination
63 20A* Instrument panel power point
64 20A* Ignition switch #1 feed
65 30A* SJB #2–Left cornering/auxiliary
lamps, Left low beam, Right front
park/turn lamps, Right rear
park/stop/turn lamps, Puddle
lamps, Mirror signals, Visors, 2nd
and 3rd row lamps, Cargo lamp,
Defroster indicator
66 20A* 2nd row seat power point
67 20A* Ignition switch #2 feed
70—Not used
71—Not used
72—Not used
73—Not used
74—Not used
75 Diode PCM
76 Diode A/C clutch
* Mini Fuse ** Cartridge Fuse
2004 Monterey(mty)
Owners Guide (post-2002-fmt)
USA English(fus)
Roadside Emergencies
186