fuel Mercury Monterey 2006 s Owner's Guide
[x] Cancel search | Manufacturer: MERCURY, Model Year: 2006, Model line: Monterey, Model: Mercury Monterey 2006Pages: 320, PDF Size: 3.57 MB
Page 213 of 320

•Turn the key to 4 (ON) without
turning the key to 5 (START).
Some warning lights will briefly illuminate. SeeWarning lights and
chimesin theInstrument Clusterchapter for more information
regarding the warning lights.
Starting the engine
Note:Whenever you start your vehicle, release the key as soon as the
engine starts. Excessive cranking could damage the starter.
1. Turn the key to 5 (START)
without pressing the accelerator
pedal and release as soon as the
engine starts. The key will return to
4 (ON).
2. When the engine starts, release
the key.
Note:If the engine does not start within five seconds on the first try,
turn the key to 3 (OFF), wait 10 seconds and try again. If the engine still
fails to start, press the accelerator to the floor and try again; this will
allow the engine to crank with the fuel shut off in case the engine is
flooded with fuel.
Guarding against exhaust fumes
Carbon monoxide is present in exhaust fumes. Take precautions to avoid
its dangerous effects.
If you smell exhaust fumes inside your vehicle, have your dealer
inspect your vehicle immediately. Do not drive if you smell
exhaust fumes.
1
2
34
5
3
1
2
5
4
2006 Monterey(mty)
Owners Guide (post-2002-fmt)
USA(fus)
Driving
213
Page 220 of 320

Do not drive your vehicle until you verify that the brakelamps
are working.
Always set the parking brake fully and make sure the gearshift is
latched in P (Park). Turn the ignition to the LOCK position and
remove the key whenever you leave your vehicle.
If the parking brake is fully released, but the brake warning lamp
remains illuminated, the brakes may not be working properly.
See your authorized dealer.
Driving with an automatic overdrive transaxle with column
gearshift
Your transaxle is equipped with an adaptive learning strategy found in
the vehicle computer. This feature is designed to increase durability and
provide consistent shift feel over the life of the vehicle. A new vehicle or
transaxle may have firm and/or soft shifts. This operation is considered
normal and will not affect function or durability of the transaxle. Over
time, the adaptive learning process will fully update transaxle operation.
Additionally, whenever the battery is disconnected or a new battery
installed, the strategy must be relearned.
Your automatic overdrive transaxle provides fully automatic operation in
either D (Drive) or 3. Driving with the gearshift lever in D (Drive) gives
the best fuel economy for normal driving conditions. For manual control
start in 1 (First) and then shift manually.
To put your vehicle in gear, start the engine, depress the brake pedal,
then move gearshift lever out of P (Park). Once you place the gearshift
lever securely into position, gradually release the brake pedal and use
the accelerator as necessary.
Understanding the gearshift positions of the 4–speed automatic
transaxle
P (Park)
This position locks the transaxle and prevents the front wheels from
turning.
2006 Monterey(mty)
Owners Guide (post-2002-fmt)
USA(fus)
Driving
220
Page 221 of 320

To put your vehicle in gear:
•Start the engine
•Depress the brake pedal
•Move the gearshift lever into the desired gear
To put your vehicle in P (Park):
•Come to a complete stop
•Move the gearshift lever and securely latch it in P (Park)
Always set the parking brake fully and make sure the gearshift is
latched in P (Park). Turn the ignition to the LOCK position and
remove the key whenever you leave your vehicle.
R (Reverse)
With the gearshift lever in R (Reverse), the vehicle will move backward.
Always come to a complete stop before shifting into and out of R
(Reverse).
N (Neutral)
With the gearshift lever in N (Neutral), the vehicle can be started and is
free to roll. Hold the brake pedal down while in this position.
D (Drive) with Overdrive
The normal driving position for the best fuel economy. The transaxle
operates in gears one through four.
3 (Third)
•This position allows for all forward gears except overdrive.
•Provides more engine braking than D (Overdrive).
•Use when driving conditions cause excessive shifting from D
(Overdrive) to other gears. Examples: city traffic, hilly terrain, heavy
loads, trailer towing and when engine braking is required.
1 (First)
•Transaxle operates in first gear only.
•Provides maximum engine braking.
•Allows upshifts by moving gearshift lever.
•Will not downshift into 1 (First) at high speeds; allows for 1 (First)
when vehicle reaches slower speeds.
2006 Monterey(mty)
Owners Guide (post-2002-fmt)
USA(fus)
Driving
221
Page 227 of 320

ROADSIDE ASSISTANCE
Getting roadside assistance
To fully assist you should you have a vehicle concern, Ford Motor
Company offers a complimentary roadside assistance program. This
program is separate from the New Vehicle Limited Warranty. The service
is available:
•24–hours, seven days a week
•for the New Vehicle Limited Warranty period of three years or
36,000 miles (60,000 km), whichever occurs first on Ford and Mercury
vehicles, and four years or 50,000 miles (80,000 km) on Lincoln
vehicles.
Roadside assistance will cover:
•a flat tire change with a good spare (except Ford GT which has a tire
inflation kit)
•battery jump start
•lock-out assistance (key replacement cost is the customer’s
responsibility)
•fuel delivery (2.0 gallons [7.5L], maximum two occurrences within
12 month period)
•towing of your disabled vehicle to the nearest authorized dealer, or
your selling authorized dealer if within 35 miles (56.3 km) of the
nearest authorized dealer (one tow per disablement). Even
non-warranty related tows, like accidents, are covered (some
exclusions apply, such as impound towing or repossession).
Canadian customers refer to your Owner Information Guide for
information on:
•coverage period
•exact fuel amounts
•towing of your disabled vehicle
•emergency travel expense reimbursement
•travel planning benefits
Using roadside assistance
Complete the roadside assistance identification card and place it in your
wallet for quick reference. In the United States, this card is found in the
Owner Guide portfolio in the glove compartment. In Canada, the card is
found in theOwner Information Guidein the glove compartment.
2006 Monterey(mty)
Owners Guide (post-2002-fmt)
USA(fus)
Roadside Emergencies
227
Page 228 of 320

U.S. Ford or Mercury vehicle customers who require roadside assistance,
call 1–800–241–3673; Lincoln vehicle customers call 1–800–521–4140.
Canadian customers who require roadside assistance, call
1–800–665–2006.
If you need to arrange roadside assistance for yourself, Ford Motor
Company will reimburse a reasonable amount. To obtain reimbursement
information, U.S. Ford or Mercury vehicles customers call
1-800-241-3673; Lincoln vehicle customers call 1–800–521–4140.
Canadian customers who need to obtain reimbursement information, call
1–800–665–2006.
Roadside coverage beyond basic warranty
In the United States, you may purchase additional roadside assistance
coverage beyond this period through the Ford Auto Club by contacting
your authorized dealer.
Similarly in Canada, for uninterrupted Roadside Assistance coverage, you
may purchase extended coverage prior to your Basic Warranty’s Roadside
Assistance expiring. For more information and enrollment, contact
1–877–294–2582 or visit our website at www.ford.ca.
HAZARD FLASHER CONTROL
The hazard flasher is located on the
instrument panel by the radio. The
hazard flashers will operate when
the ignition is in any position or if
the key is not in the ignition.
Push in the flasher control and all
front and rear direction signals will
flash. Press the flasher control again to turn them off. Use it when your
vehicle is disabled and is creating a safety hazard for other motorists.
Note:With extended use, the flasher may run down your battery.
FUEL PUMP SHUT-OFF SWITCH
This device stops the electric fuel pump from sending fuel to the engine
when your vehicle has had a substantial jolt.
After an accident, if the engine cranks but does not start, this switch
may have been activated.
2006 Monterey(mty)
Owners Guide (post-2002-fmt)
USA(fus)
Roadside Emergencies
228
Page 229 of 320

This switch is located behind the
service panel on the right side of
the cargo area.
To reset the switch:
1. Turn the ignition OFF.
2. Check the fuel system for leaks.
3. If no leaks are apparent, reset the
switch by pushing in on the reset
button.
4. Turn the ignition ON.
5. Wait a few seconds and return
the key to OFF.
6. Make another check for leaks.
FUSES AND RELAYS
Fuses
If electrical components in the
vehicle are not working, a fuse may
have blown. Blown fuses are
identified by a broken wire within
the fuse. Check the appropriate
fuses before replacing any electrical
components.
Note:Always replace a fuse with one that has the specified amperage
rating. Using a fuse with a higher amperage rating can cause severe wire
damage and could start a fire.
15
2006 Monterey(mty)
Owners Guide (post-2002-fmt)
USA(fus)
Roadside Emergencies
229
Page 234 of 320

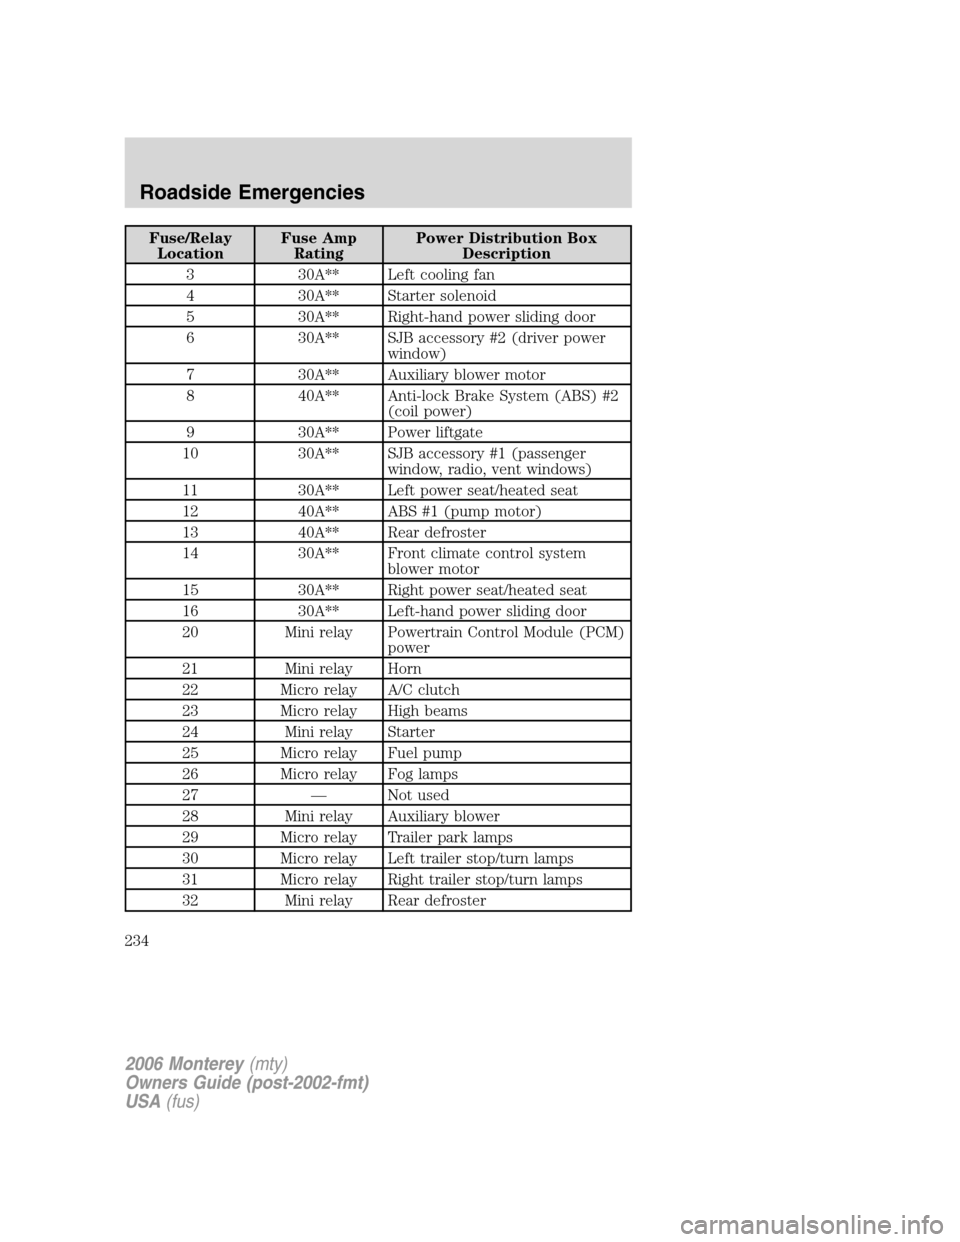
Fuse/Relay
LocationFuse Amp
RatingPower Distribution Box
Description
3 30A** Left cooling fan
4 30A** Starter solenoid
5 30A** Right-hand power sliding door
6 30A** SJB accessory #2 (driver power
window)
7 30A** Auxiliary blower motor
8 40A** Anti-lock Brake System (ABS) #2
(coil power)
9 30A** Power liftgate
10 30A** SJB accessory #1 (passenger
window, radio, vent windows)
11 30A** Left power seat/heated seat
12 40A** ABS #1 (pump motor)
13 40A** Rear defroster
14 30A** Front climate control system
blower motor
15 30A** Right power seat/heated seat
16 30A** Left-hand power sliding door
20 Mini relay Powertrain Control Module (PCM)
power
21 Mini relay Horn
22 Micro relay A/C clutch
23 Micro relay High beams
24 Mini relay Starter
25 Micro relay Fuel pump
26 Micro relay Fog lamps
27 — Not used
28 Mini relay Auxiliary blower
29 Micro relay Trailer park lamps
30 Micro relay Left trailer stop/turn lamps
31 Micro relay Right trailer stop/turn lamps
32 Mini relay Rear defroster
2006 Monterey(mty)
Owners Guide (post-2002-fmt)
USA(fus)
Roadside Emergencies
234
Page 235 of 320

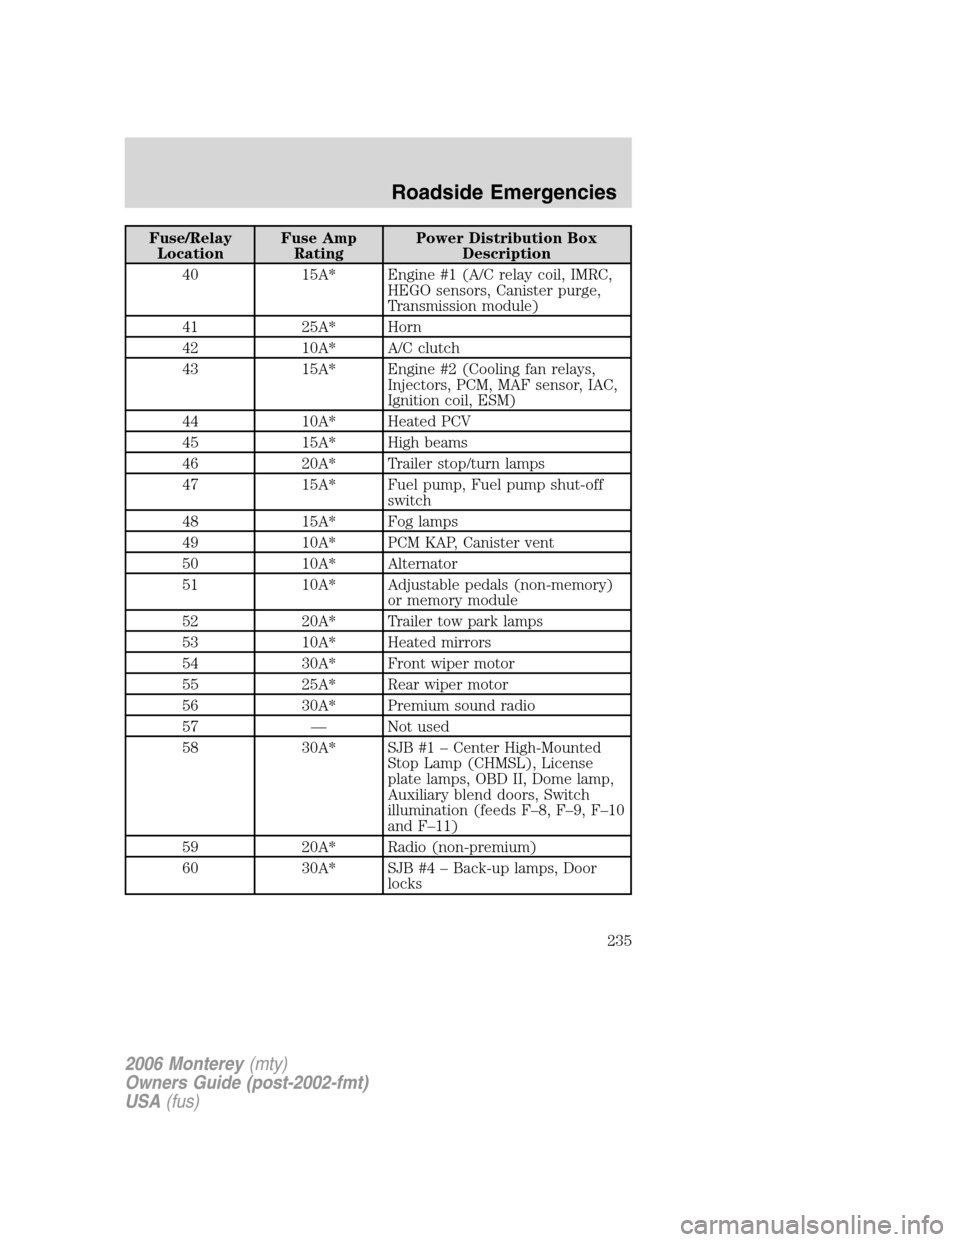
Fuse/Relay
LocationFuse Amp
RatingPower Distribution Box
Description
40 15A* Engine #1 (A/C relay coil, IMRC,
HEGO sensors, Canister purge,
Transmission module)
41 25A* Horn
42 10A* A/C clutch
43 15A* Engine #2 (Cooling fan relays,
Injectors, PCM, MAF sensor, IAC,
Ignition coil, ESM)
44 10A* Heated PCV
45 15A* High beams
46 20A* Trailer stop/turn lamps
47 15A* Fuel pump, Fuel pump shut-off
switch
48 15A* Fog lamps
49 10A* PCM KAP, Canister vent
50 10A* Alternator
51 10A* Adjustable pedals (non-memory)
or memory module
52 20A* Trailer tow park lamps
53 10A* Heated mirrors
54 30A* Front wiper motor
55 25A* Rear wiper motor
56 30A* Premium sound radio
57 — Not used
58 30A* SJB #1 – Center High-Mounted
Stop Lamp (CHMSL), License
plate lamps, OBD II, Dome lamp,
Auxiliary blend doors, Switch
illumination (feeds F–8, F–9, F–10
and F–11)
59 20A* Radio (non-premium)
60 30A* SJB #4 – Back-up lamps, Door
locks
2006 Monterey(mty)
Owners Guide (post-2002-fmt)
USA(fus)
Roadside Emergencies
235
Page 249 of 320

3. Connect the negative (-) cable to the negative (-) terminal of the
assisting battery.
4. Make the final connection of the negative (-) cable to an exposed
metal part of the stalled vehicle’s engine, away from the battery and the
carburetor/fuel injection system.Do notuse fuel lines, engine rocker
covers or the intake manifold asgroundingpoints.
Do not connect the end of the second cable to the negative (-)
terminal of the battery to be jumped. A spark may cause an
explosion of the gases that surround the battery.
5. Ensure that the cables are clear of fan blades, belts, moving parts of
both engines, or any fuel delivery system parts.
Jump starting
1. Start the engine of the booster vehicle and run the engine at
moderately increased speed.
2. Start the engine of the disabled vehicle.
+–+–
+–+–
2006 Monterey(mty)
Owners Guide (post-2002-fmt)
USA(fus)
Roadside Emergencies
249
Page 261 of 320

CAMVAP services are available in all territories and provinces. For more
information, without charge or obligation, call your CAMVAP Provincial
Administrator directly at 1-800-207-0685.
FORD EXTENDED SERVICE PLAN
You can get more protection for your new car or light truck by
purchasing Ford Extended Service Plan (Ford ESP) coverage. It provides
the following:
•Benefits during the warranty period depending on the plan you
purchase (such as: reimbursement for rentals; coverage for certain
maintenance and wear items).
•Protection against covered repair costs after your Bumper-to-Bumper
Warranty expires.
You may purchase Ford ESP from any participating authorized dealer.
There are several plans available in various time, distance and deductible
combinations which can be tailored to fit your own driving needs. Ford
ESP also offers reimbursement benefits for towing and rental coverage.
When you buy Ford ESP, you receive Peace-of-Mind protection
throughout the United States and Canada, provided by a network of
more than 4,600 participating authorized dealers.
If you did not take advantage of the Ford Extended Service Plan at the
time of purchasing your vehicle, you may still be eligible. Since this
information is subject to change, please ask your authorized dealer for
complete details about Ford Extended Service Plan coverage options, or
visit the Ford ESP website at www.ford-esp.com.
GETTING ASSISTANCE OUTSIDE THE U.S. AND CANADA
Before exporting your vehicle to a foreign country, contact the
appropriate foreign embassy or consulate. These officials can inform you
of local vehicle registration regulations and where to find unleaded fuel.
If you cannot find unleaded fuel or can only get fuel with an anti-knock
index lower than is recommended for your vehicle, contact a regional
office or owner relations/customer relationship office.
The use of leaded fuel in your vehicle without proper conversion may
damage the effectiveness of your emission control system and may cause
engine knocking or serious engine damage. Ford Motor Company/Ford of
Canada is not responsible for any damage caused by use of improper
fuel. Using leaded fuel may also result in difficulty importing your vehicle
back into the U.S.
2006 Monterey(mty)
Owners Guide (post-2002-fmt)
USA(fus)
Customer Assistance
261