lock Mercury Mountaineer 2002 Owner's Manuals
[x] Cancel search | Manufacturer: MERCURY, Model Year: 2002, Model line: Mountaineer, Model: Mercury Mountaineer 2002Pages: 312, PDF Size: 3.02 MB
Page 4 of 312
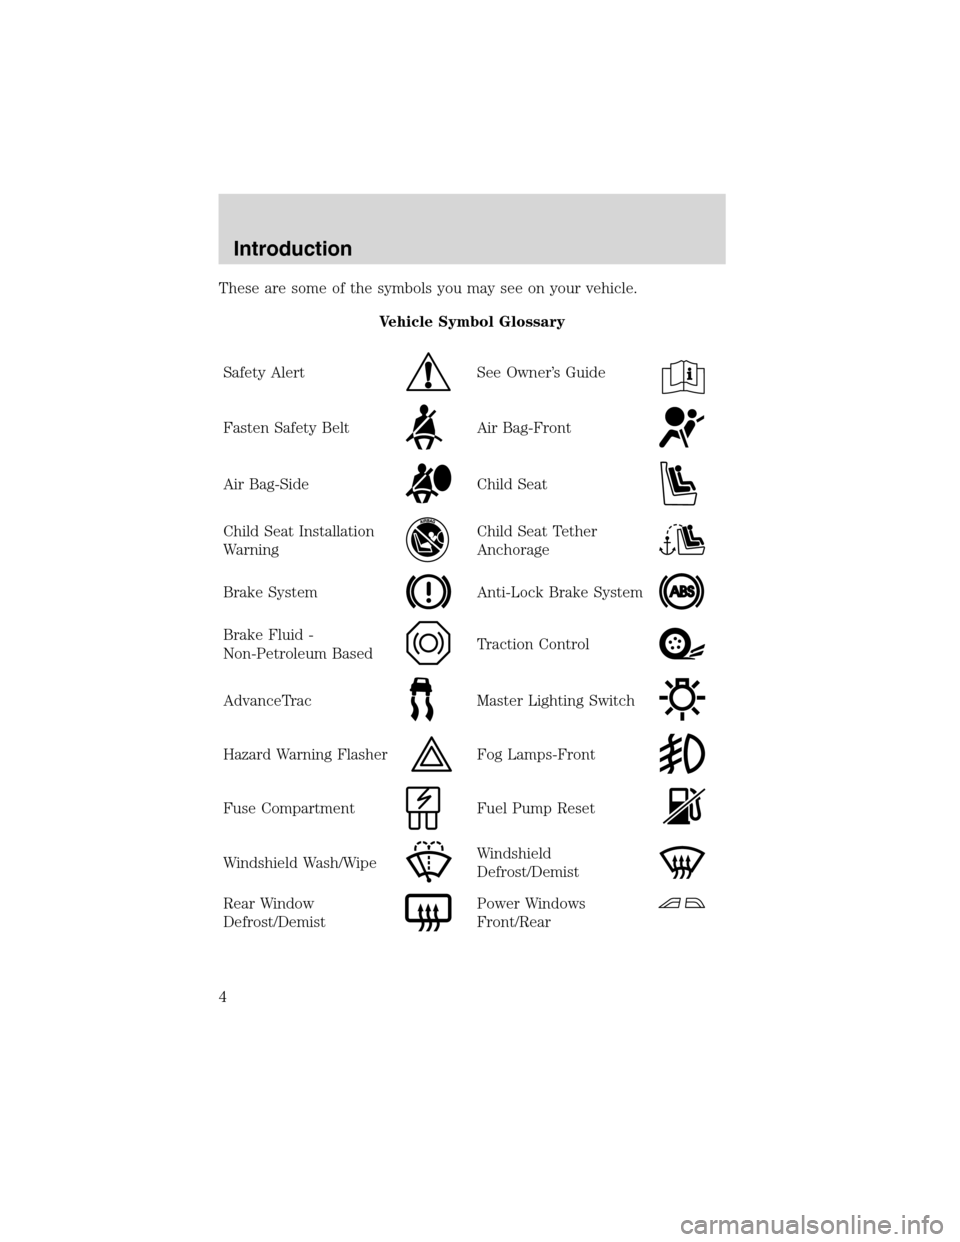
These are some of the symbols you may see on your vehicle.
Vehicle Symbol Glossary
Safety Alert
See Owner’s Guide
Fasten Safety BeltAir Bag-Front
Air Bag-SideChild Seat
Child Seat Installation
WarningChild Seat Tether
Anchorage
Brake SystemAnti-Lock Brake System
Brake Fluid -
Non-Petroleum BasedTraction Control
AdvanceTracMaster Lighting Switch
Hazard Warning FlasherFog Lamps-Front
Fuse CompartmentFuel Pump Reset
Windshield Wash/WipeWindshield
Defrost/Demist
Rear Window
Defrost/DemistPower Windows
Front/Rear
Introduction
4
Page 5 of 312
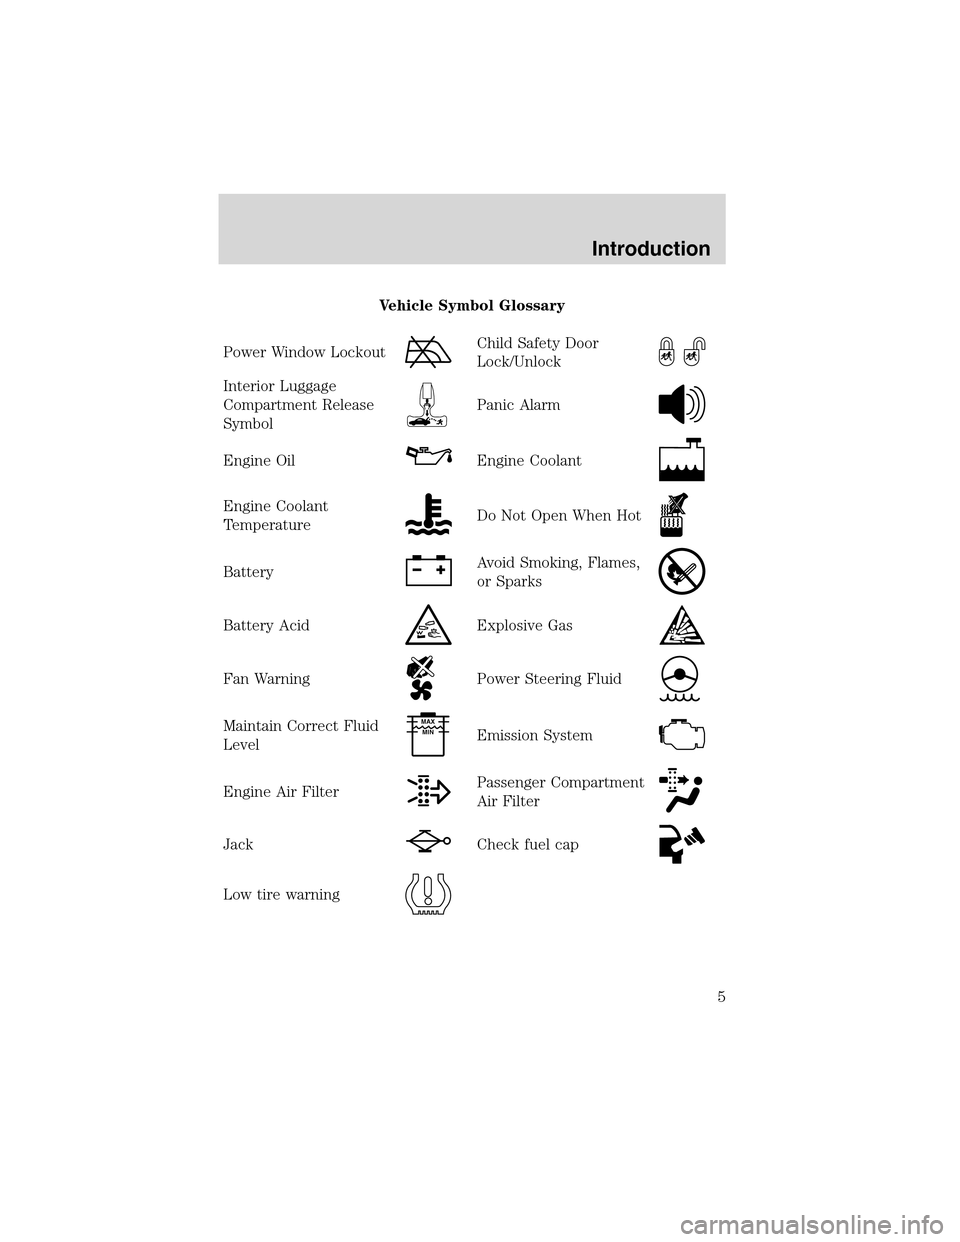
Vehicle Symbol Glossary
Power Window Lockout
Child Safety Door
Lock/Unlock
Interior Luggage
Compartment Release
Symbol
Panic Alarm
Engine OilEngine Coolant
Engine Coolant
TemperatureDo Not Open When Hot
BatteryAvoid Smoking, Flames,
or Sparks
Battery AcidExplosive Gas
Fan WarningPower Steering Fluid
Maintain Correct Fluid
LevelMAX
MIN
Emission System
Engine Air FilterPassenger Compartment
Air Filter
JackCheck fuel cap
Low tire warning
Introduction
5
Page 11 of 312
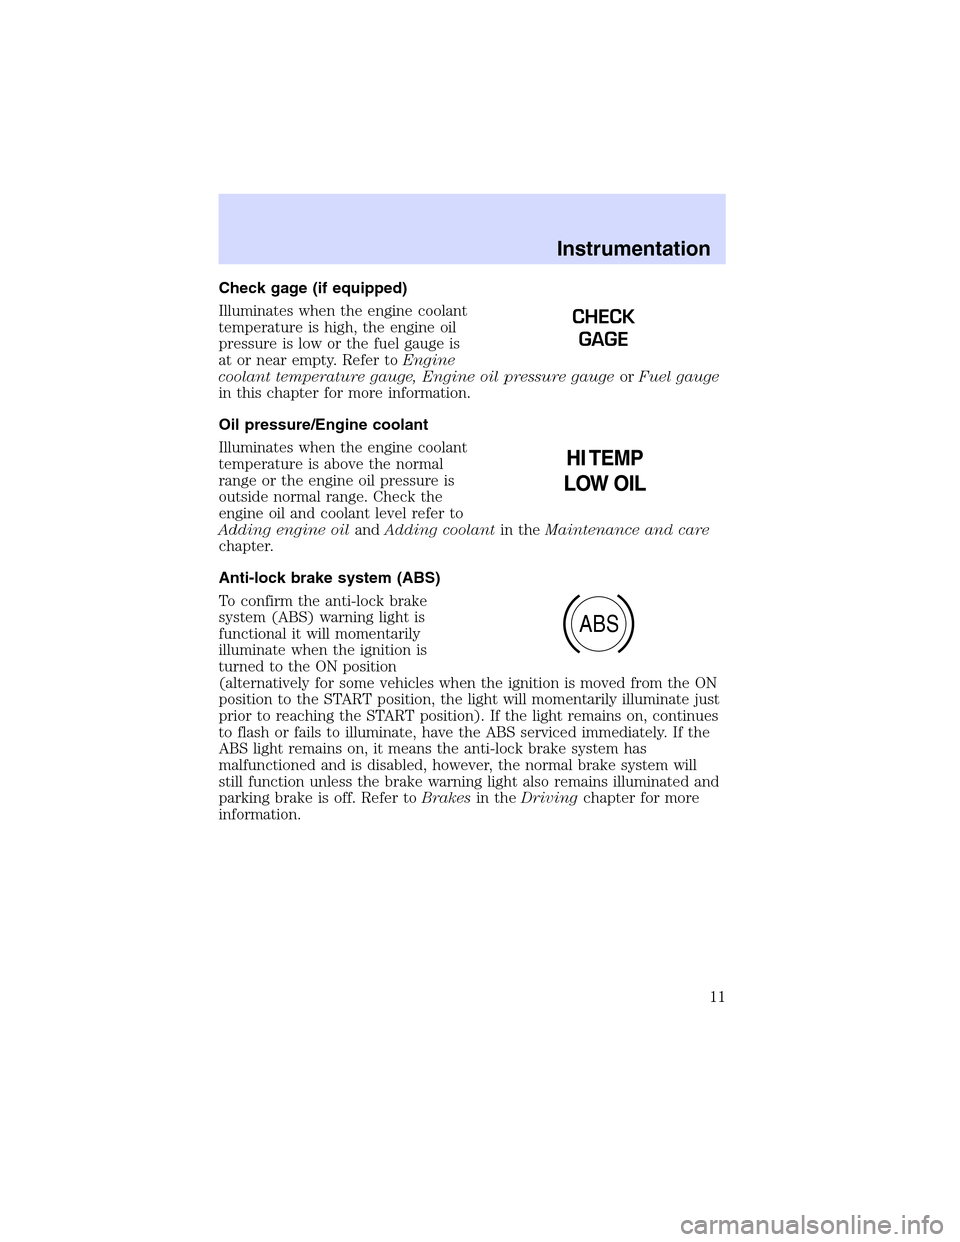
Check gage (if equipped)
Illuminates when the engine coolant
temperature is high, the engine oil
pressure is low or the fuel gauge is
at or near empty. Refer toEngine
coolant temperature gauge, Engine oil pressure gaugeorFuel gauge
in this chapter for more information.
Oil pressure/Engine coolant
Illuminates when the engine coolant
temperature is above the normal
range or the engine oil pressure is
outside normal range. Check the
engine oil and coolant level refer to
Adding engine oilandAdding coolantin theMaintenance and care
chapter.
Anti-lock brake system (ABS)
To confirm the anti-lock brake
system (ABS) warning light is
functional it will momentarily
illuminate when the ignition is
turned to the ON position
(alternatively for some vehicles when the ignition is moved from the ON
position to the START position, the light will momentarily illuminate just
prior to reaching the START position). If the light remains on, continues
to flash or fails to illuminate, have the ABS serviced immediately. If the
ABS light remains on, it means the anti-lock brake system has
malfunctioned and is disabled, however, the normal brake system will
still function unless the brake warning light also remains illuminated and
parking brake is off. Refer toBrakesin theDrivingchapter for more
information.
CHECK
GAGE
ABS
Instrumentation
11
Page 23 of 312

Trip elapsed drive time
Select this function from the INFO
menu to display a timer.
To operate the Trip Elapsed Drive
Time perform the following:
1. Press and release RESET in order
to start the timer.
2. Press and release RESET to pause the timer.
3. Press and hold RESET for 2 seconds in order to reset the timer.
Distance to empty (DTE)
Selecting this function from the
INFO menu will give you an
estimate of how far you can drive
with the fuel remaining in your tank
under normal driving conditions.
Remember to turn the ignition OFF when refueling your vehicle.
Otherwise, the display will not show the addition of fuel for a few
kilometers (miles).
The DTE function will display LOW FUEL LEVEL and sound a tone for 1
second when you have low fuel level indicated on the fuel gauge.
Setup menu
Press this control for the following
displays:
•Autolock
•Easy Entry/Exit
•Autolamp Delay
•Language
•Units (English/Metric)
•System Check
•Oil Change
Instrumentation
23
Page 24 of 312

Autolocks
1. Select this function from the
SETUP control for the current
display mode.
2. Press the RESET control to turn
the autolocks ON or OFF.
Easy entry/exit
1. Select this function from the
SETUP control for the current
display mode.
2. Press the RESET control to turn
the easy entry/exit feature ON or
OFF. For more information refer toMemory Seatin theSeating and
Safety Restraintschapter.
Autolamp delay
1. Select this function from the
SETUP control for the current
display mode.
2. Press the RESET control to select
the autolamp delay time.
Language
1. Select this function from the
SETUP menu for the current
language to be displayed.
2. Pressing the RESET control
cycles the message center through
each of the language choices.
3. Press and hold the RESET
control to set the language choice.
Instrumentation
24
Page 31 of 312
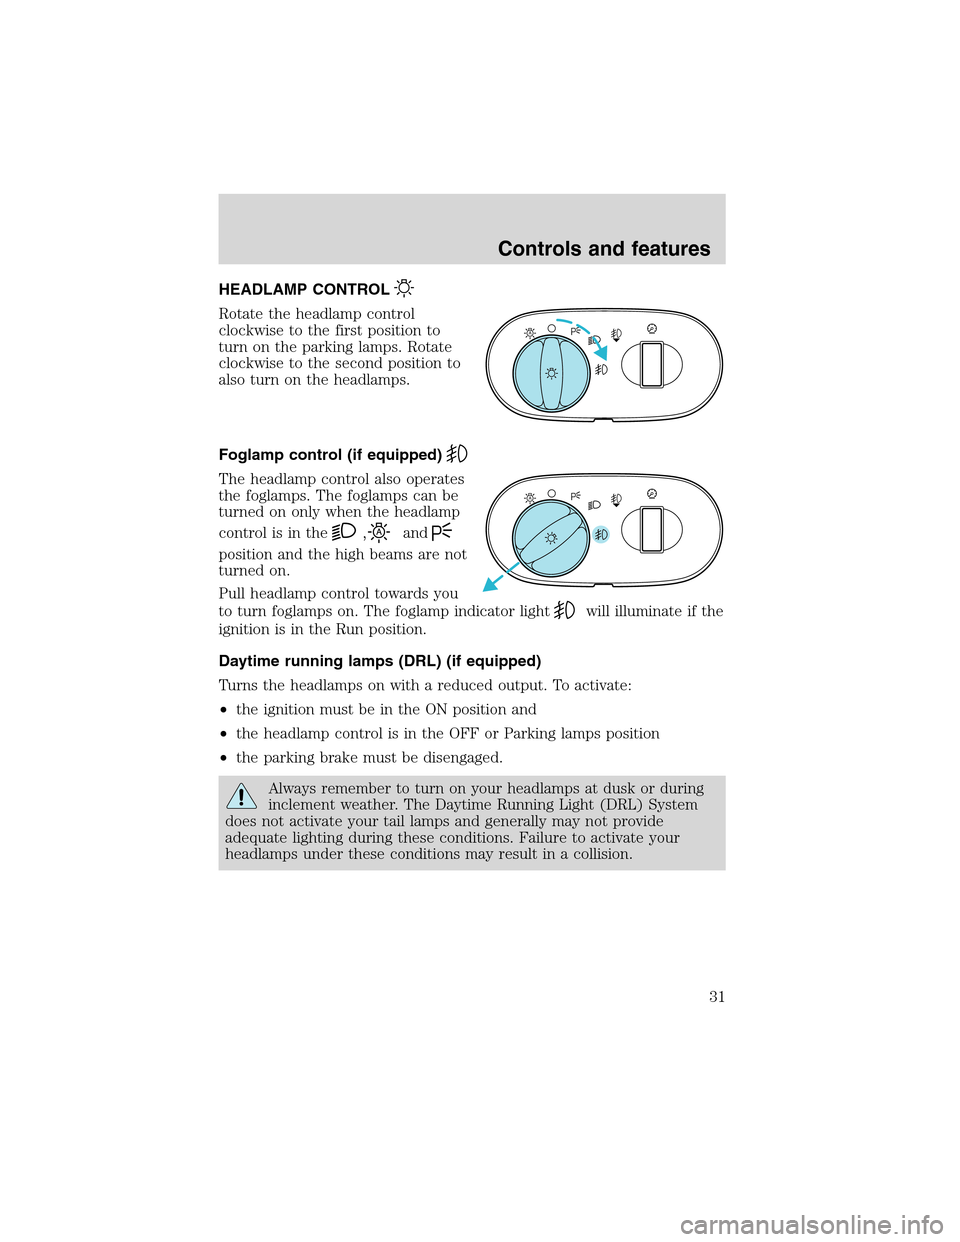
HEADLAMP CONTROL
Rotate the headlamp control
clockwise to the first position to
turn on the parking lamps. Rotate
clockwise to the second position to
also turn on the headlamps.
Foglamp control (if equipped)
The headlamp control also operates
the foglamps. The foglamps can be
turned on only when the headlamp
control is in the
,and
position and the high beams are not
turned on.
Pull headlamp control towards you
to turn foglamps on. The foglamp indicator light
will illuminate if the
ignition is in the Run position.
Daytime running lamps (DRL) (if equipped)
Turns the headlamps on with a reduced output. To activate:
•the ignition must be in the ON position and
•the headlamp control is in the OFF or Parking lamps position
•the parking brake must be disengaged.
Always remember to turn on your headlamps at dusk or during
inclement weather. The Daytime Running Light (DRL) System
does not activate your tail lamps and generally may not provide
adequate lighting during these conditions. Failure to activate your
headlamps under these conditions may result in a collision.
A
A
Controls and features
31
Page 33 of 312
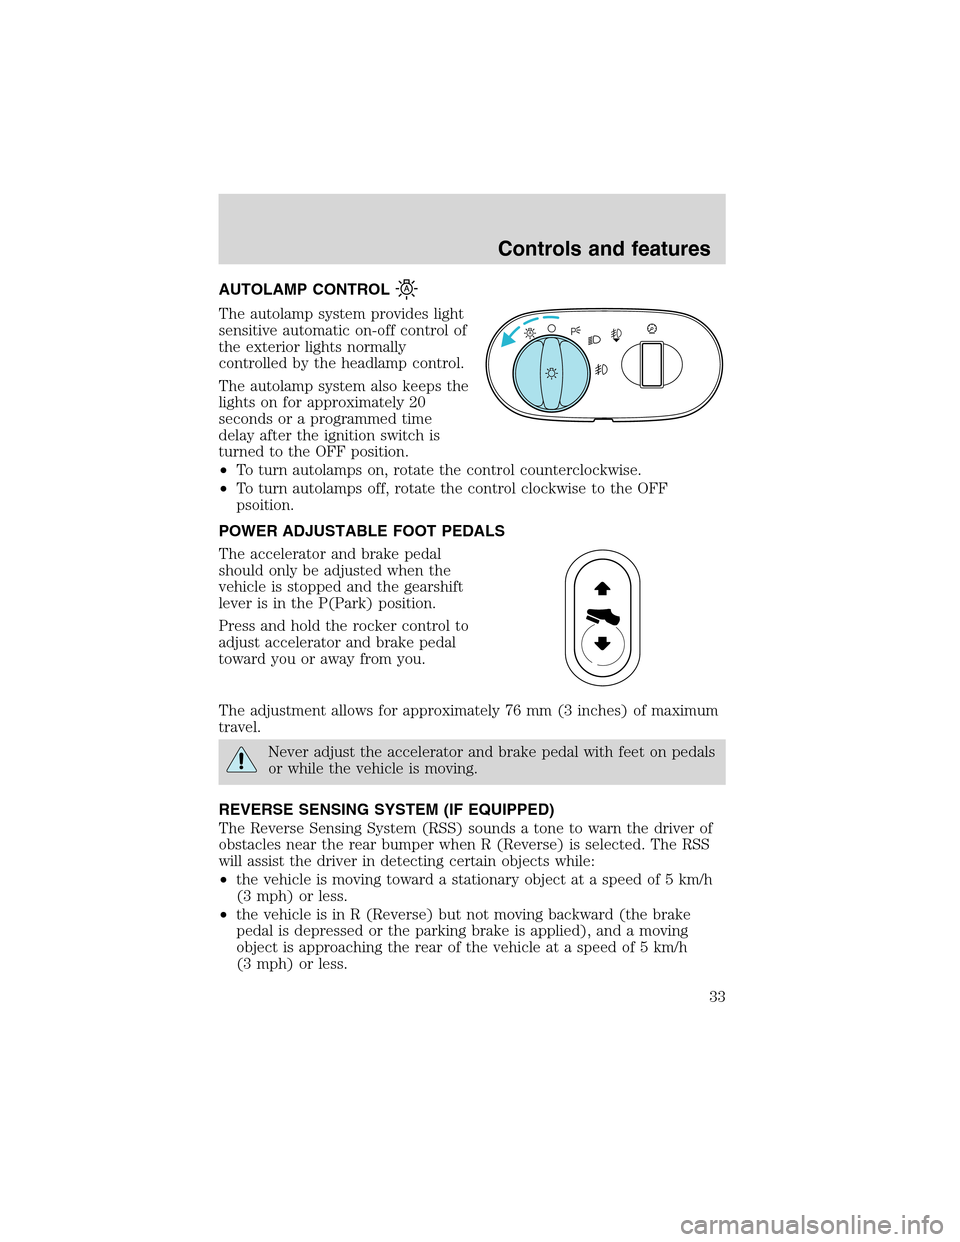
AUTOLAMP CONTROL
The autolamp system provides light
sensitive automatic on-off control of
the exterior lights normally
controlled by the headlamp control.
The autolamp system also keeps the
lights on for approximately 20
seconds or a programmed time
delay after the ignition switch is
turned to the OFF position.
•To turn autolamps on, rotate the control counterclockwise.
•To turn autolamps off, rotate the control clockwise to the OFF
psoition.
POWER ADJUSTABLE FOOT PEDALS
The accelerator and brake pedal
should only be adjusted when the
vehicle is stopped and the gearshift
lever is in the P(Park) position.
Press and hold the rocker control to
adjust accelerator and brake pedal
toward you or away from you.
The adjustment allows for approximately 76 mm (3 inches) of maximum
travel.
Never adjust the accelerator and brake pedal with feet on pedals
or while the vehicle is moving.
REVERSE SENSING SYSTEM (IF EQUIPPED)
The Reverse Sensing System (RSS) sounds a tone to warn the driver of
obstacles near the rear bumper when R (Reverse) is selected. The RSS
will assist the driver in detecting certain objects while:
•the vehicle is moving toward a stationary object at a speed of 5 km/h
(3 mph) or less.
•the vehicle is in R (Reverse) but not moving backward (the brake
pedal is depressed or the parking brake is applied), and a moving
object is approaching the rear of the vehicle at a speed of 5 km/h
(3 mph) or less.
A
Controls and features
33
Page 39 of 312
Operating tips
•In humid weather conditions, place the climate control system in
before driving. This will reduce fogging on your windshield. Once the
windshield has been cleared, operate the climate control system as
desired.
•To reduce humidity buildup inside the vehicle in cold weather
conditions, don’t drive with the climate control system in the OFF or
MAX A/C position.
•To reduce humidity buildup inside the vehicle in warm weather
conditions, don’t drive with the climate control system in the OFF
position.
•Under normal weather conditions, your vehicle’s climate control
system should be left in any position other than MAX A/C or OFF
when the vehicle is parked. This allows the vehicle to“breathe”
through the outside air inlet duct.
•Under snowy or dirty weather conditions, your vehicle’s climate
control system should be left in the OFF position when the vehicle is
parked. This allows the climate control system to be free from
contamination of outside pollutants.
•If your vehicle has been parked with the windows closed during warm
weather conditions, the air conditioner will perform more efficiently in
cooling the vehicle if driven for two or three minutes with the
windows open. This will force most of the hot, stale air out of the
vehicle. Once the vehicle has been“aired out”, operate the climate
control system as desired.
•Do not place objects under the front seat that will interfere with the
airflow to the rear seats.
•Remove any snow, ice or leaves from the air intake area at the base of
the windshield.
•Do not place objects over the defroster outlets. These objects can
block airflow and reduce your ability to see through your windshield.
Avoid placing small objects on top of the instrument panel. These
objects may fall down into the defroster outlets and block airflow, in
addition to damaging the climate control system.
To aid in side window defogging/demisting in cold weather conditions:
1. Select
2. Set the temperature control to full heat
3. Select
A/C
Controls and features
39
Page 48 of 312

If the outside temperature is displayed while the DEATC system is in the
OFF mode and the DEATC is turned on, the driver and passenger
temperatures will be displayed for 4 seconds. Following this, the outside
temperature display will return to the window.
The outside temperature reading is most accurate when the vehicle is
moving. Higher readings may be obtained when the vehicle is not
moving. The readings that you get may not agree with temperatures
given on the radio due to differences in vehicle and station locations.
Operating tips
•In humid weather conditions, place the climate control system in
orRbefore driving. This will reduce fogging on your windshield.
Once the windshield has been cleared, operate the climate control
system as desired.
•To reduce humidity buildup inside the vehicle in cold weather
conditions, don’t drive with the climate control system in the OFF
position or
.
•To reduce humidity buildup inside the vehicle in warm weather
conditions, don’t drive with the climate control system in the OFF
position.
•Under normal weather conditions, your vehicle’s climate control
system should be left in any position other than OFF or
when
the vehicle is parked. This allows the vehicle to“breathe”through the
outside air inlet duct.
•Under snowy or dirty weather conditions, your vehicle’s climate
control system should be left in the OFF position when the vehicle is
parked. This allows the climate control system to be free from
contamination of outside pollutants.
•If your vehicle has been parked with the windows closed during warm
weather conditions, the air conditioner will perform more efficiently in
cooling the vehicle if driven for two or three minutes with the
windows open. This will force most of the hot, stale air out of the
vehicle. Once the vehicle has been“aired out”, operate the climate
control system as desired.
•Remove any snow, ice or leaves from the air intake area at the base of
the windshield.
•Do not place objects over the defroster outlets. These objects can
block airflow and reduce your ability to see through your windshield.
Avoid placing small objects on top of the instrument panel. These
Controls and features
48
Page 49 of 312

objects may fall down into the defroster outlets and block airflow, in
addition to damaging the climate control system.
To aide in side window defogging/demisting in cold weather conditions:
1. Select
2. Set the temperature control to full heat
3. Select A/C
4. Set the fan speed to High
5. Direct the outer panel vents towards the side windows
In order to increase the airflow to the outer panel vents, close the
central panel vents.
Do not place objects on top of the instrument panel, as these
objects may become projectiles in a collision or sudden stop.
Auxiliary climate controls (if equipped)
Your vehicle may be equipped with auxiliary climate controls which are
located in the overhead console of the first row and in the headliner for
second row seating. The auxiliary climate control feature provides
increased capacity to quickly heat or cool your vehicle.
If your vehicle is equipped with a manual heating and air conditioning
system, the auxiliary climate controls are dependent on the main climate
control system. If the main climate control system is in the OFF position,
the auxiliary climate controls will not work.
If your vehicle is equipped with a DEATC system, the auxiliary climate
controls are independent of the main climate control system. If the main
climate control system is in the OFF position, the auxiliary climate
controls will still work. However, the A/C function will not operate unless
the A/C control has been selected on the main climate control system.
Controls and features
49