clock Mercury Mountaineer 2006 Owner's Manuals
[x] Cancel search | Manufacturer: MERCURY, Model Year: 2006, Model line: Mountaineer, Model: Mercury Mountaineer 2006Pages: 344, PDF Size: 2.66 MB
Page 22 of 344

3.MENU:Press to toggle through
the following modes:
Setting the clock:Press MENU until SET HOURS or SET MINUTES is
displayed. Use
/to manually increase/decrease Press MENU again
to disengage clock mode.
CATEGORY(Satellite Radio if equipped): Press MENU until the
currently active category appears in the display (CATEGORY MODE). In
CATEGORY MODE, press
/to scroll through the list of available
Sirius channel Categories (Pop, Rock, News, etc.) Press
SEEKor
SCAN to select the category. After a category is selected, press SEEK to
search for that specific category of channels only (i.e. ROCK). To select
a different category, press MENU until the category appears in the
display. Press
/to select a different category. You may also select
CATEGORY ALL to seek all available Sirius categories and channels.
Satellite radio is available only in the continental United States.
Autoset:Allows you to set the strongest local radio stations without
losing your original manually set preset stations for AM/FM1/FM2. Press
MENU to access. Use
/to set.
When the six strongest stations are filled, the station stored in preset 1
will begin playing. If there are less than six strong stations, the system
will store the last one in the remaining presets. Use
/to turn
on/off.
Bass:Press
/to adjust the bass setting.
Treble:Press
/to adjust the treble setting.
Balance:Press
/to adjust the audio between the left and right
speakers.
Fade:Press
/to adjust the audio between the front and rear
speakers.
Speed sensitive volume:Radio volume automatically changes slightly
with vehicle speed to compensate for road and wind noise. Press MENU
to access and use
/to adjust. The recommended level is 1–3.
Level 0 (SPEED OFF) turns the feature off and level 7 is the maximum
setting.
2006 Mountaineer(mnt)
Owners Guide (post-2002-fmt)
USA(fus)
Entertainment Systems
22
Page 27 of 344

In CD mode, press/to access the previous/next CD track.
In Satellite Radio mode (if equipped), press
SEEKto seek to the
previous/next channel. If a specific category is selected, (Jazz, Rock,
News, etc.), press
SEEKto seek to the previous/next channel in
the selected category. Press and hold
SEEKto fast seek through
the previous /next channels.
In TEXT MODE, press
SEEKto view the previous/additional
display text.
In CATEGORY MODE, press
SEEKto select a category.
Satellite radio is available only in the continental United States.
3.MUTE/Phone:Press to mute the
playing media. Press again to return
to the playing media.
4.MENU:Press to toggle through
the following modes:
Setting the clock:Press MENU until SET HOURS or SET MINUTES is
displayed. Press
/to adjust the hours/minutes.
CATEGORY(Satellite Radio if equipped): Press MENU until the
currently active category appears in the display (CATEGORY MODE). In
CATEGORY MODE, press
/to scroll through the list of available
Sirius channel Categories (Pop, Rock, News, etc.) Press
SEEKor
SCAN to select the category. After a category is selected, press SEEK to
search for that specific category of channels only (i.e. ROCK). To select
a different category, press MENU until the category appears in the
display. Press
/to select a different category. You may also select
CATEGORY ALL to seek all available Sirius categories and channels.
Satellite radio is available only in the continental United States.
Autoset:Allows you to set the strongest local radio stations without
losing your original manually set preset stations for AM/FM1/FM2 . Press
MENU to access. Use
/to set.
When the six strongest stations are filled, the station stored in preset 1
will begin playing. If there are less than six strong stations, the system
will store the last one in the remaining presets. Use
/to turn
on/off.
2006 Mountaineer(mnt)
Owners Guide (post-2002-fmt)
USA(fus)
Entertainment Systems
27
Page 32 of 344

2.MUTE/Phone:Press to mute the
playing media. Press again to return
to the playing media.
3.MENU:Press to toggle through
the following modes:
Setting the clock:Press until SET HOURS or SET MINUTES is
displayed. Press
/to adjust the hours/minutes.
CATEGORY(Satellite Radio if equipped): Press MENU until the
currently active category appears in the display (CATEGORY MODE). In
CATEGORY MODE, press
/to scroll through the list of available
Sirius channel Categories (Pop, Rock, News, etc.) Press
SEEKor
SCAN to select the category. After a category is selected, press SEEK to
search for that specific category of channels only (i.e. ROCK). To select
a different category, press MENU until the category appears in the
display. Press
/to select a different category. You may also select
CATEGORY ALL to seek all available Sirius categories and channels.
Satellite radio is available only in the continental United States.
RBDS (Radio Broadcast Digital Signal) ON/OFF:Press
/to
turn RBDS ON or OFF.
Program Type:If RBDS is ON, press
/to find the desired program
type, then use
SEEKor SCAN to search for FM radio stations
broadcasting the desired program type.
SHOW RBDS Info:If RBDS is ON, this allows you to display the name
of the FM radio station or program type. Press
/to show program
type, station name or none.
RBDS:Allows you to search RBDS (Radio Broadcast Digital Signal)
equipped stations for the following music formats: Classical, Country,
Jazz, Oldies, R&B, Religious, Rock, Soft, Top 40 and Information
(Inform). RBDS is only available in FM mode.
Autoset:Allows you to set the strongest local radio stations without
losing your original manually set preset stations for AM/FM1/FM2 .
Use
/to turn on/off.
2006 Mountaineer(mnt)
Owners Guide (post-2002-fmt)
USA(fus)
Entertainment Systems
32
Page 48 of 344

HEADLAMP CONTROL
Turns the lamps off.
Turns on the parking lamps,
instrument panel lamps, license
plate lamps and tail lamps.
Turns the headlamps on.
Autolamp Control
The autolamp Control sets the
headlamps to turn on and off
automatically. The autolamp control,
located on the headlamp control,
may be set to:
•turn on the lamps automatically
at night
•turn off the lamps automatically
during the daylight
•keep the lamps on for up to three minutes after the key is turned to
OFF.
To turn the autolamps on, rotate the control counterclockwise to
.
Foglamp control
The foglamps can be turned on only
when the headlamp control is in
the
,orposition and
the high beams are not turned on.
Pull headlamp control towards you
to turn foglamps on. The foglamp
indicator light
will illuminate
when foglamp is activated.
Push the headlamp control towards
the instrument panel to deactivate
the foglamps.
2006 Mountaineer(mnt)
Owners Guide (post-2002-fmt)
USA(fus)
Lights
48
Page 51 of 344

3. Turn on the low beam headlamps.
The brightest part of the light
should be below the horizontal line
(4). If it is above the line the
headlamp will need to be adjusted.
4. Open the hood.
5. Locate the vertical adjuster for
each headlamp. Adjust the aim by
turning the adjuster control either
clockwise (to adjust down) or
counterclockwise (to adjust up).
Note:Usea4mmsocket or box
wrench to turn the vertical adjuster
control.
6. Horizontal aiming is not required
for this vehicle and is
non-adjustable.
TURN SIGNAL CONTROL
•Push down to activate the left
turn signal.
•Push up to activate the right turn
signal.
2006 Mountaineer(mnt)
Owners Guide (post-2002-fmt)
USA(fus)
Lights
51
Page 56 of 344

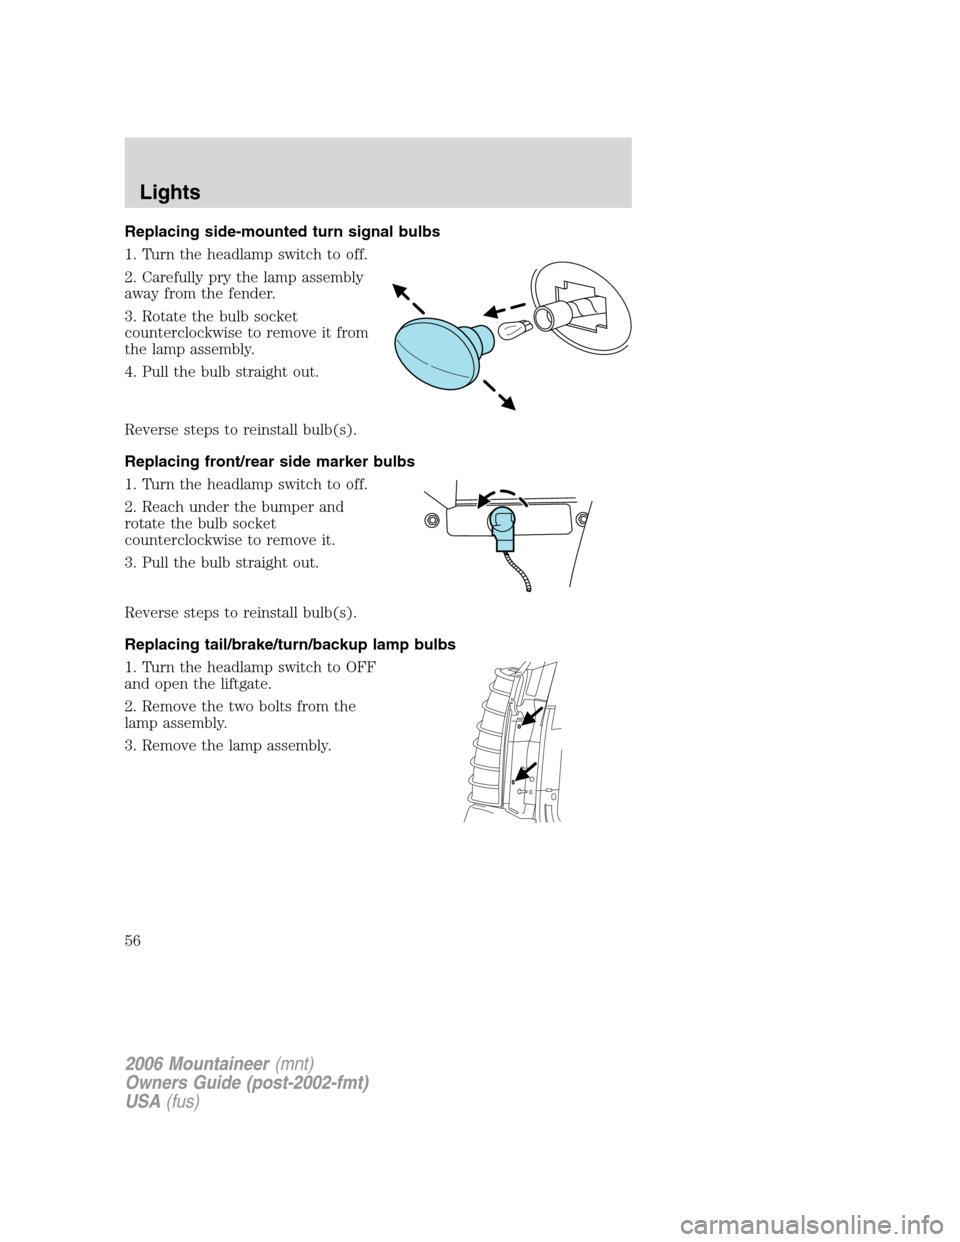
Replacing side-mounted turn signal bulbs
1. Turn the headlamp switch to off.
2. Carefully pry the lamp assembly
away from the fender.
3. Rotate the bulb socket
counterclockwise to remove it from
the lamp assembly.
4. Pull the bulb straight out.
Reverse steps to reinstall bulb(s).
Replacing front/rear side marker bulbs
1. Turn the headlamp switch to off.
2. Reach under the bumper and
rotate the bulb socket
counterclockwise to remove it.
3. Pull the bulb straight out.
Reverse steps to reinstall bulb(s).
Replacing tail/brake/turn/backup lamp bulbs
1. Turn the headlamp switch to OFF
and open the liftgate.
2. Remove the two bolts from the
lamp assembly.
3. Remove the lamp assembly.
2006 Mountaineer(mnt)
Owners Guide (post-2002-fmt)
USA(fus)
Lights
56
Page 57 of 344

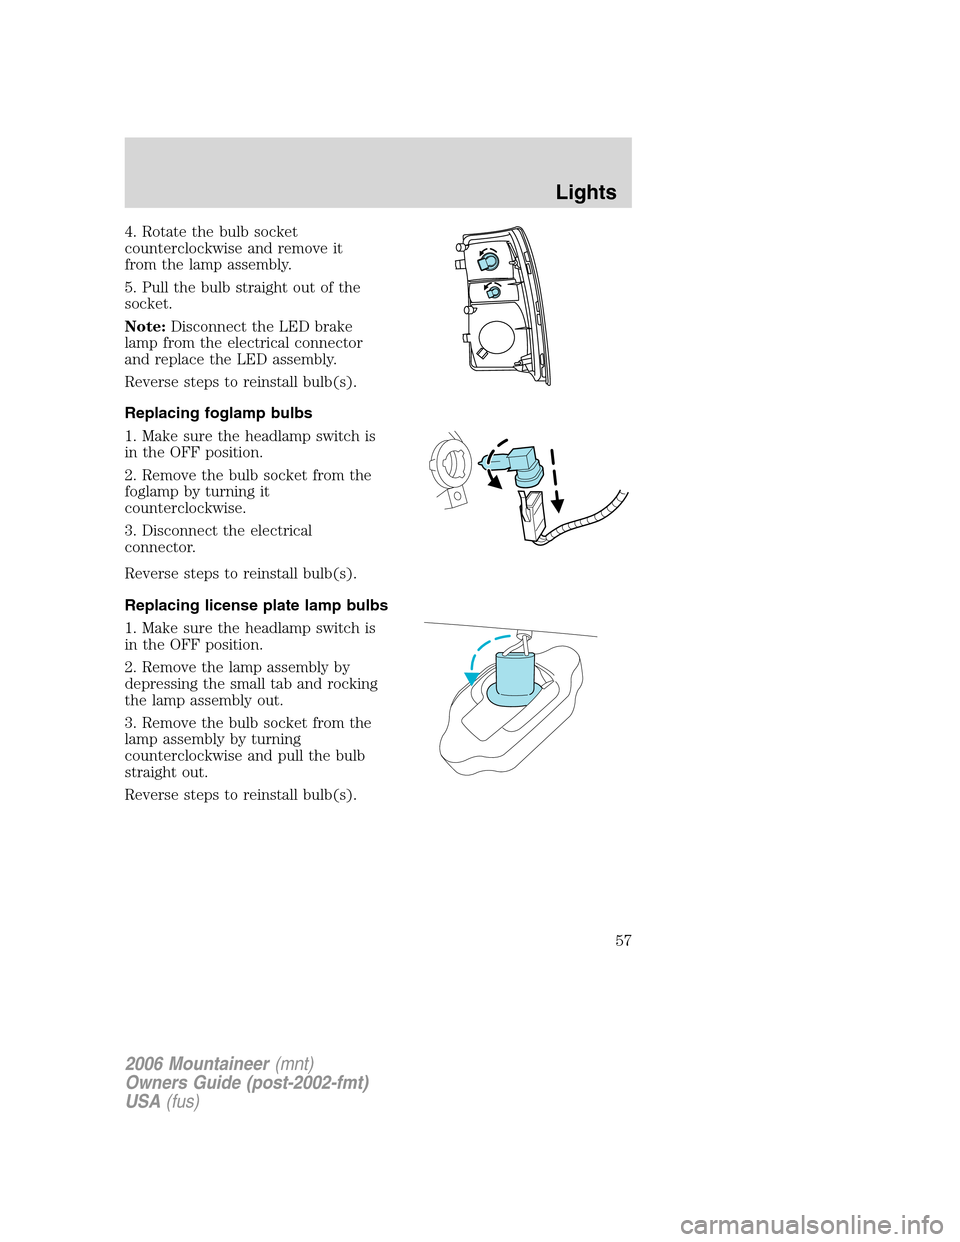
4. Rotate the bulb socket
counterclockwise and remove it
from the lamp assembly.
5. Pull the bulb straight out of the
socket.
Note:Disconnect the LED brake
lamp from the electrical connector
and replace the LED assembly.
Reverse steps to reinstall bulb(s).
Replacing foglamp bulbs
1. Make sure the headlamp switch is
in the OFF position.
2. Remove the bulb socket from the
foglamp by turning it
counterclockwise.
3. Disconnect the electrical
connector.
Reverse steps to reinstall bulb(s).
Replacing license plate lamp bulbs
1. Make sure the headlamp switch is
in the OFF position.
2. Remove the lamp assembly by
depressing the small tab and rocking
the lamp assembly out.
3. Remove the bulb socket from the
lamp assembly by turning
counterclockwise and pull the bulb
straight out.
Reverse steps to reinstall bulb(s).
2006 Mountaineer(mnt)
Owners Guide (post-2002-fmt)
USA(fus)
Lights
57
Page 66 of 344

AUTOMATIC DIMMING INSIDE REAR VIEW MIRROR (IF EQUIPPED)
Your vehicle may be equipped with
an inside rear view mirror with an
auto-dimming function. The
electrochromic day/night mirror will
change from the normal (high
reflective) state to the non-glare
(darkened) state when bright lights (glare) reach the mirror. When the
mirror detects bright light from behind the vehicle, it will automatically
adjust (darken) to minimize glare.
The mirror will automatically return to the normal state whenever the
vehicle is placed in R (Reverse) to ensure a bright clear view when
backing up.
Do not block the sensor on the backside of the inside rear view mirror
since this may impair proper mirror performance.
EXTERIOR MIRRORS
Power side view mirrors
The ignition must be in the ACC or ON position to adjust the power side
view mirrors.
To adjust your mirrors:
1. Rotate the control clockwise to
adjust the right mirror and rotate
the control counterclockwise to
adjust the left mirror.
2. Move the control in the direction
you wish to tilt the mirror.
3. Return to the center position to
lock mirrors in place.
2006 Mountaineer(mnt)
Owners Guide (post-2002-fmt)
USA(fus)
Driver Controls
66
Page 260 of 344

The spare tire and tools for your vehicle are stowed in the following
locations:
Tool Location
Spare tire Under the vehicle, just in front of
the rear bumper. The spare tire
winch drive nut is located at the
rear center of the cargo area
under a lid.
Jack, lug nut wrench, jack handle,
wheel chockBehind the rear seat under the
carpeted floor lid in the cargo
floor. The tools are located in a
bag attached to the jack.
Removing the jack and tools
1. Open liftgate and remove the
carpeted floor lid.
2. Turn jack screw eyelet (1)
counterclockwise to release
pressure.
3. Rotate the locking pin (2)
clockwise until loose then pull out
until it stops and remove the jack
and tool bag from the bracket.
4. Remove the chock and jack tools
from the provided bag rotate the
wrench socket out from the handle.
2006 Mountaineer(mnt)
Owners Guide (post-2002-fmt)
USA(fus)
Roadside Emergencies
260
Page 262 of 344

3. Turn the wrench
counterclockwise until the tire is
lowered to the ground and the cable
has slack. When turning the wrench,
make sure that it does not scuff the
kick plate.
4. Slide the tire rearward, lift one
side and remove the retainer from
the spare tire.
Changing the spare tire
To help prevent the vehicle from moving when you change a tire,
be sure the parking brake is set, then block the wheel that is
diagonally opposite (other end of the vehicle) to the tire being
changed.
If the vehicle slips off the jack, you or someone else could be
seriously injured.
Do not attempt to change a tire on the side of the vehicle close
to moving traffic. Pull far enough off the road to avoid the
danger of being hit when operating the jack or changing the wheel.
Turn off the running boards (if equipped) before working under
the vehicle, jacking, or placing any object under the vehicle.
Never place your hand in the hinge assemblies. A moving running
board may cause injury.
2006 Mountaineer(mnt)
Owners Guide (post-2002-fmt)
USA(fus)
Roadside Emergencies
262