light Mercury Mountaineer 2007 s User Guide
[x] Cancel search | Manufacturer: MERCURY, Model Year: 2007, Model line: Mountaineer, Model: Mercury Mountaineer 2007Pages: 360, PDF Size: 3.36 MB
Page 32 of 360
To search for specific RBDS music categories:When the desired
category appears in the display, press
/to find the desired type,
then press and release
SEEK, SEEKor press and hold SCAN to
begin the search.
To view the station name or type:When the desired category appears
in the display, press TEXT/SCAN to toggle between displaying the station
type (COUNTRY, ROCK, etc.) or the station name (WYCD, WXYT, etc.).
BASS:Press MENU to reach the bass setting. Use
/to adjust.
TREB (Treble):Press MENU to reach the treble setting. Use
/to
adjust.
BAL (Balance):Press MENU to reach the balance setting. Use
/
to adjust the audio between the left (L) and right (R) speakers.
FADE:Press MENU to reach the fade setting. Use
/to adjust the
audio between the back (B) and front (F) speakers.
SPEED VOL (Speed sensitive volume, if equipped):Press MENU to
reach the SPEEDVOL setting. Radio volume automatically gets louder
with increasing vehicle speed to compensate for road and wind noise.
Use
/to adjust.
The default setting isoff;increasing your vehicle speed will not change
the volume level.
Adjust1–7:Increasing this setting from 1 (lowest setting) to 7 (highest
setting) allows the radio volume to automatically change slightly with
vehicle speed to compensate for road and wind noise.
Recommended level is1–3;SPEED OFF turns the feature off and level 7
is the maximum setting.
Track/Folder mode:Available only on MP3 discs in CD mode.
In track mode, press
SEEK, SEEKto scroll through all tracks on
the disc
In folder mode, press
SEEK, SEEKto scroll through tracks
within the selected folder.
Press
FOLDER, FOLDERto access the previous/next folder (if
available).
COMPRESS (Compression):Available only in CD/MP3 mode. Press
MENU until COMPRESS ON/OFF appears in the display. Use
//
2007 Mountaineer(mnt)
Owners Guide (post-2002-fmt)
USA(fus)
Entertainment Systems
32
Page 38 of 360
compatible with the AIJ. The AIJ will only work correctly with devices
that have a headphone output with a volume control.
2. Do not set the portable music player’s volume level higher than is
necessary to match the volume of the CD or FM radio in your audio
system as this will cause distortion and will reduce sound quality. Many
portable music players have different output levels, so not all players
should be set at the same levels. Some players will sound best at full
volume and others will need to be set at a lower volume.
3. If the music sounds distorted at lower listening levels, turn the
portable music player volume down. If the problems persists, replace or
recharge the batteries in the portable music player.
4. The portable music player must be controlled in the same manner
when it is used with headphones as the AIJ does not provide control
(play, pause, etc.) over the attached portable music player.
5. For safety reasons, connecting or adjusting the settings on your
portable music player should not be attempted while the vehicle is
moving. Also, the portable music player should be stored in a secure
location, such as the center console or the glove box, when the vehicle is
in motion. The audio extension cable must be long enough to allow the
portable music player to be safely stored while the vehicle is in motion.
GENERAL AUDIO INFORMATION
Radio frequencies:
AM and FM frequencies are established by the Federal Communications
Commission (FCC) and the Canadian Radio and Telecommunications
Commission (CRTC). Those frequencies are:
AM: 530, 540–1700, 1710 kHz
FM: 87.7, 87.9–107.7, 107.9 MHz
Radio reception factors:
There are three factors that can affect radio reception:
•Distance/strength: The further you travel from an FM station, the
weaker the signal and the weaker the reception.
•Terrain: Hills, mountains, tall buildings, power lines, electric fences,
traffic lights and thunderstorms can interfere with your reception.
•Station overload: When you pass a broadcast tower, a stronger signal
may overtake a weaker one and play while the weak station frequency
is displayed.
2007 Mountaineer(mnt)
Owners Guide (post-2002-fmt)
USA(fus)
Entertainment Systems
38
Page 39 of 360
CD/CD player care
Do:
•Handle discs by their edges only. Never touch the playing surface.
•Inspect discs before playing. Clean only with an approved CD cleaner
and wipe from the center out.
Don’t:
•Expose discs to direct sunlight or heat sources for extended periods
of time.
•Clean using a circular motion.
CD units are designed to play commercially pressed 4.75 in
(12 cm) audio compact discs only. Due to technical
incompatibility, certain recordable and re-recordable compact
discs may not function correctly when used in Ford CD players.
Dirty, warped or damaged CDs, irregular shaped CDs, CDs with a
scratch protection film attached, and CDs with homemade paper
(adhesive) labels should not be inserted into the CD player. The
label may peel and cause the CD to become jammed. It is
recommended that homemade CDs be identified with permanent
felt tip marker rather than adhesive labels. Ballpoint pens may
damage CDs. Please contact your authorized dealer for further
information.
Audio system warranty and service
Refer to theWarranty Guidefor audio system warranty information. If
service is necessary, see your dealer or qualified technician.
MP3 track and folder structure
Your MP3 system recognizes MP3 individual tracks and folder structure
as follows:
•There are two different modes for MP3 disc playback: MP3 track mode
(system default) and MP3 folder mode. For more information on track
and folder mode, refer toSample MP3 structurein the following
section.
•MP3 track mode ignores any folder structure on the MP3 disc. The
player numbers each MP3 track on the disc (noted by the .mp3 file
extension) from T001 to T255.
•MP3 folder mode represents a folder structure consisting of one level
of folders. The CD player numbers all MP3 tracks on the disc (noted
by the .mp3 file extension) and all folders containing MP3 files, from
F001 (folder) T001 (track) to F253 T255.
2007 Mountaineer(mnt)
Owners Guide (post-2002-fmt)
USA(fus)
Entertainment Systems
39
Page 44 of 360
Quick start
Your Family Entertainment System includes a DVD system, two sets of
wireless infrared (IR) headphones and a wireless infrared (IR) remote
control.
To play a DVD in the DVD system:
The DVD system can play DVD-Video, DVD-R, DVD-R/W discs as well as
audio CDs and video CDs. To ensure proper disc operation, check the
disc for finger prints, scratches and cleanliness. Clean with a soft cloth,
wiping from center to edge.
1. Ensure that the vehicle ignition is in the RUN or ACCESSORY
position.
2. Insert a DVD into the system,
label-side up to turn on the system.
It will load automatically and begin
to play. If a DVD is already loaded in the system, press PLAY on the DVD
player.
The power indicator will turn on
automatically indicating the DVD
system is ON.
Press VIDEO to change the source
displayed on the screen. Press
repeatedly to cycle through:
DVD-DISC, DVD-AUX, NON-DVD,
OFF.
Press the power button to turn the
system OFF. The indicator light will
turn off indicating the system is off.
Note:The audio from the DVD system will play over all vehicle speakers
and can be adjusted by the radio volume control.
To play a CD in the DVD system:
The DVD system can play audio CDs, CD-R and CD-R/W, CD-ROM and
video CDs. To ensure proper disc operation, check the disc for finger
prints and scratches. Clean the disc with a soft cloth, wiping from the
center to the edge.
2007 Mountaineer(mnt)
Owners Guide (post-2002-fmt)
USA(fus)
Entertainment Systems
44
Page 46 of 360
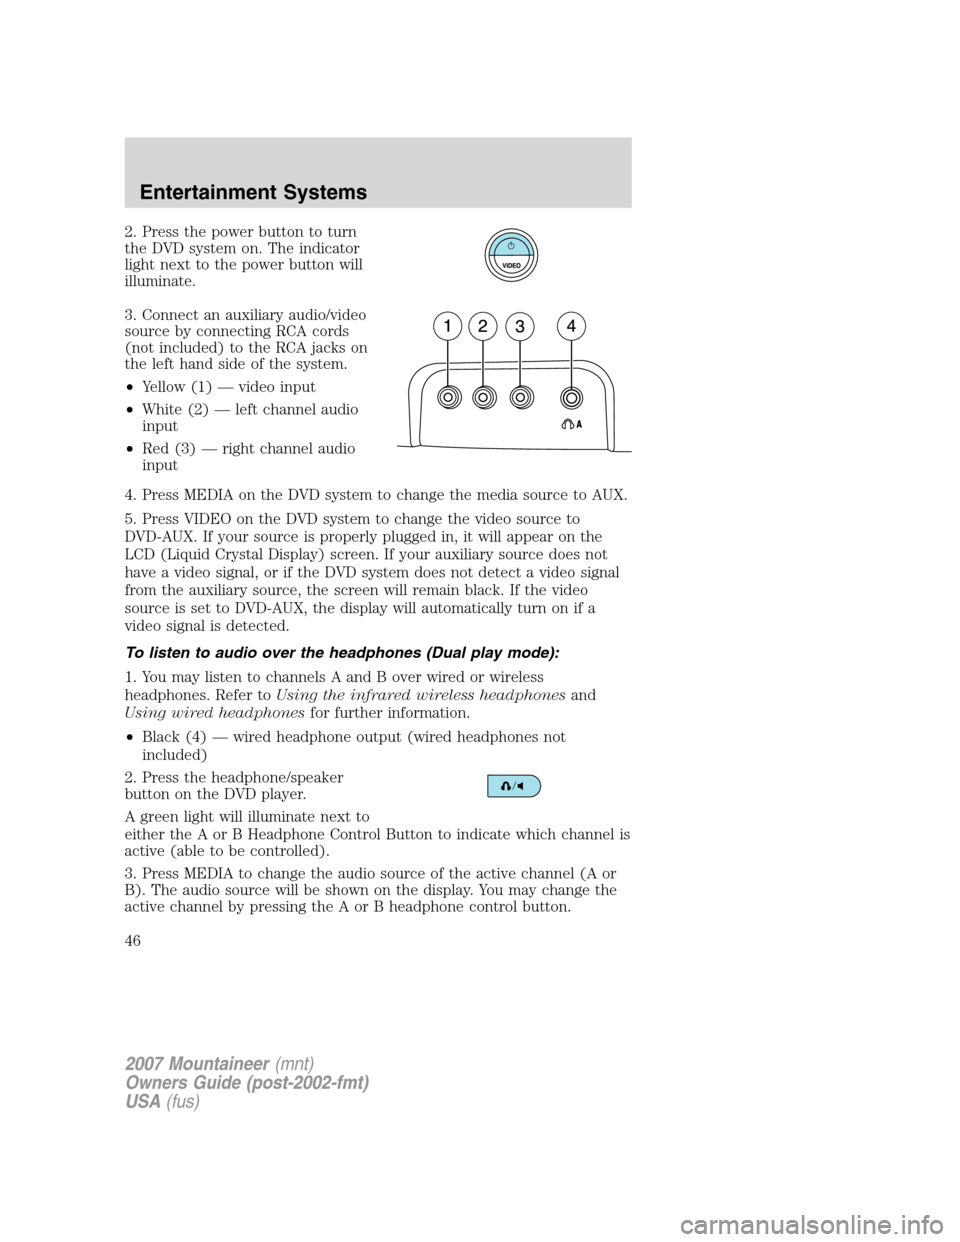
2. Press the power button to turn
the DVD system on. The indicator
light next to the power button will
illuminate.
3. Connect an auxiliary audio/video
source by connecting RCA cords
(not included) to the RCA jacks on
the left hand side of the system.
•Yellow (1) — video input
•White (2) — left channel audio
input
•Red (3) — right channel audio
input
4. Press MEDIA on the DVD system to change the media source to AUX.
5. Press VIDEO on the DVD system to change the video source to
DVD-AUX. If your source is properly plugged in, it will appear on the
LCD (Liquid Crystal Display) screen. If your auxiliary source does not
have a video signal, or if the DVD system does not detect a video signal
from the auxiliary source, the screen will remain black. If the video
source is set to DVD-AUX, the display will automatically turn on if a
video signal is detected.
To listen to audio over the headphones (Dual play mode):
1. You may listen to channels A and B over wired or wireless
headphones. Refer toUsing the infrared wireless headphonesand
Using wired headphonesfor further information.
•Black (4) — wired headphone output (wired headphones not
included)
2. Press the headphone/speaker
button on the DVD player.
A green light will illuminate next to
either the A or B Headphone Control Button to indicate which channel is
active (able to be controlled).
3. Press MEDIA to change the audio source of the active channel (A or
B). The audio source will be shown on the display. You may change the
active channel by pressing the A or B headphone control button.
2007 Mountaineer(mnt)
Owners Guide (post-2002-fmt)
USA(fus)
Entertainment Systems
46
Page 52 of 360

(Wireless headphone volume is controlled with the rotary dial on the
right ear piece.)
8.Fast Forward/Next:In DVD mode, press and hold for a quick
advance within the DVD. Press and release to advance to the next
chapter. In CD/MP3 mode, press to access the next track.
9.Play/Pause:Press to play or pause a DVD.
10.SHUFFLE:Press to play all tracks on the current CD/MP3 disc in
random order.
11.STOP:Press to stop the current DVD or CD/MP3.
12.
/Speaker/Headphone(Single/Dual Play): Press to toggle
between Single Play (same media playing through all speakers) and Dual
Play (headphone mode — the rear speakers are muted).
13.Keypad:Use the numeric controls to enter in a specific CD/MP3
track or DVD chapter to be played.
14.C (Cancel):Press to cancel/clear the numeric input (i.e. chapter
number).
15.MEDIA:Press to cycle through the possible media sources: AM,
FM1, FM2, SAT (if equipped), CD, CASSETTE, DVD, LINE IN (if
equipped), DVD-AUX.
Channel B can only access DVD and AUX sources.
16.VIDEO:Press to cycle through video states: DVD-DISC, DVD-AUX,
NON-DVD, Off.
17.EJECT:Press to eject a disc from the FES.
18.Fast reverse/Previous:When a DVD is playing, press and hold for a
quick reverse within the DVD. Press and release for the previous
chapter. Press PLAY to resume normal playback speed and volume.
In CD/MP3 mode, press to access the previous track.
19.MENU:Press to access the DVD disc menu for selections. Press
MENU again when in the DVD disc menu to access the system set-up
menu.
20.SUBTITLE(DVD dependent): Press to turn the subtitle feature ON
or OFF.
21.LANGUAGE(DVD dependent): Press to select the desired
language.
22.ENTER:Press to select the highlighted menu option.
23.ILLUMINATION: Press to illuminate the remote control and
backlight all of the buttons.
2007 Mountaineer(mnt)
Owners Guide (post-2002-fmt)
USA(fus)
Entertainment Systems
52
Page 54 of 360

Headphones
Wireless headphones
Your FES system is equipped with two sets of battery powered, infrared
wireless headphones. Two AAA batteries are needed to operate the
headphones. (Batteries are included.)
Additional infrared wireless headphones may be purchased for use with
the system. Also, wired headphones may be purchased and plugged in
where indicated on the left and right hand sides of the system. Refer to
Wired Headphonesbelow.
To install the batteries, remove the
screw at the bottom of the cover.
Then, lightly press down on top and
slide the cover off.
When replacing the batteries, use
two new batteries (alkaline
recommended) and install them
with the correct orientation as
indicated in the battery housing.
2007 Mountaineer(mnt)
Owners Guide (post-2002-fmt)
USA(fus)
Entertainment Systems
54
Page 55 of 360
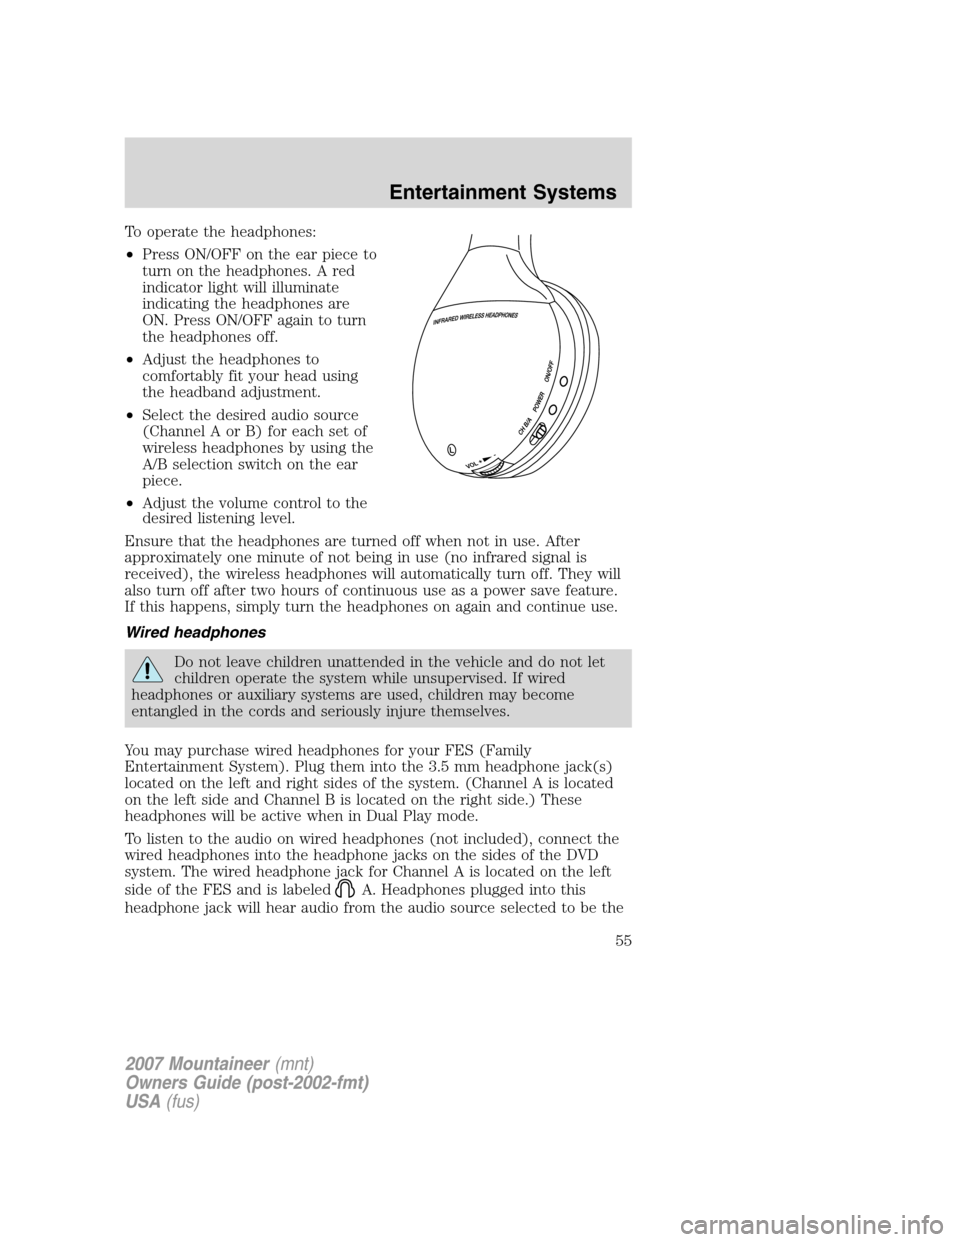
To operate the headphones:
•Press ON/OFF on the ear piece to
turn on the headphones. A red
indicator light will illuminate
indicating the headphones are
ON. Press ON/OFF again to turn
the headphones off.
•Adjust the headphones to
comfortably fit your head using
the headband adjustment.
•Select the desired audio source
(Channel A or B) for each set of
wireless headphones by using the
A/B selection switch on the ear
piece.
•Adjust the volume control to the
desired listening level.
Ensure that the headphones are turned off when not in use. After
approximately one minute of not being in use (no infrared signal is
received), the wireless headphones will automatically turn off. They will
also turn off after two hours of continuous use as a power save feature.
If this happens, simply turn the headphones on again and continue use.
Wired headphones
Do not leave children unattended in the vehicle and do not let
children operate the system while unsupervised. If wired
headphones or auxiliary systems are used, children may become
entangled in the cords and seriously injure themselves.
You may purchase wired headphones for your FES (Family
Entertainment System). Plug them into the 3.5 mm headphone jack(s)
located on the left and right sides of the system. (Channel A is located
on the left side and Channel B is located on the right side.) These
headphones will be active when in Dual Play mode.
To listen to the audio on wired headphones (not included), connect the
wired headphones into the headphone jacks on the sides of the DVD
system. The wired headphone jack for Channel A is located on the left
side of the FES and is labeled
A. Headphones plugged into this
headphone jack will hear audio from the audio source selected to be the
2007 Mountaineer(mnt)
Owners Guide (post-2002-fmt)
USA(fus)
Entertainment Systems
55
Page 56 of 360
Channel A source. The wired headphone jack for Channel B is located on
the right side of the FES and is labeled
B. Headphones plugged into
this headphone jack will hear audio from the audio source selected to be
the Channel B source.
Adjust the headphone volume using
the volume control on the DVD
system.
Operation
Single play/Dual play
Your DVD and audio system work together with the infrared headphones
and wired headphones (not included) to enable the front and rear seat
passengers to listen to a variety of sources a variety of ways.
Single Play:Single play consists of all occupants in the vehicle listening
to the same playing media over the front and rear speakers. When the
DVD system is on, and the same source is playing through the front and
rear speakers, SINGLE PLAY will appear in the front radio display.
Dual Play:Dual play is when the rear seat passengers choose to listen
to a different playing media than the front seat passengers. With the
DVD and Rear Seat Controls turned ON, the rear seat passengers may
choose to listen to the radio, CD, MP3, DVD, or DVD-AUX media sources
over headphones while the front speakers play the chosen selection for
the front audio system, they may listen to another over the headphones.
DUAL PLAY will appear in the radio display.
When both the front seat passengers and the rear seat passengers listen
to the same audio source, SHARED MODE will appear on the radio.
Note:If the front seat passengers are listening to the radio, the rear seat
passengers can also listen to the radio, however they will be limited to
listening to the same radio channel.
Press
/on the DVD player to
listen to audio over the headphones.
The headphone control will now be active and a green light next to the
A or B headphone control buttons will illuminate. The system can output
two different audio sources over the headphones. These are called
Channel A and Channel B. Both Channel A and Channel B can be
listened to on the wired headphones (not included) or on the infrared
(IR) wireless headphones.
2007 Mountaineer(mnt)
Owners Guide (post-2002-fmt)
USA(fus)
Entertainment Systems
56
Page 60 of 360

Once you have made your selection,
press ENTER to confirm. This is
disc dependent.
Audio CDs
To play audio CDs on your DVD system:
1. Ensure that the vehicle ignition is in the RUN or ACCESSORY
position.
2. Ensure that the DVD system is ON.
3. Insert an audio CD into the DVD system, label side up.
4. The track and elapsed time will
appear in the status bar. Use the
DVD cursor controls on the bezel to
highlight which track you would like
to play. You can also use the cursor
controls to highlight
COMPRESSION, SHUFFLE or
SCAN. Once you have highlighted
the desired track or function, press ENTER on the DVD bezel to confirm
your selection.
COMP (Compression):Compression brings soft and loud CD passages
together for a more consistent listening level when in CD mode. Press to
turn the feature ON/OFF
SHUFFLE:Press to hear all tracks on the current CD in random order.
Press again to stop.
SCAN:Press for a brief sampling of all tracks on the current CD. Press
again to stop.
Playing MP3 discs
To play an MP3 disc on your DVD system:
1. Ensure that the vehicle ignition is in the RUN or ACCESSORY
position.
2. Ensure that the DVD system is ON.
3. Insert the MP3 disc into the DVD system, label side up.
2007 Mountaineer(mnt)
Owners Guide (post-2002-fmt)
USA(fus)
Entertainment Systems
60