mirror Mercury Mountaineer 2007 Owner's Manuals
[x] Cancel search | Manufacturer: MERCURY, Model Year: 2007, Model line: Mountaineer, Model: Mercury Mountaineer 2007Pages: 360, PDF Size: 3.36 MB
Page 1 of 360
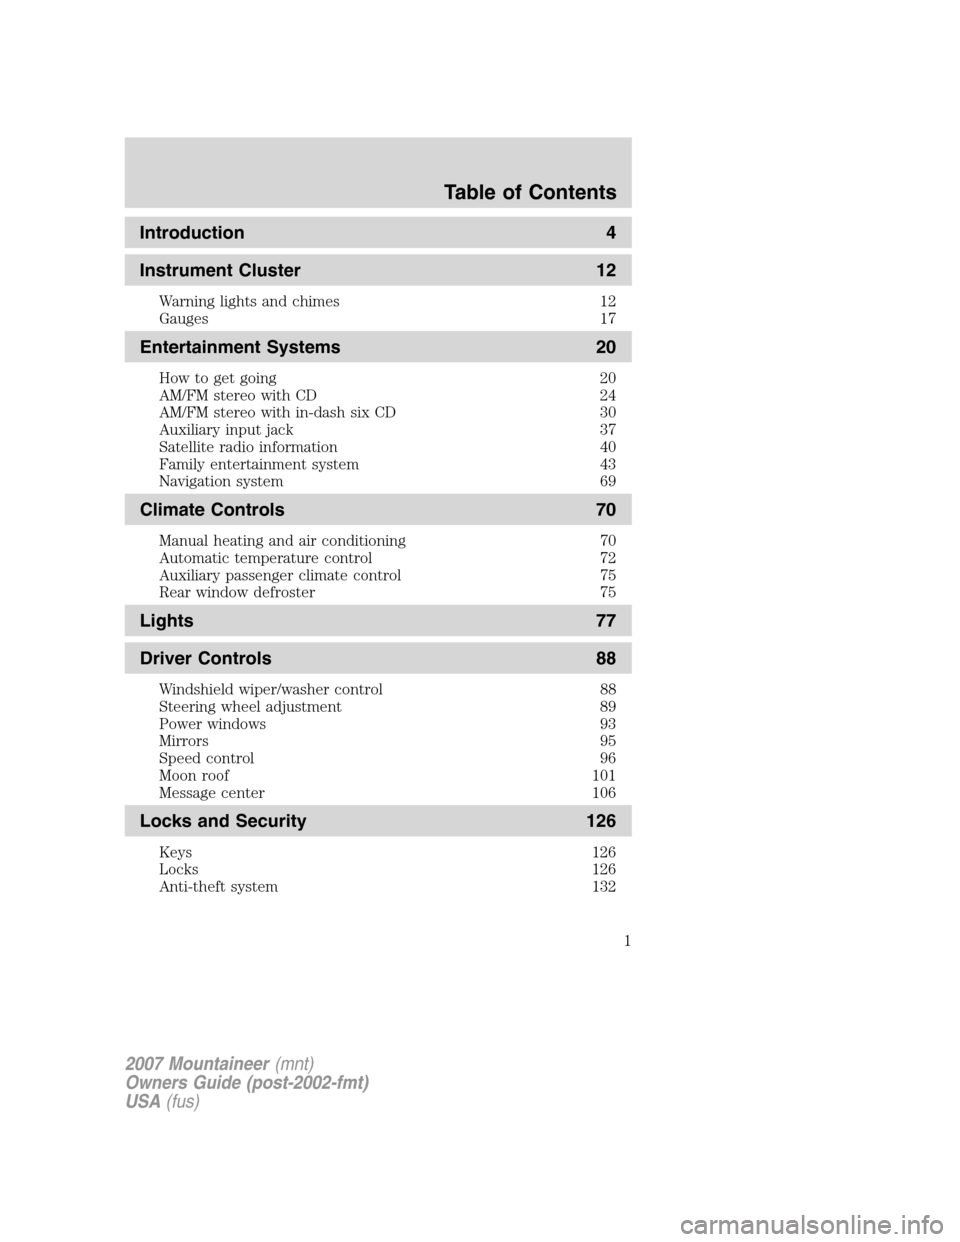
Introduction 4
Instrument Cluster 12
Warning lights and chimes 12
Gauges 17
Entertainment Systems 20
How to get going 20
AM/FM stereo with CD 24
AM/FM stereo with in-dash six CD 30
Auxiliary input jack 37
Satellite radio information 40
Family entertainment system 43
Navigation system 69
Climate Controls 70
Manual heating and air conditioning 70
Automatic temperature control 72
Auxiliary passenger climate control 75
Rear window defroster 75
Lights 77
Driver Controls 88
Windshield wiper/washer control 88
Steering wheel adjustment 89
Power windows 93
Mirrors 95
Speed control 96
Moon roof 101
Message center 106
Locks and Security 126
Keys 126
Locks 126
Anti-theft system 132
Table of Contents
1
2007 Mountaineer(mnt)
Owners Guide (post-2002-fmt)
USA(fus)
Page 90 of 360
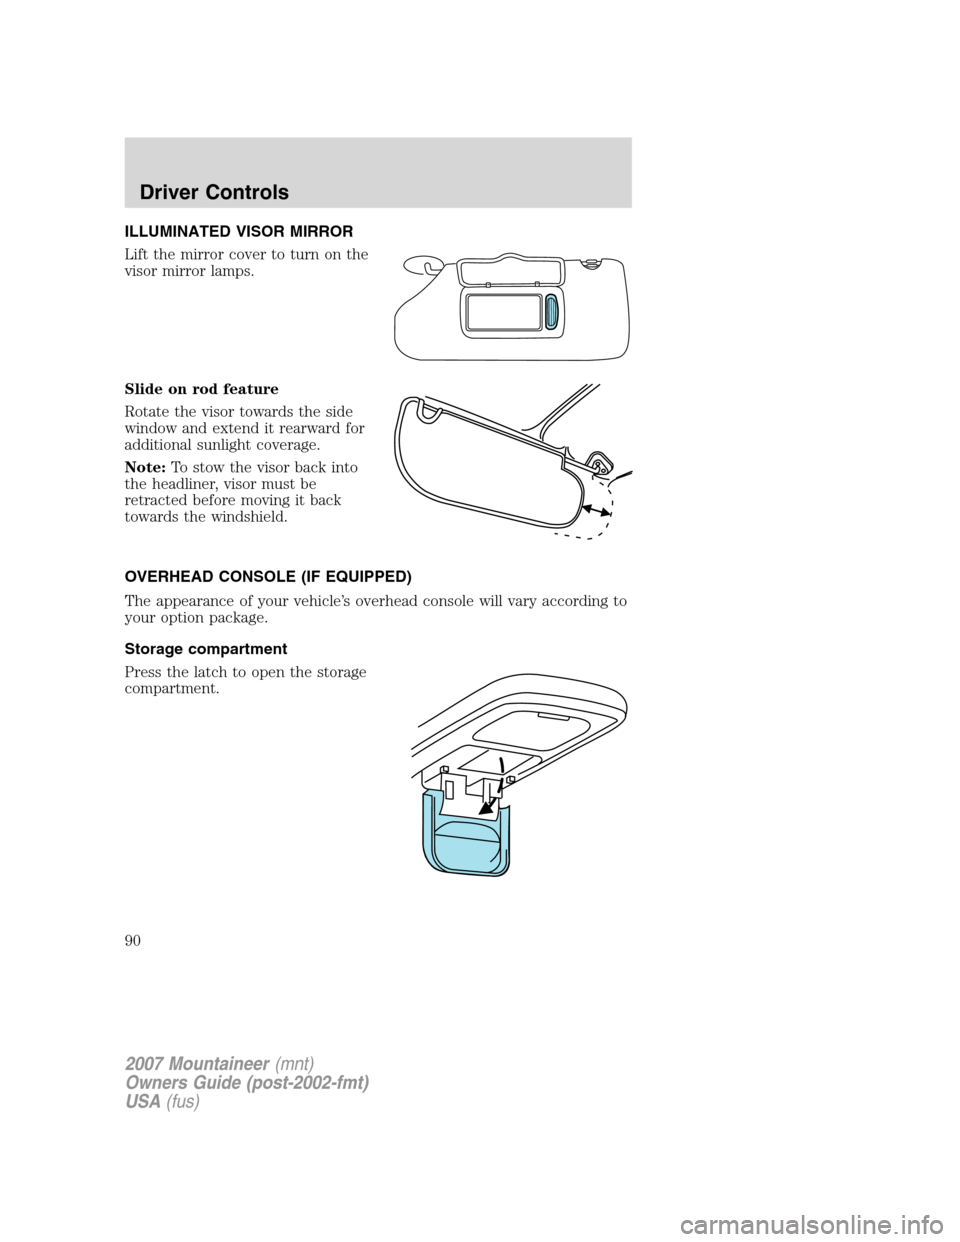
ILLUMINATED VISOR MIRROR
Lift the mirror cover to turn on the
visor mirror lamps.
Slide on rod feature
Rotate the visor towards the side
window and extend it rearward for
additional sunlight coverage.
Note:To stow the visor back into
the headliner, visor must be
retracted before moving it back
towards the windshield.
OVERHEAD CONSOLE (IF EQUIPPED)
The appearance of your vehicle’s overhead console will vary according to
your option package.
Storage compartment
Press the latch to open the storage
compartment.
2007 Mountaineer(mnt)
Owners Guide (post-2002-fmt)
USA(fus)
Driver Controls
90
Page 94 of 360

One touch down
Allows the driver’s window to open
fully without holding the control
down. Push the switch completely
down to the second detent and
release quickly. The window will
open fully. Momentarily press the
switch to any position to stop the
window operation.
Window lock
The window lock feature allows only
the driver to operate the power
windows.
To lock out all the window controls
except for the driver’s press the
right side of the control. Press the
left side to restore the window
controls.
Accessory delay
With accessory delay, the window switches, audio system and moon roof
(if equipped) may be used for up to ten minutes after the ignition switch
is turned to the OFF position or until either front door is opened.
AUTOMATIC DIMMING INSIDE REAR VIEW MIRROR (IF EQUIPPED)
Your vehicle may be equipped with
an inside rear view mirror which has
an auto-dimming function. The
electronic day/night mirror will
change from the normal (high
reflective) state to the non-glare
(darkened) state when bright lights (glare) reach the mirror. When the
mirror detects bright light from behind the vehicle, it will automatically
adjust (darken) to minimize glare.
The mirror will automatically return to the normal state whenever the
vehicle is placed in R (Reverse) (when the mirror is on) to ensure a
bright clear view when backing up.
Do not block the sensor on the backside of the mirror since this may
impair proper mirror performance.
2007 Mountaineer(mnt)
Owners Guide (post-2002-fmt)
USA(fus)
Driver Controls
94
Page 95 of 360
EXTERIOR MIRRORS
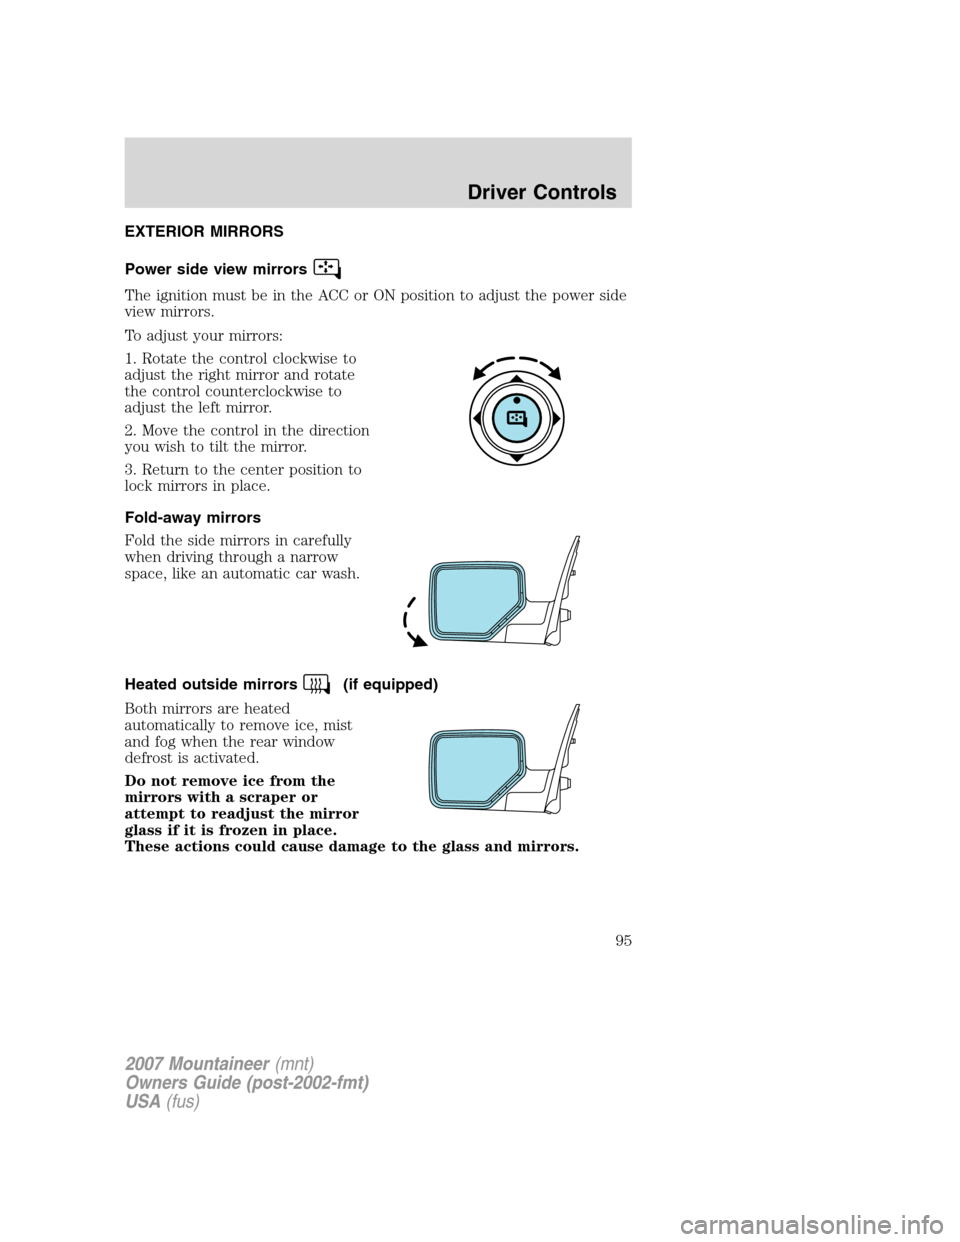
Power side view mirrors
The ignition must be in the ACC or ON position to adjust the power side
view mirrors.
To adjust your mirrors:
1. Rotate the control clockwise to
adjust the right mirror and rotate
the control counterclockwise to
adjust the left mirror.
2. Move the control in the direction
you wish to tilt the mirror.
3. Return to the center position to
lock mirrors in place.
Fold-away mirrors
Fold the side mirrors in carefully
when driving through a narrow
space, like an automatic car wash.
Heated outside mirrors
(if equipped)
Both mirrors are heated
automatically to remove ice, mist
and fog when the rear window
defrost is activated.
Do not remove ice from the
mirrors with a scraper or
attempt to readjust the mirror
glass if it is frozen in place.
These actions could cause damage to the glass and mirrors.
2007 Mountaineer(mnt)
Owners Guide (post-2002-fmt)
USA(fus)
Driver Controls
95
Page 115 of 360

1. To disable/enable the reverse
sensing system feature with the
vehicle in P (Park), select this
function from the SETUP MENU or
put the vehicle in R (Reverse).
2. Press the RESET control to turn
the park aid ON or OFF.
3. Press the RESET control for the
next SETUP MENU item or wait for more than 4 seconds to return to
the INFO menu.
Compass display (if equipped)
The compass reading may be affected when you drive near large
buildings, bridges, power lines and powerful broadcast antenna. Magnetic
or metallic objects placed in, on or near the vehicle may also affect
compass accuracy.
Usually, when something affects the compass readings, the compass will
correct itself after a few days of operating your vehicle in normal
conditions. If the compass still appears to be inaccurate, a manual
calibration may be necessary. Refer toCompass zone/calibration
adjustment.
Most geographic areas (zones) have a magnetic north compass point that
varies slightly from the northerly direction on maps. This variation is four
degrees between adjacent zones and will become noticeable as the
vehicle crosses multiple zones. A correct zone setting will eliminate this
error. Refer toCompass zone/calibration adjustment.
Note:Compass zone and calibration adjustments can be entered by
using the INFO and SETUP MENU controls or using the reset button on
top of the compass sensor mounted behind the mirror.
2007 Mountaineer(mnt)
Owners Guide (post-2002-fmt)
USA(fus)
Driver Controls
115
Page 270 of 360

Fuse/Relay
LocationFuse Amp
RatingPassenger Compartment Fuse
Panel Description
6 20A Liftglass release motor, Door
unlock/lock
7 15A Trailer stop/turn
8 15A Ignition switch power, PATS
9 2A 6R TCM/PCM (Ignition
RUN/START), Fuel pump relay
10 5A Front wiper RUN/ACC relay in
PDB
11 5A Radio start
12 5A Rear wiper motor RUN/ACC,
Trailer battery charge relay in
PDB, Radio
13 15A Heated mirror, Manual climate
rear defrost indicator
14 20A Horn
15 10A Reverse lamps
16 10A Trailer reverse lamps
17 10A RCM, PAD lamp, OCS module
18 10A Reverse park aid, IVD switch,
IVD, AWD module, Heated seat
switches, Compass,
Electrochromatic mirror, AUX
climate control
19 — Not used
20 10A Manual climate, DEATC, Brake
shift
21 — Not used
22 15A Brake switch, Bi-color stop lamps,
CHMSL, All turn lamps
23 15A Interior lamps, Puddle lamps,
Battery saver, Instrument
illumination, Homelink
2007 Mountaineer(mnt)
Owners Guide (post-2002-fmt)
USA(fus)
Roadside Emergencies
270
Page 271 of 360
Fuse/Relay
LocationFuse Amp
RatingPassenger Compartment Fuse
Panel Description
24 10A Cluster, Theft LED
25 15A Trailer tow park lamps
26 15A License plate/rear park lamp,
Front park lamps, Manual climate
27 15A Tri-color stop lamps
28 10A Manual/DEATC
CB1 25A Windows
The following relays are located on either side of the passenger
compartment fuse panel. See your authorized dealer for service of these
relays.
Fuse/Relay Location Description
Relay 1 Delayed ACC
Relay 2 Rear defrost, Heated mirror
Relay 3 Park lamps
Relay 4 RUN/START
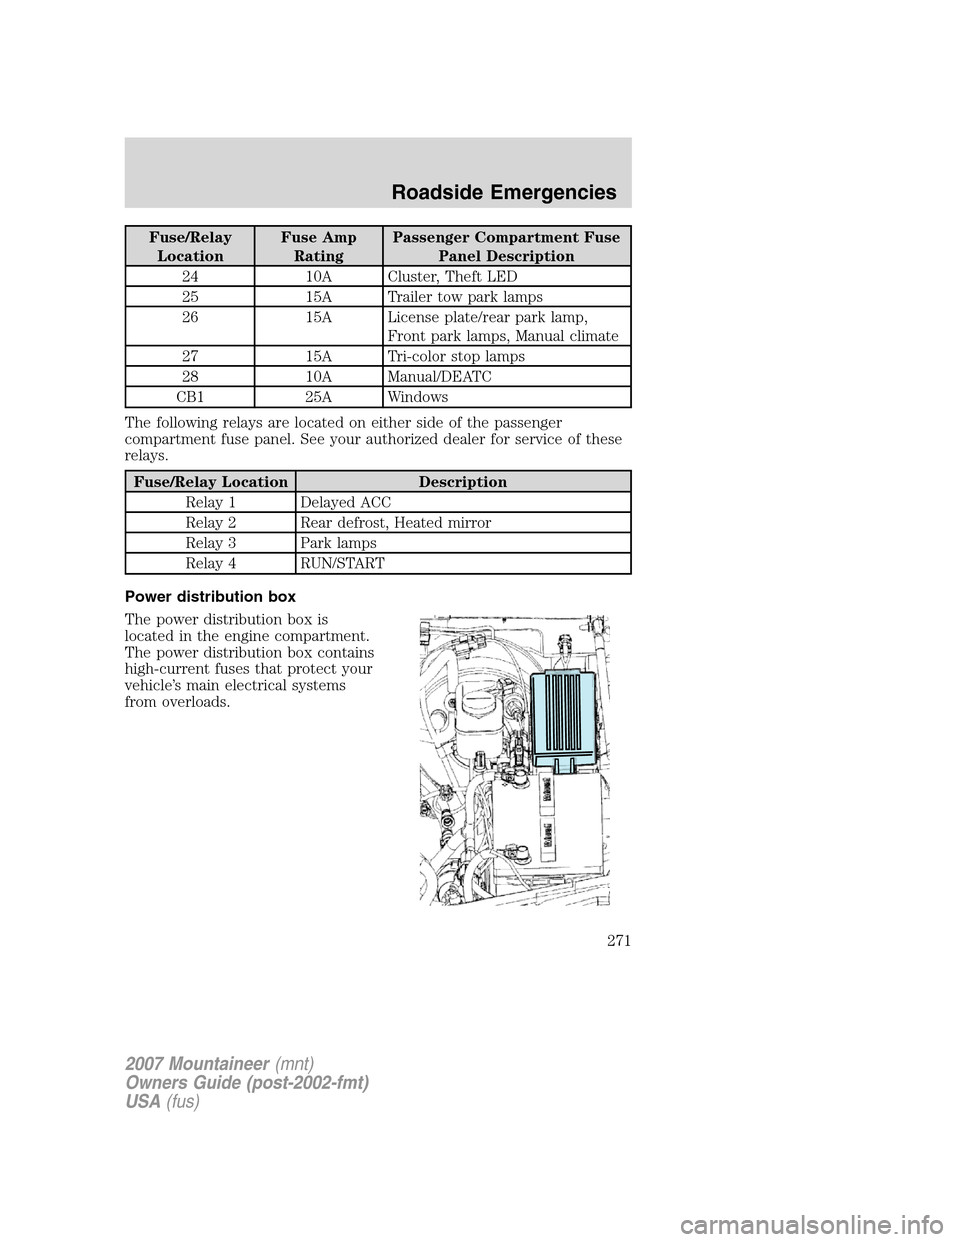
Power distribution box
The power distribution box is
located in the engine compartment.
The power distribution box contains
high-current fuses that protect your
vehicle’s main electrical systems
from overloads.
2007 Mountaineer(mnt)
Owners Guide (post-2002-fmt)
USA(fus)
Roadside Emergencies
271
Page 273 of 360
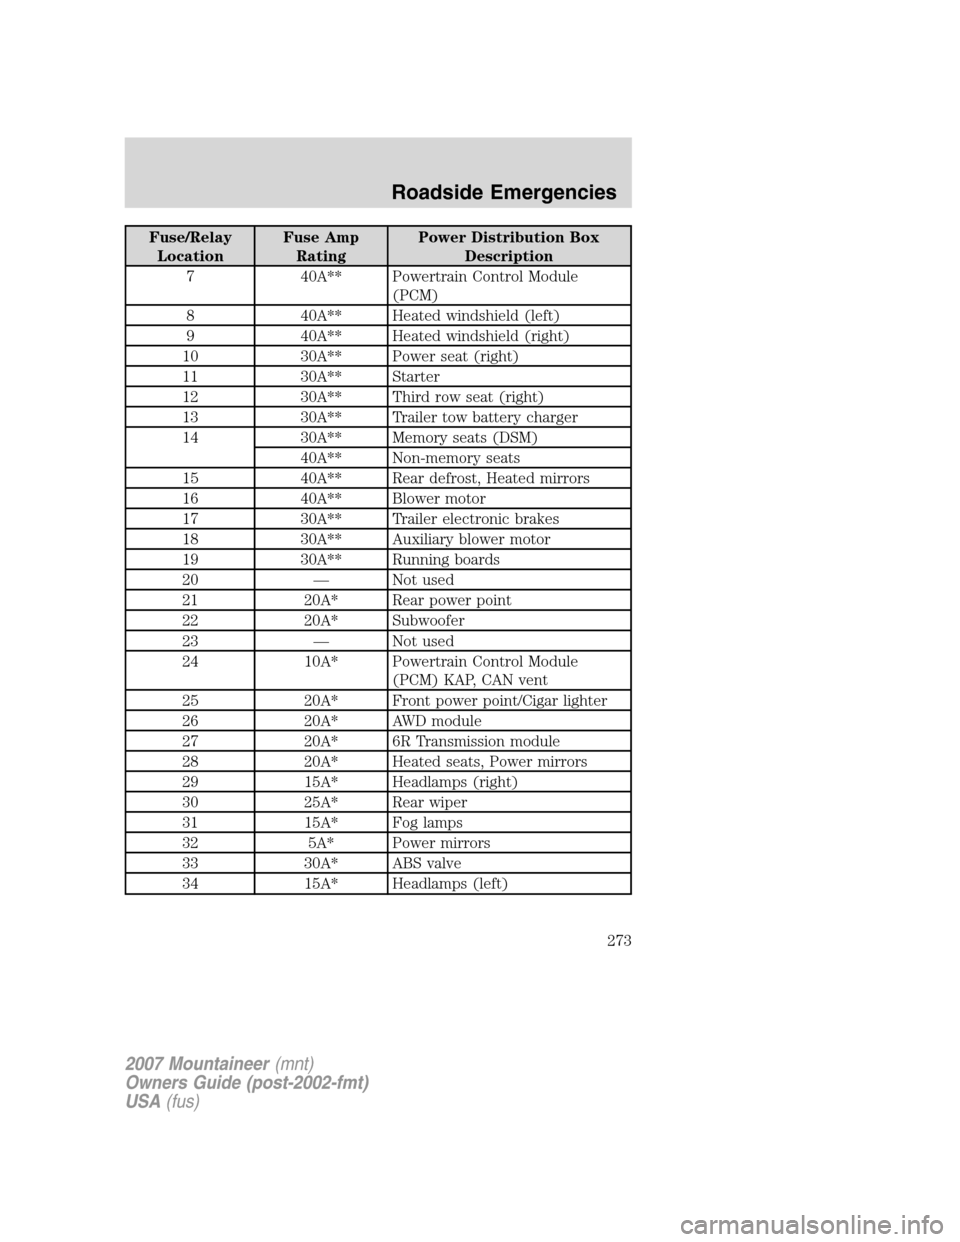
Fuse/Relay
LocationFuse Amp
RatingPower Distribution Box
Description
7 40A** Powertrain Control Module
(PCM)
8 40A** Heated windshield (left)
9 40A** Heated windshield (right)
10 30A** Power seat (right)
11 30A** Starter
12 30A** Third row seat (right)
13 30A** Trailer tow battery charger
14 30A** Memory seats (DSM)
40A** Non-memory seats
15 40A** Rear defrost, Heated mirrors
16 40A** Blower motor
17 30A** Trailer electronic brakes
18 30A** Auxiliary blower motor
19 30A** Running boards
20 — Not used
21 20A* Rear power point
22 20A* Subwoofer
23 — Not used
24 10A* Powertrain Control Module
(PCM) KAP, CAN vent
25 20A* Front power point/Cigar lighter
26 20A* AWD module
27 20A* 6R Transmission module
28 20A* Heated seats, Power mirrors
29 15A* Headlamps (right)
30 25A* Rear wiper
31 15A* Fog lamps
32 5A* Power mirrors
33 30A* ABS valve
34 15A* Headlamps (left)
2007 Mountaineer(mnt)
Owners Guide (post-2002-fmt)
USA(fus)
Roadside Emergencies
273
Page 301 of 360

•After polishing chrome bumpers, apply a coating of Motorcraft
Premium Liquid Wax (ZC-53-A), available from your authorized dealer,
or an equivalent quality product to help protect from environmental
effects.
WAXING
Applying Motorcraft Paint Sealant (ZC-45) to your vehicle every six
months will assist in reducing minor scratches and paint damage.
•Wash the vehicle first.
•Do not use waxes that contain abrasives; use Motorcraft Premium
Liquid Wax (ZC-53-A), which is available from your authorized dealer,
or an equivalent quality product.
•Do not allow paint sealant to come in contact with any non-body
(low-gloss black) colored trim, such as grained door handles, roof
racks, bumpers, side moldings, mirror housings or the windshield cowl
area. The paint sealant will “gray” or stain the parts over time.
PAINT CHIPS
Your authorized dealer has touch-up paint to match your vehicle’s color.
Take your color code (printed on a sticker in the driver’s door jamb) to
your authorized dealer to ensure you get the correct color.
•Remove particles such as bird droppings, tree sap, insect deposits, tar
spots, road salt and industrial fallout before repairing paint chips.
•Always read the instructions before using the products.
ALUMINUM WHEELS AND WHEEL COVERS
Aluminum wheels and wheel covers are coated with a clearcoat paint
finish. In order to maintain their shine:
•Clean weekly with Motorcraft Wheel and Tire Cleaner (ZC-37-A),
which is available from your authorized dealer. Heavy dirt and brake
dust accumulation may require agitation with a sponge. Rinse
thoroughly with a strong stream of water.
•Never apply any cleaning chemical to hot or warm wheel rims or
covers.
•Some automatic car washes may cause damage to the finish on your
wheel rims or covers. Chemical-strength cleaners, or cleaning
chemicals, in combination with brush agitation to remove brake dust
and dirt, could wear away the clearcoat finish over time.
•Do not use hydrofluoric acid-based or high caustic-based wheel
cleaners, steel wool, fuels or strong household detergent.
2007 Mountaineer(mnt)
Owners Guide (post-2002-fmt)
USA(fus)
Cleaning
301
Page 349 of 360

GENUINE MERCURY ACCESSORIES FOR YOUR VEHICLE
A wide selection of Genuine Mercury Accessories are available for your
vehicle through your local Mercury or Ford of Canada dealer. These
quality accessories have been specifically engineered to fulfill your
automotive needs; they are custom designed to complement the style
and aerodynamic appearance of your vehicle. In addition, each accessory
is made from high quality materials and meets or exceeds Mercury’s
rigorous engineering and safety specifications. Ford Motor Company will
repair or replace any properly dealer-installed Genuine Mercury
Accessories found to be defective in factory-supplied materials or
workmanship during the warranty period, as well as any component
damaged by the defective accessories. The accessories will be warranted
for whichever provides you the greatest benefit:
•12 months or 12,000 miles (20,000 km) (whichever occurs first), or
•the remainder of your new vehicle limited warranty.
Contact your dealer for details and a copy of the warranty.
Following is a list of several Genuine Mercury Accessories. Not all
accessories are available for all models. To find out what accessories are
available for your vehicle, please contact your dealer or visit our online
store at: www.mercuryaccessories.com.
Exterior style
Bug shields
Chrome exhaust tips
Deflectors
Running boards
Splash guards
Step Bars
Interior style
Electrochromatic compass/temperature interior mirrors
Floor mats
Lifestyle
Ash cup / smoker’s package
Cargo organization and management
Trailer hitches, wiring harnesses and accessories
2007 Mountaineer(mnt)
Owners Guide (post-2002-fmt)
USA(fus)
Accessories
349