change time Mercury Mountaineer 2008 Pioneer Navigation System Supplement
[x] Cancel search | Manufacturer: MERCURY, Model Year: 2008, Model line: Mountaineer, Model: Mercury Mountaineer 2008Pages: 164, PDF Size: 4.44 MB
Page 18 of 164
•PTY:This feature allows the user to search for Radio Data System
(RDS) stations selectively by their Program Type (PTY). To be able to
select this feature, RDS must be enabled. PTY and station call letters
will be displayed on the Status Bar.
•SET PTY:Press to select a program type, which, once selected, will
be displayed above the SET PTY button. Once PTY has been
programmed, press SEEK or SCAN to initiate a search up or down the
frequency. The search will stop when the desired program type has
been reached.
Note:The system will scan the frequency band three times for the
chosen program type. If the program type is unavailable in your
reception range, the system will return to the previous station.
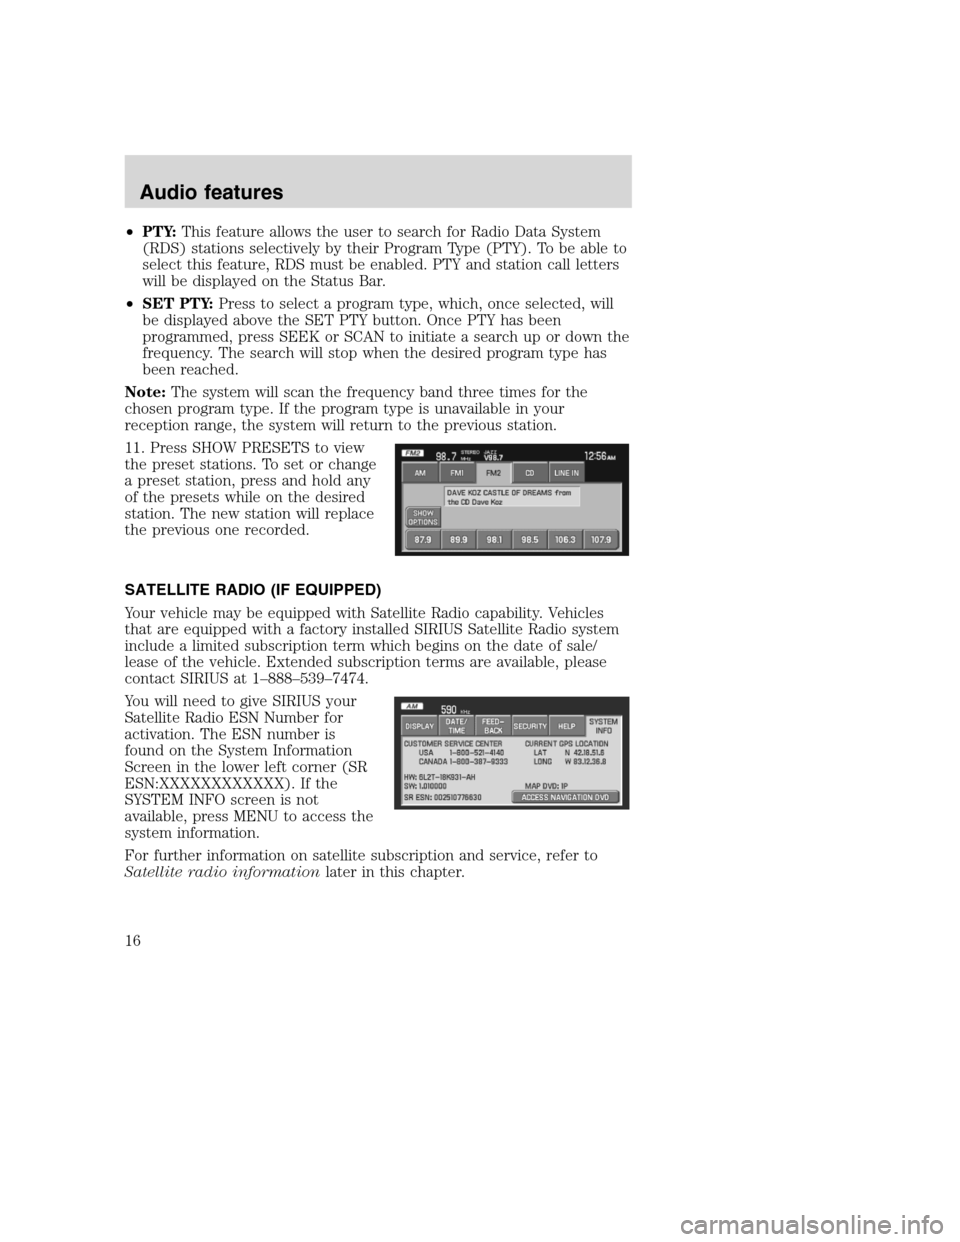
11. Press SHOW PRESETS to view
the preset stations. To set or change
a preset station, press and hold any
of the presets while on the desired
station. The new station will replace
the previous one recorded.
SATELLITE RADIO (IF EQUIPPED)
Your vehicle may be equipped with Satellite Radio capability. Vehicles
that are equipped with a factory installed SIRIUS Satellite Radio system
include a limited subscription term which begins on the date of sale/
lease of the vehicle. Extended subscription terms are available, please
contact SIRIUS at 1–888–539–7474.
You will need to give SIRIUS your
Satellite Radio ESN Number for
activation. The ESN number is
found on the System Information
Screen in the lower left corner (SR
ESN:XXXXXXXXXXXX). If the
SYSTEM INFO screen is not
available, press MENU to access the
system information.
For further information on satellite subscription and service, refer to
Satellite radio informationlater in this chapter.
2008(nv1)
Supplement
USA(fus)
Audio features
16
Page 21 of 164
SIRIUS satellite radio service:SIRIUS Satellite Radio is a subscription
based satellite radio service that broadcasts music, sports, news and
entertainment programming. A service fee is required in order to receive
SIRIUS service. Vehicles that are equipped with a factory installed
SIRIUS Satellite Radio system include:
•Hardware and limited subscription term, which begins on the date of
sale or lease of the vehicle.
•Online media player providing access to all 65 SIRIUS music channels
over the internet (U.S. customers only).
For information on extended subscription terms, contact SIRIUS at
1–888–539–7474.
Note:SIRIUS reserves the unrestricted right to change, rearrange, add
or delete programming including canceling, moving or adding particular
channels, and its prices, at any time, with or without notice to you. Ford
Motor Company shall not be responsible for any such programming
changes.
Satellite Radio Electronic Serial Number (ESN):This 12 digit
Satellite Serial Number is needed to activate, modify or track your
satellite radio account. You will need this number when communicating
with SIRIUS. While in Satellite Radio mode, you can view this number by
pressing the MENU hard button and then selecting SYSTEM INFO. The
number will appear in the bottom left corner of the screen. For further
information, please refer toSystem informationin theSystem features
chapterof this navigation supplement.
Radio Display Condition Action Required
ACQUIRING Radio requires more
than two seconds to
produce audio for the
selected channel.No action required.
This message should
disappear shortly.
SAT FAULT Internal module or
system failure
present.If this message does
not clear within a short
period of time, or with
an ignition key cycle,
your receiver may have
a fault. See your
authorized dealer for
service.
2008(nv1)
Supplement
USA(fus)
Audio features
19
Page 27 of 164
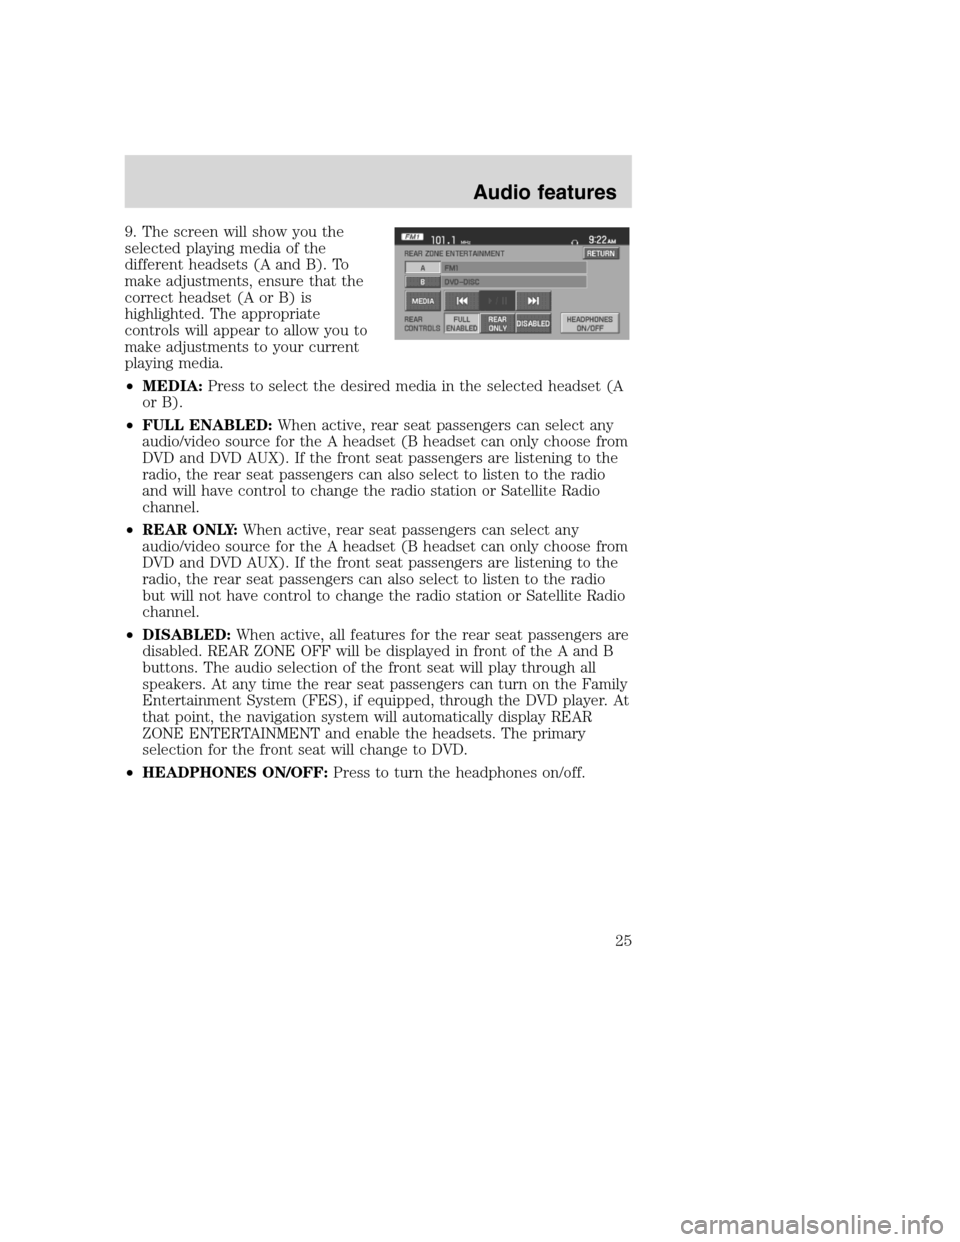
9. The screen will show you the
selected playing media of the
different headsets (A and B). To
make adjustments, ensure that the
correct headset (A or B) is
highlighted. The appropriate
controls will appear to allow you to
make adjustments to your current
playing media.
•MEDIA:Press to select the desired media in the selected headset (A
or B).
•FULL ENABLED:When active, rear seat passengers can select any
audio/video source for the A headset (B headset can only choose from
DVD and DVD AUX). If the front seat passengers are listening to the
radio, the rear seat passengers can also select to listen to the radio
and will have control to change the radio station or Satellite Radio
channel.
•REAR ONLY:When active, rear seat passengers can select any
audio/video source for the A headset (B headset can only choose from
DVD and DVD AUX). If the front seat passengers are listening to the
radio, the rear seat passengers can also select to listen to the radio
but will not have control to change the radio station or Satellite Radio
channel.
•DISABLED:When active, all features for the rear seat passengers are
disabled. REAR ZONE OFF will be displayed in front of the A and B
buttons. The audio selection of the front seat will play through all
speakers. At any time the rear seat passengers can turn on the Family
Entertainment System (FES), if equipped, through the DVD player. At
that point, the navigation system will automatically display REAR
ZONE ENTERTAINMENT and enable the headsets. The primary
selection for the front seat will change to DVD.
•HEADPHONES ON/OFF:Press to turn the headphones on/off.
2008(nv1)
Supplement
USA(fus)
Audio features
25
Page 31 of 164
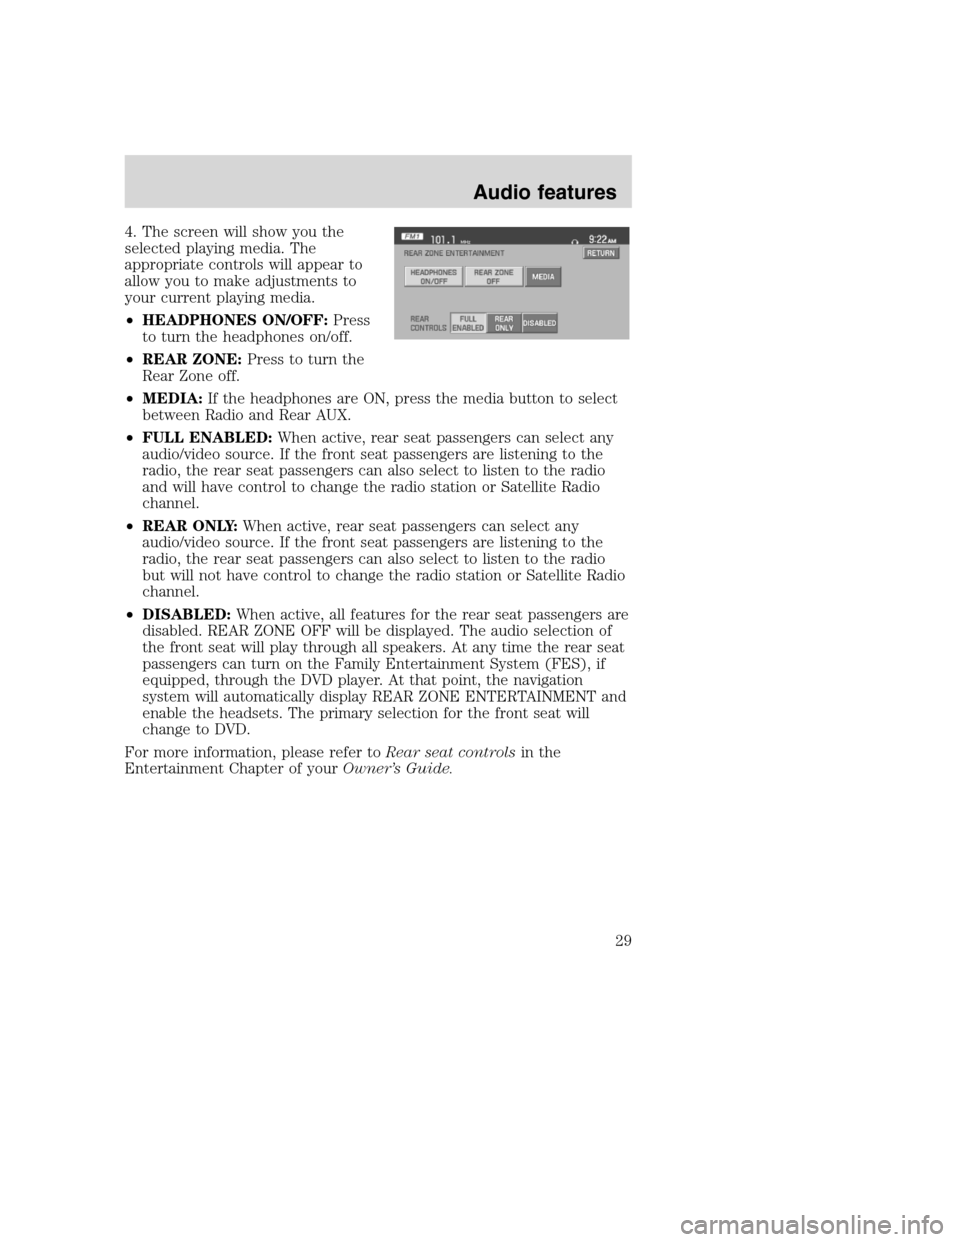
4. The screen will show you the
selected playing media. The
appropriate controls will appear to
allow you to make adjustments to
your current playing media.
•HEADPHONES ON/OFF:Press
to turn the headphones on/off.
•REAR ZONE:Press to turn the
Rear Zone off.
•MEDIA:If the headphones are ON, press the media button to select
between Radio and Rear AUX.
•FULL ENABLED:When active, rear seat passengers can select any
audio/video source. If the front seat passengers are listening to the
radio, the rear seat passengers can also select to listen to the radio
and will have control to change the radio station or Satellite Radio
channel.
•REAR ONLY:When active, rear seat passengers can select any
audio/video source. If the front seat passengers are listening to the
radio, the rear seat passengers can also select to listen to the radio
but will not have control to change the radio station or Satellite Radio
channel.
•DISABLED:When active, all features for the rear seat passengers are
disabled. REAR ZONE OFF will be displayed. The audio selection of
the front seat will play through all speakers. At any time the rear seat
passengers can turn on the Family Entertainment System (FES), if
equipped, through the DVD player. At that point, the navigation
system will automatically display REAR ZONE ENTERTAINMENT and
enable the headsets. The primary selection for the front seat will
change to DVD.
For more information, please refer toRear seat controlsin the
Entertainment Chapter of yourOwner’s Guide.
2008(nv1)
Supplement
USA(fus)
Audio features
29
Page 40 of 164
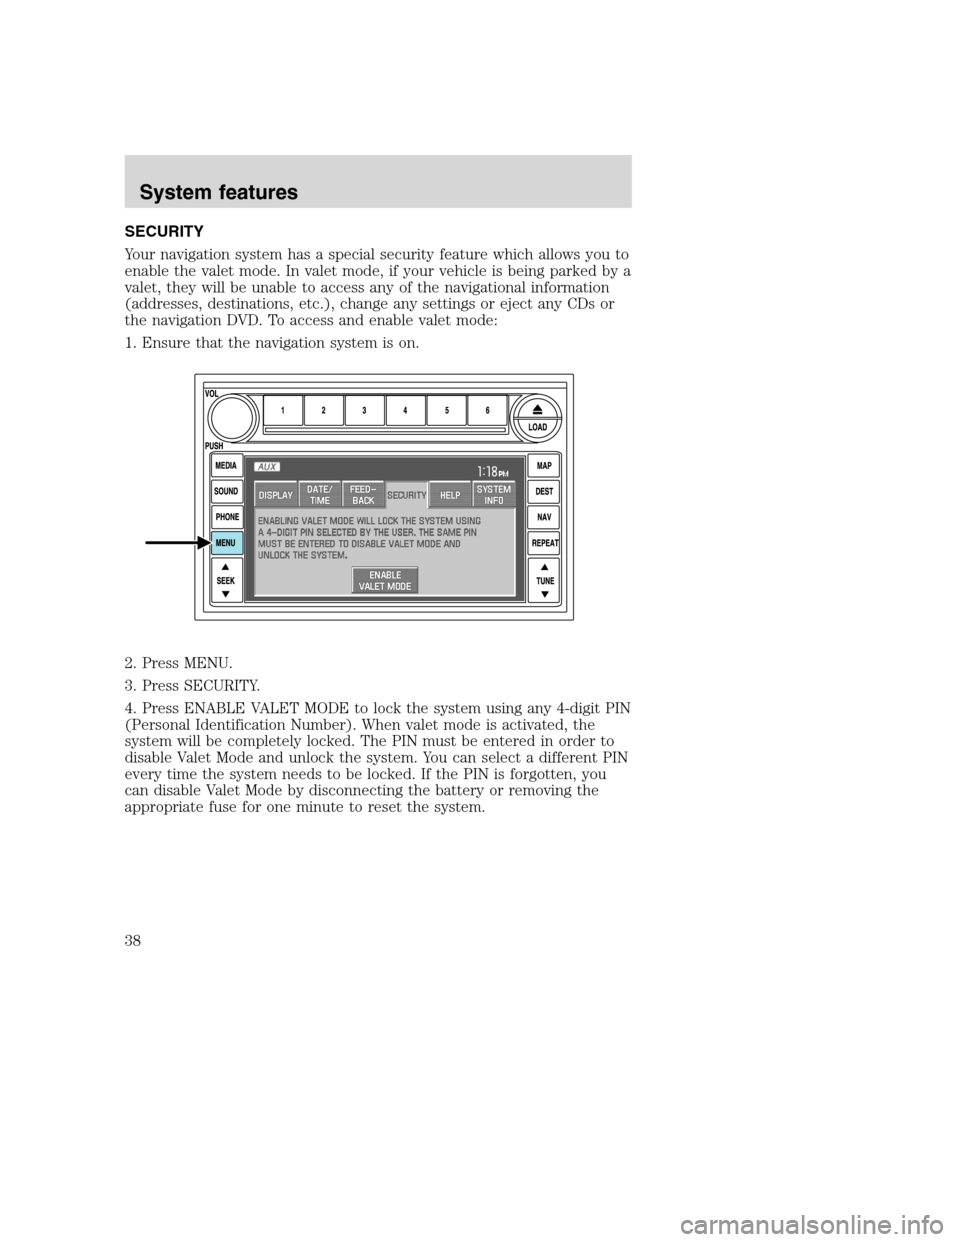
SECURITY
Your navigation system has a special security feature which allows you to
enable the valet mode. In valet mode, if your vehicle is being parked by a
valet, they will be unable to access any of the navigational information
(addresses, destinations, etc.), change any settings or eject any CDs or
the navigation DVD. To access and enable valet mode:
1. Ensure that the navigation system is on.
2. Press MENU.
3. Press SECURITY.
4. Press ENABLE VALET MODE to lock the system using any 4-digit PIN
(Personal Identification Number). When valet mode is activated, the
system will be completely locked. The PIN must be entered in order to
disable Valet Mode and unlock the system. You can select a different PIN
every time the system needs to be locked. If the PIN is forgotten, you
can disable Valet Mode by disconnecting the battery or removing the
appropriate fuse for one minute to reset the system.
2008(nv1)
Supplement
USA(fus)
System features
38
Page 47 of 164
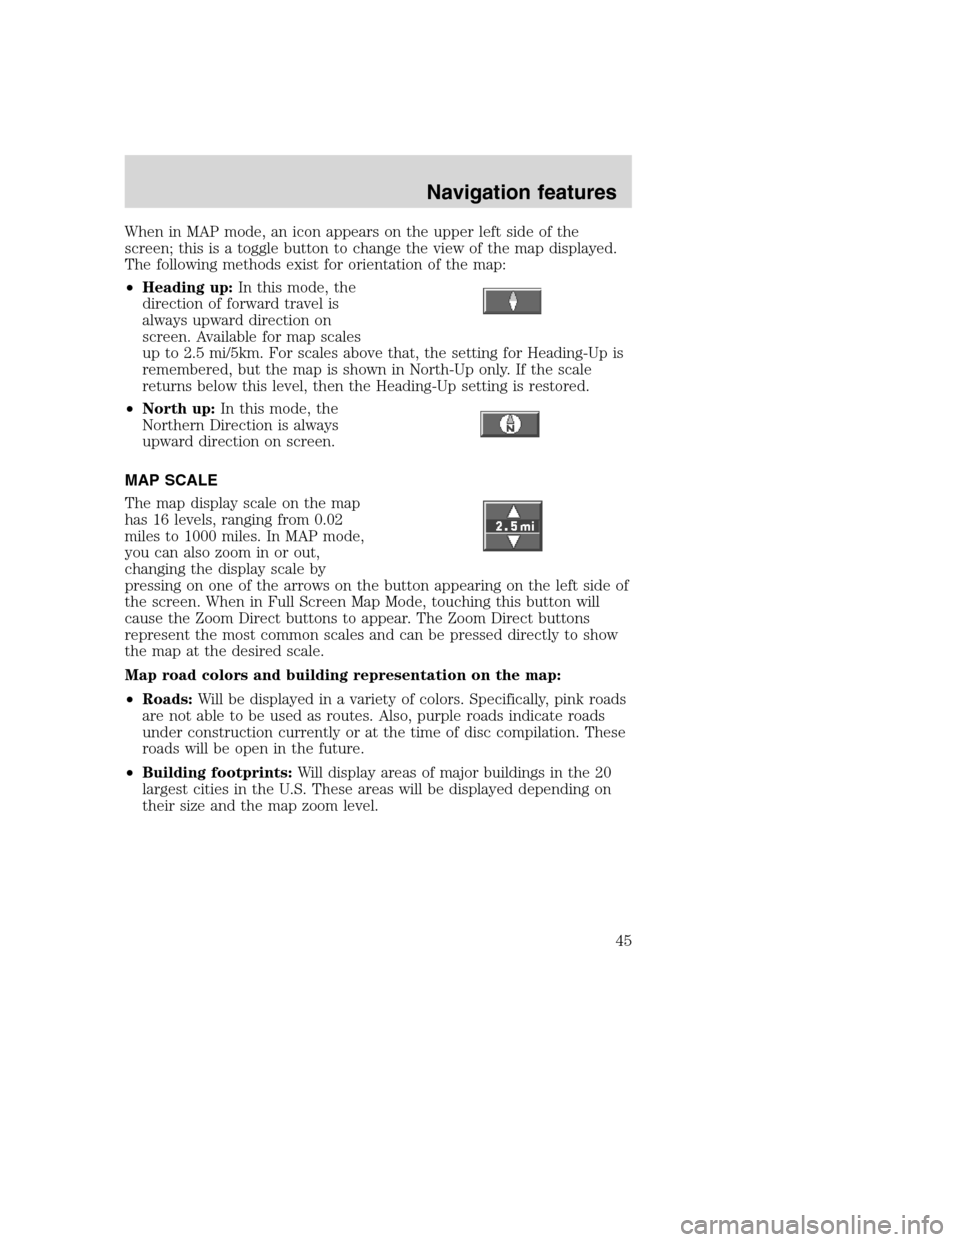
When in MAP mode, an icon appears on the upper left side of the
screen; this is a toggle button to change the view of the map displayed.
The following methods exist for orientation of the map:
•Heading up:In this mode, the
direction of forward travel is
always upward direction on
screen. Available for map scales
up to 2.5 mi/5km. For scales above that, the setting for Heading-Up is
remembered, but the map is shown in North-Up only. If the scale
returns below this level, then the Heading-Up setting is restored.
•North up:In this mode, the
Northern Direction is always
upward direction on screen.
MAP SCALE
The map display scale on the map
has 16 levels, ranging from 0.02
miles to 1000 miles. In MAP mode,
you can also zoom in or out,
changing the display scale by
pressing on one of the arrows on the button appearing on the left side of
the screen. When in Full Screen Map Mode, touching this button will
cause the Zoom Direct buttons to appear. The Zoom Direct buttons
represent the most common scales and can be pressed directly to show
the map at the desired scale.
Map road colors and building representation on the map:
•Roads:Will be displayed in a variety of colors. Specifically, pink roads
are not able to be used as routes. Also, purple roads indicate roads
under construction currently or at the time of disc compilation. These
roads will be open in the future.
•Building footprints:Will display areas of major buildings in the 20
largest cities in the U.S. These areas will be displayed depending on
their size and the map zoom level.
2008(nv1)
Supplement
USA(fus)
Navigation features
45
Page 48 of 164
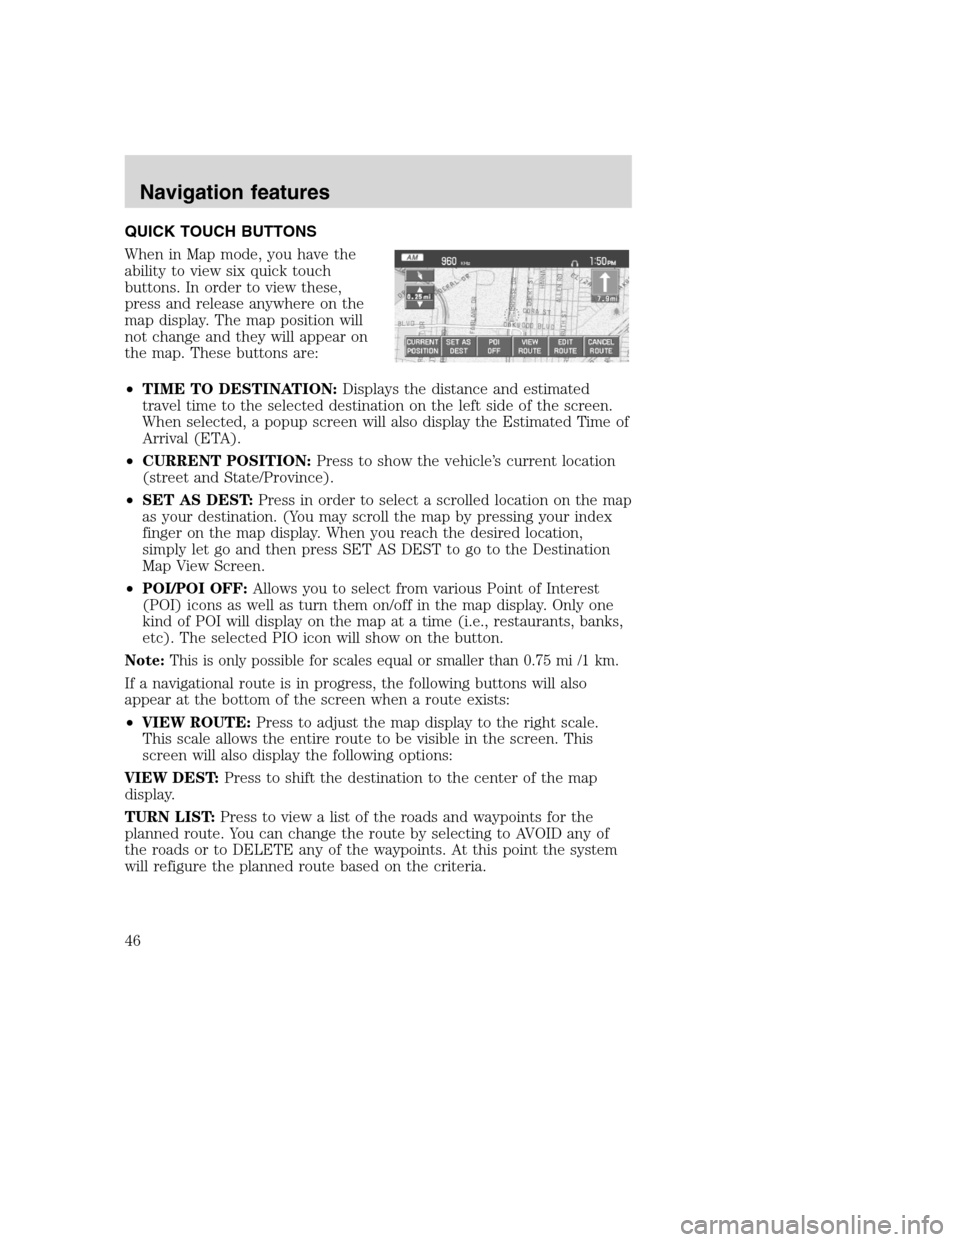
QUICK TOUCH BUTTONS
When in Map mode, you have the
ability to view six quick touch
buttons. In order to view these,
press and release anywhere on the
map display. The map position will
not change and they will appear on
the map. These buttons are:
•TIME TO DESTINATION:Displays the distance and estimated
travel time to the selected destination on the left side of the screen.
When selected, a popup screen will also display the Estimated Time of
Arrival (ETA).
•CURRENT POSITION:Press to show the vehicle’s current location
(street and State/Province).
•SET AS DEST:Press in order to select a scrolled location on the map
as your destination. (You may scroll the map by pressing your index
finger on the map display. When you reach the desired location,
simply let go and then press SET AS DEST to go to the Destination
Map View Screen.
•POI/POI OFF:Allows you to select from various Point of Interest
(POI) icons as well as turn them on/off in the map display. Only one
kind of POI will display on the map at a time (i.e., restaurants, banks,
etc). The selected PIO icon will show on the button.
Note:This is only possible for scales equal or smaller than 0.75 mi /1 km.
If a navigational route is in progress, the following buttons will also
appear at the bottom of the screen when a route exists:
•VIEW ROUTE:Press to adjust the map display to the right scale.
This scale allows the entire route to be visible in the screen. This
screen will also display the following options:
VIEW DEST:Press to shift the destination to the center of the map
display.
TURN LIST:Press to view a list of the roads and waypoints for the
planned route. You can change the route by selecting to AVOID any of
the roads or to DELETE any of the waypoints. At this point the system
will refigure the planned route based on the criteria.
2008(nv1)
Supplement
USA(fus)
Navigation features
46
Page 49 of 164
•EDIT ROUTE:Press in order to adjust the following features of the
current route:
DETOUR:Press to select a portion of the route for the navigation
system to avoid. Select the desired distance (between one and 100
miles) of the current road. A map for each alternative route will display
on the screen. Select the desired route.
EDIT TURN LIST:Press to display the TURN LIST screen and make
any desired adjustments. Refer toTurn list.
EDIT ROUTE PREFERENCES:Press in order to change settings for
route searches. Refer toRoute preferences.
EDIT DESTINATION/WAYPOINTS:Press in order to add, delete or
adjust any waypoints or your destination. Refer to
Destination/Waypoints list.
•CANCEL ROUTE:Press to delete the next waypoint or the whole
current route. The route cannot be deleted while a reroute is in
progress.
Note:Once deleted, you will not be able to restore the waypoint or
route.
MAP SCROLLING
Single scroll:In single scroll mode, press and release on the map
display will bring the pressed position to the center of the screen. The
scroll mode will time out after five minutes of inactivity.
Continuous scroll:During scroll mode, press and hold to begin
scrolling continuously in one of eight directions closest to the point that
is pressed. The scroll will continue until the map is released, and will
increase in speed after three seconds. This is not possible if the vehicle
is moving. The scroll mode will time out after five minutes of inactivity.
2008(nv1)
Supplement
USA(fus)
Navigation features
47
Page 50 of 164
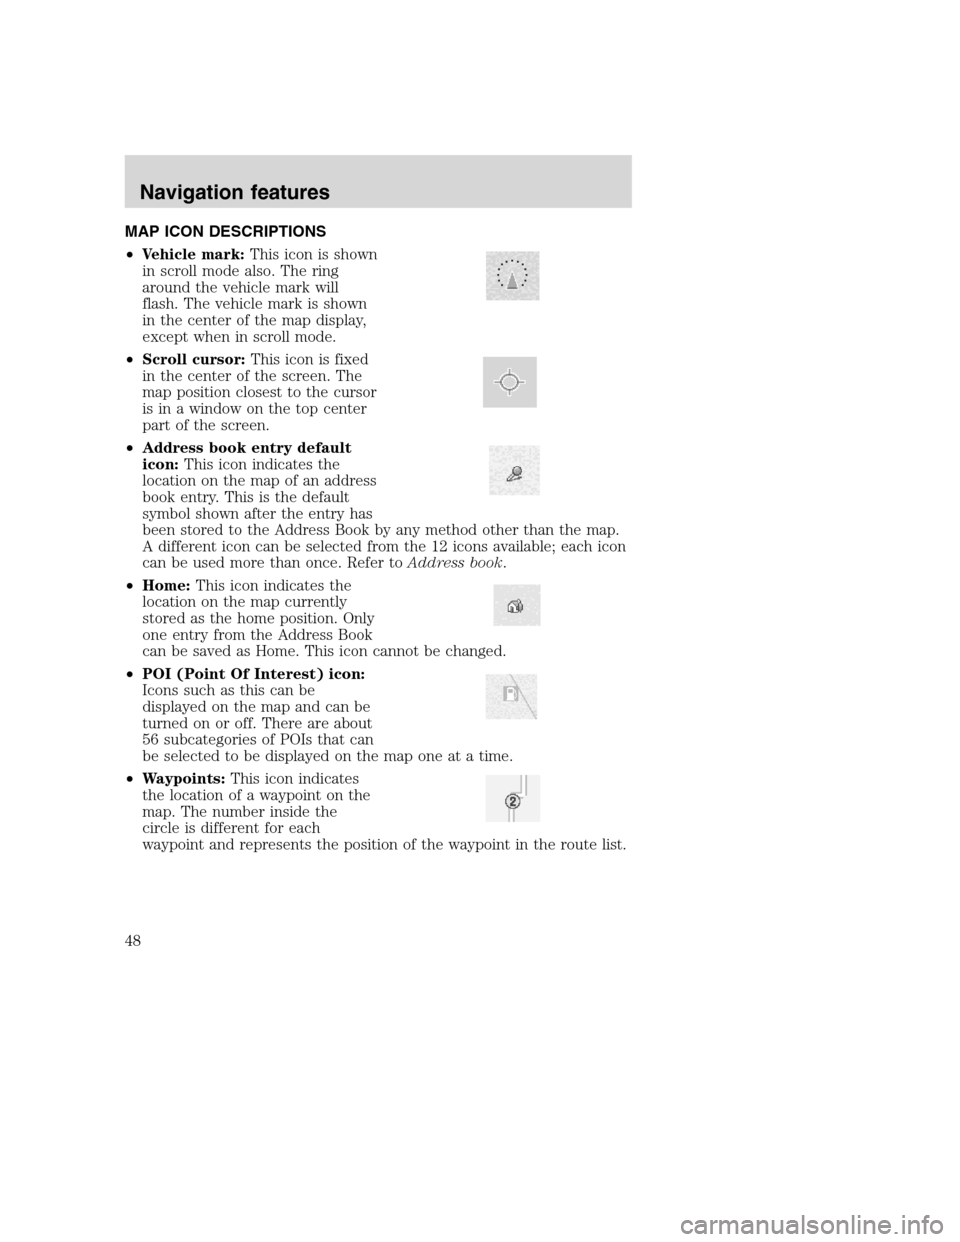
MAP ICON DESCRIPTIONS
•Vehicle mark:This icon is shown
in scroll mode also. The ring
around the vehicle mark will
flash. The vehicle mark is shown
in the center of the map display,
except when in scroll mode.
•Scroll cursor:This icon is fixed
in the center of the screen. The
map position closest to the cursor
is in a window on the top center
part of the screen.
•Address book entry default
icon:This icon indicates the
location on the map of an address
book entry. This is the default
symbol shown after the entry has
been stored to the Address Book by any method other than the map.
A different icon can be selected from the 12 icons available; each icon
can be used more than once. Refer toAddress book.
•Home:This icon indicates the
location on the map currently
stored as the home position. Only
one entry from the Address Book
can be saved as Home. This icon cannot be changed.
•POI (Point Of Interest) icon:
Icons such as this can be
displayed on the map and can be
turned on or off. There are about
56 subcategories of POIs that can
be selected to be displayed on the map one at a time.
•Waypoints:This icon indicates
the location of a waypoint on the
map. The number inside the
circle is different for each
waypoint and represents the position of the waypoint in the route list.
2008(nv1)
Supplement
USA(fus)
Navigation features
48
Page 52 of 164
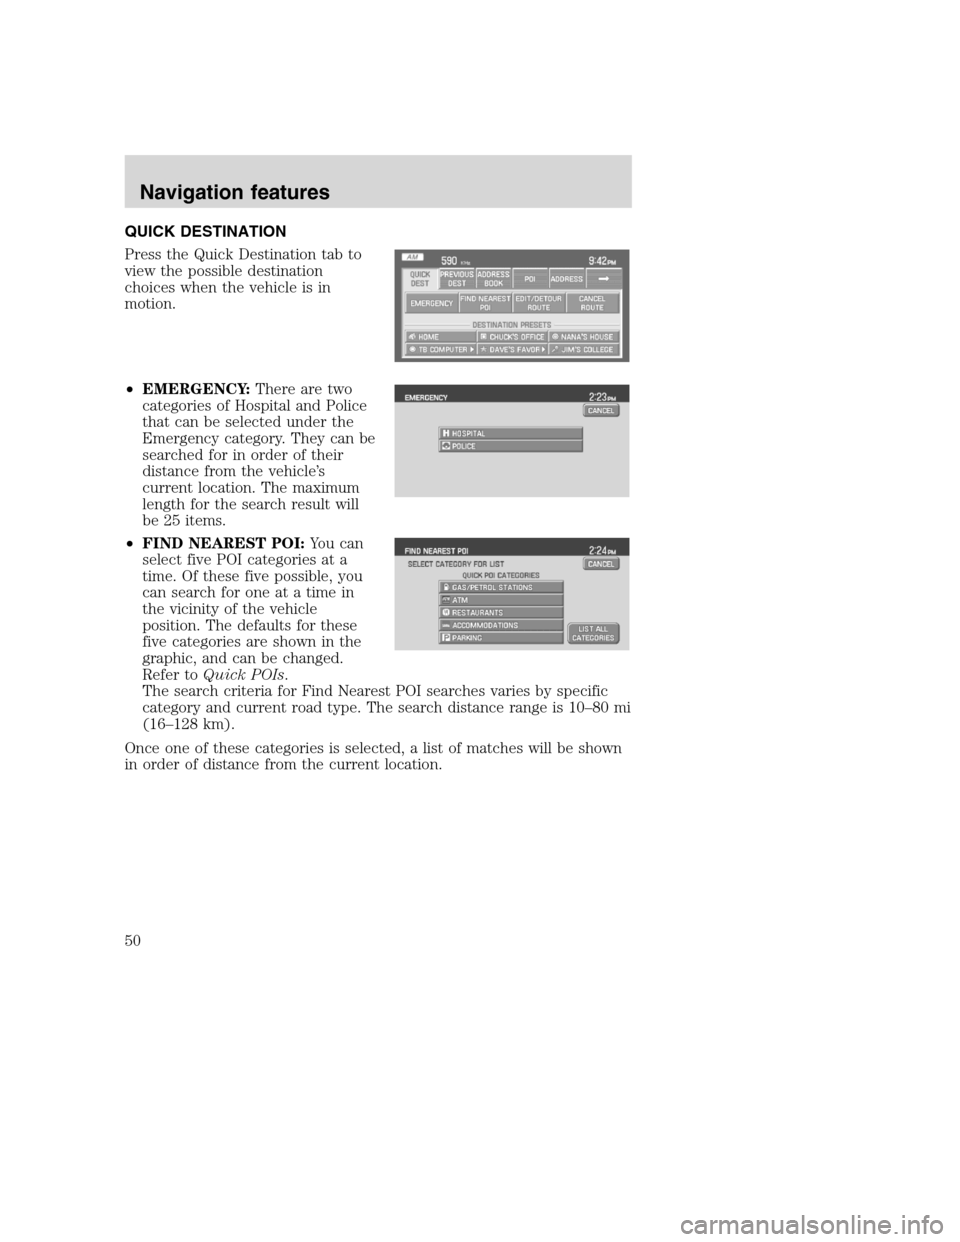
QUICK DESTINATION
Press the Quick Destination tab to
view the possible destination
choices when the vehicle is in
motion.
•EMERGENCY:There are two
categories of Hospital and Police
that can be selected under the
Emergency category. They can be
searched for in order of their
distance from the vehicle’s
current location. The maximum
length for the search result will
be 25 items.
•FIND NEAREST POI:You can
select five POI categories at a
time. Of these five possible, you
can search for one at a time in
the vicinity of the vehicle
position. The defaults for these
five categories are shown in the
graphic, and can be changed.
Refer toQuick POIs.
The search criteria for Find Nearest POI searches varies by specific
category and current road type. The search distance range is 10–80 mi
(16–128 km).
Once one of these categories is selected, a list of matches will be shown
in order of distance from the current location.
2008(nv1)
Supplement
USA(fus)
Navigation features
50