warning Mercury Mountaineer 2009 Owner's Manuals
[x] Cancel search | Manufacturer: MERCURY, Model Year: 2009, Model line: Mountaineer, Model: Mercury Mountaineer 2009Pages: 388, PDF Size: 3.28 MB
Page 284 of 388

ALL WHEEL DRIVE (AWD) SYSTEM (IF EQUIPPED)
For the lubricant specification and refill capacity of the AWD transfer
case refer toMaintenance and Specificationschapter.
WARNING:If your vehicle is equipped with AWD, a spare tire of
a different size than the road tires should never be used. Such a
tire could make the vehicle difficult to control as well as result in
damage to driveline components.
WARNING:Utility and four-wheel drive vehicles arenot
designed for cornering at speeds as high as passenger cars any
more than low-slung sports cars are designed to perform satisfactorily
under off-road conditions. Avoid sharp turns or abrupt maneuvers in
these vehicles.
Normal operation (4.0L engine vehicles only)
The AWD system is always active and requires no driver input. It is
capable of handling all road conditions, including street and highway
driving as well as off-road conditions such as deep snow, ice or shallow
sand.
Normal operation (4.6L engine vehicles only)
During normal operation the AWD system is in AWD AUTO mode (AWD
LOCKED will illuminate in the message center for four seconds when
you first start your vehicle). The 4X4 indicator in the instrument cluster
will also come on.
For instructions on selecting the AWD LOCKED mode, refer toMessage
centerin theDriver Controlschapter. This mode is not intended for use
on dry pavement. This mode is appropriate for severe winter or off-road
conditions such as deep snow, ice or shallow sand. The use of AWD
LOCKED on dry or hard surfaces may produce some noise, such as
occasional clunks, but will not damage the drive system.
Autolock operation (4.6L engine vehicles only)
If the AWD system begins to overheat, the system will place itself in the
Autolock mode:
•AWD LOCKED will be displayed in the message center for four
seconds and the 4x4 indicator light will illuminate in the instrument
cluster. A warning chime will also sound. This condition may clear
2009 Mountaineer(mnt)
Owners Guide, 2nd Printing
USA(fus)
Driving
284
Page 286 of 388

•It often may be less risky to strike small objects, such as highway
reflectors, with minor damage to your vehicle rather than attempt a
sudden return to the pavement which could cause the vehicle to slide
sideways out of control or rollover. Remember, your safety and the
safety of others should be your primary concern.
WARNING:Vehicles with a higher center of gravity such as
utility and four-wheel drive vehicles handle differently than
vehicles with a lower center of gravity. Utility and four-wheel drive
vehicles arenotdesigned for cornering at speeds as high as passenger
cars any more than low-slung sports cars are designed to perform
satisfactorily under off-road conditions. Avoid sharp turns, excessive
speed and abrupt maneuvers in these vehicles. Failure to drive
cautiously could result in an increased risk of loss of vehicle control,
vehicle rollover, personal injury and death.
If your vehicle gets stuck
If your vehicle gets stuck in mud or snow it may be rocked out by
shifting between forward and reverse gears, stopping between shifts, in a
steady pattern. Press lightly on the accelerator in each gear.
Do not rock the vehicle if the engine is not at normal operating
temperature or damage to the transmission may occur.
Do not rock the vehicle for more than a few minutes or damage
to the transmission and tires may occur or the engine may
overheat.
WARNING:Always set the parking brake fully and make sure
the gearshift is latched in P (Park). Turn the ignition to the
LOCK position and remove the key whenever you leave your vehicle.
WARNING:If the parking brake is fully released, but the brake
warning lamp remains illuminated, the brakes may not be
working properly. See your authorized dealer.
WARNING:Do not spin the wheels at over 35 mph (56 km/h).
The tires may fail and injure a passenger or bystander.
2009 Mountaineer(mnt)
Owners Guide, 2nd Printing
USA(fus)
Driving
286
Page 287 of 388

Emergency maneuvers
•In an unavoidable emergency situation where a sudden sharp turn
must be made, remember to avoid “over-driving” your vehicle (i.e.,
turn the steering wheel only as rapidly and as far as required to avoid
the emergency). Excessive steering will result in less vehicle control,
not more. Additionally, smooth variations of the accelerator and/or
brake pedal pressure should be utilized if changes in vehicle speed are
called for. Avoid abrupt steering, acceleration or braking which could
result in an increased risk of loss of vehicle control, vehicle rollover
and/or personal injury. Use all available road surface to return the
vehicle to a safe direction of travel.
•In the event of an emergency stop, avoid skidding the tires and do not
attempt any sharp steering wheel movements.
WARNING:Vehicles with a higher center of gravity such as
utility and four-wheel drive vehicles handle differently than
vehicles with a lower center of gravity. Utility and four-wheel drive
vehicles arenotdesigned for cornering at speeds as high as passenger
cars any more than low-slung sports cars are designed to perform
satisfactorily under off-road conditions. Avoid sharp turns, excessive
speed and abrupt maneuvers in these vehicles. Failure to drive
cautiously could result in an increased risk of loss of vehicle control,
vehicle rollover, personal injury and death.
•If the vehicle goes from one type of surface to another (i.e., from
concrete to gravel) there will be a change in the way the vehicle
responds to a maneuver (steering, acceleration or braking). Again,
avoid these abrupt inputs.
AWD Systems (if equipped)
AWD uses all four wheels to power the vehicle. This increases traction,
enabling you to drive over terrain and road conditions that a
conventional two-wheel drive vehicle cannot.
Sand
When driving over sand, try to keep all four wheels on the most solid
area of the trail. Avoid reducing the tire pressures but shift to a lower
gear and drive steadily through the terrain. Apply the accelerator slowly
and avoid spinning the wheels.
Note:If your vehicle is equipped with the Tire Pressure Monitoring
System (TPMS), the system indicator light may illuminate depending on
2009 Mountaineer(mnt)
Owners Guide, 2nd Printing
USA(fus)
Driving
287
Page 299 of 388

Power distribution box
The power distribution box is
located in the engine compartment.
The power distribution box contains
high-current fuses that protect your
vehicle’s main electrical systems
from overloads.
WARNING:Always disconnect the battery before servicing high
current fuses.
WARNING:To reduce risk of electrical shock, always replace
the cover to the Power Distribution Box before reconnecting the
battery or refilling fluid reservoirs.
If the battery has been disconnected and reconnected, refer to the
Batterysection of theMaintenance and Specificationschapter.
2009 Mountaineer(mnt)
Owners Guide, 2nd Printing
USA(fus)
Roadside Emergencies
299
Page 303 of 388

CHANGING THE TIRES
If you get a flat tire while driving:
•do not brake heavily.
•gradually decrease the vehicle’s speed.
•hold the steering wheel firmly.
•slowly move to a safe place on the side of the road.
Note:The tire pressure monitoring system (TPMS) indicator light will
illuminate when the spare is in use. To restore the full functionality of
the monitoring system, all road wheels equipped with tire pressure
monitoring sensors must be mounted on the vehicle.
Have a flat serviced by an authorized dealer in order to prevent damage
to the TPMS sensor, refer toChanging tires with TPMSin theTires,
Wheels and Loadingchapter. Replace the spare tire with a road tire as
soon as possible.
WARNING:The use of tire sealants may damage your Tire
Pressure Monitoring System and should not be used.
WARNING:Refer toTire Pressure Monitoring System (TPMS)
in theTires, Wheels and Loadingchapter for important
information. If the tire pressure monitor sensor becomes damaged, it
will no longer function.
Dissimilar spare tire/wheel information
WARNING:Failure to follow these guidelines could result in an
increased risk of loss of vehicle control, injury or death.
Note:Turn off the power running boards (if equipped) before driving
with a dissimilar spare tire/wheel. Refer toRunning boardsin the
Driver Controlschapter.
If you have a dissimilar spare tire/wheel, then it is intended for
temporary use only. This means that if you need to use it, you should
replace it as soon as possible with a road tire/wheel that is the same size
and type as the road tires and wheels that were originally provided by
Ford. If the dissimilar spare tire or wheel is damaged, it should be
replaced rather than repaired.
2009 Mountaineer(mnt)
Owners Guide, 2nd Printing
USA(fus)
Roadside Emergencies
303
Page 308 of 388

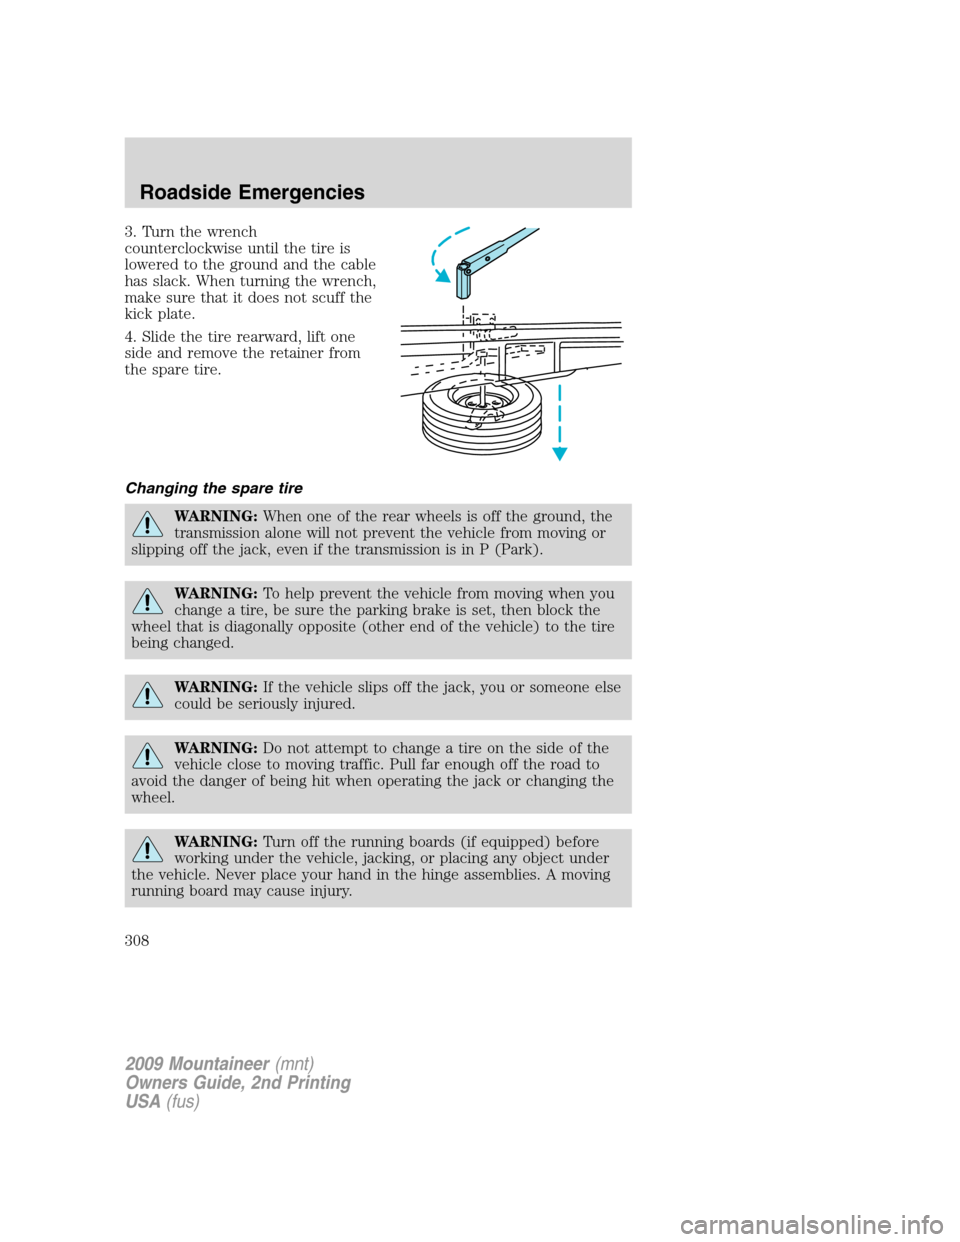
3. Turn the wrench
counterclockwise until the tire is
lowered to the ground and the cable
has slack. When turning the wrench,
make sure that it does not scuff the
kick plate.
4. Slide the tire rearward, lift one
side and remove the retainer from
the spare tire.
Changing the spare tire
WARNING:When one of the rear wheels is off the ground, the
transmission alone will not prevent the vehicle from moving or
slipping off the jack, even if the transmission is in P (Park).
WARNING:To help prevent the vehicle from moving when you
change a tire, be sure the parking brake is set, then block the
wheel that is diagonally opposite (other end of the vehicle) to the tire
being changed.
WARNING:If the vehicle slips off the jack, you or someone else
could be seriously injured.
WARNING:Do not attempt to change a tire on the side of the
vehicle close to moving traffic. Pull far enough off the road to
avoid the danger of being hit when operating the jack or changing the
wheel.
WARNING:Turn off the running boards (if equipped) before
working under the vehicle, jacking, or placing any object under
the vehicle. Never place your hand in the hinge assemblies. A moving
running board may cause injury.
2009 Mountaineer(mnt)
Owners Guide, 2nd Printing
USA(fus)
Roadside Emergencies
308
Page 310 of 388

5. Position the jack according to the
illustrated guides and turn the jack
handle clockwise until the tire is a
maximum of 1 inch (25 mm) off the
ground.
Note:Do not use the running
boards, front and rear hinge
assemblies, running board motors,
or the running board underbody
mounts to lift the vehicle with the
jack.
WARNING:To lessen the
risk of personal injury, do
not put any part of your body
under the vehicle while changing a
tire. Do not start the engine when
your vehicle is on the jack. The
jack is only meant for changing
the tire.
•Never use the front or rear differential as a jacking point.
6. Remove the lug nuts with the lug wrench.
7. Replace the flat tire with the spare tire, making sure the valve stem is
facing outward. Reinstall the lug nuts, cone side in, until the wheel is
snug against the hub. Do not fully tighten the lug nuts until the wheel
has been lowered.
8. Lower the wheel by turning the jack handle counterclockwise.
2009 Mountaineer(mnt)
Owners Guide, 2nd Printing
USA(fus)
Roadside Emergencies
310
Page 312 of 388

Re-stowing the jack and tools
1. Unblock the wheels.
2. Stow the wheel ornament (if removed) in a safe location in the vehicle
(such as the glove box or jack stowage compartment) so it will not
become damaged. Re-install the wheel ornament onto the wheel once the
tire is repaired or replaced.
3. Stow the jack and tools in their respective locations, making sure they
are fully secured so they do not rattle when you drive.
WHEEL LUG NUT TORQUE SPECIFICATIONS
Retighten the lug nuts to the specified torque within 100 miles (160 km)
after any wheel disturbance (rotation, flat tire, wheel removal, etc.).
Lug nut socket
size/Bolt sizeWheel lug nut torque*
lb.ft. N•m
Lug nut socket size:
3�4
inch (19 mm) hex
Bolt size:1�2x20100 135
* Torque specifications are for nut and bolt threads free of dirt and
rust. Use only Ford recommended replacement fasteners.
WARNING:When a wheel is installed, always remove any
corrosion, dirt or foreign materials present on the mounting
surfaces of the wheel or the surface of the wheel hub, brake drum or
brake disc that contacts the wheel. Ensure that any fasteners that
attach the rotor to the hub are secured so they do not interfere with
the mounting surfaces of the wheel. Installing wheels without correct
metal-to-metal contact at the wheel mounting surfaces can cause the
wheel nuts to loosen and the wheel to come off while the vehicle is in
motion, resulting in loss of control.
2009 Mountaineer(mnt)
Owners Guide, 2nd Printing
USA(fus)
Roadside Emergencies
312
Page 313 of 388

Note:Inspect the wheel pilot hole
prior to installation. If there is
visible corrosion in wheel pilot hole,
remove loose particles by wiping
with clean rag and apply grease.
Apply grease only to the wheel pilot
hole surface by smearing a “dime”
(1 square cm) sized glob of grease
around the wheel pilot surface (1)
with end of finger. DO NOT apply
grease to lugnut/stud holes or
wheel-to-brake surfaces.
RUNNING OUT OF FUEL
If you have run out of fuel and need to refill the vehicle with a portable
fuel container, seeRunning out of fuelin theMaintenance and
Specificationschapter for proper fuel filling method using a portable
fuel container and the included fuel filler funnel.Do notinsert the
nozzle of portable fuel containers or any type of aftermarket funnels into
the Easy Fuel™ “no cap” fuel system as it can be damaged. You must
use the included funnel in such circumstances.
WARNING:Do not insert the nozzle of portable fuel containers
or aftermarket funnels into the Easy Fuel™ system. This could
damage the fuel system and its seal, and may cause fuel to run onto
the ground instead of filling the tank, all of which could result in
serious personal injury.
JUMP STARTING
WARNING:The gases around the battery can explode if
exposed to flames, sparks, or lit cigarettes. An explosion could
result in injury or vehicle damage.
WARNING:Batteries contain sulfuric acid which can burn skin,
eyes and clothing, if contacted.
Do not attempt to push-start your automatic transmission
vehicle. Automatic transmissions do not have push-start
capability. Attempting to push-start a vehicle with an automatic
transmission may cause transmission damage.
2009 Mountaineer(mnt)
Owners Guide, 2nd Printing
USA(fus)
Roadside Emergencies
313
Page 316 of 388

4. Make the final connection of the negative (-) cable to the ground stud
located toward the front of the vehicle (forward of the battery) on the
radiator support. Keep the negative (-) cable away from the battery and
the carburetor/fuel injection system.Do notuse fuel lines, engine rocker
covers or the intake manifold asgroundingpoints.
WARNING:Do not connect the end of the second cable to the
negative (-) terminal of the battery to be jumped. A spark may
cause an explosion of the gases that surround the battery.
5. Ensure that the cables are clear of fan blades, belts, moving parts of
both engines, or any fuel delivery system parts.
Jump starting
1. Start the engine of the booster vehicle and run the engine at
moderately increased speed.
2. Start the engine of the disabled vehicle.
3. Once the disabled vehicle has been started, run both engines for an
additional three minutes before disconnecting the jumper cables.
++-
-
2009 Mountaineer(mnt)
Owners Guide, 2nd Printing
USA(fus)
Roadside Emergencies
316