engine Mercury Sable 1997 s Owner's Guide
[x] Cancel search | Manufacturer: MERCURY, Model Year: 1997, Model line: Sable, Model: Mercury Sable 1997Pages: 167, PDF Size: 1.59 MB
Page 91 of 167
Do not exceed the GVWR or the GAWR
specified on the Safety Compliance
Certification Label.
Do not use replacement tires with lower weight
capacities than the originals because they may lower
the vehicle's GVWR and GAWR limitations.
Replacement tires with a higher weight limit than
the originals do not increase the GVWR and GAWR
limitations.
TRAILER TOWING
Your vehicle is classified as a light duty towing
vehicle. The amount of weight you can safely tow
depends on the type of engine you have in your
vehicle. Your vehicle does not come from the factory
fully equipped to tow. No towing packages are
available through Ford or Mercury/Lincoln dealers.
Do not tow a trailer until your vehicle has been
driven at least 800 km (500 miles). If towing with a
station wagon, inflate the rear tires to 35 psi.
Towing a trailer places an additional load on your
vehicle's engine, transaxle, brakes, tires and
suspension. Inspect these components carefully after
towing.
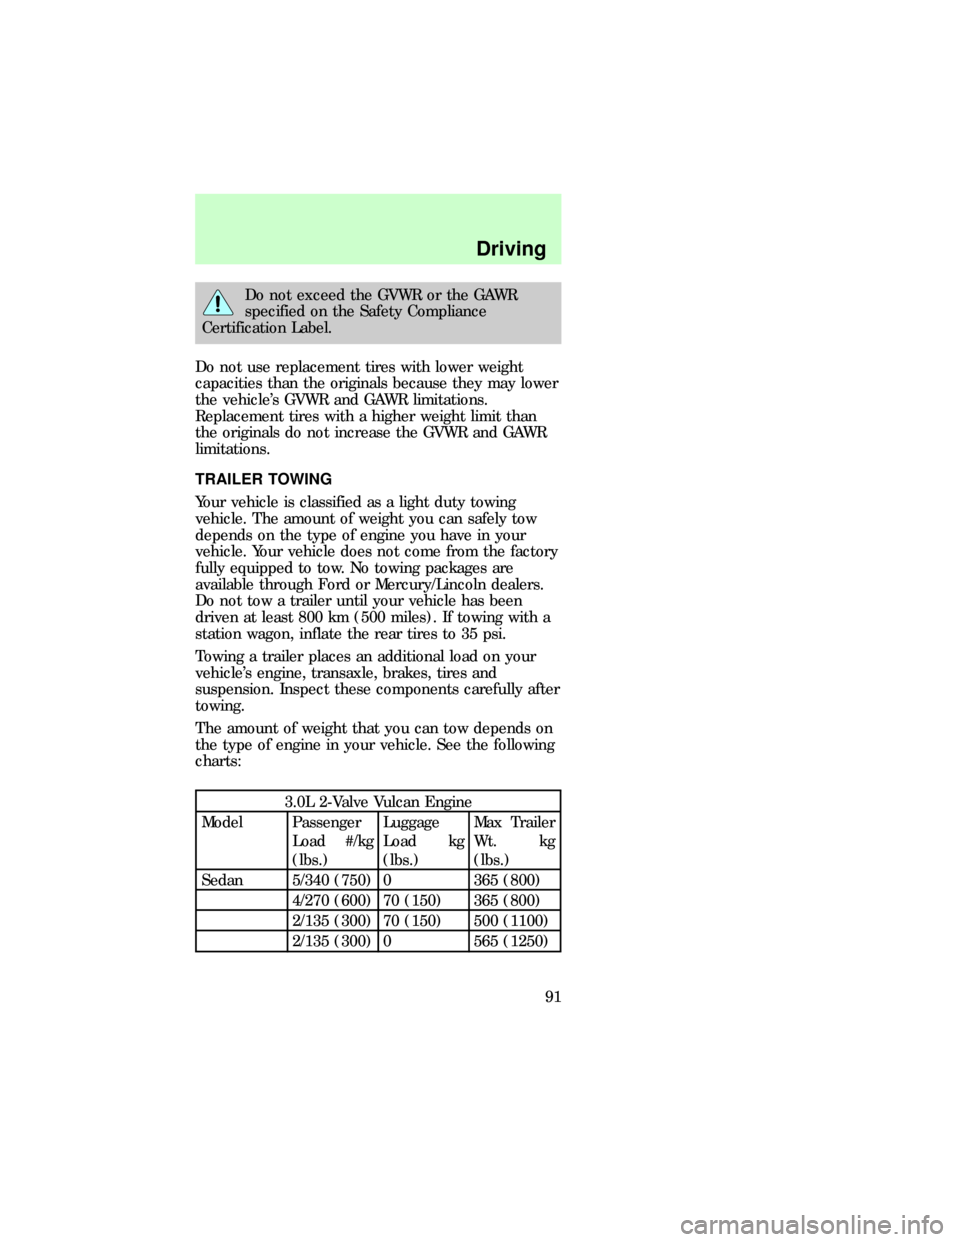
The amount of weight that you can tow depends on
the type of engine in your vehicle. See the following
charts:
3.0L 2-Valve Vulcan Engine
Model Passenger
Load #/kg
(lbs.)Luggage
Load kg
(lbs.)Max Trailer
Wt. kg
(lbs.)
Sedan 5/340 (750) 0 365 (800)
4/270 (600) 70 (150) 365 (800)
2/135 (300) 70 (150) 500 (1100)
2/135 (300) 0 565 (1250)
sab_trailer-towing
Driving
91
Page 92 of 167
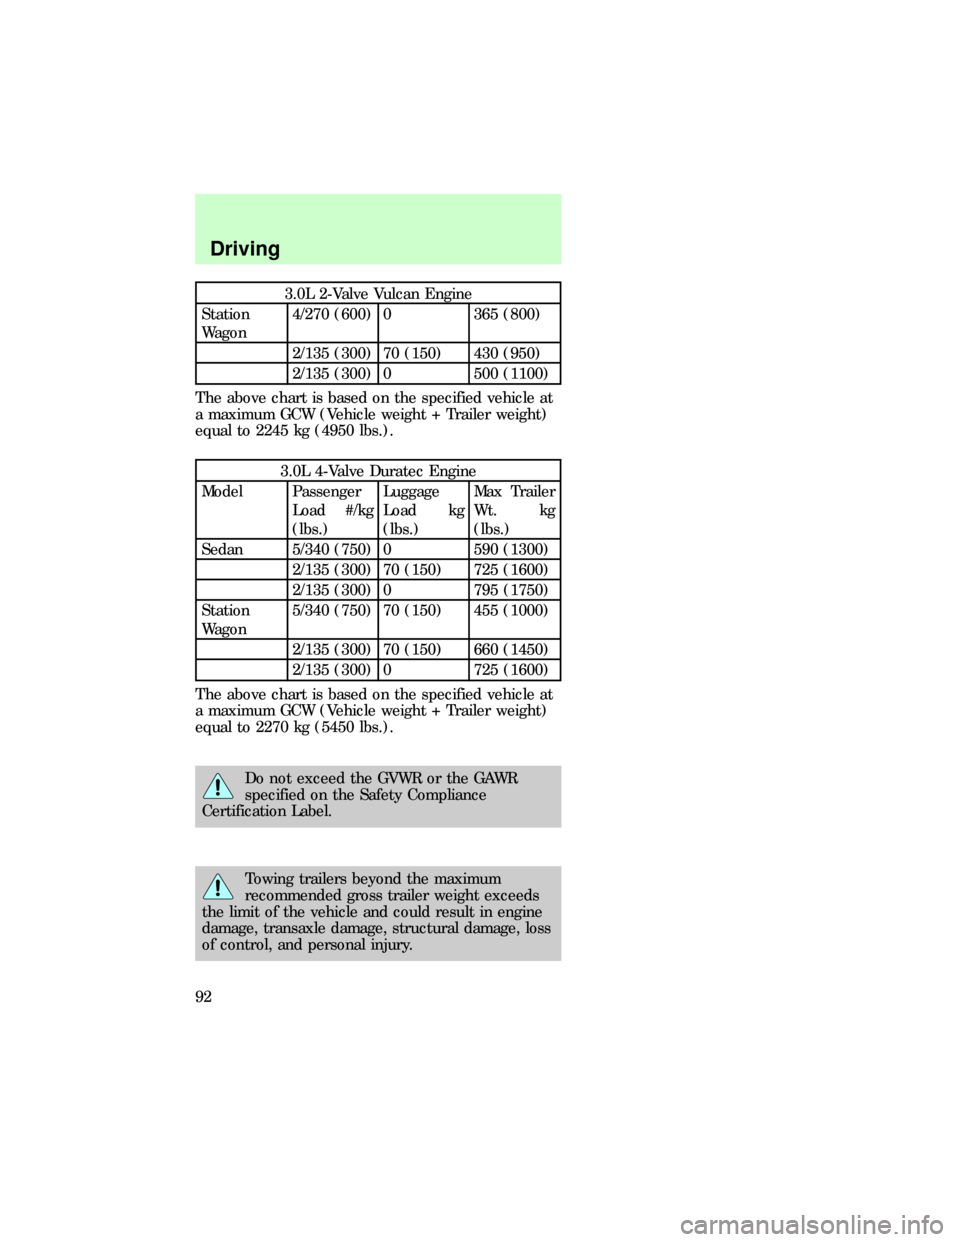
3.0L 2-Valve Vulcan Engine
Station
Wagon4/270 (600) 0 365 (800)
2/135 (300) 70 (150) 430 (950)
2/135 (300) 0 500 (1100)
The above chart is based on the specified vehicle at
a maximum GCW (Vehicle weight + Trailer weight)
equal to 2245 kg (4950 lbs.).
3.0L 4-Valve Duratec Engine
Model Passenger
Load #/kg
(lbs.)Luggage
Load kg
(lbs.)Max Trailer
Wt. kg
(lbs.)
Sedan 5/340 (750) 0 590 (1300)
2/135 (300) 70 (150) 725 (1600)
2/135 (300) 0 795 (1750)
Station
Wagon5/340 (750) 70 (150) 455 (1000)
2/135 (300) 70 (150) 660 (1450)
2/135 (300) 0 725 (1600)
The above chart is based on the specified vehicle at
a maximum GCW (Vehicle weight + Trailer weight)
equal to 2270 kg (5450 lbs.).
Do not exceed the GVWR or the GAWR
specified on the Safety Compliance
Certification Label.
Towing trailers beyond the maximum
recommended gross trailer weight exceeds
the limit of the vehicle and could result in engine
damage, transaxle damage, structural damage, loss
of control, and personal injury.
dno_preparing-to-tow
Driving
92
Page 94 of 167

Driving while you tow
Do not drive faster than 72 km/h (45 mph) with any
weight on the trailer while towing on a hot day or in
hilly country.
Cruise control may shut off if you are towing on
long, steep grades.
When towing a trailer:
²Use 2 (Second) (if equipped) or 1 (First) when
towing up or down steep hills. This will eliminate
excessive downshifting and upshifting for
optimum fuel economy and transaxle cooling.
²Anticipate stops and brake gradually.
Servicing after towing
If you tow a trailer for long distances, your vehicle
will require more frequent service intervals. Refer to
theService Guidefor more information.
Trailer towing tips
²Practice turning, stopping and backing up in an
area before starting on a trip to get the feel of the
vehicle trailer combination. When turning, drive
slightly beyond the normal turning point so the
trailer wheels will clear curbs and other obstacles.
²Allow more room for stopping with a trailer
attached.
²The trailer tongue weight should be 10±15% of
the loaded trailer weight.
²After you have traveled 80 km (50 miles),
thoroughly check your hitch, electrical
connections and trailer wheel lug nuts.
²When stopped in traffic for long periods of time in
hot weather, place the gearshift in P (Park) and
increase idle speed. This aids engine cooling and
air conditioner efficiency.
²Vehicles with trailers should not be parked on a
grade. If you must park on a grade, place wheel
chocks under the trailer's wheels.
dno_towing-tips
com_fuel_consumption.01
Driving
94
Page 96 of 167
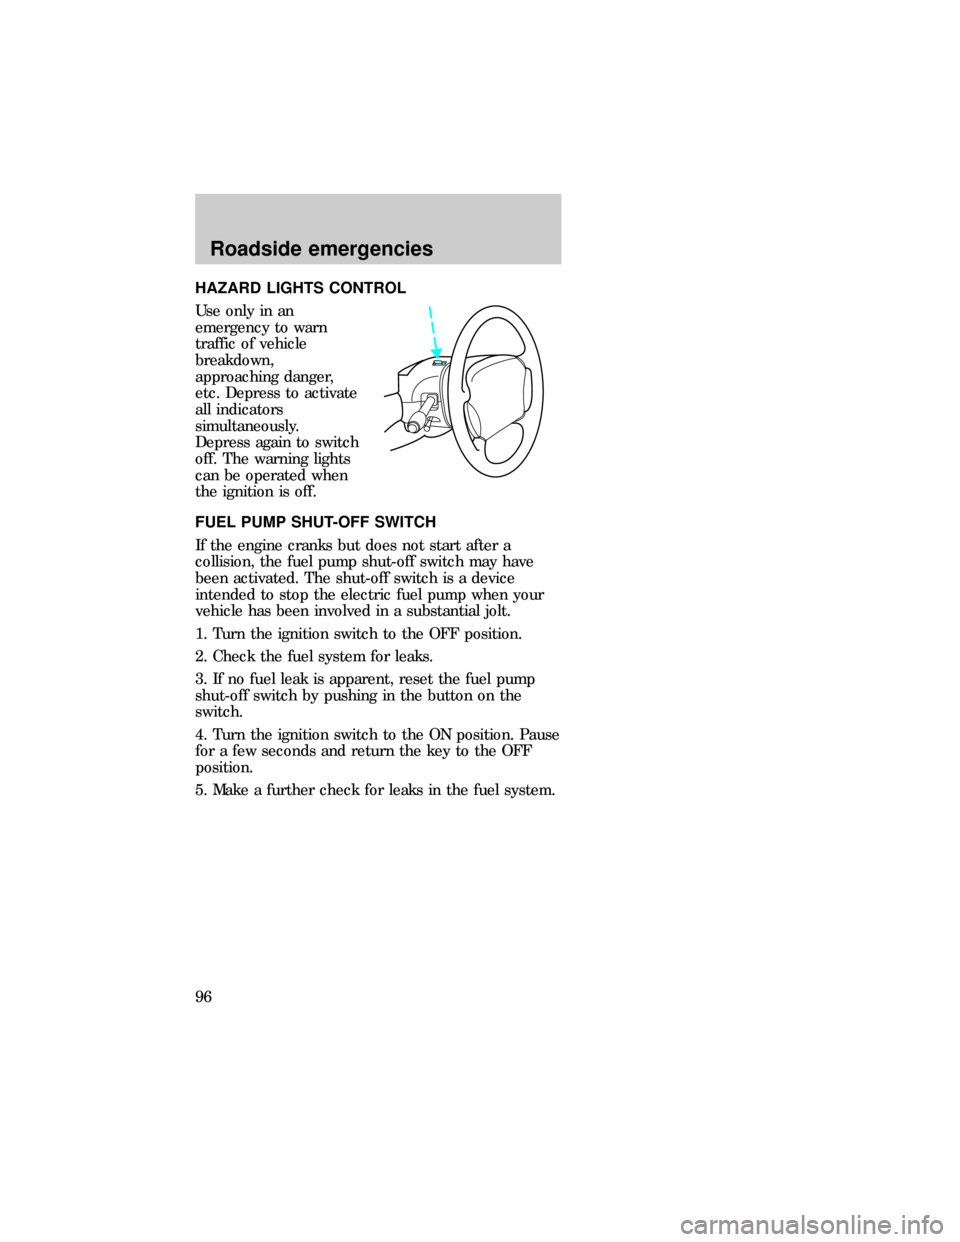
HAZARD LIGHTS CONTROL
Use only in an
emergency to warn
traffic of vehicle
breakdown,
approaching danger,
etc. Depress to activate
all indicators
simultaneously.
Depress again to switch
off. The warning lights
can be operated when
the ignition is off.
FUEL PUMP SHUT-OFF SWITCH
If the engine cranks but does not start after a
collision, the fuel pump shut-off switch may have
been activated. The shut-off switch is a device
intended to stop the electric fuel pump when your
vehicle has been involved in a substantial jolt.
1. Turn the ignition switch to the OFF position.
2. Check the fuel system for leaks.
3. If no fuel leak is apparent, reset the fuel pump
shut-off switch by pushing in the button on the
switch.
4. Turn the ignition switch to the ON position. Pause
for a few seconds and return the key to the OFF
position.
5. Make a further check for leaks in the fuel system.com_hazard_switch.01
dno_fuel-shut-off
Roadside emergencies
96
Page 102 of 167
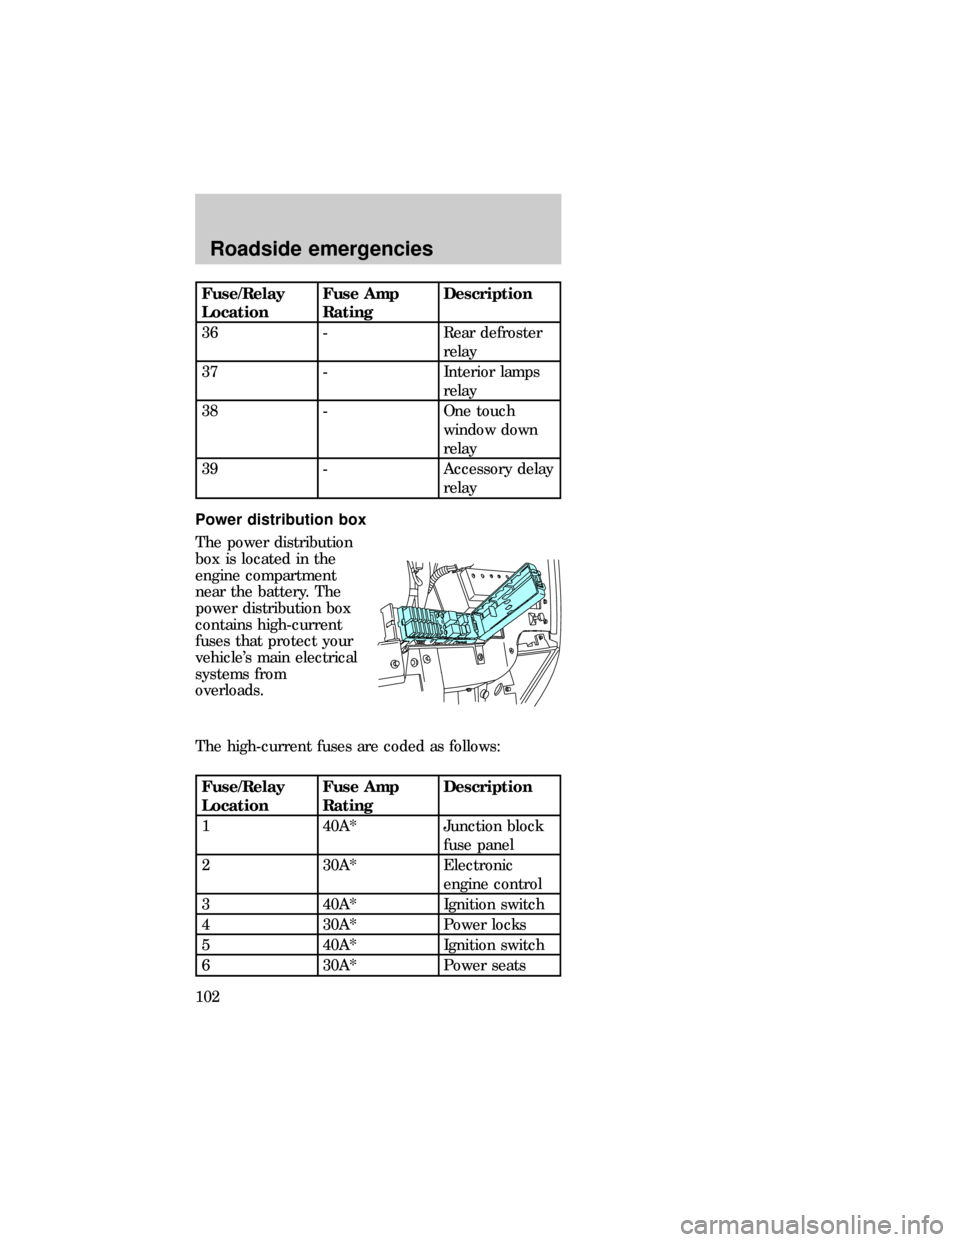
Fuse/Relay
LocationFuse Amp
RatingDescription
36 - Rear defroster
relay
37 - Interior lamps
relay
38 - One touch
window down
relay
39 - Accessory delay
relay
Power distribution box
The power distribution
box is located in the
engine compartment
near the battery. The
power distribution box
contains high-current
fuses that protect your
vehicle's main electrical
systems from
overloads.
The high-current fuses are coded as follows:
Fuse/Relay
LocationFuse Amp
RatingDescription
1 40A* Junction block
fuse panel
2 30A* Electronic
engine control
3 40A* Ignition switch
4 30A* Power locks
5 40A* Ignition switch
6 30A* Power seats
sab_pdb
Roadside emergencies
102
Page 103 of 167

Fuse/Relay
LocationFuse Amp
RatingDescription
7 40A* Rear defroster
8 30A* Thermactor air
pump
9 40A* Engine cooling
fans
10 20A* Fuel pump
11 40A* Blower motor
12 - Not used
13 40A* Anti-lock brake
module
14 - Not used
15 15A** Daytime
running lamps
16 10A** Air bag
diagnostic
monitor
17 20A** Radio, amplifier,
CD changer
18 30A** Anti-lock brake
module
19 15A** Horn
20 15A** Park lamps
21 - Not used
22 30A** Headlamps
23 - Blower motor
24 - Intermittent
wiper control
25 - Wiper relay
26 30A** Alternator
27 - Not used
Roadside emergencies
103
Page 104 of 167
Fuse/Relay
LocationFuse Amp
RatingDescription
28 15A** Electronic
engine control
29 - Washer pump
relay
30 - Horn relay
31 - Autolamp
(headlamps)
32 - Starter relay
33 - Autolamp
(parking lamps)
*Maxi fuses. **Mini fuses
Always disconnect the battery before
servicing high current fuses.
Always replace the cover to the Power
Distribution Box before reconnecting the
battery or refilling fluid reservoirs.
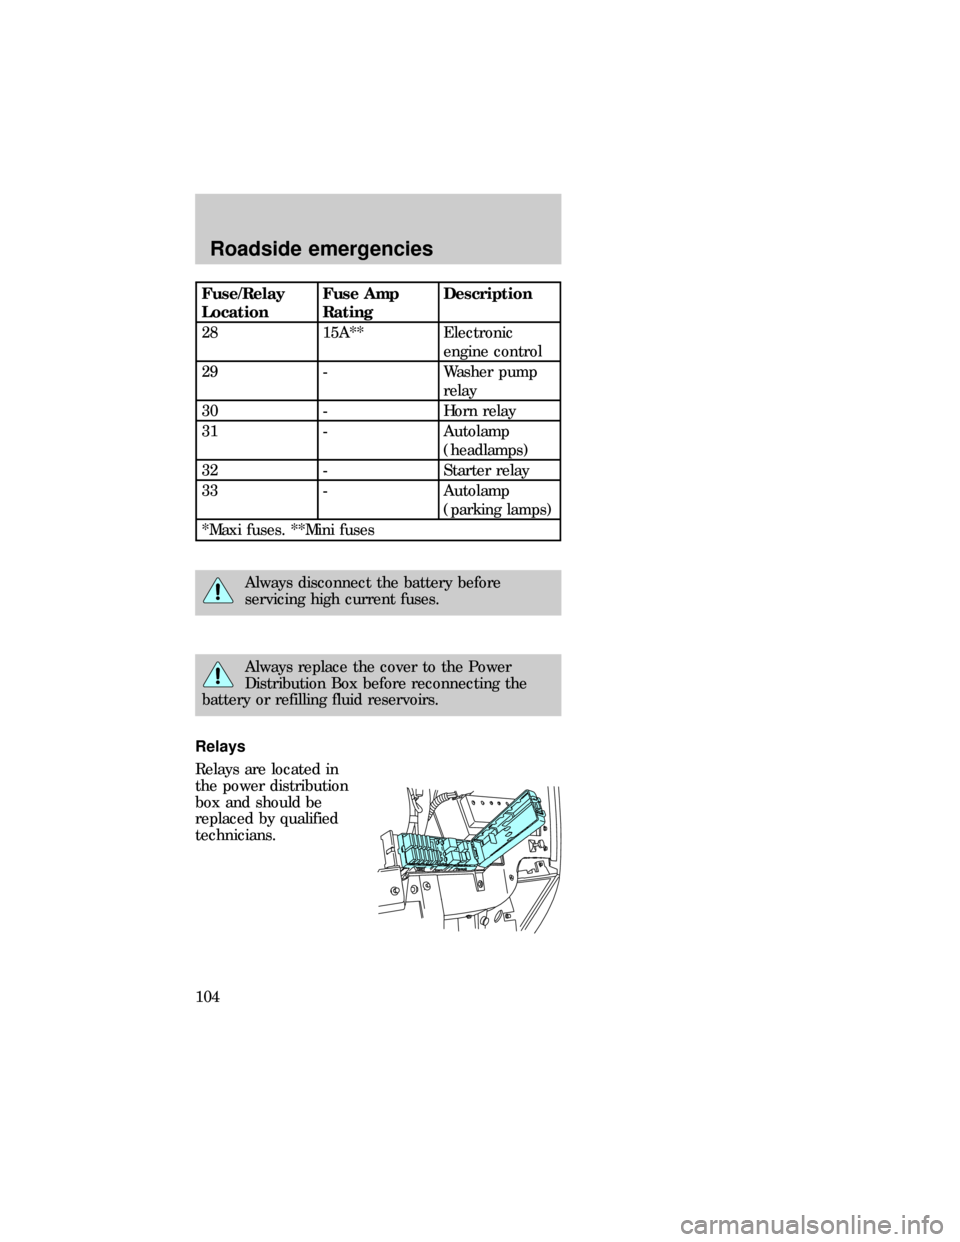
Relays
Relays are located in
the power distribution
box and should be
replaced by qualified
technicians.
dno_relay
dno_flat-tires
Roadside emergencies
104
Page 110 of 167
the key, send the registration card to the
manufacturer (not the dealer) to get a replacement
key. If the lug wrench/lug nut key assembly is lost,
see your nearest Ford or Lincoln/Mercury dealer
who has access to the master set of keys.Do not
use an impact wrench with the anti-theft key.
JUMP STARTING YOUR VEHICLE
The gases around the battery can explode if
exposed to flames, sparks, or lit cigarettes.
An explosion could result in injury or vehicle
damage.
Do not push-start your vehicle. You could
damage the catalytic converter. For further
information, seeJumper Cablesin the Index.
Batteries contain sulfuric acid which burns
skin, eyes, and clothing.
CONNECTING THE JUMPER CABLES
1. Position the vehicles so that they do not touch
one another.
2. Switch off the engine. Switch off any unnecessary
electrical equipment.
com_jump-starting.01
com_connecting_cables.01
Roadside emergencies
110
Page 111 of 167
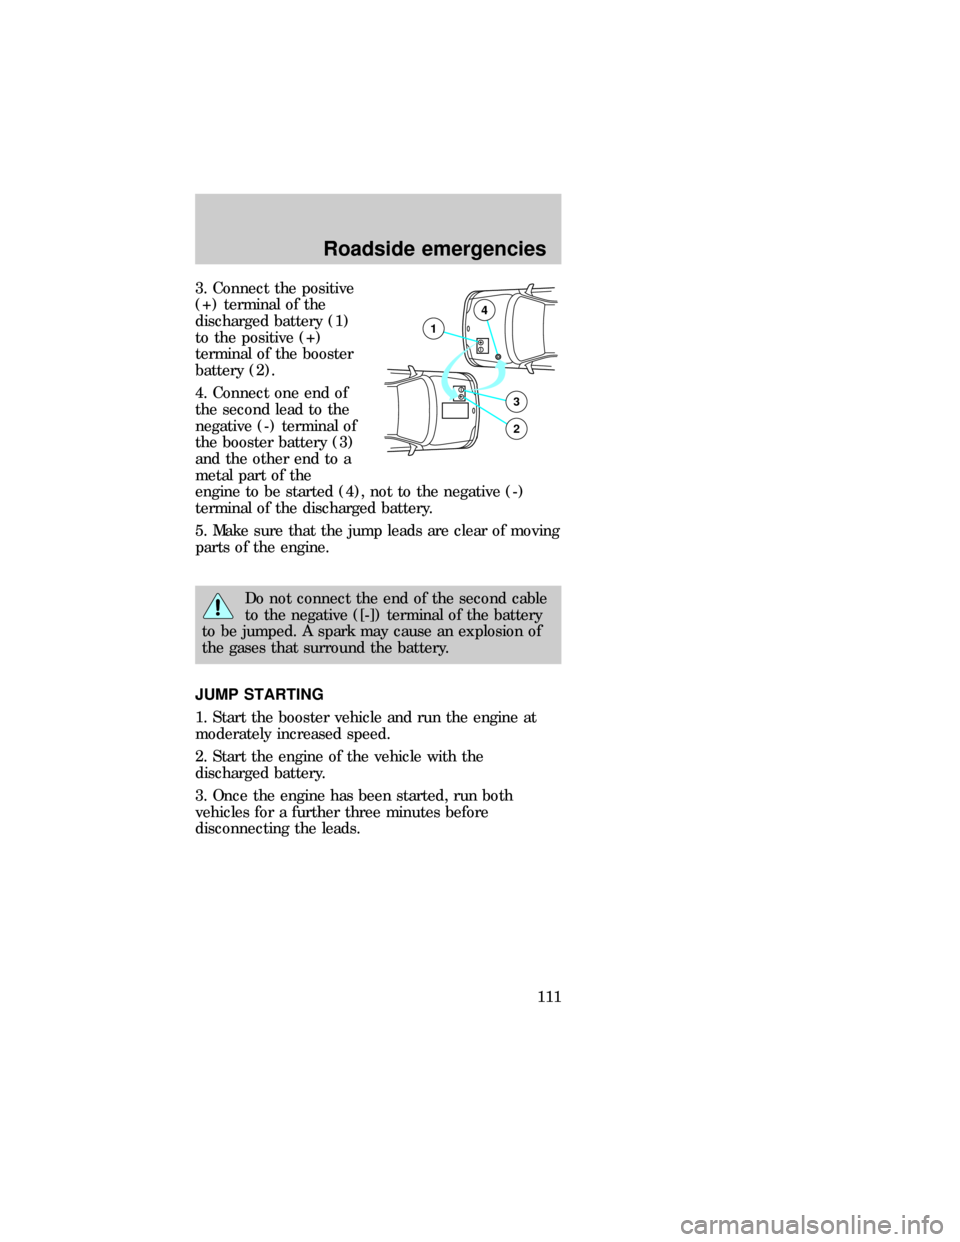
3. Connect the positive
(+) terminal of the
discharged battery (1)
to the positive (+)
terminal of the booster
battery (2).
4. Connect one end of
the second lead to the
negative (-) terminal of
the booster battery (3)
and the other end to a
metal part of the
engine to be started (4), not to the negative (-)
terminal of the discharged battery.
5. Make sure that the jump leads are clear of moving
parts of the engine.
Do not connect the end of the second cable
to the negative ([-]) terminal of the battery
to be jumped. A spark may cause an explosion of
the gases that surround the battery.
JUMP STARTING
1. Start the booster vehicle and run the engine at
moderately increased speed.
2. Start the engine of the vehicle with the
discharged battery.
3. Once the engine has been started, run both
vehicles for a further three minutes before
disconnecting the leads.
+–
+–3
2
1
4
com_jump_starting.01
com_removing_cables.01
Roadside emergencies
111
Page 112 of 167
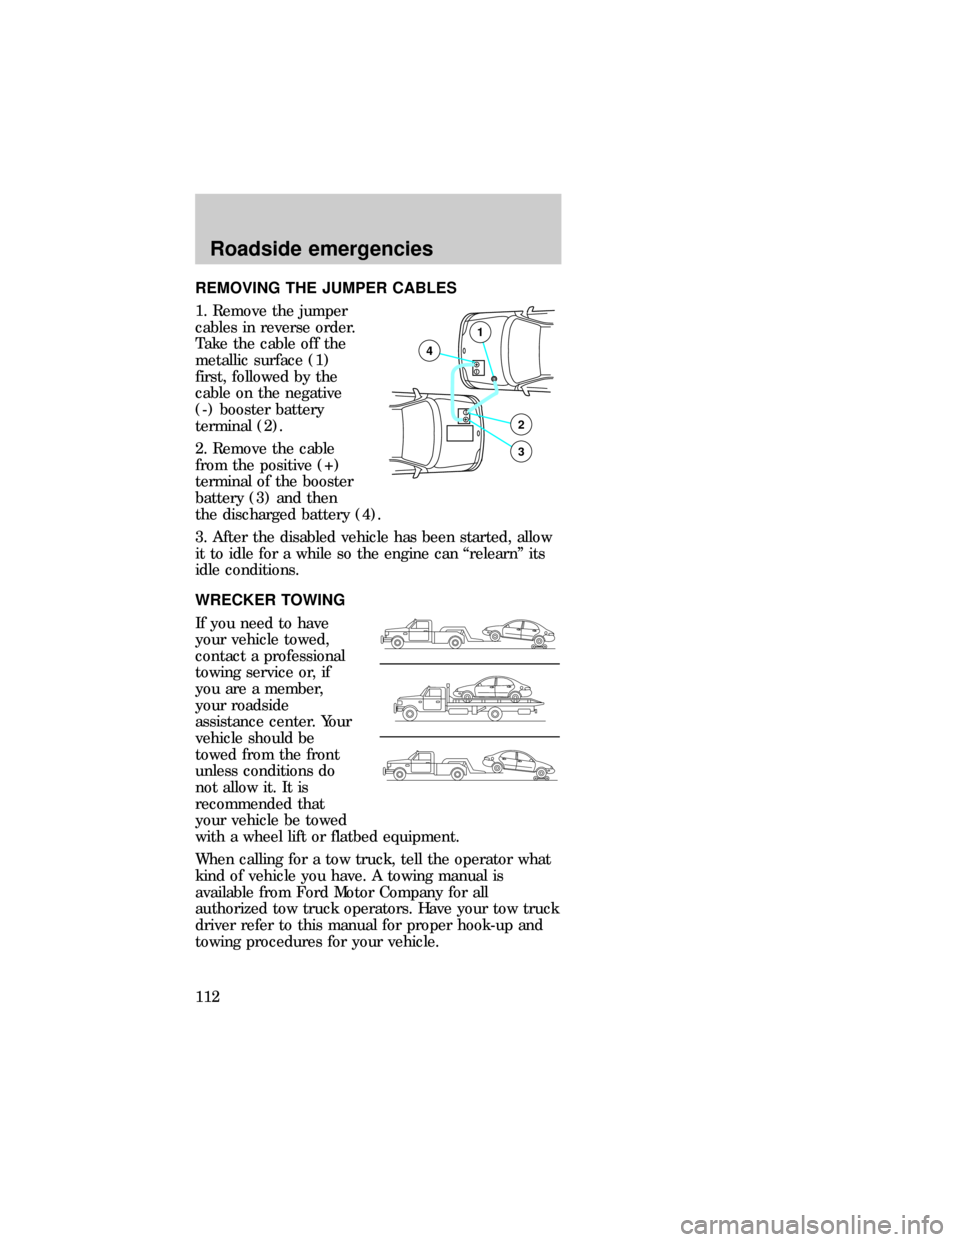
REMOVING THE JUMPER CABLES
1. Remove the jumper
cables in reverse order.
Take the cable off the
metallic surface (1)
first, followed by the
cable on the negative
(-) booster battery
terminal (2).
2. Remove the cable
from the positive (+)
terminal of the booster
battery (3) and then
the discharged battery (4).
3. After the disabled vehicle has been started, allow
it to idle for a while so the engine can ªrelearnº its
idle conditions.
WRECKER TOWING
If you need to have
your vehicle towed,
contact a professional
towing service or, if
you are a member,
your roadside
assistance center. Your
vehicle should be
towed from the front
unless conditions do
not allow it. It is
recommended that
your vehicle be towed
with a wheel lift or flatbed equipment.
When calling for a tow truck, tell the operator what
kind of vehicle you have. A towing manual is
available from Ford Motor Company for all
authorized tow truck operators. Have your tow truck
driver refer to this manual for proper hook-up and
towing procedures for your vehicle.
+–
+–2
3
4
1
dno_towing
dno_towing
Roadside emergencies
112