brake Mercury Sable 1997 Owner's Manuals
[x] Cancel search | Manufacturer: MERCURY, Model Year: 1997, Model line: Sable, Model: Mercury Sable 1997Pages: 167, PDF Size: 1.59 MB
Page 2 of 167

ICONS
Indicates a warning.
Read the following
section onWarnings
for a full explanation of
them.
Indicates that vehicle
information related to
recycling and other
environmental
concerns will follow.
We must all play our part in protecting the
environment. Correct vehicle usage and the
authorized disposal of waste cleaning and lubrication
materials are significant steps towards this aim.
WARNINGS
How can you reduce the risk of personal injury and
prevent possible damage to others, your vehicle and
its equipment?
In this owner's guide, answers to such questions are
contained in comments highlighted by the warning
triangle symbol.
BREAKING-IN YOUR VEHICLE
There are no particular breaking-in rules for your
vehicle. Simply avoid driving too briskly during the
first 1,600 km (1,000 miles) of driving. Vary speeds
frequently. This is necessary to give the moving
parts a chance to break in.
If possible, you should avoid full use of the brakes
for the first 1,600 km (1,000 miles).
From 1,600 km (1,000 miles) onwards you can
gradually increase the performance of your vehicle
up to the permitted maximum speeds.com_icons.01
com_warn.01
com_breaking_vehicle.01
com_info_guide.01
Introduction
2
Page 4 of 167

BASSTREBBALFADEREWFFEJECT
1234
56wTAPE SIDETAPE
R-DEFTUNESEEKSCAN AM
FM
MH
LO
HIOFF
A/C
MAX
A/CVENT
VOL
PUSH-ON
wSTFM 12
AMCBLRF
EFC HFUEL DOOR>
SERVICE
ENGINE
SOONLOW
COOLANTTHEFT102030405060
70
80
90
100
1202060100
140
180P R N D 2 1MPH km/h0000000000P!
BRAKE
+ Ð
110CRUISE
RPMx1000
ABSO/D
OFFREAR
LAMP
OUTPREMIUM UNLEADED
FUEL RECOMMENDED0 1234
5
6
78
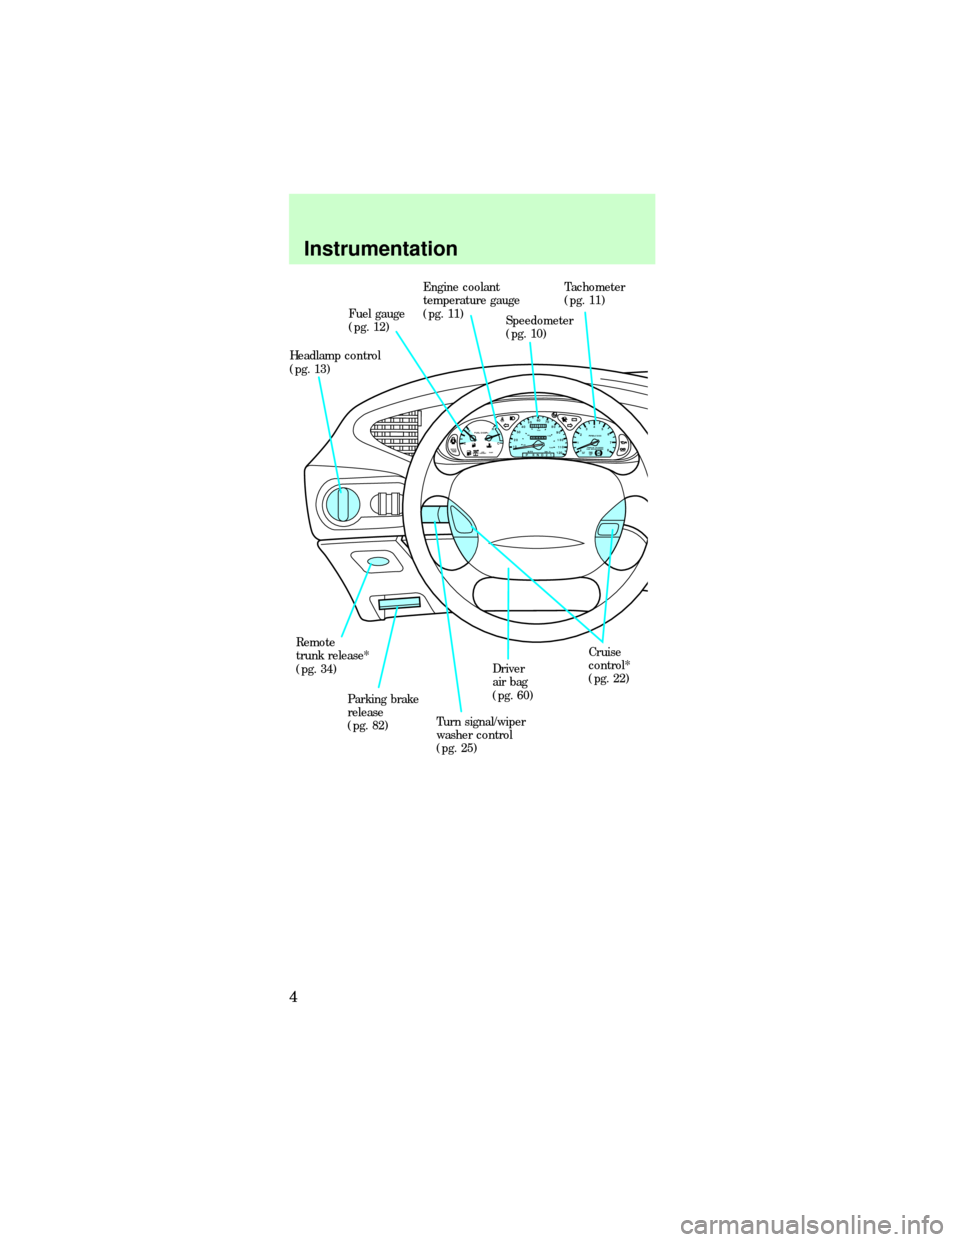
Fuel gauge
(pg. 12)
Headlamp control
(pg. 13)Engine coolant
temperature gauge
(pg. 11)
Speedometer
(pg. 10)Tachometer
(pg. 11)
Driver
air bag
(pg. 60)Cruise
control*
(pg. 22)
Turn signal/wiper
washer control
(pg. 25) Parking brake
release
(pg. 82) Remote
trunk release*
(pg. 34)
Instrumentation
4
Page 6 of 167

WARNING LIGHTS AND GAUGES
Standard instrument cluster
Optional instrument cluster
Turn signal
Illuminates when the
left or right turn signal
or the hazard lights are
turned on.
High beams
Illuminates when the
headlamp high beams
are on.
CRUISE
RPMx1000
0 1234
5
6
7EFC H
FUEL DOOR>
SERVICE
ENGINE
SOON1020304050 60
70
80
90
100
110
00 20406080100
120
140
160
180P R N D D 1MPH km/h
00
122
00013
P!
BRAKEABS
+ –
UNLEADED FUEL ONLY
THEFT LOW
COOLANTO/D
OFF
EFC H
FUEL DOOR>
SERVICE
ENGINE
SOON
THEFT102030405060
70
80
90
100
1202060100
140
180
P R N D 2 1MPH km/h
00
000
00000
P!
BRAKELOW
COOLANT
+ –
110CRUISE
RPMx1000
ABSO/D
OFFPREMIUM UNLEADED
FUEL RECOMMENDED0 1234
5
6
78
dno_optional
com_turn_signal.01
com_high_beams.01
com_safety_belt.01
Instrumentation
6
Page 8 of 167

you should check the coolant level inside the
reservoir. For instructions on adding coolant, see
Engine coolantin the index.
Anti-theft alarm light (if equipped)
This light is used when
you set the anti-theft
alarm system. See
Anti-theft systemin
the index.
O/D off (if equipped)
Illuminates when the
transaxle control
switch (TCS) has been
pushed. When the light
is on, the transaxle does not shift into overdrive. If
the light does not come on when the TCS is
depressed or if the light flashes when you are
driving, have your vehicle serviced.
Anti-lock brake system (ABS) (if equipped)
Momentarily illuminates
when the ignition is
turned on and the
engine is off. If the
light stays on or continues to flash, the ABS needs
to be serviced.
Cruise control (if equipped)
This light comes on
when the cruise control
ON button is pressed.
It turns off when the
cruise control OFF
button is pressed or when the ignition is turned to
the OFF position.
THEFT
O/D
OFF
ABS
CRUISE
dno_theft
dno_overdrive-off
dno_abs
dno_cruise-light
com_brake_system.01
Instrumentation
8
Page 9 of 167

Brake system warning
Extinguishes when the
parking brake is
released. Illumination
after releasing the
parking brake indicates low brake fluid level.
Engine oil pressure
When the oil pressure
is below the normal
operating range, this
lamp will illuminate.
The engine oil level being too high or too low could
cause this lamp to illuminate. This lamp will come
on when the ignition is first turned on but then
should turn off. If the lamp stays on, continued
operation will cause severe engine damage.
Charging system
Briefly illuminates
when the ignition is
turned on and the
engine is off. The light
also illuminates when the battery is not charging
properly, requiring electrical system service.
Air bag readiness
Briefly illuminates
when the ignition is
turned on and the
engine is off. If the
light fails to illuminate, continue to flash or remains
on, have the system serviced immediately.
Headlamps on warning chime
Sounds when the headlamps are on, the ignition is
off (and the key is not in the ignition) and the
driver's door is opened.
P!
BRAKE
dno_engine-oil-pressure
com_charging_system.01
dno_srs-light
dno_warning-lights
com_headlamps_chime.01
com_key_chime.01
Instrumentation
9
Page 14 of 167

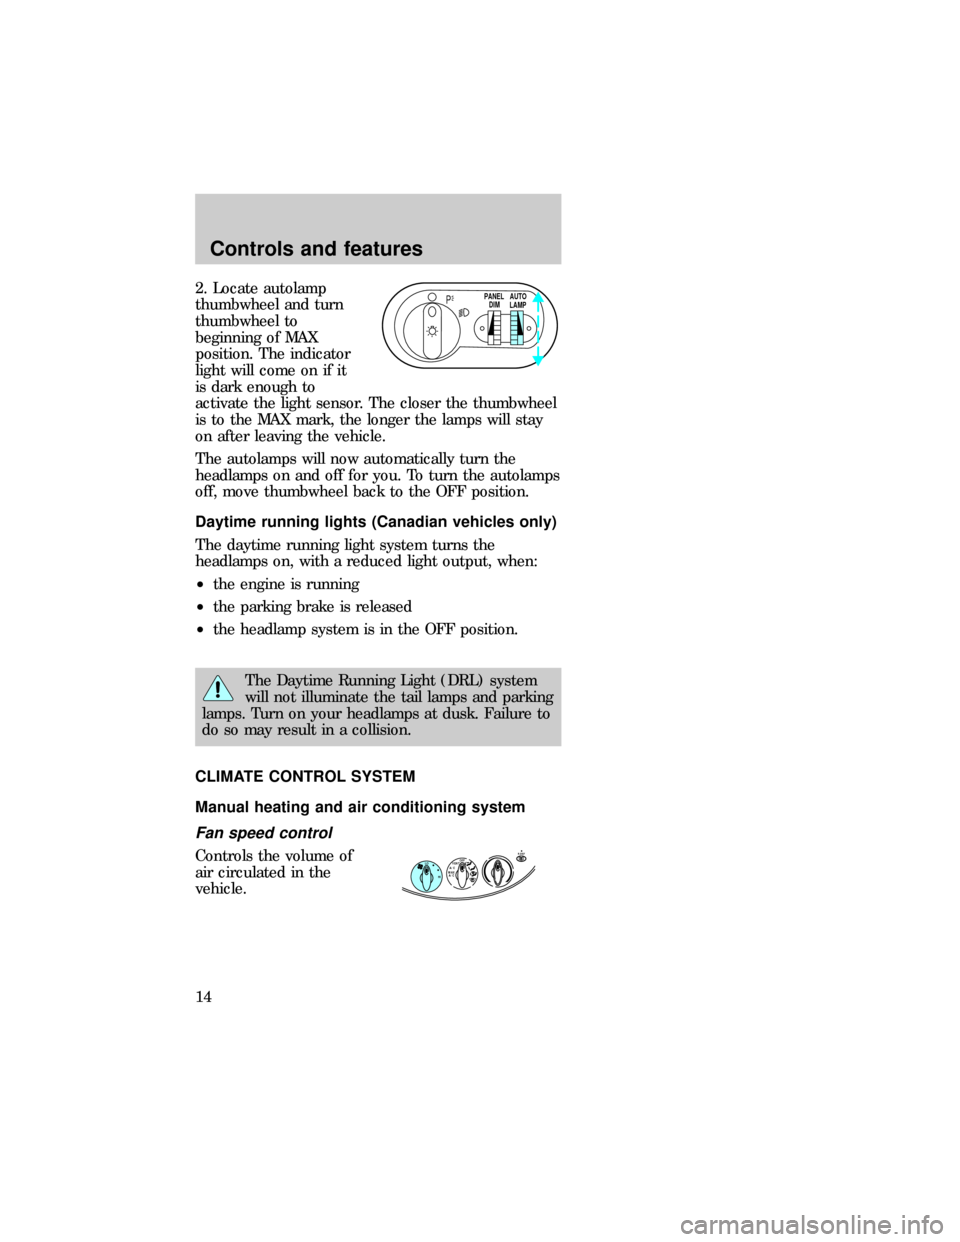
2. Locate autolamp
thumbwheel and turn
thumbwheel to
beginning of MAX
position. The indicator
light will come on if it
is dark enough to
activate the light sensor. The closer the thumbwheel
is to the MAX mark, the longer the lamps will stay
on after leaving the vehicle.
The autolamps will now automatically turn the
headlamps on and off for you. To turn the autolamps
off, move thumbwheel back to the OFF position.
Daytime running lights (Canadian vehicles only)
The daytime running light system turns the
headlamps on, with a reduced light output, when:
²the engine is running
²the parking brake is released
²the headlamp system is in the OFF position.
The Daytime Running Light (DRL) system
will not illuminate the tail lamps and parking
lamps. Turn on your headlamps at dusk. Failure to
do so may result in a collision.
CLIMATE CONTROL SYSTEM
Manual heating and air conditioning system
Fan speed control
Controls the volume of
air circulated in the
vehicle.
PPANEL
DIMAUTO
LAMP
R-DEFLO
HIOFF
A/C
MAX
A/CVENT
dno_drl
dno_climate-control-system
dno_manual-air-conditioning
Controls and features
14
Page 24 of 167

You can accelerate with the accelerator pedal at any
time during cruise control usage. Releasing the
accelerator pedal will return your vehicle to the
previously programmed set speed.
To set a lower set speed
²Press and hold
COAST. Release the
control when the
desired speed is
reached or
²Press and release
COAST. Each press
will decrease the set
speed by 1.6 km/h (1 mph) or
²Depress the brake pedal. When the desired
vehicle speed is reached, press SET ACCEL.
To disengage cruise control
²Depress the brake pedal.
Disengaging the cruise control will not erase the
previously programmed set speed.
Pressing OFF will erase the previously programmed
set speed.
To return to a set speed
²Press RESUME. For
RESUME to operate,
the vehicle speed
must be faster than
48 km/h (30 mph).
ON
OFF
COASTRESUMESET
ACCEL
ON
OFF
COASTRESUMESET
ACCEL
dno_tap-down-feature
dno_disengage
dno_resume-feature
dno_cruise-light
Controls and features
24
Page 33 of 167

If your vehicle is
equipped with a
cellular phone, press
the latch release
located on the driver's
side edge of the
console lid to access
the phone.
If your vehicle is
equipped with the
column shift, it has a
center console in the
center front seating
position.
The center console has the same features as the full
console. To open the storage compartment, raise the
armrest and pull the strap on the seat up and
toward the front of the vehicle. The cupholders in
the center console can be removed for cleaning.
Cellular phone
Refer to the cellular phone user's manual for
instruction on operation.
POSITIVE RETENTION FLOOR MAT (IF
EQUIPPED)
Position the floor mat so that the eyelet is over the
pointed end of the retention post and rotate forward
to lock in. Make sure the mat does not interfere with
the operation of the accelerator and brake pedal. To
remove the floor mat, reverse the installation
procedure.
dno_cell-phone
dno_floor-mats
dno_opening-trunk-remote
Controls and features
33
Page 39 of 167

Operating your perimeter anti-theft system (if
equipped) from the keyless entry pad
The keyless entry
system arms by
pressing 7/8 and 9/0.
To disarm or reset a triggered anti-theft alarm, enter
the five digit code.
All doors must be fully closed for the anti-theft
system to arm. Refer to theAnti-theft system
section, if equipped, in this chapter for more details.
Autolock
The autolock feature is part of your remote keyless
entry system which locks all of the doors when:
²all vehicle doors are closed
²the ignition key is turned to the ON position
²the brake pedal is pressed
²you shift through R (reverse)
²one second has elapsed after the brake pedal is
released.
The autolock feature repeats when:
²a door is opened and then all doors are closed
²the brake pedal is released.
The doors may not lock automatically if the driver:
²shifts through gears without pressing the brake
²shifts through gears quickly after starting the
vehicle
²releases their foot from the brake while someone
has stepped out of the vehicle for a moment.
Deactivating the system by using the controls for the
keyless entry system:
1. Enter your permanent five-digit entry code (not
the user code you may have set).
2. Within five seconds, press and hold 7/8.
123
45678
90
com_keyless_autolock.02
Controls and features
39
Page 53 of 167

To test the vehicle
sensitive (emergency)
locking mode, pull the
shoulder belt quickly to
lock.
The vehicle sensitive mode is the normal retractor
mode, adjusting shoulder belt tightness in response
to vehicle movement. For example, if the driver
brakes suddenly or turns a corner sharply or the
vehicle receives an impact of 8 km/h (5 mph) or
more, the combination safety belts would lock to
help reduce forward movement of the driver and
passengers.
Automatic locking mode
In this mode, the shoulder belt is locked in a certain
position by the occupant anddoes notadjust
tightness during vehicle movement.
The automatic locking mode is not available on the
driver belt.
When to use the automatic locking mode
²When a tight lap/shoulder fit is desired.
²Any timea child safety seat is installed in the
vehicle. Refer toChildren and infant or Child
safety seatslater in this chapter.
dno_when-to-use-locking-mode
dno_how-to-use-locking-mode
Seating and safety restraints
53