battery Mercury Sable 1998 s User Guide
[x] Cancel search | Manufacturer: MERCURY, Model Year: 1998, Model line: Sable, Model: Mercury Sable 1998Pages: 190, PDF Size: 1.29 MB
Page 127 of 190

SERVICE RECOMMENDATIONS
To help you service your vehicle:
²We highlight do-it-yourself items in the engine
compartment for easy location.
²We provide a ªService Guideº which makes
tracking routine service easy.
If your vehicle requires professional service, your
dealership can provide necessary parts and service.
Check your ªWarranty Guideº to find out which parts
and services are covered.
Use only recommended fuels, lubricants, fluids and
service parts conforming to specifications. Motorcraft
parts are designed and built to provide the best
performance in your vehicle.
PRECAUTIONS WHEN SERVICING YOUR
VEHICLE
Be especially careful when inspecting or servicing
your vehicle.
²Do not work on a hot engine.
²When the engine is running, avoid wearing loose
clothing, jewelry or long hair that could get
caught up in moving parts.
²Do not work on a vehicle with the engine running
in an enclosed space, unless you are sure you
have enough ventilation.
²Keep all lit cigarettes, open flames and other lit
material away from the battery and all fuel related
parts.
If you disconnect the battery, the engine must
ªrelearnº its idle conditions before your vehicle will
drive properly, as explained in theBatterysection in
this chapter.
Working with the engine off
1. Set the parking brake, and ensure the gearshift is
securely latched in park.
Maintenance and care
127
Page 129 of 190

IDENTIFYING COMPONENTS IN THE ENGINE
COMPARTMENT
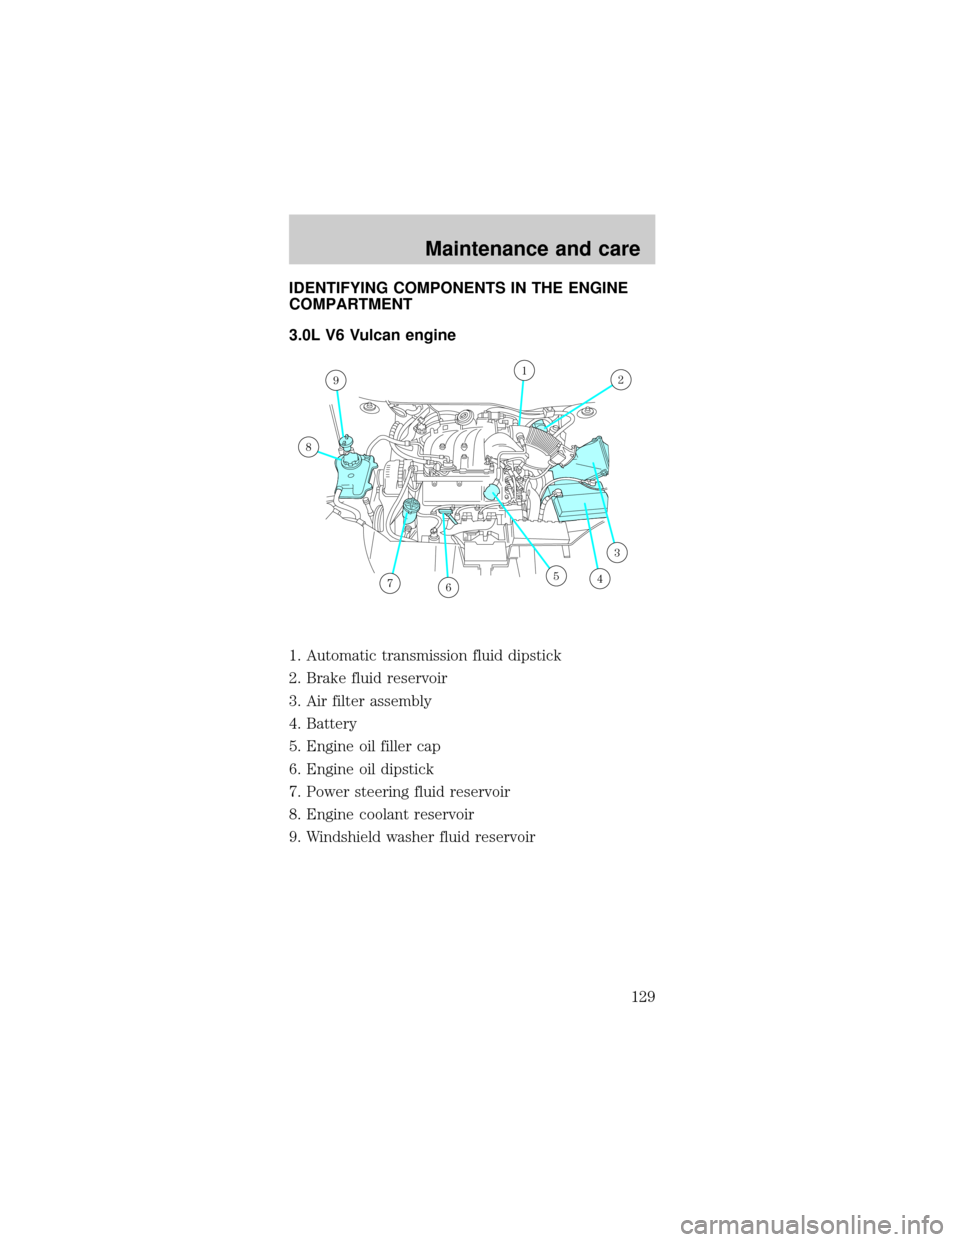
3.0L V6 Vulcan engine
1. Automatic transmission fluid dipstick
2. Brake fluid reservoir
3. Air filter assembly
4. Battery
5. Engine oil filler cap
6. Engine oil dipstick
7. Power steering fluid reservoir
8. Engine coolant reservoir
9. Windshield washer fluid reservoir
12
3
4567
8
9
Maintenance and care
129
Page 130 of 190

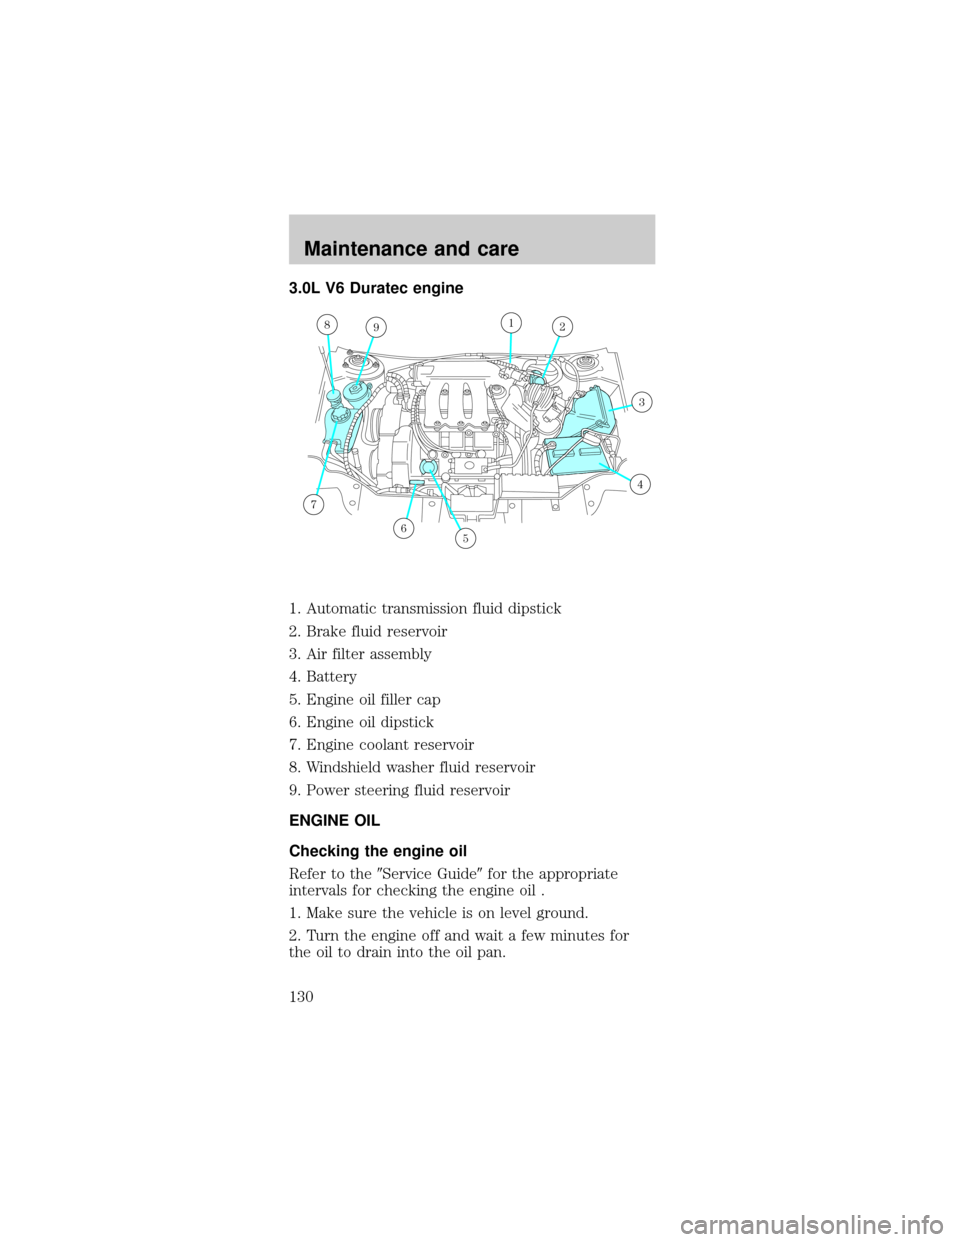
3.0L V6 Duratec engine
1. Automatic transmission fluid dipstick
2. Brake fluid reservoir
3. Air filter assembly
4. Battery
5. Engine oil filler cap
6. Engine oil dipstick
7. Engine coolant reservoir
8. Windshield washer fluid reservoir
9. Power steering fluid reservoir
ENGINE OIL
Checking the engine oil
Refer to the9Service Guide9for the appropriate
intervals for checking the engine oil .
1. Make sure the vehicle is on level ground.
2. Turn the engine off and wait a few minutes for
the oil to drain into the oil pan.
8912
3
4
56
7
Maintenance and care
130
Page 142 of 190

If an overfill occurs,
excess fluid should be
removed by a qualified
technician.
An overfill condition of transmission fluid may
cause shift and/or engagement concerns and/or
possible damage.
BATTERY
Your vehicle is
equipped with a
Motorcraft
maintenance-free
battery which normally
does not require
additional water during
its life of service.
However, for severe usage or in high temperature
climates, check the battery electrolyte level. Refer to
the ªService Guideº for the service interval
schedules.
If the electrolyte level in the battery is low, you can
add plain tap water to the battery, as long as you do
not use hard water (water with a high mineral or
alkali content). If possible, however, try to only fill
the battery cells with distilled water. If the battery
needs water often, have the charging system
checked.
Keep the electrolyte level in each cell up to the
ªlevel indicatorº. Do not overfill the battery
cells.
For longer, trouble-free operation, keep the top of
the battery clean and dry. Also, make certain the
battery cables are always tightly fastened to the
battery terminals.
If you see any corrosion on the battery or terminals,
remove the cables from the terminals and clean with
a wire brush. You can neutralize the acid with a
solution of baking soda and water. Reinstall the
DON’T ADD IF IN CROSSHATCH AREA--CHECH WHEN HOT-IDLING
Maintenance and care
142
Page 143 of 190

cables when you are done cleaning them, and apply
a small quantity of grease to the top of each battery
terminal to help prevent corrosion.
If your battery has a cover/shield, make sure it
is reinstalled after the battery has been
cleaned or replaced.
Batteries normally produce explosive gases
which can cause personal injury. Therefore,
do not allow flames, sparks or lighted substances
to come near the battery. When working near the
battery, always shield your face and protect your
eyes. Always provide proper ventilation.
When lifting a plastic-cased battery,
excessive pressure on the end walls could
cause acid to flow through the vent caps, resulting
in personal injury and/or damage to the vehicle or
battery. Lift the battery with a battery carrier or
with your hands on opposite corners.
Keep batteries out of reach of children.
Batteries contain sulfuric acid. Avoid contact
with skin, eyes or clothing. Shield your eyes when
working near the battery to protect against
possible splashing of acid solution. In case of acid
contact with skin or eyes, flush immediately with
water for a minimum of 15 minutes and get
prompt medical attention. If acid is swallowed, call
a physician immediately.
Maintenance and care
143
Page 144 of 190

Because your vehicle's engine is electronically
controlled by a computer, some control conditions
are maintained by power from the battery. When the
battery is disconnected or a new battery is installed,
the engine must relearn its idle conditions before
your vehicle will drive properly. To begin this
process:
1. Set your parking brake.
2. Put the gearshift in P (Park), turn off all
accessories and start the engine.
3. Let the engine idle for at least one minute.
4. The relearning process will automatically
complete as you drive the vehicle.
²If you do not allow the engine to relearn its idle,
the idle quality of your vehicle may be adversely
affected until the idle is eventually relearned.
²If the battery has been disconnected or a new
battery has been installed, the clock and the
preset radio stations must be reset once the
battery is reconnected.
²Always dispose of
automotive batteries
in a responsible
manner. Follow your
local authorized
standards for
disposal. Call your
local authorized
authorized recycling center to find out more
about recycling automotive batteries.
LEAD
RETURN
RECYCLE
Maintenance and care
144
Page 160 of 190

If the vehicle's powertrain system or its battery has
just been serviced, the OBD-II system is reset to a
ªnot ready for I/M testº condition. To ready the
OBD-II system for I/M testing, a minimum of 30
minutes of city and highway driving is necessary as
described below:
²First, at least 10 minutes of driving on an
expressway or highway.
²Next, at least 20 minutes driving in stop-and-go,
city-type traffic with at least four idle periods.
Allow the vehicle to sit for at least eight hours
without starting the engine. Then, start the engine
and complete the above driving cycle. The engine
must warm up to its normal operating temperature.
Once started, do not turn off the engine until the
above driving cycle is complete.
EXTERIOR BULBS
Replacing exterior bulbs
Check the operation of the following lamps
frequently:
²Headlamps
²Tail lamps
²Brakelamps
²High-mount brakelamp
²Turn signals
²Backup lamps
²License plate lamp
Do not remove lamp bulbs unless they will be
replaced immediately. If a bulb is removed for an
extended period of time, contaminants may enter
the lamp housings and affect performance.
Maintenance and care
160
Page 161 of 190

Replacing headlamp bulbs
Handle a halogen headlamp bulb carefully
and keep out of children's reach. Grasp the
bulb only by its plastic base and do not touch the
glass. The oil from your hand could cause the bulb
to break the next time the headlamps are
operated.
If the bulb is accidentally touched, it should be
cleaned with rubbing alcohol before being used.
To remove the headlamp bulb:
1. Make sure headlamp switch is in OFF position,
then open the hood. If you are replacing the driver
side headlamp, unclip the electronic module on the
right side of the battery and move it out of the way.
2. Locate the headlamp bulb through the hole in the
upper radiator support assembly.
3. Release clip and
disconnect the
electrical connector
from the bulb.
4. Remove the bulb
retaining ring by
rotating it
counterclockwise
(when viewed from the
rear) about 1/8 turn to
free it from the bulb socket, and slide the ring off
the plastic base. Keep the ring to retain the new
bulb.
5. With out turning, remove the old bulb from the
lamp assembly by gently pulling it straight out of the
lamp assembly.
Maintenance and care
161
Page 173 of 190

MOTORCRAFT PART NUMBERS
Component 3.0L V6 Vulcan
engine3.0L V6
Duratec engine
Air filter FA-1630 FA-1630
Fuel filter FG-800-A FG-800-A
Battery
(standard)BXT-58R BXT-36R
Battery
(optional)BXT-36R N/A
Cabin air
filterFP-6 FP-6
Oil filter FL-400-S FL-820-S
PCV valve EV-228 EV-152
Spark plugs* AWSF-32PP** AWSF-32F
* Refer to Vehicle Emissions Control Information
(VECI) decal for spark plug gap information.
** If a spark plug is removed for inspection, it must
be reinstalled in the same cylinder. Cylinders No. 1,
2 and 3 have a ªPGº suffix. Cylinders No. 4, 5 and 6
have a ªPº suffix. If a spark plug needs to be
replaced, use only spark plugs with the service part
number suffix letter9PP9as shown on the engine
decal.
Capacities and specifications
173