lock Mercury Sable 1998 s Workshop Manual
[x] Cancel search | Manufacturer: MERCURY, Model Year: 1998, Model line: Sable, Model: Mercury Sable 1998Pages: 190, PDF Size: 1.29 MB
Page 148 of 190

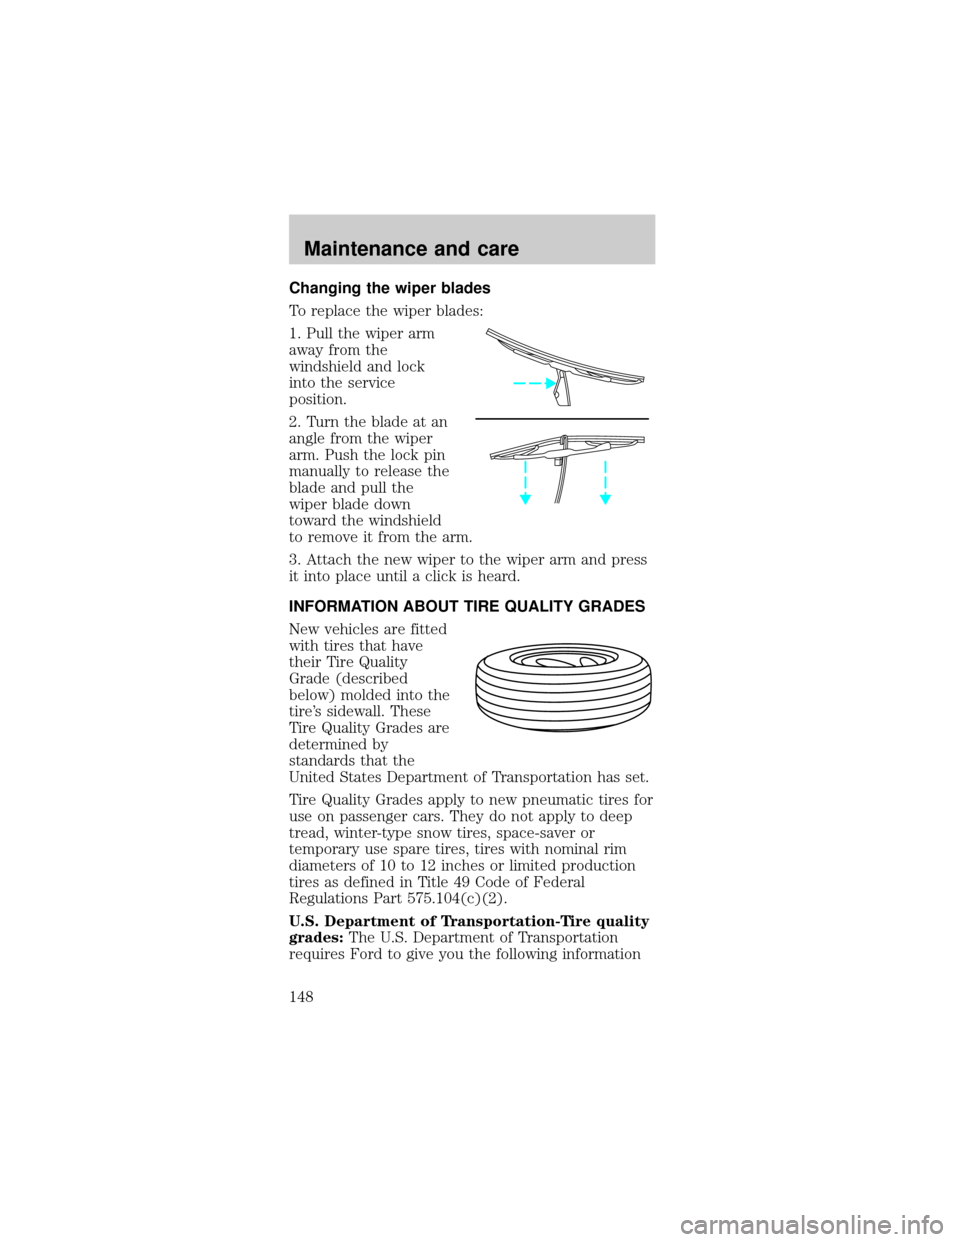
Changing the wiper blades
To replace the wiper blades:
1. Pull the wiper arm
away from the
windshield and lock
into the service
position.
2. Turn the blade at an
angle from the wiper
arm. Push the lock pin
manually to release the
blade and pull the
wiper blade down
toward the windshield
to remove it from the arm.
3. Attach the new wiper to the wiper arm and press
it into place until a click is heard.
INFORMATION ABOUT TIRE QUALITY GRADES
New vehicles are fitted
with tires that have
their Tire Quality
Grade (described
below) molded into the
tire's sidewall. These
Tire Quality Grades are
determined by
standards that the
United States Department of Transportation has set.
Tire Quality Grades apply to new pneumatic tires for
use on passenger cars. They do not apply to deep
tread, winter-type snow tires, space-saver or
temporary use spare tires, tires with nominal rim
diameters of 10 to 12 inches or limited production
tires as defined in Title 49 Code of Federal
Regulations Part 575.104(c)(2).
U.S. Department of Transportation-Tire quality
grades:The U.S. Department of Transportation
requires Ford to give you the following information
Maintenance and care
148
Page 155 of 190

Fuel Filler Cap
Your fuel tank filler cap has an indexed design with
a one-eighth turn on/off feature.
When fueling your vehicle:
1. Turn the engine off.
2. Carefully turn the filler cap counterclockwise 1/8
of a turn until it stops.
3. Pull to remove the cap from the fuel filler pipe.
4. To install the cap, align the tabs on the cap with
the notches on the filler pipe.
5. Turn the filler cap clockwise 1/8 of a turn until it
stops.
If the ªService Engine Soon/Check Engine ª indicator
comes on and stays on when you start the engine,
the fuel filler cap may not be properly installed.
Turn off the engine, remove the fuel filler cap and
reinstall it being careful to align the cap properly.
If you must replace the fuel filler cap, replace
it with an authorized Motorcraft part. The
customer warranty may be void for any damage
to the fuel tank or fuel system if an authorized
Motorcraft fuel filler cap is not used.
The fuel system may be under pressure. If
the fuel filler cap is venting vapor or if you
hear a hissing sound, wait until it stops before
completely removing the fuel filler cap. Otherwise,
fuel may spray out and injure you or others.
If you do not use the proper fuel filler cap,
the pressure in the fuel tank can damage
the fuel system or cause it to work improperly in a
collision.
Maintenance and care
155
Page 161 of 190

Replacing headlamp bulbs
Handle a halogen headlamp bulb carefully
and keep out of children's reach. Grasp the
bulb only by its plastic base and do not touch the
glass. The oil from your hand could cause the bulb
to break the next time the headlamps are
operated.
If the bulb is accidentally touched, it should be
cleaned with rubbing alcohol before being used.
To remove the headlamp bulb:
1. Make sure headlamp switch is in OFF position,
then open the hood. If you are replacing the driver
side headlamp, unclip the electronic module on the
right side of the battery and move it out of the way.
2. Locate the headlamp bulb through the hole in the
upper radiator support assembly.
3. Release clip and
disconnect the
electrical connector
from the bulb.
4. Remove the bulb
retaining ring by
rotating it
counterclockwise
(when viewed from the
rear) about 1/8 turn to
free it from the bulb socket, and slide the ring off
the plastic base. Keep the ring to retain the new
bulb.
5. With out turning, remove the old bulb from the
lamp assembly by gently pulling it straight out of the
lamp assembly.
Maintenance and care
161
Page 162 of 190

To install the new bulb:
1. With the flat side of
the bulb's plastic base
facing upward, insert
the glass end of the
bulb into the lamp
assembly. You may
need to turn the bulb left or right to align the
grooves in the plastic base with the tabs in the lamp
assembly. When the grooves are aligned, push the
bulb into the lamp assembly until the plastic base
contacts the rear of the lamp assembly.
2. Install the bulb retaining ring over the plastic base
until it contacts the rear of the socket by rotating
clockwise until you feel a ªstop.º
3. Install the electrical connector into the rear of the
plastic base until it snaps, locking it into position.
4. Turn the headlamps on and make sure they work
properly. If the headlamp was correctly aligned
before you changed the bulb, you should not need to
align it again.
High-mount brakelamp bulbs
The following
procedure is for sedans
only. For wagon, refer
to a qualified
technician.
1. Open trunk.
2. Inside trunk, locate
access hole under the
rear window
3. Remove the bulb
socket by rotating it 45 degrees and pulling it out of
the lamp assembly.
4. Carefully pull bulb straight out of socket and push
in new bulb.
5. To complete installation, follow the removal
procedure in reverse order.
Maintenance and care
162
Page 163 of 190

License plate lamp bulbs
To change the license plate bulbs:
Sedan
1. Remove two screws
and the license plate
lamp assembly from
the rear bumper.
2. Remove bulb socket
by turning
counterclockwise .
3. Carefully pull the
bulb out from the
socket and push in the
new bulb.
4. Install the lamp assembly on rear bumper with
two screws.
Wagon
1. Remove screw and
the license plate lamp
assembly from liftgate.
2. Remove bulb socket
by turning
counterclockwise .
3. Carefully pull the
bulb out from the
socket and push in the
new bulb.
4. Install the lamp assembly on liftgate with screw.
Replacing front parking lamp/turn signal bulbs
For bulb replacement, see a dealer or qualified
technician.
Replacing tail lamp/backup bulbs
For bulb replacement, see a dealer or qualified
technician.
Maintenance and care
163
Page 166 of 190

3. Turn the horizontal
adjusting screw in the
direction of the arrow
to change the
horizontal aim as
shown.
4.Usea7mmwrench
or socket to turn the
horizontal adjusting screw until the ª0º reference
mark on the view dial is aligned with the rearward
facing tab (as shown) on the plastic housing.
Vertical aim adjustment
1. Park the vehicle on a level surface.
2. With the hood open,
locate the bubble level
vertical aim indicator.
It is visible when
viewed from above
center rear of the
headlamp. Locate the
vertical adjusting
screw, located on the
outboard side of the headlamp adjacent to the
headlamp upper outboard attachment.
3. The ªUPº and ªDNº on the bubble label indicate
the directional change (up or down) of the vertical
aim.
4.Usea7mmwrench or socket to turn the vertical
adjusting screw clockwise or counterclockwise until
the bubble aligns with the ª0º reference mark on the
vertical indicator when viewed directly from above.
Repeat the above procedures to the other headlamp,
if necessary.
Maintenance and care
166
Page 169 of 190

²Do not spray with cold water to avoid cracking
the engine block or other engine components.
²Cover the highlighted areas to prevent water
damage when cleaning the engine.
²3.0L Vulcan engine
²3.0L Duratec engine
²Never wash or rinse the engine while it is
running; water in the running engine may cause
internal damage.
Maintenance and care
169
Page 175 of 190

Fluid Ford Part
NameApplication Capacity
Windshield
washer
fluid -
FrontUltra-Clear
Windshield
Washer
ConcentrateAll 2.7L (90
oz.)
Windshield
washer
fluid -
RearUltra-Clear
Windshield
Washer
ConcentrateWagon 2.1L (70
oz.)
1If your engine coolant is green in color, use Ford
Premium Cooling System Fluid. If your coolant is
orange in color, use Ford Extended Life Engine
Coolant. Refer toLubricant Specifications.
LUBRICANT SPECIFICATIONS
ItemsFord Part
Name or
equivalentFord
Part
NumberFord
Specification
Brake fluid High
Performance
DOT 3
Motor
Vehicle
Brake FluidC6AZ-
19542-ABESA-
M6C25-A and
DOT 3
Door latch,
hood latch,
auxiliary
hood latch,
seat
tracks,
trunk and
liftgate
latchesMulti-
Purpose
GreaseDOAZ-
19584-
AA or
F5AZ-
19G209-
AAESA-
M1C93-B or
ESR-
M1C159-A
Lock
cylindersPenetrating
LubricantE8AZ-
19A501-Bnone
Capacities and specifications
175
Page 180 of 190

IDENTIFYING YOUR VEHICLE
Safety compliance label
The National Highway
Traffic Safety
Administration
Regulations require
that a Safety
Compliance
Certification Label be
affixed to a vehicle and
prescribe where the
Safety Compliance
Certification Label may
be located. The Safety Compliance Certification
Label is located on the front door latch pillar on the
driver's side.
Vehicle identification number
The vehicle
identification number
is attached to a metal
tag and is located on
the driver side
instrument panel.
Engine number
The engine number (the last eight numbers of the
vehicle identification number) is stamped on the
engine block, transmission, frame and transfer case
(if equipped).
MFD. BY FORD MOTOR CO. IN U.S.A.
EXT PNT: XXXXXX XXXXXX RC: XX DSO: XXXX F0000
BAR INT TR TP/PS R AXLE TR SPR T0000
X XX XXX X XX X XXXX
UTC
ÑFOHT-15294A10-GA
MAXIMUM LOAD=OCCUPANTS + LUGGAGE=XXXKG/XXXXLB
OCCUPANTS: X TOTAL X FR X 2ND X RR OCCUPANTS LUGGAGE
XX XXXKG/XXXXLB
TIRE: XXXX/XXXXX XXX X XXXKG/XXXXLB
PRESSURE (FR) XXX kPa/33 PSI COLD
PRESSURE (RR) XXX kPa/33 PSI COLD
TRAILER TOWING - SEE OWNER GUIDE
DATE: XXXXX GVWR:XXXXX LB/ XXXXX KG
VIN: XXXXXXXXXXXXXXXXX TYPE: XXXXXXXXXXXXXXX FGAWR: XXXXXX/XXXXXXX RGAWR: XXXXXXX/XXXXXXXTHIS VEHICLE CONFORMS TO ALL APPLICABLE FEDERAL
MOTOR VEHICLE SAFETY STANDARDS IN EFFECT ON THE
DATE OF MANUFACTURE SHOWN ABOVE.
XXXXXXXXXXXXXXXXXAIR BAG
Capacities and specifications
180
Page 182 of 190

Air bag supplemental
restraint system ........ 66
and child
safety seats ............. 69
description .............. 67
disposal .................... 72
indicator light ......... 72
passenger air bag ... 70
Air conditioning
automatic temperature
control
system . 21,22,23,24,26
Anti-theft system ...... 47
arming the system .. 47
Automatic transaxle . 93
driving
with ........... 96,97,98,99
Brakes ........................ 89
anti-lock ................... 89
anti-lock brake system
(ABS) warning
light .......................... 90
fluid, checking and
adding .................... 133
shift interlock .......... 93
Break-in period ........... 3
Cargo cover .......... 41,42
Cargo net ................... 41
Cellular telephone
(see your Cellular
Phone Guide) ............ 39
Child safety seats
attaching with tether
straps ....................... 78
in rear seat ......... 76,78
tether anchorage
hardware ................. 79
Cleaning your
vehicle ...................... 167
built-in child
seat ..................... 80,83engine
compartment ......... 168
exterior lamps ....... 170
plastic parts .......... 170
washing .................. 167
waxing ................... 168
wheels .................... 168
wiper blades .......... 170
Console ...................... 38
Controls
power seat ............... 55
Coolant ............. 137,138
checking and
adding .................... 135
refill capacities ...... 137
Defrost
rear window ............ 17
Doors
central unlocking 36,37
Emission control
system ...................... 158
Engine
coolant ................... 134
idle speed control . 142
service points . 129,130
starting after a
collision ................. 108
Engine block heater . 87
Engine oil
checking and
adding .................... 132
dipstick .................. 130
specifications . 130,132
Exhaust fumes .......... 87
Floor mats ................. 39
Fuel
choosing the
right fuel ................ 156
detergent in fuel ... 157
filling your vehicle
with fuel ......... 153,155
quality .................... 156
Index
182