oil Mercury Sable 1998 Owner's Manuals
[x] Cancel search | Manufacturer: MERCURY, Model Year: 1998, Model line: Sable, Model: Mercury Sable 1998Pages: 190, PDF Size: 1.29 MB
Page 10 of 190

Speed control (if equipped)
This light comes on
when either the
SET/ACCEL or
RESUME controls are
pressed. It turns off
when the speed control OFF control is pressed, the
brake is applied or the ignition is turned to the OFF
position.
Brake system warning
Momentarily illuminates
when the ignition is
turned to the ON
position and the engine
is off. If brake warning lamp does not illuminate at
this time, seek service immediately. Also illuminates
when the parking brake is engaged. Illumination
after releasing the parking brake indicates low brake
fluid level and the brake system should be inspected
immediately.
Engine oil pressure
Illuminates when the
oil pressure falls below
the normal range. Stop
the vehicle as soon as
safely possible and switch off the engine
immediately. Check the oil level and add oil if
needed. Refer toEngine oilin theMaintenance
and Carechapter.
This lamp also illuminates when the ignition is
turned to ON and the engine is off.
Charging system
Illuminates when the
ignition is turned to
the ON position and
the engine is off. The
light also illuminates when the battery is not
CRUISE
ON
P!
BRAKE
Instrumentation
10
Page 111 of 190

The fuses are coded as follows.
Fuse/
Relay
LocationFuse
Amp
RatingDescription
1 Ð Not Used
2 5A Instrument Illumination
3 10A Left Low Beam Headlamp
4 10A Right Low Beam Headlamp
5 5A Brake Shift Interlock, Rear
Defrost
6 15A MLPS Switch, Backup Lamps,
Speed Control
7 10A MLPS Switch, Starter Relay
8 5A Power Antenna, RCU, GEM
9 10A ABS
10 20A PCM Relay, Ignition Coil,
PATS, Radio
11 5A Instrument Cluster
12 5A Instrument Cluster, Autolamps,
Transmission Control Switch,
ICP, GEM
13 5A Air Bag, Blower Motor, EATC
14 5A Air Suspension
15 10A Multi-Function Switch (Turn
Signal)
16 Ð Not Used
17 30A Front Wiper/Washer
18 5A Headlamp Switch
19 15A Rear Wiper/Washer
20 5A ICP, RAP, Phone
21 20A Cigar Lighter
22 5A Power Mirrors, Power
Antenna, Decklid Lamps,
Autolamp
Roadside emergencies
111
Page 129 of 190

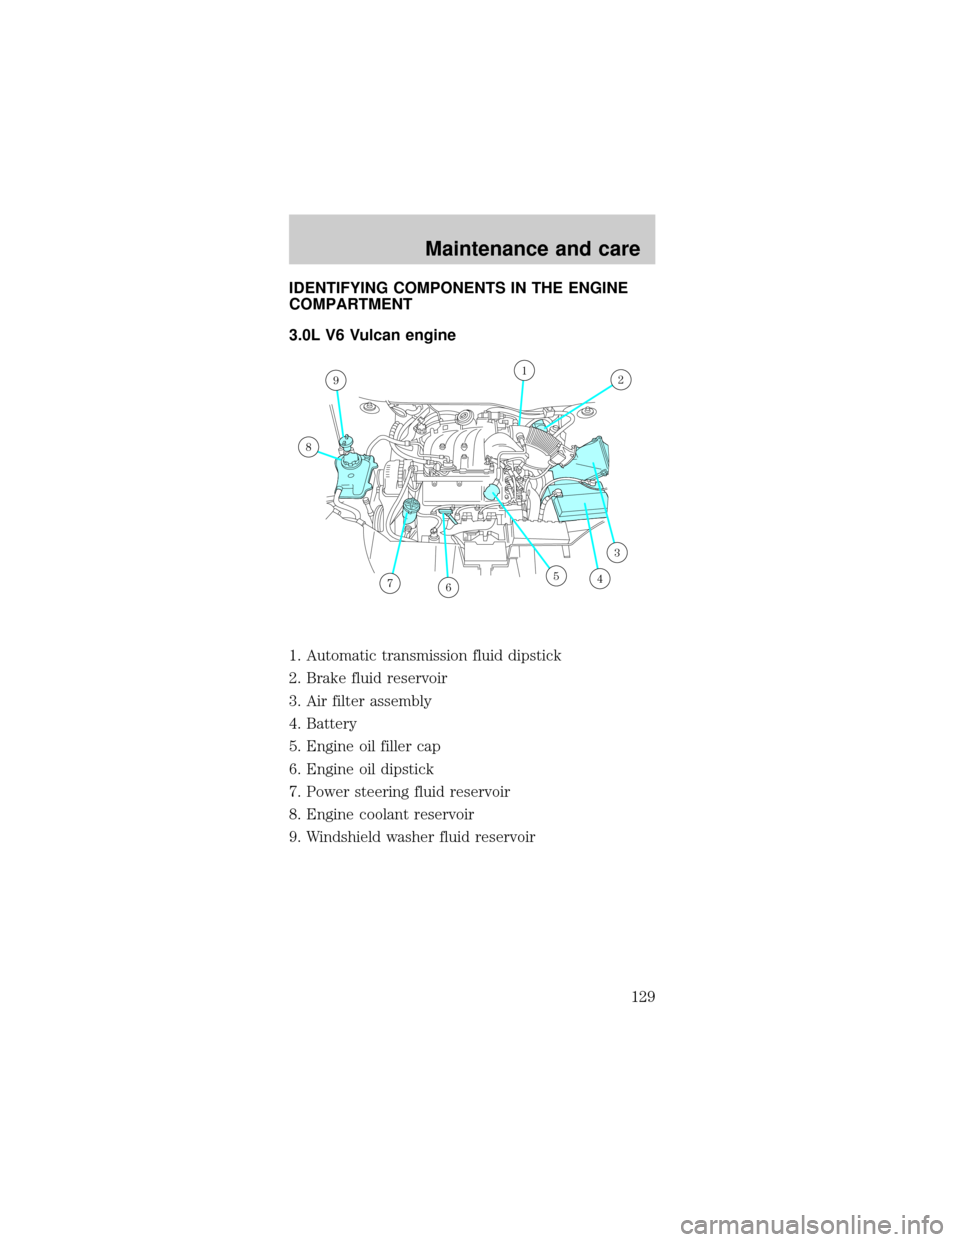
IDENTIFYING COMPONENTS IN THE ENGINE
COMPARTMENT
3.0L V6 Vulcan engine
1. Automatic transmission fluid dipstick
2. Brake fluid reservoir
3. Air filter assembly
4. Battery
5. Engine oil filler cap
6. Engine oil dipstick
7. Power steering fluid reservoir
8. Engine coolant reservoir
9. Windshield washer fluid reservoir
12
3
4567
8
9
Maintenance and care
129
Page 130 of 190

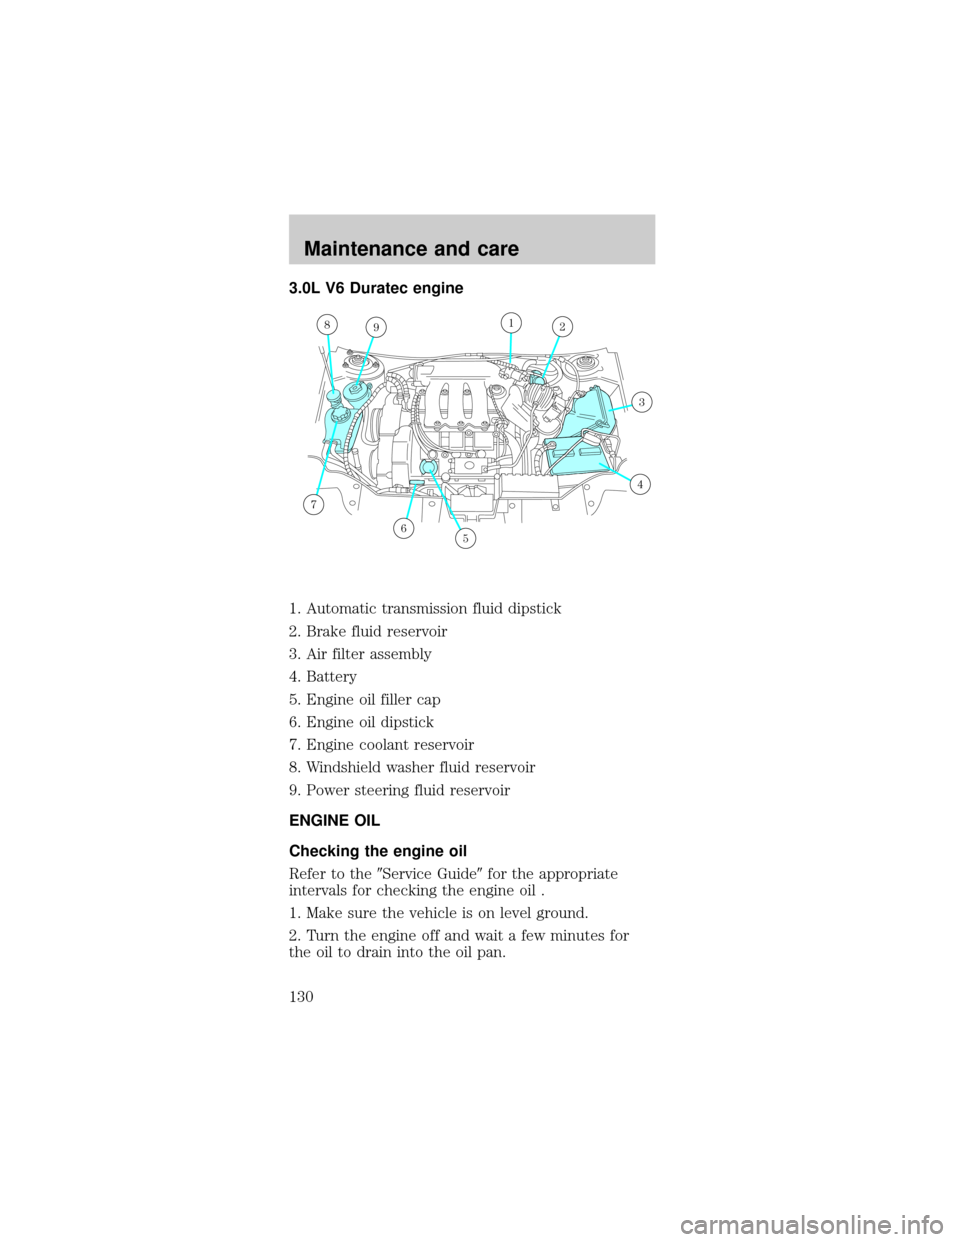
3.0L V6 Duratec engine
1. Automatic transmission fluid dipstick
2. Brake fluid reservoir
3. Air filter assembly
4. Battery
5. Engine oil filler cap
6. Engine oil dipstick
7. Engine coolant reservoir
8. Windshield washer fluid reservoir
9. Power steering fluid reservoir
ENGINE OIL
Checking the engine oil
Refer to the9Service Guide9for the appropriate
intervals for checking the engine oil .
1. Make sure the vehicle is on level ground.
2. Turn the engine off and wait a few minutes for
the oil to drain into the oil pan.
8912
3
4
56
7
Maintenance and care
130
Page 131 of 190

3. Set the parking brake and ensure the gearshift is
securely latched in P.
4. Open the hood. Protect yourself from engine heat.
5. Locate and carefully
remove the engine oil
indicator (dipstick).
6. Wipe the indicator clean. Insert the indicator fully,
then remove it again.
²If the oil level isbetween the ADD and FULL
marks or between the MIN and MAX marks
(depending on application),the oil level is
acceptable.DO NOT ADD OIL.
²If the oil level is
below the ADD or
MIN mark, add
enough oil to raise
the level within the
ADD-FULL or within
the MIN-MAX range.
²Oil levels above the F in FULL or above the MAX
mark, may cause engine damage. Some oil must
be removed from the engine by a service
technician.
7. Put the indicator back in and ensure it is fully
seated.
ADD 1 QTFULL
MAX MIN
Maintenance and care
131
Page 132 of 190

Adding engine oil
1. Check the engine oil. For instructions, refer to
Checking the engine oilin this chapter.
2. If the engine oil level is not within the normal
range, add only certified engine oil of the
recommended viscosity. Remove the engine oil filler
cap and use a funnel to pour the engine oil into the
opening.
3. Recheck the engine oil level. Make sure the oil
level is not above the F in FULL mark on the
dipstick.
Engine oil and filter recommendations
Look for this
certification mark.
Ford oil specification is WSS-M2C153-G.
Use SAE 5W-30 motor oil certified for gasoline
engines by the American Petroleum Institute.
Do not use supplemental engine oil additives, oil
treatments or engine treatments. They are
unnecessary and could, under certain conditions,
lead to engine damage which is not covered by your
warranty.
Change your engine oil and filter according to the
appropriate schedule listed in the ªService Guideº.
Ford production and aftermarket (Motorcraft) oil
filters are designed for added engine protection and
long life. If a replacement oil filter is used that does
not meet Ford material and design specifications,
startup engine noises or knock may be experienced.
It is recommended you use the appropriate
Motorcraft oil filter (or another brand meeting Ford
specifications) for your engine application.
Maintenance and care
132
Page 159 of 190

Do not park, idle, or drive your vehicle in
dry grass or other dry ground cover. The
emission system heats up the engine compartment
and exhaust system, which can start a fire.
Lumination of the charging system warning light,
ªService Engine Soonº light or the temperature
warning light, fluid leaks, strange odors, smoke or
loss of oil pressure, could indicate that the emission
control system is not working properly.
Exhaust leaks may result in entry of harmful
and potentially lethal fumes into the
passenger compartment.
Do not make any unauthorized changes to your
vehicle or engine. By law, vehicle owners and anyone
who manufactures, repairs, items, sells, leases,
trades vehicles, or supervises a fleet of vehicles are
not permitted to intentionally remove an emission
control device or prevent it from working.
Information about your vehicle's emission system is
on the Vehicle Emission Control Information Decal
located on or near the engine. This decal identifies
engine displacement and gives some tune up
specifications.
Please consult your ªWarranty Guideº for complete
emission warranty information.
Readiness for inspection/maintenance (I/M)
testing
In some localities, it may be a legal requirement to
pass an I/M test of the on-board diagnostic (OBD-II)
system. If your ªCheck Engine/Service Engine Soonº
light is on, refer to the description in theWarning
Lights and Chimessection of theInstrumentation
chapter. Your vehicle may not pass the I/M test with
the ªCheck Engine/Service Engine Soonº light on.
Maintenance and care
159
Page 161 of 190

Replacing headlamp bulbs
Handle a halogen headlamp bulb carefully
and keep out of children's reach. Grasp the
bulb only by its plastic base and do not touch the
glass. The oil from your hand could cause the bulb
to break the next time the headlamps are
operated.
If the bulb is accidentally touched, it should be
cleaned with rubbing alcohol before being used.
To remove the headlamp bulb:
1. Make sure headlamp switch is in OFF position,
then open the hood. If you are replacing the driver
side headlamp, unclip the electronic module on the
right side of the battery and move it out of the way.
2. Locate the headlamp bulb through the hole in the
upper radiator support assembly.
3. Release clip and
disconnect the
electrical connector
from the bulb.
4. Remove the bulb
retaining ring by
rotating it
counterclockwise
(when viewed from the
rear) about 1/8 turn to
free it from the bulb socket, and slide the ring off
the plastic base. Keep the ring to retain the new
bulb.
5. With out turning, remove the old bulb from the
lamp assembly by gently pulling it straight out of the
lamp assembly.
Maintenance and care
161
Page 168 of 190

Waxing your vehicle
Wax when water stops beading on the surface. This
could be every three or four months, depending on
operating conditions.
Use only carnauba or synthetic-based waxes. Use
cleaning fluid or alcohol with a clean cloth to remove
any bugs and tar before waxing vehicle. Use tar
remover to remove any tar spots.
Avoid getting wax on the windshield. If you have
wax applied at a commercial car wash, it is
recommended that you clean the wiper blades and
windshield as described inCleaning the wiper
blades and windshield.
Repairing paint chips
Minor scratches or paint damage from road debris
may be repaired with touch-up paint, repair foil or
aerosol paint spray from the Ford accessory line.
Observe the application instructions on the
products.
Remove particles such as bird droppings, tree sap,
insect remains, tar spots, road salt and industrial
fallout immediately.
Cleaning the wheels
Wash with the same detergent as the body of your
vehicle. Do not use acid-based or alcohol-based
wheel cleaners, steel wool, fuel or strong detergents.
Never use abrasives that will damage the finish of
special wheel surfaces. Use a tar remover to remove
grease and tar.
Cleaning the engine
Engines are more efficient when they are clean
because grease and dirt buildup keep the engine
warmer than normal. When washing:
²Take care when using a power washer to clean
the engine. The high pressure fluid could
penetrate the sealed parts and cause damage.
Maintenance and care
168
Page 171 of 190

Cleaning the interior fabric
Remove dust and loose dirt with a whisk broom or a
vacuum cleaner. Remove fresh spots immediately. Do
not use household or glass cleaners. These agents
can stain and discolor the fabric. Use a mild soap
and water solution if necessary.
Cleaning leather seats (if equipped)
For routine cleaning, wipe the surface with a soft,
damp cloth. For more thorough cleaning, wipe the
surface with a mild soap.
If the leather cannot be completely cleaned using a
mild soap and water solution, the leather may be
cleaned using a commercially available cleaning
product ªTanners Preserve Leather Cleanerº and a
3M ªType T' scrubbing pad by using the following
steps;
The type of scrubbing pad is very critical
because the common 3M ªScotch Briteº green
pad is too aggressive and will damage the
leather surface
²Spray a small amount of the leather cleaner on
the pad and rub the area to be cleaned with the
pad using a circular motion. Only clean 1/4 of the
area at a time. For heavily soiled areas, spray the
cleaner directly onto the leather (two squirts
should be adequate) and rub with the pad. Repeat
if necessary.
²Use a soft, damp cloth to remove the loosened
dirt and foam.
²Dry with a soft cloth.
Do not use household cleaners, glass cleaner,
alcohol solutions or cleaner intended for vinyl,
rubber or plastics. These products can damage
the leather.
In some instances, color or dye transfer can
occur when wet clothing (wool, denim, leathers
or other non-colorfast garments) comes in
Maintenance and care
171