brake fluid Mercury Sable 2000 Owner's Manuals
[x] Cancel search | Manufacturer: MERCURY, Model Year: 2000, Model line: Sable, Model: Mercury Sable 2000Pages: 232, PDF Size: 2.09 MB
Page 4 of 232
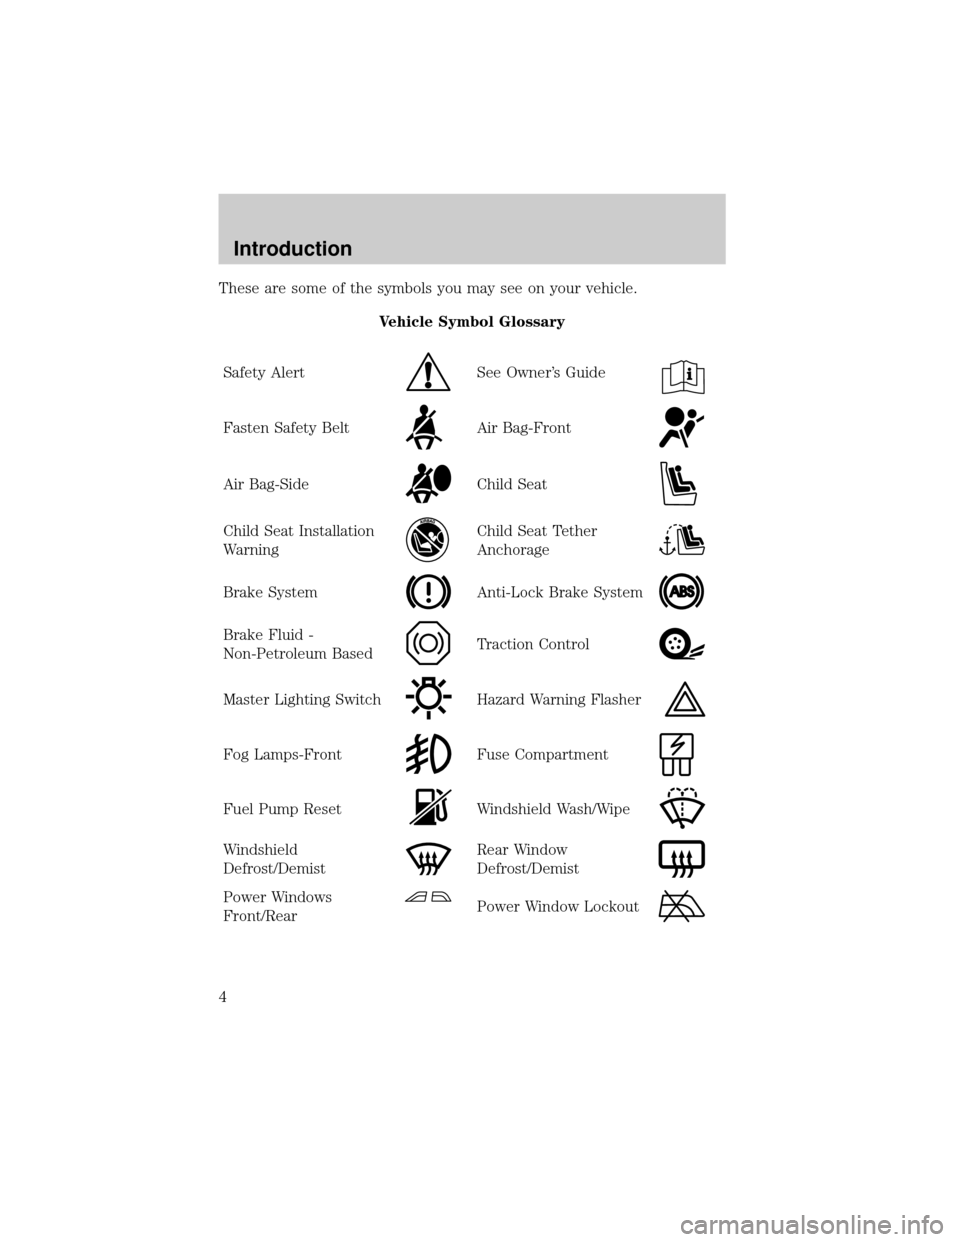
These are some of the symbols you may see on your vehicle.
Vehicle Symbol Glossary
Safety Alert
See Owner's Guide
Fasten Safety BeltAir Bag-Front
Air Bag-SideChild Seat
Child Seat Installation
WarningChild Seat Tether
Anchorage
Brake SystemAnti-Lock Brake System
Brake Fluid -
Non-Petroleum BasedTraction Control
Master Lighting SwitchHazard Warning Flasher
Fog Lamps-FrontFuse Compartment
Fuel Pump ResetWindshield Wash/Wipe
Windshield
Defrost/DemistRear Window
Defrost/Demist
Power Windows
Front/RearPower Window Lockout
Introduction
4
Page 12 of 232
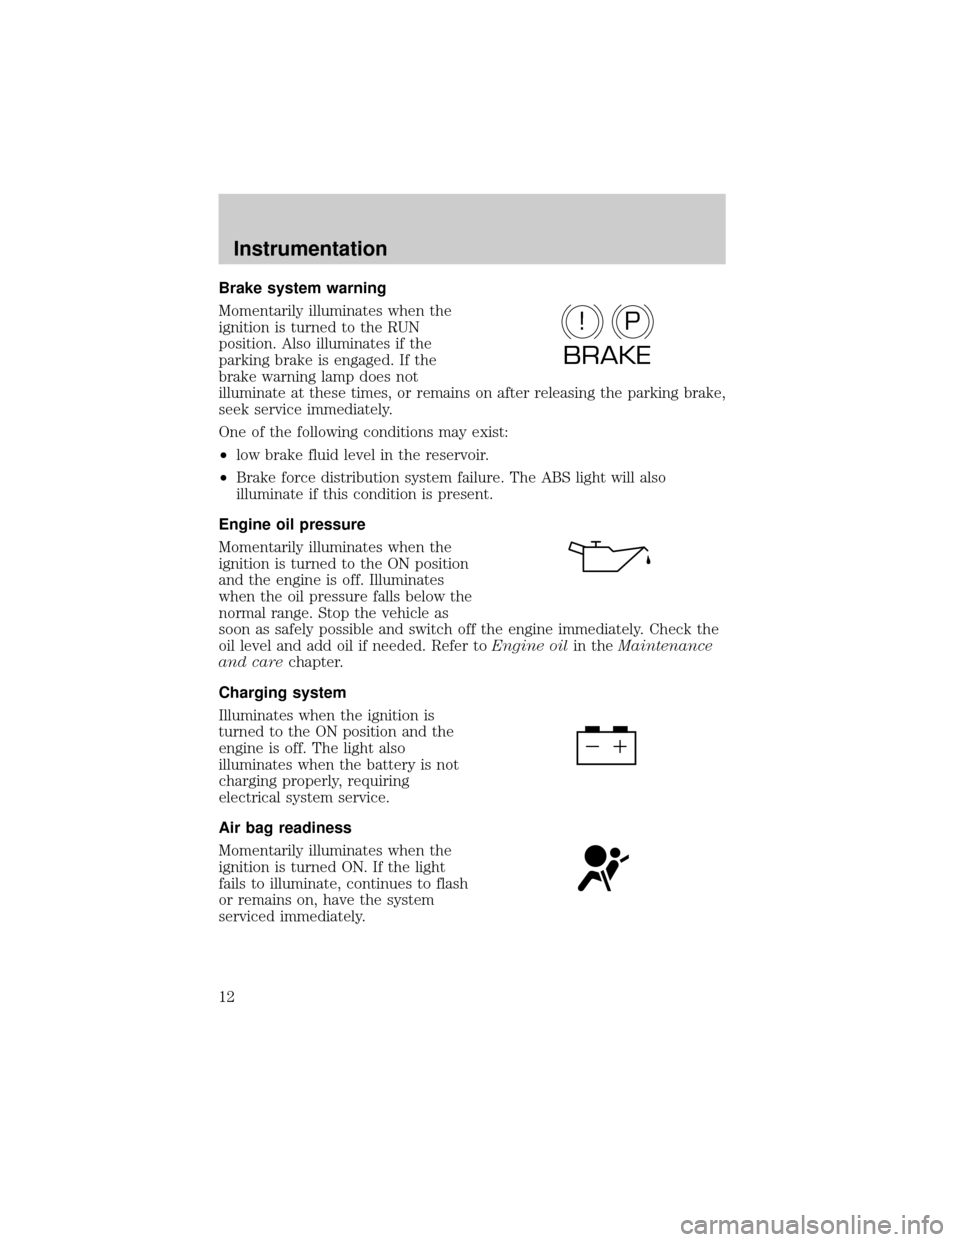
Brake system warning
Momentarily illuminates when the
ignition is turned to the RUN
position. Also illuminates if the
parking brake is engaged. If the
brake warning lamp does not
illuminate at these times, or remains on after releasing the parking brake,
seek service immediately.
One of the following conditions may exist:
²low brake fluid level in the reservoir.
²Brake force distribution system failure. The ABS light will also
illuminate if this condition is present.
Engine oil pressure
Momentarily illuminates when the
ignition is turned to the ON position
and the engine is off. Illuminates
when the oil pressure falls below the
normal range. Stop the vehicle as
soon as safely possible and switch off the engine immediately. Check the
oil level and add oil if needed. Refer toEngine oilin theMaintenance
and carechapter.
Charging system
Illuminates when the ignition is
turned to the ON position and the
engine is off. The light also
illuminates when the battery is not
charging properly, requiring
electrical system service.
Air bag readiness
Momentarily illuminates when the
ignition is turned ON. If the light
fails to illuminate, continues to flash
or remains on, have the system
serviced immediately.
P!
BRAKE
Instrumentation
12
Page 122 of 232

When parking, do not use the gearshift in place of the parking
brake. Always set the parking brake fully and make sure that the
gearshift is securely latched in Park (P). Turn off the ignition
whenever you leave your vehicle. Never leave your vehicle unattended
while it is running. If you do not take these precautions, your vehicle
may move unexpectedly and injure someone.
VEHICLE LOADING
Before loading a vehicle, familiarize yourself with the following terms:
²Base Curb Weight:Weight of the vehicle including any standard
equipment, fluids, lubricants, etc. It does not include passengers or
aftermarket equipment.
²Payload:Combined maximum allowable weight of cargo, passengers
and optional equipment. The payload equals the gross vehicle weight
rating minus base curb weight.
²GVW (Gross Vehicle Weight):Base curb weight plus payload
weight. The GVW is not a limit or a specification.
²GVWR (Gross Vehicle Weight Rating):Maximum total weight of
the base vehicle, passengers, optional equipment and cargo. The
GVWR is specific to each vehicle and is listed on the Safety
Certification Label on the driver's door pillar.
²GAWR (Gross Axle Weight Rating):Carrying capacity for each axle
system. The GAWR is specific to each vehicle and is listed on the
Safety Certification Label on the driver's door pillar.
²GCW (Gross Combined Weight):The combined weight of the
towing vehicle (including passengers and cargo) and the trailer.
²GCWR (Gross Combined Weight Rating):Maximum combined
weight of towing vehicle (including passengers and cargo) and the
trailer. The GCWR indicates the maximum loaded weight that the
vehicle is designed to tow.
²Maximum Trailer Weight Rating:Maximum weight of a trailer the
vehicle is permitted to tow. The maximum trailer weight rating is
determined by subtracting the vehicle curb weight for each
engine/transmission combination, any required option weight for trailer
towing and the weight of the driver from the GCWR for the towing
vehicle.
Driving
122
Page 147 of 232

SERVICE RECOMMENDATIONS
To help you service your vehicle:
²We highlight do-it-yourself items in the engine compartment for easy
location.
²We provide a Scheduled Maintenance Guide which makes tracking
routine service easy.
If your vehicle requires professional service, your dealership can provide
necessary parts and service. Check your ªWarranty Guideº to find out
which parts and services are covered.
Use only recommended fuels, lubricants, fluids and service parts
conforming to specifications. Motorcraft parts are designed and built to
provide the best performance in your vehicle.
PRECAUTIONS WHEN SERVICING YOUR VEHICLE
Be especially careful when inspecting or servicing your vehicle.
²Do not work on a hot engine.
²When the engine is running, keep loose clothing, jewelry or long hair
away from moving parts.
²Do not work on a vehicle with the engine running in an enclosed
space, unless you are sure you have enough ventilation.
²Keep all lit cigarettes, open flames and other lit material away from
the battery and all fuel related parts.
If you disconnect the battery, the engine must ªrelearnº its idle
conditions before your vehicle will drive properly, as explained in the
Batterysection in this chapter.
Working with the engine off
1. Set the parking brake, and ensure the gearshift is securely latched in
park.
2. Turn off the engine and remove the key.
3. Block the wheels to prevent the vehicle from moving unexpectedly.
Working with the engine on
1. Set the parking brake and ensure the gearshift is securely latched in
P (Park).
2. Block the wheels to prevent the vehicle from moving unexpectedly.
Maintenance and care
147
Page 149 of 232
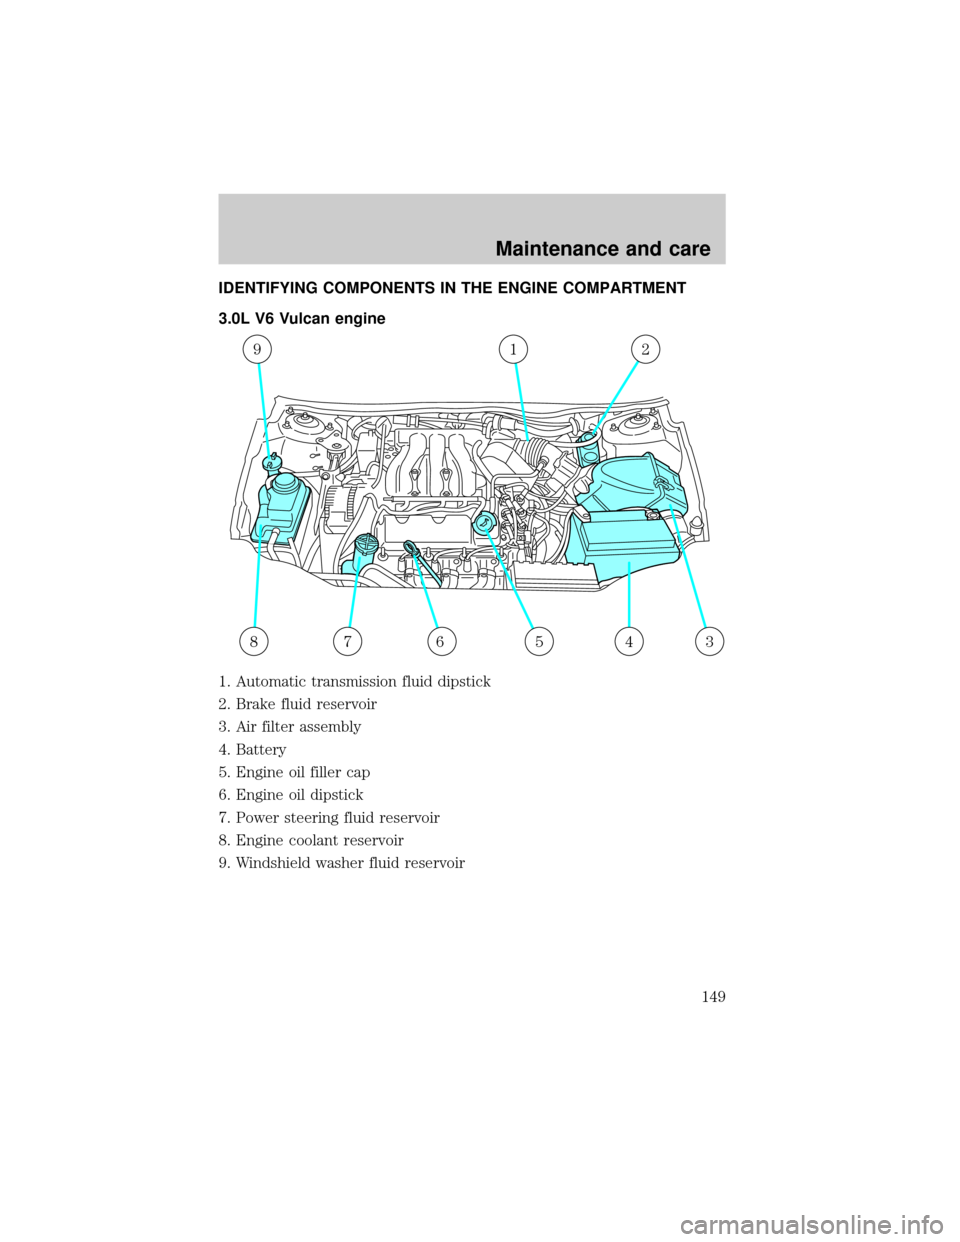
IDENTIFYING COMPONENTS IN THE ENGINE COMPARTMENT
3.0L V6 Vulcan engine
1. Automatic transmission fluid dipstick
2. Brake fluid reservoir
3. Air filter assembly
4. Battery
5. Engine oil filler cap
6. Engine oil dipstick
7. Power steering fluid reservoir
8. Engine coolant reservoir
9. Windshield washer fluid reservoir
786 543
912
Maintenance and care
149
Page 150 of 232
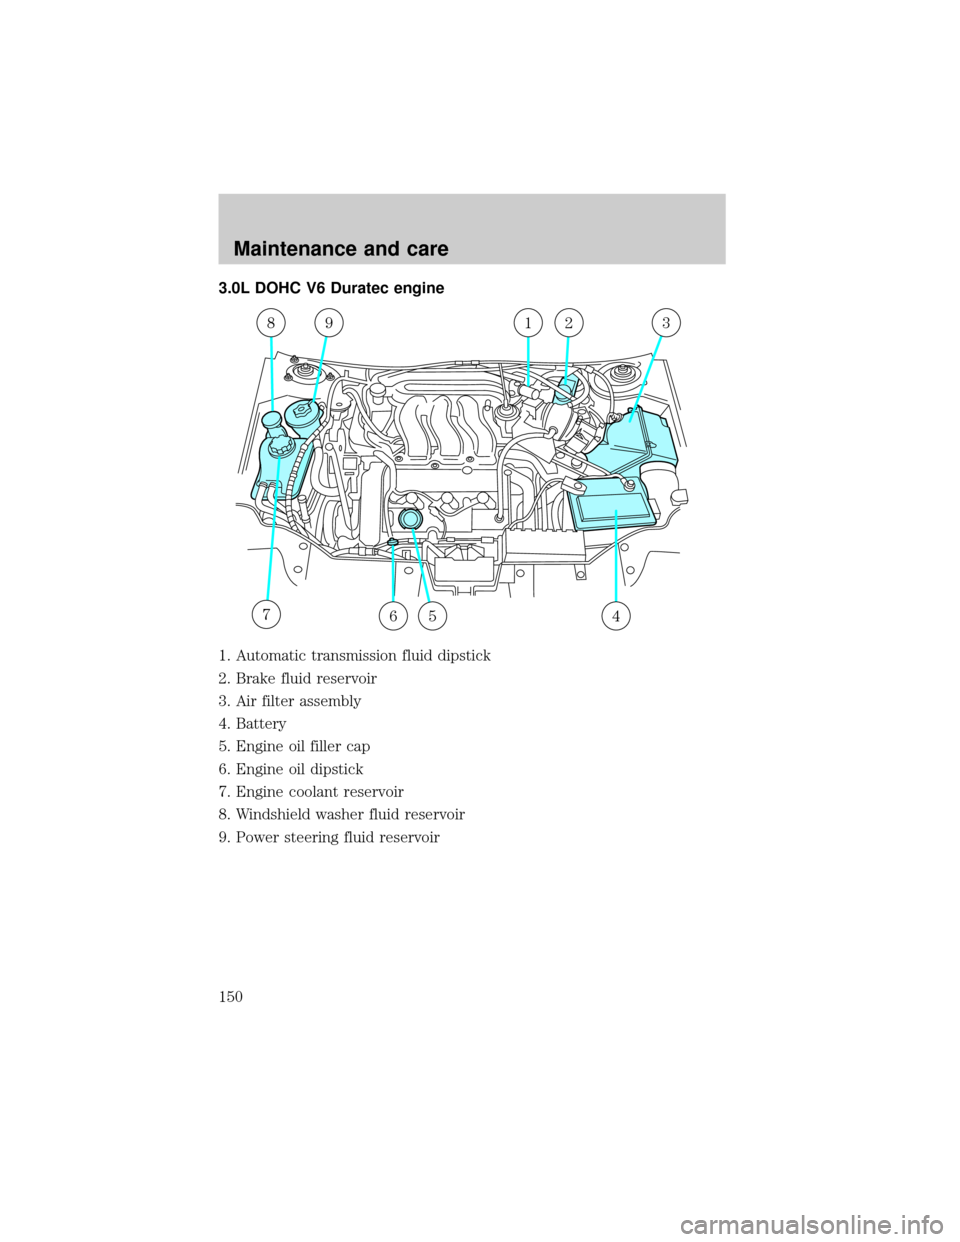
3.0L DOHC V6 Duratec engine
1. Automatic transmission fluid dipstick
2. Brake fluid reservoir
3. Air filter assembly
4. Battery
5. Engine oil filler cap
6. Engine oil dipstick
7. Engine coolant reservoir
8. Windshield washer fluid reservoir
9. Power steering fluid reservoir
7654
89123
Maintenance and care
150
Page 154 of 232

BRAKE FLUID
Checking and adding brake fluid
Brake fluid should be checked and
refilled as needed. Refer to the
Scheduled Maintenance Guide for
the service interval schedules.
1. Clean the reservoir cap before
removal to prevent dirt or water
from entering the reservoir.
2. Visually inspect the fluid level.
3. If necessary, add brake fluid from
a clean un-opened container until
the level reaches MAX. Do not fill
above this line.
4. Use only a DOT 3 brake fluid
certified to meet Ford specifications. Refer toLubricant specifications
in theCapacities and specificationschapter.
Brake fluid is toxic. If brake fluid contacts the eyes, flush eyes
with running water for 15 minutes. Seek medical attention if
irritation persists. If taken internally, drink water and induce vomiting.
Seek medical attention immediately.
If you use a brake fluid that is not DOT 3, you will cause
permanent damage to your brakes.
Do not let the reservoir for the master cylinder run dry. This
may cause the brakes to fail.
MAX
Maintenance and care
154
Page 163 of 232
![Mercury Sable 2000 Owners Manuals Automatic transmission fluid expands when warmed. To obtain an
accurate fluid check, drive the vehicle until it is warmed up
(approximately 30 km [20 miles]). If your vehicle has been
operated for an Mercury Sable 2000 Owners Manuals Automatic transmission fluid expands when warmed. To obtain an
accurate fluid check, drive the vehicle until it is warmed up
(approximately 30 km [20 miles]). If your vehicle has been
operated for an](/img/33/11162/w960_11162-162.png)
Automatic transmission fluid expands when warmed. To obtain an
accurate fluid check, drive the vehicle until it is warmed up
(approximately 30 km [20 miles]). If your vehicle has been
operated for an extended period at high speeds, in city traffic
during hot weather or pulling a trailer, the vehicle should be
turned off for about 30 minutes to allow fluid to cool before
checking.
1. Drive the vehicle 30 km (20 miles) or until it reaches normal operating
temperature.
2. Park the vehicle on a level surface and engage the parking brake.
3. With the parking brake engaged and your foot on the brake pedal,
start the engine and move the gearshift lever through all of the gear
ranges. Allow sufficient time for each gear to engage.
4. Latch the gearshift lever in P (Park) and leave the engine running.
5. Remove the dipstick, wiping it clean with a clean, dry lint free rag. If
necessary, refer toIdentifying components in the engine compartment
in this chapter for the location of the dipstick.
6. Install the dipstick making sure it is fully seated in the filler tube.
7. Remove the dipstick and inspect the fluid level. The fluid should be in
the designated areas for normal operating temperature.
Low fluid level
Do not drive the vehicle if the fluid
level is at the bottom of the dipstick
and the outside temperatures are
above 10ÉC (50ÉF).
Correct fluid level
The transmission fluid should be checked at normal operating
temperatures 66ÉC-77ÉC (150ÉF-170ÉF) on a level surface. The normal
operating temperature can be reached after approximately 30 km (20
miles) of driving.
The transmission fluid should be in
this range if at normal operating
temperature (66ÉC-77ÉC
[150ÉF-170ÉF]).
DON’T ADD IF IN CROSSHATCH AREA--CHECH WHEN HOT-IDLING
DON’T ADD IF IN CROSSHATCH AREA--CHECH WHEN HOT-IDLING
Maintenance and care
163
Page 198 of 232

Washing your vehicle
Wash your vehicle regularly with
cold or lukewarm water. Never use
strong detergents or soap. If your
vehicle is particularly dirty, use a
quality car wash detergent. Always
use a clean sponge, washing glove
or similar device and plenty of water
for best results. To avoid spots,
avoid washing when the hood is still
warm, immediately after or during
exposure to strong sunlight.
During winter months, it is especially important to wash the vehicle on a
regular basis. Large quantities of dirt and road salt are difficult to
remove and also cause damage to the vehicle.
Any gasoline spilled on the vehicle or deposits such as bird droppings
should be washed and sponged off as soon as possible. Deposits not
removed promptly can cause damage to the vehicle's paintwork.
Remove any exterior accessories, such as antennas, before entering a car
wash. If you have wax applied to the vehicle at a commercial car wash, it
is recommended that you clean the wiper blades and windshield as
described inCleaning the wiper blades and windshield.
After washing, apply the brakes several times to dry them.
Waxing your vehicle
Waxing your vehicle on a regular basis will reduce minor scratches and
paint damage.
Wax when water stops beading on the surface. This could be every three
or four months, depending on operating conditions.
Use only carnauba or synthetic-based waxes. Use a cleaning fluid with a
clean cloth to remove any bugs before waxing your vehicle. Use tar
remover to remove any tar spots.
Avoid getting wax on the windshield, or on any surfaces which appear
coarse or bumpy. If you have wax applied at a commercial car wash, it is
recommended that you clean the wiper blades and windshield as
described inCleaning the wiper blades and windshield.
Maintenance and care
198
Page 205 of 232
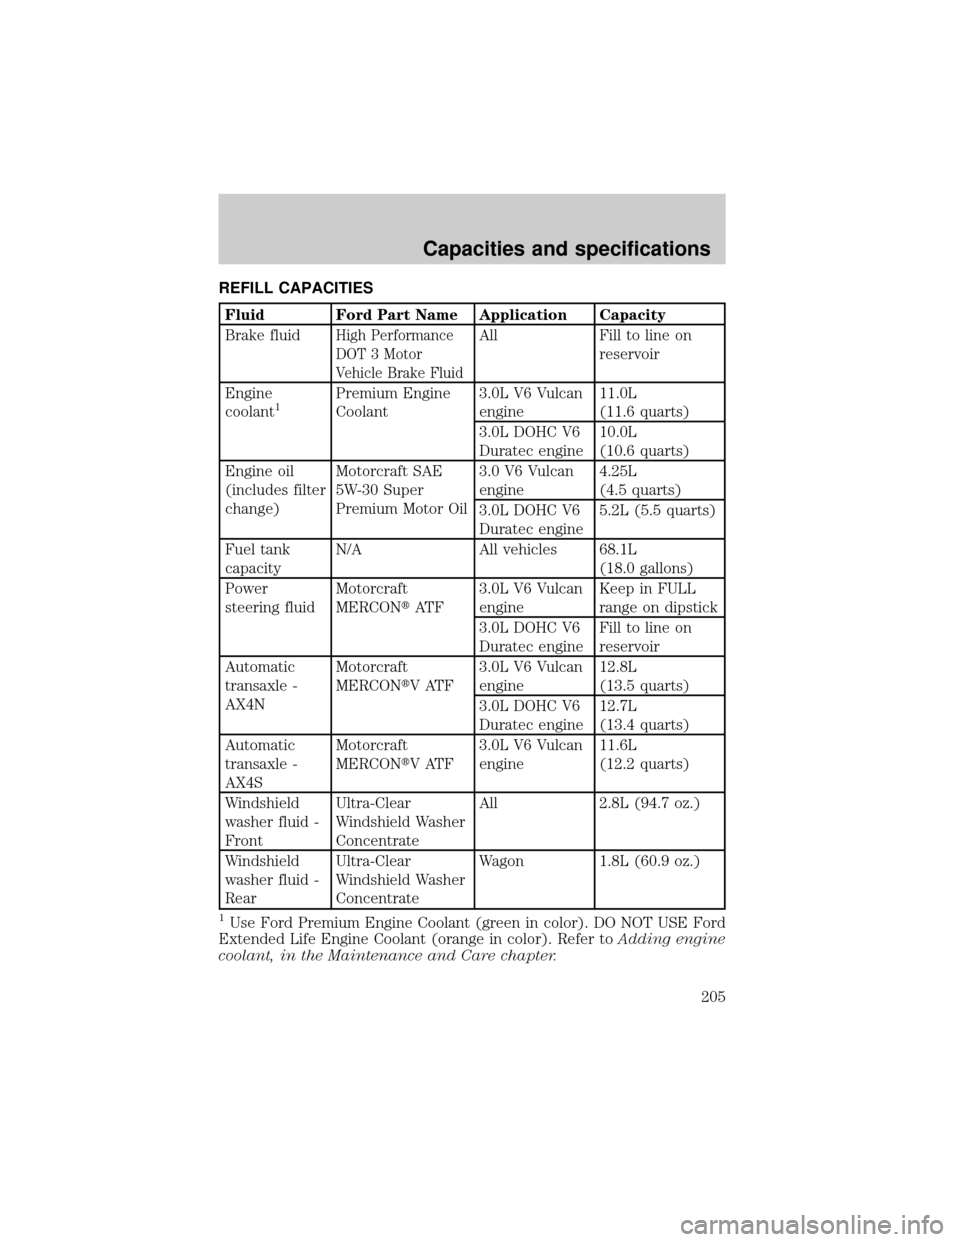
REFILL CAPACITIES
Fluid Ford Part Name Application Capacity
Brake fluid
High Performance
DOT 3 Motor
Vehicle Brake FluidAll Fill to line on
reservoir
Engine
coolant
1Premium Engine
Coolant3.0L V6 Vulcan
engine11.0L
(11.6 quarts)
3.0L DOHC V6
Duratec engine10.0L
(10.6 quarts)
Engine oil
(includes filter
change)Motorcraft SAE
5W-30 Super
Premium Motor Oil3.0 V6 Vulcan
engine4.25L
(4.5 quarts)
3.0L DOHC V6
Duratec engine5.2L (5.5 quarts)
Fuel tank
capacityN/A All vehicles 68.1L
(18.0 gallons)
Power
steering fluidMotorcraft
MERCONtAT F3.0L V6 Vulcan
engineKeep in FULL
range on dipstick
3.0L DOHC V6
Duratec engineFill to line on
reservoir
Automatic
transaxle -
AX4NMotorcraft
MERCONtVATF3.0L V6 Vulcan
engine12.8L
(13.5 quarts)
3.0L DOHC V6
Duratec engine12.7L
(13.4 quarts)
Automatic
transaxle -
AX4SMotorcraft
MERCONtVATF3.0L V6 Vulcan
engine11.6L
(12.2 quarts)
Windshield
washer fluid -
FrontUltra-Clear
Windshield Washer
ConcentrateAll 2.8L (94.7 oz.)
Windshield
washer fluid -
RearUltra-Clear
Windshield Washer
ConcentrateWagon 1.8L (60.9 oz.)
1Use Ford Premium Engine Coolant (green in color). DO NOT USE Ford
Extended Life Engine Coolant (orange in color). Refer toAdding engine
coolant, in the Maintenance and Care chapter.
Capacities and specifications
205