lock Mercury Sable 2002 s Repair Manual
[x] Cancel search | Manufacturer: MERCURY, Model Year: 2002, Model line: Sable, Model: Mercury Sable 2002Pages: 240, PDF Size: 3.53 MB
Page 160 of 240
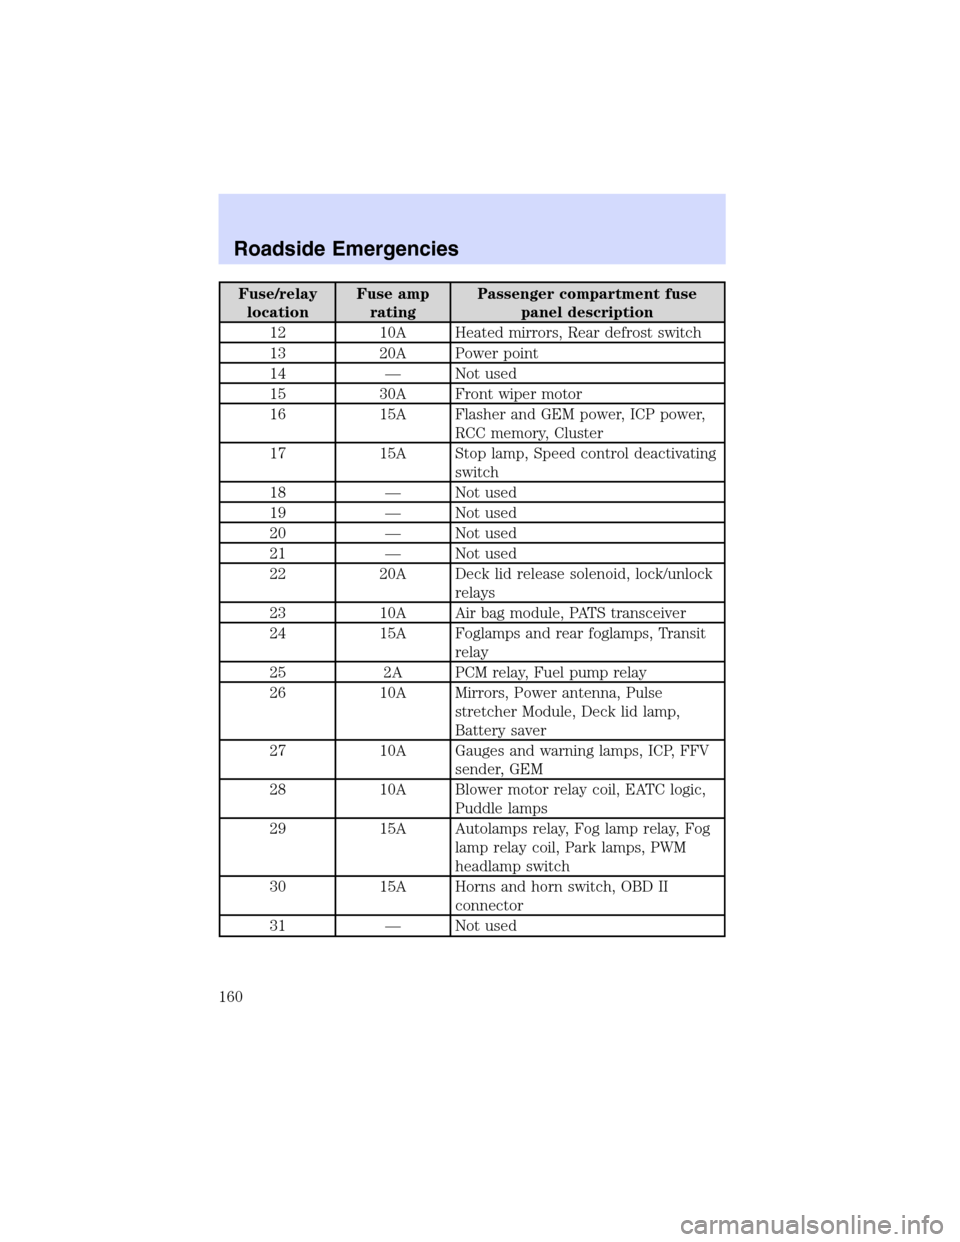
Fuse/relay
locationFuse amp
ratingPassenger compartment fuse
panel description
12 10A Heated mirrors, Rear defrost switch
13 20A Power point
14—Not used
15 30A Front wiper motor
16 15A Flasher and GEM power, ICP power,
RCC memory, Cluster
17 15A Stop lamp, Speed control deactivating
switch
18—Not used
19—Not used
20—Not used
21—Not used
22 20A Deck lid release solenoid, lock/unlock
relays
23 10A Air bag module, PATS transceiver
24 15A Foglamps and rear foglamps, Transit
relay
25 2A PCM relay, Fuel pump relay
26 10A Mirrors, Power antenna, Pulse
stretcher Module, Deck lid lamp,
Battery saver
27 10A Gauges and warning lamps, ICP, FFV
sender, GEM
28 10A Blower motor relay coil, EATC logic,
Puddle lamps
29 15A Autolamps relay, Fog lamp relay, Fog
lamp relay coil, Park lamps, PWM
headlamp switch
30 15A Horns and horn switch, OBD II
connector
31—Not used
Roadside Emergencies
160
Page 161 of 240
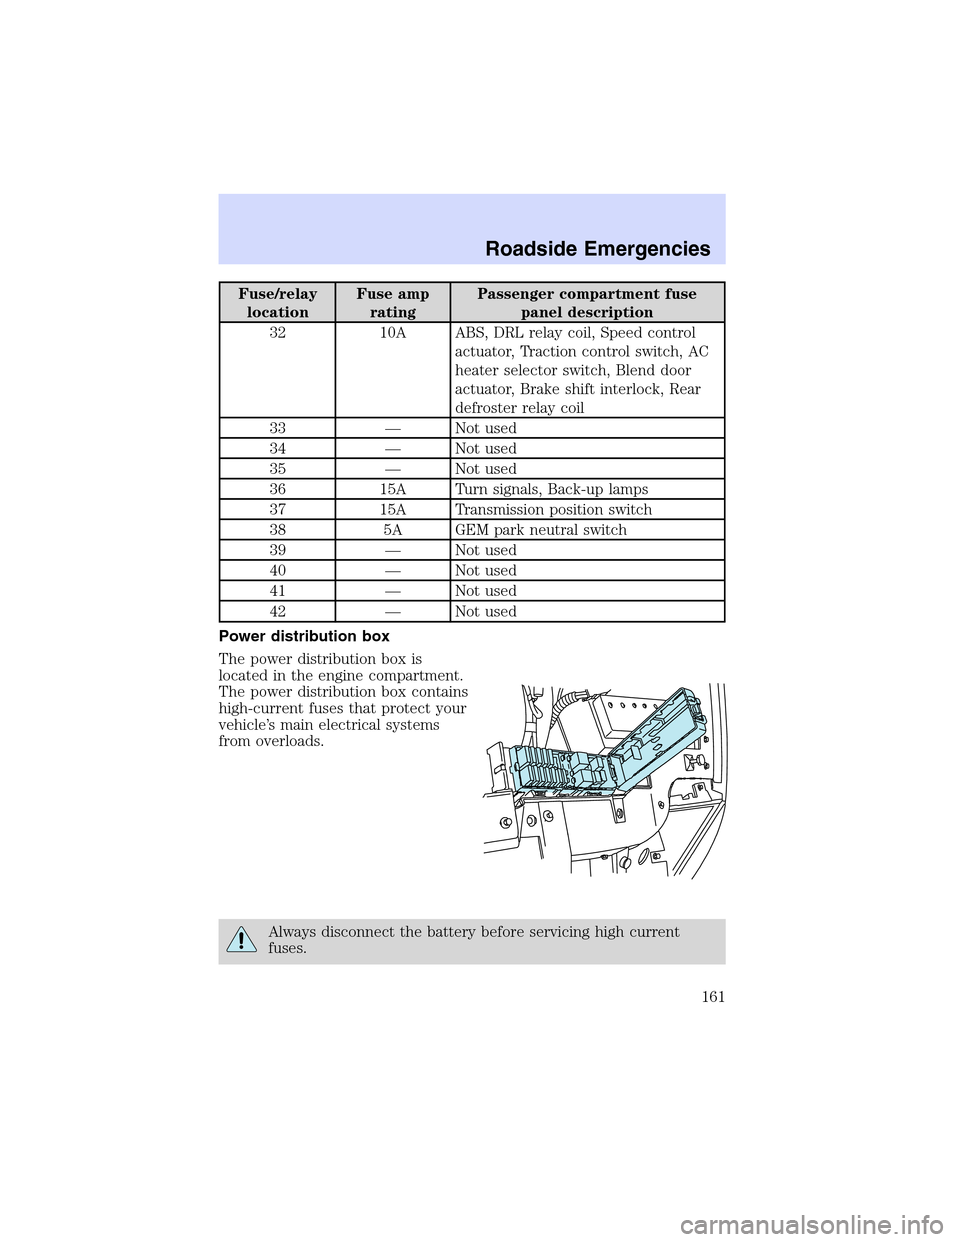
Fuse/relay
locationFuse amp
ratingPassenger compartment fuse
panel description
32 10A ABS, DRL relay coil, Speed control
actuator, Traction control switch, AC
heater selector switch, Blend door
actuator, Brake shift interlock, Rear
defroster relay coil
33—Not used
34—Not used
35—Not used
36 15A Turn signals, Back-up lamps
37 15A Transmission position switch
38 5A GEM park neutral switch
39—Not used
40—Not used
41—Not used
42—Not used
Power distribution box
The power distribution box is
located in the engine compartment.
The power distribution box contains
high-current fuses that protect your
vehicle’s main electrical systems
from overloads.
Always disconnect the battery before servicing high current
fuses.
Roadside Emergencies
161
Page 163 of 240
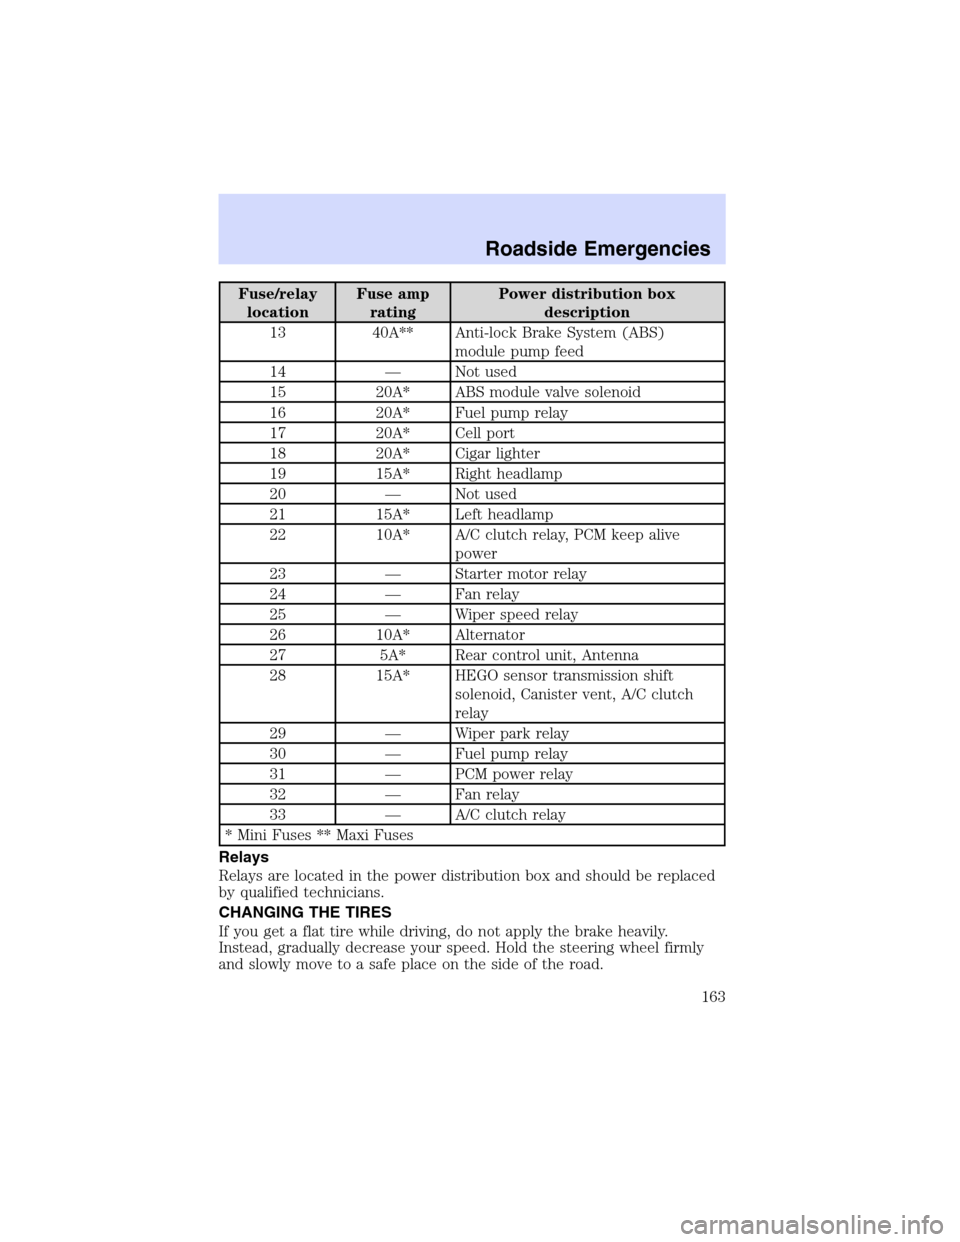
Fuse/relay
locationFuse amp
ratingPower distribution box
description
13 40A** Anti-lock Brake System (ABS)
module pump feed
14—Not used
15 20A* ABS module valve solenoid
16 20A* Fuel pump relay
17 20A* Cell port
18 20A* Cigar lighter
19 15A* Right headlamp
20—Not used
21 15A* Left headlamp
22 10A* A/C clutch relay, PCM keep alive
power
23—Starter motor relay
24—Fan relay
25—Wiper speed relay
26 10A* Alternator
27 5A* Rear control unit, Antenna
28 15A* HEGO sensor transmission shift
solenoid, Canister vent, A/C clutch
relay
29—Wiper park relay
30—Fuel pump relay
31—PCM power relay
32—Fan relay
33—A/C clutch relay
* Mini Fuses ** Maxi Fuses
Relays
Relays are located in the power distribution box and should be replaced
by qualified technicians.
CHANGING THE TIRES
If you get a flat tire while driving, do not apply the brake heavily.
Instead, gradually decrease your speed. Hold the steering wheel firmly
and slowly move to a safe place on the side of the road.
Roadside Emergencies
163
Page 165 of 240
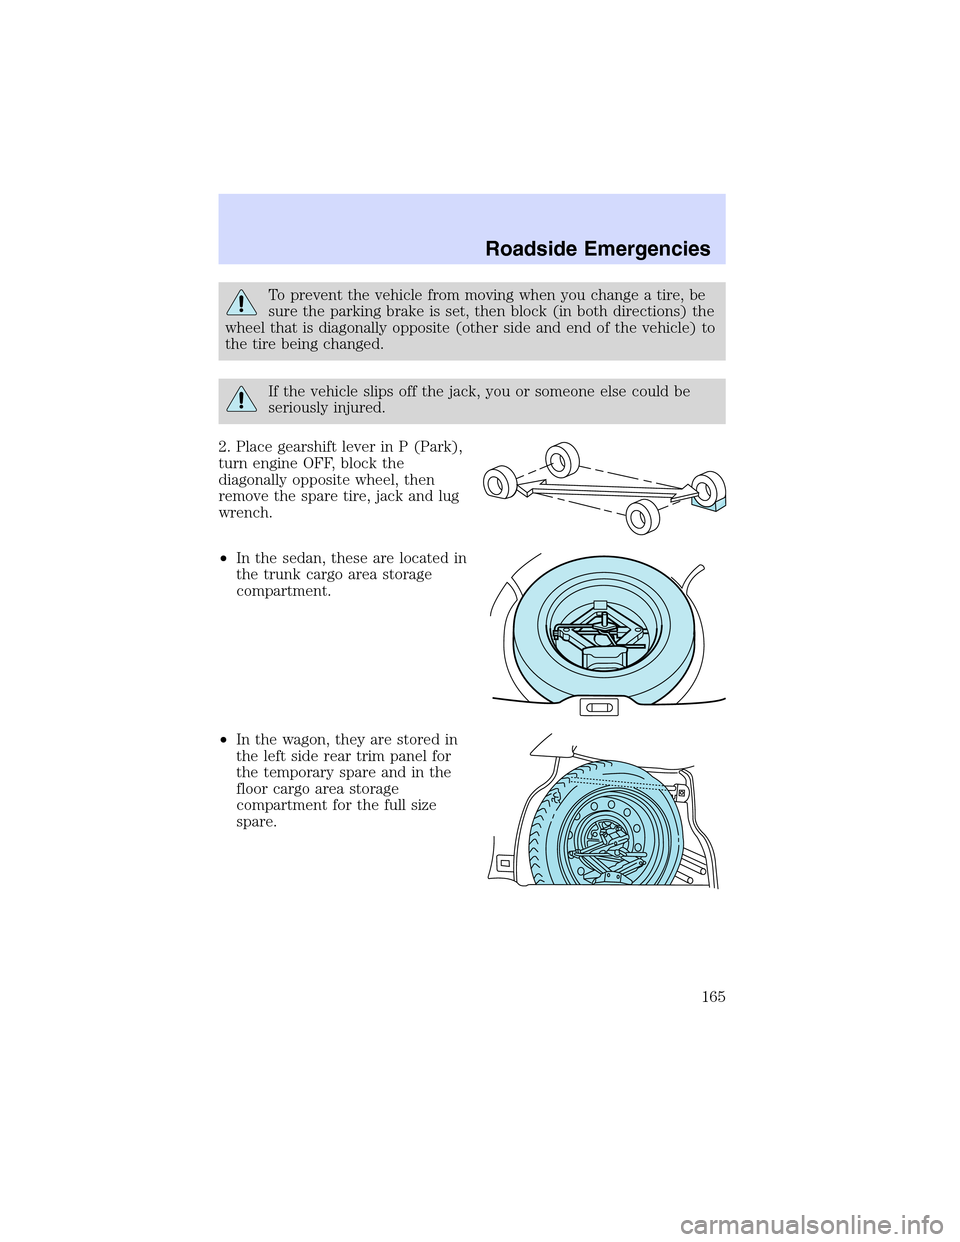
To prevent the vehicle from moving when you change a tire, be
sure the parking brake is set, then block (in both directions) the
wheel that is diagonally opposite (other side and end of the vehicle) to
the tire being changed.
If the vehicle slips off the jack, you or someone else could be
seriously injured.
2. Place gearshift lever in P (Park),
turn engine OFF, block the
diagonally opposite wheel, then
remove the spare tire, jack and lug
wrench.
•In the sedan, these are located in
the trunk cargo area storage
compartment.
•In the wagon, they are stored in
the left side rear trim panel for
the temporary spare and in the
floor cargo area storage
compartment for the full size
spare.
Roadside Emergencies
165
Page 166 of 240
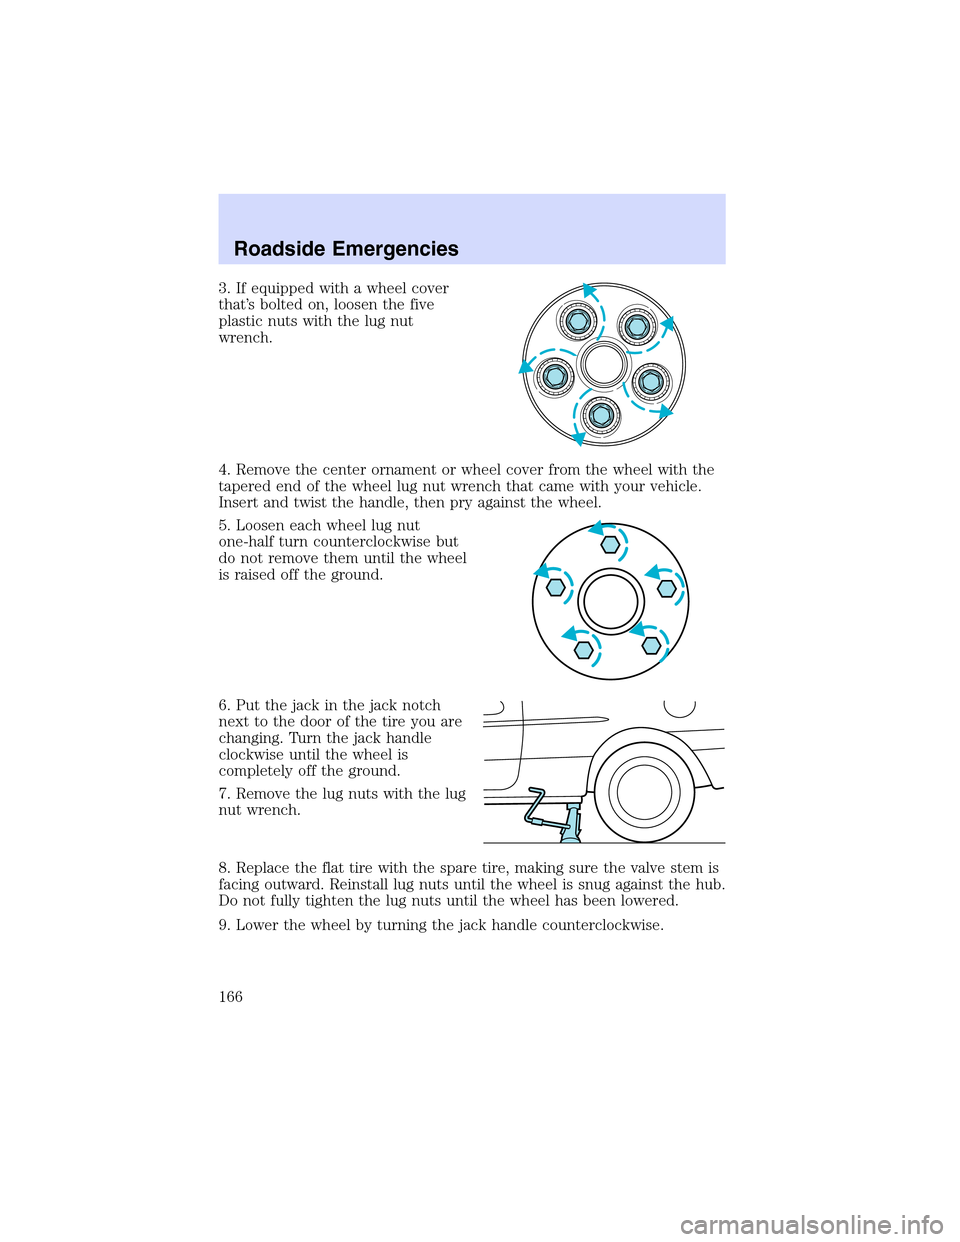
3. If equipped with a wheel cover
that’s bolted on, loosen the five
plastic nuts with the lug nut
wrench.
4. Remove the center ornament or wheel cover from the wheel with the
tapered end of the wheel lug nut wrench that came with your vehicle.
Insert and twist the handle, then pry against the wheel.
5. Loosen each wheel lug nut
one-half turn counterclockwise but
do not remove them until the wheel
is raised off the ground.
6. Put the jack in the jack notch
next to the door of the tire you are
changing. Turn the jack handle
clockwise until the wheel is
completely off the ground.
7. Remove the lug nuts with the lug
nut wrench.
8. Replace the flat tire with the spare tire, making sure the valve stem is
facing outward. Reinstall lug nuts until the wheel is snug against the hub.
Do not fully tighten the lug nuts until the wheel has been lowered.
9. Lower the wheel by turning the jack handle counterclockwise.
Roadside Emergencies
166
Page 167 of 240
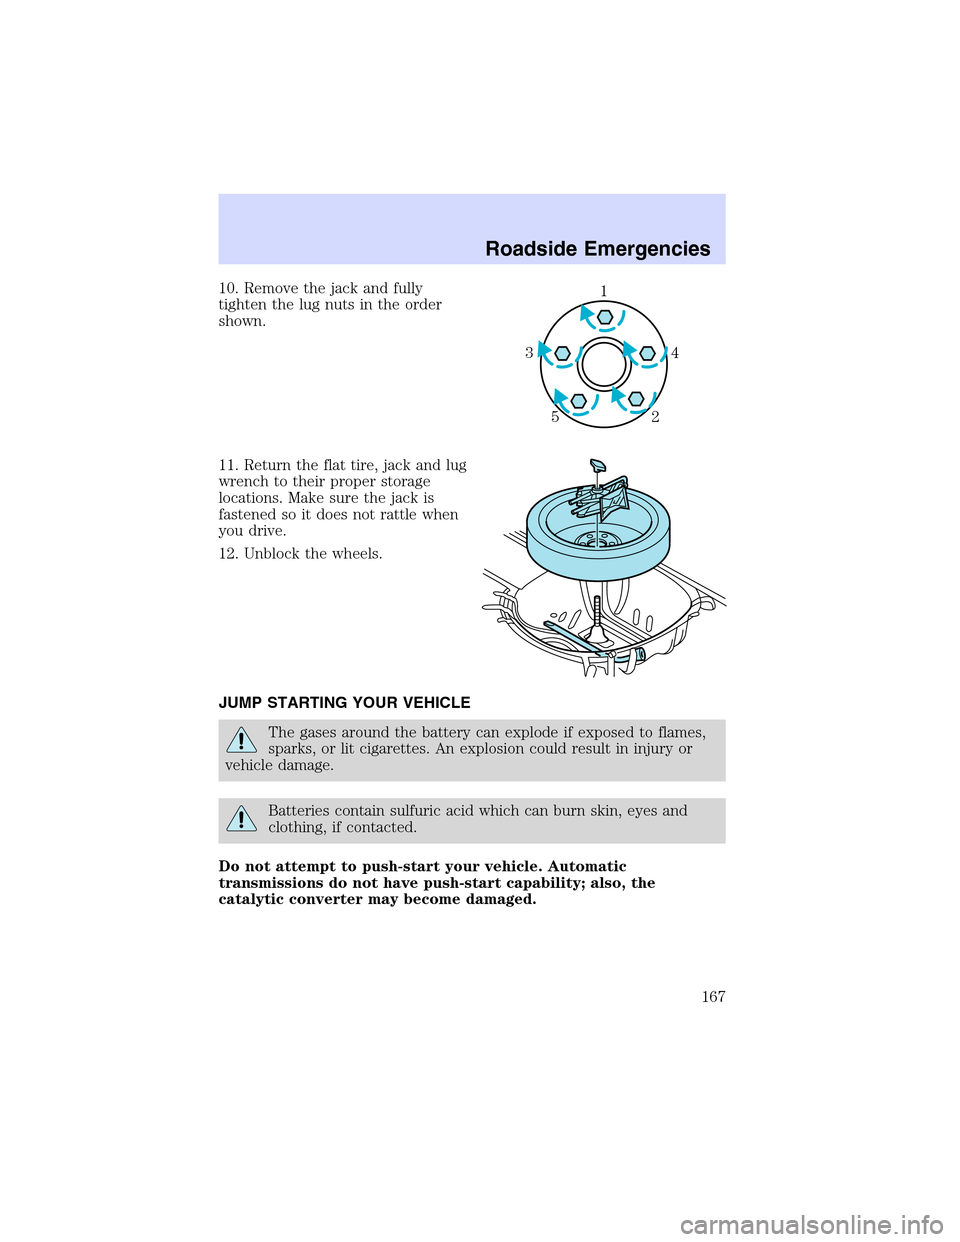
10. Remove the jack and fully
tighten the lug nuts in the order
shown.
11. Return the flat tire, jack and lug
wrench to their proper storage
locations. Make sure the jack is
fastened so it does not rattle when
you drive.
12. Unblock the wheels.
JUMP STARTING YOUR VEHICLE
The gases around the battery can explode if exposed to flames,
sparks, or lit cigarettes. An explosion could result in injury or
vehicle damage.
Batteries contain sulfuric acid which can burn skin, eyes and
clothing, if contacted.
Do not attempt to push-start your vehicle. Automatic
transmissions do not have push-start capability; also, the
catalytic converter may become damaged.
1
4 3
2 5
Roadside Emergencies
167
Page 185 of 240
•Remove particles such as bird droppings, tree sap, insect deposits, tar
spots, road salt and industrial fallout before repairing paint chips.
•Always read the instructions before using the products.
ALUMINUM WHEELS AND COVERS
Aluminum wheel rims or covers are coated with a clearcoat paint finish.
In order to maintain their shine:
•Clean with Motorcraft Wheel and Tire Cleaner (ZC-37–A), which is
available from your dealer.
•Never apply any cleaning chemical to hot or warm wheel rims or
covers.
•Some automatic car washes may cause damage to the finish on your
wheel rims or covers. Chemical-strength cleaners, or cleaning
chemicals, in combination with brush agitation to remove brake dust
and dirt, could wear away the clearcoat finish over time.
•Do not use hydrofluoric acid-based or high caustic-based wheel
cleaners, steel wool, fuels or strong household detergent.
•To remove tar and grease, use Ford Extra Strength Tar and Road Oil
Removal (B7A-19520–AA), available from your dealer.
ENGINE
Engines are more efficient when they are clean because grease and dirt
buildup keep the engine warmer than normal. When washing:
•Take care when using a power washer to clean the engine. The
high-pressure fluid could penetrate the sealed parts and cause
damage.
•Do not spray a hot engine with cold water to avoid cracking the
engine block or other engine components.
•Spray Motorcraft Engine Shampoo and Degreaser (ZC-20) on all parts
that require cleaning and pressure rinse clean.
•Cover the highlighted areas to prevent water damage when cleaning
the engine.
Cleaning
185
Page 190 of 240
SERVICE RECOMMENDATIONS
To help you service your vehicle:
•We highlight do-it-yourself items in the engine compartment for easy
location.
•We provide a scheduled maintenance guide which makes tracking
routine service easy.
If your vehicle requires professional service, your dealership can provide
the necessary parts and service. Check yourWarranty Guide/Owner
Information Guideto find out which parts and services are covered.
Use only recommended fuels, lubricants, fluids and service parts
conforming to specifications. Motorcraft parts are designed and built to
provide the best performance in your vehicle.
PRECAUTIONS WHEN SERVICING YOUR VEHICLE
Be especially careful when inspecting or servicing your vehicle.
•Do not work on a hot engine.
•When the engine is running, keep loose clothing, jewelry or long hair
away from moving parts.
•Do not work on a vehicle with the engine running in an enclosed
space, unless you are sure you have enough ventilation.
•Keep all lit cigarettes, open flames and other lit material away from
the battery and all fuel related parts.
If you disconnect the battery, the engine must“relearn”its idle
conditions before your vehicle will drive properly, as explained in the
Batterysection in this chapter.
Working with the engine off
1. Set the parking brake, and ensure the gearshift is securely latched in
(P) park.
2. Turn off the engine and remove the key.
3. Block the wheels to prevent the vehicle from moving unexpectedly.
Working with the engine on
1. Set the parking brake and ensure the gearshift is securely latched in P
(Park).
2. Block the wheels to prevent the vehicle from moving unexpectedly.
Note:Do not start your engine with the air cleaner removed and do not
remove it while the engine is running.
Maintenance and Specifications
190
Page 197 of 240
Adding engine oil
1. Check the engine oil. For instructions, refer toChecking the engine
oilin this chapter.
2. If the engine oil level is not within the normal range, add only certified
engine oil of the recommended viscosity. Remove the engine oil filler cap
and use a funnel to pour the engine oil into the opening.
3. Recheck the engine oil level. Make sure the oil level is not above the
MAX mark or the letter F in FULL on the engine oil level indicator
(dipstick).
4. Install the indicator and ensure it is fully seated.
5. Fully install the engine oil filler cap by turning the filler cap clockwise
until it stops.
To avoid possible oil loss, DO NOT operate the vehicle with the
engine oil level indicator and/or the engine oil filler cap removed.
Engine oil and filter recommendations
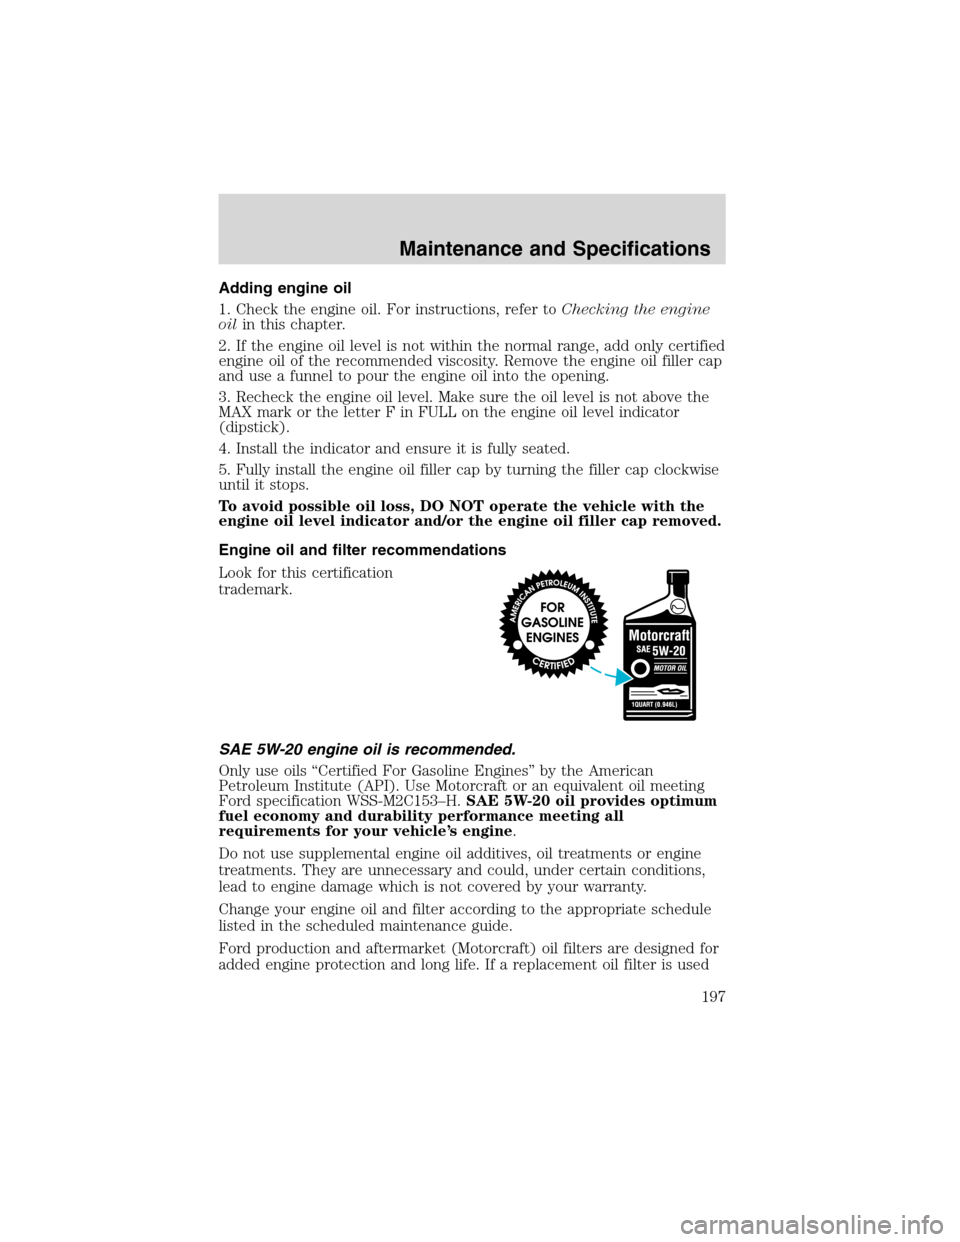
Look for this certification
trademark.
SAE 5W-20 engine oil is recommended.
Only use oils“Certified For Gasoline Engines”by the American
Petroleum Institute (API). Use Motorcraft or an equivalent oil meeting
Ford specification WSS-M2C153–H.SAE 5W-20 oil provides optimum
fuel economy and durability performance meeting all
requirements for your vehicle’s engine.
Do not use supplemental engine oil additives, oil treatments or engine
treatments. They are unnecessary and could, under certain conditions,
lead to engine damage which is not covered by your warranty.
Change your engine oil and filter according to the appropriate schedule
listed in the scheduled maintenance guide.
Ford production and aftermarket (Motorcraft) oil filters are designed for
added engine protection and long life. If a replacement oil filter is used
Maintenance and Specifications
197
Page 199 of 240
When lifting a plastic-cased battery, excessive pressure on the
end walls could cause acid to flow through the vent caps,
resulting in personal injury and/or damage to the vehicle or battery.
Lift the battery with a battery carrier or with your hands on opposite
corners.
Keep batteries out of reach of children. Batteries contain sulfuric
acid. Avoid contact with skin, eyes or clothing. Shield your eyes
when working near the battery to protect against possible splashing of
acid solution. In case of acid contact with skin or eyes, flush
immediately with water for a minimum of 15 minutes and get prompt
medical attention. If acid is swallowed, call a physician immediately.
Battery posts, terminals and related accessories contain lead and
lead compounds.Wash hands after handling.
Because your vehicle’s engine is electronically controlled by a computer,
some control conditions are maintained by power from the battery. When
the battery is disconnected or a new battery is installed, the engine must
relearn its idle and fuel trim strategy for optimum driveability and
performance. To begin this process:
1. With the vehicle at a complete stop, set the parking brake.
2. Put the gearshift in P (Park), turn off all accessories and start the
engine.
3. Run the engine until it reaches normal operating temperature.
4. Allow the engine to idle for at least one minute.
5. Turn the A/C on and allow the engine to idle for at least one minute.
6. Release the parking brake. With your foot on the brake pedal and with
the A/C on, put the vehicle in D (Drive) and allow the engine to idle for
at least one minute.
7. Drive the vehicle to complete the relearning process.
•The vehicle may need to be driven 16 km (10 miles) or more to
relearn the idle and fuel trim strategy.
•If you do not allow the engine to relearn its idle trim, the idle
quality of your vehicle may be adversely affected until the idle
trim is eventually relearned.
If the battery has been disconnected or a new battery has been installed,
the clock and radio settings must be reset once the battery is
reconnected.
Maintenance and Specifications
199