Bulbs Mercury Sable 2002 Owner's Manuals
[x] Cancel search | Manufacturer: MERCURY, Model Year: 2002, Model line: Sable, Model: Mercury Sable 2002Pages: 240, PDF Size: 3.53 MB
Page 51 of 240
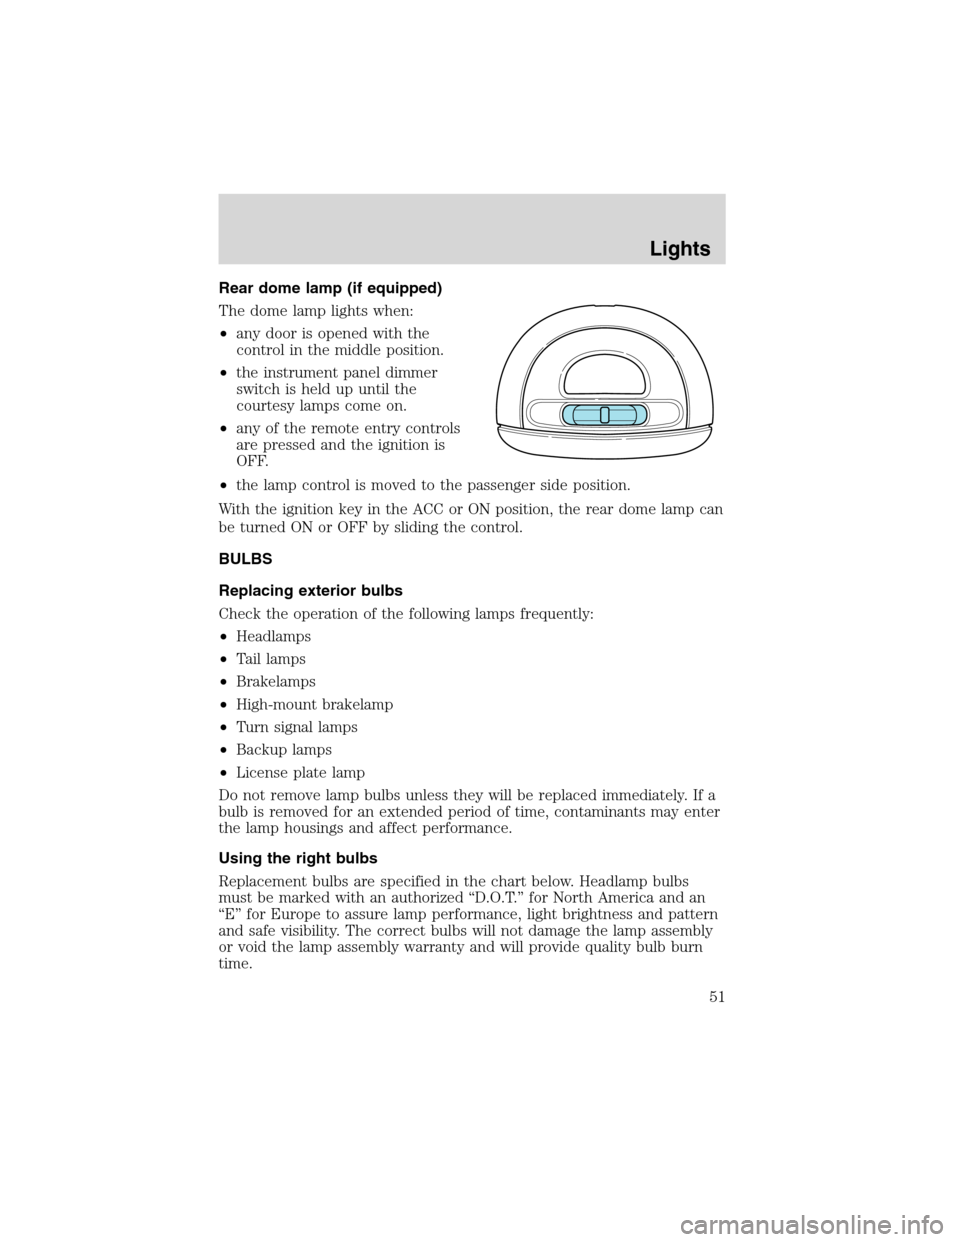
Rear dome lamp (if equipped)
The dome lamp lights when:
•any door is opened with the
control in the middle position.
•the instrument panel dimmer
switch is held up until the
courtesy lamps come on.
•any of the remote entry controls
are pressed and the ignition is
OFF.
•the lamp control is moved to the passenger side position.
With the ignition key in the ACC or ON position, the rear dome lamp can
be turned ON or OFF by sliding the control.
BULBS
Replacing exterior bulbs
Check the operation of the following lamps frequently:
•Headlamps
•Tail lamps
•Brakelamps
•High-mount brakelamp
•Turn signal lamps
•Backup lamps
•License plate lamp
Do not remove lamp bulbs unless they will be replaced immediately. If a
bulb is removed for an extended period of time, contaminants may enter
the lamp housings and affect performance.
Using the right bulbs
Replacement bulbs are specified in the chart below. Headlamp bulbs
must be marked with an authorized“D.O.T.”for North America and an
“E”for Europe to assure lamp performance, light brightness and pattern
and safe visibility. The correct bulbs will not damage the lamp assembly
or void the lamp assembly warranty and will provide quality bulb burn
time.
Lights
51
Page 52 of 240
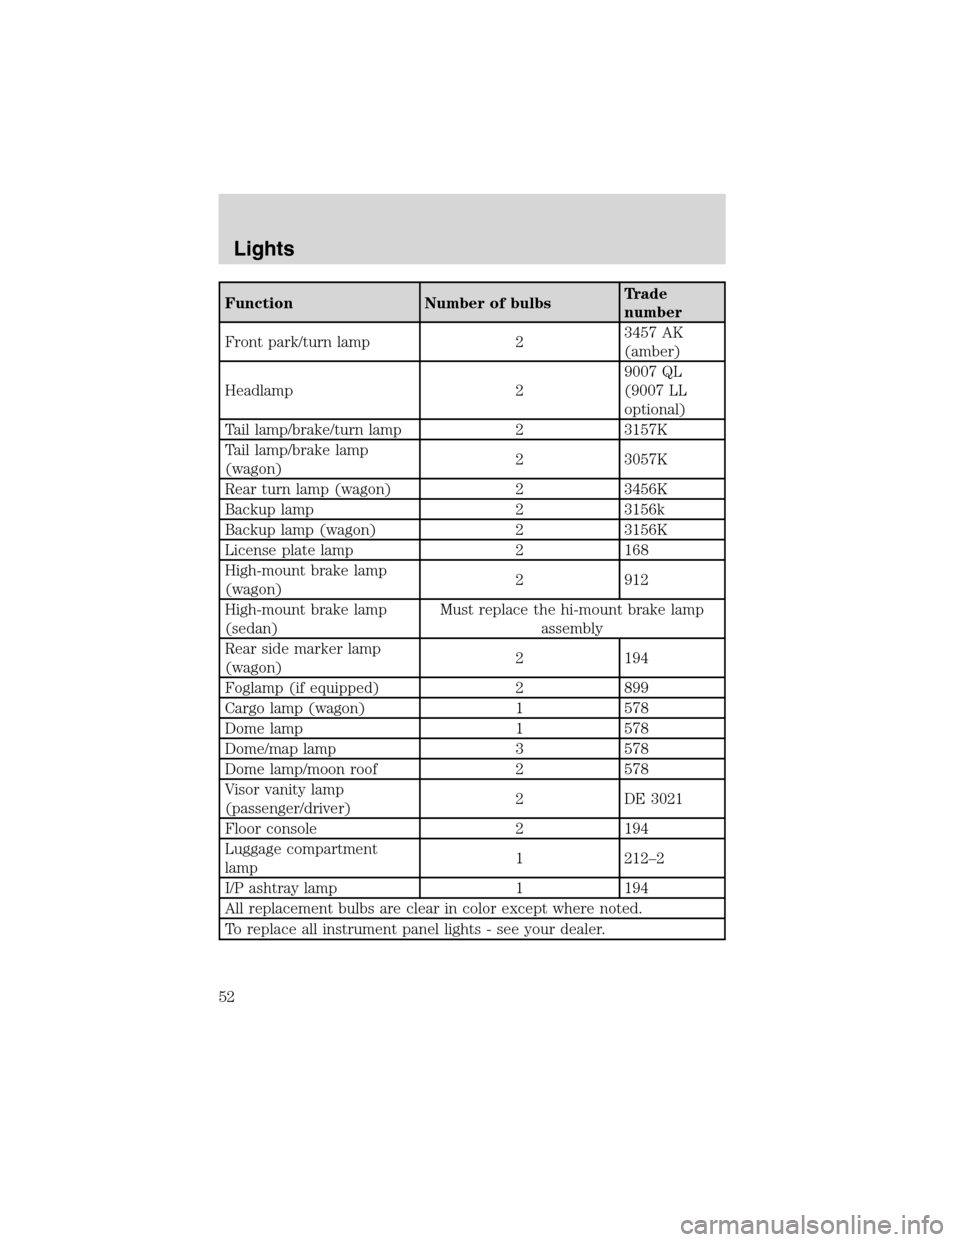
Function Number of bulbsTrade
number
Front park/turn lamp 23457 AK
(amber)
Headlamp 29007 QL
(9007 LL
optional)
Tail lamp/brake/turn lamp 2 3157K
Tail lamp/brake lamp
(wagon)2 3057K
Rear turn lamp (wagon) 2 3456K
Backup lamp 2 3156k
Backup lamp (wagon) 2 3156K
License plate lamp 2 168
High-mount brake lamp
(wagon)2 912
High-mount brake lamp
(sedan)Must replace the hi-mount brake lamp
assembly
Rear side marker lamp
(wagon)2 194
Foglamp (if equipped) 2 899
Cargo lamp (wagon) 1 578
Dome lamp 1 578
Dome/map lamp 3 578
Dome lamp/moon roof 2 578
Visor vanity lamp
(passenger/driver)2 DE 3021
Floor console 2 194
Luggage compartment
lamp1 212–2
I/P ashtray lamp 1 194
All replacement bulbs are clear in color except where noted.
To replace all instrument panel lights - see your dealer.
Lights
52
Page 53 of 240
Replacing the interior bulbs
Check the operation of the following interior bulbs frequently:
•Interior overhead lamp
•Map lamp
For bulb replacement, see a dealer or qualified technician.
Replacing headlamp bulbs
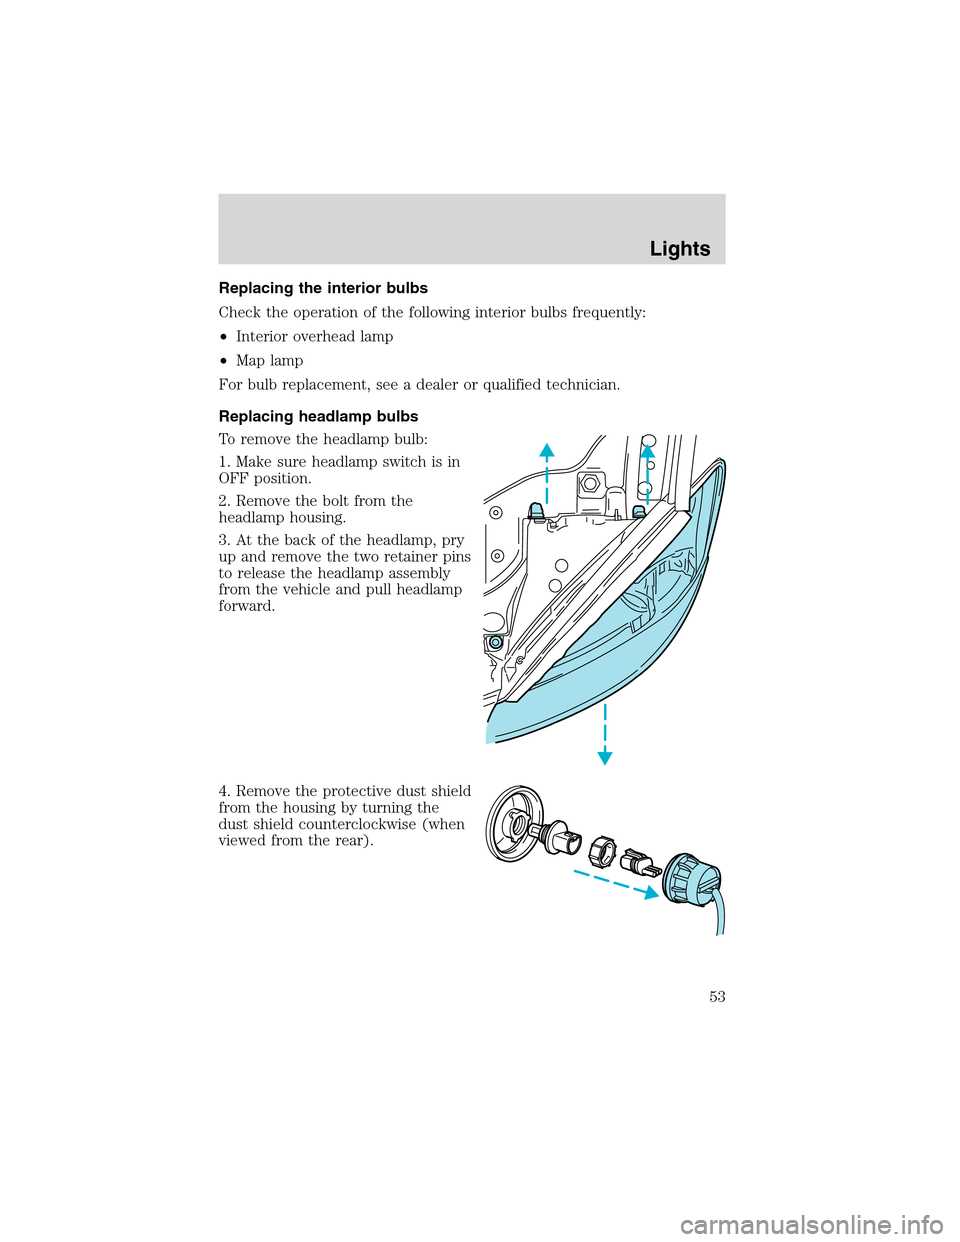
To remove the headlamp bulb:
1. Make sure headlamp switch is in
OFF position.
2. Remove the bolt from the
headlamp housing.
3. At the back of the headlamp, pry
up and remove the two retainer pins
to release the headlamp assembly
from the vehicle and pull headlamp
forward.
4. Remove the protective dust shield
from the housing by turning the
dust shield counterclockwise (when
viewed from the rear).
Lights
53
Page 55 of 240
2. Install the bulb retaining ring over the plastic base and lock the ring
by rotating clockwise until it snaps into place.
3. Connect the electrical connector to the bulb.
4. Install the protective dust shield and lock the shield by rotating it
clockwise until it locks into position.
5. Carefully position the headlamp assembly onto the vehicle.
6. Hold the headlamp assembly snugly against the vehicle and install the
retainer pins straight down to lock the lamp into place.
7. Before reinstalling the bolt, make sure the retainer pins are fully
seated, and install bolt on headlamp housing.
8. Turn the headlamps on and make sure they work properly. If the
headlamp was correctly aligned before you changed the bulb, you should
not need to align it again.
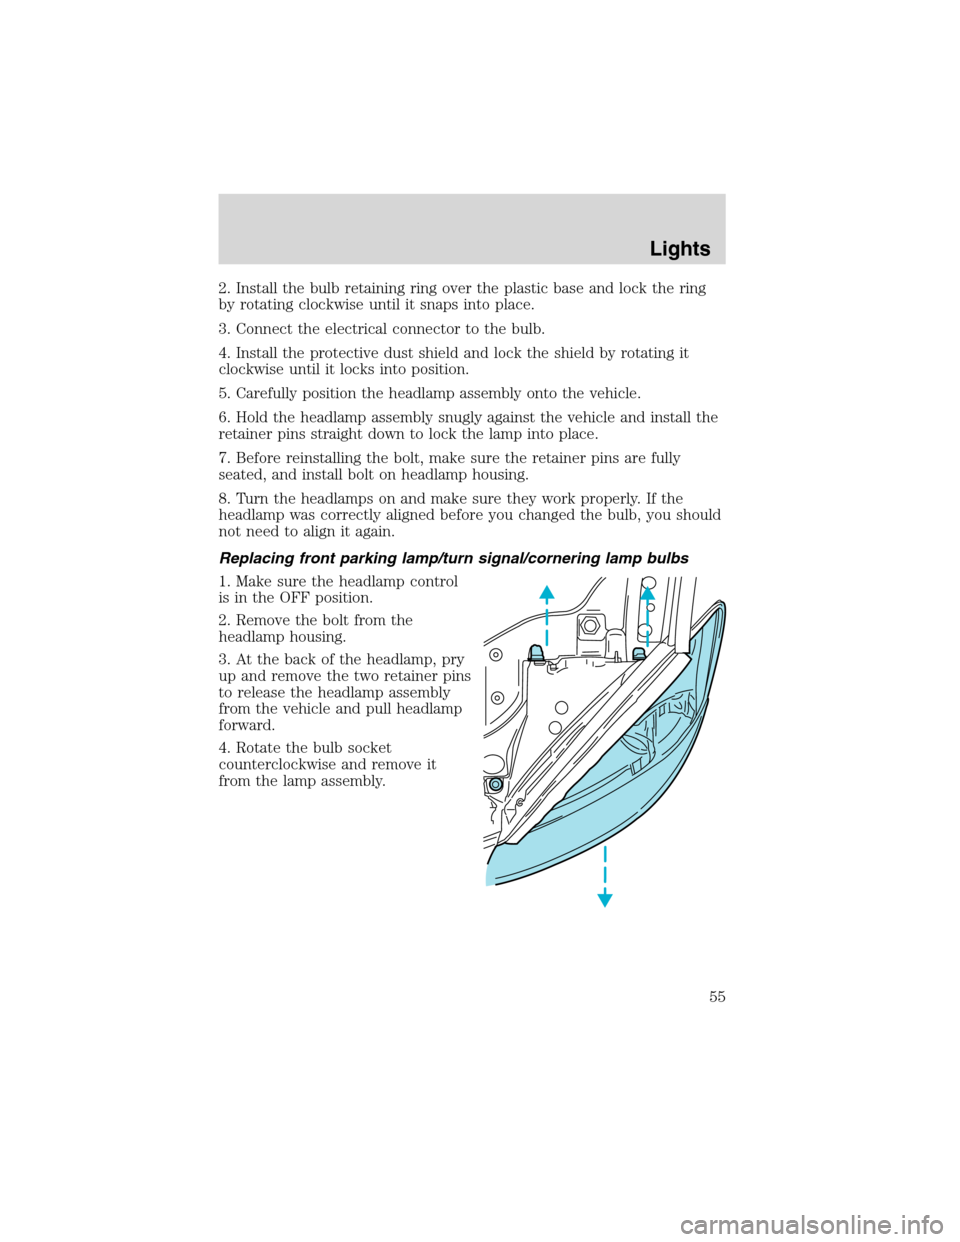
Replacing front parking lamp/turn signal/cornering lamp bulbs
1. Make sure the headlamp control
is in the OFF position.
2. Remove the bolt from the
headlamp housing.
3. At the back of the headlamp, pry
up and remove the two retainer pins
to release the headlamp assembly
from the vehicle and pull headlamp
forward.
4. Rotate the bulb socket
counterclockwise and remove it
from the lamp assembly.
Lights
55
Page 57 of 240

Replacing high-mount brakelamp bulbs—Wagon only
1. Open liftgate.
2. Remove two screw covers, screws
and handle from liftgate.
3. Remove two screws and the lower
trim panel from the liftgate.
4. Remove the upper trim panel.
5. Remove the rubber plug from the
lower access hole in the upper
portion of the liftgate.
6. Remove four nuts from the lamp
assembly.
Lights
57
Page 58 of 240
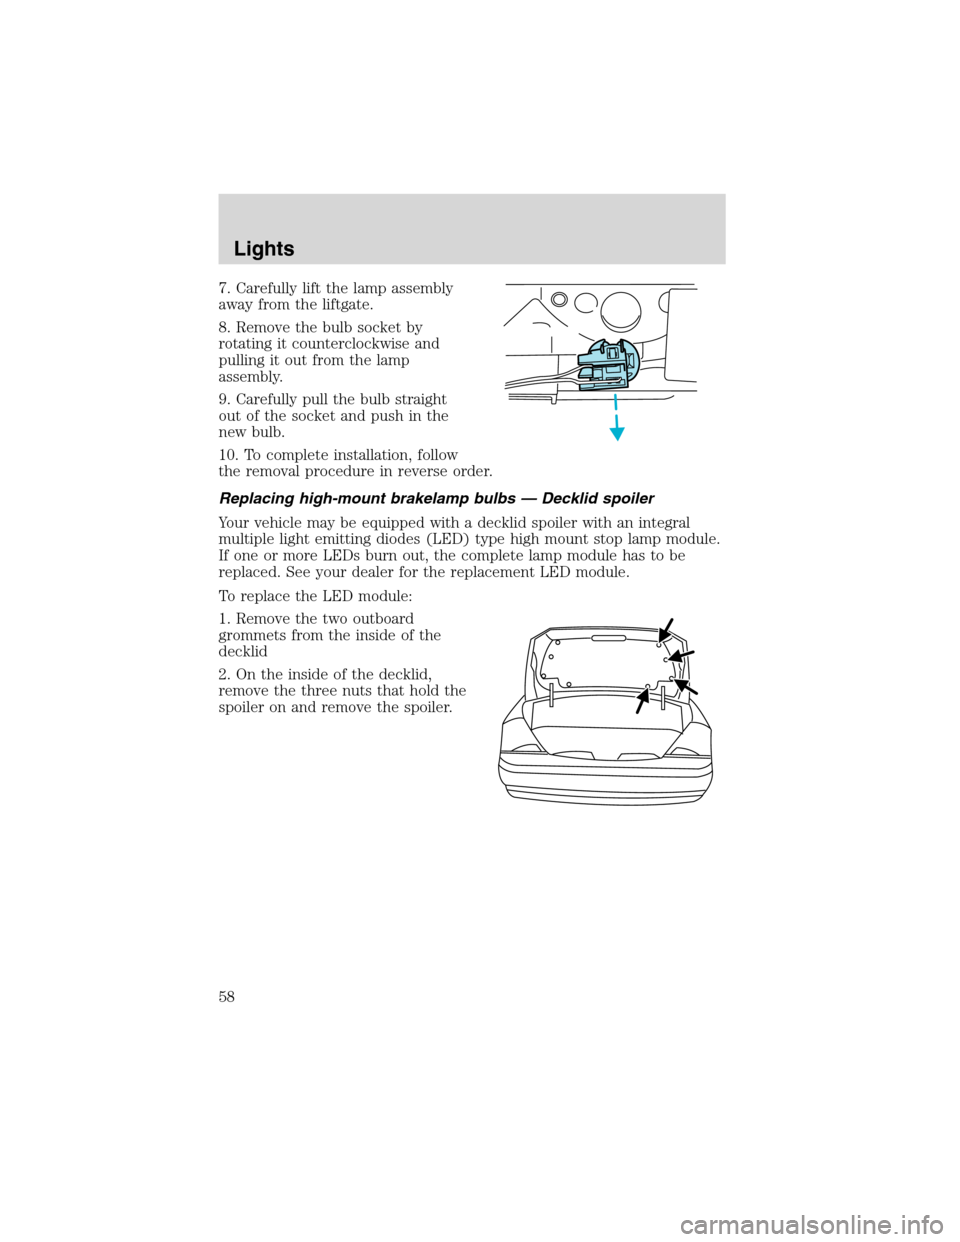
7. Carefully lift the lamp assembly
away from the liftgate.
8. Remove the bulb socket by
rotating it counterclockwise and
pulling it out from the lamp
assembly.
9. Carefully pull the bulb straight
out of the socket and push in the
new bulb.
10. To complete installation, follow
the removal procedure in reverse order.
Replacing high-mount brakelamp bulbs—Decklid spoiler
Your vehicle may be equipped with a decklid spoiler with an integral
multiple light emitting diodes (LED) type high mount stop lamp module.
If one or more LEDs burn out, the complete lamp module has to be
replaced. See your dealer for the replacement LED module.
To replace the LED module:
1. Remove the two outboard
grommets from the inside of the
decklid
2. On the inside of the decklid,
remove the three nuts that hold the
spoiler on and remove the spoiler.
Lights
58
Page 59 of 240
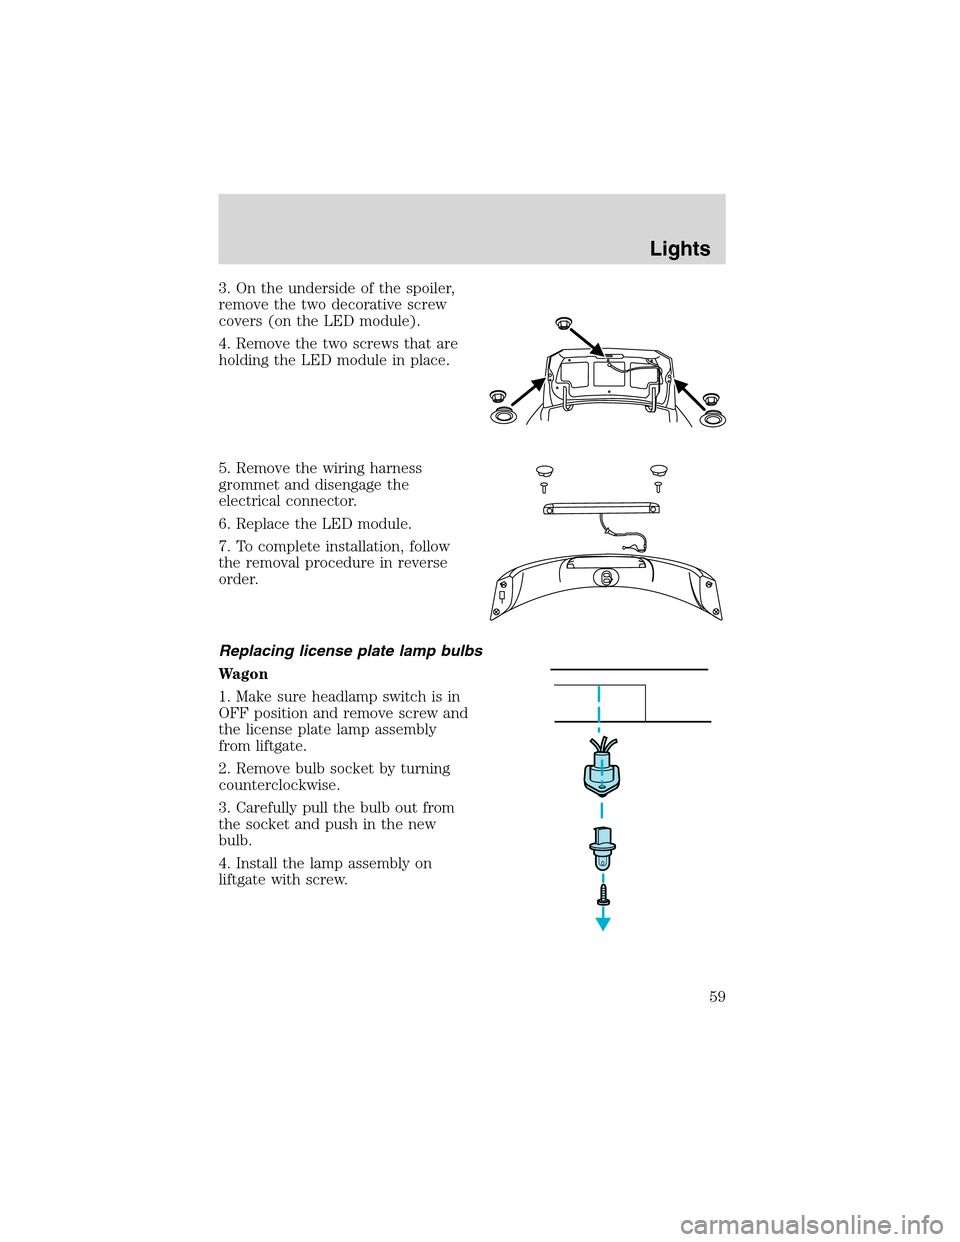
3. On the underside of the spoiler,
remove the two decorative screw
covers (on the LED module).
4. Remove the two screws that are
holding the LED module in place.
5. Remove the wiring harness
grommet and disengage the
electrical connector.
6. Replace the LED module.
7. To complete installation, follow
the removal procedure in reverse
order.
Replacing license plate lamp bulbs
Wagon
1. Make sure headlamp switch is in
OFF position and remove screw and
the license plate lamp assembly
from liftgate.
2. Remove bulb socket by turning
counterclockwise.
3. Carefully pull the bulb out from
the socket and push in the new
bulb.
4. Install the lamp assembly on
liftgate with screw.
Lights
59
Page 60 of 240
Sedan
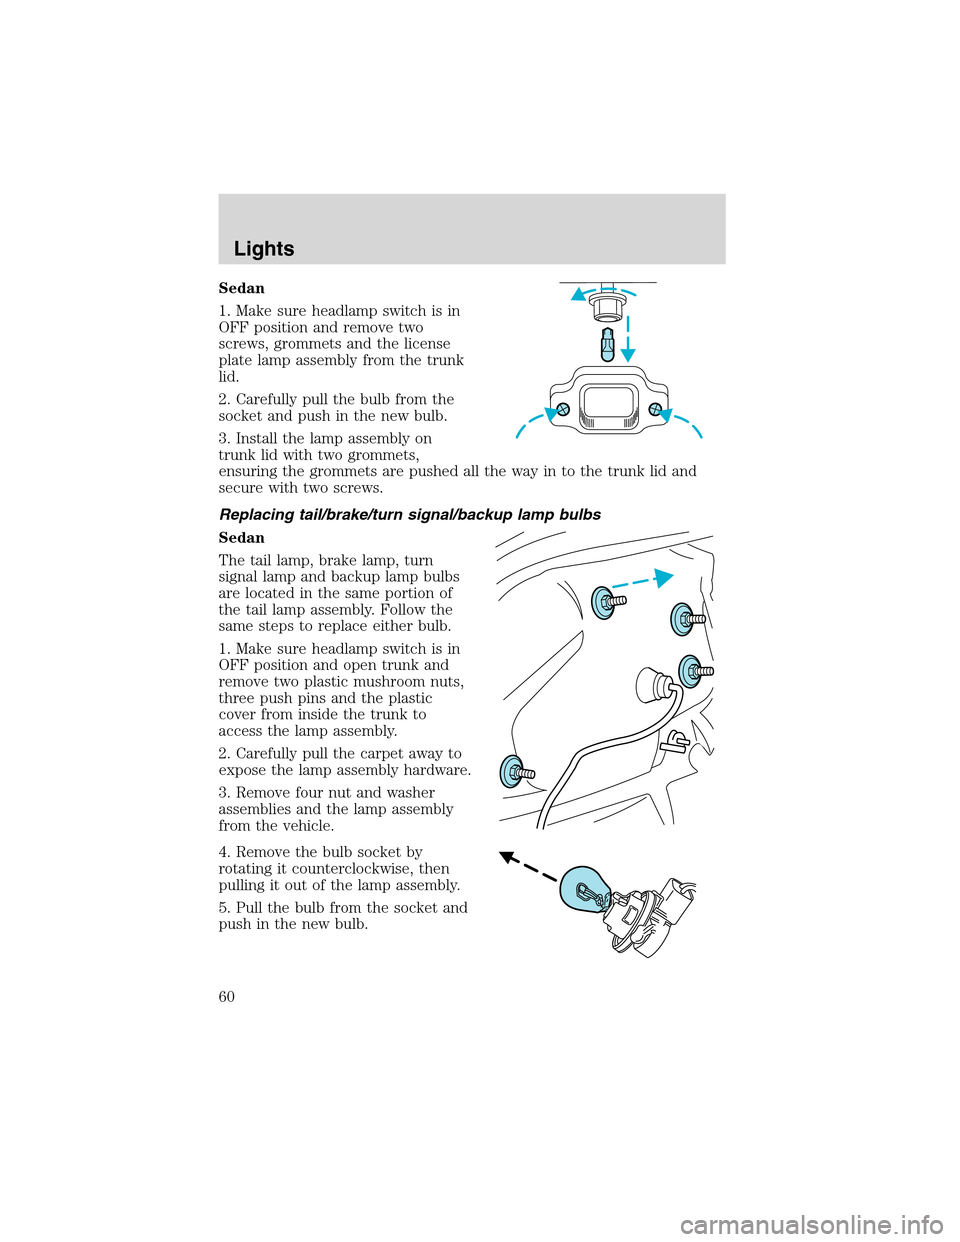
1. Make sure headlamp switch is in
OFF position and remove two
screws, grommets and the license
plate lamp assembly from the trunk
lid.
2. Carefully pull the bulb from the
socket and push in the new bulb.
3. Install the lamp assembly on
trunk lid with two grommets,
ensuring the grommets are pushed all the way in to the trunk lid and
secure with two screws.
Replacing tail/brake/turn signal/backup lamp bulbs
Sedan
The tail lamp, brake lamp, turn
signal lamp and backup lamp bulbs
are located in the same portion of
the tail lamp assembly. Follow the
same steps to replace either bulb.
1. Make sure headlamp switch is in
OFF position and open trunk and
remove two plastic mushroom nuts,
three push pins and the plastic
cover from inside the trunk to
access the lamp assembly.
2. Carefully pull the carpet away to
expose the lamp assembly hardware.
3. Remove four nut and washer
assemblies and the lamp assembly
from the vehicle.
4. Remove the bulb socket by
rotating it counterclockwise, then
pulling it out of the lamp assembly.
5. Pull the bulb from the socket and
push in the new bulb.
Lights
60
Page 61 of 240
6. Install the bulb socket into the lamp assembly by rotating it clockwise.
7. Install the lamp assembly on the vehicle with four nut and washer
assemblies ensuring the washers on the nuts are flush with the body to
prevent water from entering the trunk.
8. Carefully push the carpet back in to place and install the plastic cover
inside the trunk with three push pins and two plastic mushroom nuts.
Wagon
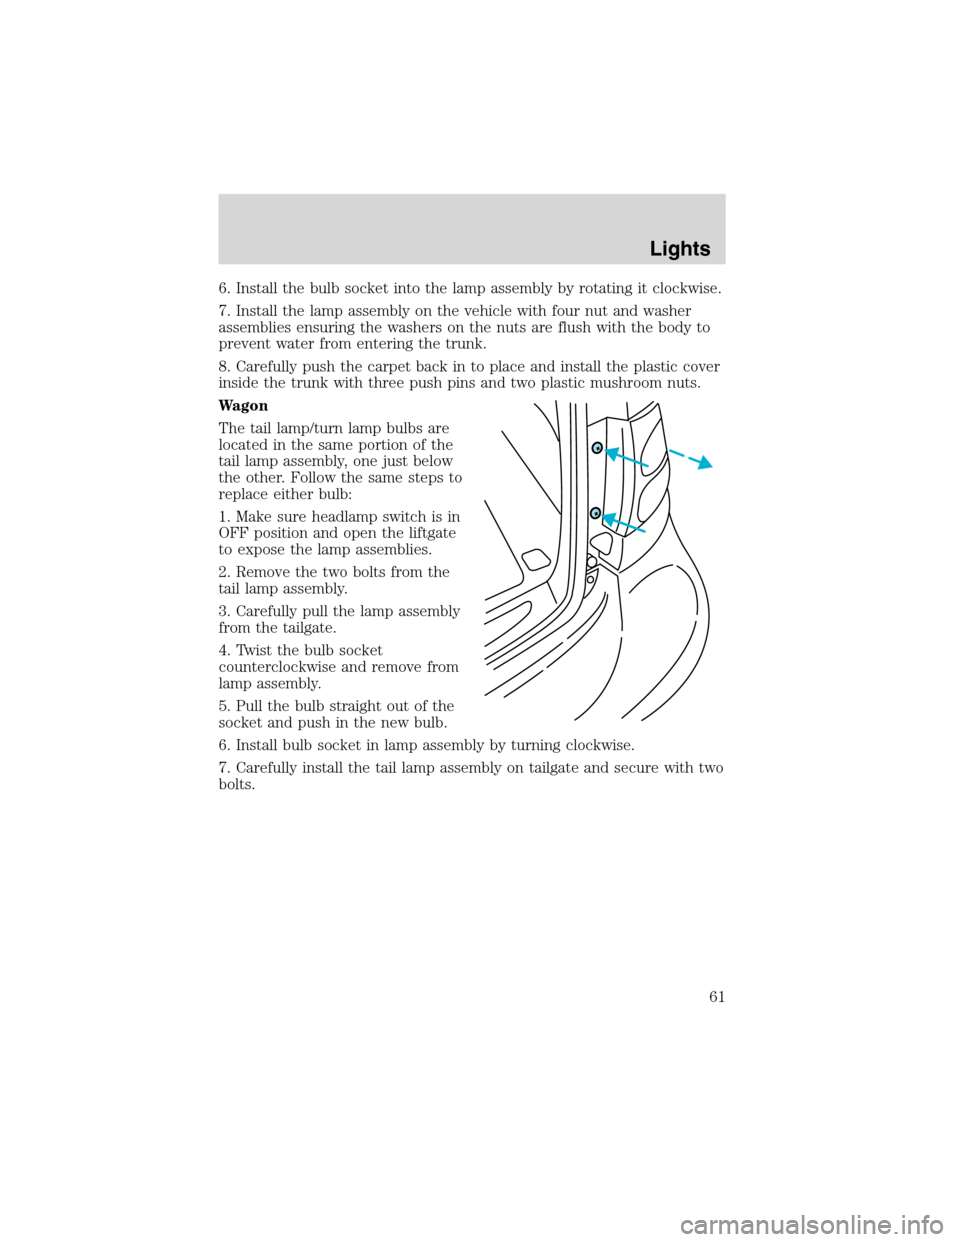
The tail lamp/turn lamp bulbs are
located in the same portion of the
tail lamp assembly, one just below
the other. Follow the same steps to
replace either bulb:
1. Make sure headlamp switch is in
OFF position and open the liftgate
to expose the lamp assemblies.
2. Remove the two bolts from the
tail lamp assembly.
3. Carefully pull the lamp assembly
from the tailgate.
4. Twist the bulb socket
counterclockwise and remove from
lamp assembly.
5. Pull the bulb straight out of the
socket and push in the new bulb.
6. Install bulb socket in lamp assembly by turning clockwise.
7. Carefully install the tail lamp assembly on tailgate and secure with two
bolts.
Lights
61
Page 235 of 240
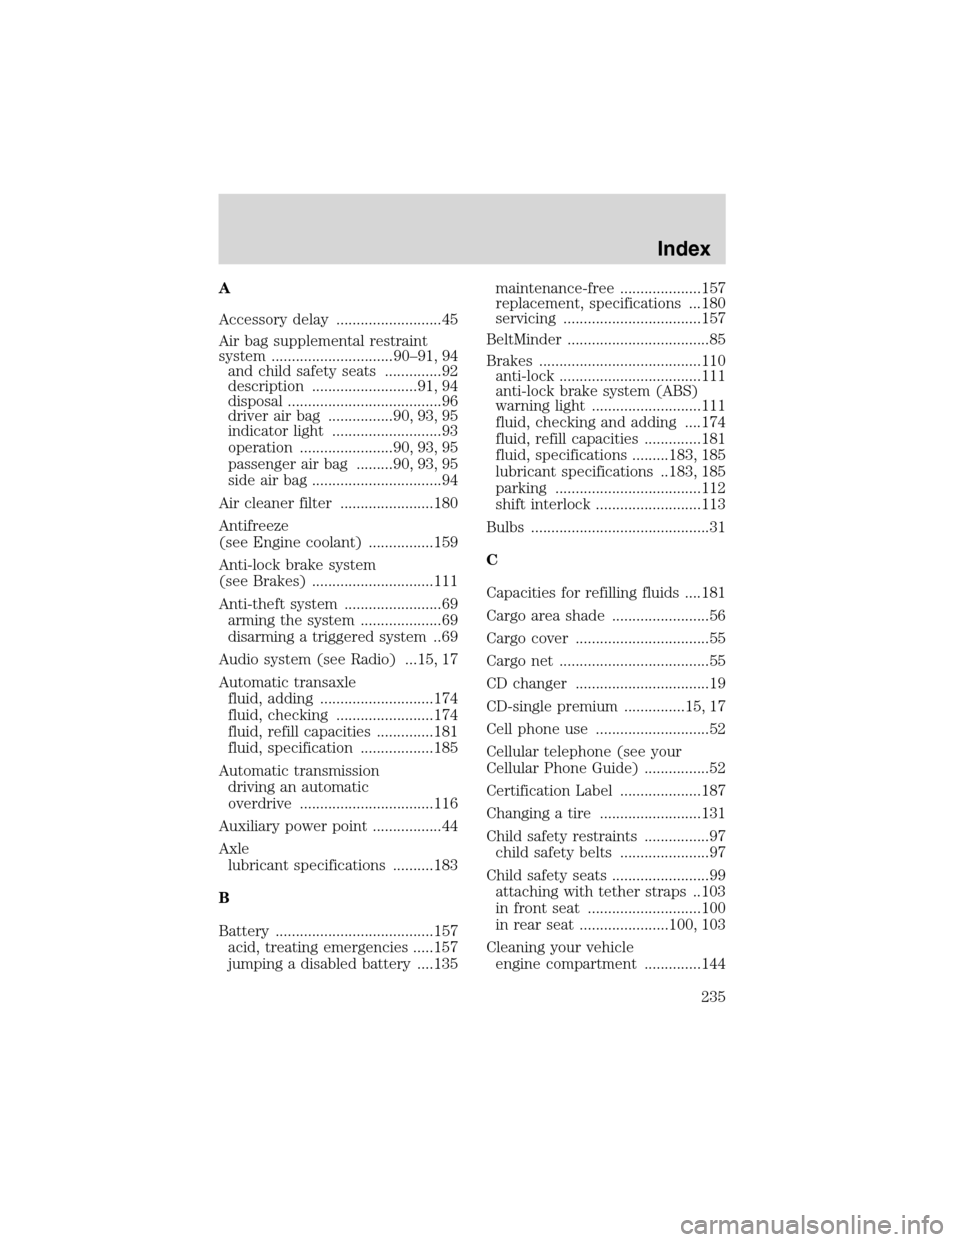
A
Accessory delay ..........................45
Air bag supplemental restraint
system ..............................90–91, 94
and child safety seats ..............92
description ..........................91, 94
disposal ......................................96
driver air bag ................90, 93, 95
indicator light ...........................93
operation .......................90, 93, 95
passenger air bag .........90, 93, 95
side air bag ................................94
Air cleaner filter .......................180
Antifreeze
(see Engine coolant) ................159
Anti-lock brake system
(see Brakes) ..............................111
Anti-theft system ........................69
arming the system ....................69
disarming a triggered system ..69
Audio system (see Radio) ...15, 17
Automatic transaxle
fluid, adding ............................174
fluid, checking ........................174
fluid, refill capacities ..............181
fluid, specification ..................185
Automatic transmission
driving an automatic
overdrive .................................116
Auxiliary power point .................44
Axle
lubricant specifications ..........183
B
Battery .......................................157
acid, treating emergencies .....157
jumping a disabled battery ....135maintenance-free ....................157
replacement, specifications ...180
servicing ..................................157
BeltMinder ...................................85
Brakes ........................................110
anti-lock ...................................111
anti-lock brake system (ABS)
warning light ...........................111
fluid, checking and adding ....174
fluid, refill capacities ..............181
fluid, specifications .........183, 185
lubricant specifications ..183, 185
parking ....................................112
shift interlock ..........................113
Bulbs ............................................31
C
Capacities for refilling fluids ....181
Cargo area shade ........................56
Cargo cover .................................55
Cargo net .....................................55
CD changer .................................19
CD-single premium ...............15, 17
Cell phone use ............................52
Cellular telephone (see your
Cellular Phone Guide) ................52
Certification Label ....................187
Changing a tire .........................131
Child safety restraints ................97
child safety belts ......................97
Child safety seats ........................99
attaching with tether straps ..103
in front seat ............................100
in rear seat ......................100, 103
Cleaning your vehicle
engine compartment ..............144
Index
235