antenna Mercury Sable 2002 Owner's Manuals
[x] Cancel search | Manufacturer: MERCURY, Model Year: 2002, Model line: Sable, Model: Mercury Sable 2002Pages: 240, PDF Size: 3.53 MB
Page 34 of 240
RADIO RECEPTION FACTORS
Three factors can affect radio reception:
•Distance/strength.The further an FM signal travels, the weaker it is.
The listenable range of the average FM station is approximately 40 km
(24 miles). This range can be affected by“signal modulation.”Signal
modulation is a process radio stations use to increase their
strength/volume relative to other stations.
•Terrain.Hills, mountains and tall buildings between your vehicle’s
antenna and the radio station signal can cause FM reception problems.
Static can be caused on AM stations by power lines, electric fences,
traffic lights and thunderstorms. Moving away from an interfering
structure (out of its“shadow”) returns your reception to normal.
•Station overload.Weak signals are sometimes captured by stronger
signals when you pass a broadcast tower. A stronger signal may
temporarily overtake a weaker signal and play while the weak station
frequency is displayed.
The audio system automatically switches to single channel reception if it
will improve the reception of a station normally received in stereo.
AUDIO SYSTEM WARRANTIES AND SERVICE
Refer to theWarranty Guidefor audio system warranty information.
If service is necessary, see your dealer or a qualified technician.
Entertainment Systems
34
Page 67 of 240
If highly magnetized items (such as magnetic mount antennas) are
placed very near the compass the display will change to“C”for 15
seconds, then display all segments until the magnetized item is removed.
If a“C”is displayed, refer toCompass calibration adjustment.
Most geographic areas (zones) have a magnetic north compass point that
varies slightly from the northerly direction on maps. This variation is four
degrees between adjacent zones and will become noticeable as the
vehicle crosses multiple zones. A correct zone setting will eliminate this
error. Refer toCompass zone adjustment.
Compass zone adjustment
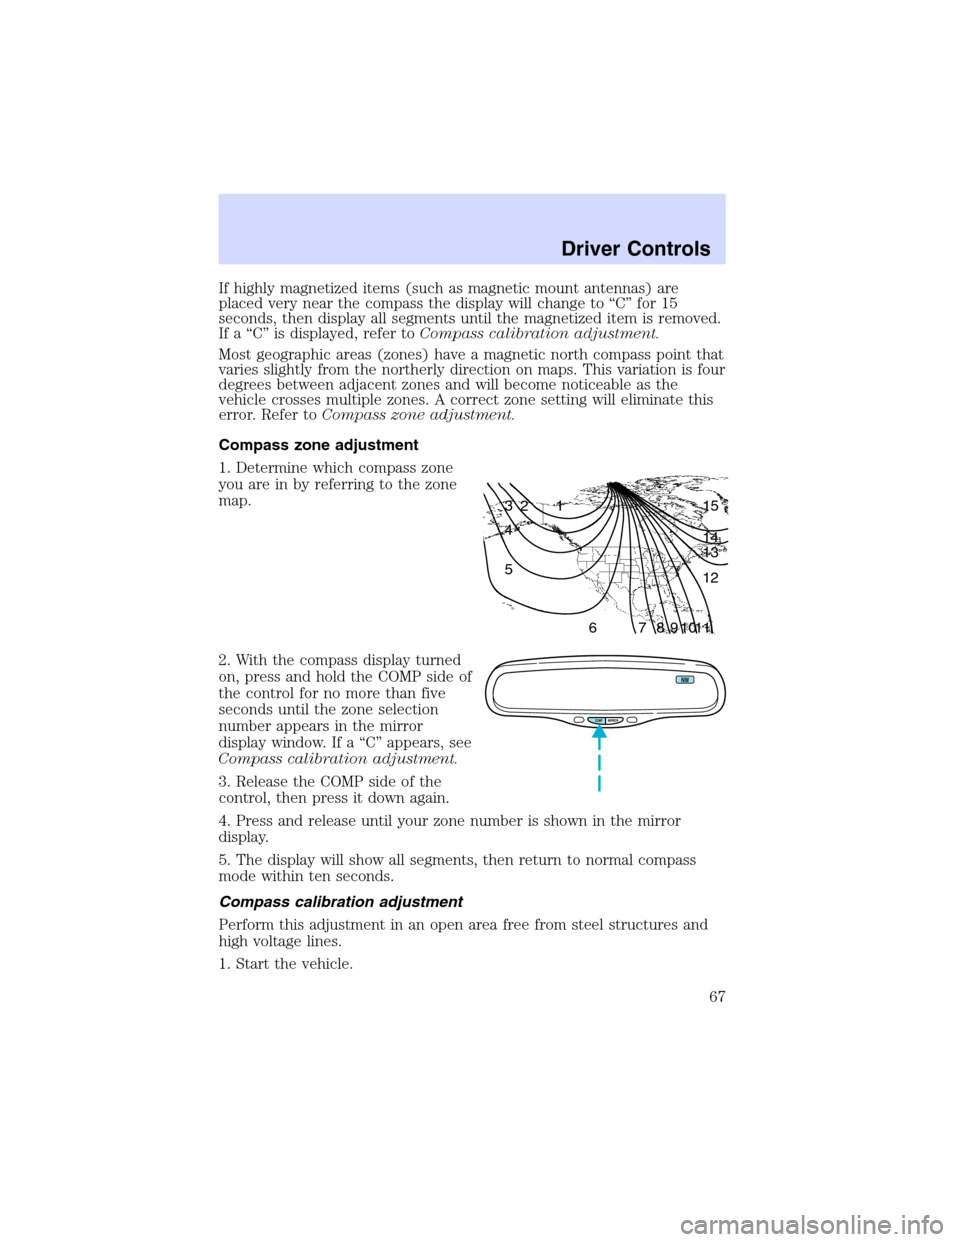
1. Determine which compass zone
you are in by referring to the zone
map.
2. With the compass display turned
on, press and hold the COMP side of
the control for no more than five
seconds until the zone selection
number appears in the mirror
display window. If a“C”appears, see
Compass calibration adjustment.
3. Release the COMP side of the
control, then press it down again.
4. Press and release until your zone number is shown in the mirror
display.
5. The display will show all segments, then return to normal compass
mode within ten seconds.
Compass calibration adjustment
Perform this adjustment in an open area free from steel structures and
high voltage lines.
1. Start the vehicle.
1 2 3
4
5
6 7 8 9 101112 13 14 15
COMP MIRROR
NW
Driver Controls
67
Page 75 of 240
To avoid potential distraction and increased risk of injury or
accident, Ford recommends you do not use the phone while
driving.
Please pull off the road and park before making or answering a call.
To prevent damage to the antenna or your car, remove the cellular phone
antenna mast before using an automatic car wash.
POSITIVE RETENTION FLOOR MAT
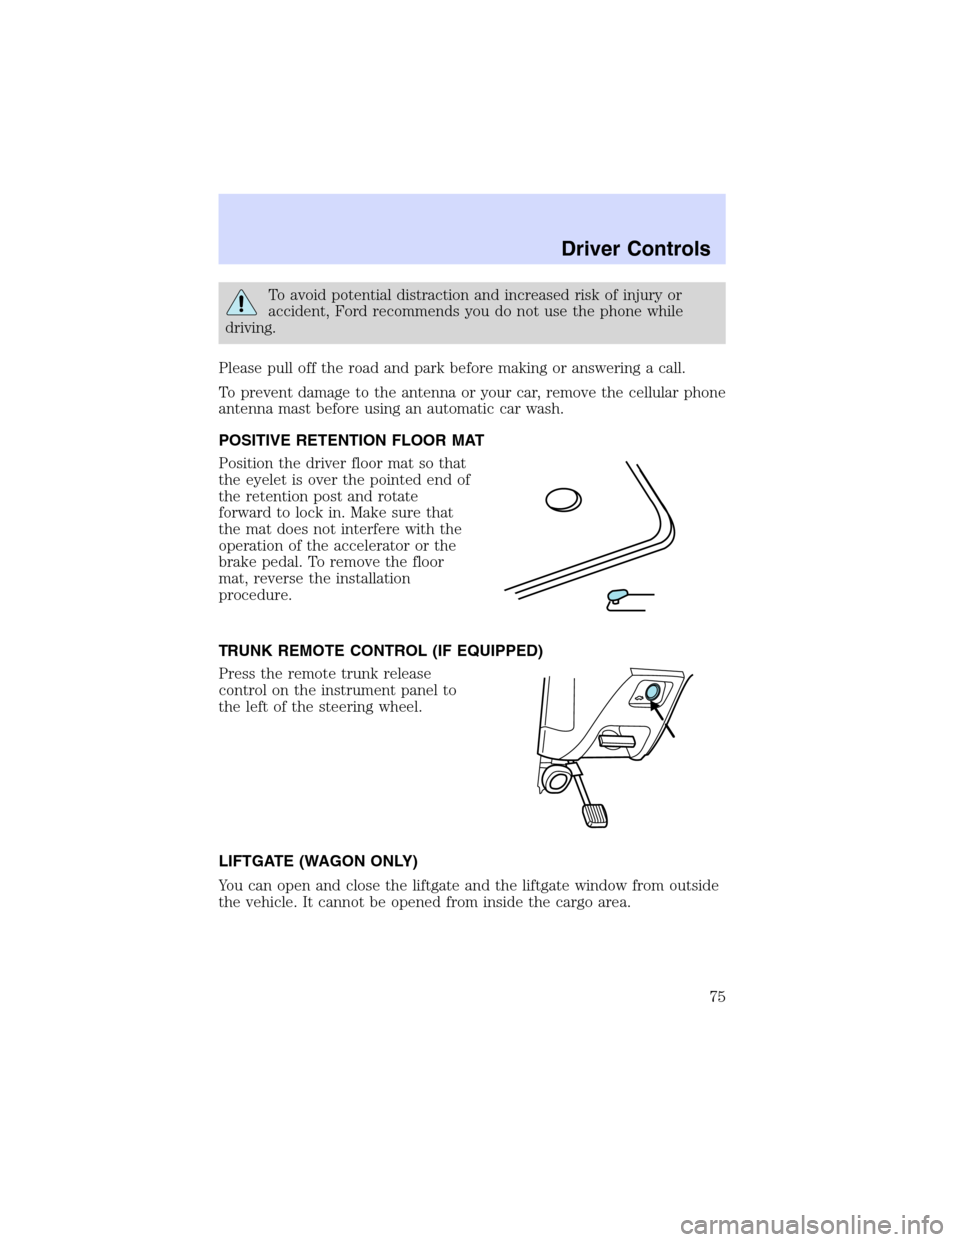
Position the driver floor mat so that
the eyelet is over the pointed end of
the retention post and rotate
forward to lock in. Make sure that
the mat does not interfere with the
operation of the accelerator or the
brake pedal. To remove the floor
mat, reverse the installation
procedure.
TRUNK REMOTE CONTROL (IF EQUIPPED)
Press the remote trunk release
control on the instrument panel to
the left of the steering wheel.
LIFTGATE (WAGON ONLY)
You can open and close the liftgate and the liftgate window from outside
the vehicle. It cannot be opened from inside the cargo area.
Driver Controls
75
Page 160 of 240
Fuse/relay
locationFuse amp
ratingPassenger compartment fuse
panel description
12 10A Heated mirrors, Rear defrost switch
13 20A Power point
14—Not used
15 30A Front wiper motor
16 15A Flasher and GEM power, ICP power,
RCC memory, Cluster
17 15A Stop lamp, Speed control deactivating
switch
18—Not used
19—Not used
20—Not used
21—Not used
22 20A Deck lid release solenoid, lock/unlock
relays
23 10A Air bag module, PATS transceiver
24 15A Foglamps and rear foglamps, Transit
relay
25 2A PCM relay, Fuel pump relay
26 10A Mirrors, Power antenna, Pulse
stretcher Module, Deck lid lamp,
Battery saver
27 10A Gauges and warning lamps, ICP, FFV
sender, GEM
28 10A Blower motor relay coil, EATC logic,
Puddle lamps
29 15A Autolamps relay, Fog lamp relay, Fog
lamp relay coil, Park lamps, PWM
headlamp switch
30 15A Horns and horn switch, OBD II
connector
31—Not used
Roadside Emergencies
160
Page 163 of 240
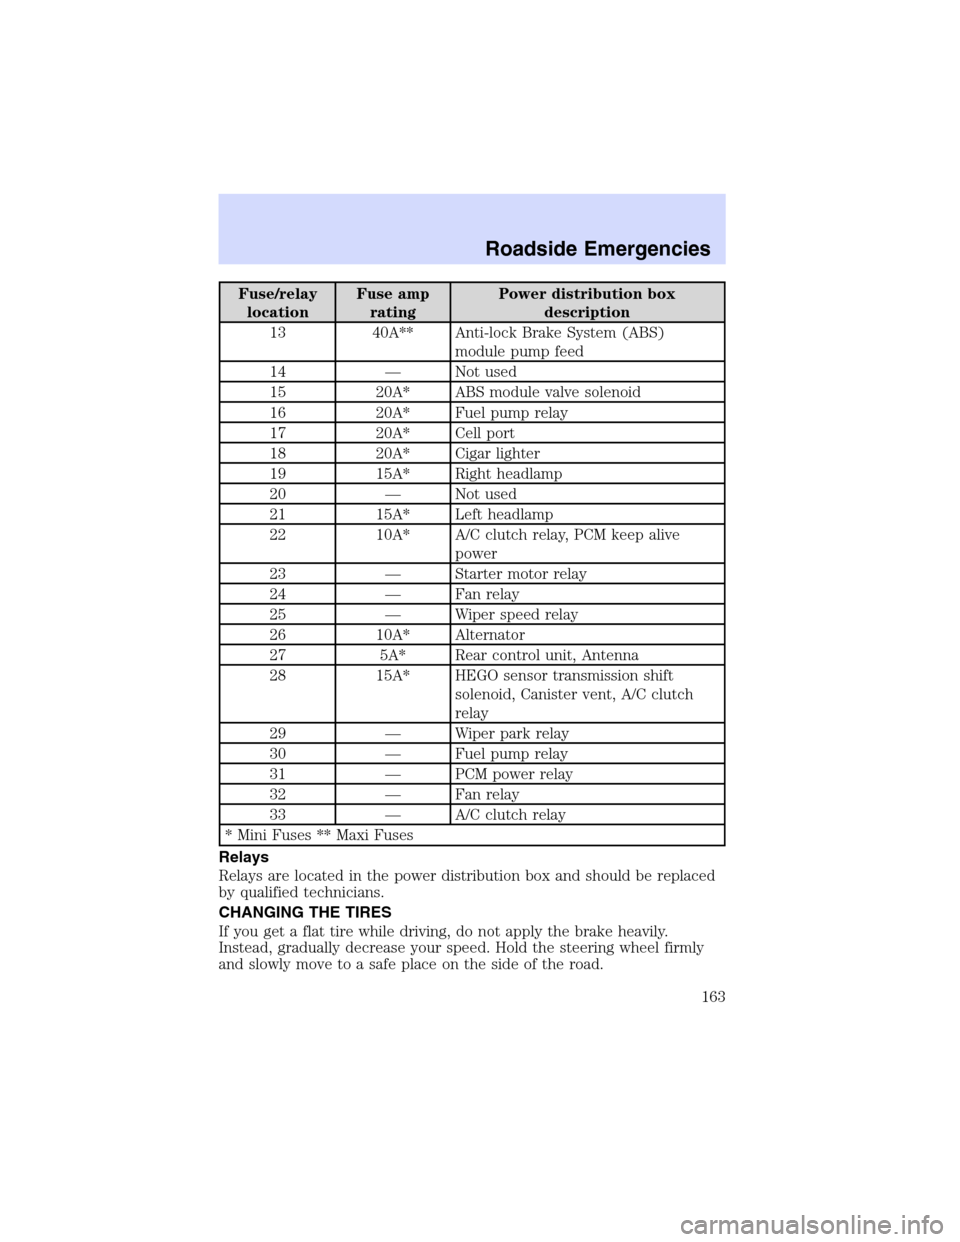
Fuse/relay
locationFuse amp
ratingPower distribution box
description
13 40A** Anti-lock Brake System (ABS)
module pump feed
14—Not used
15 20A* ABS module valve solenoid
16 20A* Fuel pump relay
17 20A* Cell port
18 20A* Cigar lighter
19 15A* Right headlamp
20—Not used
21 15A* Left headlamp
22 10A* A/C clutch relay, PCM keep alive
power
23—Starter motor relay
24—Fan relay
25—Wiper speed relay
26 10A* Alternator
27 5A* Rear control unit, Antenna
28 15A* HEGO sensor transmission shift
solenoid, Canister vent, A/C clutch
relay
29—Wiper park relay
30—Fuel pump relay
31—PCM power relay
32—Fan relay
33—A/C clutch relay
* Mini Fuses ** Maxi Fuses
Relays
Relays are located in the power distribution box and should be replaced
by qualified technicians.
CHANGING THE TIRES
If you get a flat tire while driving, do not apply the brake heavily.
Instead, gradually decrease your speed. Hold the steering wheel firmly
and slowly move to a safe place on the side of the road.
Roadside Emergencies
163
Page 184 of 240
WASHING THE EXTERIOR
Wash your vehicle regularly with cool or lukewarm water and a neutral
Ph shampoo, such as Motorcraft Detail Wash (ZC-3–A), which is available
from your dealer.
•Never use strong household detergents or soap, such as dish washing
or laundry liquid. These products can discolor and spot painted
surfaces.
•Never wash a vehicle that is“hot to the touch”or during exposure to
strong, direct sunlight.
•Always use a clean sponge or carwash mitt with plenty of water for
best results.
•Dry the vehicle with a chamois or soft terry cloth towel in order to
eliminate water spotting.
•It is especially important to wash the vehicle regularly during the
winter months, as dirt and road salt are difficult to remove and cause
damage to the vehicle.
•Immediately remove items such as gasoline, diesel fuel, bird droppings
and insect deposits because they can cause damage to the vehicle’s
paintwork and trim over time.
•Remove any exterior accessories, such as antennas, before entering a
car wash.
•Suntan lotions and insect repellents can damage any painted
surface; if these substances come in contact with your vehicle,
wash off as soon as possible.
WAXING
Applying a polymer paint sealant to your vehicle every six months will
assist in reducing minor scratches and paint damage.
•Wash the vehicle first.
•Do not use waxes that contain abrasives.
•Do not allow paint sealant to come in contact with any non-body
(low-gloss black) colored trim, such as grained door handles, roof
racks, bumpers, side moldings, mirror housings or the windshield cowl
area. The paint sealant will“gray”or stain the parts over time.
PAINT CHIPS
Your dealer has touch-up paint and sprays to match your vehicle’s color.
Take your color code (printed on a sticker in the driver’s door jam) to
your dealer to ensure you get the correct color.
Cleaning
184