wheel Mercury Sable 2003 s User Guide
[x] Cancel search | Manufacturer: MERCURY, Model Year: 2003, Model line: Sable, Model: Mercury Sable 2003Pages: 216, PDF Size: 1.66 MB
Page 126 of 216
Trailer towing tips
•Practice turning, stopping and backing up before starting on a trip to
get the feel of the vehicle trailer combination. When turning, make
wider turns so the trailer wheels will clear curbs and other obstacles.
•Allow more distance for stopping with a trailer attached.
•If you are driving down a long or steep hill, shift to a lower gear. Do
not apply the brakes continuously, as they may overheat and become
less effective.
•The trailer tongue weight should be 10–15% of the loaded trailer
weight.
•After you have traveled 80 km (50 miles), thoroughly check your
hitch, electrical connections and trailer wheel lug nuts.
•To aid in engine/transmission cooling and A/C efficiency during hot
weather while stopped in traffic, place the gearshift lever in P (Park).
•Vehicles with trailers should not be parked on a grade. If you must
park on a grade, place wheel chocks under the trailer’s wheels.
RECREATIONAL TOWING
Follow these guidelines for your specific powertrain combination to tow
your vehicle with all four wheels on the ground (such as behind a
recreational vehicle).
These guidelines are designed to ensure that your transmission is not
damaged due to insufficient lubrication.
All Front Wheel Drive (FWD) vehicles:
It is not recommended to tow front wheel drive vehicles with the front
drive wheels on the ground. It is recommended to tow your vehicle with
the drive wheels on a dolly or two wheel car hauling trailer.
In case of a roadside emergency with a disabled vehicle (without access
to wheel dollies, car hauling trailer or flatbed transport vehicle) your
vehicle can be flat towed (all wheels on the ground) under the following
conditions:
•Place the transmission in N (Neutral).
•Maximum speed is 56 km/h (35 mph).
•Maximum distance is 80 km (50 miles).
Driving
126
Page 128 of 216
Canadian customers who require roadside assistance, call
1–800–665–2006.
If you need to arrange roadside assistance for yourself, Ford Motor
Company will reimburse a reasonable amount. To obtain reimbursement
information, U.S. Ford or Mercury vehicles customers call
1-800-241-3673; Lincoln vehicle customers call 1–800–521–4140.
Canadian customers who need to obtain reimbursement information, call
1–800–665–2006.
ROADSIDE COVERAGE BEYOND BASIC WARRANTY
In the United States, you may purchase additional roadside assistance
coverage beyond this period through the Ford Auto Club by contacting
your Ford or Lincoln Mercury dealer.
Similarly in Canada, for uninterrupted Roadside Assistance coverage, you
may purchase extended coverage prior to your Basic Warranty’s Roadside
Assistance expiring. For more information and enrollment, contact
1–877–294–2582 or visit our website at www.ford.ca.
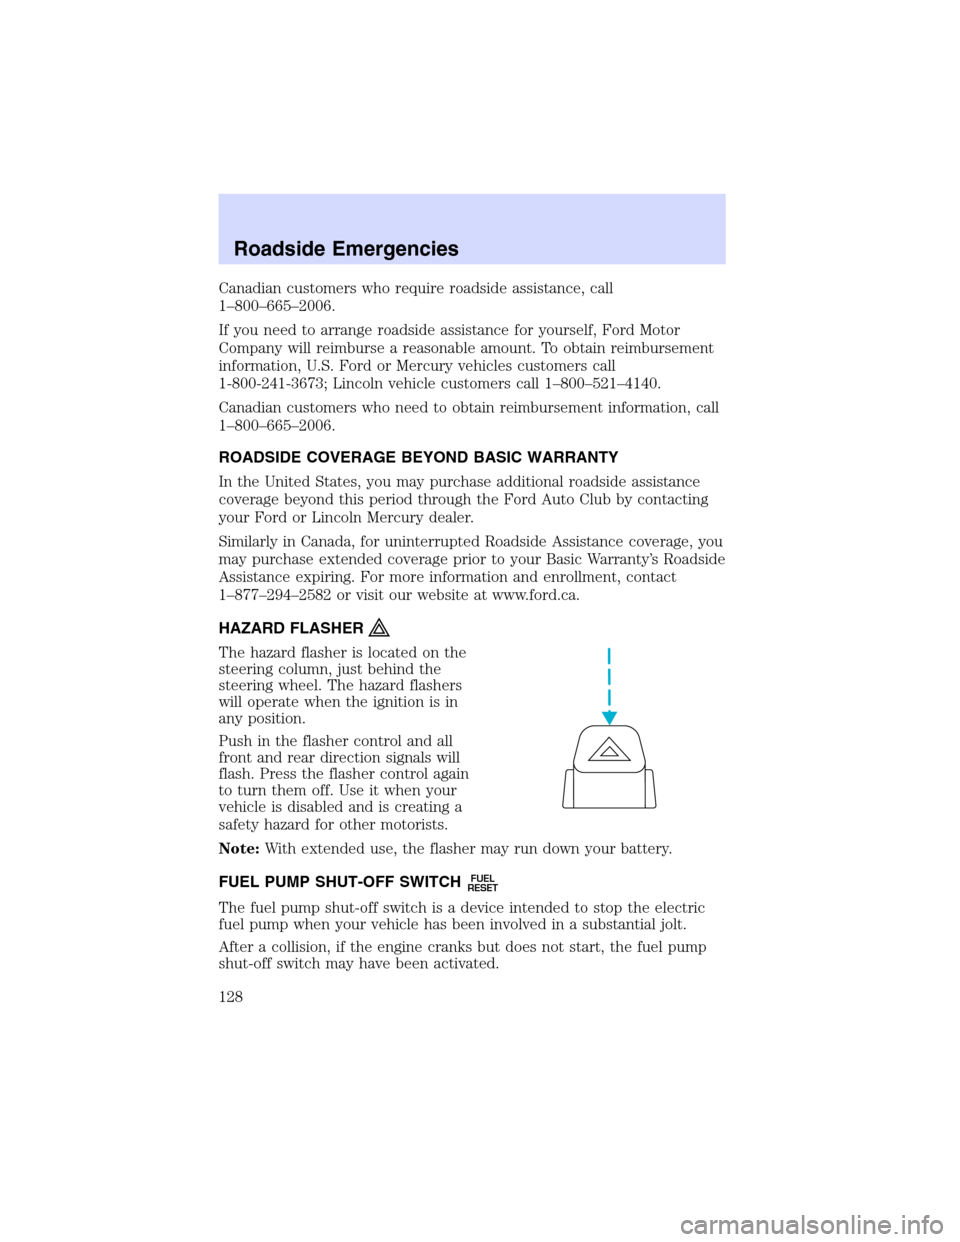
HAZARD FLASHER
The hazard flasher is located on the
steering column, just behind the
steering wheel. The hazard flashers
will operate when the ignition is in
any position.
Push in the flasher control and all
front and rear direction signals will
flash. Press the flasher control again
to turn them off. Use it when your
vehicle is disabled and is creating a
safety hazard for other motorists.
Note:With extended use, the flasher may run down your battery.
FUEL PUMP SHUT-OFF SWITCH
FUEL
RESET
The fuel pump shut-off switch is a device intended to stop the electric
fuel pump when your vehicle has been involved in a substantial jolt.
After a collision, if the engine cranks but does not start, the fuel pump
shut-off switch may have been activated.
Roadside Emergencies
128
Page 130 of 216
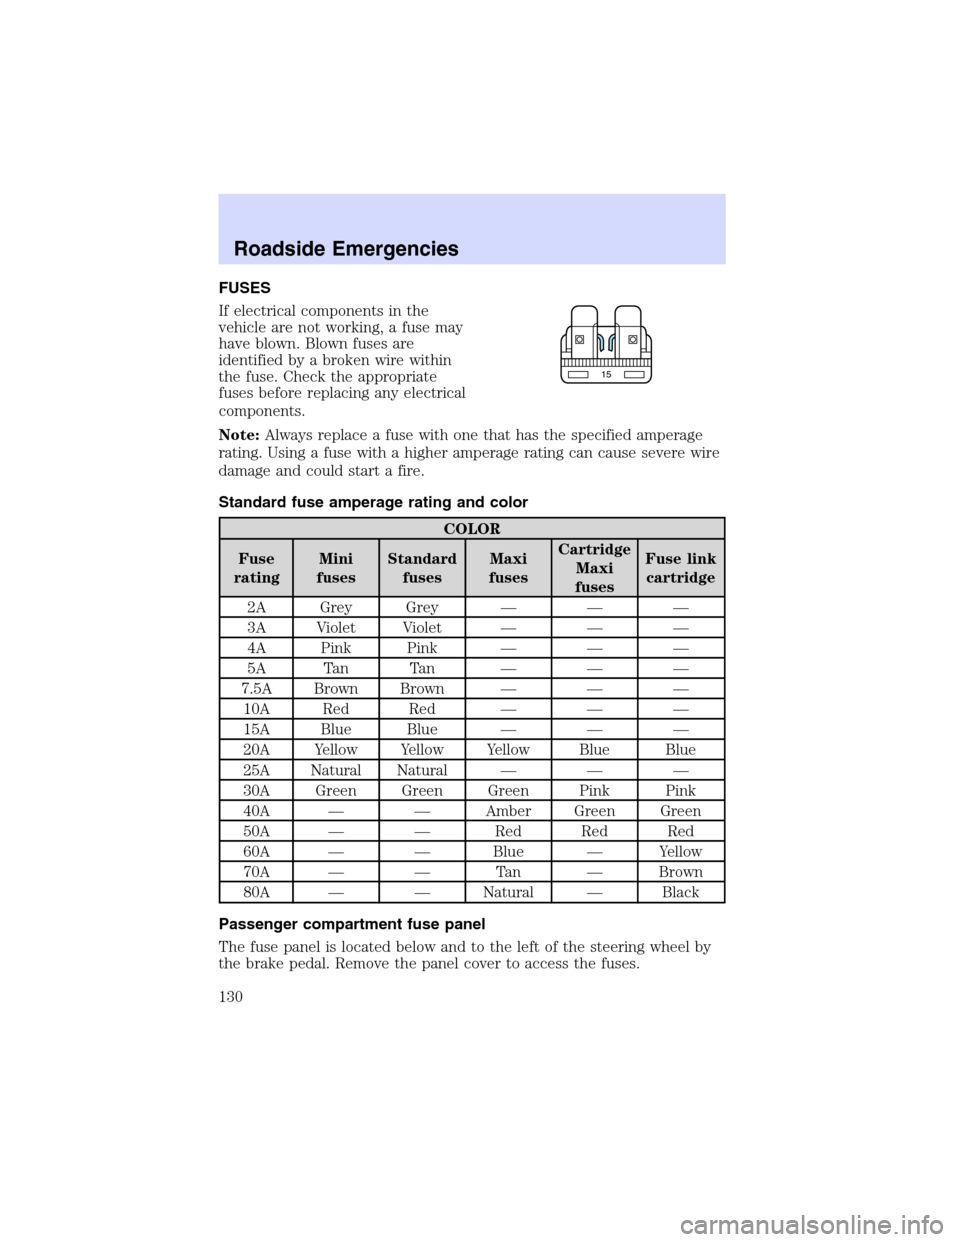
FUSES
If electrical components in the
vehicle are not working, a fuse may
have blown. Blown fuses are
identified by a broken wire within
the fuse. Check the appropriate
fuses before replacing any electrical
components.
Note:Always replace a fuse with one that has the specified amperage
rating. Using a fuse with a higher amperage rating can cause severe wire
damage and could start a fire.
Standard fuse amperage rating and color
COLOR
Fuse
ratingMini
fusesStandard
fusesMaxi
fusesCartridge
Maxi
fusesFuse link
cartridge
2A Grey Grey———
3A Violet Violet———
4A Pink Pink———
5A Tan Tan———
7.5A Brown Brown———
10A Red Red———
15A Blue Blue———
20A Yellow Yellow Yellow Blue Blue
25A Natural Natural———
30A Green Green Green Pink Pink
40A——Amber Green Green
50A——Red Red Red
60A——Blue—Yellow
70A——Ta n—Brown
80A——Natural—Black
Passenger compartment fuse panel
The fuse panel is located below and to the left of the steering wheel by
the brake pedal. Remove the panel cover to access the fuses.
15
Roadside Emergencies
130
Page 136 of 216

CHANGING THE TIRES
If you get a flat tire while driving, do not apply the brake heavily.
Instead, gradually decrease your speed. Hold the steering wheel firmly
and slowly move to a safe place on the side of the road.
The use of tire sealants is not recommended and may
compromise the integrity of your tires.
Temporary spare tire information
The temporary spare tire for your vehicle is labeled as such. It is smaller
than a regular tire and is designed for emergency use only. Replace the
temporary spare tire with a full-size tire as soon as possible.
If you use the temporary spare tire continuously or do not follow
these precautions, the tire could fail, causing you to lose control
of the vehicle, possibly injuring yourself or others.
When driving with the temporary spare tiredo not:
•use more than one temporary spare tire at a time
•exceed 80 km/h (50 mph)
•load the vehicle beyond maximum vehicle load rating listed on the
Safety Compliance Label
•tow a trailer
•use tire chains
•drive through an automatic car wash, because of the vehicle’s reduced
ground clearance
•try to repair the temporary spare tire or remove it from its wheel
•use the wheel for any other type of vehicle
Use of a temporary spare tire at any one wheel location can lead to
impairment of the following:
•handling, stability and braking performance
•comfort and noise
•ground clearance and parking at curbs
•Winter driving capability
Roadside Emergencies
136
Page 137 of 216

Tire change procedure
1. Park on a level surface, activate hazard flashers and set parking brake.
When one of the front wheels is off the ground, the transaxle
alone will not prevent the vehicle from moving or slipping off the
jack, even if the vehicle is in P (Park).
To prevent the vehicle from moving when you change a tire, be
sure the parking brake is set, then block (in both directions) the
wheel that is diagonally opposite (other side and end of the vehicle) to
the tire being changed.
If the vehicle slips off the jack, you or someone else could be
seriously injured.
2. Place gearshift lever in P (Park),
turn engine OFF, block the
diagonally opposite wheel, then
remove the spare tire, jack and lug
wrench.
•In the sedan, these are located in
the trunk cargo area storage
compartment.
Roadside Emergencies
137
Page 138 of 216

•In the wagon, they are stored in
the left side rear trim panel for
the temporary spare and in the
floor cargo area storage
compartment for the full size
spare.
3. If equipped with a wheel cover
that’s bolted on, loosen the five
plastic nuts with the lug nut
wrench.
4. Remove the center ornament or wheel cover from the wheel with the
tapered end of the wheel lug nut wrench that came with your vehicle.
Insert and twist the handle, then pry against the wheel.
5. Loosen each wheel lug nut
one-half turn counterclockwise but
do not remove them until the wheel
is raised off the ground.
Roadside Emergencies
138
Page 139 of 216

6. Put the jack in the jack notch
next to the door of the tire you are
changing. Turn the jack handle
clockwise until the wheel is
completely off the ground.
7. Remove the lug nuts with the lug
nut wrench.
8. Replace the flat tire with the spare tire, making sure the valve stem is
facing outward. Reinstall lug nuts until the wheel is snug against the hub.
Do not fully tighten the lug nuts until the wheel has been lowered.
9. Lower the wheel by turning the jack handle counterclockwise.
10. Remove the jack and fully
tighten the lug nuts in the order
shown.
11. Return the flat tire, jack and lug
wrench to their proper storage
locations. Make sure the jack is
fastened so it does not rattle when
you drive.
12. Unblock the wheels.
1
4 3
2 5
Roadside Emergencies
139
Page 145 of 216
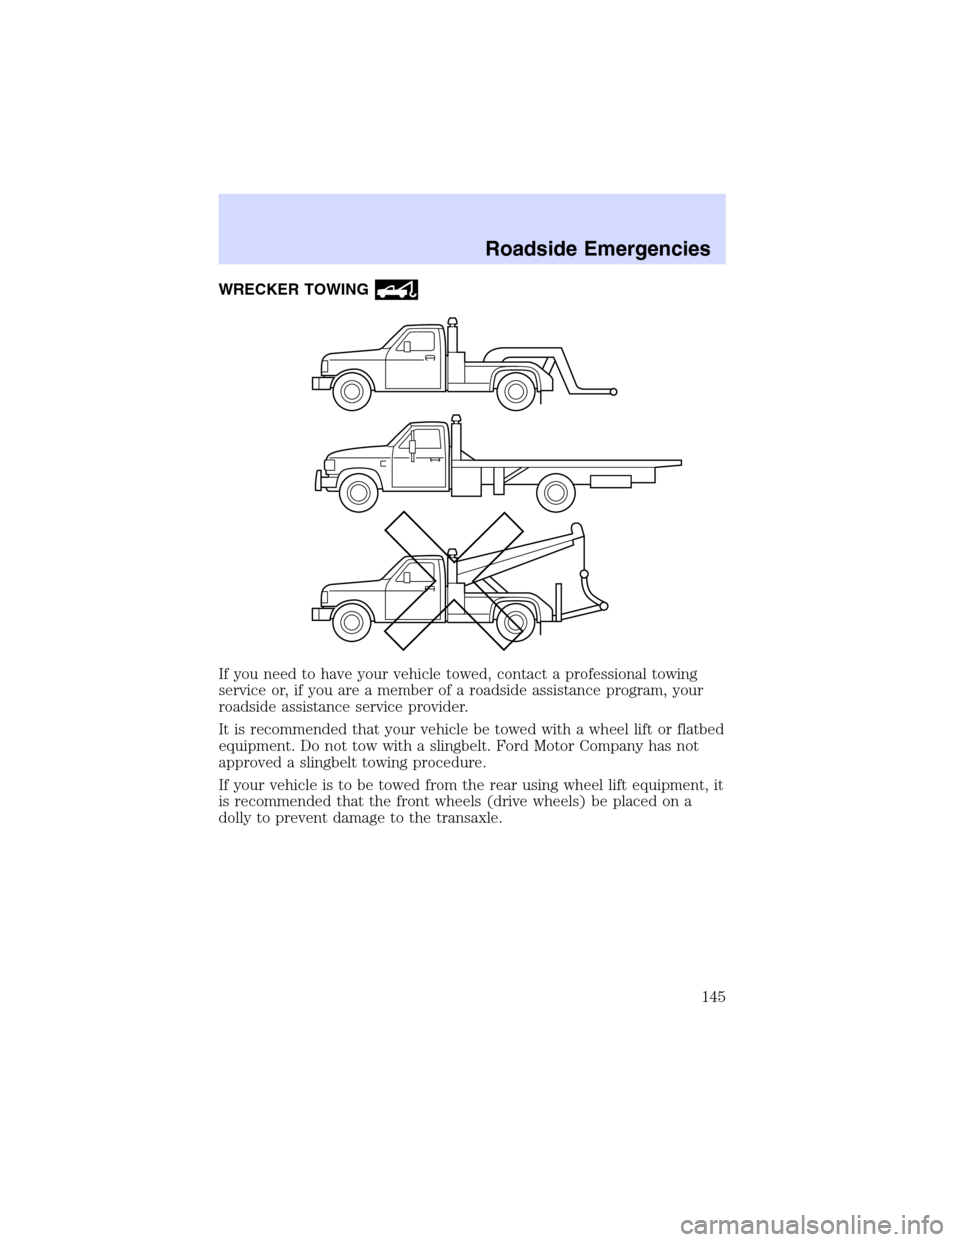
WRECKER TOWING
If you need to have your vehicle towed, contact a professional towing
service or, if you are a member of a roadside assistance program, your
roadside assistance service provider.
It is recommended that your vehicle be towed with a wheel lift or flatbed
equipment. Do not tow with a slingbelt. Ford Motor Company has not
approved a slingbelt towing procedure.
If your vehicle is to be towed from the rear using wheel lift equipment, it
is recommended that the front wheels (drive wheels) be placed on a
dolly to prevent damage to the transaxle.
Roadside Emergencies
145
Page 146 of 216

If your vehicle must be towed with the drive wheels on the ground:
•Place the transaxle in N (Neutral).
•DO NOT exceed the distance of 80 km (50 miles).
•DO NOT exceed the speed of 56 km/h (35 mph).
If the vehicle is towed by other means or incorrectly, vehicle
damage may occur.
Ford Motor Company produces a towing manual for all authorized tow
truck operators. Have your tow truck operator refer to this manual for
proper hook-up and towing procedures for your vehicle.
Roadside Emergencies
146
Page 157 of 216
•Remove particles such as bird droppings, tree sap, insect deposits, tar
spots, road salt and industrial fallout before repairing paint chips.
•Always read the instructions before using the products.
ALUMINUM WHEELS AND WHEEL COVERS
Aluminum wheels and wheel covers are coated with a clearcoat paint
finish. In order to maintain their shine:
•Clean weekly with Motorcraft Wheel and Tire Cleaner (ZC-37–A),
which is available from your dealer. Heavy dirt and brake dust
accumulation may require agitation with a sponge. Rinse thoroughly
with a strong stream of water.
•Never apply any cleaning chemical to hot or warm wheel rims or
covers.
•Some automatic car washes may cause damage to the finish on your
wheel rims or covers. Chemical-strength cleaners, or cleaning
chemicals, in combination with brush agitation to remove brake dust
and dirt, could wear away the clearcoat finish over time.
•Do not use hydrofluoric acid-based or high caustic-based wheel
cleaners, steel wool, fuels or strong household detergent.
•To remove tar and grease, use Ford Extra Strength Tar and Road Oil
Removal (B7A-19520–AA), available from your dealer.
ENGINE
Engines are more efficient when they are clean because grease and dirt
buildup keep the engine warmer than normal. When washing:
•Take care when using a power washer to clean the engine. The
high-pressure fluid could penetrate the sealed parts and cause
damage.
•Do not spray a hot engine with cold water to avoid cracking the
engine block or other engine components.
•Spray Motorcraft Engine Shampoo and Degreaser (ZC-20) on all parts
that require cleaning and pressure rinse clean.
•Cover the highlighted areas to prevent water damage when cleaning
the engine.
Cleaning
157