Mercury Sable 2004 Owner's Manuals
Manufacturer: MERCURY, Model Year: 2004, Model line: Sable, Model: Mercury Sable 2004Pages: 248, PDF Size: 2.28 MB
Page 151 of 248

FUSES
If electrical components in the
vehicle are not working, a fuse may
have blown. Blown fuses are
identified by a broken wire within
the fuse. Check the appropriate
fuses before replacing any electrical
components.
Note:Always replace a fuse with one that has the specified amperage
rating. Using a fuse with a higher amperage rating can cause severe wire
damage and could start a fire.
Standard fuse amperage rating and color
COLOR
Fuse
ratingMini
fusesStandard
fusesMaxi
fusesCartridge
Maxi
fusesFuse link
cartridge
2A Grey Grey———
3A Violet Violet———
4A Pink Pink———
5A Tan Tan———
7.5A Brown Brown———
10A Red Red———
15A Blue Blue———
20A Yellow Yellow Yellow Blue Blue
25A Natural Natural———
30A Green Green Green Pink Pink
40A——Amber Green Green
50A——Red Red Red
60A——Blue—Yellow
70A——Ta n—Brown
80A——Natural—Black
Passenger compartment fuse panel
The fuse panel is located below and to the left of the steering wheel by
the brake pedal. Remove the panel cover to access the fuses.
15
2004 Sable(sab)
Owners Guide (post-2002-fmt)
USA English(fus)
Roadside Emergencies
151
Page 152 of 248

To remove a fuse use the fuse puller tool provided on the fuse panel
cover.
The fuses are coded as follows.
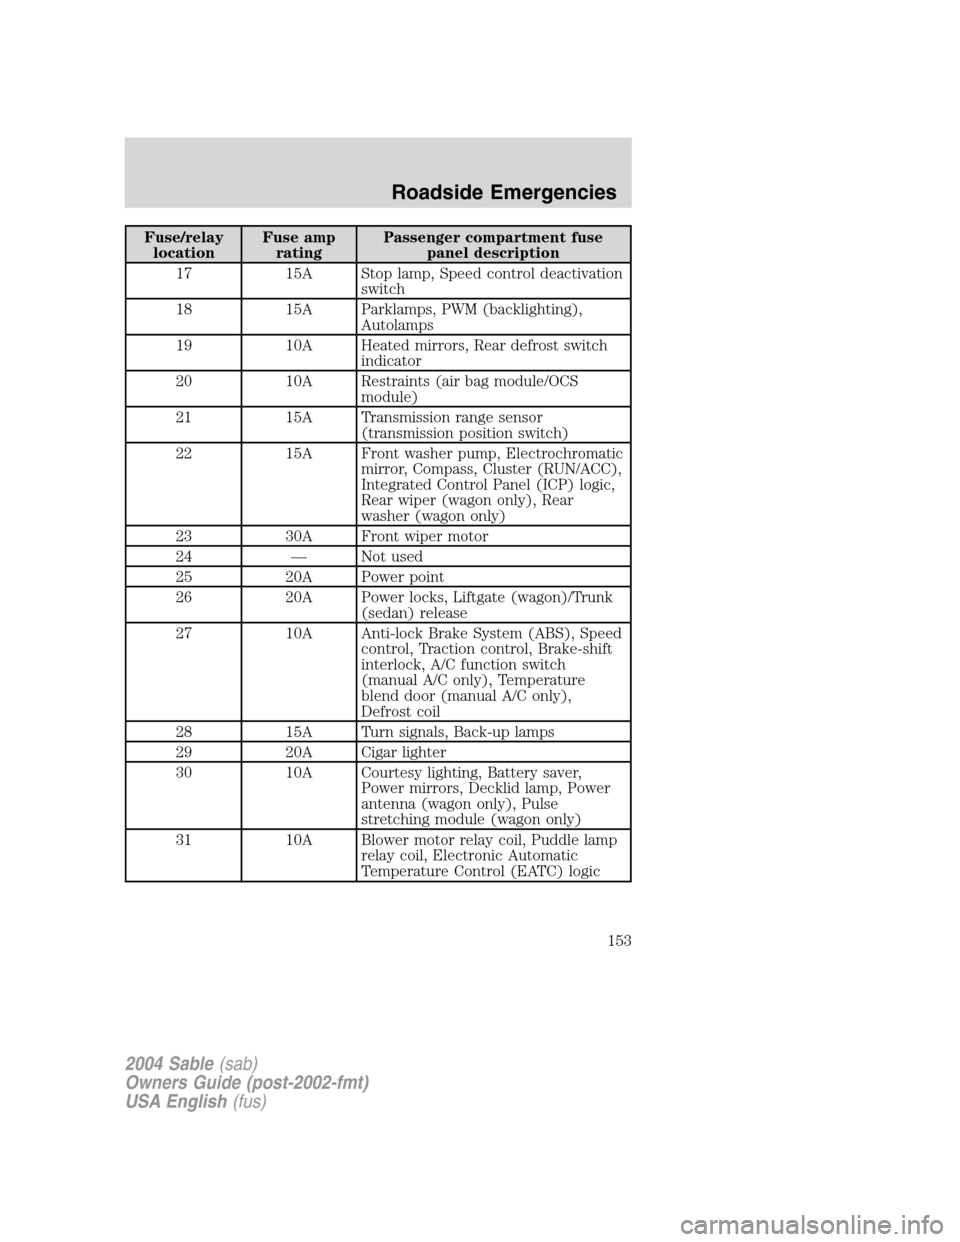
Fuse/relay
locationFuse amp
ratingPassenger compartment fuse
panel description
1—Accessory delay relay
2—Driver one touch down relay
3—Blower motor relay
4—Flasher relay
5—Not used
6—Not used
7 20A Rear defrost grid feed (wagon
only)/Rear defrost relay coil feed
(sedan only)
8 40A Blower motor
9—Rear defrost relay
10 30A CB Power seats, Delayed accessory,
Adjustable pedals
11 10A Right headlamp
12 15A Highbeam headlamps
13—Not used
14—Not used
15 10A Left headlamp
16 10A Foglamps
2004 Sable(sab)
Owners Guide (post-2002-fmt)
USA English(fus)
Roadside Emergencies
152
Page 153 of 248

Fuse/relay
locationFuse amp
ratingPassenger compartment fuse
panel description
17 15A Stop lamp, Speed control deactivation
switch
18 15A Parklamps, PWM (backlighting),
Autolamps
19 10A Heated mirrors, Rear defrost switch
indicator
20 10A Restraints (air bag module/OCS
module)
21 15A Transmission range sensor
(transmission position switch)
22 15A Front washer pump, Electrochromatic
mirror, Compass, Cluster (RUN/ACC),
Integrated Control Panel (ICP) logic,
Rear wiper (wagon only), Rear
washer (wagon only)
23 30A Front wiper motor
24—Not used
25 20A Power point
26 20A Power locks, Liftgate (wagon)/Trunk
(sedan) release
27 10A Anti-lock Brake System (ABS), Speed
control, Traction control, Brake-shift
interlock, A/C function switch
(manual A/C only), Temperature
blend door (manual A/C only),
Defrost coil
28 15A Turn signals, Back-up lamps
29 20A Cigar lighter
30 10A Courtesy lighting, Battery saver,
Power mirrors, Decklid lamp, Power
antenna (wagon only), Pulse
stretching module (wagon only)
31 10A Blower motor relay coil, Puddle lamp
relay coil, Electronic Automatic
Temperature Control (EATC) logic
2004 Sable(sab)
Owners Guide (post-2002-fmt)
USA English(fus)
Roadside Emergencies
153
Page 154 of 248

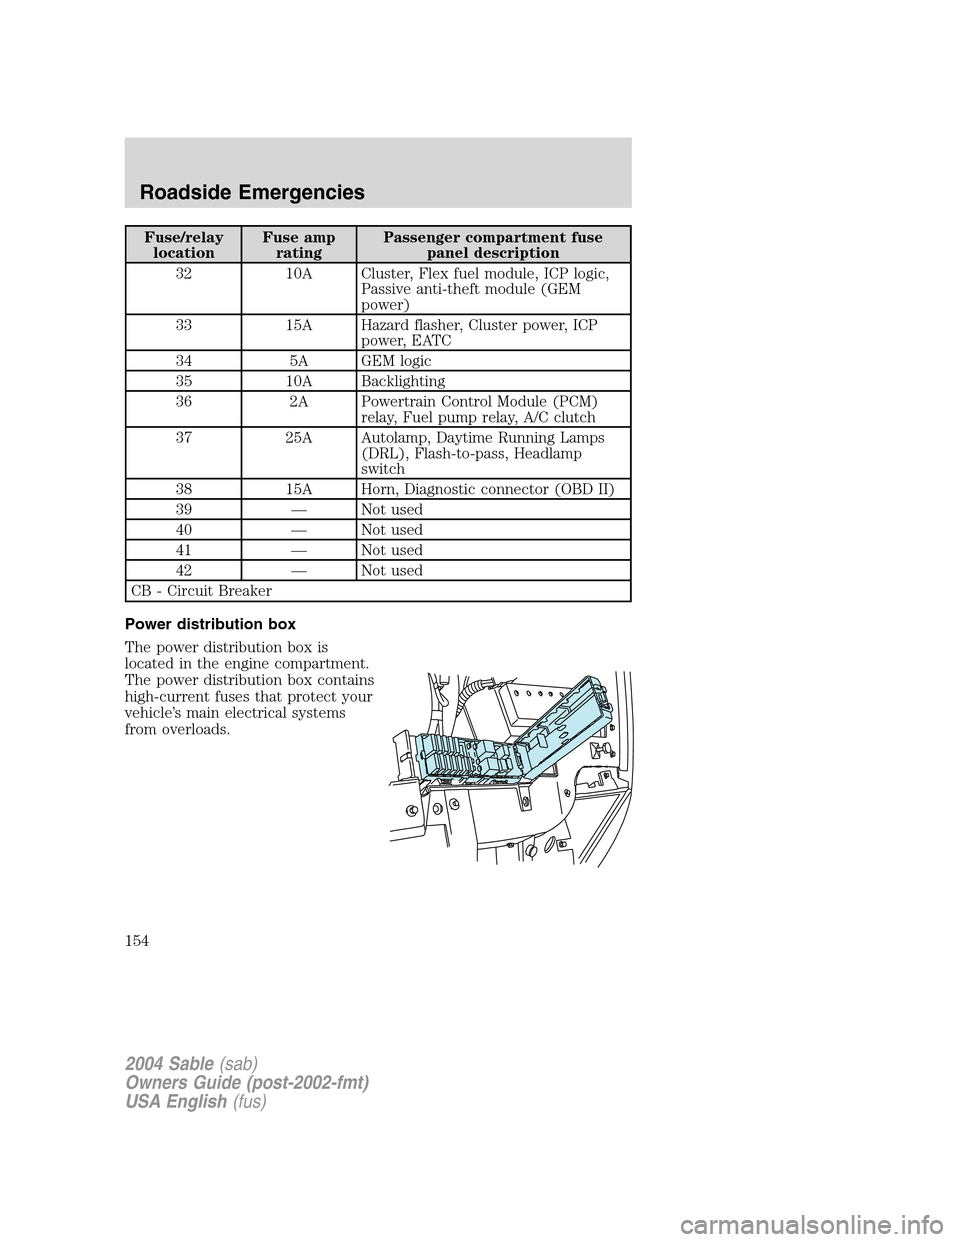
Fuse/relay
locationFuse amp
ratingPassenger compartment fuse
panel description
32 10A Cluster, Flex fuel module, ICP logic,
Passive anti-theft module (GEM
power)
33 15A Hazard flasher, Cluster power, ICP
power, EATC
34 5A GEM logic
35 10A Backlighting
36 2A Powertrain Control Module (PCM)
relay, Fuel pump relay, A/C clutch
37 25A Autolamp, Daytime Running Lamps
(DRL), Flash-to-pass, Headlamp
switch
38 15A Horn, Diagnostic connector (OBD II)
39—Not used
40—Not used
41—Not used
42—Not used
CB - Circuit Breaker
Power distribution box
The power distribution box is
located in the engine compartment.
The power distribution box contains
high-current fuses that protect your
vehicle’s main electrical systems
from overloads.
2004 Sable(sab)
Owners Guide (post-2002-fmt)
USA English(fus)
Roadside Emergencies
154
Page 155 of 248

Always disconnect the battery before servicing high current
fuses.
To reduce risk of electrical shock, always replace the cover to
the Power Distribution Box before reconnecting the battery or
refilling fluid reservoirs.
If the battery has been disconnected and reconnected, refer to the
Batterysection of the chapter.
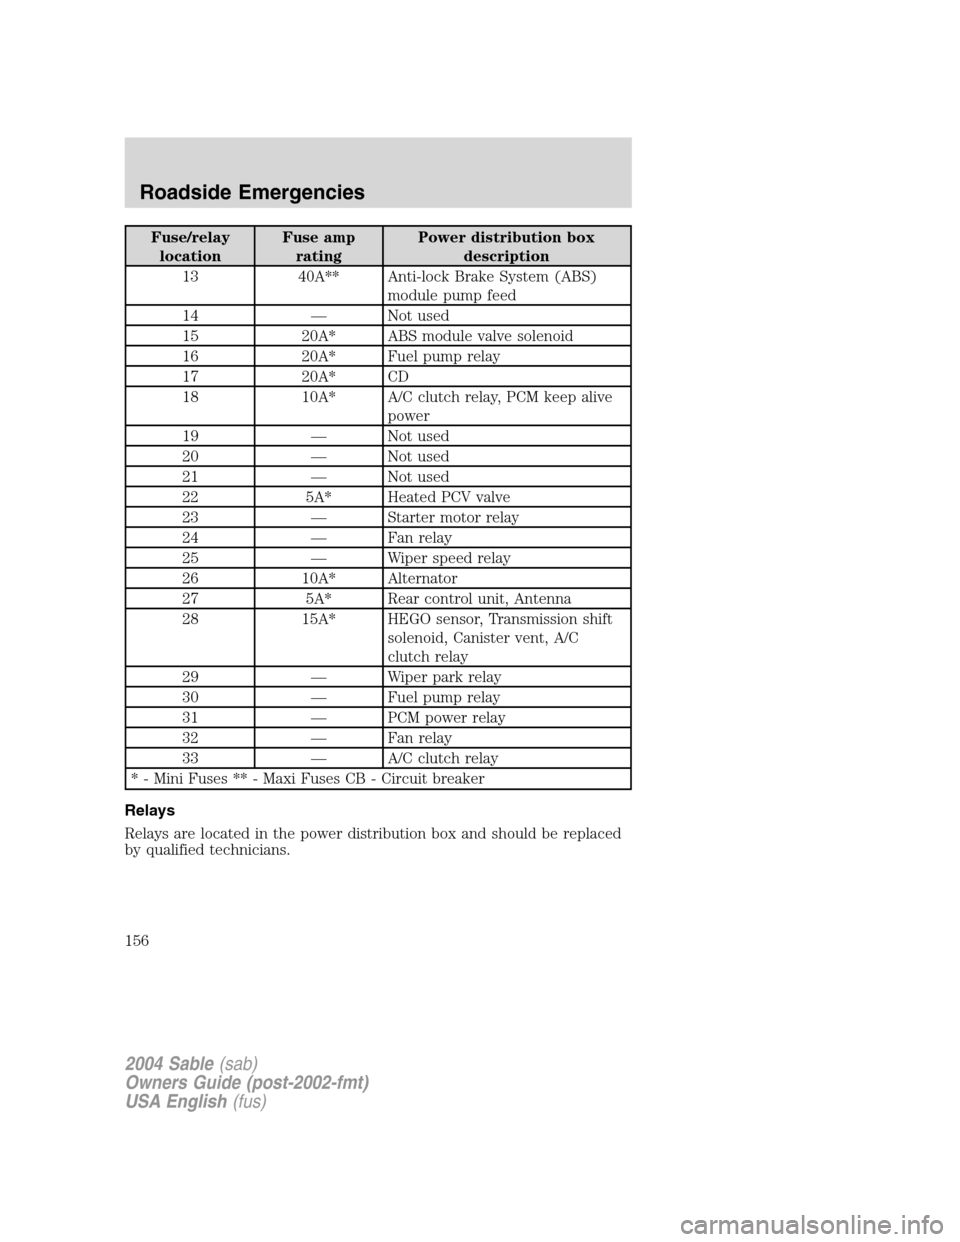
The high-current fuses are coded as follows.
Fuse/relay
locationFuse amp
ratingPower distribution box
description
1 60A** Fuse junction panel
2 30A** Powertrain Control Module (PCM)
3 60A** Fuse junction panel
4 10A CB Low speed cooling fan
5 40A** Cooling fan
6—Not used
7 40A** Starter relay, Ignition switch
8—Not used
9 20A** Cooling fan (passenger side)
10 20A** Cooling fan (driver side)
11 50A** Rear defrost (sedan only)
12—Not used
1
23
4
56
7
8
910
11 12
1314
1516 17
18
19202122
2324
25
29
3026 27 28
31
32
33
2004 Sable(sab)
Owners Guide (post-2002-fmt)
USA English(fus)
Roadside Emergencies
155
Page 156 of 248

Fuse/relay
locationFuse amp
ratingPower distribution box
description
13 40A** Anti-lock Brake System (ABS)
module pump feed
14—Not used
15 20A* ABS module valve solenoid
16 20A* Fuel pump relay
17 20A* CD
18 10A* A/C clutch relay, PCM keep alive
power
19—Not used
20—Not used
21—Not used
22 5A* Heated PCV valve
23—Starter motor relay
24—Fan relay
25—Wiper speed relay
26 10A* Alternator
27 5A* Rear control unit, Antenna
28 15A* HEGO sensor, Transmission shift
solenoid, Canister vent, A/C
clutch relay
29—Wiper park relay
30—Fuel pump relay
31—PCM power relay
32—Fan relay
33—A/C clutch relay
* - Mini Fuses ** - Maxi Fuses CB - Circuit breaker
Relays
Relays are located in the power distribution box and should be replaced
by qualified technicians.
2004 Sable(sab)
Owners Guide (post-2002-fmt)
USA English(fus)
Roadside Emergencies
156
Page 157 of 248

CHANGING THE TIRES
If you get a flat tire while driving, do not apply the brake heavily.
Instead, gradually decrease your speed. Hold the steering wheel firmly
and slowly move to a safe place on the side of the road.
The use of tire sealants is not recommended and may damage
your tires.
Temporary spare tire information
The temporary spare tire for your vehicle is labeled as such. It is smaller
than a regular tire and is designed for emergency use only. Replace the
temporary spare tire with a full-size tire as soon as possible.
If you use the temporary spare tire continuously or do not follow
these precautions, the tire could fail, causing you to lose control
of the vehicle, possibly injuring yourself or others.
When driving with the temporary spare tiredo not:
•use more than one temporary spare tire at a time
•exceed 80 km/h (50 mph)
•load the vehicle beyond maximum vehicle load rating listed on the
Safety Compliance Label
•tow a trailer
•use tire chains
•drive through an automatic car wash, because of the vehicle’s reduced
ground clearance
•try to repair the temporary spare tire or remove it from its wheel
•use the wheel for any other type of vehicle
Use of a temporary spare tire at any one wheel location can lead to
impairment of the following:
•handling, stability and braking performance
•comfort and noise
•ground clearance and parking at curbs
•Winter driving capability
2004 Sable(sab)
Owners Guide (post-2002-fmt)
USA English(fus)
Roadside Emergencies
157
Page 158 of 248

Dissimilar spare tire/wheel information
Failure to follow these guidelines could result in an increased
risk of loss of vehicle control, injury or death.
Your vehicle may be equipped with a dissimilar spare tire/wheel. A
dissimilar spare tire/wheel is defined as a spare tire and/or wheel that is
different in brand, size or appearance from the road tires and wheels. If
you have a dissimilar spare tire/wheel, then it is intended for temporary
use only. This means that if you need to use it, you should replace it as
soon as possible with a road tire/wheel that is the same size and type as
the road tires and wheels that were originally provided by Ford. If the
dissimilar spare tire or wheel is damaged, it should be replaced rather
than repaired.
When driving with the dissimilar spare tire/wheel,do not:
•Exceed 113 km/h (70 mph)
•Use more than one dissimilar spare tire/wheel at a time
•Use commercial car washing equipment
•Use snow chains on the end of the vehicle with the dissimilar spare
tire/wheel
The usage of a dissimilar spare tire/wheel can lead to impairment of the
following:
•Handling, stability and braking performance
•Comfort and noise
•Ground clearance and parking at curbs
•Winter weather driving capability
•Wet weather driving capability
•All-Wheel Driving Capability (if applicable)
•Load Leveling Adjustment (if applicable)
When driving with the dissimilar spare tire/wheel additional caution
should be given to:
•Towing a trailer
•Driving vehicles equipped with a camper body
•Driving vehicles with a load on the cargo rack
Drive cautiously when using a dissimilar spare tire/wheel and seek
service as soon as possible.
2004 Sable(sab)
Owners Guide (post-2002-fmt)
USA English(fus)
Roadside Emergencies
158
Page 159 of 248

Tire change procedure
1. Park on a level surface, activate hazard flashers and set parking brake.
When one of the front wheels is off the ground, the transaxle
alone will not prevent the vehicle from moving or slipping off the
jack, even if the vehicle is in P (Park).
To help prevent the vehicle from moving when you change a tire,
be sure the parking brake is set, then block (in both directions)
the wheel that is diagonally opposite (other side and end of the
vehicle) to the tire being changed.
If the vehicle slips off the jack, you or someone else could be
seriously injured.
2. Place gearshift lever in P (Park),
turn engine OFF, block the
diagonally opposite wheel, then
remove the spare tire, jack and lug
wrench.
•In the sedan, these are located in
the trunk cargo area storage
compartment.
2004 Sable(sab)
Owners Guide (post-2002-fmt)
USA English(fus)
Roadside Emergencies
159
Page 160 of 248

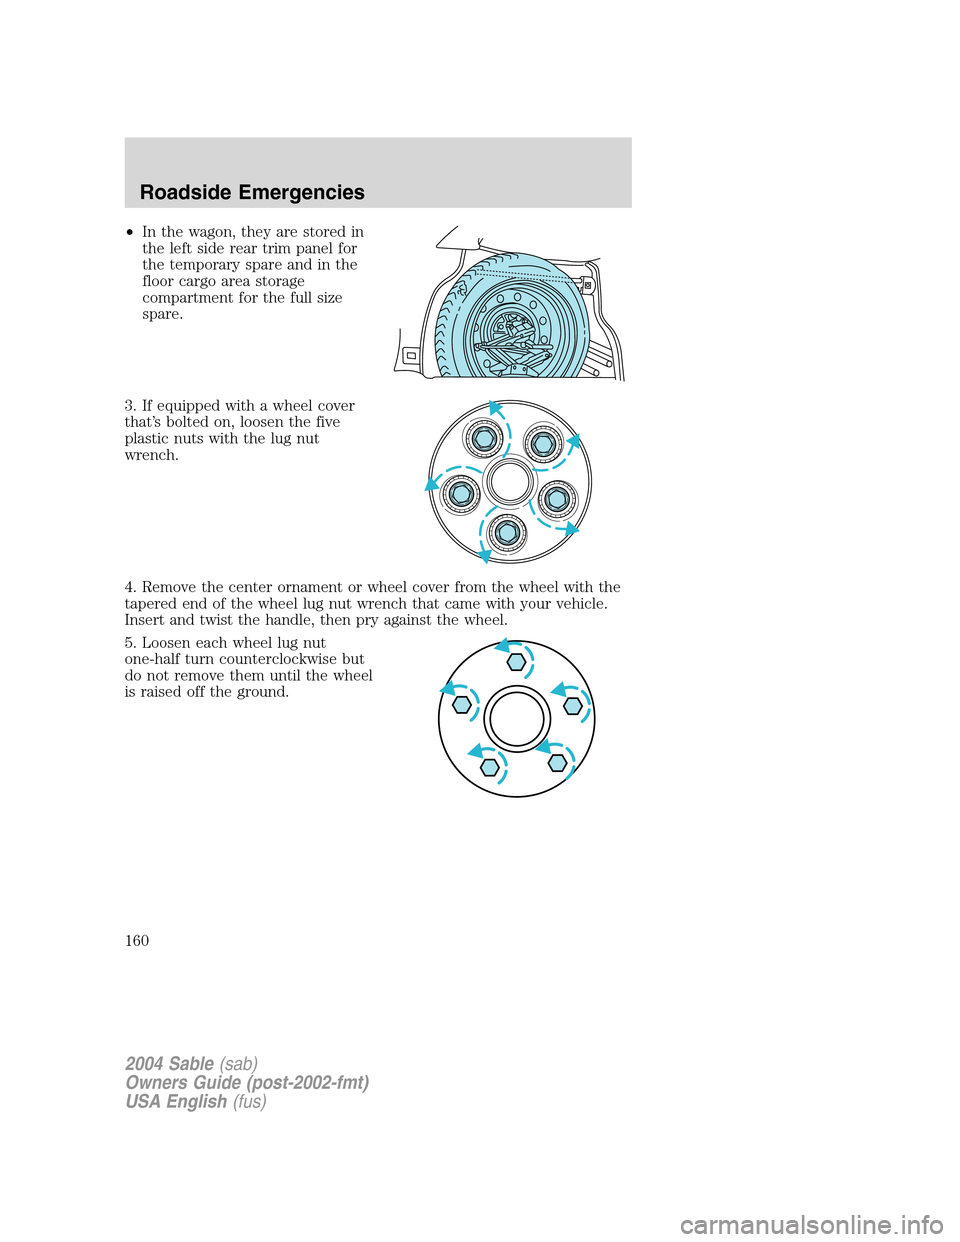
•In the wagon, they are stored in
the left side rear trim panel for
the temporary spare and in the
floor cargo area storage
compartment for the full size
spare.
3. If equipped with a wheel cover
that’s bolted on, loosen the five
plastic nuts with the lug nut
wrench.
4. Remove the center ornament or wheel cover from the wheel with the
tapered end of the wheel lug nut wrench that came with your vehicle.
Insert and twist the handle, then pry against the wheel.
5. Loosen each wheel lug nut
one-half turn counterclockwise but
do not remove them until the wheel
is raised off the ground.
2004 Sable(sab)
Owners Guide (post-2002-fmt)
USA English(fus)
Roadside Emergencies
160