audio Mercury Villager 1999 s User Guide
[x] Cancel search | Manufacturer: MERCURY, Model Year: 1999, Model line: Villager, Model: Mercury Villager 1999Pages: 264, PDF Size: 2.19 MB
Page 75 of 264

The rear speakers will cut out once the speaker on/off control is pressed.
A soft audible sound may be heard from the rear speakers. The front
speaker will remain playing for the front passengers. Press the
/
control again to deactivate headphones (Personal Audio System).
Media select
Push the MEDIA control to toggle
between AM, FM1, FM2, tape, CD,
or CD changer (if equipped).
Memory preset control
Push the MEM control successively
to allow rear seat passengers to
scroll through the 6 memory presets
in AM, FM1, or FM2.
Push the MEM control in CD
changer mode (if equipped) to
advance to the next disc.
Seek function
²Pressto find the next
listenable station down the
frequency band.
²Press
to find the next
listenable station up the
frequency band.
In tape mode, use the SEEK function to access the next
or previous
selection.
In CD or CD changer mode (if equipped), use the SEEK function to
access the next
or previousselection.
VOLUME MEDIA
MEMSEEK
VOLUME MEDIA
MEMSEEK
VOLUME MEDIA
MEMSEEK
Controls and features
75
Page 78 of 264
The CD magazine may be inserted or ejected with the radio power on or off.
ONLY use the magazine type supplied with the CD changer, other types
will damage the unit.
Keep the CD changer door closed. Coins and foreign objects will damage
the CD player and void your audio system warranty.
Do not insert any promotional (odd shaped or sized) discs into
the CD changer as that jamming may occur.
Troubleshooting the CD changer (if equipped)
The laser beam used in the compact disc player is harmful to the
eyes. Do not attempt to disassemble the case.
If sound skips:
²You may be traveling on a rough road, playing badly scratched discs or
the disc may be dirty. Skipping will not scratch the discs or damage
the player.
If your changer does not work, it may be that:
²A disc is already loaded where you want to insert a disc.
²The disc is inserted with the label surface downward.
²The disc is dusty or defective.
²The player's internal temperature is above 60ÉC (140ÉF). Allow the
player to cool down before operating.
²A disc with format and dimensions not within industry standards is
inserted.
Cleaning compact discs
Inspect all discs for contamination before playing. If necessary, clean
discs only with an approved CD cleaner and wipe from the center out to
the edge. Do not use circular motion.
CD and CD changer care
²Handle discs by their edges only. Never touch the playing surface.
²Do not expose discs to direct sunlight or heat sources for extended
periods of time.
²Do not insert more than one disc into each slot of the CD changer
magazine.
Controls and features
78
Page 80 of 264
²Station overload.Weak signals are sometimes captured by stronger
signals when you pass a broadcast tower. A stronger signal may
temporarily overtake a weaker signal and play while the weak station
frequency is displayed.
The audio system automatically switches to single channel reception if it
will improve the reception of a station normally received in stereo.
Audio system warranties and service
Refer to the ªWarranty Guideº for audio system warranty information.
If service is necessary, see your dealer or a qualified technician.
AUXILIARY POWER POINT
The power point is an additional power source for electrical accessories.
There are two auxiliary power points:
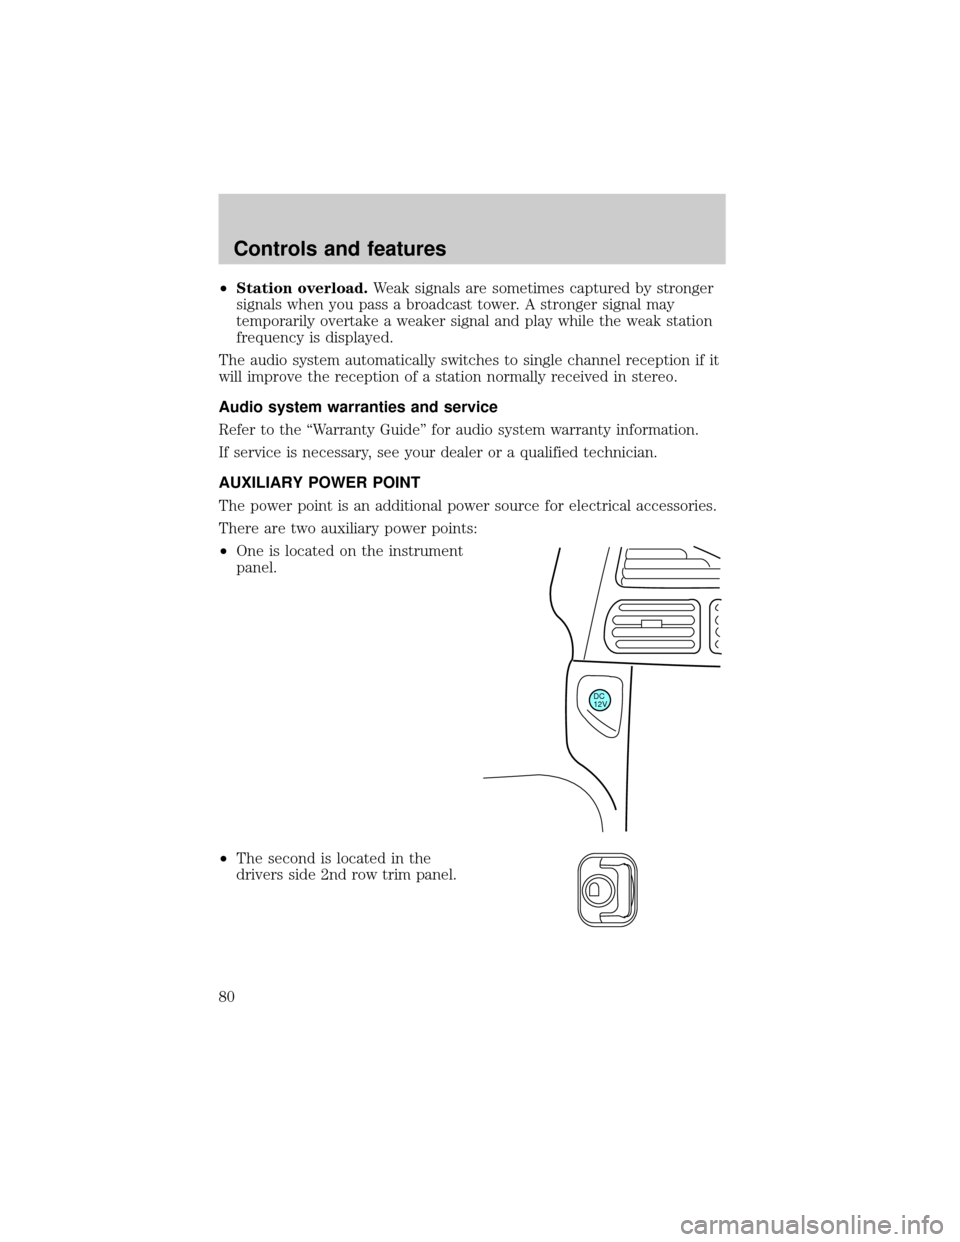
²One is located on the instrument
panel.
²The second is located in the
drivers side 2nd row trim panel.
DC
12V
Controls and features
80
Page 85 of 264
To return to a previously set speed
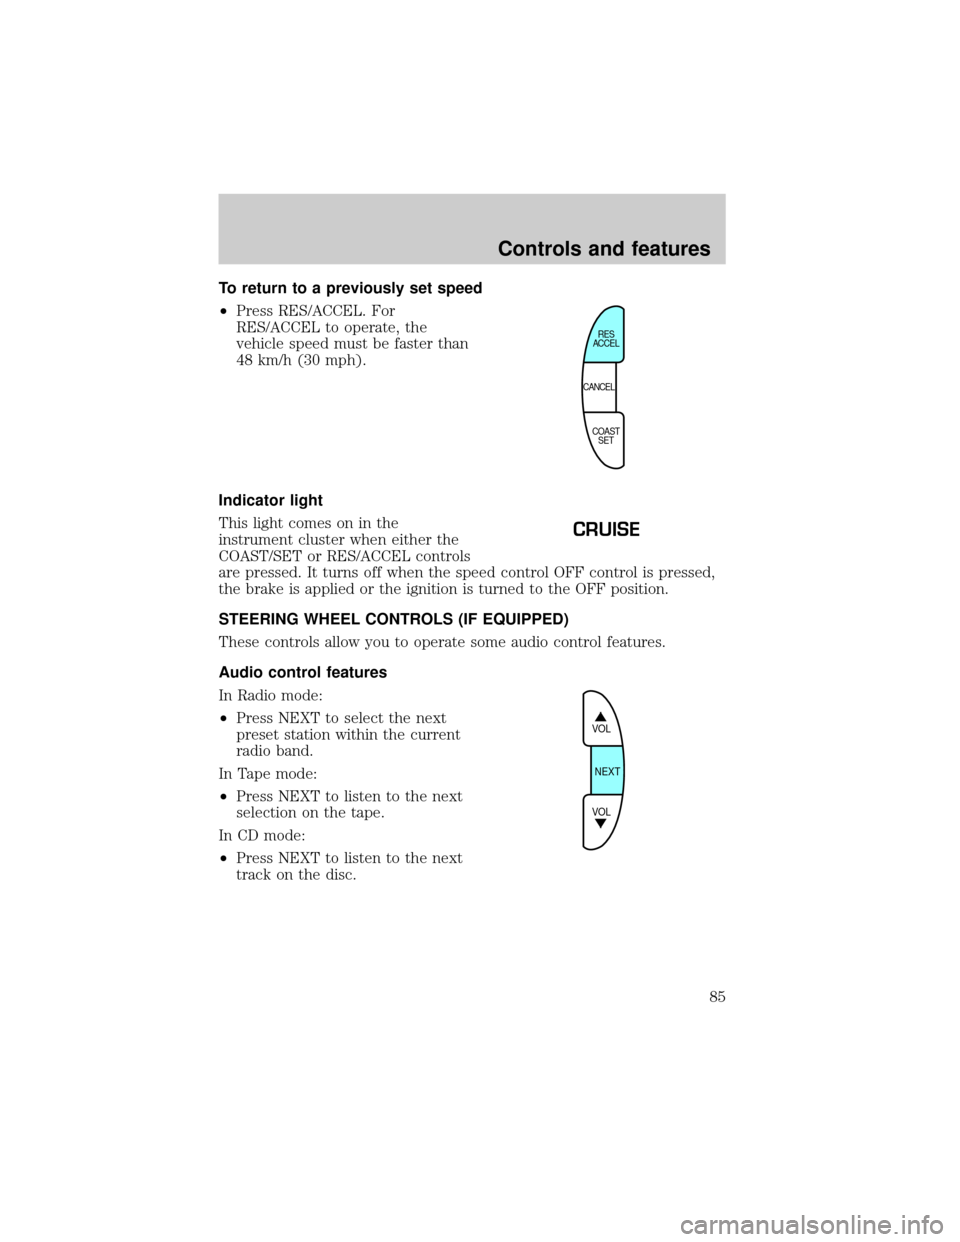
²Press RES/ACCEL. For
RES/ACCEL to operate, the
vehicle speed must be faster than
48 km/h (30 mph).
Indicator light
This light comes on in the
instrument cluster when either the
COAST/SET or RES/ACCEL controls
are pressed. It turns off when the speed control OFF control is pressed,
the brake is applied or the ignition is turned to the OFF position.
STEERING WHEEL CONTROLS (IF EQUIPPED)
These controls allow you to operate some audio control features.
Audio control features
In Radio mode:
²Press NEXT to select the next
preset station within the current
radio band.
In Tape mode:
²Press NEXT to listen to the next
selection on the tape.
In CD mode:
²Press NEXT to listen to the next
track on the disc.
CANCELRES
ACCEL
COAST
SET
CRUISE
VOL
NEXT
VOL
Controls and features
85
Page 174 of 264
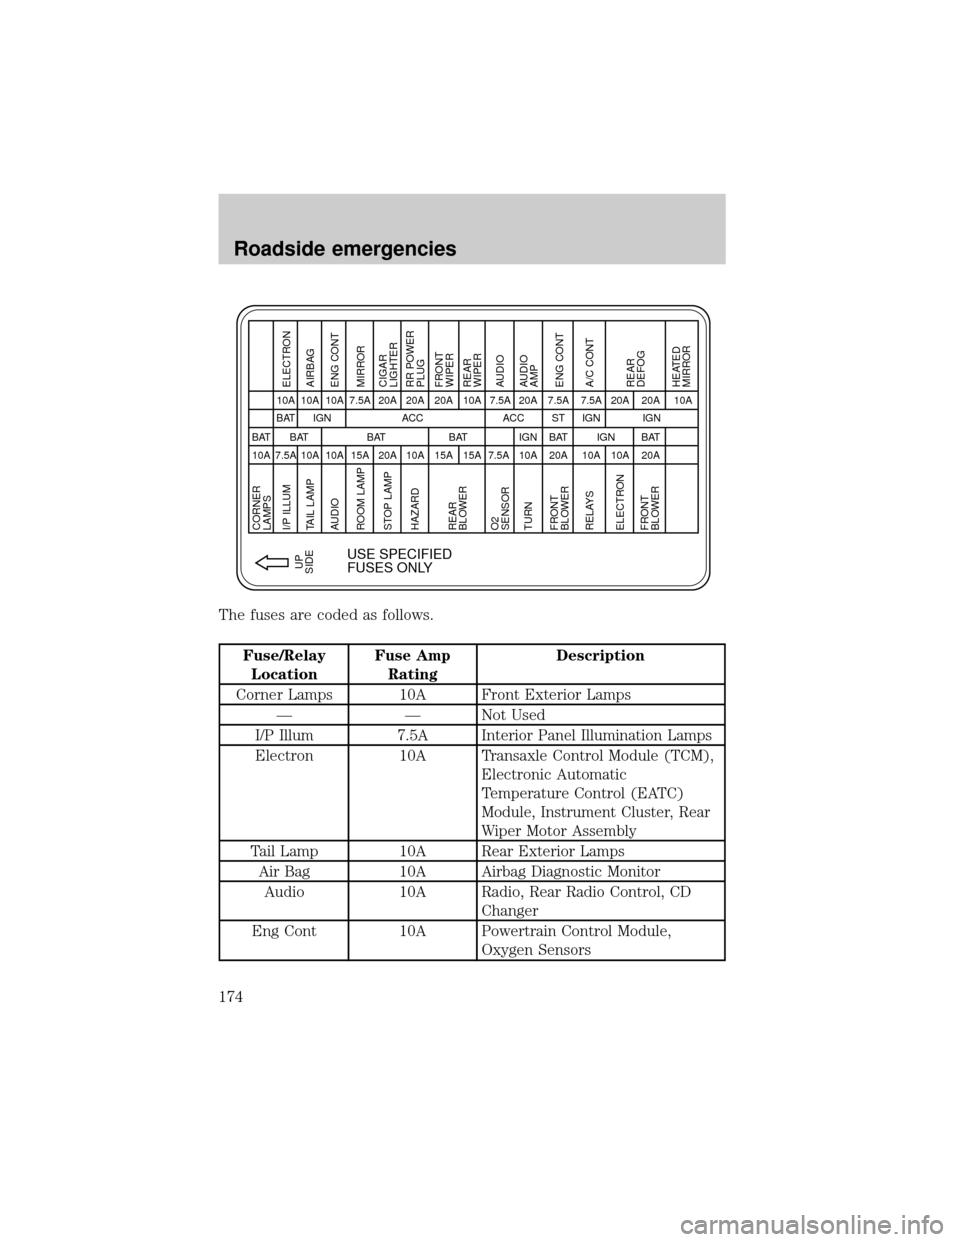
The fuses are coded as follows.
Fuse/Relay
LocationFuse Amp
RatingDescription
Corner Lamps 10A Front Exterior Lamps
Ð Ð Not Used
I/P Illum 7.5A Interior Panel Illumination Lamps
Electron 10A Transaxle Control Module (TCM),
Electronic Automatic
Temperature Control (EATC)
Module, Instrument Cluster, Rear
Wiper Motor Assembly
Tail Lamp 10A Rear Exterior Lamps
Air Bag 10A Airbag Diagnostic Monitor
Audio 10A Radio, Rear Radio Control, CD
Changer
Eng Cont 10A Powertrain Control Module,
Oxygen Sensors
CORNER
LAMPS
I/P ILLUM
10A BAT
7.5ABAT IGN ACC
USE SPECIFIED
FUSES ONLY
ACC 10A
10A 10A
10A 10A
15A 7.5A
20A 20A
10A 20A
15A 20A
15A 7.5A 10A 7.5A
BAT BAT BAT
10A 20A
IGNST
20A 7.5A
BAT
20A 20A 10A
BAT IGN IGN
10A 7.5A
10A 20A
IGN
UP
SIDEELECTRON
TAIL LAMP AIRBAG
AUDIO ENG CONT
ROOM LAMP MIRROR
RELAYS A/C CONT
ELECTRON
FRONT
BLOWERREAR
DEFOG
HEATED
MIRROR STOP LAMPCIGAR
LIGHTER
HAZARDRR POWER
PLUG
TURNAUDIO
AMP
FRONT
BLOWERENG CONT REAR
BLOWER
O2
SENSORFRONT
WIPER
REAR
WIPER
AUDIO
Roadside emergencies
174
Page 175 of 264
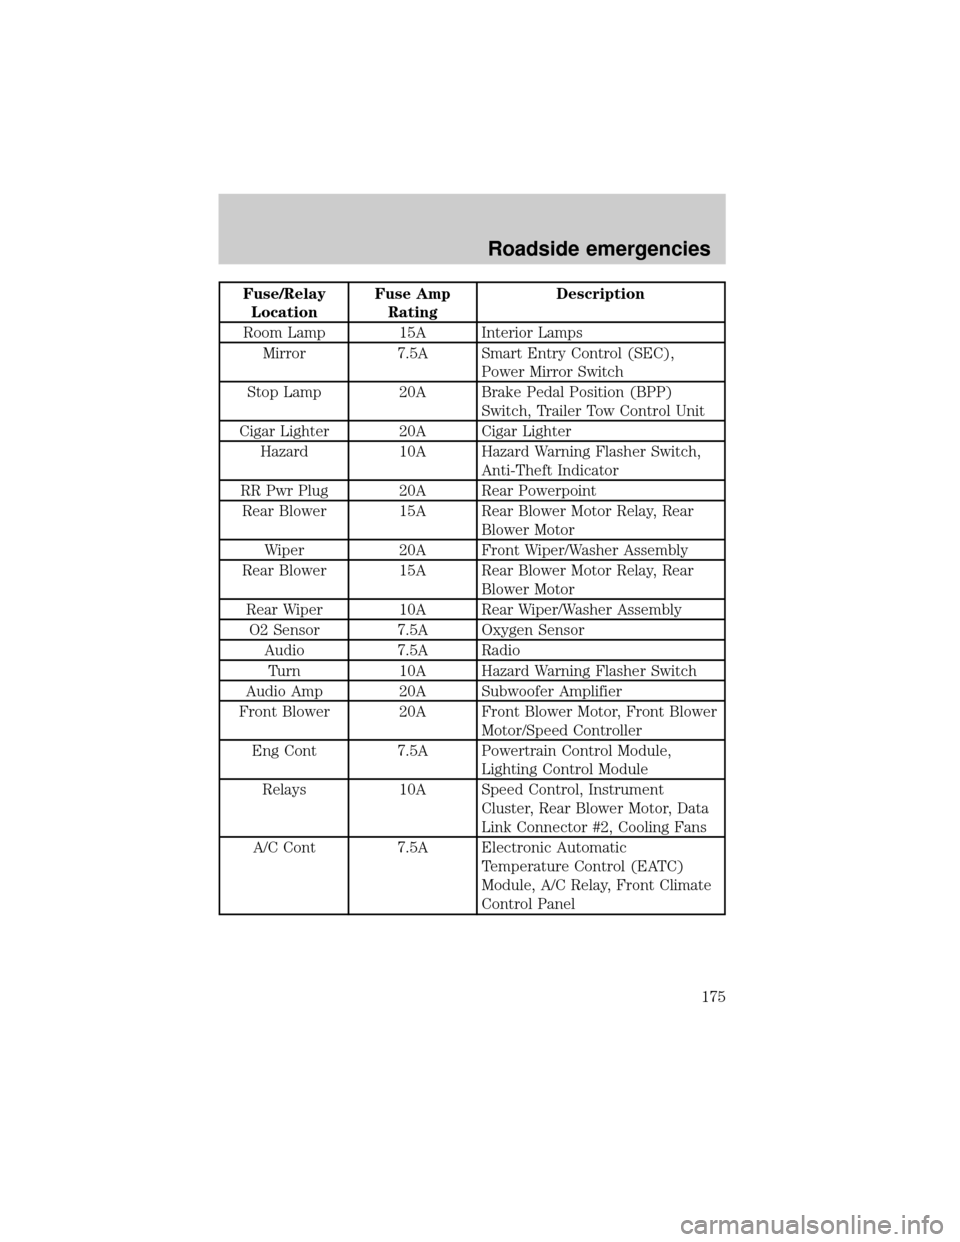
Fuse/Relay
LocationFuse Amp
RatingDescription
Room Lamp 15A Interior Lamps
Mirror 7.5A Smart Entry Control (SEC),
Power Mirror Switch
Stop Lamp 20A Brake Pedal Position (BPP)
Switch, Trailer Tow Control Unit
Cigar Lighter 20A Cigar Lighter
Hazard 10A Hazard Warning Flasher Switch,
Anti-Theft Indicator
RR Pwr Plug 20A Rear Powerpoint
Rear Blower 15A Rear Blower Motor Relay, Rear
Blower Motor
Wiper 20A Front Wiper/Washer Assembly
Rear Blower 15A Rear Blower Motor Relay, Rear
Blower Motor
Rear Wiper 10A Rear Wiper/Washer Assembly
O2 Sensor 7.5A Oxygen Sensor
Audio 7.5A Radio
Turn 10A Hazard Warning Flasher Switch
Audio Amp 20A Subwoofer Amplifier
Front Blower 20A Front Blower Motor, Front Blower
Motor/Speed Controller
Eng Cont 7.5A Powertrain Control Module,
Lighting Control Module
Relays 10A Speed Control, Instrument
Cluster, Rear Blower Motor, Data
Link Connector #2, Cooling Fans
A/C Cont 7.5A Electronic Automatic
Temperature Control (EATC)
Module, A/C Relay, Front Climate
Control Panel
Roadside emergencies
175