window Mercury Villager 1999 s User Guide
[x] Cancel search | Manufacturer: MERCURY, Model Year: 1999, Model line: Villager, Model: Mercury Villager 1999Pages: 264, PDF Size: 2.19 MB
Page 106 of 264

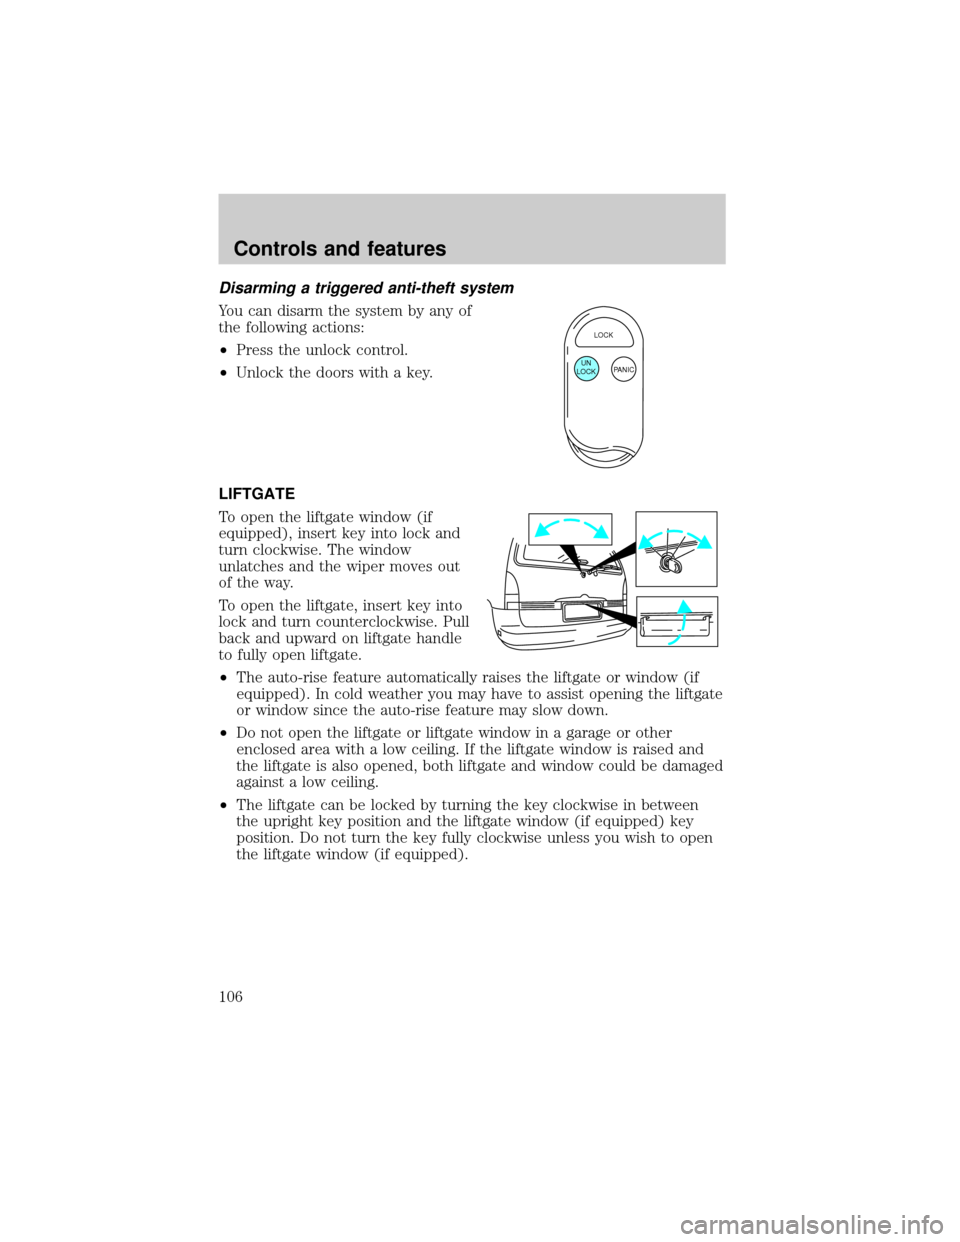
Disarming a triggered anti-theft system
You can disarm the system by any of
the following actions:
²Press the unlock control.
²Unlock the doors with a key.
LIFTGATE
To open the liftgate window (if
equipped), insert key into lock and
turn clockwise. The window
unlatches and the wiper moves out
of the way.
To open the liftgate, insert key into
lock and turn counterclockwise. Pull
back and upward on liftgate handle
to fully open liftgate.
²The auto-rise feature automatically raises the liftgate or window (if
equipped). In cold weather you may have to assist opening the liftgate
or window since the auto-rise feature may slow down.
²Do not open the liftgate or liftgate window in a garage or other
enclosed area with a low ceiling. If the liftgate window is raised and
the liftgate is also opened, both liftgate and window could be damaged
against a low ceiling.
²The liftgate can be locked by turning the key clockwise in between
the upright key position and the liftgate window (if equipped) key
position. Do not turn the key fully clockwise unless you wish to open
the liftgate window (if equipped).
LOCK
PANIC UN
LOCK
Controls and features
106
Page 107 of 264

Make sure that the liftgate door and/or window are closed to
prevent exhaust fumes from being drawn into the vehicle. This
will also prevent passengers and cargo from falling out. If you must
drive with the liftgate door or window open, keep the vents open so
outside air comes into the vehicle.
CARGO AREA FEATURES
Rear Cargo net
The cargo net helps stabilize lightweight objects in the cargo area.
Attach the net to the anchors provided. The cargo restrained in the net
must not exceed 22 kg (50 lbs.) or the net may not stay secured.
The cargo net is not designed to restrain objects during a
collision or heavy braking.
Controls and features
107
Page 150 of 264

4. Read all information and warnings
on the child seat cushion and
shoulder safety belt. The child seat
is to be used only by children who:
²are at least one year old
²weigh between 10 and 27 kg (22
and 60 lbs.)
²shoulders must be below the
shoulder harness slots
5. If connected, squeeze the top and the bottom of the right half of the
chest clip and pull to separate both halves and unbuckle the two safety
belt tongues from the crotch belt buckle.
6. Place the child on the child seat and position the shoulder belts over
each shoulder.
7. Insert either the left or the right
safety belt tongue into the single
opening of the crotch safety belt
buckle (it doesn't matter which
tongue is inserted first). Insert other
tongue. The color green must
appear in the indicator window on
the crotch safety belt buckle when
buckled. Allow belts to retract and
fit snugly.
8. Fasten both halves of the chest
clip below the child's shoulders and
adjust it to comfortably hold the
shoulder belts in place on the child's
chest. The color green must appear
in the indicator window when fastened.
9. Pull the shoulder belts toward you to make sure the crotch safety belt
buckle is properly fastened and the retractor is locked.
Seating and safety restraints
150
Page 156 of 264

Important ventilating information
If the engine is idling while the vehicle is stopped in an open area for
long periods of time, open the windows at least 2.5 cm (one inch).
Adjust the heating or air conditioning to bring in fresh air.
Improve vehicle ventilation by
keeping all air inlet vents clear of
snow, leaves and other debris.
Starting
156
Page 176 of 264

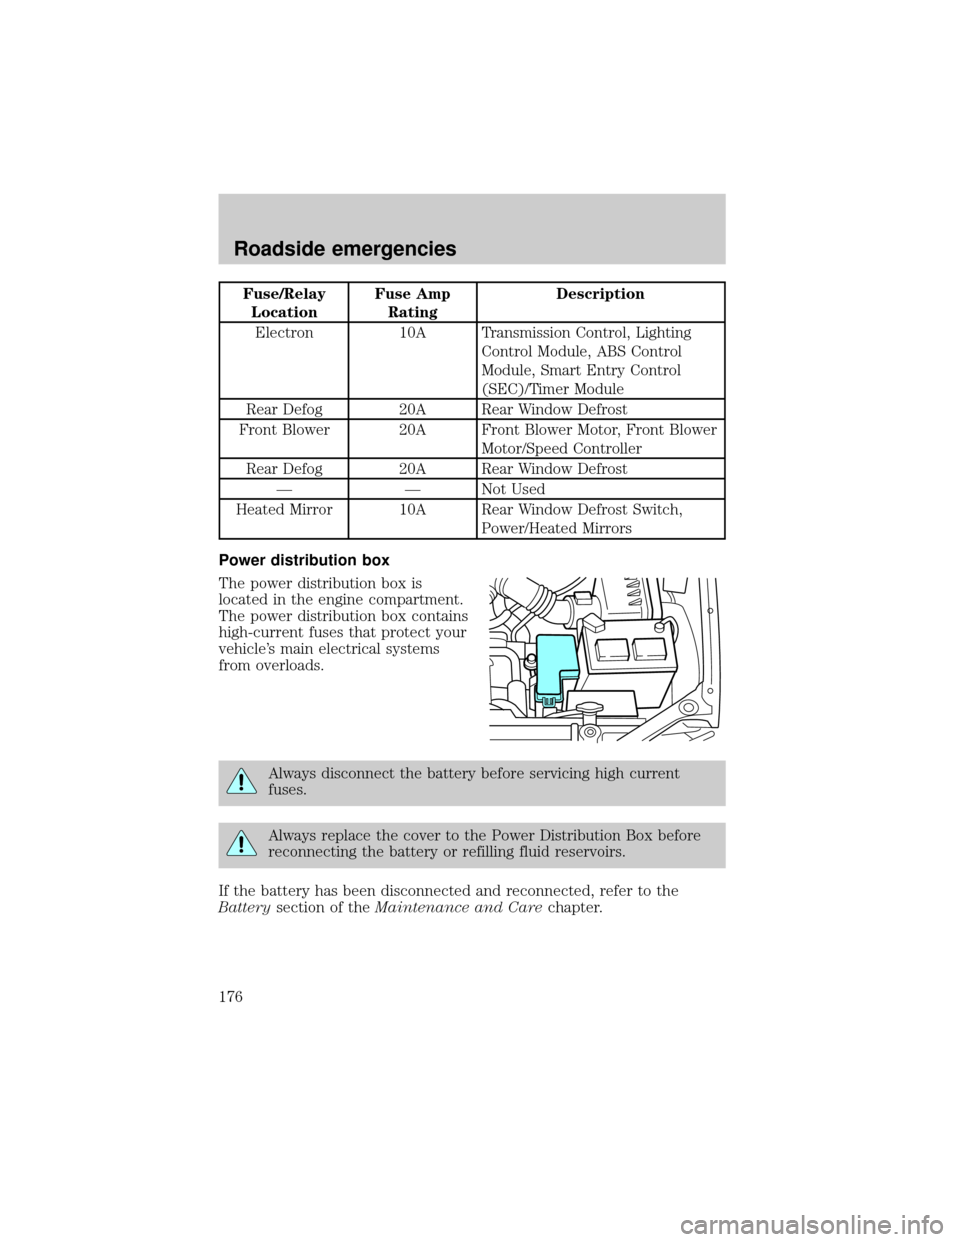
Fuse/Relay
LocationFuse Amp
RatingDescription
Electron 10A Transmission Control, Lighting
Control Module, ABS Control
Module, Smart Entry Control
(SEC)/Timer Module
Rear Defog 20A Rear Window Defrost
Front Blower 20A Front Blower Motor, Front Blower
Motor/Speed Controller
Rear Defog 20A Rear Window Defrost
Ð Ð Not Used
Heated Mirror 10A Rear Window Defrost Switch,
Power/Heated Mirrors
Power distribution box
The power distribution box is
located in the engine compartment.
The power distribution box contains
high-current fuses that protect your
vehicle's main electrical systems
from overloads.
Always disconnect the battery before servicing high current
fuses.
Always replace the cover to the Power Distribution Box before
reconnecting the battery or refilling fluid reservoirs.
If the battery has been disconnected and reconnected, refer to the
Batterysection of theMaintenance and Carechapter.
Roadside emergencies
176
Page 178 of 264

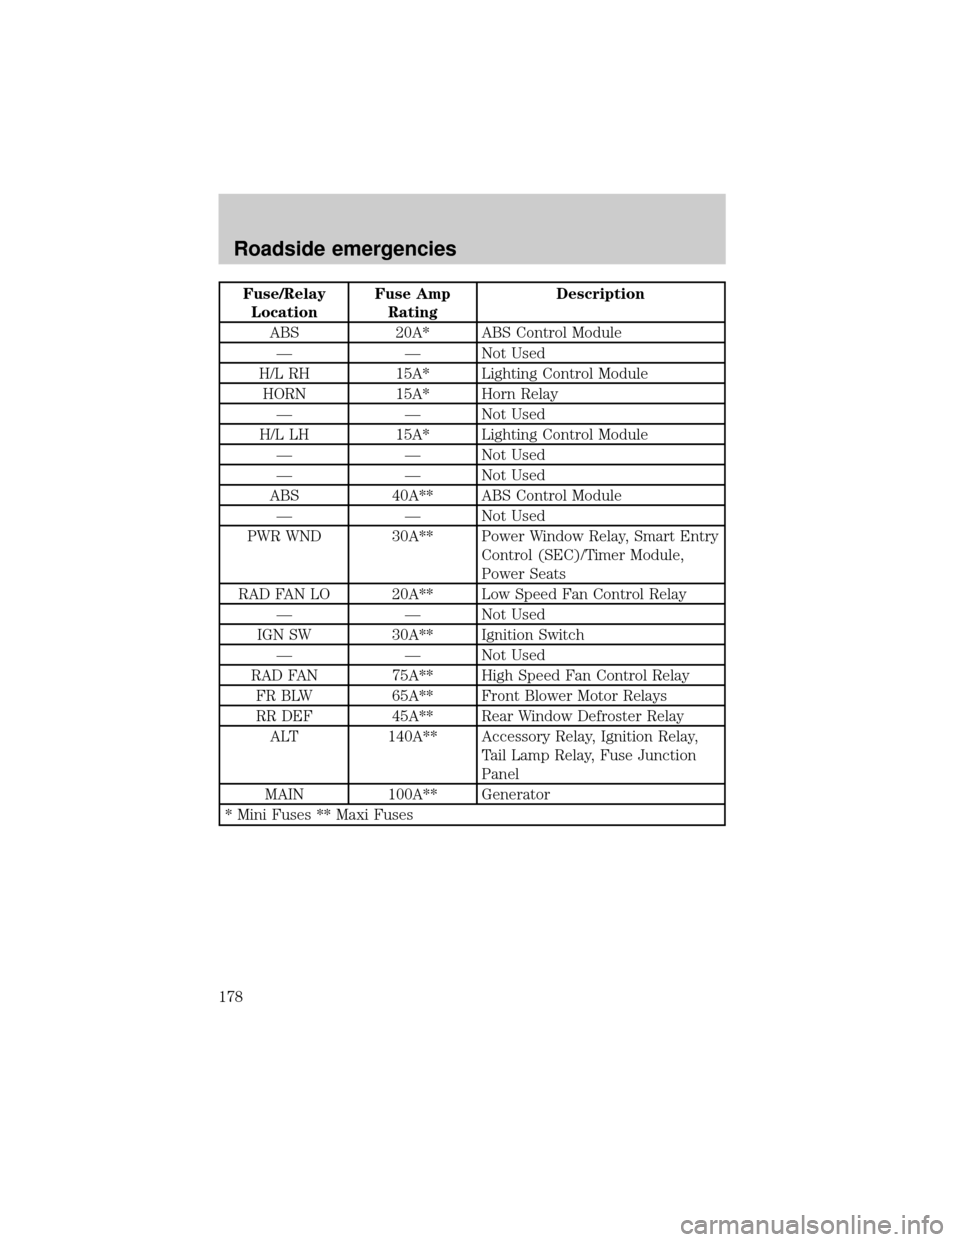
Fuse/Relay
LocationFuse Amp
RatingDescription
ABS 20A* ABS Control Module
Ð Ð Not Used
H/L RH 15A* Lighting Control Module
HORN 15A* Horn Relay
Ð Ð Not Used
H/L LH 15A* Lighting Control Module
Ð Ð Not Used
Ð Ð Not Used
ABS 40A** ABS Control Module
Ð Ð Not Used
PWR WND 30A** Power Window Relay, Smart Entry
Control (SEC)/Timer Module,
Power Seats
RAD FAN LO 20A** Low Speed Fan Control Relay
Ð Ð Not Used
IGN SW 30A** Ignition Switch
Ð Ð Not Used
RAD FAN 75A** High Speed Fan Control Relay
FR BLW 65A** Front Blower Motor Relays
RR DEF 45A** Rear Window Defroster Relay
ALT 140A** Accessory Relay, Ignition Relay,
Tail Lamp Relay, Fuse Junction
Panel
MAIN 100A** Generator
* Mini Fuses ** Maxi Fuses
Roadside emergencies
178
Page 223 of 264
![Mercury Villager 1999 s User Guide ²Carrying unnecessary weight may reduce fuel economy (approximately
0.4 km/L [1 mpg] is lost for every 180 kg [400 lb] of weight carried).
²Adding certain accessories to your vehicle (for example bu Mercury Villager 1999 s User Guide ²Carrying unnecessary weight may reduce fuel economy (approximately
0.4 km/L [1 mpg] is lost for every 180 kg [400 lb] of weight carried).
²Adding certain accessories to your vehicle (for example bu](/img/33/11172/w960_11172-222.png)
²Carrying unnecessary weight may reduce fuel economy (approximately
0.4 km/L [1 mpg] is lost for every 180 kg [400 lb] of weight carried).
²Adding certain accessories to your vehicle (for example bug
deflectors, rollover/light bars, running boards, ski/luggage racks) may
reduce fuel economy.
²Using fuel blended with alcohol may lower fuel economy.
²Fuel economy may decrease with lower temperatures during the first
12±16 km (8±10 miles) of driving.
²Driving on flat terrain offers improved fuel economy as compared to
driving on hilly terrain.
²Transmissions give their best fuel economy when operated in the top
cruise gear and with steady pressure on the gas pedal.
²Close windows for high speed driving.
EPA window sticker
Every new vehicle should have the EPA window sticker. Contact your
dealer if the window sticker is not supplied with your vehicle. The EPA
window sticker should be your guide for the fuel economy comparisons
with other vehicles.
It is important to note the box in the lower left corner of the window
sticker. These numbers represent the Range of L/100 km (MPG)
expected on the vehicle under optimum conditions. Your fuel economy
may vary depending upon the method of operation and conditions.
EMISSION CONTROL SYSTEM
Your vehicle is equipped with various emission control components and a
catalytic converter which will enable your vehicle to comply with
applicable exhaust emission standards. To make sure that the catalytic
converter and other emission control components continue to work
properly:
²Use only unleaded fuel.
²Avoid running out of fuel.
²Do not turn off the ignition while your vehicle is moving, especially at
high speeds.
²Have the items listed in your Scheduled Maintenance Guide performed
according to the specified schedule.
Maintenance and care
223
Page 234 of 264

Cleaning the built-in child seat (if equipped)
Clean with mild soap and water. Do not use household cleaning products
because they may weaken the safety belt webbing or damage the vinyl
parts of the seat.
The child seat liner is removable and may be machine-washed and air dried.
Cleaning the interior fabric
Remove dust and loose dirt with a whisk broom or a vacuum cleaner.
Remove fresh spots immediately. Do not use household or glass cleaners.
These agents can stain and discolor the fabric. Use a mild soap and
water solution if necessary.
Cleaning leather seats (if equipped)
To clean, simply use a soft cloth dampened with water and a mild soap.
Wipe the leather again with a damp cloth to remove soap residue. Dry
with a soft cloth. For tougher soiling concerns, Ford recommends using
the Deluxe Leather Care Kit F8AZ-19G253±AA, which is available from
your Ford Dealer. This mild cleaner and special pad, cleans the leather
and maintains its natural beauty. Follow the instructions on the cleaner
label. Regular cleaning of your leather upholstery helps maintain its
resiliency and color.
Do not use household cleaning products, alcohol solutions,
solvents or cleaners intended for rubber, vinyl or plastics.
Cleaning and maintaining the safety belts
Clean the safety belts with a mild soap solution recommended for
cleaning upholstery or carpets. Do not bleach or dye the belts, because
these actions may weaken the belt webbing.
Check the safety belt system periodically to make sure there are no
nicks, wear or cuts. If your vehicle has been involved in an accident,
refer to theSafety belt maintenancesection in theSeating and safety
restraintschapter.
Inside windows
Use Ultra-Clear Spray Glass Cleaner (E4AZ-19C507±AA) for the inside
windows if they become fogged.
Cleaning mirrors
Do not clean your mirrors with a dry cloth or abrasive materials. Use a
soft cloth and mild detergent and water. Be careful when removing ice
from outside mirrors because you may damage the reflective surface.
Maintenance and care
234
Page 250 of 264

Comfort and convenience
Air conditioner
Air filtration systems
Cargo nets
Cargo organizers
Cargo shades
Cargo trays
Dash trim
Engine block heaters
Gear shift knob
Luggage presenter (Continental only)
Manual sliding rear window
Tire step
Travel equipment
Console
Console armrest
Daytime running lights
Factory luggage rack
Factory luggage rack adaptors
Fog lights
Framed luggage covers
Heavy-duty battery
Neutral towing transfer case kit (Explorer 4.0L only)
Off road lights
Pickup box rails
Removable luggage rack
Removable luggage rack adapters
Retractable bed hooks and loops
Running boards
Snow traction cables
Customer assistance
250
Page 251 of 264

Soft luggage cover
Speed control
Towing mirrors
Trailer hitch
Trailer hitch bars and balls
Trailer hitch wiring adaptor
Protection and appearance equipment
Air bag anti-theft locks
Bed mat/bedliner tailgate covers
Bed mats
Bedliners
Car/truck covers
Cargo liners, interior
Carpet floor mats
Cleaners, waxes and polishes
Flat splash guards
Front end covers (full and mini)
Hood deflectors
Locking gas cap
Lubricants and oils
Molded splash guards
Molded vinyl floor mats
Rallye bars
Rear air deflectors
Rear decklid spoilers
Side window air deflectors
Spare tire lock
Step bumpers
Step/sill plates
Tailgate covers
Customer assistance
251