lights Mercury Villager 2000 Owner's Manuals
[x] Cancel search | Manufacturer: MERCURY, Model Year: 2000, Model line: Villager, Model: Mercury Villager 2000Pages: 256, PDF Size: 2.21 MB
Page 8 of 256
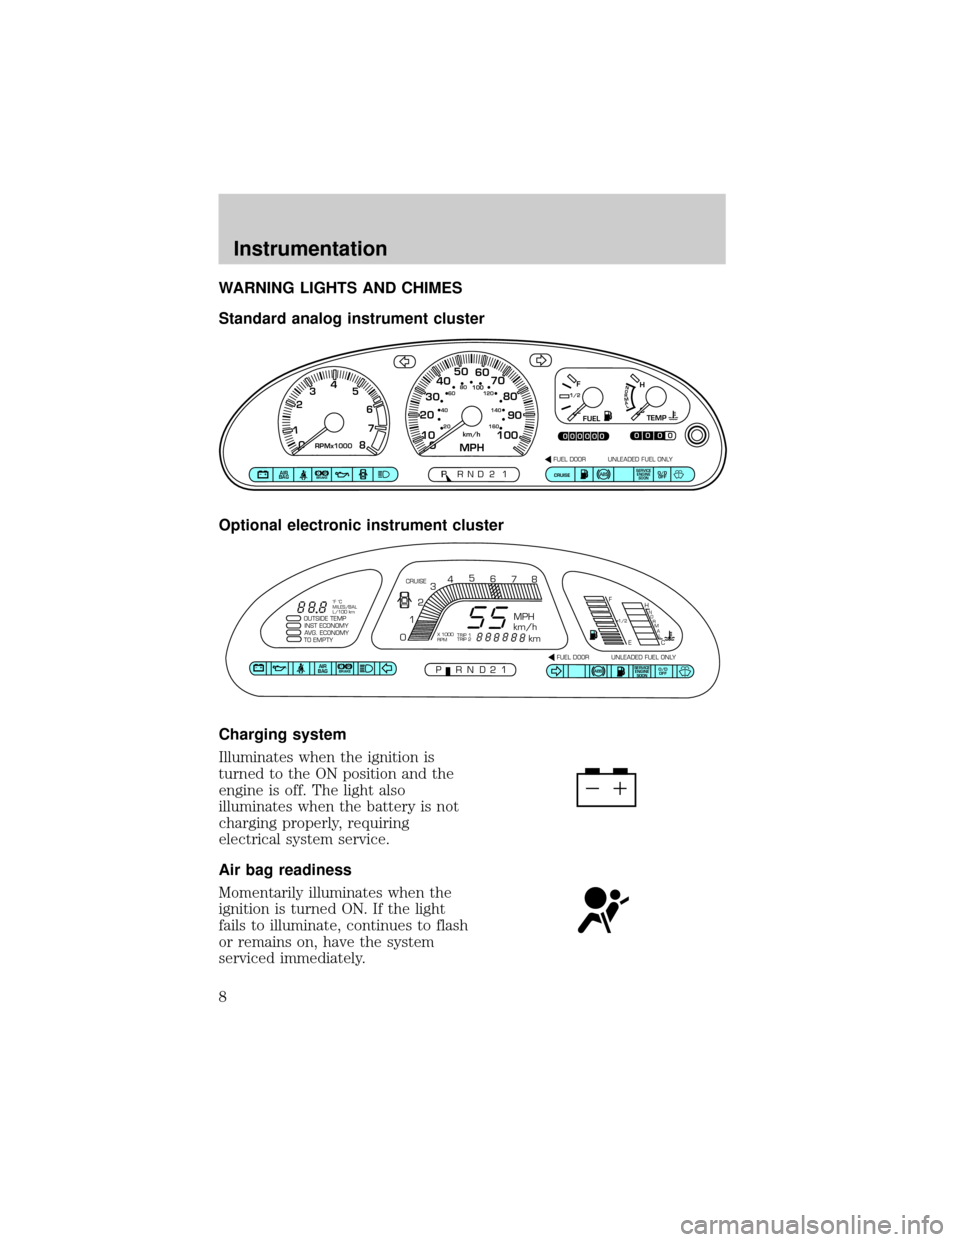
WARNING LIGHTS AND CHIMES
Standard analog instrument cluster
Optional electronic instrument cluster
Charging system
Illuminates when the ignition is
turned to the ON position and the
engine is off. The light also
illuminates when the battery is not
charging properly, requiring
electrical system service.
Air bag readiness
Momentarily illuminates when the
ignition is turned ON. If the light
fails to illuminate, continues to flash
or remains on, have the system
serviced immediately.
CE
F
H1/2
FUELTEMP
NORMAL
0
PRND2P1P!
BRAKEAIR
BAGSERVICE
ENGINE
SOONCRUISEO/D
OFF
00000
00000MPHkm/h10 20304050
60
70
80
90
10020 406080
100120
140
160
0 234
5
6
7
8RPMx10001
FUEL DOOR UNLEADED FUEL ONLY
SERVICE
ENGINE
SOONABSAIR
BAGABSO/D
OFF
OUTSIDE TEMP
INST ECONOMY
AVG. ECONOMY
TO EMPTY
PRND21FUEL DOOR UNLEADED FUEL ONLY CRUISE
MPH
km/h
km
F
EH
C
1/2N
O
R
M
A
L
012345
6
78
P!BRAKE
X 1000
RPMTRIP 1
TRIP 2 ˚F ˚C
MILES/BAL
L/100 km
Instrumentation
8
Page 10 of 256
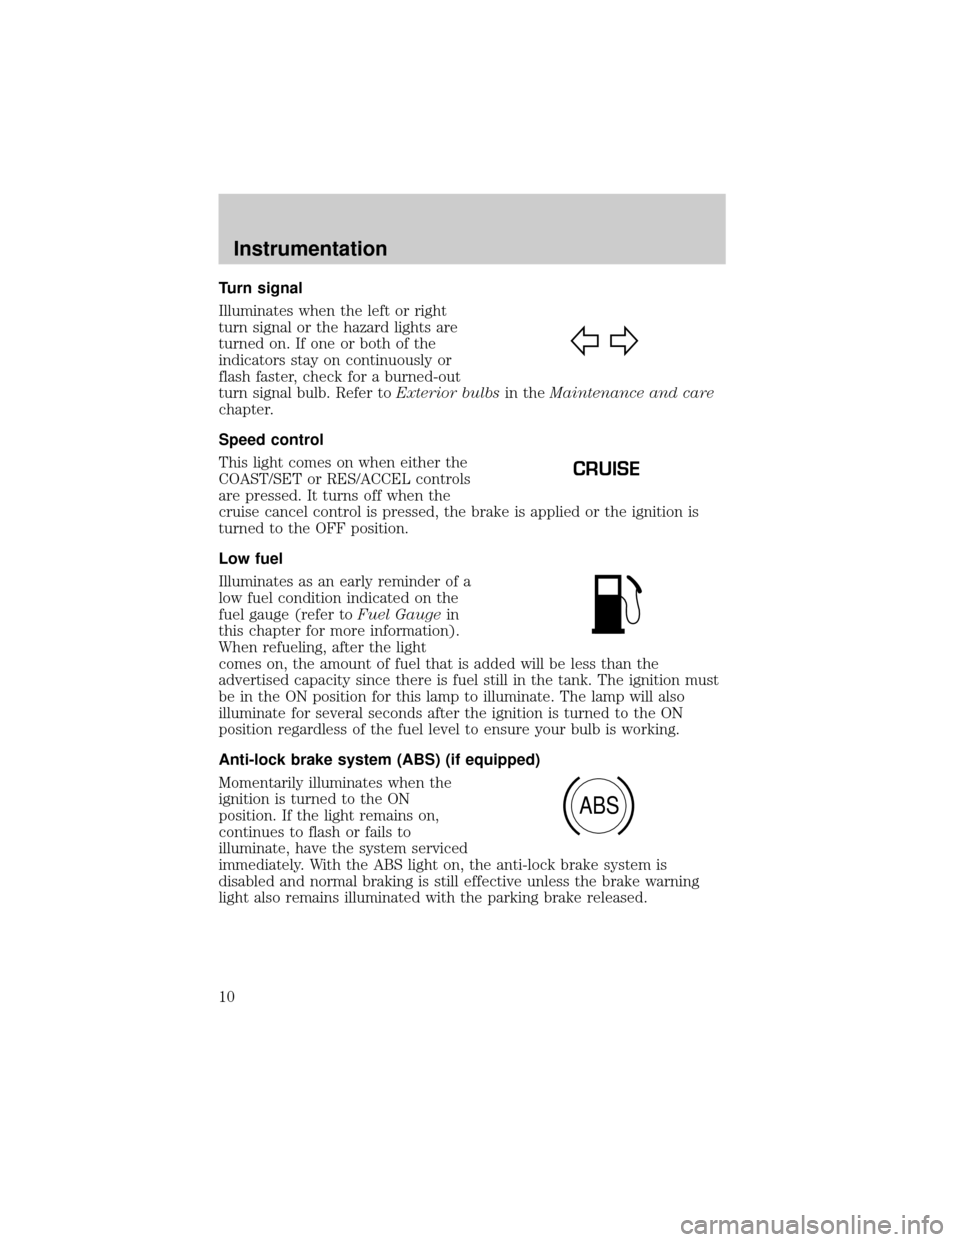
Turn signal
Illuminates when the left or right
turn signal or the hazard lights are
turned on. If one or both of the
indicators stay on continuously or
flash faster, check for a burned-out
turn signal bulb. Refer toExterior bulbsin theMaintenance and care
chapter.
Speed control
This light comes on when either the
COAST/SET or RES/ACCEL controls
are pressed. It turns off when the
cruise cancel control is pressed, the brake is applied or the ignition is
turned to the OFF position.
Low fuel
Illuminates as an early reminder of a
low fuel condition indicated on the
fuel gauge (refer toFuel Gaugein
this chapter for more information).
When refueling, after the light
comes on, the amount of fuel that is added will be less than the
advertised capacity since there is fuel still in the tank. The ignition must
be in the ON position for this lamp to illuminate. The lamp will also
illuminate for several seconds after the ignition is turned to the ON
position regardless of the fuel level to ensure your bulb is working.
Anti-lock brake system (ABS) (if equipped)
Momentarily illuminates when the
ignition is turned to the ON
position. If the light remains on,
continues to flash or fails to
illuminate, have the system serviced
immediately. With the ABS light on, the anti-lock brake system is
disabled and normal braking is still effective unless the brake warning
light also remains illuminated with the parking brake released.
CRUISE
ABS
Instrumentation
10
Page 22 of 256
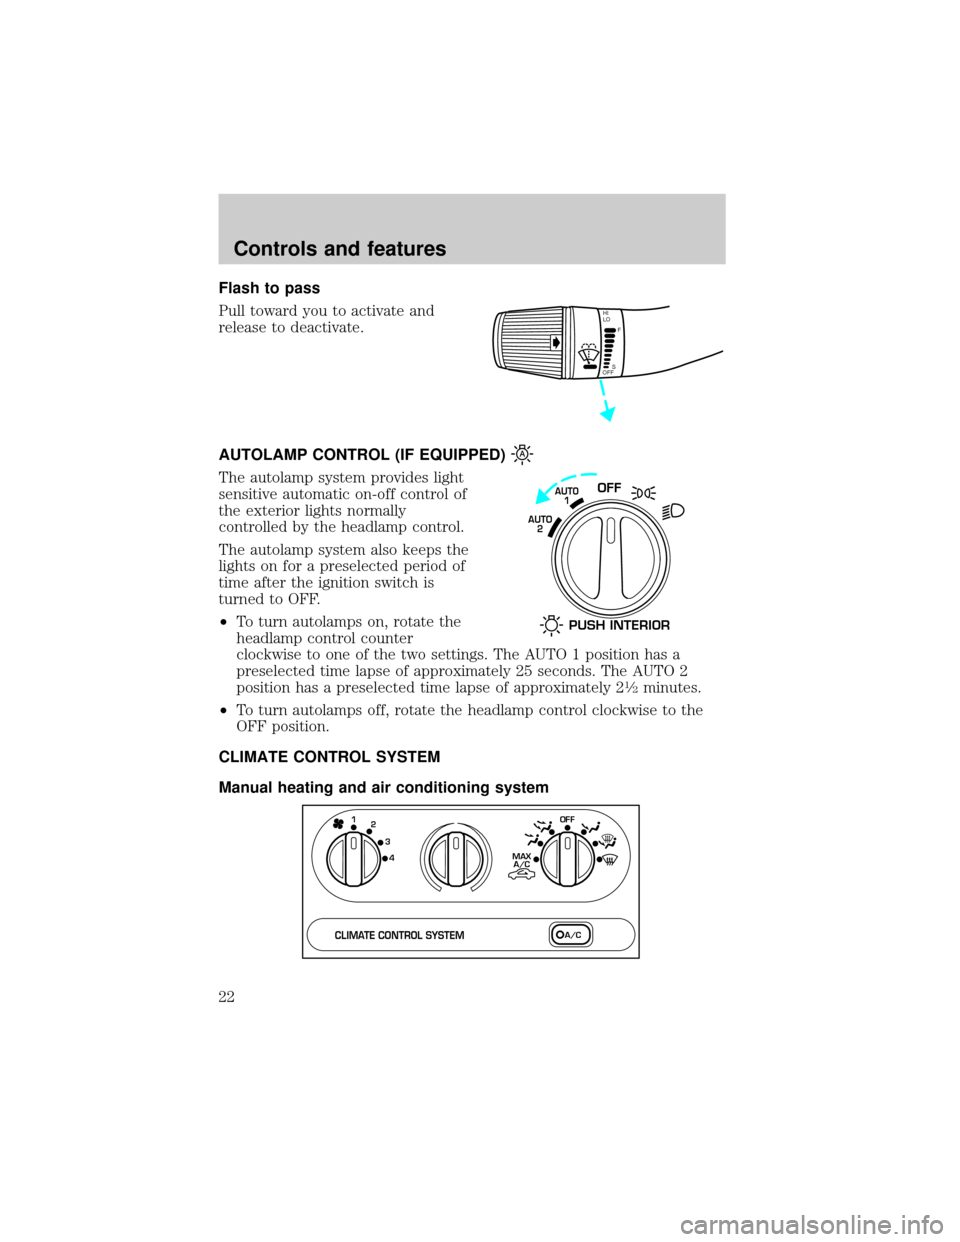
Flash to pass
Pull toward you to activate and
release to deactivate.
AUTOLAMP CONTROL (IF EQUIPPED)
The autolamp system provides light
sensitive automatic on-off control of
the exterior lights normally
controlled by the headlamp control.
The autolamp system also keeps the
lights on for a preselected period of
time after the ignition switch is
turned to OFF.
²To turn autolamps on, rotate the
headlamp control counter
clockwise to one of the two settings. The AUTO 1 position has a
preselected time lapse of approximately 25 seconds. The AUTO 2
position has a preselected time lapse of approximately 2
1¤2minutes.
²To turn autolamps off, rotate the headlamp control clockwise to the
OFF position.
CLIMATE CONTROL SYSTEM
Manual heating and air conditioning system
HI
LO
F
S
OFF
OFFAUTO
1
AUTO
2
PUSH INTERIOR
1
MAX
A/C
A/C OFF2
3
4
CLIMATE CONTROL SYSTEM
Controls and features
22
Page 80 of 256

Cleaning cassette player
Clean the tape player head with a cassette cleaning cartridge after 10 to
12 hours of play in order to maintain the best sound and operation.
Cassette and cassette player care
²Use only cassettes that are 90 minutes long or less.
²Do not expose tapes to direct sunlight, high humidity, extreme heat or
extreme cold. Allow tapes that may have been exposed to extreme
temperatures to reach a moderate temperature before playing.
²Tighten very loose tapes by inserting a finger or pencil into the hole
and turning the hub.
²Remove loose labels before inserting tapes.
²Do not leave tapes in the cassette player for a long time when not
being played.
Radio frequency information
The Federal Communications Commission (FCC) and the Canadian Radio
and Telecommunications Commission(CRTC) establish the frequencies
AM and FM stations may use for their broadcasts. Allowable frequencies
are:
AM 530, 540±1600, 1610 kHz
FM 87.7, 87.9±107.7, 107.9 MHz
Not all frequencies are used in a given area.
Radio reception factors
Three factors can affect radio reception:
²Distance/strength.The further an FM signal travels, the weaker it is.
The listenable range of the average FM station is approximately 40 km
(24 miles). This range can be affected by ªsignal modulation.º Signal
modulation is a process radio stations use to increase their
strength/volume relative to other stations.
²Terrain.Hills, mountains and tall buildings between your vehicle's
antenna and the radio station signal can cause FM reception problems.
Static can be caused on AM stations by power lines, electric fences,
traffic lights and thunderstorms. Moving away from an interfering
structure (out of its ªshadowº) returns your reception to normal.
Controls and features
80
Page 82 of 256
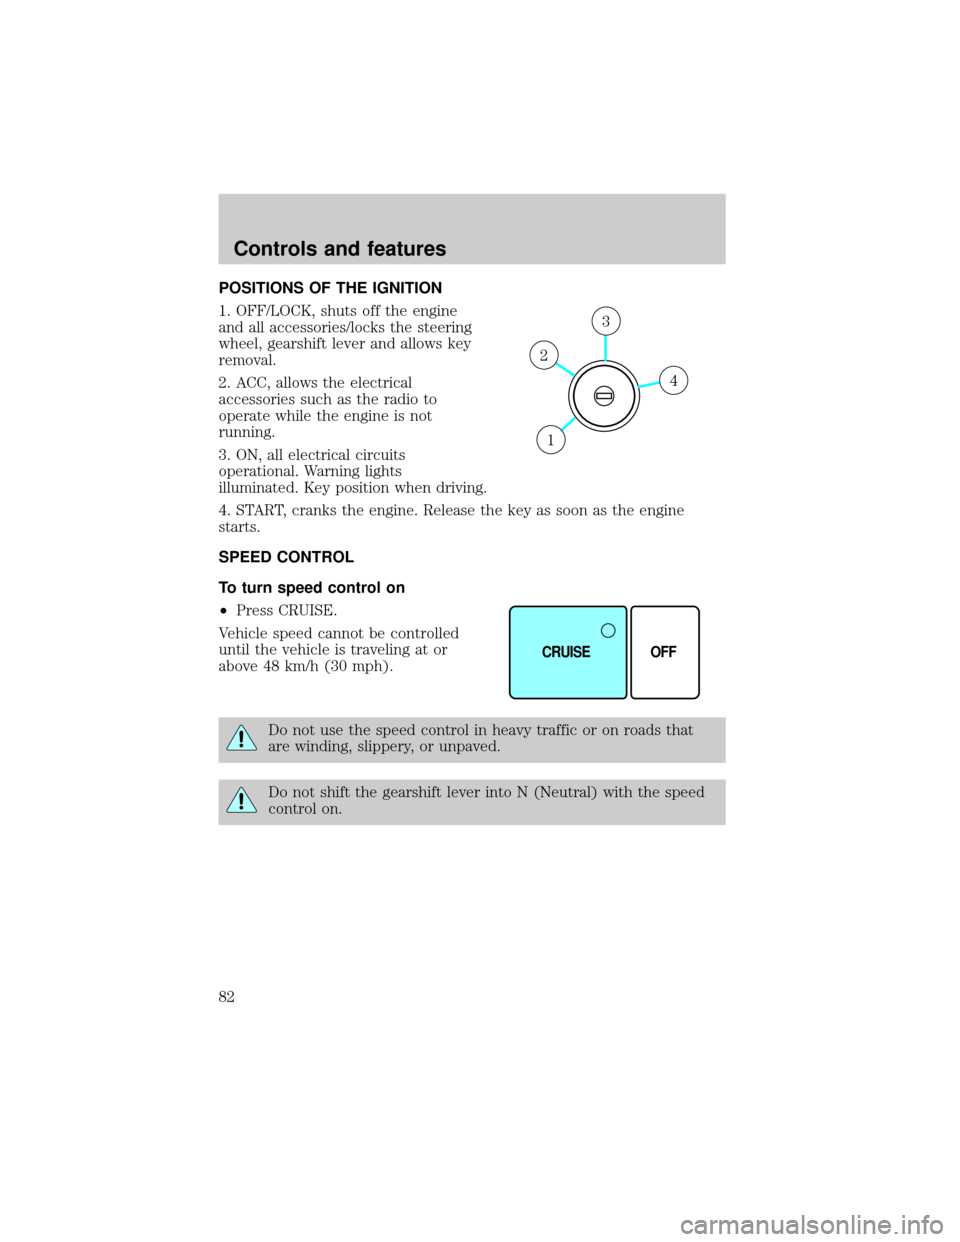
POSITIONS OF THE IGNITION
1. OFF/LOCK, shuts off the engine
and all accessories/locks the steering
wheel, gearshift lever and allows key
removal.
2. ACC, allows the electrical
accessories such as the radio to
operate while the engine is not
running.
3. ON, all electrical circuits
operational. Warning lights
illuminated. Key position when driving.
4. START, cranks the engine. Release the key as soon as the engine
starts.
SPEED CONTROL
To turn speed control on
²Press CRUISE.
Vehicle speed cannot be controlled
until the vehicle is traveling at or
above 48 km/h (30 mph).
Do not use the speed control in heavy traffic or on roads that
are winding, slippery, or unpaved.
Do not shift the gearshift lever into N (Neutral) with the speed
control on.
4
3
2
1
CRUISE OFF
Controls and features
82
Page 103 of 256

Locking the doors
Press this control to lock all doors.
To confirm all doors are closed and
locked, the horn will chirp and the
lamps will flash. The horn chirp
feature can be turned on/off by
holding the LOCK and UNLOCK
controls on the transmitter
simultaneously for two seconds. The
hazard lights will flash three times
each time the system is toggled
between active and non-active
modes.
If any of the doors are ajar, the horn will not chirp and the lights will not
flash.
Sounding a panic alarm
To activate the alarm, press and
hold the PANIC control for longer
than 1.5 seconds. The horn will
sound and the headlamps and tail
lights will flash for thirty (30)
seconds.
To deactivate the alarm, press the
LOCK or UNLOCK or hold the
PANIC control down for longer than
1.5 seconds.
This device complies with part 15 of the FCC rules and with RS-210 of
Industry Canada. Operation is subject to the following two conditions:
(1) This device may not cause harmful interference, and (2) This device
must accept any interference received, including interference that may
cause undesired operation.
Changes or modifications not expressly approved by the party
responsible for compliance could void the user's authority to
operate the equipment.
Illuminated entry
The interior lamps illuminate when the remote entry system is used to
unlock the door(s) or sound the panic alarm.
Controls and features
103
Page 104 of 256
The system automatically turns off after 15 seconds or when the ignition
is turned to the RUN position.
The inside lights will not turn off if:
²they have been turned on with the headlamp control or
²any door is open.
The battery saver will shut off the interior lamps after 30 minutes if the
front door is left open or after 60 minutes if the liftgate is left open.
Replacing the battery
The transmitter is powered by one coin type three-volt lithium battery.
Typical operating range will allow you to be up to 10 meters (33 feet)
away from your vehicle. A decrease in operating range can be caused by:
²weather conditions
²nearby radio towers
²structures around the vehicle
²other vehicles parked next to the vehicle
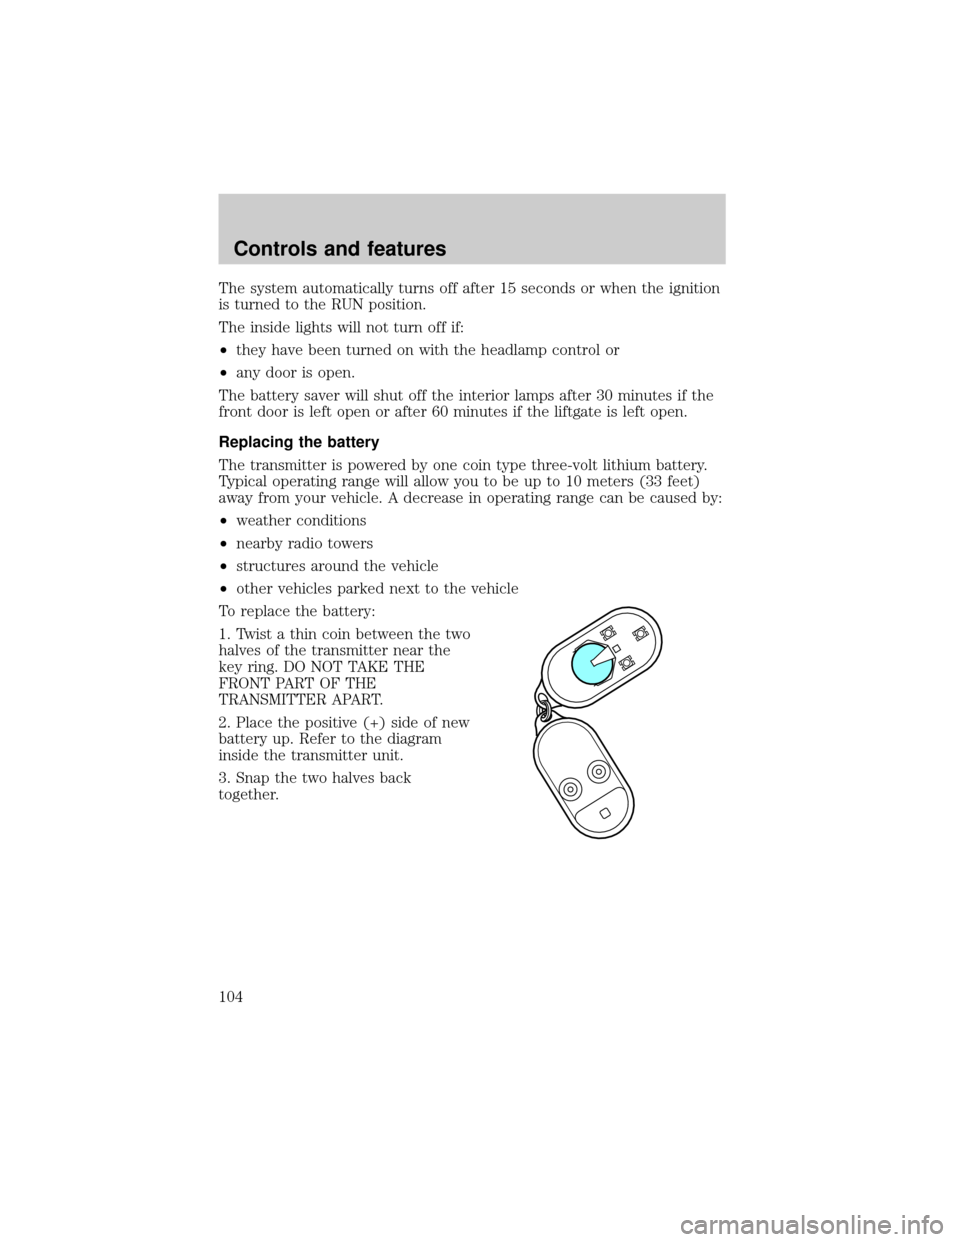
To replace the battery:
1. Twist a thin coin between the two
halves of the transmitter near the
key ring. DO NOT TAKE THE
FRONT PART OF THE
TRANSMITTER APART.
2. Place the positive (+) side of new
battery up. Refer to the diagram
inside the transmitter unit.
3. Snap the two halves back
together.
Controls and features
104
Page 106 of 256
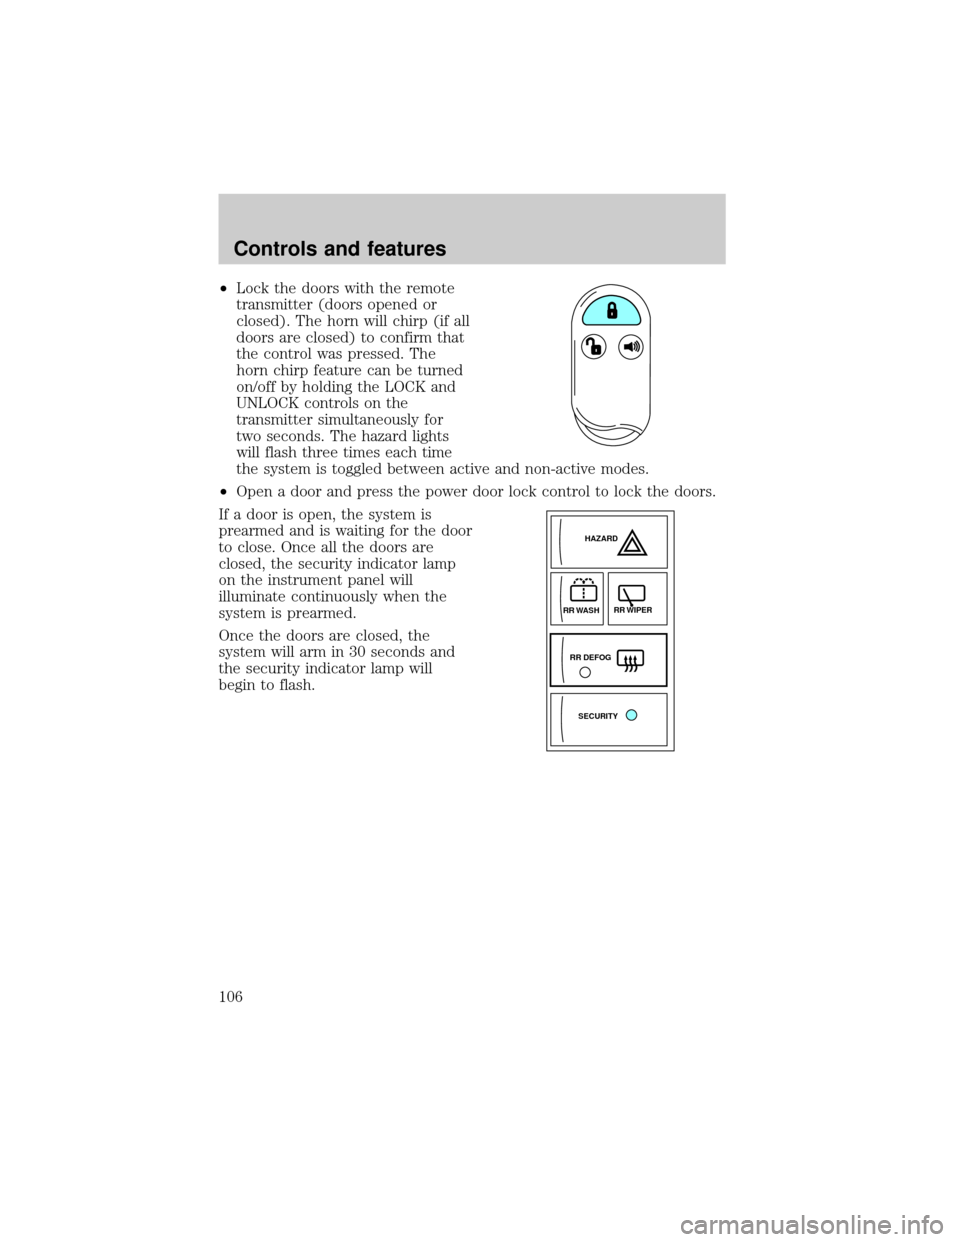
²Lock the doors with the remote
transmitter (doors opened or
closed). The horn will chirp (if all
doors are closed) to confirm that
the control was pressed. The
horn chirp feature can be turned
on/off by holding the LOCK and
UNLOCK controls on the
transmitter simultaneously for
two seconds. The hazard lights
will flash three times each time
the system is toggled between active and non-active modes.
²Open a door and press the power door lock control to lock the doors.
If a door is open, the system is
prearmed and is waiting for the door
to close. Once all the doors are
closed, the security indicator lamp
on the instrument panel will
illuminate continuously when the
system is prearmed.
Once the doors are closed, the
system will arm in 30 seconds and
the security indicator lamp will
begin to flash.
SECURITYHAZARD
RR DEFOGRR WIPER
RR WASH
Controls and features
106
Page 149 of 256
Make sure the corresponding lights illuminate briefly. If a light fails to
illuminate, have the vehicle serviced.
²If the driver's safety belt is fastened, the
light may not illuminate.
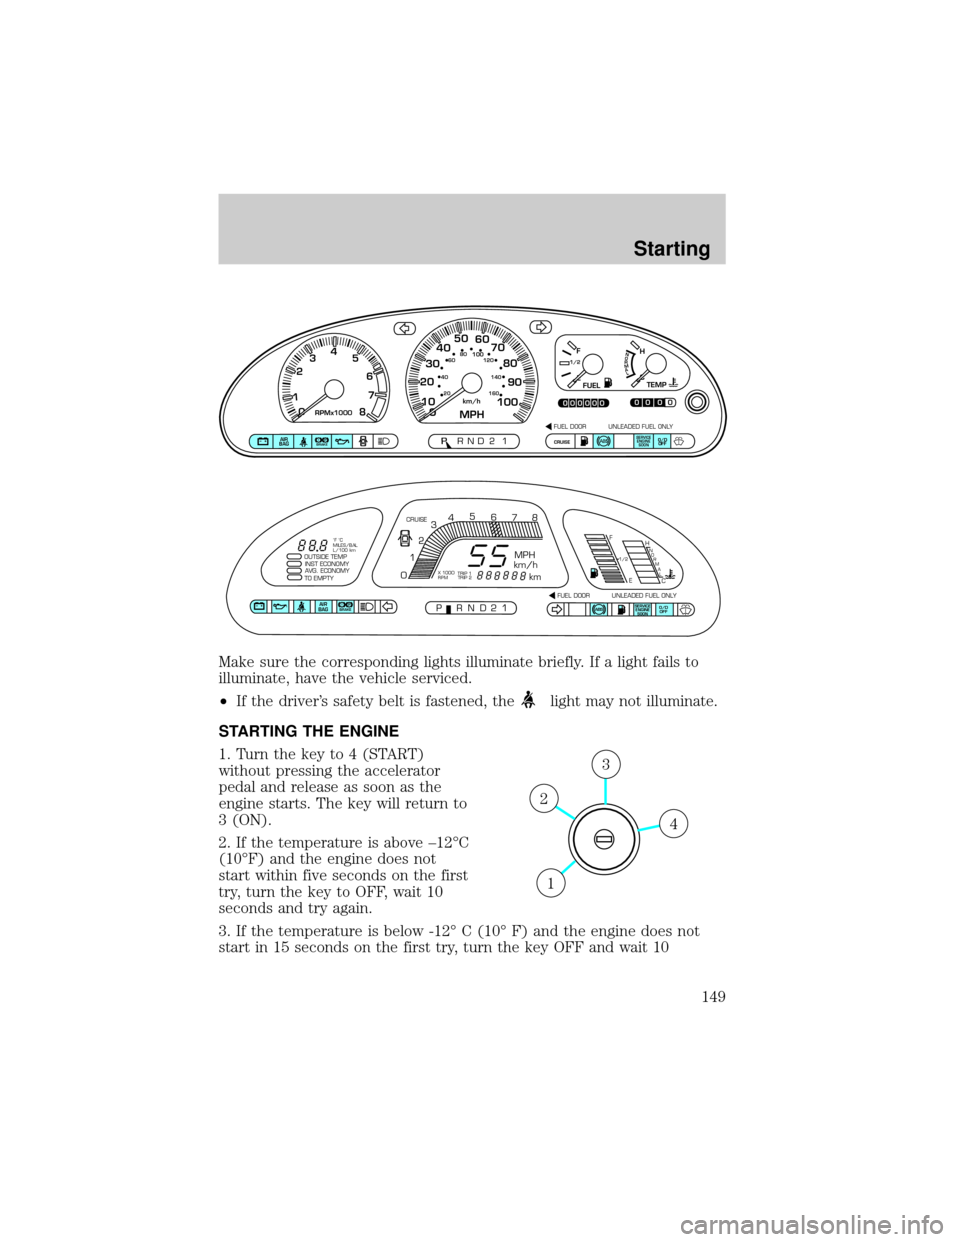
STARTING THE ENGINE
1. Turn the key to 4 (START)
without pressing the accelerator
pedal and release as soon as the
engine starts. The key will return to
3 (ON).
2. If the temperature is above ±12ÉC
(10ÉF) and the engine does not
start within five seconds on the first
try, turn the key to OFF, wait 10
seconds and try again.
3. If the temperature is below -12É C (10É F) and the engine does not
start in 15 seconds on the first try, turn the key OFF and wait 10
CE
F
H1/2
FUELTEMP
NORMAL
0
PRND2P1P!
BRAKEAIR
BAGSERVICE
ENGINE
SOONCRUISEO/D
OFF
00000
00000MPHkm/h10 20304050
60
70
80
90
10020 406080
100120
140
160
0 234
5
6
7
8RPMx10001
FUEL DOOR UNLEADED FUEL ONLY
SERVICE
ENGINE
SOONABSAIR
BAGABSO/D
OFF
OUTSIDE TEMP
INST ECONOMY
AVG. ECONOMY
TO EMPTY
PRND21FUEL DOOR UNLEADED FUEL ONLY CRUISE
MPH
km/h
km
F
EH
C
1/2N
O
R
M
A
L
012345
6
78
P!BRAKE
X 1000
RPMTRIP 1
TRIP 2 ˚F ˚C
MILES/BAL
L/100 km
4
3
2
1
Starting
149
Page 167 of 256
Roadside coverage beyond basic warranty
In the United States, you may purchase additional roadside assistance
coverage beyond this period through the Ford Auto Club by contacting
your Ford or Lincoln Mercury dealer.
Similarly in Canada, you may purchase additional coverage beyond the
basic coverage period by consulting the Ford Roadside Assistance Club
brochure or by calling 1±877±294±CLUB (1±877±894±2582).
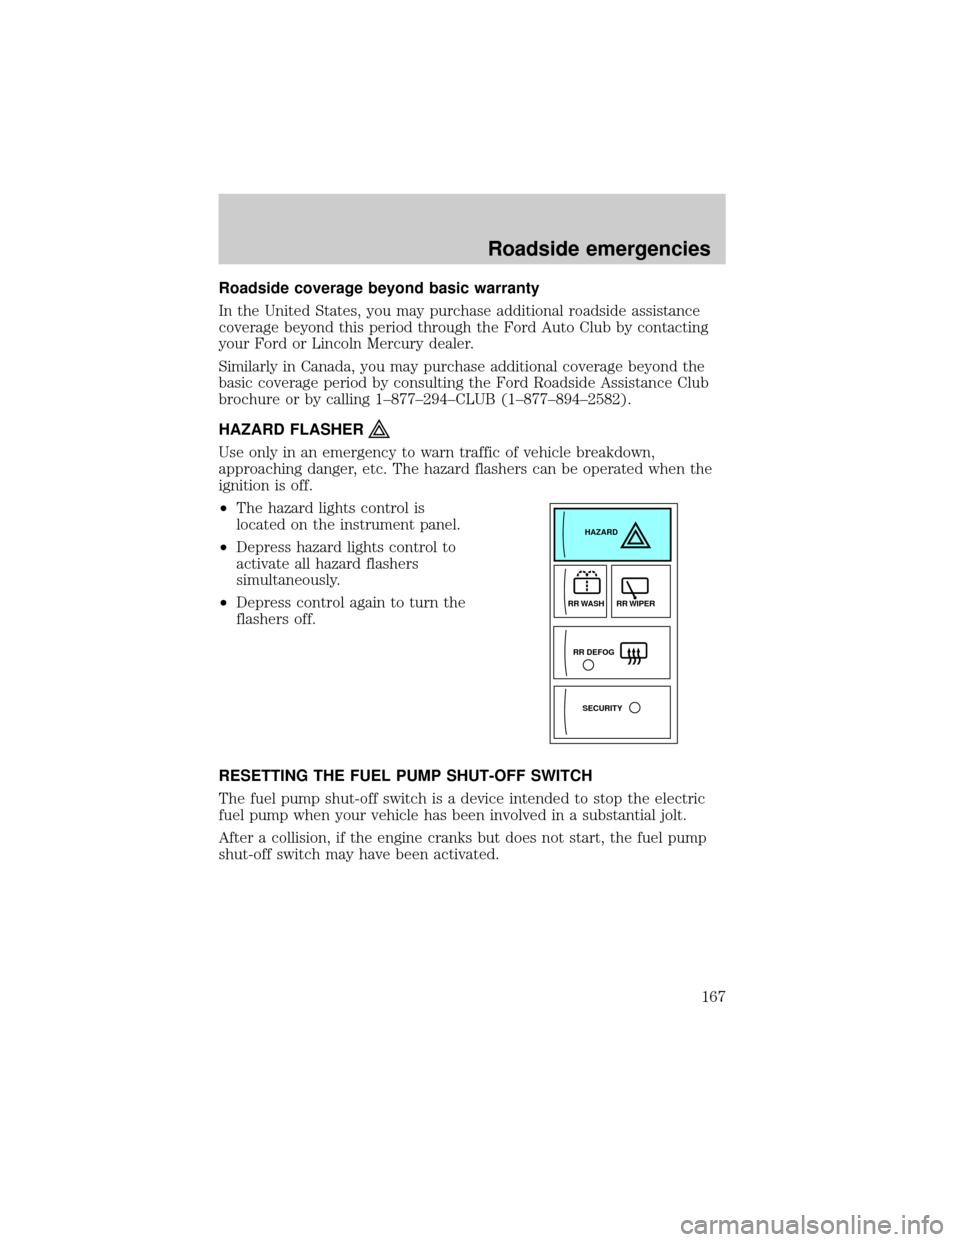
HAZARD FLASHER
Use only in an emergency to warn traffic of vehicle breakdown,
approaching danger, etc. The hazard flashers can be operated when the
ignition is off.
²The hazard lights control is
located on the instrument panel.
²Depress hazard lights control to
activate all hazard flashers
simultaneously.
²Depress control again to turn the
flashers off.
RESETTING THE FUEL PUMP SHUT-OFF SWITCH
The fuel pump shut-off switch is a device intended to stop the electric
fuel pump when your vehicle has been involved in a substantial jolt.
After a collision, if the engine cranks but does not start, the fuel pump
shut-off switch may have been activated.
SECURITYHAZARD
RR DEFOGRR WIPER RR WASH
Roadside emergencies
167