lights Mercury Villager 2002 s User Guide
[x] Cancel search | Manufacturer: MERCURY, Model Year: 2002, Model line: Villager, Model: Mercury Villager 2002Pages: 256, PDF Size: 1.91 MB
Page 80 of 256

1. With the flat side of the new bulb’s plastic base facing upward, insert
the glass end of the bulb into the lamp assembly. Turn the bulb left or
right to align the grooves in the plastic base with the tabs in the lamp
assembly. When the grooves are aligned, push the bulb into the lamp
assembly until the plastic base contacts the rear of the lamp assembly.
2. Install the bulb retaining ring over the plastic base until it contacts the
rear of the socket by rotating clockwise until you feel a“stop.”
3. Connect the electrical connector into the rear of the plastic base until
it snaps, locking it into position.
4. Turn the headlamps on and make sure they work properly. If the
headlamp was correctly aligned before you changed the bulb, you should
not need to align it again.
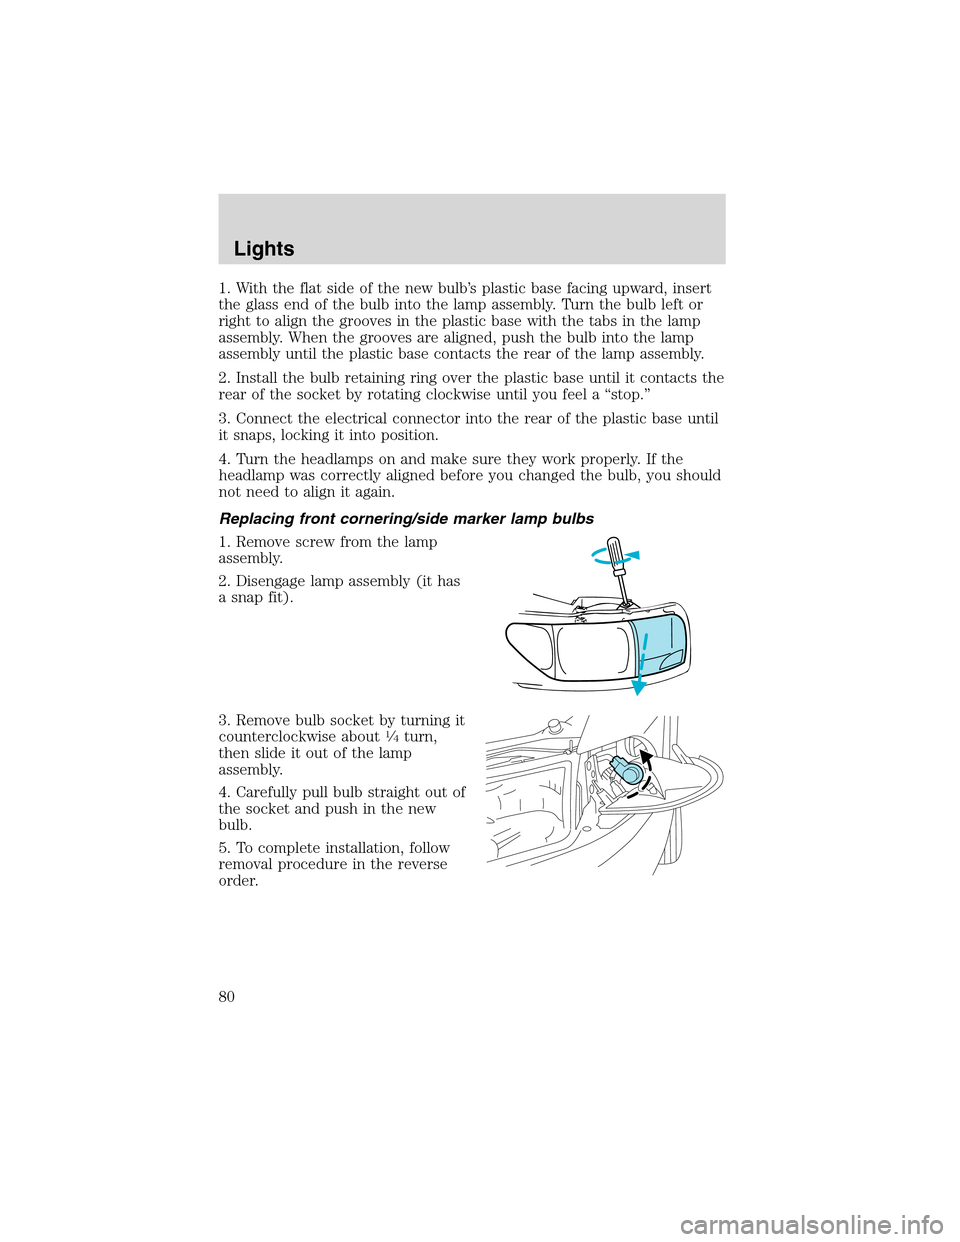
Replacing front cornering/side marker lamp bulbs
1. Remove screw from the lamp
assembly.
2. Disengage lamp assembly (it has
a snap fit).
3. Remove bulb socket by turning it
counterclockwise about
1⁄4turn,
then slide it out of the lamp
assembly.
4. Carefully pull bulb straight out of
the socket and push in the new
bulb.
5. To complete installation, follow
removal procedure in the reverse
order.
Lights
80
Page 81 of 256

Replacing front turn signal lamp bulbs
1. Remove bulb socket by turning it
counterclockwise, then slide it out
of the lamp assembly.
2. Carefully pull bulb straight out of
the socket and push in the new
bulb.
3. To complete installation, follow
removal procedure in the reverse
order.
Replacing high-mount brakelamp bulbs
1. Remove the two screws and lamp
assembly from vehicle.
2. Remove the bulb by rotating
socket counterclockwise and pulling
it out of the lamp assembly.
3. Pull bulb straight out of socket
and push in the new bulb.
4. To complete installation, follow
removal procedure in the reverse
order.
Lights
81
Page 82 of 256

Replacing tail lamp/backup/turn signal lamp bulbs
1. Open the liftgate to expose the
lamp assemblies.
2. Remove the two screws from the
lamp assembly.
3. Carefully remove the lamp
assembly by pulling it rearward.
4. Rotate bulb socket
counterclockwise and remove from
lamp assembly.
5. Carefully pull bulb straight out of
the socket and push in the new
bulb.
6. To complete installation, follow
removal procedure in the reverse
order.
Replacing license plate lamp bulbs
1. Remove two screws, grommets
and the license plate lamp assembly
from the liftgate.
2. Remove bulb socket by turning
counterclockwise.
3. Carefully pull the bulb from the
socket and push in the new bulb.
4. Install the lamp assembly on
liftgate with two grommets, ensuring
the grommets are pushed all the
way in to the liftgate and secure
with two screws.
Lights
82
Page 93 of 256

•Press OFF.
Pressing OFF will erase the
previously programmed set speed.
To return to a previously set speed
•Press RES/ACCEL. For
RES/ACCEL to operate, the
vehicle speed must be faster than
48 km/h (30 mph).
Indicator light
•Standard analog instrument
cluster
The“CRUISE”light comes on when
the ON control is pressed.
The“SET”light comes on when either the COAST/SET or RES/ACCEL
controls are pressed. The“SET”light turns off when the cruise CANCEL
control is pressed or the brake is applied. Both the“CRUISE”and“SET”
lights turn off when the OFF control is pressed or the ignition is turned
to the OFF position.
•Optional electronic instrument
cluster
This light comes on when either the
COAST/SET or RES/ACCEL controls are pressed. It turns off when the
cruise CANCEL control is pressed, the brake is applied or the ignition is
turned to the OFF position.
CANCEL ON
OFFRES
ACCEL
COAST
SET
CANCEL ON
OFFRES
ACCEL
COAST
SET
CRUISE SET
CRUISE
Driver Controls
93
Page 110 of 256

Unlocking the doors
Press this control to unlock the
driver’s door. The interior lamps will
illuminate and the parking and tail
lamps will flash once.
Press the control a second time
within five seconds to unlock all
doors.
Locking the doors
Press this control to lock all doors.
To confirm all doors are closed and
locked, the horn will chirp and the
lamps will flash. The horn chirp
feature can be turned on/off by
holding the LOCK and UNLOCK
controls on the transmitter
simultaneously for two seconds. The
hazard lights will flash three times
each time the system is toggled
between active and non-active modes.
If any of the doors are ajar, the horn will not chirp and the lights will not
flash.
Sounding a panic alarm
To activate the alarm, press and
hold the PANIC control for longer
than 1.5 seconds. The horn will
sound and the headlamps and tail
lights will flash for thirty (30)
seconds.
To deactivate the alarm, press the
LOCK or UNLOCK or hold the
PANIC control down for longer than
1.5 seconds.
Locks and Security
110
Page 112 of 256

Re-insert the key and turn to the ON position. Press any control on the
first transmitter. The park lamps will flash twice to confirm the
programming.
To program additional (up to four) transmitters yourself, perform the
following procedure.
•Unlock, then lock the driver’s door using the power door lock switch.
•Press any control on the next transmitter to be programmed. The park
lamps will flash twice to confirm the acceptance of registration.
Repeat this step for additional transmitters.
When programming is complete, open the driver’s door. The park lamps
will flash twice to confirm the end of programming.
All transmittersmustbe programmed at the same time.
Illuminated entry
The interior lamps illuminate when the remote entry system is used to
unlock the door(s) or sound the panic alarm.
The system automatically turns off after 15 seconds or when the ignition
is turned to the RUN position.
The inside lights will not turn off if:
•they have been turned on with the headlamp control, or
•any door is open.
The battery saver will shut off the interior lamps after 30 minutes if the
front door is left open or after 60 minutes if the liftgate is left open.
ANTI-THEFT SYSTEM
When armed, the anti-theft system will help prevent your vehicle from
unauthorized entry.
If there is any potential perimeter anti-theft problem with your vehicle,
ensureALL remote entry transmittersare brought to the dealership,
to aid in troubleshooting.
Locks and Security
112
Page 113 of 256

Arming the system
When unauthorized entry occurs, the system will flash headlamp lamps,
tail lamps and the security indicator lamp, chirp the horn and disable the
starting system.
The system is ready to arm whenever the key is removed from the
ignition. Any of the following actions will prearm the alarm system:
•Lock the doors with the remote
transmitter (doors opened or
closed). The horn will chirp (if all
doors are closed) to confirm that
the control was pressed. The
horn chirp feature can be turned
on/off by holding the LOCK and
UNLOCK controls on the
transmitter simultaneously for
two seconds. The hazard lights
will flash three times each time
the system is toggled between active and non-active modes.
•Open a door and press the power door lock control to lock the doors.
If a door is open, the system is
prearmed and is waiting for the door
to close. Once all the doors are
closed, the security indicator lamp
on the instrument panel will
illuminate continuously when the
system is prearmed.
The system will arm in 30 seconds
and the security indicator lamp will
begin to flash.
SECURITYHAZARD
RR DEFOGRR WIPER
RR WASH
Locks and Security
113
Page 155 of 256

STARTING
Positions of the ignition
1. OFF/LOCK, shuts off the engine
and all accessories/locks the steering
wheel, gearshift lever and allows key
removal.
2. ACC, allows the electrical
accessories such as the radio to
operate while the engine is not
running.
3. ON, all electrical circuits
operational. Warning lights
illuminated. Key position when driving.
4. START, cranks the engine. Release the key as soon as the engine
starts.
Preparing to start your vehicle
Engine starting is controlled by the powertrain control system. This
system meets all Canadian Interference-Causing Equipment standard
requirements regulating the impulse electrical field strength of radio
noise.
When starting a fuel-injected engine, avoid pressing the accelerator
before or during starting. Only use the accelerator when you have
difficulty starting the engine. For more information on starting the
vehicle, refer toStarting the enginein this chapter.
Extended idling at high engine speeds can produce very high
temperatures in the engine and exhaust system, creating the risk
of fire or other damage.
Do not park, idle, or drive your vehicle in dry grass or other dry
ground cover. The emission system heats up the engine
compartment and exhaust system, which can start a fire.
Do not start your vehicle in a closed garage or in other enclosed
areas. Exhaust fumes can be toxic. Always open the garage door
before you start the engine. SeeGuarding against exhaust fumesin
this chapter for more instructions.
4
3
2
1
Driving
155
Page 157 of 256

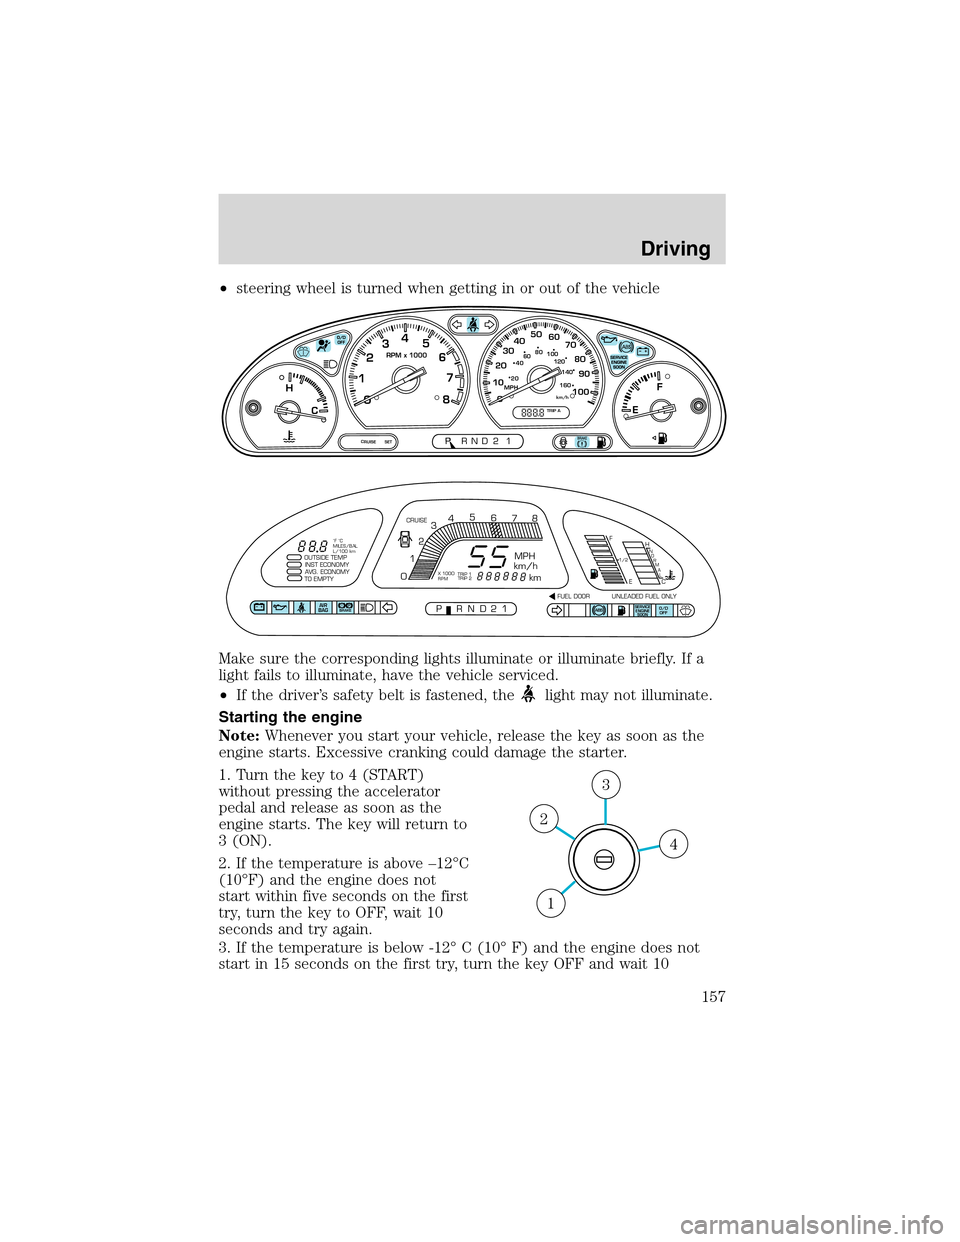
•steering wheel is turned when getting in or out of the vehicle
Make sure the corresponding lights illuminate or illuminate briefly. If a
light fails to illuminate, have the vehicle serviced.
•If the driver’s safety belt is fastened, the
light may not illuminate.
Starting the engine
Note:Whenever you start your vehicle, release the key as soon as the
engine starts. Excessive cranking could damage the starter.
1. Turn the key to 4 (START)
without pressing the accelerator
pedal and release as soon as the
engine starts. The key will return to
3 (ON).
2. If the temperature is above–12°C
(10°F) and the engine does not
start within five seconds on the first
try, turn the key to OFF, wait 10
seconds and try again.
3. If the temperature is below -12°C (10°F) and the engine does not
start in 15 seconds on the first try, turn the key OFF and wait 10
km/h0 1020304050
60
70
80
90
100MPH
TRIP A
RPM x 1000
20406080
100
120
140
160
0 1234
5
6
7
8F
H
CE
CRUISE SETPRND2P1
SERVICE
ENGINE
SOONABSAIR
BAGABSO/D
OFF
OUTSIDE TEMP
INST ECONOMY
AVG. ECONOMY
TO EMPTY
PRND21FUEL DOOR UNLEADED FUEL ONLY CRUISE
MPH
km/h
km
F
EH
C
1/2N
O
R
M
A
L
012345
6
78
P!BRAKE
X 1000
RPMTRIP 1
TRIP 2 ˚F ˚C
MILES/BAL
L/100 km
4
3
2
1
Driving
157
Page 174 of 256

If you need to arrange roadside assistance for yourself, Ford Motor
Company will reimburse a reasonable amount. To obtain reimbursement
information, U.S. Ford or Mercury vehicles customers call
1-800-241-3673; Lincoln vehicle customers call 1–800–521–4140.
Canadian customers who need to obtain reimbursement information, call
1–800–665–2006.
ROADSIDE COVERAGE BEYOND BASIC WARRANTY
In the United States, you may purchase additional roadside assistance
coverage beyond this period through the Ford Auto Club by contacting
your Ford or Lincoln Mercury dealer.
Similarly in Canada, for uninterrupted Roadside Assistance coverage, you
may purchase extended coverage prior to your Basic Warranty’s Roadside
Assistance expiring. For more information and enrollment, contact
1–877–294–2582 or visit our website at www.ford.ca.
HAZARD FLASHER
Use only in an emergency to warn traffic of vehicle breakdown,
approaching danger, etc. The hazard flashers can be operated when the
ignition is off.
•The hazard lights control is
located on the instrument panel.
•Depress hazard lights control to
activate all hazard flashers
simultaneously.
•Depress control again to turn the
flashers off.
FUEL PUMP SHUT-OFF SWITCH
FUEL
RESET
The fuel pump shut-off switch is a device intended to stop the electric
fuel pump when your vehicle has been involved in a substantial jolt.
After a collision, if the engine cranks but does not start, the fuel pump
shut-off switch may have been activated.
SECURITYHAZARD
RR DEFOGRR WIPER RR WASH
Roadside Emergencies
174