check engine Mercury Villager 2002 Owner's Manuals
[x] Cancel search | Manufacturer: MERCURY, Model Year: 2002, Model line: Villager, Model: Mercury Villager 2002Pages: 256, PDF Size: 1.91 MB
Page 9 of 256
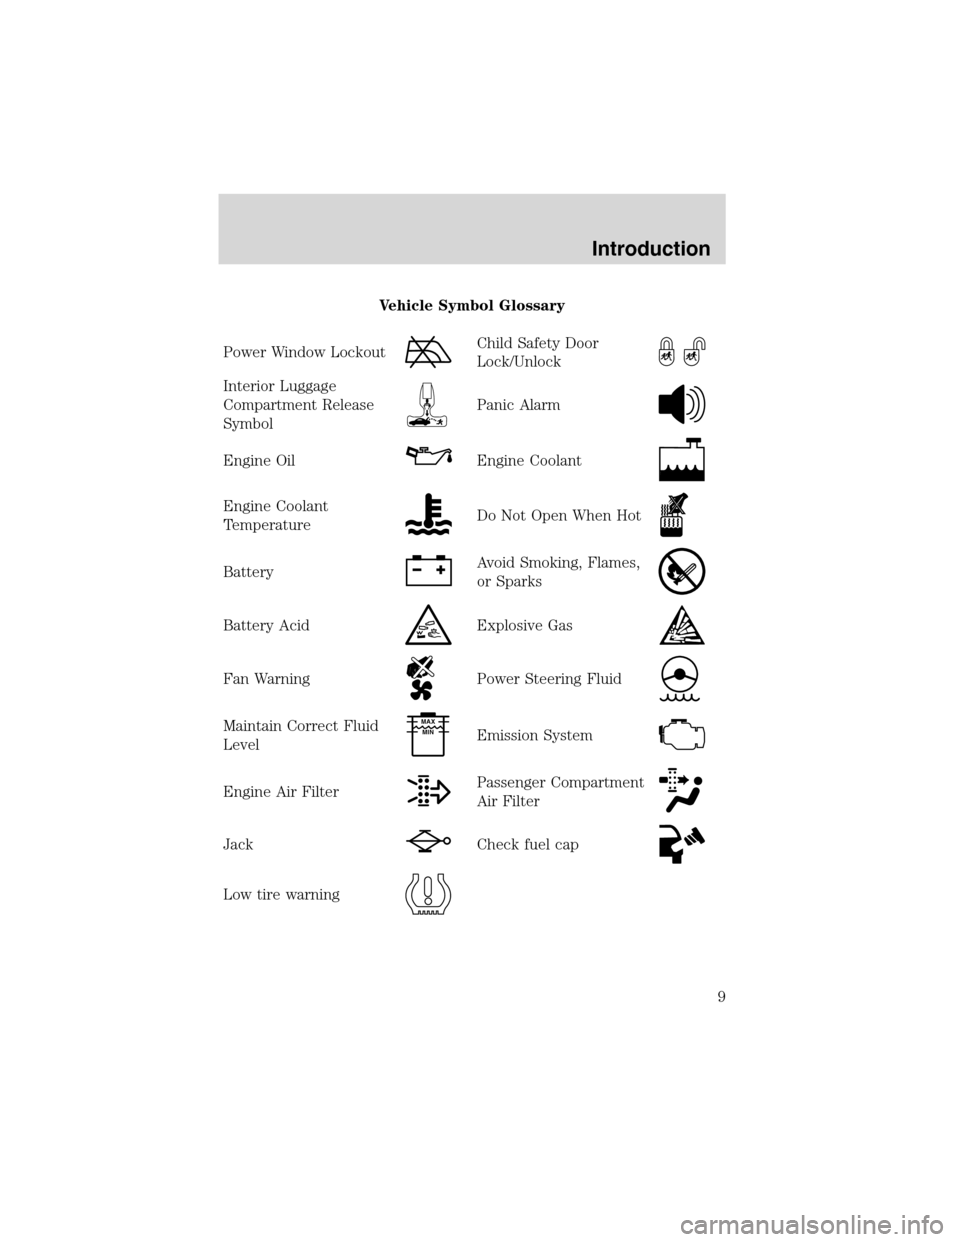
Vehicle Symbol Glossary
Power Window Lockout
Child Safety Door
Lock/Unlock
Interior Luggage
Compartment Release
Symbol
Panic Alarm
Engine OilEngine Coolant
Engine Coolant
TemperatureDo Not Open When Hot
BatteryAvoid Smoking, Flames,
or Sparks
Battery AcidExplosive Gas
Fan WarningPower Steering Fluid
Maintain Correct Fluid
LevelMAX
MIN
Emission System
Engine Air FilterPassenger Compartment
Air Filter
JackCheck fuel cap
Low tire warning
Introduction
9
Page 13 of 256
•Optional electronic instrument
cluster
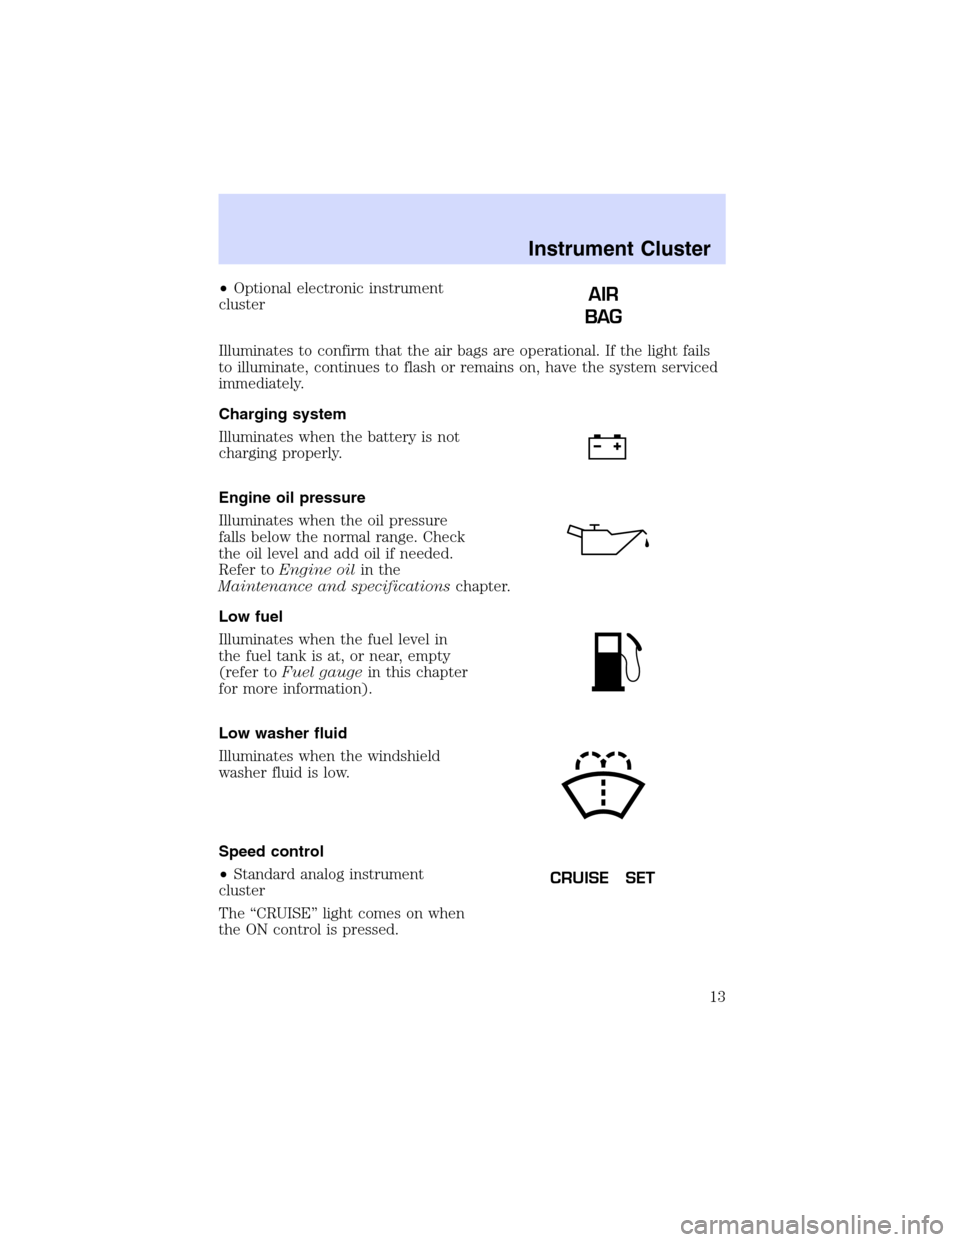
Illuminates to confirm that the air bags are operational. If the light fails
to illuminate, continues to flash or remains on, have the system serviced
immediately.
Charging system
Illuminates when the battery is not
charging properly.
Engine oil pressure
Illuminates when the oil pressure
falls below the normal range. Check
the oil level and add oil if needed.
Refer toEngine oilin the
Maintenance and specificationschapter.
Low fuel
Illuminates when the fuel level in
the fuel tank is at, or near, empty
(refer toFuel gaugein this chapter
for more information).
Low washer fluid
Illuminates when the windshield
washer fluid is low.
Speed control
•Standard analog instrument
cluster
The“CRUISE”light comes on when
the ON control is pressed.AIR
BAG
CRUISE SET
Instrument Cluster
13
Page 102 of 256

Checking your highway fuel economy using the electronic
message center display
Use the following procedure will allow you to accurately monitor your
actual highway fuel economy. This procedure requires the vehicle speed
control system to be set to highway speeds and must be run only on
suitable roadways where long distance speed control can be safely
maintained.
You may notice gradual improvement in fuel economy over the course of
your vehicle’s break-in period (approximately 1 600 kilometers [1 000
miles]).
1. Set the speed control. Refer toSpeed controlin this chapter.
2. Select AVG ECONOMY.
3. Press the RESET control to clear
the system memory.
•Actual highway fuel economy is
now displayed.This current
average measure will change as
the speed control system changes
the engine speed to maintain a
constant vehicle speed. This is most noticeable in hilly environments.
4. Drive the vehicle at least 8 km (5 miles) with the speed control
system engaged to display a stabilized average.
5. Record the highway fuel economy for future reference.
It is important to press the RESET control after setting the speed
control to get accurate highway fuel economy readings.
To empty
Press SELECT until the menu
displays TO EMPTY. This will
display how many kilometers or
miles you can drive until you run
out of fuel.
To ensure accuracy, turn the
ignition off when you fill the fuel
tank.
When the engine is restarted, the message center will display the last
setting selected.
SELECT
OD / TRIP RESET ENG / MET TRIP / RST
OUTSIDE TEMPINST ECONOMY
AVG ECONOMY
TO EMPTY
˚F ˚C
MILES/GAL
L/100 km
MILES km
Driver Controls
102
Page 156 of 256

If you smell exhaust fumes inside your vehicle, have your dealer
inspect your vehicle immediately. Do not drive if you smell
exhaust fumes.
Important safety precautions
A computer system controls the engine’s idle revolutions per minute
(RPM). When the engine starts, the idle RPM runs higher than normal in
order to warm the engine. If the engine idle speed does not slow down
automatically, have the vehicle checked. Do not allow the vehicle to idle
for more than 10 minutes at the higher engine RPM.
Before starting the vehicle:
1. Make sure all vehicle occupants have buckled their safety belts. For
more information on safety belts and their proper usage, refer to the
Seating and safety restraintschapter.
2. Make sure the headlamps and vehicle accessories are off.
3. Make sure the parking brake is
set.
4. Make sure the gearshift is in P
(Park).
5. Turn the key to 3 (ON) without
turning the key to 4 (START).
If there is difficulty in turning the
key, firmly rotate the steering wheel
left and right until the key turns
freely. This condition may occur
when:
•front wheels are turned
•front wheel is against the curb
PUSH
TO
RELEASE
P RND21
4
3
2
1
Driving
156
Page 158 of 256
seconds and try again. If the engine does not start in two attempts, Press
the accelerator pedal all the way to floor and hold. Turn the key to
START position.
4. When the engine starts, release the key, then release the accelerator
pedal gradually as the engine speeds up.
5. After idling for a few seconds, apply the brake, shift into gear and
drive.
Guarding against exhaust fumes
Although odorless and colorless, carbon monoxide is present in exhaust
fumes. Take precautions to avoid its dangerous effects.
If you ever smell exhaust fumes of any kind inside your vehicle,
have your dealer inspect and fix your vehicle immediately. Do
not drive if you smell exhaust fumes. These fumes are harmful and
could kill you.
Have the exhaust and body ventilation systems checked whenever:
•the vehicle is raised for service.
•the sound of the exhaust system changes.
•the vehicle has been damaged in a collision.
WARNING:Engine exhaust, some of its constituents, and
certain vehicle components contain or emit chemicals known to
the State of California to cause cancer and birth defects or other
reproductive harm. In addition, certain fluids contained in vehicles and
certain products of component wear contain or emit chemicals known
to the State of California to cause cancer and birth defects or other
reproductive harm.
Important ventilating information
If the engine is idling while the vehicle is stopped in an open area for
long periods of time, open the windows at least 2.5 cm (one inch).
Adjust the heating or air conditioning to bring in fresh air.
Improve vehicle ventilation by keeping all air inlet vents clear of snow,
leaves and other debris.
BRAKES
Your service brakes are self-adjusting. Refer to the scheduled
maintenance guide for scheduled maintenance.
Driving
158
Page 159 of 256
Occasional brake noise is normal and often does not indicate a
performance concern with the vehicle’s brake system. In normal
operation, automotive brake systems may emit occasional or intermittent
squeal or groan noises when the brakes are applied. Such noises are
usually heard during the first few brake applications in the morning;
however, they may be heard at any time while braking and can be
aggravated by environmental conditions such as cold, heat, moisture,
road dust, salt or mud. If a“metal-to-metal,”“continuous grinding”or
“continuous squeal”sound is present while braking, the brake linings
may be worn-out and should be inspected by a qualified service
technician.
If you are driving down a long or steep hill, shift to a lower gear.
Do not apply your brakes continuously, as they may overheat
and become less effective.
Anti-lock brake system (ABS) (if equipped)
On vehicles equipped with an anti-lock braking system (ABS), a noise
from the hydraulic pump motor and pulsation in the pedal may be
observed during ABS braking events. Pedal pulsation coupled with noise
while braking under panic conditions or on loose gravel, bumps, wet or
snowy roads is normal and indicates proper functioning of the vehicle’s
anti-lock brake system. The ABS performs a self-check after you start
the engine and begin to drive away. A brief mechanical noise may be
heard during this test. This is normal. If a malfunction is found, the ABS
warning light will come on. If the vehicle has continuous vibration or
shudder in the steering wheel while braking, the vehicle should be
inspected by a qualified service technician.
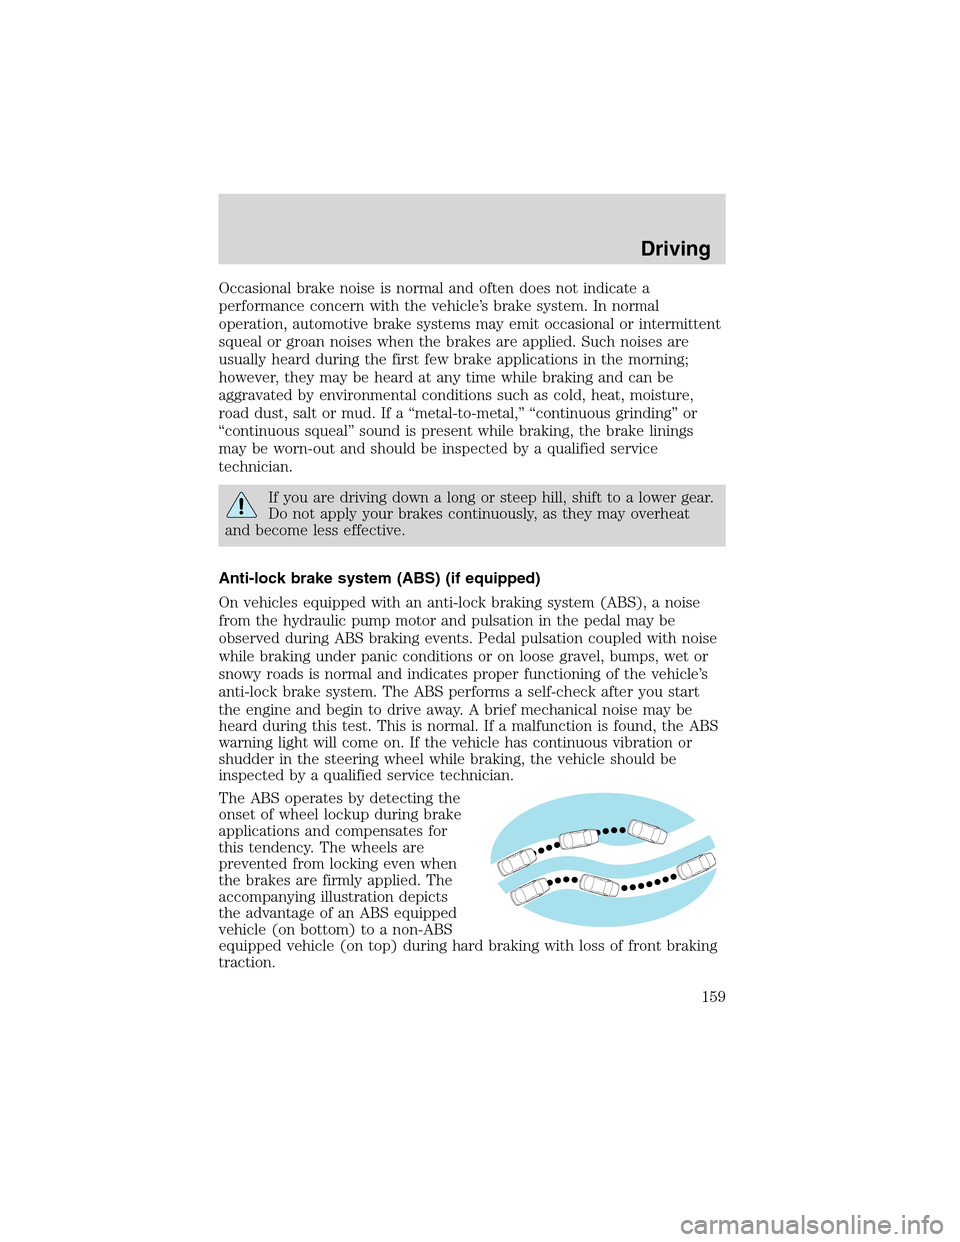
The ABS operates by detecting the
onset of wheel lockup during brake
applications and compensates for
this tendency. The wheels are
prevented from locking even when
the brakes are firmly applied. The
accompanying illustration depicts
the advantage of an ABS equipped
vehicle (on bottom) to a non-ABS
equipped vehicle (on top) during hard braking with loss of front braking
traction.
Driving
159
Page 167 of 256
Once through the water, always try the brakes. Wet brakes do not stop
the vehicle as effectively as dry brakes. Drying can be improved by
moving your vehicle slowly while applying light pressure on the brake
pedal.
Driving through deep water where the transaxle is submerged
may allow water into the transaxle and cause internal damage.
Have the fluid checked and, if water is found, replace the fluid.
VEHICLE LOADING
Before loading a vehicle, familiarize yourself with the following terms:
•Base Curb Weight:Weight of the vehicle including any standard
equipment, fluids, lubricants, etc. It does not include occupants or
aftermarket equipment.
•Payload:Combined maximum allowable weight of cargo, occupants
and optional equipment. The payload equals the gross vehicle weight
rating minus base curb weight.
•GVW (Gross Vehicle Weight):Base curb weight plus payload
weight. The GVW is not a limit or a specification.
•GVWR (Gross Vehicle Weight Rating):Maximum permissible total
weight of the base vehicle, occupants, optional equipment and cargo.
The GVWR is specific to each vehicle and is listed on the Safety
Certification Label on the driver’s door pillar.
•GAWR (Gross Axle Weight Rating):Carrying capacity for each axle
system. The GAWR is specific to each vehicle and is listed on the
Safety Certification Label on the driver’s door pillar.
•GCWR (Gross Combined Weight Rating):Maximum permissible
combined weight of towing vehicle (including occupants and cargo)
and the loaded trailer.
•Maximum Trailer Weight Rating:Maximum weight of a trailer the
vehicle is permitted to tow. The maximum trailer weight rating is
determined by subtracting the vehicle curb weight for each
engine/transmission combination, any required option weight for trailer
towing and the weight of the driver from the GCWR for the towing
vehicle.
•Maximum Trailer Weight:maximum weight of a trailer the loaded
vehicle (including occupants and cargo) is permitted to tow. It is
determined by subtracting the weight of the loaded trailer towing
vehicle from the GCWR for the towing vehicle.
•Trailer Weight Range:Specified weight range that the trailer must
fall within that ranges from zero to the maximum trailer weight rating.
Driving
167
Page 172 of 256

•Allow more distance for stopping with a trailer attached.
•If you are driving down a long or steep hill, shift to a lower gear. Do
not apply the brakes continuously, as they may overheat and become
less effective.
•The trailer tongue weight should be 10–15% of the loaded trailer
weight.
•After you have traveled 80 km (50 miles), thoroughly check your
hitch, electrical connections and trailer wheel lug nuts.
•To aid in engine/transmission cooling and A/C efficiency during hot
weather while stopped in traffic, place the gearshift lever in P (Park).
•Vehicles with trailers should not be parked on a grade. If you must
park on a grade, place wheel chocks under the trailer’s wheels.
RECREATIONAL TOWING
Follow these guidelines for your specific powertrain combination to tow
your vehicle with all four wheels on the ground (such as behind a
recreational vehicle).
These guidelines are designed to ensure that your transmission is not
damaged due to insufficient lubrication.
All Front Wheel Drive (FWD) vehicles
An example of recreational towing is towing your vehicle behind a
motorhome. The following recreational towing guidelines are designed to
ensure that your transmission is not damaged. It is not recommended to
tow front wheel drive vehicles with the front drive wheels on the ground.
It is recommended to tow your vehicle with the drive wheels on a dolly
or two wheel car hauling trailer.
In case of a roadside emergency with a disabled vehicle (without access
to wheel dollies, car hauling trailer or flatbed transport vehicle) your
vehicle can be flat towed (all wheels on the ground) under the following
conditions:
•Place the transmission in N (Neutral).
•Maximum speed is 56 km/h (35 mph).
•Maximum distance is 80 km (50 miles).
Driving
172
Page 182 of 256

Relay box
The relay box is located in the
engine compartment in front of the
battery.
The relays are coded as follows:
Relay location Description
1 Start Inhibit Relay
2 Fuel Pump Relay
3 Bulb Check Relay
4 Fog Lamp
5 Anti-theft Relay
6 Horn Relay
7 A/C Relay
CHANGING THE TIRES
If you get a flat tire while driving, do not apply the brake heavily.
Instead, gradually decrease your speed. Hold the steering wheel firmly
and slowly move to a safe place on the side of the road.
The use of tire sealants is not recommended and may compromise the
integrity of your tires. The use of tire sealants may also affect your tire
pressure monitoring system (if equipped).
1234
56 7
Roadside Emergencies
182
Page 188 of 256

JUMP STARTING YOUR VEHICLE
The gases around the battery can explode if exposed to flames,
sparks, or lit cigarettes. An explosion could result in injury or
vehicle damage.
Batteries contain sulfuric acid which can burn skin, eyes, and
clothing, if contacted.
Do not attempt to push-start your vehicle. Automatic
transmissions do not have push-start capability; also, the
catalytic converter may become damaged.
Preparing your vehicle
When the battery is disconnected or a new battery is installed, the
transmission must relearn its shift strategy. As a result, the transmission
may have firm and/or soft shifts. This operation is considered normal and
will not affect function or durability of the transmission. Over time, the
adaptive learning process will fully update transmission operation.
1.Use only a 12–volt supply to start your vehicle.
2. Do not disconnect the battery of the disabled vehicle as this could
damage the vehicle’s electrical system.
3. Park the booster vehicle close to the hood of the disabled vehicle
making sure the two vehiclesdo nottouch. Set the parking brake on
both vehicles and stay clear of the engine cooling fan and other moving
parts.
4. Check all battery terminals and remove any excessive corrosion before
you attach the battery cables. Ensure that vent caps are tight and level.
5. Turn the heater fan on in both vehicles to protect any electrical
surges. Turn all other accessories off.
Roadside Emergencies
188