fog light Mercury Villager 2002 Owner's Manuals
[x] Cancel search | Manufacturer: MERCURY, Model Year: 2002, Model line: Villager, Model: Mercury Villager 2002Pages: 256, PDF Size: 1.91 MB
Page 8 of 256

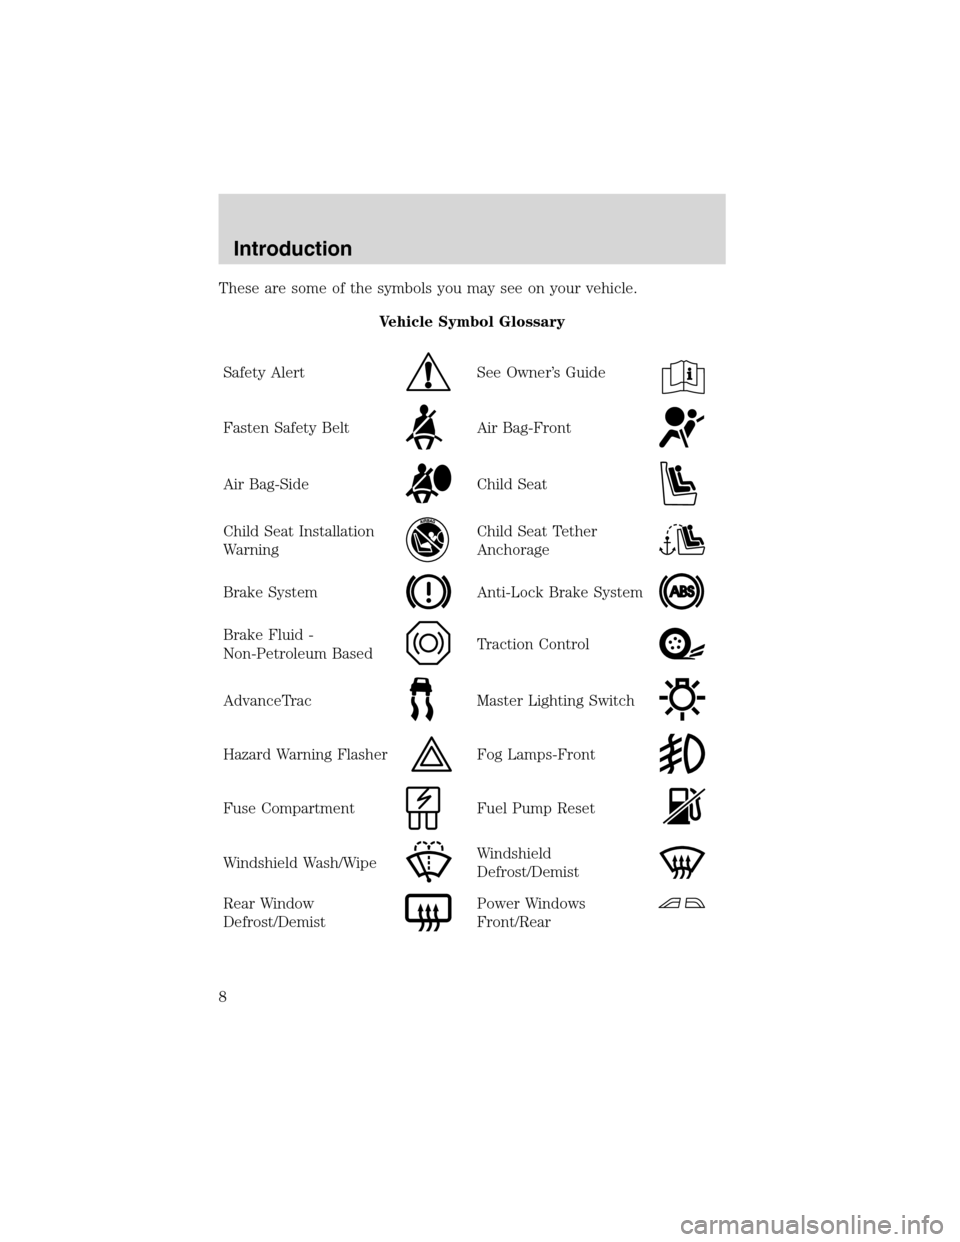
These are some of the symbols you may see on your vehicle.
Vehicle Symbol Glossary
Safety Alert
See Owner’s Guide
Fasten Safety BeltAir Bag-Front
Air Bag-SideChild Seat
Child Seat Installation
WarningChild Seat Tether
Anchorage
Brake SystemAnti-Lock Brake System
Brake Fluid -
Non-Petroleum BasedTraction Control
AdvanceTracMaster Lighting Switch
Hazard Warning FlasherFog Lamps-Front
Fuse CompartmentFuel Pump Reset
Windshield Wash/WipeWindshield
Defrost/Demist
Rear Window
Defrost/DemistPower Windows
Front/Rear
Introduction
8
Page 59 of 256

The air condition operates in MAX A/C and when the A/C control is
depressed. However, the air conditioning will only function if the outside
temperature is about 4°C (40°F) or higher.
Since the air conditioner removes considerable moisture from the air
during operation, it is normal if clear water drips on the ground under
the air conditioner drain while the system is working and even after you
have stopped the vehicle.
•MAX A/C–Uses recirculated air to cool the vehicle. MAX A/C is
noisier than A/C modes but more economical and will cool the inside
of the vehicle faster. In this mode, the air conditioning will
automatically engage if the outside temperature is about 4°C (40°F) or
higher and the
A/Cindicator will automatically light. Airflow will be
from the instrument panel registers. This mode can also be used to
prevent undesirable odors from entering the vehicle.
•
(Panel)–Distributes outside air through the instrument panel
registers. Heating and air conditioning capabilities are provided in this
mode. Push
A/Cto cool the vehicle below the outside temperature.
•OFF–Outside air is shut out and the fan will not operate. For short
periods of time only, use this mode to reduce undesirable odors from
entering the vehicle.
•
(Panel and floor)–Distributes outside air through the
instrument panel registers and the front and rear floor ducts. Heating
and air conditioning capabilities are provided in this mode. Push
A/C
in order to cool the vehicle below the outside temperature. For added
customer comfort, when the temperature control knob is anywhere in
between the full hot and full cold positions, the air distributed through
the front and rear floor ducts will be slightly warmer than the air sent
to the instrument panel registers.
•
(Floor)–Distributes outside air through the front and rear floor
ducts. Heating and air conditioning capabilities are provided in this
mode. Push
A/Cin order to cool the vehicle below the outside
temperature.
Operating tips
•In humid weather conditions, place the climate control system in
Defrost mode before driving. This will reduce fogging on your
windshield. Once the windshield has been cleared, operate the climate
control system as desired.
•To reduce humidity buildup inside the vehicle in cold weather
conditions, don’t drive with the climate control system in the OFF or
MAX A/C position.
Climate Controls
59
Page 67 of 256

•(Defrost) - Distributes outside air through the windshield
defroster ducts. It can be used to clear ice or fog from the windshield.
If the temperature is about 4°C (40°F) or higher, the air conditioner
will automatically dehumidify the air to reduce fogging.
•
(Panel) - Distributes outside air through the instrument panel
registers. Heating and air conditioning capabilities are provided in this
mode. Push
A/Cto cool the vehicle below the outside temperature.
•
(Panel and floor) - Distributes outside air through the instrument
panel registers and the front and rear floor ducts. Heating and air
conditioning capabilities are provided in this mode. Push
A/Cto cool
the vehicle below the outside temperature. For added customer
comfort, when the temperature control is anywhere in between the
full hot and full cold, the air distributed through the front and rear
floor ducts will be slightly warmer than the air sent to the instrument
panel registers.
•
(Floor) - Allows for maximum heating by distributing outside air
through the front and rear floor ducts. Heating and air conditioning
capabilities are provided in this mode. Push
A/Cto cool the vehicle
below the outside temperature.
•MAX A/C - Uses recirculated air to cool the vehicle. MAX A/C is
noisier than
A/CA/C but more economical and will cool the inside of
the vehicle faster. After pressing the MAX control, both the MAX
and
A/CA/C indicators will light and the airflow will be from the
instrument panel registers. In this mode, the air conditioning will
automatically engage if the outside temperature is about 4°C (40°F) or
higher.
Cooling your vehicle with outside air using override controls
Cooling your vehicle with air conditioned outside air using just the A/C
override control is quieter but less economical than using both the A/C
and the MAX control. It also has less cooling capacity and is not
recommended for high outside temperatures.
In order to cool your vehicle with outside air using the override controls:
1. Select the override control
,or.
2. Press
A/C. The indicator light onA/Cwill illuminate.
3. Select the desired temperature for your comfort level.
4. Adjust the fan speed override knob to the position of your choice.
Climate Controls
67
Page 74 of 256

HEADLAMP CONTROL
Rotate the headlamp control
clockwise to the first position to
turn on the parking lamps. Rotate
clockwise to the second position to
also turn on the headlamps.
Push the control to turn on the
interior lamps. Push control again to
turn off the interior lamps.
Autolamp control (if equipped)
The autolamp system provides light
sensitive automatic on-off control of
the low-beam exterior lights
normally controlled by the headlamp
control.
The autolamp system also keeps the
lights on for a preselected period of
time after the ignition switch is
turned to OFF.
•To turn autolamps on, rotate the
headlamp control counter clockwise to one of the two settings. The
AUTO 1 position has a preselected time lapse of approximately 25
seconds. The AUTO 2 position has a preselected time lapse of
approximately 2
1⁄2minutes.
•To turn autolamps off, rotate the headlamp control clockwise to the
OFF position.
Foglamp control (if equipped)
Turn on the low-beam headlamps
and press the foglamp control to
activate the foglamps. The foglamp
control will illuminate when the
foglamps are on.
Press the foglamp control a second
time to deactivate the foglamps.
OFFAUTO
1
AUTO
2
PUSH INTERIOR
Lights
74
Page 113 of 256

Arming the system
When unauthorized entry occurs, the system will flash headlamp lamps,
tail lamps and the security indicator lamp, chirp the horn and disable the
starting system.
The system is ready to arm whenever the key is removed from the
ignition. Any of the following actions will prearm the alarm system:
•Lock the doors with the remote
transmitter (doors opened or
closed). The horn will chirp (if all
doors are closed) to confirm that
the control was pressed. The
horn chirp feature can be turned
on/off by holding the LOCK and
UNLOCK controls on the
transmitter simultaneously for
two seconds. The hazard lights
will flash three times each time
the system is toggled between active and non-active modes.
•Open a door and press the power door lock control to lock the doors.
If a door is open, the system is
prearmed and is waiting for the door
to close. Once all the doors are
closed, the security indicator lamp
on the instrument panel will
illuminate continuously when the
system is prearmed.
The system will arm in 30 seconds
and the security indicator lamp will
begin to flash.
SECURITYHAZARD
RR DEFOGRR WIPER
RR WASH
Locks and Security
113
Page 174 of 256

If you need to arrange roadside assistance for yourself, Ford Motor
Company will reimburse a reasonable amount. To obtain reimbursement
information, U.S. Ford or Mercury vehicles customers call
1-800-241-3673; Lincoln vehicle customers call 1–800–521–4140.
Canadian customers who need to obtain reimbursement information, call
1–800–665–2006.
ROADSIDE COVERAGE BEYOND BASIC WARRANTY
In the United States, you may purchase additional roadside assistance
coverage beyond this period through the Ford Auto Club by contacting
your Ford or Lincoln Mercury dealer.
Similarly in Canada, for uninterrupted Roadside Assistance coverage, you
may purchase extended coverage prior to your Basic Warranty’s Roadside
Assistance expiring. For more information and enrollment, contact
1–877–294–2582 or visit our website at www.ford.ca.
HAZARD FLASHER
Use only in an emergency to warn traffic of vehicle breakdown,
approaching danger, etc. The hazard flashers can be operated when the
ignition is off.
•The hazard lights control is
located on the instrument panel.
•Depress hazard lights control to
activate all hazard flashers
simultaneously.
•Depress control again to turn the
flashers off.
FUEL PUMP SHUT-OFF SWITCH
FUEL
RESET
The fuel pump shut-off switch is a device intended to stop the electric
fuel pump when your vehicle has been involved in a substantial jolt.
After a collision, if the engine cranks but does not start, the fuel pump
shut-off switch may have been activated.
SECURITYHAZARD
RR DEFOGRR WIPER RR WASH
Roadside Emergencies
174
Page 179 of 256

Fuse/Relay
LocationFuse Amp
RatingPassenger Compartment Fuse
Panel Description
Electron 10A Transmission Control, Lighting
Control Module, ABS Control
Module, Smart Entry Control
(SEC)/Timer Module
Rear Defog 20A Rear Window Defrost
Front Blower 20A Front Blower Motor, Front Blower
Motor/Speed Controller
Rear Defog 20A Rear Window Defrost
——Not Used
Heated Mirror 10A Rear Window Defrost Switch,
Power/Heated Mirrors
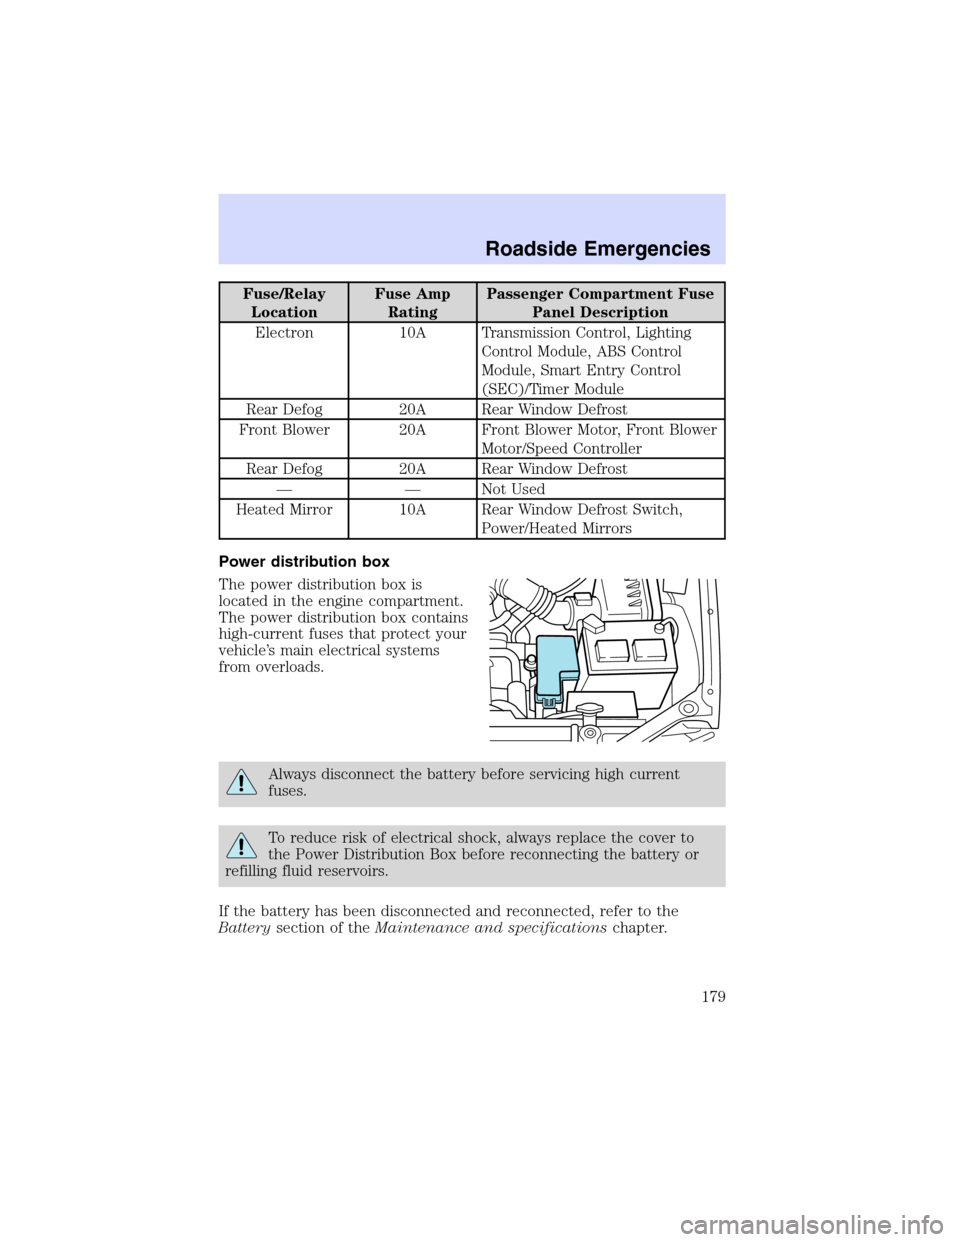
Power distribution box
The power distribution box is
located in the engine compartment.
The power distribution box contains
high-current fuses that protect your
vehicle’s main electrical systems
from overloads.
Always disconnect the battery before servicing high current
fuses.
To reduce risk of electrical shock, always replace the cover to
the Power Distribution Box before reconnecting the battery or
refilling fluid reservoirs.
If the battery has been disconnected and reconnected, refer to the
Batterysection of theMaintenance and specificationschapter.
Roadside Emergencies
179
Page 250 of 256

filter, specifications ........214, 239
recommendations ...................214
refill capacities ........................239
specifications ..................240–241
Exhaust fumes ..........................158
F
Floor mats .................................103
Fluid capacities .........................239
Foglamps .....................................74
Fuel ............................................221
calculating fuel economy .......225
cap ...........................................223
capacity ...................................239
choosing the right fuel ...........224
comparisons with EPA fuel
economy estimates .................228
detergent in fuel .....................225
filling your vehicle with
fuel ...........................221, 223, 226
filter, specifications ........225, 239
fuel pump shut-off switch .....174
gauge .........................................17
improving fuel economy ........225
low fuel warning light ..............13
octane rating ...........224, 241–242
quality ......................................224
running out of fuel .................225
safety information relating to
automotive fuels .....................221
Fuses ..................................175–176
G
Garage door opener ....................95
Gas cap (see Fuel cap) ............223
Gas mileage (see Fuel
economy) ...................................225
Gauges ...................................15–16engine coolant temperature
gauge .........................................16
fuel gauge ..................................17
odometer ...................................18
speedometer .............................18
trip odometer ............................19
GAWR (Gross Axle Weight
Rating) .......................................167
calculating ...............................168
definition .................................167
driving with a heavy load ......167
location ....................................167
GVWR (Gross Vehicle Weight
Rating) .......................................167
calculating .......................167–168
definition .................................167
driving with a heavy load ......167
location ....................................167
H
Hazard flashers .........................174
Head restraints .........................115
Headlamps ...................................74
aiming ........................................75
autolamp system .......................74
bulb specifications ....................77
flash to pass ..............................75
high beam ...........................15, 75
replacing bulbs .........................79
turning on and off ....................74
warning chime ..........................15
Heating
heating and air conditioning
system .................................58, 63
rear seat controls ...............61, 69
HomeLink universal
transceiver (see Garage door
opener) ...................... 95–96, 98–99
Hood ..........................................210
Index
250
Page 251 of 256

I
Ignition .......................155, 241–242
Infant seats
(see Safety seats) .....................144
Inspection/maintenance (I/M)
testing ........................................230
Instrument panel
cleaning ...................................206
cluster ........................................10
lighting up panel and
interior .......................................75
J
Jack ............................................182
positioning ...............................182
storage .....................................182
Jump-starting your vehicle ......188
K
Keys
key in ignition chime ...............15
positions of the ignition .........155
L
Lamps
autolamp system .......................74
bulb replacement
specifications chart ..................77
cargo lamps ...............................75
fog lamps ...................................74
headlamps .................................74
headlamps, flash to pass ..........75
instrument panel, dimming .....75
interior lamps ...........................76
replacing bulbs .............77, 79–82
Lane change indicator
(see Turn signal) ........................76Liftgate ......................................104
Lights, warning and indicator ....10
air bag ........................................12
anti-lock brakes (ABS) ....12, 160
brake ..........................................11
charging system ........................13
cruise indicator ...................13, 94
door ajar ....................................14
high beam .................................15
low fuel ......................................13
low washer fluid .......................13
oil pressure ...............................13
overdrive off ..............................14
safety belt .................................12
service engine soon ..................10
speed control ............................93
turn signal indicator .................14
Load limits .................................167
GAWR ......................................167
GVWR ......................................167
trailer towing ..........................167
Locks
childproof ................................108
doors ........................................108
Lubricant specifications ...240–241
Lumbar support, seats .............117
M
Message center ...................99–101
Mirrors .........................................86
heated ........................................89
side view mirrors (power) .......89
Moon roof ....................................94
Motorcraft parts ................225, 239
O
Octane rating ............................224
Odometer .....................................18
Index
251