horn Mercury Villager 2002 Owner's Manuals
[x] Cancel search | Manufacturer: MERCURY, Model Year: 2002, Model line: Villager, Model: Mercury Villager 2002Pages: 256, PDF Size: 1.91 MB
Page 110 of 256

Unlocking the doors
Press this control to unlock the
driver’s door. The interior lamps will
illuminate and the parking and tail
lamps will flash once.
Press the control a second time
within five seconds to unlock all
doors.
Locking the doors
Press this control to lock all doors.
To confirm all doors are closed and
locked, the horn will chirp and the
lamps will flash. The horn chirp
feature can be turned on/off by
holding the LOCK and UNLOCK
controls on the transmitter
simultaneously for two seconds. The
hazard lights will flash three times
each time the system is toggled
between active and non-active modes.
If any of the doors are ajar, the horn will not chirp and the lights will not
flash.
Sounding a panic alarm
To activate the alarm, press and
hold the PANIC control for longer
than 1.5 seconds. The horn will
sound and the headlamps and tail
lights will flash for thirty (30)
seconds.
To deactivate the alarm, press the
LOCK or UNLOCK or hold the
PANIC control down for longer than
1.5 seconds.
Locks and Security
110
Page 113 of 256

Arming the system
When unauthorized entry occurs, the system will flash headlamp lamps,
tail lamps and the security indicator lamp, chirp the horn and disable the
starting system.
The system is ready to arm whenever the key is removed from the
ignition. Any of the following actions will prearm the alarm system:
•Lock the doors with the remote
transmitter (doors opened or
closed). The horn will chirp (if all
doors are closed) to confirm that
the control was pressed. The
horn chirp feature can be turned
on/off by holding the LOCK and
UNLOCK controls on the
transmitter simultaneously for
two seconds. The hazard lights
will flash three times each time
the system is toggled between active and non-active modes.
•Open a door and press the power door lock control to lock the doors.
If a door is open, the system is
prearmed and is waiting for the door
to close. Once all the doors are
closed, the security indicator lamp
on the instrument panel will
illuminate continuously when the
system is prearmed.
The system will arm in 30 seconds
and the security indicator lamp will
begin to flash.
SECURITYHAZARD
RR DEFOGRR WIPER
RR WASH
Locks and Security
113
Page 180 of 256

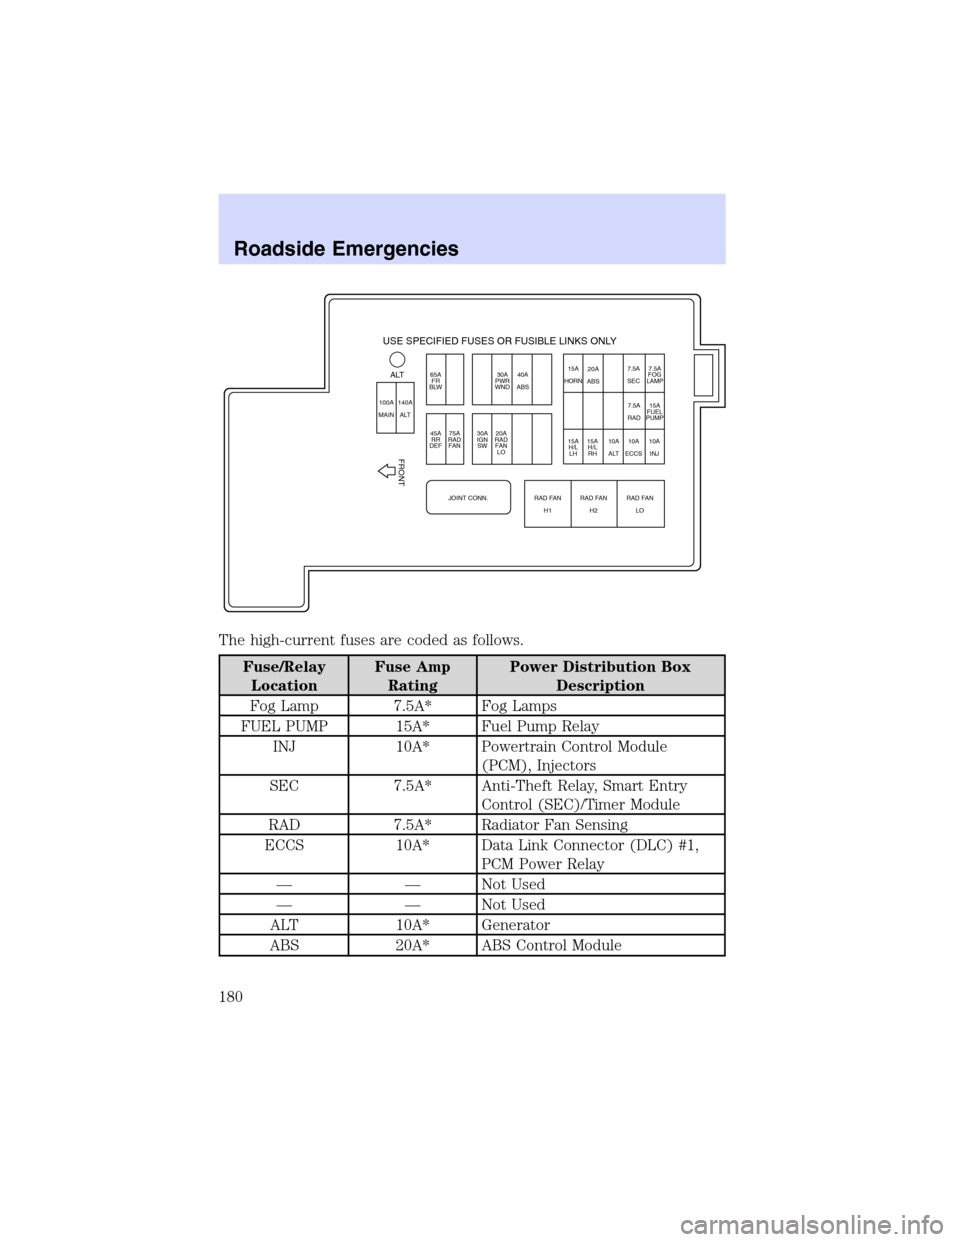
The high-current fuses are coded as follows.
Fuse/Relay
LocationFuse Amp
RatingPower Distribution Box
Description
Fog Lamp 7.5A* Fog Lamps
FUEL PUMP 15A* Fuel Pump Relay
INJ 10A* Powertrain Control Module
(PCM), Injectors
SEC 7.5A* Anti-Theft Relay, Smart Entry
Control (SEC)/Timer Module
RAD 7.5A* Radiator Fan Sensing
ECCS 10A* Data Link Connector (DLC) #1,
PCM Power Relay
——Not Used
——Not Used
ALT 10A* Generator
ABS 20A* ABS Control Module
USE SPECIFIED FUSES OR FUSIBLE LINKS ONLY
ALT
100A
MAIN140A
ALT65A
FR
BLW
45A
RR
DEF75A
RAD
FA N
JOINT CONN. RAD FAN
H1RAD FAN
H2RAD FAN
LO 30A
IGN
SW20A
RAD
FA N
LO 30A
PWR
WND40A
ABS20A
ABS
15A
HORN7.5A
SEC7.5A
LAMP
15A
H/L
LH15A
H/L
RH10A
ALT10A
ECCS10A
INJ 15A
FUEL
PUMP 7.5A
RAD
FRONT
FOG
Roadside Emergencies
180
Page 181 of 256

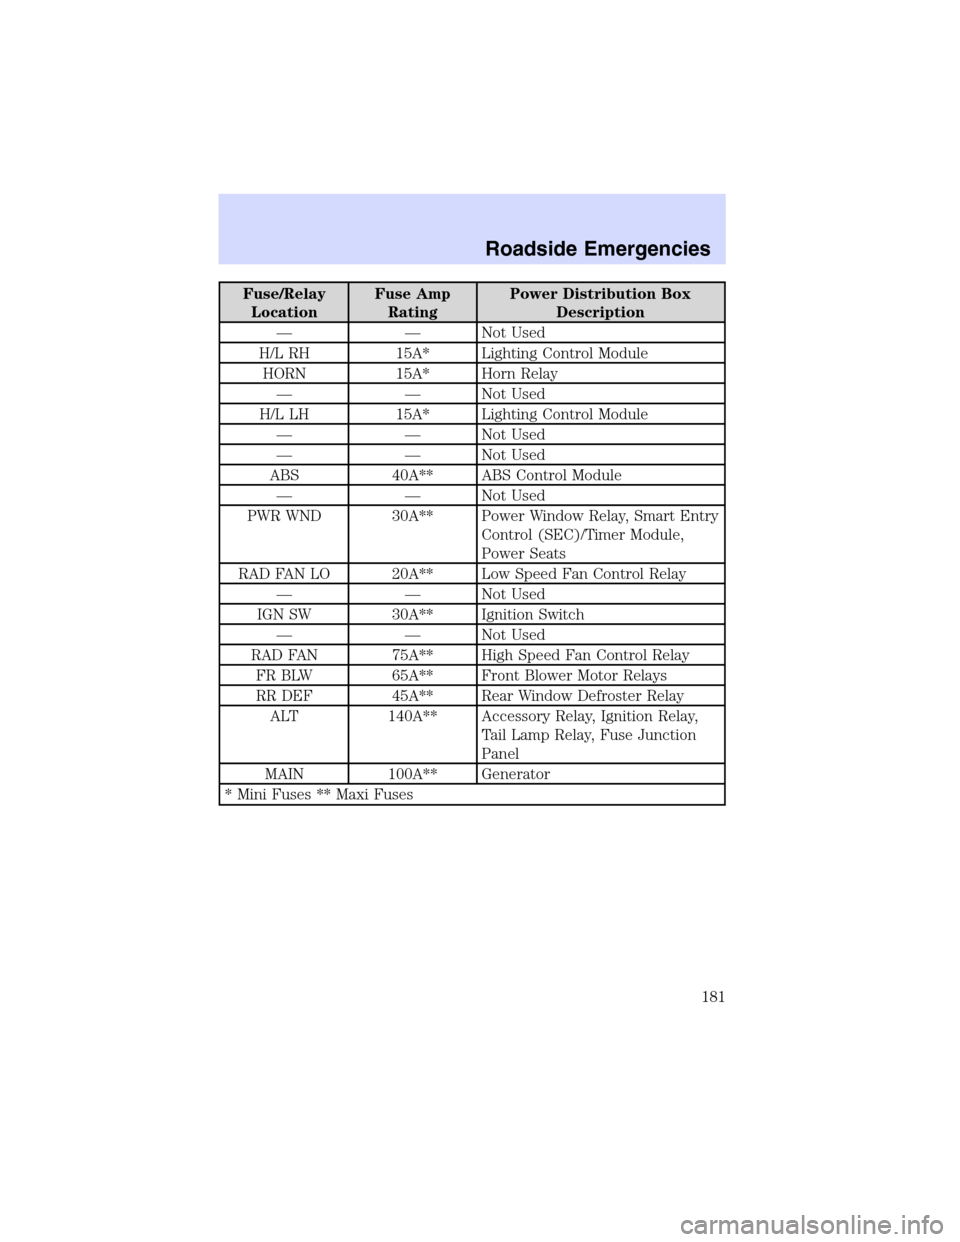
Fuse/Relay
LocationFuse Amp
RatingPower Distribution Box
Description
——Not Used
H/L RH 15A* Lighting Control Module
HORN 15A* Horn Relay
——Not Used
H/L LH 15A* Lighting Control Module
——Not Used
——Not Used
ABS 40A** ABS Control Module
——Not Used
PWR WND 30A** Power Window Relay, Smart Entry
Control (SEC)/Timer Module,
Power Seats
RAD FAN LO 20A** Low Speed Fan Control Relay
——Not Used
IGN SW 30A** Ignition Switch
——Not Used
RAD FAN 75A** High Speed Fan Control Relay
FR BLW 65A** Front Blower Motor Relays
RR DEF 45A** Rear Window Defroster Relay
ALT 140A** Accessory Relay, Ignition Relay,
Tail Lamp Relay, Fuse Junction
Panel
MAIN 100A** Generator
* Mini Fuses ** Maxi Fuses
Roadside Emergencies
181
Page 182 of 256

Relay box
The relay box is located in the
engine compartment in front of the
battery.
The relays are coded as follows:
Relay location Description
1 Start Inhibit Relay
2 Fuel Pump Relay
3 Bulb Check Relay
4 Fog Lamp
5 Anti-theft Relay
6 Horn Relay
7 A/C Relay
CHANGING THE TIRES
If you get a flat tire while driving, do not apply the brake heavily.
Instead, gradually decrease your speed. Hold the steering wheel firmly
and slowly move to a safe place on the side of the road.
The use of tire sealants is not recommended and may compromise the
integrity of your tires. The use of tire sealants may also affect your tire
pressure monitoring system (if equipped).
1234
56 7
Roadside Emergencies
182