towing Mercury Villager 2002 Owner's Manuals
[x] Cancel search | Manufacturer: MERCURY, Model Year: 2002, Model line: Villager, Model: Mercury Villager 2002Pages: 256, PDF Size: 1.91 MB
Page 2 of 256
Seating and Safety Restraints 115
Seating 115
Safety restraints 129
Air bags 136
Child restraints 141
Driving 155
Starting 155
Brakes 158
Transmission operation 162
Vehicle loading 167
Trailer towing 169
Recreational towing 172
Roadside Emergencies 173
Getting roadside assistance 173
Hazard flasher switch 174
Fuel pump shut-off switch 174
Fuses and relays 175
Changing tires 182
Jump starting 188
Wrecker towing 193
Customer Assistance 194
The dispute settlement board 197
Utilizing the mediation/arbitration 200
Getting assistance outside the U.S. and Canada 200
Ordering additional owner’s literature 201
Reporting safety defects (U.S. only) 202
Table of Contents
2
Page 10 of 256
WARNING LIGHTS AND CHIMES
Warning lights and gauges can alert you to a vehicle condition that may
become serious enough to cause expensive repairs. A warning light may
illuminate when a problem exists with one of your vehicle’s functions.
Many lights will illuminate when you start your vehicle to make sure the
bulb works.If any light remains on after starting the vehicle, have
the respective system inspected immediately.
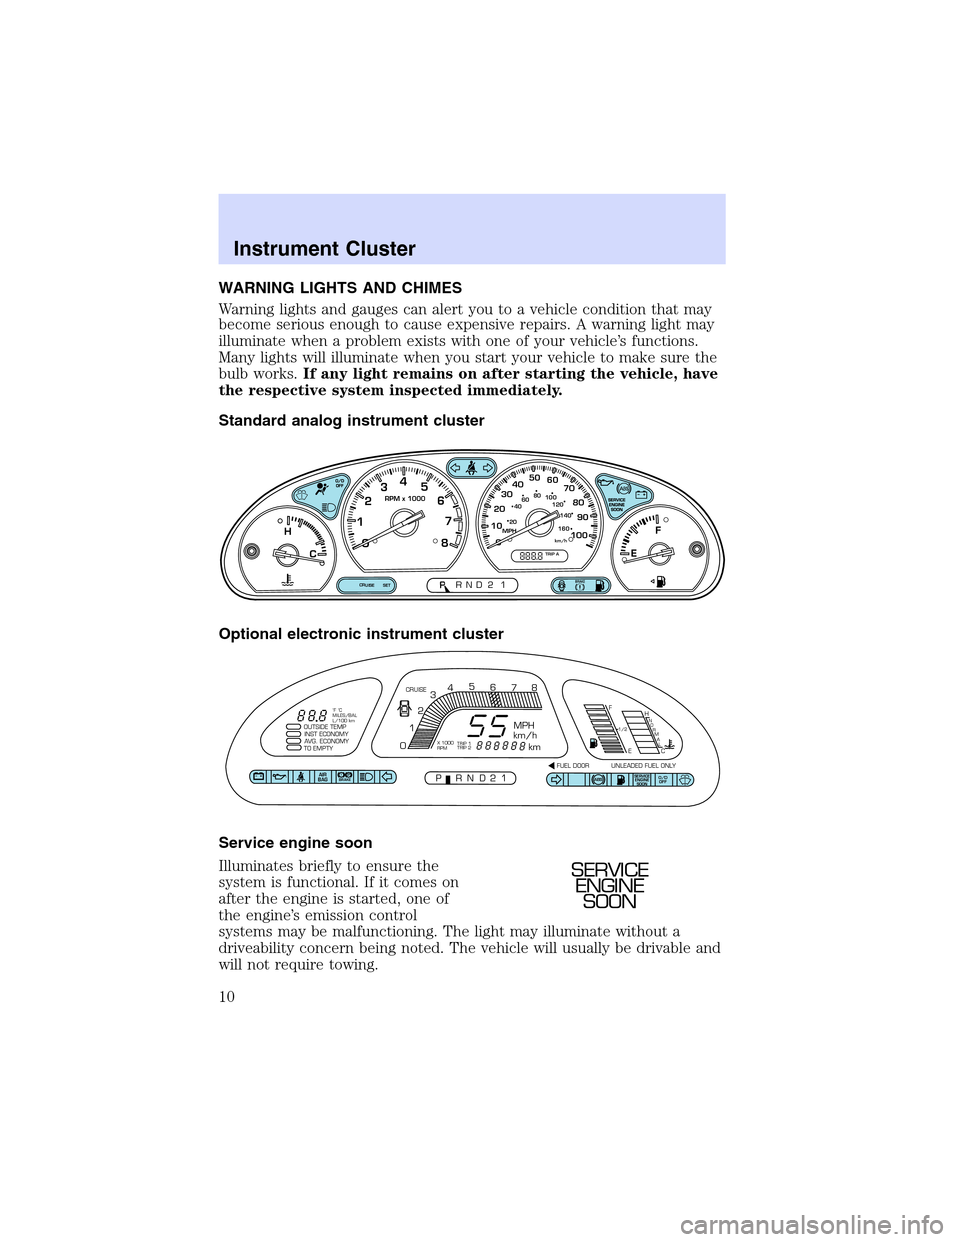
Standard analog instrument cluster
Optional electronic instrument cluster
Service engine soon
Illuminates briefly to ensure the
system is functional. If it comes on
after the engine is started, one of
the engine’s emission control
systems may be malfunctioning. The light may illuminate without a
driveability concern being noted. The vehicle will usually be drivable and
will not require towing.
km/h0 1020304050
60
70
80
90
100MPH
TRIP A
RPM x 1000
20406080
100
120
140
160
0 1234
5
6
7
8F
H
CE
CRUISE SETPRND2P1
SERVICE
ENGINE
SOONABSAIR
BAGABSO/D
OFF
OUTSIDE TEMP
INST ECONOMY
AVG. ECONOMY
TO EMPTY
PRND21FUEL DOOR UNLEADED FUEL ONLY CRUISE
MPH
km/h
km
F
EH
C
1/2N
O
R
M
A
L
012345
6
78
P!BRAKE
X 1000
RPMTRIP 1
TRIP 2 ˚F ˚C
MILES/BAL
L/100 km
SERVICE
ENGINE
SOON
Instrument Cluster
10
Page 167 of 256
Once through the water, always try the brakes. Wet brakes do not stop
the vehicle as effectively as dry brakes. Drying can be improved by
moving your vehicle slowly while applying light pressure on the brake
pedal.
Driving through deep water where the transaxle is submerged
may allow water into the transaxle and cause internal damage.
Have the fluid checked and, if water is found, replace the fluid.
VEHICLE LOADING
Before loading a vehicle, familiarize yourself with the following terms:
•Base Curb Weight:Weight of the vehicle including any standard
equipment, fluids, lubricants, etc. It does not include occupants or
aftermarket equipment.
•Payload:Combined maximum allowable weight of cargo, occupants
and optional equipment. The payload equals the gross vehicle weight
rating minus base curb weight.
•GVW (Gross Vehicle Weight):Base curb weight plus payload
weight. The GVW is not a limit or a specification.
•GVWR (Gross Vehicle Weight Rating):Maximum permissible total
weight of the base vehicle, occupants, optional equipment and cargo.
The GVWR is specific to each vehicle and is listed on the Safety
Certification Label on the driver’s door pillar.
•GAWR (Gross Axle Weight Rating):Carrying capacity for each axle
system. The GAWR is specific to each vehicle and is listed on the
Safety Certification Label on the driver’s door pillar.
•GCWR (Gross Combined Weight Rating):Maximum permissible
combined weight of towing vehicle (including occupants and cargo)
and the loaded trailer.
•Maximum Trailer Weight Rating:Maximum weight of a trailer the
vehicle is permitted to tow. The maximum trailer weight rating is
determined by subtracting the vehicle curb weight for each
engine/transmission combination, any required option weight for trailer
towing and the weight of the driver from the GCWR for the towing
vehicle.
•Maximum Trailer Weight:maximum weight of a trailer the loaded
vehicle (including occupants and cargo) is permitted to tow. It is
determined by subtracting the weight of the loaded trailer towing
vehicle from the GCWR for the towing vehicle.
•Trailer Weight Range:Specified weight range that the trailer must
fall within that ranges from zero to the maximum trailer weight rating.
Driving
167
Page 169 of 256
TRAILER TOWING
The trailer towing table shows the maximum allowable maximum GCWR
and trailer weight.
Maximum GCWR - kg (lbs.) Trailer weight range (0 -
maximum) - kg (lbs.)
3628 ( 8000) 0-1588 (0-3500)
Do not exceed the GVWR or the GAWR specified on the
certification label.
Towing trailers beyond the maximum recommended gross trailer
weight could result in engine damage, transmission/axle damage,
structural damage, loss of control, and personal injury.
The optional Trailer Tow Prep Package is recommended for towing of
any trailer since it provides a heavy duty battery, conventional size spare
tire and wiring.
Trailer towing puts additional loads on your vehicle’s engine,
transmission, axle, brakes, tires, and suspension. For your safety and to
maximize vehicle performance, be sure to use the proper equipment
while towing.
Follow these guidelines to ensure safe towing procedure:
•Stay within your vehicle’s load limits. If exceeded, cargo should be
removed from the trailer and/or the vehicle until all weights are within
specified limits.
•Thoroughly prepare your vehicle for towing. Refer toPreparing to
towin this chapter.
•Use extra caution when driving while trailer towing. Refer toDriving
while you towin this chapter.
•Service your vehicle more frequently if you tow a trailer. Refer to the
severe duty schedule in the scheduled maintenance guide.
•Do not tow a trailer until your vehicle has been driven at least 800 km
(500 miles).
•Refer to the instructions included with towing accessories for the
proper installation and adjustment specifications.
Driving
169
Page 170 of 256
Trailer Tow Prep Package (if equipped)
The trailer tow prep package on your vehicle (if equipped) includes:
•Heavy duty battery
•Conventional size spare tire
•Trailer tow module and jumper harness
Using the jumper harness (if equipped)
•Remove the connector cap from the vehicle harness located behind
the rear bumper. Store the connector cap in the glove box for
reinstallation.
•Connect the tow harness to the vehicle harness located behind the
rear bumper.
•Connect the tow harness connector (SAE J1239) to your trailer.
•Confirm the proper vehicle and trailer stop/turn lamp operation.
Preparing to tow
Use the proper equipment for towing a trailer, and make sure it is
properly attached to your vehicle. See your dealer or a reliable trailer
dealer if you require assistance.
Hitches
For towing trailers up to 907 kg (2 000 lb), use a weight carrying hitch
and ball which uniformly distributes the trailer tongue load through the
underbody structure. For towing trailers up to 1 588 kg (3 500 lb) use a
frame-mounted weight distributing hitch which transfers a portion of the
trailer tongue load to the front axle system.
Do not install a single or multi-clamp type bumper hitch, or a hitch
which attaches to the axle. Follow the towing instructions of a reputable
rental agency.
Whenever a trailer hitch and hardware are removed, make sure all
mounting holes in the underbody are properly sealed to prevent noxious
gases or water from entering.
Safety chains
Always connect the trailer’s safety chains to the frame or hook retainers
of the vehicle hitch. To connect the trailer’s safety chains, cross the
chains under the trailer tongue and allow slack for turning corners.
If you use a rental trailer, follow the instructions that the rental agency
gives to you.
Driving
170
Page 171 of 256

Do not attach safety chains to the bumper.
Trailer brakes
Electric brakes and manual, automatic or surge-type trailer brakes are
safe if installed properly and adjusted to the manufacturer’s
specifications. The trailer brakes must meet local and Federal
regulations.
Do not connect a trailer’s hydraulic brake system directly to your
vehicle’s brake system. Your vehicle may not have enough
braking power and your chances of having a collision greatly increase.
The braking system of the tow vehicle is rated for operation at the
GVWR not GCWR.
Trailer lamps
Trailer lamps are required on most towed vehicles. Make sure your
trailer lamps conform to local and Federal regulations. See your dealer or
trailer rental agency for proper instructions and equipment for hooking
up trailer lamps.
Driving while you tow
When towing a trailer:
•Ensure that you turn off your speed control. The speed control may
shut off automatically when you are towing on long, steep grades.
•Consult your local motor vehicle speed regulations for towing a trailer.
•To eliminate excessive shifting, use a lower gear. This will also assist
in transaxle cooling.
•Anticipate stops and brake gradually.
•Do not exceed the GCWR rating or transaxle damage may occur.
Servicing after towing
If you tow a trailer for long distances, your vehicle will require more
frequent service intervals. Refer to your scheduled maintenance guide for
more information.
Trailer towing tips
•Practice turning, stopping and backing up before starting on a trip to
get the feel of the vehicle trailer combination. When turning, make
wider turns so the trailer wheels will clear curbs and other obstacles.
Driving
171
Page 172 of 256

•Allow more distance for stopping with a trailer attached.
•If you are driving down a long or steep hill, shift to a lower gear. Do
not apply the brakes continuously, as they may overheat and become
less effective.
•The trailer tongue weight should be 10–15% of the loaded trailer
weight.
•After you have traveled 80 km (50 miles), thoroughly check your
hitch, electrical connections and trailer wheel lug nuts.
•To aid in engine/transmission cooling and A/C efficiency during hot
weather while stopped in traffic, place the gearshift lever in P (Park).
•Vehicles with trailers should not be parked on a grade. If you must
park on a grade, place wheel chocks under the trailer’s wheels.
RECREATIONAL TOWING
Follow these guidelines for your specific powertrain combination to tow
your vehicle with all four wheels on the ground (such as behind a
recreational vehicle).
These guidelines are designed to ensure that your transmission is not
damaged due to insufficient lubrication.
All Front Wheel Drive (FWD) vehicles
An example of recreational towing is towing your vehicle behind a
motorhome. The following recreational towing guidelines are designed to
ensure that your transmission is not damaged. It is not recommended to
tow front wheel drive vehicles with the front drive wheels on the ground.
It is recommended to tow your vehicle with the drive wheels on a dolly
or two wheel car hauling trailer.
In case of a roadside emergency with a disabled vehicle (without access
to wheel dollies, car hauling trailer or flatbed transport vehicle) your
vehicle can be flat towed (all wheels on the ground) under the following
conditions:
•Place the transmission in N (Neutral).
•Maximum speed is 56 km/h (35 mph).
•Maximum distance is 80 km (50 miles).
Driving
172
Page 173 of 256

GETTING ROADSIDE ASSISTANCE
To fully assist you should you have a vehicle concern, Ford Motor Company
offers a complimentary roadside assistance program. This program is
separate from the New Vehicle Limited Warranty. The service is available:
•24–hours, seven days a week
•
for the New Vehicle Limited Warranty period of three years or 60,000 km
(36,000 miles), whichever occurs first on Ford and Mercury vehicles, and
four years or 80,000 km (50,000 miles) on Lincoln vehicles.
Roadside assistance will cover:
•changing a flat tire.
•jump-starts.
•lock-out assistance.
•limited fuel delivery.
•towing of your disabled vehicle to the nearest Ford Motor Company
dealership, or your selling dealer if within 56.3 km (35 miles) of the
nearest Ford Motor Company dealership (one tow per disablement).
Even non-warranty related tows, like accidents or getting stuck in the
mud or snow, are covered (some exclusions apply, such as impound
towing or repossession).
Canadian customers refer to your Owner Information Guide for
information on:
•Coverage period
•Exact fuel amounts
•Towing of your disabled vehicle
•Emergency travel expense reimbursement
•Travel planning benefits
USING ROADSIDE ASSISTANCE
Complete the roadside assistance identification card and place it in your
wallet for quick reference. In the United States, this card is found in the
Owner Guide portfolio in the glove compartment in Ford vehicles and is
mailed to you if you own a Mercury or Lincoln. In Canada, the card is
found in the Owner Information Guide in the glove compartment.
U.S. Ford or Mercury vehicle customers who require roadside assistance,
call 1–800–241–3673; Lincoln vehicle customers call 1–800–521–4140.
Canadian customers who require roadside assistance, call
1–800–665–2006.
Roadside Emergencies
173
Page 184 of 256
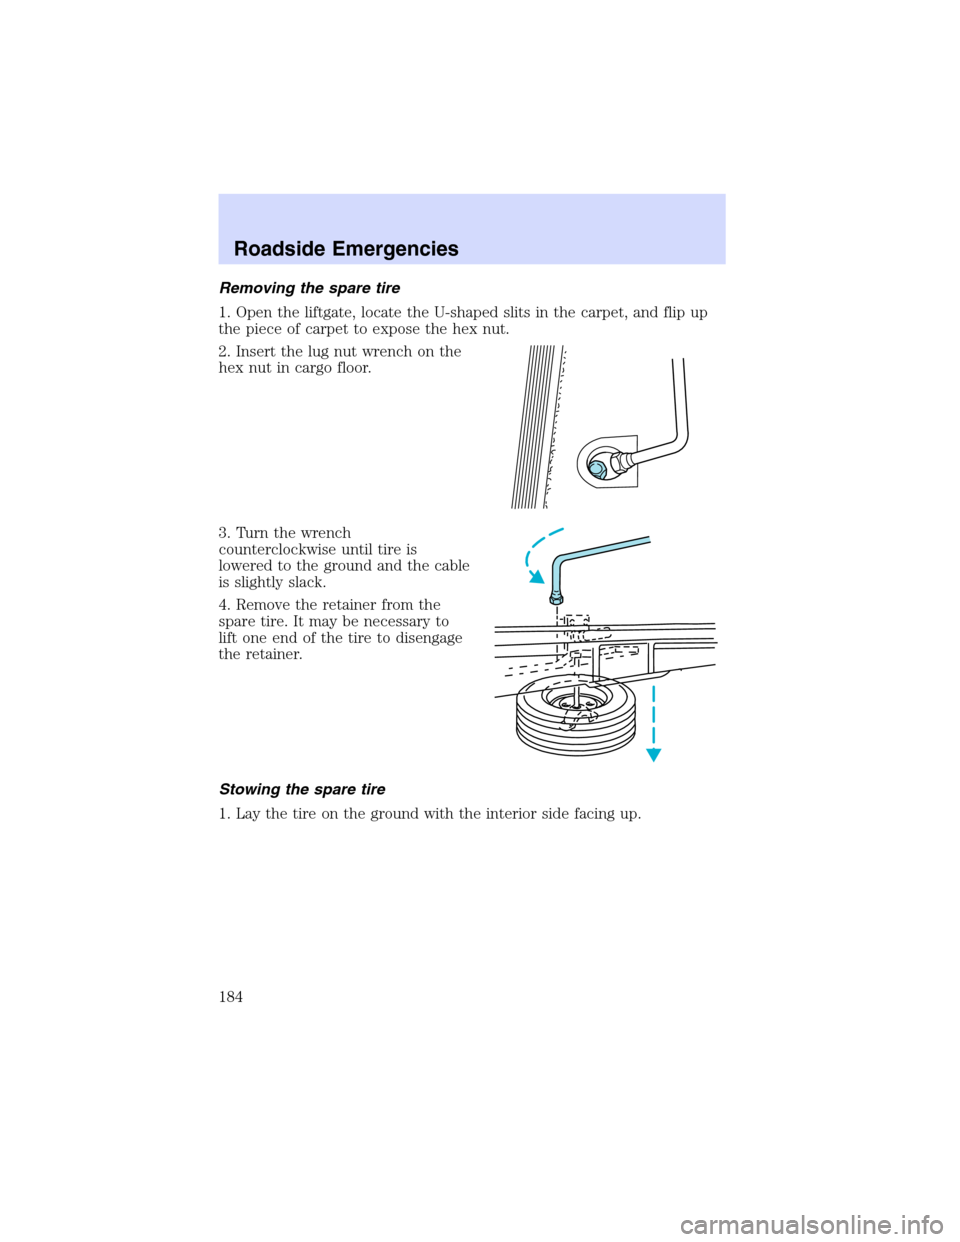
Removing the spare tire
1. Open the liftgate, locate the U-shaped slits in the carpet, and flip up
the piece of carpet to expose the hex nut.
2. Insert the lug nut wrench on the
hex nut in cargo floor.
3. Turn the wrench
counterclockwise until tire is
lowered to the ground and the cable
is slightly slack.
4. Remove the retainer from the
spare tire. It may be necessary to
lift one end of the tire to disengage
the retainer.
Stowing the spare tire
1. Lay the tire on the ground with the interior side facing up.
Roadside Emergencies
184
Page 187 of 256
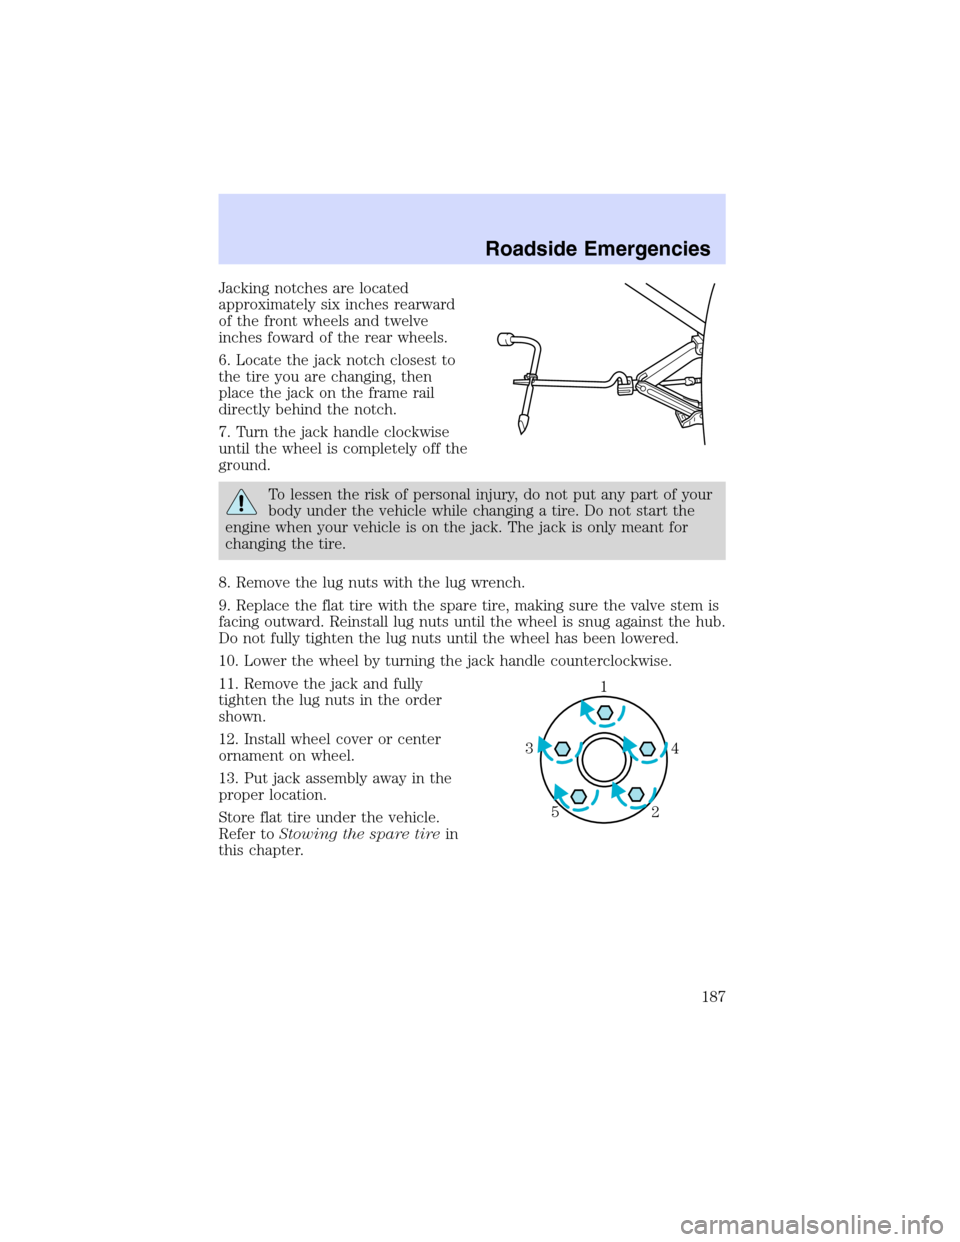
Jacking notches are located
approximately six inches rearward
of the front wheels and twelve
inches foward of the rear wheels.
6. Locate the jack notch closest to
the tire you are changing, then
place the jack on the frame rail
directly behind the notch.
7. Turn the jack handle clockwise
until the wheel is completely off the
ground.
To lessen the risk of personal injury, do not put any part of your
body under the vehicle while changing a tire. Do not start the
engine when your vehicle is on the jack. The jack is only meant for
changing the tire.
8. Remove the lug nuts with the lug wrench.
9. Replace the flat tire with the spare tire, making sure the valve stem is
facing outward. Reinstall lug nuts until the wheel is snug against the hub.
Do not fully tighten the lug nuts until the wheel has been lowered.
10. Lower the wheel by turning the jack handle counterclockwise.
11. Remove the jack and fully
tighten the lug nuts in the order
shown.
12. Install wheel cover or center
ornament on wheel.
13. Put jack assembly away in the
proper location.
Store flat tire under the vehicle.
Refer toStowing the spare tirein
this chapter.
1
4 3
2 5
Roadside Emergencies
187