wheel Mercury Villager 2002 Owner's Manuals
[x] Cancel search | Manufacturer: MERCURY, Model Year: 2002, Model line: Villager, Model: Mercury Villager 2002Pages: 256, PDF Size: 1.91 MB
Page 1 of 256

Introduction 4
Instrument Cluster 10
Warning and control lights 10
Gauges 15
Entertainment Systems 20
AM/FM stereo cassette (CD changer compatible) 20
AM/FM stereo cassette with CD 39
Rear seat controls 50
CD changer 53
Climate Controls 58
Manual heating and air conditioning 58
Electronic automatic temperature control 63
Lights 74
Headlamps 74
Turn signal control 76
Bulb replacement 77
Driver Controls 83
Windshield wiper/washer control 83
Steering wheel adjustment 85
Power windows 87
Mirrors 89
Speed control 90
Message center 99
Locks and Security 108
Keys 108
Locks 108
Anti-theft system 109
Table of Contents
1
Page 64 of 256

Turning the EATC system on
Press AUTOMATIC, any of the override controls or the fan speed control.
The EATC system will only operate when the vehicle is running.
Turning the EATC system off
Press OFF.
Automatic operation
Press AUTOMATIC and select the desired temperature. The selected
temperature and the word AUTO will appear in the display window. The
EATC system will either heat or cool to achieve the selected
temperature. The system will automatically determine fan speed, airflow
location and if outside air or recirculated air is required. Fan speed
remains automatic unless the fan speed thumbwheel is turned or the
steering wheel fan speed control (if equipped) is pressed.
When in AUTOMATIC and weather conditions require heat, air will be
sent to the floor. However, if the engine is not warm enough to provide
heat, the fan will be at a low speed and the air will be directed to the
windshield. In approximately 3
1⁄2minutes or less, the fan speed will start
to increase and the airflow location will change to the floor area.
TEMP
AUTOMATICOFF REAR 1 2 3 4
OFFA/C
A/CMAXHI
LO
TEMP
AUTOMATICOFF REAR 1
OFF
A/C
Climate Controls
64
Page 65 of 256

If unusual conditions exist (i.e.-window fogging, etc.), the manual
override controls allow you to select airflow locations and the fan control
allows you to adjust fan speed as necessary.
Temperature selection
The display window indicates the
selected temperature, function
(AUTO or one of the override
controls) and manual control of fan
speed (
) if automatic fan speed is not desired.
To control the temperature, select
any temperature between 15°C
(60°F) and 32°C (90°F) by pressing
the temperature controls. However,
individual temperature settings
between 15°C (60°F) and 18°C
(65°F) cannot be selected. The 15°C
(60°F) and 18°C (65°F)
temperatures are the lowest settings
available.
For continuous maximum cooling, push the temperature control until
15°C (60°F) is shown in the display window. The EATC will continue
maximum cooling (disregarding the displayed temperature) until a
warmer temperature is selected by pressing the temperature controls.
For continuous maximum heating, push the temperature controls until
32°C (90°F) is shown in the display window. The EATC will continue
maximum heating (disregarding the displayed temperature) until a
cooler temperature is selected by pressing the temperature control.
Fan speed (
)
When AUTOMATIC is pressed, fan
speed is adjusted automatically for
existing conditions. You can override
fan speed at any time. To control
fan speed manually, use the
thumbwheel to cancel automatic fan
speed operation. Rotate the
thumbwheel or press the steering
wheel controls (if equipped) up for
higher fan speed or down for lower
fan speed.
˚F
AUTO
TEMP
AUTOMATICOFF REAR 1
OFF
A/C
1 2 3 4A/C
MAXHI
LO
Climate Controls
65
Page 85 of 256

Changing the wiper blades
To replace the wiper blades:
1. Pull the wiper arm away from the
windshield and lock into the service
position.
2. Turn the blade at an angle from
the wiper arm. Push the lock pin
manually to release the blade and
pull the wiper blade down toward
the windshield to remove it from the
arm.
3. Attach the new wiper to the
wiper arm and press it into place
until a click is heard.
Rear window wiper blade
Refer toWindshield wiper bladesin this section for more information
on rear wiper blades.
TILT STEERING WHEEL
Push the tilt steering wheel lever
downward to move the steering
wheel up or down. Push the lever
upward to lock the steering wheel in
position.
Never adjust the steering wheel when the vehicle is moving.
Driver Controls
85
Page 94 of 256

STEERING WHEEL CONTROLS (IF EQUIPPED)
These controls allow you to operate some audio control features.
Audio control features
In Radio mode:
•Press NEXT to select the next
preset station within the current
radio band.
In Tape mode:
•Press NEXT to listen to the next
selection on the tape.
In CD mode:
•Press NEXT to listen to the next
track on the disc.
In any mode:
•Press VOL up or down to adjust
the volume.
MOON ROOF (IF EQUIPPED)
To operate the moon roof:
•To open, press and hold the rear
portion of the control. This will
fully open the moon roof.
•To close, press and hold the front
portion of the control.
To operate the moon roof vent
position:
•To open, press and hold the front
portion of the control. This will
open the vent.
VOL
NEXT
VOL
VOL
NEXT
VOL
Driver Controls
94
Page 107 of 256

All objects loaded on the cargo shelf MUST BE SECURED UNDER THE
CARGO NET. The net is permanently attached to the cargo shelf.
Do not load more than 14 kg (30 lbs.) on the parcel shelf.
Do not load the parcel shelf through the liftgate glass. You MUST
open the entire rear liftgate to gain access to the rear net
retainers under the shelf.
Make sure the rear seat back is in the rearmost/upright position
when parcel shelf is loaded.
Do not load any objects on the parcel shelf that may obstruct
your vision or strike occupants of the vehicle in the case of a
sudden stop or collision.
Failure to secure cargo under the cargo net will increase the risk
of the cargo striking occupants in the case of a sudden stop or
collision.
To properly use child safety tethers in the 3rd row seat position,
REMOVE THE PARCEL SHELF and tether child safety seat to
the tether anchor located on the floor behind the 3rd row seat.
Do not place people or pets on or under the parcel shelf.
LUGGAGE RACK (IF EQUIPPED)
The front and rear cross-bar can be adjusted to fit the item being
carried. Do not load more than 44 kg (100 lbs.) on the luggage rack.
To adjust cross-bar position:
1. Loosen the thumbwheel at both
ends of the cross-bar.
2. Slide the cross-bar to the desired
location.
3. Tighten the thumbwheel at both
ends of the cross-bar.
Use adjustable tie down loops to secure the load.
Driver Controls
107
Page 155 of 256

STARTING
Positions of the ignition
1. OFF/LOCK, shuts off the engine
and all accessories/locks the steering
wheel, gearshift lever and allows key
removal.
2. ACC, allows the electrical
accessories such as the radio to
operate while the engine is not
running.
3. ON, all electrical circuits
operational. Warning lights
illuminated. Key position when driving.
4. START, cranks the engine. Release the key as soon as the engine
starts.
Preparing to start your vehicle
Engine starting is controlled by the powertrain control system. This
system meets all Canadian Interference-Causing Equipment standard
requirements regulating the impulse electrical field strength of radio
noise.
When starting a fuel-injected engine, avoid pressing the accelerator
before or during starting. Only use the accelerator when you have
difficulty starting the engine. For more information on starting the
vehicle, refer toStarting the enginein this chapter.
Extended idling at high engine speeds can produce very high
temperatures in the engine and exhaust system, creating the risk
of fire or other damage.
Do not park, idle, or drive your vehicle in dry grass or other dry
ground cover. The emission system heats up the engine
compartment and exhaust system, which can start a fire.
Do not start your vehicle in a closed garage or in other enclosed
areas. Exhaust fumes can be toxic. Always open the garage door
before you start the engine. SeeGuarding against exhaust fumesin
this chapter for more instructions.
4
3
2
1
Driving
155
Page 156 of 256

If you smell exhaust fumes inside your vehicle, have your dealer
inspect your vehicle immediately. Do not drive if you smell
exhaust fumes.
Important safety precautions
A computer system controls the engine’s idle revolutions per minute
(RPM). When the engine starts, the idle RPM runs higher than normal in
order to warm the engine. If the engine idle speed does not slow down
automatically, have the vehicle checked. Do not allow the vehicle to idle
for more than 10 minutes at the higher engine RPM.
Before starting the vehicle:
1. Make sure all vehicle occupants have buckled their safety belts. For
more information on safety belts and their proper usage, refer to the
Seating and safety restraintschapter.
2. Make sure the headlamps and vehicle accessories are off.
3. Make sure the parking brake is
set.
4. Make sure the gearshift is in P
(Park).
5. Turn the key to 3 (ON) without
turning the key to 4 (START).
If there is difficulty in turning the
key, firmly rotate the steering wheel
left and right until the key turns
freely. This condition may occur
when:
•front wheels are turned
•front wheel is against the curb
PUSH
TO
RELEASE
P RND21
4
3
2
1
Driving
156
Page 157 of 256

•steering wheel is turned when getting in or out of the vehicle
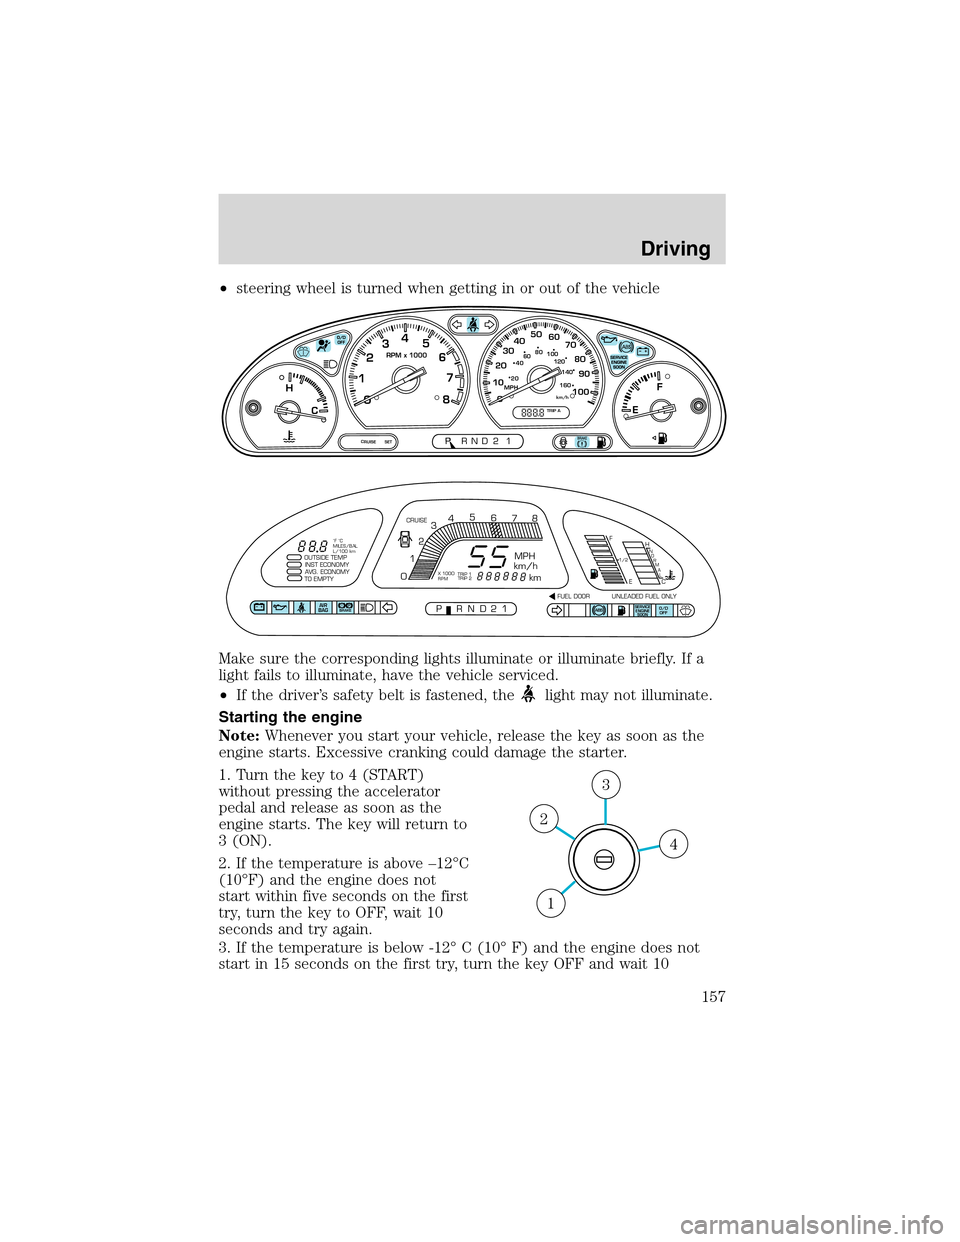
Make sure the corresponding lights illuminate or illuminate briefly. If a
light fails to illuminate, have the vehicle serviced.
•If the driver’s safety belt is fastened, the
light may not illuminate.
Starting the engine
Note:Whenever you start your vehicle, release the key as soon as the
engine starts. Excessive cranking could damage the starter.
1. Turn the key to 4 (START)
without pressing the accelerator
pedal and release as soon as the
engine starts. The key will return to
3 (ON).
2. If the temperature is above–12°C
(10°F) and the engine does not
start within five seconds on the first
try, turn the key to OFF, wait 10
seconds and try again.
3. If the temperature is below -12°C (10°F) and the engine does not
start in 15 seconds on the first try, turn the key OFF and wait 10
km/h0 1020304050
60
70
80
90
100MPH
TRIP A
RPM x 1000
20406080
100
120
140
160
0 1234
5
6
7
8F
H
CE
CRUISE SETPRND2P1
SERVICE
ENGINE
SOONABSAIR
BAGABSO/D
OFF
OUTSIDE TEMP
INST ECONOMY
AVG. ECONOMY
TO EMPTY
PRND21FUEL DOOR UNLEADED FUEL ONLY CRUISE
MPH
km/h
km
F
EH
C
1/2N
O
R
M
A
L
012345
6
78
P!BRAKE
X 1000
RPMTRIP 1
TRIP 2 ˚F ˚C
MILES/BAL
L/100 km
4
3
2
1
Driving
157
Page 159 of 256

Occasional brake noise is normal and often does not indicate a
performance concern with the vehicle’s brake system. In normal
operation, automotive brake systems may emit occasional or intermittent
squeal or groan noises when the brakes are applied. Such noises are
usually heard during the first few brake applications in the morning;
however, they may be heard at any time while braking and can be
aggravated by environmental conditions such as cold, heat, moisture,
road dust, salt or mud. If a“metal-to-metal,”“continuous grinding”or
“continuous squeal”sound is present while braking, the brake linings
may be worn-out and should be inspected by a qualified service
technician.
If you are driving down a long or steep hill, shift to a lower gear.
Do not apply your brakes continuously, as they may overheat
and become less effective.
Anti-lock brake system (ABS) (if equipped)
On vehicles equipped with an anti-lock braking system (ABS), a noise
from the hydraulic pump motor and pulsation in the pedal may be
observed during ABS braking events. Pedal pulsation coupled with noise
while braking under panic conditions or on loose gravel, bumps, wet or
snowy roads is normal and indicates proper functioning of the vehicle’s
anti-lock brake system. The ABS performs a self-check after you start
the engine and begin to drive away. A brief mechanical noise may be
heard during this test. This is normal. If a malfunction is found, the ABS
warning light will come on. If the vehicle has continuous vibration or
shudder in the steering wheel while braking, the vehicle should be
inspected by a qualified service technician.
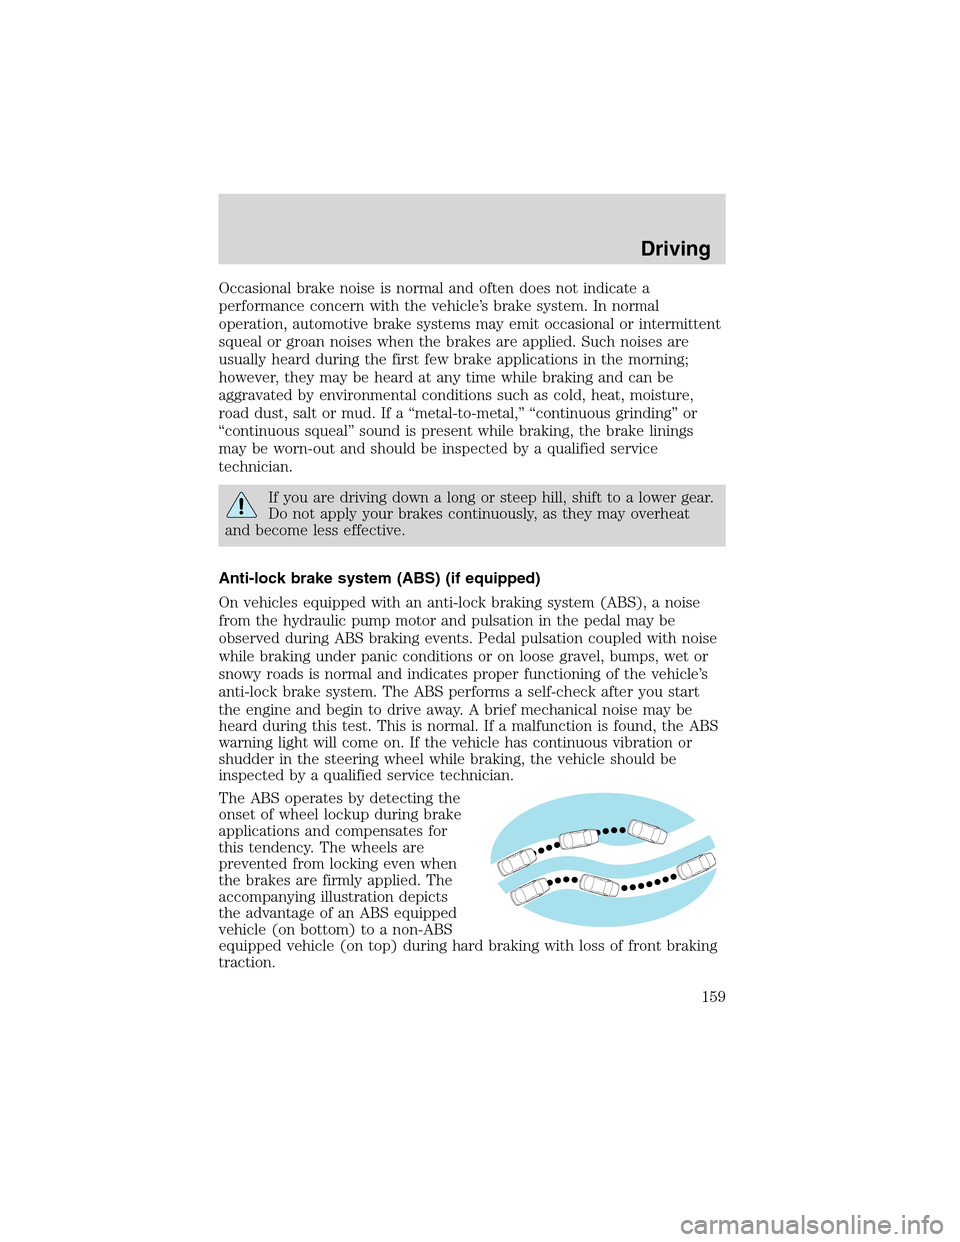
The ABS operates by detecting the
onset of wheel lockup during brake
applications and compensates for
this tendency. The wheels are
prevented from locking even when
the brakes are firmly applied. The
accompanying illustration depicts
the advantage of an ABS equipped
vehicle (on bottom) to a non-ABS
equipped vehicle (on top) during hard braking with loss of front braking
traction.
Driving
159