display MINI 3 door 2014 Manual PDF
[x] Cancel search | Manufacturer: MINI, Model Year: 2014, Model line: 3 door, Model: MINI 3 door 2014Pages: 240, PDF Size: 11.05 MB
Page 132 of 240
is active, suitable parking spaces are high‐
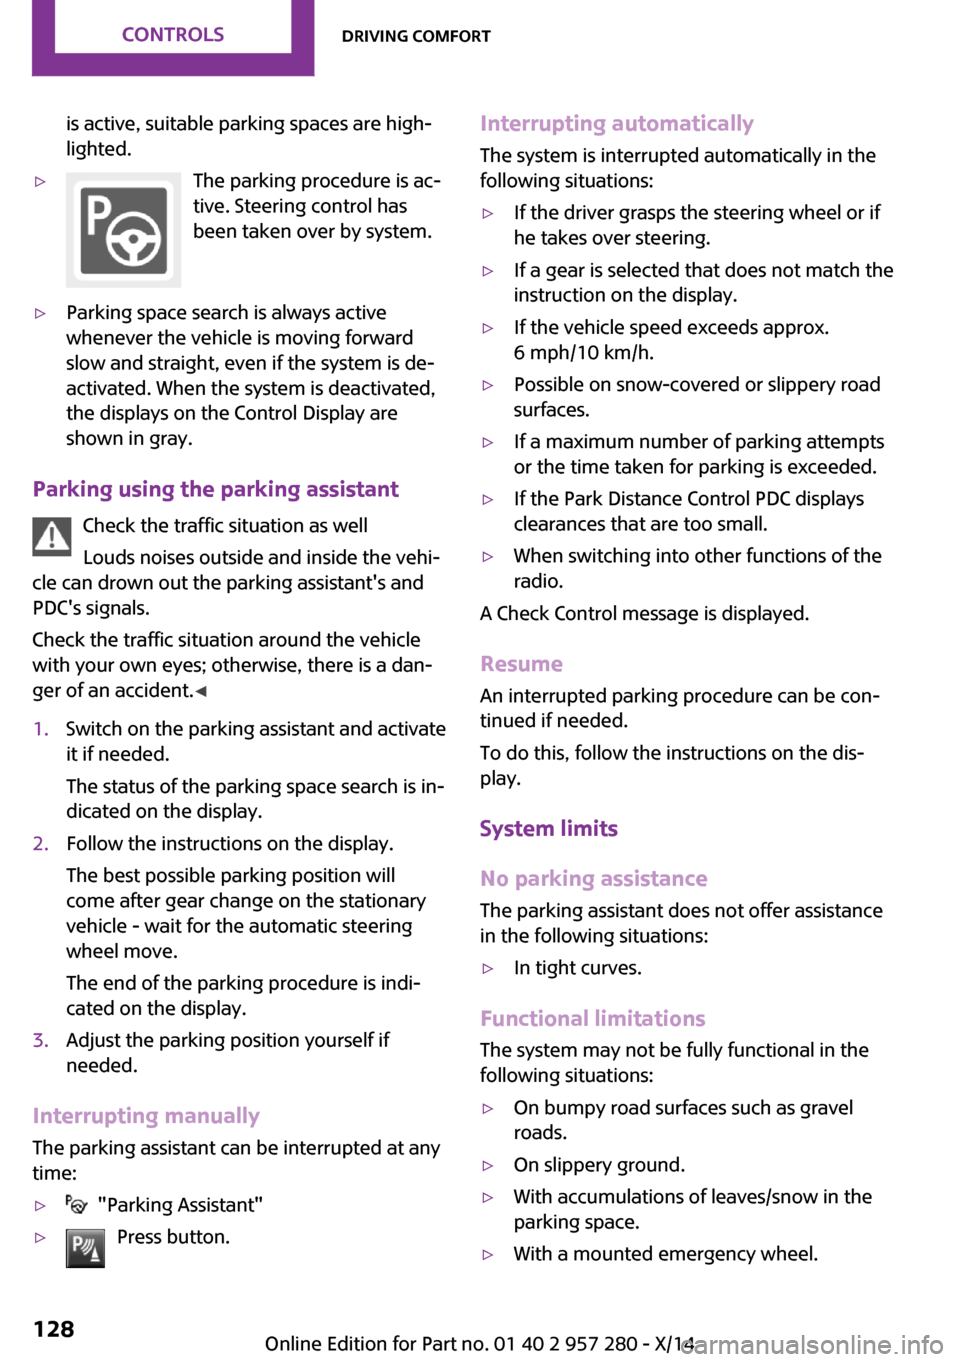
lighted.▷The parking procedure is ac‐
tive. Steering control has
been taken over by system.▷Parking space search is always active
whenever the vehicle is moving forward
slow and straight, even if the system is de‐
activated. When the system is deactivated,
the displays on the Control Display are
shown in gray.
Parking using the parking assistant
Check the traffic situation as well
Louds noises outside and inside the vehi‐
cle can drown out the parking assistant's and
PDC's signals.
Check the traffic situation around the vehicle
with your own eyes; otherwise, there is a dan‐
ger of an accident. ◀
1.Switch on the parking assistant and activate
it if needed.
The status of the parking space search is in‐
dicated on the display.2.Follow the instructions on the display.
The best possible parking position will
come after gear change on the stationary
vehicle - wait for the automatic steering
wheel move.
The end of the parking procedure is indi‐
cated on the display.3.Adjust the parking position yourself if
needed.
Interrupting manually
The parking assistant can be interrupted at any
time:
▷ "Parking Assistant"▷Press button.Interrupting automatically
The system is interrupted automatically in the
following situations:▷If the driver grasps the steering wheel or if
he takes over steering.▷If a gear is selected that does not match the
instruction on the display.▷If the vehicle speed exceeds approx.
6 mph/10 km/h.▷Possible on snow-covered or slippery road
surfaces.▷If a maximum number of parking attempts
or the time taken for parking is exceeded.▷If the Park Distance Control PDC displays
clearances that are too small.▷When switching into other functions of the
radio.
A Check Control message is displayed.
Resume
An interrupted parking procedure can be con‐
tinued if needed.
To do this, follow the instructions on the dis‐
play.
System limits
No parking assistance The parking assistant does not offer assistance
in the following situations:
▷In tight curves.
Functional limitations
The system may not be fully functional in the
following situations:
▷On bumpy road surfaces such as gravel
roads.▷On slippery ground.▷With accumulations of leaves/snow in the
parking space.▷With a mounted emergency wheel.Seite 128CONTROLSDriving comfort128
Online Edition for Part no. 01 40 2 957 280 - X/14
Page 133 of 240

Limits of ultrasonic measurement
Ultrasonic measuring might not function under
the following circumstances:▷For small children and animals.▷For persons with certain clothing, e.g.
coats.▷With external interference of the ultra‐
sound, e.g. from passing vehicles or loud
machines.▷When sensors are dirty, iced over, damaged
or out of position.▷Under certain weather conditions such as
high relative humidity, rain, snowfall, ex‐
treme heat or strong wind.▷With tow bars and trailer couplings of other
vehicles.▷With thin or wedge-shaped objects.▷With moving objects.▷With elevated, protruding objects such as
ledges or cargo.▷With objects with corners and sharp edges.▷With objects with a fine surface structure
such as fences.▷For objects with porous surfaces.
Low objects already displayed, e.g., curbs, can
move into the blind area of the sensors before
or after a continuous tone sounds.
The parking assistant may identify parking
spaces that are not suitable for parking.
Malfunction A Check Control message is displayed.
The parking assistant failed. Have the system
checked.
Seite 129Driving comfortCONTROLS129
Online Edition for Part no. 01 40 2 957 280 - X/14
Page 136 of 240
Windshield defrosterPress button.
The front window defroster switches
off automatically after a certain period of time.
Switching the system on/off
Switch off Turn wheel for air quantity to the
left until the control switches off.Switching on
Set any air volume.
Microfilter
In external and recirculated air mode the mi‐
crofilter filters dust and pollen from the air.
This filter should be replaced during scheduled
maintenance, refer to page 193, of your vehi‐
cle.
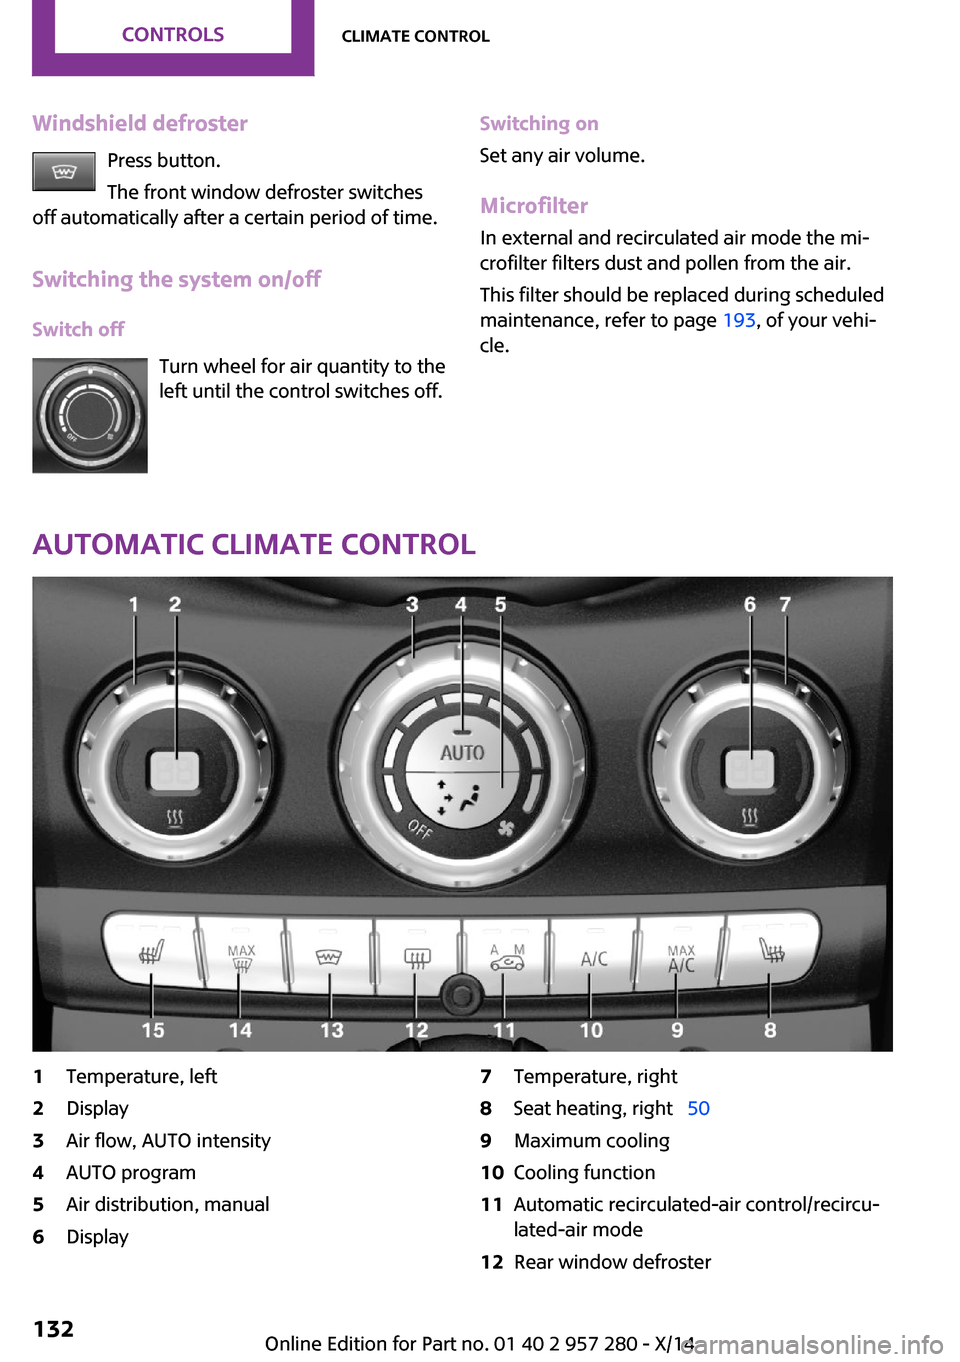
Automatic climate control
1Temperature, left2Display3Air flow, AUTO intensity4AUTO program5Air distribution, manual6Display7Temperature, right8Seat heating, right 509Maximum cooling10Cooling function11Automatic recirculated-air control/recircu‐
lated-air mode12Rear window defrosterSeite 132CONTROLSClimate control132
Online Edition for Part no. 01 40 2 957 280 - X/14
Page 137 of 240
13Windshield defroster14Defrosts windows and removes condensa‐
tion15Seat heating, left 50Hints
Sufficient ventilation
When remaining in the vehicle for an ex‐
tended period of time, ensure sufficient exter‐
nal ventilation. Do not continuously use recircu‐
lated-air mode; otherwise the air quality in the
interior continuously worsens. ◀
Climate control functions in detail
Temperature Turn the ring to set the desired
temperature.
The automatic climate control reaches this
temperature as quickly as possible, if needed
by increasing the cooling or heating output,
and then keeps it constant.
Do not rapidly switch between different tem‐
perature settings. The automatic climate con‐
trol will not have sufficient time to adjust the
set temperature.
Air flow, manual
To manually adjust air flow turn off AUTO pro‐
gram first.
Turn the ring to set the desired
air volume.
Automatic climate control displays the selected
amount of air flow.
The air flow of the automatic climate control
may be reduced automatically to save battery
power.AUTO program
Press button.
Air flow, air distribution and tempera‐
ture are controlled automatically.
Depending on the selected temperature, AUTO
intensity and outside influences, the air is di‐
rected to the windshield, side windows, upper
body, and into the footwell.
The cooling function, refer to page 134, and
the automatic recirculation control, refer to
page 134, are automatically also switched on
in the AUTO program.
To reel off the program: press the button again
or manually adjust the air distribution.
Intensity of the AUTO program
With the AUTO program activated, the auto‐
matic intensity control can be changed.
Turn the ring to set the desired
intensity.
The selected intensity is displayed on the auto‐
matic climate control.
Manual air distribution Press button repeatedly to select a
program:▷Upper body region.▷Upper body region and footwell.▷Footwell.▷Windows and footwell.▷Windows, upper body region, and footwell.▷Windows and upper body region.Seite 133Climate controlCONTROLS133
Online Edition for Part no. 01 40 2 957 280 - X/14
Page 143 of 240
peat the step. Several more attempts at dif‐
ferent distances may be necessary. Wait at
least 15 seconds between attempts.
Controls
Before operation
Before operating a system using the uni‐
versal garage door opener, ensure that there
are no people, animals, or objects within the
range of movement of the remote-controlled
system; otherwise, there is a risk of injury or
damage.
Also follow the safety instructions of the hand-
held transmitter. ◀
The system, such as the garage door, can be
operated using the button on the interior rear‐
view mirror while the engine is running or
when the ignition is started. To do this, hold
down the button within receiving range of the
system until the function is activated. The inte‐
rior rearview mirror LED stays lit while the wire‐
less signal is being transmitted.
Deleting stored functions
Press and hold the left and right button on the
interior rearview mirror simultaneously for ap‐
proximately 20 seconds until the LED flashes
rapidly. All stored functions are deleted. The
functions cannot be deleted individually.
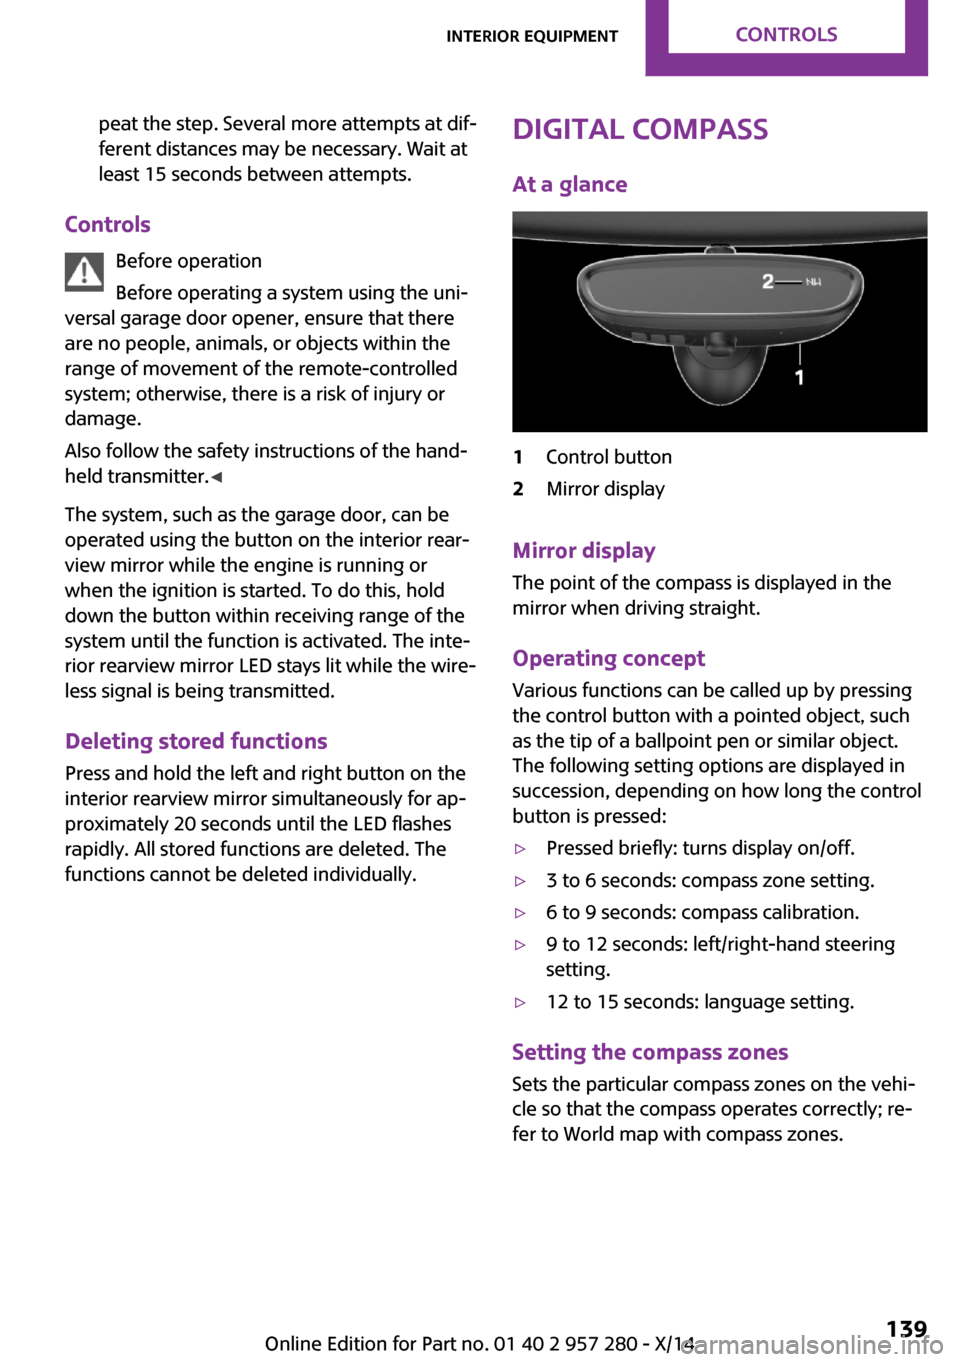
Digital compass
At a glance1Control button2Mirror display
Mirror displayThe point of the compass is displayed in the
mirror when driving straight.
Operating concept Various functions can be called up by pressing
the control button with a pointed object, such
as the tip of a ballpoint pen or similar object.
The following setting options are displayed in
succession, depending on how long the control
button is pressed:
▷Pressed briefly: turns display on/off.▷3 to 6 seconds: compass zone setting.▷6 to 9 seconds: compass calibration.▷9 to 12 seconds: left/right-hand steering
setting.▷12 to 15 seconds: language setting.
Setting the compass zones
Sets the particular compass zones on the vehi‐
cle so that the compass operates correctly; re‐
fer to World map with compass zones.
Seite 139Interior equipmentCONTROLS139
Online Edition for Part no. 01 40 2 957 280 - X/14
Page 144 of 240
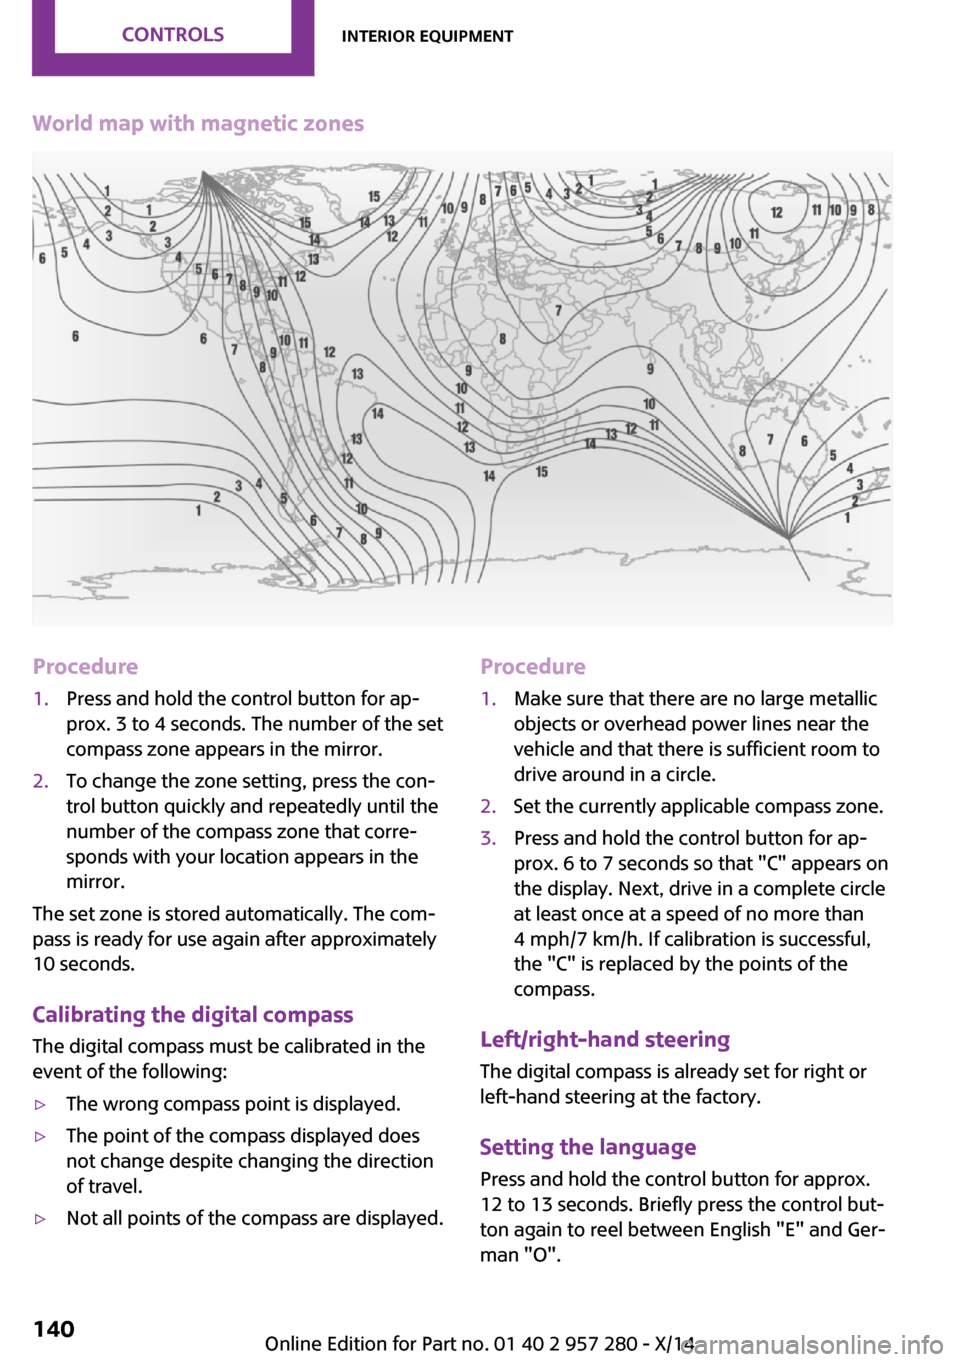
World map with magnetic zonesProcedure1.Press and hold the control button for ap‐
prox. 3 to 4 seconds. The number of the set
compass zone appears in the mirror.2.To change the zone setting, press the con‐
trol button quickly and repeatedly until the
number of the compass zone that corre‐
sponds with your location appears in the
mirror.
The set zone is stored automatically. The com‐
pass is ready for use again after approximately
10 seconds.
Calibrating the digital compass The digital compass must be calibrated in the
event of the following:
▷The wrong compass point is displayed.▷The point of the compass displayed does
not change despite changing the direction
of travel.▷Not all points of the compass are displayed.Procedure1.Make sure that there are no large metallic
objects or overhead power lines near the
vehicle and that there is sufficient room to
drive around in a circle.2.Set the currently applicable compass zone.3.Press and hold the control button for ap‐
prox. 6 to 7 seconds so that "C" appears on
the display. Next, drive in a complete circle
at least once at a speed of no more than
4 mph/7 km/h. If calibration is successful,
the "C" is replaced by the points of the
compass.
Left/right-hand steering
The digital compass is already set for right or
left-hand steering at the factory.
Setting the language
Press and hold the control button for approx.
12 to 13 seconds. Briefly press the control but‐ ton again to reel between English "E" and Ger‐
man "O".
Seite 140CONTROLSInterior equipment140
Online Edition for Part no. 01 40 2 957 280 - X/14
Page 165 of 240
The Coasting driving condition is enabled under
certain conditions.
Under certain conditions the engine is auto‐
matically decoupled from the transmission in
selector lever position D. The vehicle continues
traveling with the engine idling to reduce fuel
consumption. Selector lever position D remains
engaged. An indicator provides information
about the distance traveled in Coasting mode.
In addition, context-sensitive instructions are
displayed to assist with an optimized fuel con‐
sumption driving style.
The achieved extended range is displayed in
the instrument cluster.
At a glance The system includes the following MINIMAL
functions and displays:▷GREEN bonus range, refer to page 162.▷GREEN tips driving instruction, refer to
page 162.▷GREEN climate control, refer to page 161.▷MINIMALISM analyzer, refer to page 164.▷Coasting driving condition, refer to
page 163.
Activating GREEN mode
Turn Driving Dynamics Control to
the right until GREEN mode is
displayed in the instrument clus‐
ter.
Configuring GREEN mode
Via the Driving Dynamics Control
1.Activating GREEN mode.2."Configure GREEN"3.Configure the program.
Via onboard monitor:
1. "Settings"2."GREEN Mode"
Or
1. "Settings"2."Driving mode"3."Configure GREEN"
Configure the program.
GREEN tip
▷"Tip at:"
Set the GREEN mode speed at which a
GREEN mode tip is to be displayed.▷"GREEN speed warning":
Displays a reminder when the set GREEN
mode speed is exceeded.
Coasting
Fuel-efficiency can be optimized by disengag‐
ing the engine and Coasting, refer to page 163,
with the engine idling.
This function is only available in GREEN mode.
GREEN climate control
"GREEN climate control"
Climate control is set to be fuel-efficient.
By making a slight change to the set tempera‐
ture, or adjusting the rate of heating or cooling
of the car's interior fuel consumption can be
economized.
The outputs of the seat heater and the exterior
Additionally heat output to seats and exterior
mirror is reduced.
Exterior mirror heat is available when outside
temperatures are very low.
GREEN potential
The percentage of potential savings that can be
achieved with the current configuration is dis‐
played.
Seite 161Saving fuelDRIVING TIPS161
Online Edition for Part no. 01 40 2 957 280 - X/14
Page 166 of 240
Display in the instrument cluster
GREEN bonus range An adjusted driving style helps
you extend your driving range.
This may be displayed as the bo‐
nus range in the instrument clus‐
ter.
The bonus range is shown in the range display.
The bonus range is automatically reset every
time the vehicle is refueled.▷Green display: efficient driving style.▷Gray display: adjust driving style, e. g. by
backing off the accelerator pedal.
Driving style
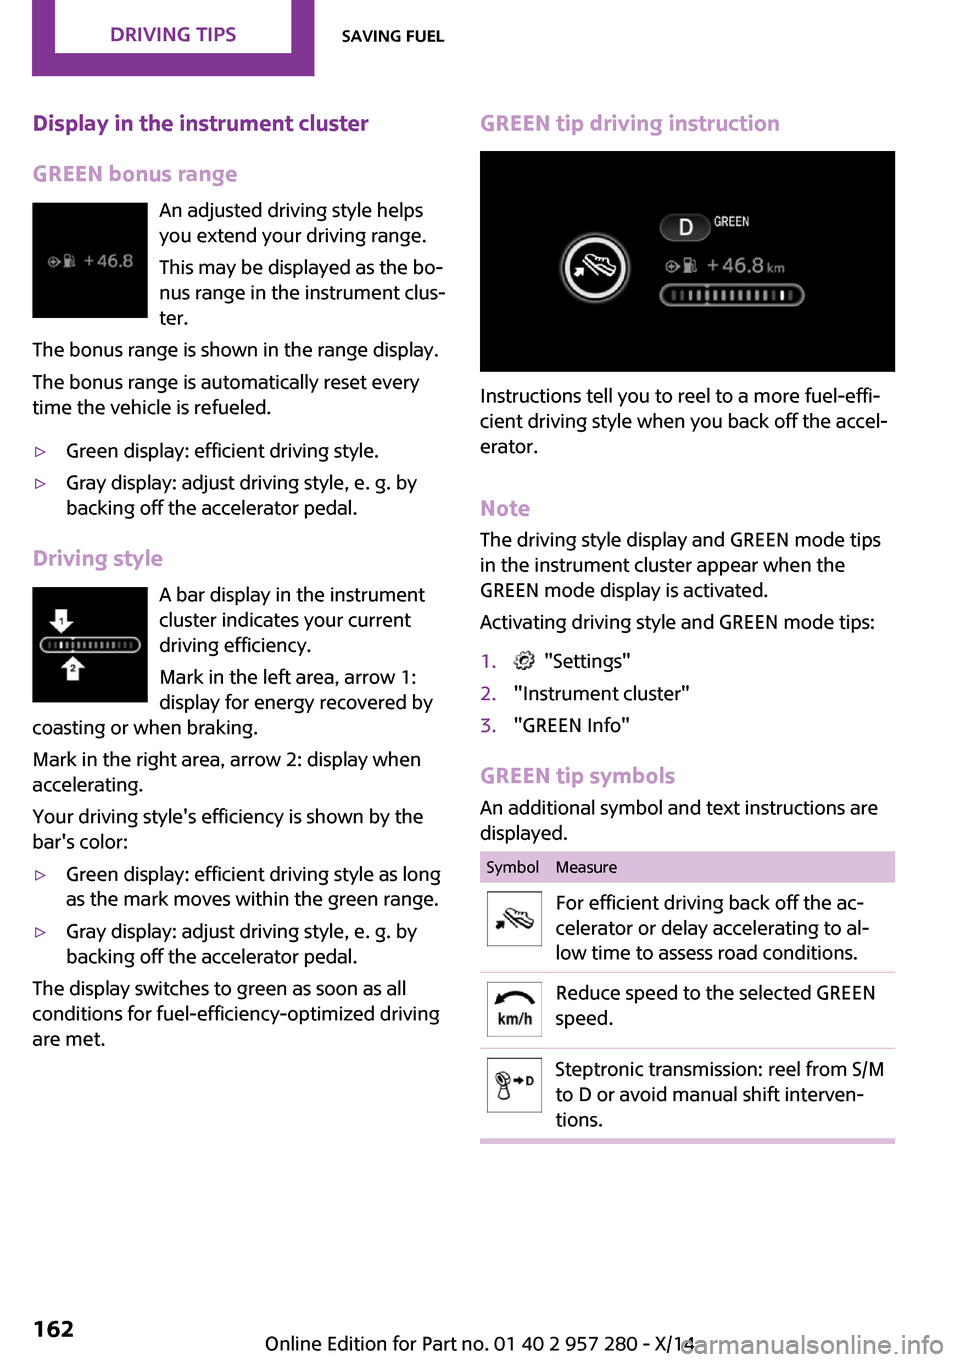
A bar display in the instrument
cluster indicates your current
driving efficiency.
Mark in the left area, arrow 1:
display for energy recovered by
coasting or when braking.
Mark in the right area, arrow 2: display when
accelerating.
Your driving style's efficiency is shown by the
bar's color:
▷Green display: efficient driving style as long
as the mark moves within the green range.▷Gray display: adjust driving style, e. g. by
backing off the accelerator pedal.
The display switches to green as soon as all
conditions for fuel-efficiency-optimized driving
are met.
GREEN tip driving instruction
Instructions tell you to reel to a more fuel-effi‐
cient driving style when you back off the accel‐
erator.
Note The driving style display and GREEN mode tips
in the instrument cluster appear when the GREEN mode display is activated.
Activating driving style and GREEN mode tips:
1. "Settings"2."Instrument cluster"3."GREEN Info"
GREEN tip symbols An additional symbol and text instructions aredisplayed.
SymbolMeasureFor efficient driving back off the ac‐
celerator or delay accelerating to al‐
low time to assess road conditions.Reduce speed to the selected GREEN
speed.Steptronic transmission: reel from S/M
to D or avoid manual shift interven‐
tions.Seite 162DRIVING TIPSSaving fuel162
Online Edition for Part no. 01 40 2 957 280 - X/14
Page 167 of 240
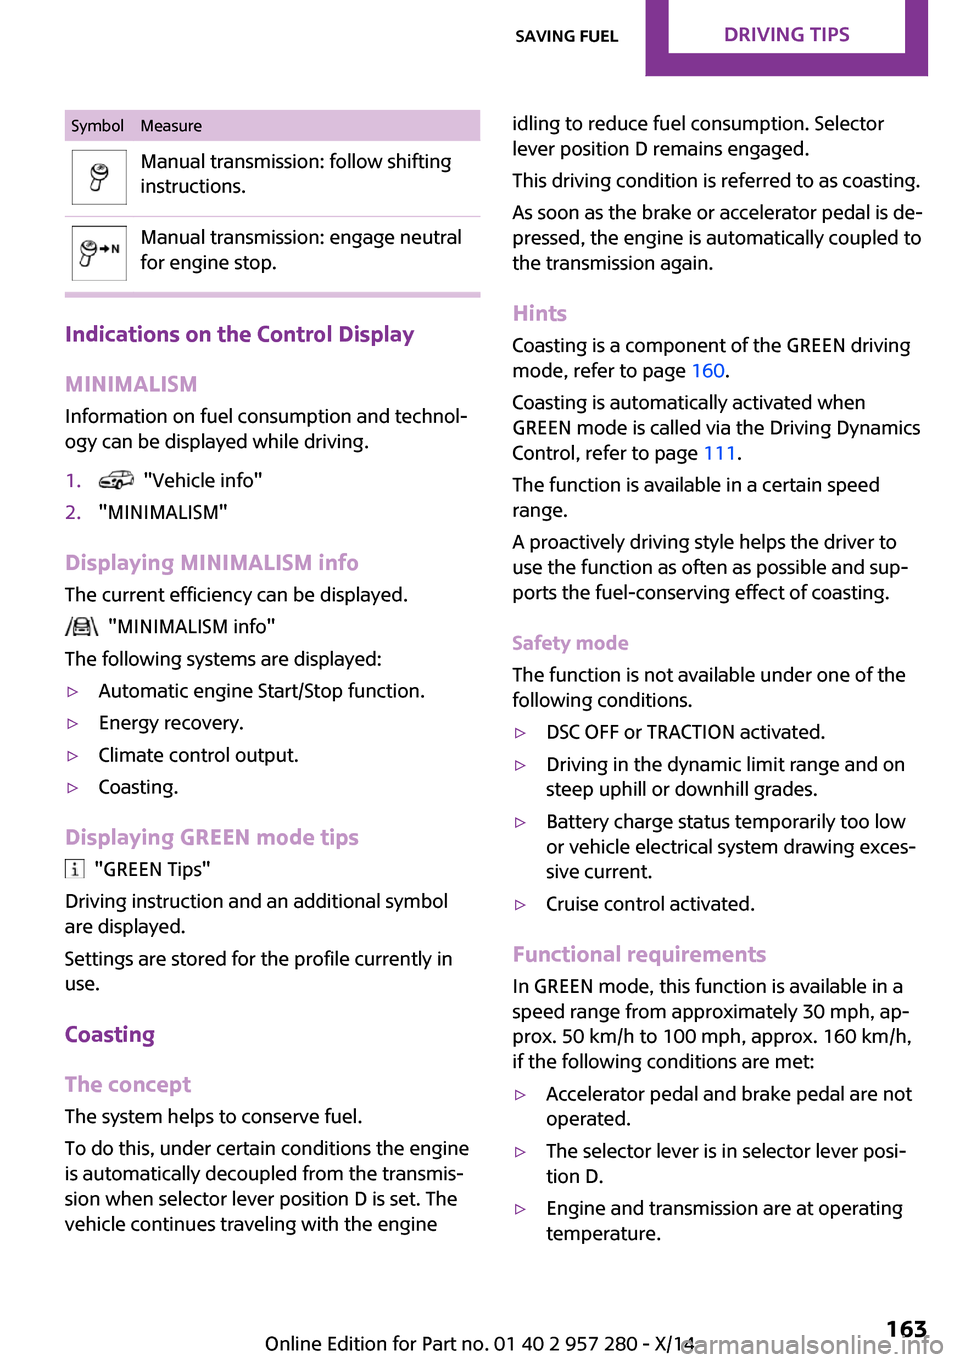
SymbolMeasureManual transmission: follow shifting
instructions.Manual transmission: engage neutral
for engine stop.
Indications on the Control Display
MINIMALISM
Information on fuel consumption and technol‐
ogy can be displayed while driving.
1. "Vehicle info"2."MINIMALISM"
Displaying MINIMALISM info
The current efficiency can be displayed.
"MINIMALISM info"
The following systems are displayed:
▷Automatic engine Start/Stop function.▷Energy recovery.▷Climate control output.▷Coasting.
Displaying GREEN mode tips
"GREEN Tips"
Driving instruction and an additional symbol
are displayed.
Settings are stored for the profile currently in
use.
Coasting
The concept
The system helps to conserve fuel.
To do this, under certain conditions the engine
is automatically decoupled from the transmis‐
sion when selector lever position D is set. The
vehicle continues traveling with the engine
idling to reduce fuel consumption. Selector
lever position D remains engaged.
This driving condition is referred to as coasting.
As soon as the brake or accelerator pedal is de‐
pressed, the engine is automatically coupled to
the transmission again.
Hints
Coasting is a component of the GREEN driving
mode, refer to page 160.
Coasting is automatically activated when
GREEN mode is called via the Driving Dynamics
Control, refer to page 111.
The function is available in a certain speed
range.
A proactively driving style helps the driver to
use the function as often as possible and sup‐
ports the fuel-conserving effect of coasting.
Safety mode
The function is not available under one of the
following conditions.▷DSC OFF or TRACTION activated.▷Driving in the dynamic limit range and on
steep uphill or downhill grades.▷Battery charge status temporarily too low
or vehicle electrical system drawing exces‐
sive current.▷Cruise control activated.
Functional requirements
In GREEN mode, this function is available in a
speed range from approximately 30 mph, ap‐
prox. 50 km/h to 100 mph, approx. 160 km/h,
if the following conditions are met:
▷Accelerator pedal and brake pedal are not
operated.▷The selector lever is in selector lever posi‐
tion D.▷Engine and transmission are at operating
temperature.Seite 163Saving fuelDRIVING TIPS163
Online Edition for Part no. 01 40 2 957 280 - X/14
Page 168 of 240
Display
Display in the instrument cluster The mark in the bar display be‐
low the tachometer is high‐
lighted green and appears at the
zero point. The tachometer ap‐
proximately indicates idle speed.
Indications on the Control Display
The Coasting driving condition is displayed in
MINIMALISM Info while this driving mode is ac‐
tive.
The distance traveled in the Coasting driving
condition is indicated by a counter.
Color code green, arrow 1: distance traveled in
the Coasting driving condition. Symbol, ar‐
row 2: coasting driving condition.
Displaying MINIMALISM info
1. "Vehicle info"2."MINIMALISM"3. "MINIMALISM info"
Deactivating the system manually The function can be deactivated in the Config‐
ure GREEN mode, refer to page 161, menu,
e.g., to use the braking effect of the engine
when traveling downhill.
Settings are saved for the profile currently be‐
ing used.
MINIMALISM driving style analysis
The concept
In this situation the system helps develop an
especially efficient driving style and to conserve
fuel.
For this purpose, the driving style is analyzed.
The assessment is done in various categories
and is displayed on the Control Display.
Using this indication, the individual driving style
can be oriented toward conserving fuel.
The last fifteen minutes of a trip are evaluated.
The range of the vehicle can be extended by an
efficient driving style. This gain in range is dis‐
played as a bonus range in the instrument clus‐
ter and on the Control Display.
Functional requirement
The function is only available in GREEN mode.
Calling up MINIMALISM Analyser Via the Driving Dynamics Control1.Activate GREEN mode.2."MINIMALISM"3. Select the symbol.
Display
Display on the Control Display
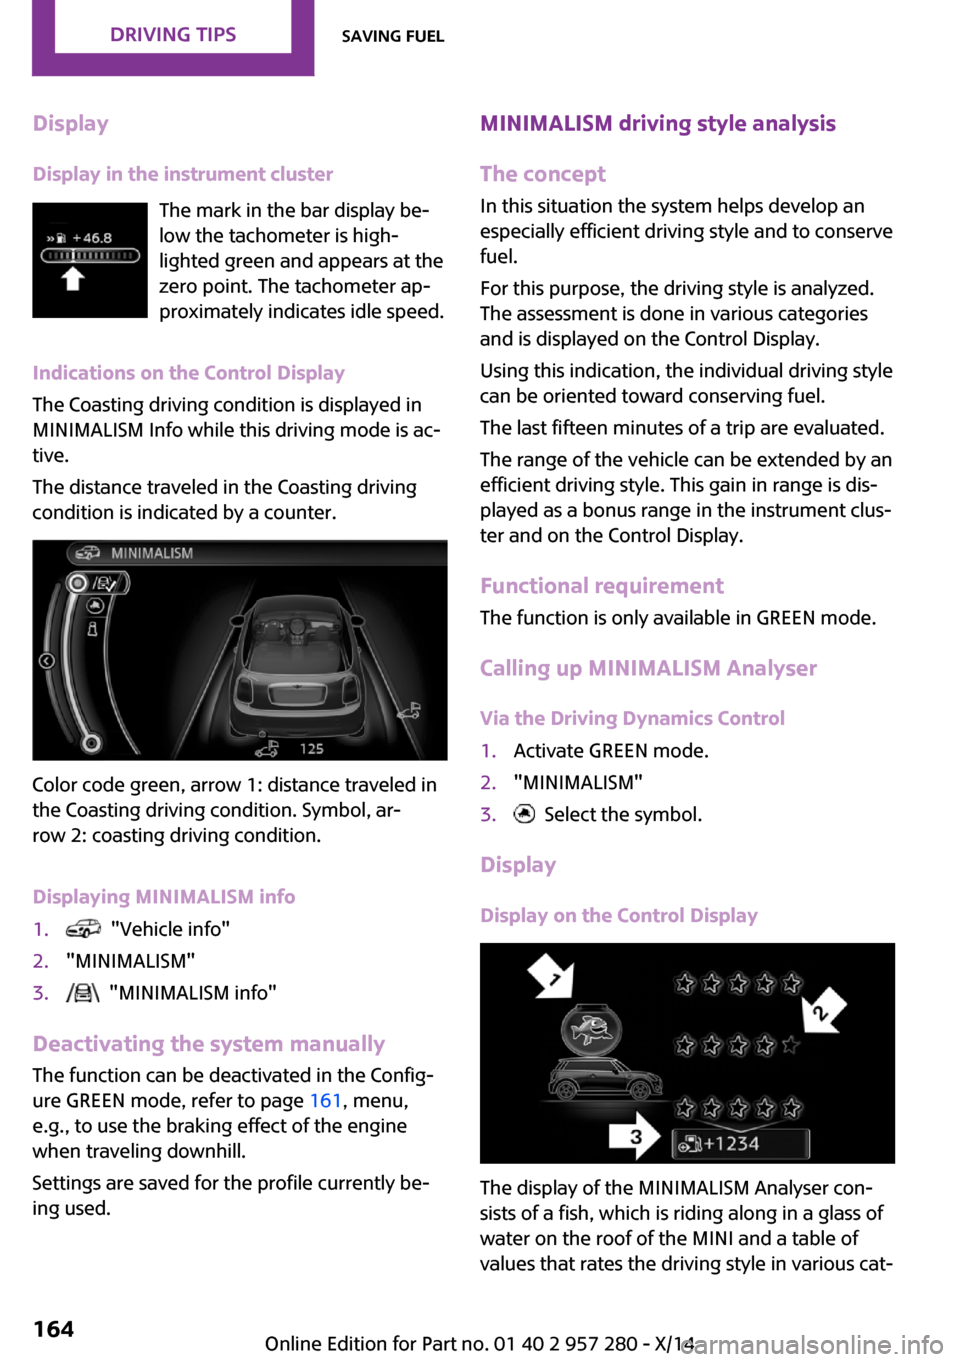
The display of the MINIMALISM Analyser con‐
sists of a fish, which is riding along in a glass of
water on the roof of the MINI and a table of
values that rates the driving style in various cat‐
Seite 164DRIVING TIPSSaving fuel164
Online Edition for Part no. 01 40 2 957 280 - X/14